language FIAT DUCATO 2007 Owner handbook (in English)
[x] Cancel search | Manufacturer: FIAT, Model Year: 2007, Model line: DUCATO, Model: FIAT DUCATO 2007Pages: 282, PDF Size: 4.49 MB
Page 29 of 282

28
SAFETY
DEVICES
CORRECT USE
OF THE
VEHICLE
WARNING
LIGHTS AND
MESSAGES
IN AN
EMERGENCY
VEHICLE
MAINTENANCE
TECHNICAL
SPECIFICATIONS
INDEX
DASHBOARD
AND CONTROLS
Day
YearMonth
Deutsch
Français
English
Español
Italiano
Nederland
Português Example:
fig. 21 Example:
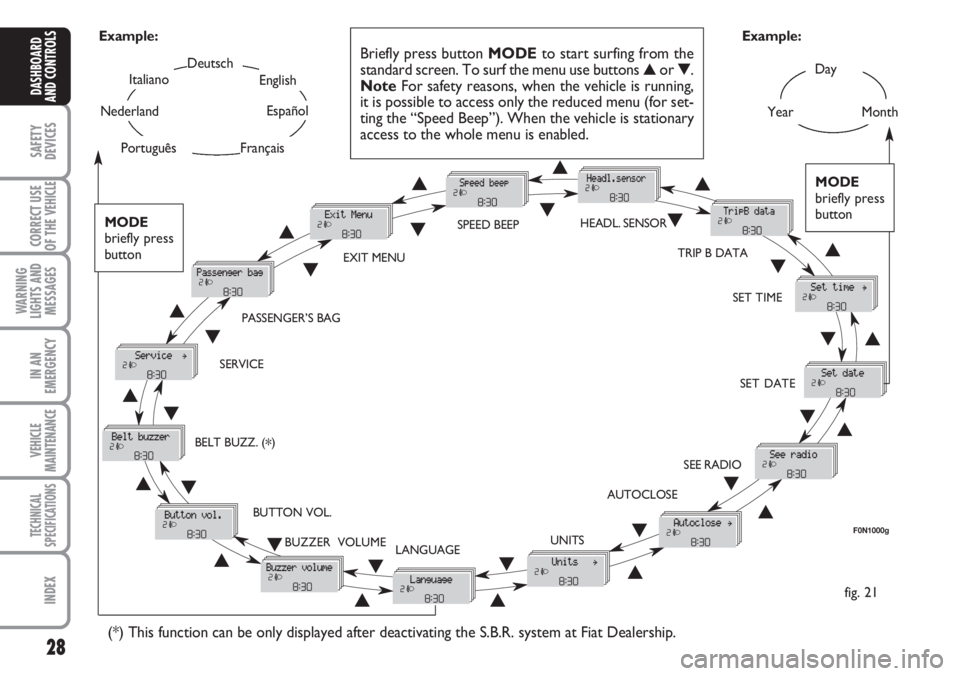
Briefly press button MODEto start surfing from the
standard screen. To surf the menu use buttons ▲or ▼.
NoteFor safety reasons, when the vehicle is running,
it is possible to access only the reduced menu (for set-
ting the “Speed Beep”). When the vehicle is stationary
access to the whole menu is enabled.
F0N1000g
MODE
briefly press
button
▲
▼
EXIT MENUSPEED BEEPHEADL. SENSOR
SET TIME
SET DATE
SEE RADIO
AUTOCLOSE
UNITS
LANGUAGE BUZZER VOLUME BUTTON VOL. SERVICEPASSENGER’S BAG
(*) This function can be only displayed after deactivating the S.B.R. system at Fiat Dealership.
TRIP B DATA
MODE
briefly press
button
▲
▼▲
▼▲
▼
▲
▼
▲ ▼
▲ ▼ ▲
▼
▲
▼
▲
▼
▲▼
▲▼
▲▼
▲▼▲ ▼
BELT BUZZ. (*)
Page 33 of 282

32
SAFETY
DEVICES
CORRECT USE
OF THE
VEHICLE
WARNING
LIGHTS AND
MESSAGES
IN AN
EMERGENCY
VEHICLE
MAINTENANCE
TECHNICAL
SPECIFICATIONS
INDEX
DASHBOARD
AND CONTROLS
Selecting the language (Language)
Display messages can be shown (after set-
ting) in different languages: Italian, German,
English, Spanish, French, Portuguese and
Dutch.
To set the required language proceed as
follows:
– briefly press button MODE: the previ-
ously set “language” will flash on the dis-
play;
– press button ▲or ▼for setting;
– briefly press button MODEto go back
to the menu screen or press the button
for long to go back to the standard screen
without storing settings.Adjusting the failure/warning
buzzer volume
(Buzzer Volume)
With this function the volume of the
buzzer accompanying any failure/warning
indication can be adjusted according to 8
levels.
To adjust the volume proceed as follows:
– briefly press button MODE: the previ-
ously set volume “level” will flash on the
display;
– press button ▲or ▼for setting;
– briefly press button MODEto go back
to the menu screen or press the button
for long to go back to the standard screen
without storing settings. If the distance unit set is “km” the fuel con-
sumption unit will be displayed in km/l or
l/100km.
If the distance unit set is “mi” the fuel con-
sumption unit will be displayed in “mpg”.
– press button ▲or ▼for setting;
– if selecting “Temperature”: briefly press but-
ton MODE, the display will show “°C” or
“°F” (according to previous setting);
– press button ▲or ▼for setting;
After setting, briefly press button MODE
to go back to the submenu screen or
press the button for long to go back to the
main menu screen without storing set-
tings.
– press again button MODEfor long to
go back to the standard screen or to the
main menu according to the current menu
level.
Page 92 of 282

91
SAFETY
DEVICES
CORRECT USE
OF THE
VEHICLE
WARNING
LIGHTS AND
MESSAGES
IN AN
EMERGENCY
VEHICLE
MAINTENANCE
TECHNICAL
SPECIFICATIONS
INDEX
DASHBOARD
AND CONTROLS
MULTIMETER
See the booklet provided by the multi-
meter Manufacturer for more detailed in-
formation on operation and use.
Multimeter installation is compulsory if the
vehicle weight (with or without the trail-
er) exceeds 3.5 tons.
IMPORTANT Changes to the instrument
or to the signal transmission system which
effects the instrument recordings, espe-
cially for fraudulent purposes, may be a
criminal offence.
IMPORTANT For all versions fitted with
tachograph (excluding the Minibus ver-
sion), it is suggested to remove the 10 A
red fuse marked with F39 (control unit) in
case of prolonged vehicle stop (over 10
days).
IMPORTANT When a macrograph is fit-
ted and the vehicle has been parked for
longer than 5 days, it is advisable to dis-
connect the battery negative terminal to
preserve the charge status. USER INTERFACE
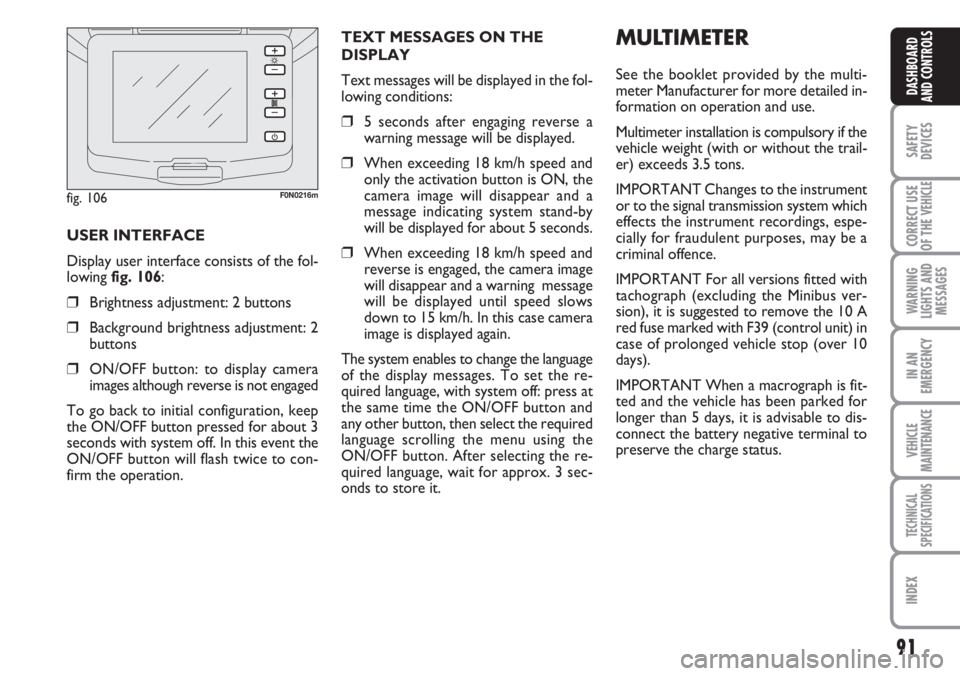
Display user interface consists of the fol-
lowing fig. 106:
❒Brightness adjustment: 2 buttons
❒Background brightness adjustment: 2
buttons
❒ON/OFF button: to display camera
images although reverse is not engaged
To go back to initial configuration, keep
the ON/OFF button pressed for about 3
seconds with system off. In this event the
ON/OFF button will flash twice to con-
firm the operation.TEXT MESSAGES ON THE
DISPLAY
Text messages will be displayed in the fol-
lowing conditions:
❒5 seconds after engaging reverse a
warning message will be displayed.
❒When exceeding 18 km/h speed and
only the activation button is ON, the
camera image will disappear and a
message indicating system stand-by
will be displayed for about 5 seconds.
❒When exceeding 18 km/h speed and
reverse is engaged, the camera image
will disappear and a warning message
will be displayed until speed slows
down to 15 km/h. In this case camera
image is displayed again.
The system enables to change the language
of the display messages. To set the re-
quired language, with system off: press at
the same time the ON/OFF button and
any other button, then select the required
language scrolling the menu using the
ON/OFF button. After selecting the re-
quired language, wait for approx. 3 sec-
onds to store it.
fig. 106F0N0216m