clock setting FIAT DUCATO 2010 Owner handbook (in English)
[x] Cancel search | Manufacturer: FIAT, Model Year: 2010, Model line: DUCATO, Model: FIAT DUCATO 2010Pages: 286, PDF Size: 12.53 MB
Page 20 of 286
19
KNOWING
YOUR CAR
SAFETY
STARTING
AND
DRIVING
WARNING
LIGHTS AND
MESSAGES
IN AN
EMERGENCY
MAINTENANCE
AND CARE
TECHNICAL
SPECIFICATIONS
INDEX
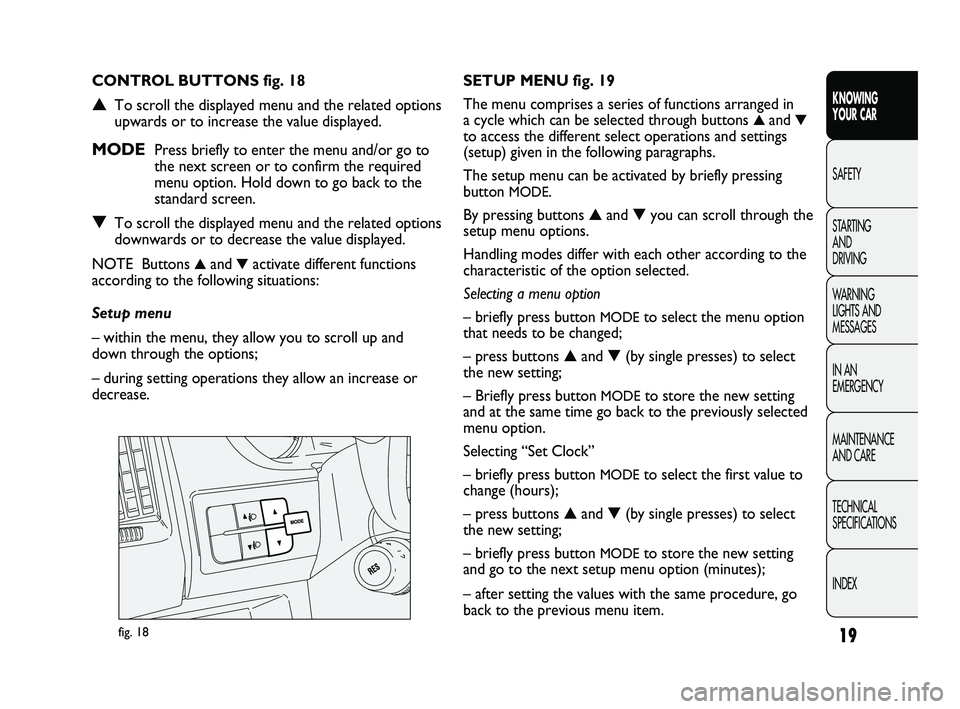
fig. 18
SETUP MENU fig. 19
The menu comprises a series of functions arranged in
a cycle which can be selected through buttons
▲and▼
to access the different select operations and settings
(setup) given in the following paragraphs.
The setup menu can be activated by briefly pressing
button
MODE.
By pressing buttons ▲and ▼you can scroll through the
setup menu options.
Handling modes differ with each other according to the
characteristic of the option selected.
Selecting a menu option
– briefly press button
MODEto select the menu option
that needs to be changed;
– press buttons ▲and ▼(by single presses) to select
the new setting;
– Briefly press button
MODEto store the new setting
and at the same time go back to the previously selected
menu option.
Selecting “Set Clock”
– briefly press button
MODEto select the first value to
change (hours);
– press buttons ▲and ▼(by single presses) to select
the new setting;
– briefly press button
MODEto store the new setting
and go to the next setup menu option (minutes);
– after setting the values with the same procedure, go
back to the previous menu item. CONTROL BUTTONS fig. 18
▲To scroll the displayed menu and the related options
upwards or to increase the value displayed.
MODE Press briefly to enter the menu and/or go to
the next screen or to confirm the required
menu option. Hold down to go back to the
standard screen.
▼To scroll the displayed menu and the related options
downwards or to decrease the value displayed.
NOTE Buttons
▲and▼activate different functions
according to the following situations:
Setup menu
– within the menu, they allow you to scroll up and
down through the options;
– during setting operations they allow an increase or
decrease.
001-036 DUCATO LUM EN 7ed 6/21/10 2:08 PM Page 19
Page 22 of 286
21
KNOWING
YOUR CAR
SAFETY
STARTING
AND
DRIVING
WARNING
LIGHTS AND
MESSAGES
IN AN
EMERGENCY
MAINTENANCE
AND CARE
TECHNICAL
SPECIFICATIONS
INDEX
Setting the clock (Hour)
This function is used to set the clock.
To set the required unit proceed as follows:
– briefly press button MODE: the display shows the
“hours” flashing;
– press button ▲or ▼to adjust;
– briefly press button MODE: “minutes” start to flash
on the display;
– press button ▲or ▼to adjust;
– press the MODE button briefly to return to the menu
screen or press the button for longer to return to the
standard screen without memorising. Setting a speed limit (SPEEd)
With this function it is possible to set the vehicle speed
limit (km/h or mph); when this limit is exceeded the
driver is immediately alerted (see section “Warning
lights and messages”).
To set the desired speed limit, proceed as follows:
– briefly press button MODE, the display will show the
wording (SPEED) and the unit (km/h) or (mph)
previously set;
– press button▲or ▼to select activation (On) or
deactivation (
OFF) of the speed limit;
– if the function has been activated (On), press buttons
▲or ▼to select the required speed limit and then
press MODE to confirm.
NOTEThe speed may be set in the range from 30 to
200 km/h, or from 20 to 125 mph according to the
previously chosen unit (see “Setting the distance unit”)
described below. The setting will increase/decrease by
five units each time button ▲/▼is pressed. Hold down
button ▲/▼to increase/decrease the setting rapidly.
Complete the setting by briefly pressing the button
when you approach the required value.
– press the MODE button briefly to return to the menu
screen or press the button for longer to return to the
standard screen without memorising.
001-036 DUCATO LUM EN 7ed 6/21/10 2:08 PM Page 21
Page 26 of 286
25
KNOWING
YOUR CAR
SAFETY
STARTING
AND
DRIVING
WARNING
LIGHTS AND
MESSAGES
IN AN
EMERGENCY
MAINTENANCE
AND CARE
TECHNICAL
SPECIFICATIONS
INDEX
SETUP MENU fig. 23
The menu comprises a series of functions arranged in
a cycle which can be selected through buttons ▲and ▼
to access the different select operations and settings
(setup) given in the following paragraphs. A submenu is
provided for some items (Setting the clock and Set
units).
The setup menu can be activated by pressing the MODE
button briefly.
Single presses on buttons ▲or ▼will scroll through
the setup menu options.
Operating modes are different according to the
characteristics of the option selected.
Selecting an option from the main menu without a submenu
– Briefly press button MODE to select the main menu
option that needs to be changed.
– Press buttons ▲or ▼(with single presses) to select
the new setting.
– Briefly press button MODE to store the new setting
and at the same time go back to the previously selected
menu option. Light adjustment inside vehicle
– with the side lights on and standard screen active, it is
possible to adjust the brightness inside the vehicle.
Setup menu
– within the menu, they allow you to scroll up and
down through the options;
– during settings operations, they increase or decrease
values.
001-036 DUCATO LUM EN 7ed 6/21/10 2:08 PM Page 25
Page 27 of 286
Hold down the MODE button:
– to return to the set up menu if you are in the main
menu;
– to return to the main menu if you are at another point
of the menu (e.g.: at submenu option setting level, at
submenu level or at main menu option setting level);
– to save only the changes stored by the user (and
confirmed by pressing button MODE).
The environment of the Set Up menu is timed; when
the menu is exited due to expiry of the time allowed,
only the changes already stored by the user (confirmed
beforehand by a brief press of the button) will be saved. Selecting an option from the main menu with
a submenu:
– a short press on the button will display the first
submenu option;
– press buttons ▲or ▼(with single presses) to scroll
through all the submenu options;
– briefly press the MODE button to select the displayed
submenu option and to open the relevant set-up menu;
– press buttons ▲or ▼(with single presses) to select
the new setting for this submenu option;
– briefly press button MODE to store the new setting
and at the same time go back to the previously selected
menu option.
Selecting “Date” and “Set Clock”:
– briefly press button MODE to select the first value to
be changed (e.g. hours/minutes or year/month/day);
– Press buttons ▲or ▼(with single presses) to select
the new setting;
– briefly press MODE to store the new setting and go
to the next setup menu option; if this is the last one you
will go back to the previous menu option.
26
KNOWING
YOUR CAR
SAFETY
STARTING
AND
DRIVING
WARNING
LIGHTS AND
MESSAGES
IN AN
EMERGENCY
MAINTENANCE
AND CARE
TECHNICAL
SPECIFICATIONS
INDEX
001-036 DUCATO LUM EN 7ed 6/21/10 2:08 PM Page 26
Page 30 of 286
29
KNOWING
YOUR CAR
SAFETY
STARTING
AND
DRIVING
WARNING
LIGHTS AND
MESSAGES
IN AN
EMERGENCY
MAINTENANCE
AND CARE
TECHNICAL
SPECIFICATIONS
INDEX
– once you have selected the submenu to be changed,
press the button MODE briefly;
– when accessing the “Time” submenu:briefly press the
button MODE, “hours” will flash on the display;
– press button
▲or ▼to adjust;
– briefly press button MODE: “minutes” starts flashing
on the display;
– press button
▲or ▼to adjust;
– when accessing the “Format” submenu:briefly press
button MODE : the previously set display format will
flash on the display;
– press
▲or ▼to select 24h or 12h.
When you have made the required settings, briefly press
the MODE button to go back to the submenu screen or
hold the button down to go back to the main menu
screen without storing the new settings.
– press the MODE button again for a while to return to
the standard screen or to the main menu according to
where you are in the menu. Trip B On/Off (trip B data)
This function can be used to activate (On) or deactivate
(Off) the Trip B display (partial trip).
For further information see “Trip computer”.
Proceed as follows to switch the function on and off:
– briefly press button MODE: ON or OFF flashes on
the display (according to the previous setting);
– press button
▲or ▼to select;
– press the MODE button briefly to return to the menu
screen or press the button for longer to return to the
standard screen without memorising.
Setting the clock (Set time)
This function enables the clock to be set through two
submenus: “Time” and “Format”.
To carry out the adjustment, proceed as follows:
– briefly press the MODE button and two submenus,
“Time” and “Format”, are displayed;
– press
▲or ▼to move between the two submenus;
001-036 DUCATO LUM EN 7ed 6/21/10 2:09 PM Page 29
Page 62 of 286
61
KNOWING
YOUR CAR
SAFETY
STARTING
AND
DRIVING
WARNING
LIGHTS AND
MESSAGES
IN AN
EMERGENCY
MAINTENANCE
AND CARE
TECHNICAL
SPECIFICATIONS
INDEX
E System off button.
F Compressor enabling/disabling button.
G Air recirculation control button.
H Fan speed increase/decrease control buttons.
I Temperature increase/decrease control knob.
USING THE CLIMATE CONTROL SYSTEM
The system can be started in different ways, but it is
advisable to start by pressing the AUTO button and
then turning the knob to set the temperature required
on the display. The system will start running
automatically in this way and the set temperature will be
reached as quickly as possible. The system will adjust
the temperature, the quantity and the distribution of the
air introduced into the passenger compartment and, by
managing the recirculation function, the activation of the
compressor. During fully automatic operation, the only
manual intervention required is the possible activation
of the following functions:
❒Òair recirculation, to keep it always on or off;
❒Zto speed up demisting/defrosting of the front
windows, rear window and door mirrors.During fully automatic system operation, you can change
the set temperature, air distribution and fan speed at
any time by using the relevant buttons or knobs: the
system will automatically change its settings to adjust to
the new requirements. During fully automatic operation
(FULL AUTO), the word FULL will disappear if the air
distribution and/or flow rate and/or engagement of the
compressor and/or recirculation settings are changed.
In this way, the functions will switch from automatic to
manual control until the AUTO button is pressed again.
With one or more functions turned on manually, the
adjustment of the intake air temperature continues to
be managed automatically, except with the compressor
switched off: if this is the case, the temperature of the
air introduced into the passenger compartment cannot
be lower than that of the outside air.
CONTROLS
Air temperature adjustment knob
air (l)
Turn the knob either clockwise or
anticlockwise to increase or lower the
requested temperature in the passenger
compartment.
The temperature set is shown on the display.
Turn the knob either fully to the right or fully to the left
to the extreme HI or LO position to turn the maximum
heating or maximum cooling functions on:
❒HI Function (maximum heating):
select by turning the temperature knob clockwise
beyond the maximum value (32 °C).
037-128 DUCATO LUM EN 7ed 6/21/10 2:10 PM Page 61
Page 63 of 286
62
KNOWING
YOUR CAR
SAFETY
STARTING
AND
DRIVING
WARNING
LIGHTS AND
MESSAGES
IN AN
EMERGENCY
MAINTENANCE
AND CARE
TECHNICAL
SPECIFICATIONS
INDEX
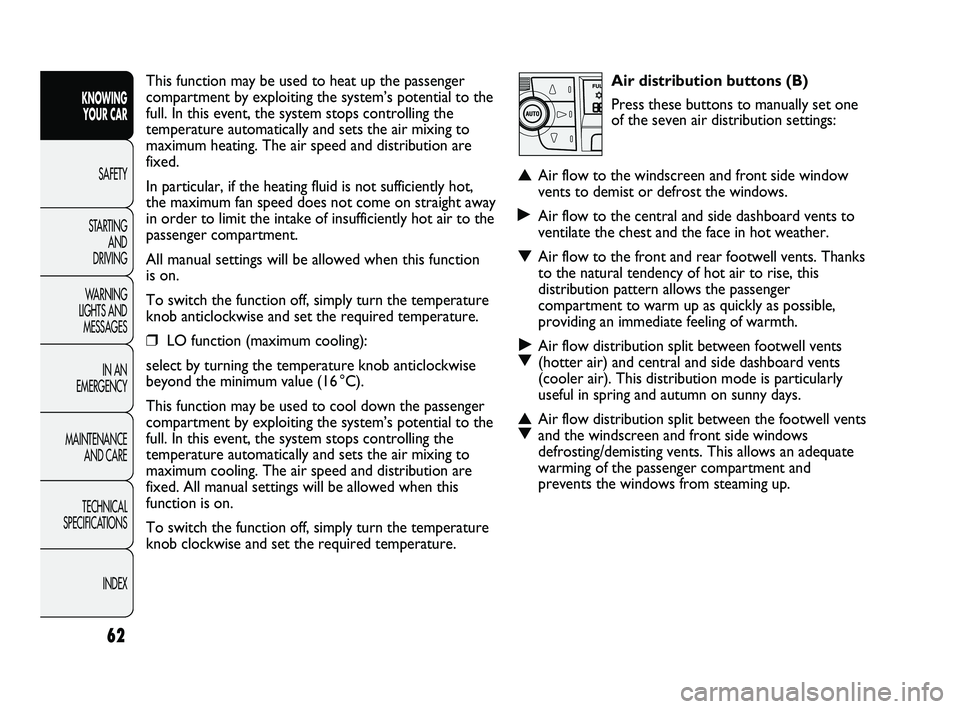
Air distribution buttons (B)
Press these buttons to manually set one
of the seven air distribution settings:
▲Air flow to the windscreen and front side window
vents to demist or defrost the windows.
˙Air flow to the central and side dashboard vents to
ventilate the chest and the face in hot weather.
▼Air flow to the front and rear footwell vents. Thanks
to the natural tendency of hot air to rise, this
distribution pattern allows the passenger
compartment to warm up as quickly as possible,
providing an immediate feeling of warmth.
˙
▼Air flow distribution split between footwell vents
(hotter air) and central and side dashboard vents
(cooler air). This distribution mode is particularly
useful in spring and autumn on sunny days.
▲
▼Air flow distribution split between the footwell vents
and the windscreen and front side windows
defrosting/demisting vents. This allows an adequate
warming of the passenger compartment and
prevents the windows from steaming up.
This function may be used to heat up the passenger
compartment by exploiting the system’s potential to the
full. In this event, the system stops controlling the
temperature automatically and sets the air mixing to
maximum heating. The air speed and distribution are
fixed.
In particular, if the heating fluid is not sufficiently hot,
the maximum fan speed does not come on straight away
in order to limit the intake of insufficiently hot air to the
passenger compartment.
All manual settings will be allowed when this function
is on.
To switch the function off, simply turn the temperature
knob anticlockwise and set the required temperature.
❒LO function (maximum cooling):
select by turning the temperature knob anticlockwise
beyond the minimum value (16 °C).
This function may be used to cool down the passenger
compartment by exploiting the system’s potential to the
full. In this event, the system stops controlling the
temperature automatically and sets the air mixing to
maximum cooling. The air speed and distribution are
fixed. All manual settings will be allowed when this
function is on.
To switch the function off, simply turn the temperature
knob clockwise and set the required temperature.
037-128 DUCATO LUM EN 7ed 6/21/10 2:10 PM Page 62
Page 70 of 286
69
KNOWING
YOUR CAR
SAFETY
STARTING
AND
DRIVING
WARNING
LIGHTS AND
MESSAGES
IN AN
EMERGENCY
MAINTENANCE
AND CARE
TECHNICAL
SPECIFICATIONS
INDEX
F0N0151mfig. 62
To prioritise windscreen demisting, set the air
distribution knob to the
-position.
To obtain both functions, set the air distribution knob
to the
®position.
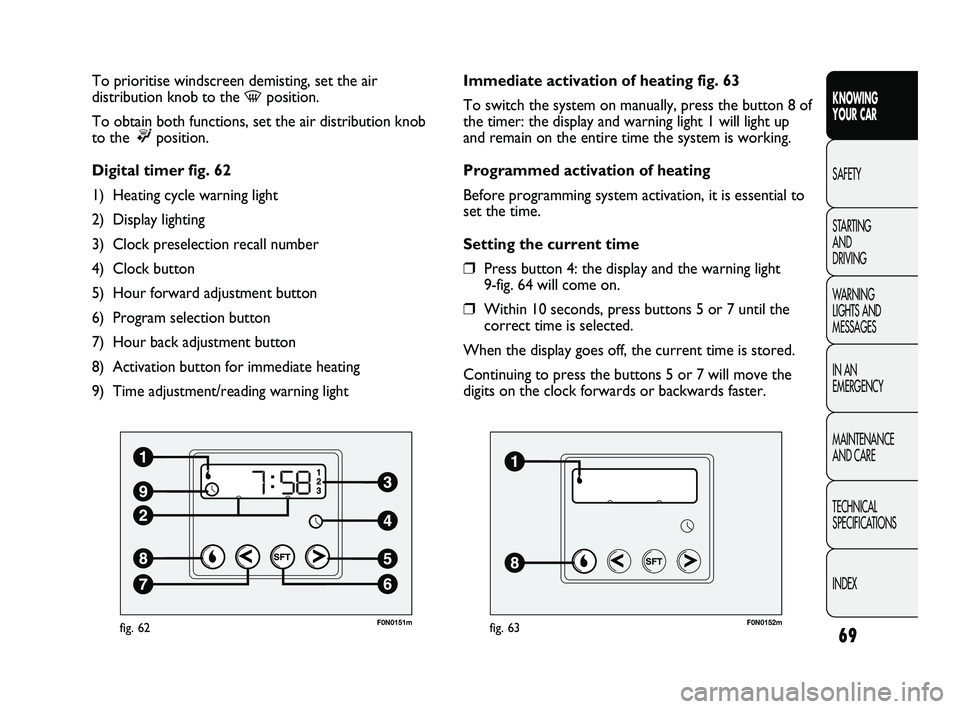
Digital timer fig. 62
1) Heating cycle warning light
2) Display lighting
3) Clock preselection recall number
4) Clock button
5) Hour forward adjustment button
6) Program selection button
7) Hour back adjustment button
8) Activation button for immediate heating
9) Time adjustment/reading warning light
F0N0152mfig. 63
Immediate activation of heating fig. 63
To switch the system on manually, press the button 8 of
the timer: the display and warning light 1 will light up
and remain on the entire time the system is working.
Programmed activation of heating
Before programming system activation, it is essential to
set the time.
Setting the current time
❒Press button 4: the display and the warning light
9-fig. 64 will come on.
❒Within 10 seconds, press buttons 5 or 7 until the
correct time is selected.
When the display goes off, the current time is stored.
Continuing to press the buttons 5 or 7 will move the
digits on the clock forwards or backwards faster.
037-128 DUCATO LUM EN 7ed 6/21/10 2:10 PM Page 69
Page 103 of 286
102
KNOWING
YOUR CAR
SAFETY
STARTING
AND
DRIVING
WARNING
LIGHTS AND
MESSAGES
IN AN
EMERGENCY
MAINTENANCE
AND CARE
TECHNICAL
SPECIFICATIONS
INDEX
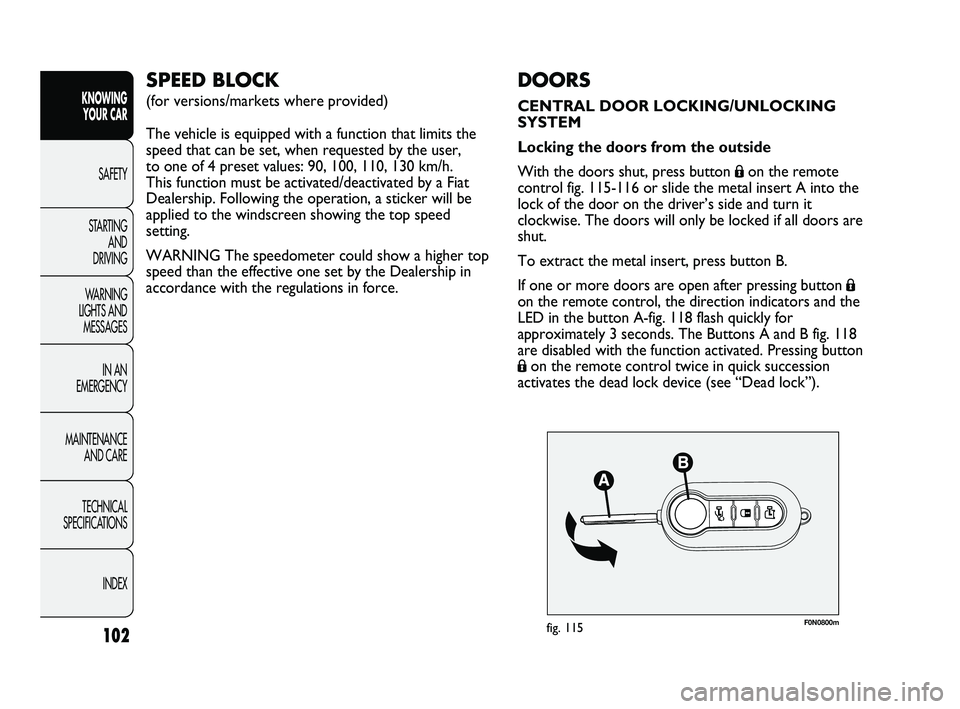
F0N0800mfig. 115
DOORS
CENTRAL DOOR LOCKING/UNLOCKING
SYSTEM
Locking the doors from the outside
With the doors shut, press button
Áon the remote
control fig. 115-116 or slide the metal insert A into the
lock of the door on the driver’s side and turn it
clockwise. The doors will only be locked if all doors are
shut.
To extract the metal insert, press button B.
If one or more doors are open after pressing button
Á
on the remote control, the direction indicators and the
LED in the button A-fig. 118 flash quickly for
approximately 3 seconds. The Buttons A and B fig. 118
are disabled with the function activated. Pressing button
Áon the remote control twice in quick succession
activates the dead lock device (see “Dead lock”).
SPEED BLOCK
(for versions/markets where provided)
The vehicle is equipped with a function that limits the
speed that can be set, when requested by the user,
to one of 4 preset values: 90, 100, 110, 130 km/h.
This function must be activated/deactivated by a Fiat
Dealership. Following the operation, a sticker will be
applied to the windscreen showing the top speed
setting.
WARNING The speedometer could show a higher top
speed than the effective one set by the Dealership in
accordance with the regulations in force.
037-128 DUCATO LUM EN 7ed 6/21/10 2:11 PM Page 102
Page 108 of 286
107
KNOWING
YOUR CAR
SAFETY
STARTING
AND
DRIVING
WARNING
LIGHTS AND
MESSAGES
IN AN
EMERGENCY
MAINTENANCE
AND CARE
TECHNICAL
SPECIFICATIONS
INDEX
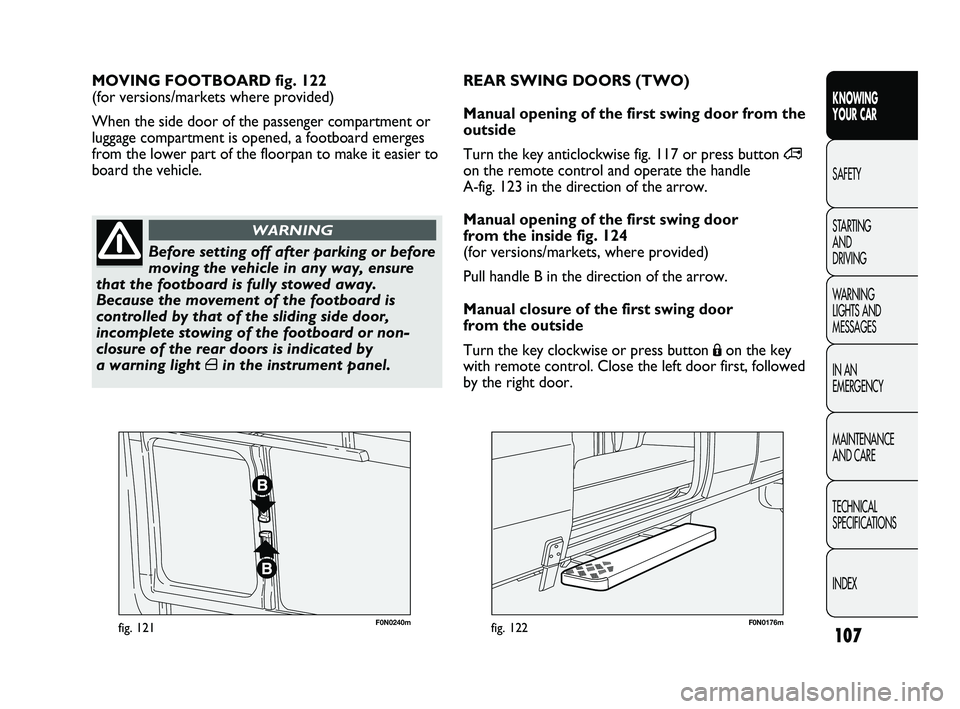
F0N0240mfig. 121F0N0176mfig. 122
MOVING FOOTBOARD fig. 122
(for versions/markets where provided)
When the side door of the passenger compartment or
luggage compartment is opened, a footboard emerges
from the lower part of the floorpan to make it easier to
board the vehicle.
Before setting off after parking or before
moving the vehicle in any way, ensure
that the footboard is fully stowed away.
Because the movement of the footboard is
controlled by that of the sliding side door,
incomplete stowing of the footboard or non-
closure of the rear doors is indicated by
a warning light
´in the instrument panel.
WARNING
REAR SWING DOORS (TWO)
Manual opening of the first swing door from the
outside
Turn the key anticlockwise fig. 117 or press button
∞
on the remote control and operate the handle
A-fig. 123 in the direction of the arrow.
Manual opening of the first swing door
from the inside fig. 124
(for versions/markets, where provided)
Pull handle B in the direction of the arrow.
Manual closure of the first swing door
from the outside
Turn the key clockwise or press button
Áon the key
with remote control. Close the left door first, followed
by the right door.
037-128 DUCATO LUM EN 7ed 6/21/10 2:11 PM Page 107