lock FIAT DUCATO 2011 Owner handbook (in English)
[x] Cancel search | Manufacturer: FIAT, Model Year: 2011, Model line: DUCATO, Model: FIAT DUCATO 2011Pages: 287, PDF Size: 4.42 MB
Page 22 of 287
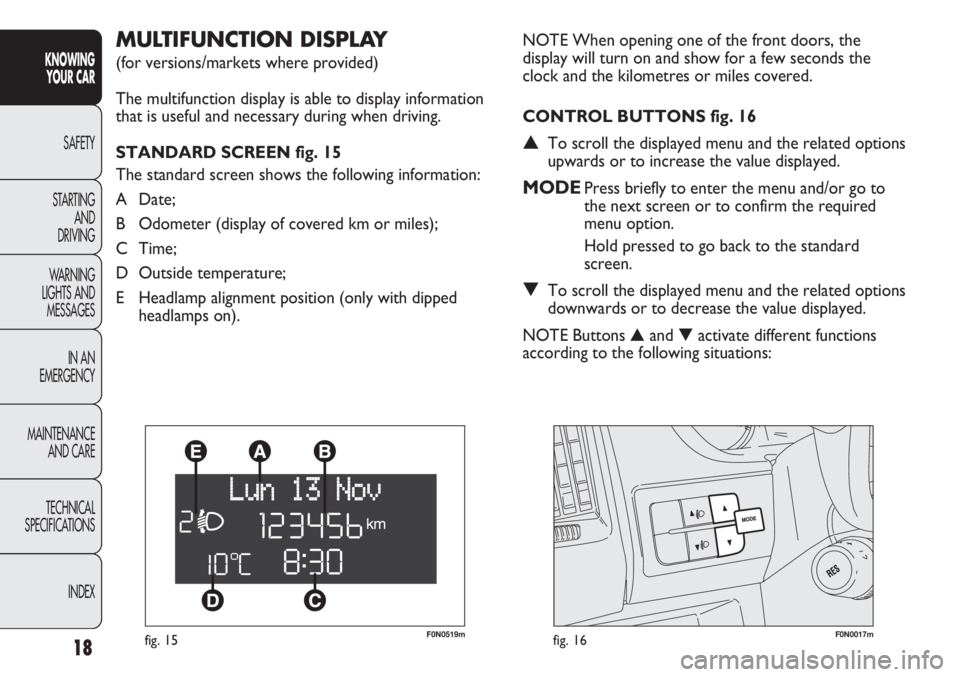
F0N0519mfig. 15F0N0017mfig. 16
NOTE When opening one of the front doors, the
display will turn on and show for a few seconds the
clock and the kilometres or miles covered.
CONTROL BUTTONS fig. 16
▲To scroll the displayed menu and the related options
upwards or to increase the value displayed.
MODEPress briefly to enter the menu and/or go to
the next screen or to confirm the required
menu option.
Hold pressed to go back to the standard
screen.
▼To scroll the displayed menu and the related options
downwards or to decrease the value displayed.
NOTE Buttons ▲and ▼activate different functions
according to the following situations:
MULTIFUNCTION DISPLAY
(for versions/markets where provided)
The multifunction display is able to display information
that is useful and necessary during when driving.
STANDARD SCREEN fig. 15
The standard screen shows the following information:
A Date;
B Odometer (display of covered km or miles);
C Time;
D Outside temperature;
E Headlamp alignment position (only with dipped
headlamps on).
18
KNOWING
YOUR CAR
SAFETY
STARTING
AND
DRIVING
WARNING
LIGHTS AND
MESSAGES
IN AN
EMERGENCY
MAINTENANCE
AND CARE
TECHNICAL
SPECIFICATIONS
INDEX
Page 23 of 287
19
KNOWING
YOUR CAR
SAFETY
STARTING
AND
DRIVING
WARNING
LIGHTS AND
MESSAGES
IN AN
EMERGENCY
MAINTENANCE
AND CARE
TECHNICAL
SPECIFICATIONS
INDEX
SETUP MENU fig. 17
The menu comprises a series of functions arranged in
a cycle which can be selected through buttons ▲and ▼
to access the different select operations and settings
(setup) given in the following paragraphs. A submenu is
provided for some items (Setting the clock and Set
units).
The setup menu can be activated by pressing the MODE
button briefly.
Single presses on buttons ▲or ▼will scroll through
the setup menu options.
Operating modes are different according to the
characteristics of the option selected.
Selecting an option from the main menu without a submenu
– Briefly press button MODE to select the main menu
option that needs to be changed.
– Press buttons ▲or ▼(with single presses) to select
the new setting.
– Briefly press button MODE to store the new setting
and at the same time go back to the previously selected
menu option. Light adjustment inside vehicle
– with the side lights on and standard screen active, it is
possible to adjust the brightness inside the vehicle.
Setup menu
– within the menu, they allow you to scroll up and
down through the options;
– during settings operations, they increase or decrease
values.
Page 24 of 287
Hold down the MODE button:
– to return to the set up menu if you are in the main
menu;
– to return to the main menu if you are at another point
of the menu (e.g.: at submenu option setting level, at
submenu level or at main menu option setting level);
– to save only the changes stored by the user (and
confirmed by pressing button MODE).
The environment of the Set Up menu is timed; when
the menu is exited due to expiry of the time allowed,
only the changes already stored by the user (confirmed
beforehand by a brief press of the button) will be saved. Selecting an option from the main menu with
a submenu:
– a short press on the button will display the first
submenu option;
– press buttons ▲or ▼(with single presses) to scroll
through all the submenu options;
– briefly press the MODE button to select the displayed
submenu option and to open the relevant set-up menu;
– press buttons ▲or ▼(with single presses) to select
the new setting for this submenu option;
– briefly press button MODE to store the new setting
and at the same time go back to the previously selected
menu option.
Selecting “Date” and “Set Clock”:
– briefly press button MODE to select the first value to
be changed (e.g. hours/minutes or year/month/day);
– Press buttons ▲or ▼(with single presses) to select
the new setting;
– briefly press MODE to store the new setting and go
to the next setup menu option; if this is the last one you
will go back to the previous menu option.
20
KNOWING
YOUR CAR
SAFETY
STARTING
AND
DRIVING
WARNING
LIGHTS AND
MESSAGES
IN AN
EMERGENCY
MAINTENANCE
AND CARE
TECHNICAL
SPECIFICATIONS
INDEX
Page 27 of 287
23
KNOWING
YOUR CAR
SAFETY
STARTING
AND
DRIVING
WARNING
LIGHTS AND
MESSAGES
IN AN
EMERGENCY
MAINTENANCE
AND CARE
TECHNICAL
SPECIFICATIONS
INDEX
– once you have selected the submenu to be changed,
press the button MODE briefly;
– when accessing the “Time” submenu:briefly press the
button MODE, “hours” will flash on the display;
– press button
▲or ▼to adjust;
– briefly press button MODE: “minutes” starts flashing
on the display;
– press button
▲or ▼to adjust;
– when accessing the “Format” submenu:briefly press
button MODE : the previously set display format will
flash on the display;
– press
▲or ▼to select 24h or 12h.
When you have made the required settings, briefly press
the MODE button to go back to the submenu screen or
hold the button down to go back to the main menu
screen without storing the new settings.
– press the MODE button again for a while to return to
the standard screen or to the main menu according to
where you are in the menu. Trip B On/Off (trip B data)
This function can be used to activate (On) or deactivate
(Off) the Trip B display (partial trip).
For further information see “Trip computer”.
Proceed as follows to switch the function on and off:
– briefly press button MODE: ON or OFF flashes on
the display (according to the previous setting);
– press button
▲or ▼to select;
– press the MODE button briefly to return to the menu
screen or press the button for longer to return to the
standard screen without memorising.
Setting the clock (Set time)
This function enables the clock to be set through two
submenus: “Time” and “Format”.
To carry out the adjustment, proceed as follows:
– briefly press the MODE button and two submenus,
“Time” and “Format”, are displayed;
– press
▲or ▼to move between the two submenus;
Page 28 of 287
Audio information (See sound system)
With this function the display shows information about
the sound system.
– Radio: selected radio station frequency or RDS
message, automatic tuning activation or AutoSTore;
– audio CD, MP3 CD: track number;
– CD Changer: CD number and track number;
To show the sound system information on the display
(On) or clear it (Off), proceed as follows:
– briefly press the button MODE: (On) or (Off) will
flash on the display (depending on the previous setting);
– press button
▲or ▼to select;
– press the MODE button briefly to return to the menu
screen or press the button for longer to return to the
standard screen without memorising.
Automatic central door locking
with vehicle
running (Autoclose)
When activated (On), this function locks the doors
automatically when the vehicle speed exceeds 20 km/h.
Proceed as follows to activate (On) or deactivate (Off)
this function:
– briefly press the button MODE to display one
submenu;
– briefly press the button MODE : “On” or “Off” flash
on the display (depending on the previous setting);
– press button
▲or ▼to select; Set date (Set Date)
Using this function you can update the date
(day – month – year).
Proceed as follows to update:
– briefly press button MODE: the day starts flashing on
the display (dd);
– press button
▲or ▼to adjust;
– briefly press button MODE: the month starts flashing
on the display (mm);
– press button
▲or ▼to adjust;
– briefly press button MODE: the year starts flashing on
the display (yyyy);
– press
▲or ▼to adjust the value.
NOTE The setting increases or decreases by one unit
each time button
▲or ▼is pressed. Hold the button
pressed to increase/decrease the setting rapidly and
automatically. Complete the setting by briefly pressing
the button when you approach the required value.
– press the MODE button briefly to return to the menu
screen or press the button for longer to return to the
standard screen without memorising.
24
KNOWING
YOUR CAR
SAFETY
STARTING
AND
DRIVING
WARNING
LIGHTS AND
MESSAGES
IN AN
EMERGENCY
MAINTENANCE
AND CARE
TECHNICAL
SPECIFICATIONS
INDEX
Page 35 of 287
31
KNOWING
YOUR CAR
SAFETY
STARTING
AND
DRIVING
WARNING
LIGHTS AND
MESSAGES
IN AN
EMERGENCY
MAINTENANCE
AND CARE
TECHNICAL
SPECIFICATIONS
INDEX
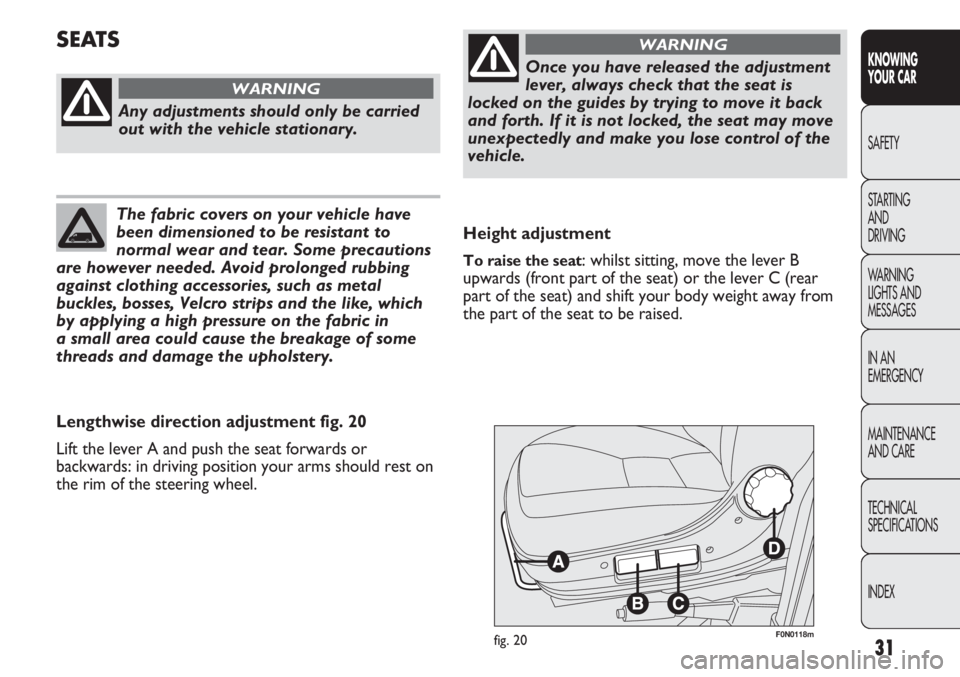
F0N0118mfig. 20
Height adjustment
To raise the seat: whilst sitting, move the lever B
upwards (front part of the seat) or the lever C (rear
part of the seat) and shift your body weight away from
the part of the seat to be raised.
SEATS
Any adjustments should only be carried
out with the vehicle stationary.
WARNING
The fabric covers on your vehicle have
been dimensioned to be resistant to
normal wear and tear. Some precautions
are however needed. Avoid prolonged rubbing
against clothing accessories, such as metal
buckles, bosses, Velcro strips and the like, which
by applying a high pressure on the fabric in
a small area could cause the breakage of some
threads and damage the upholstery.
Lengthwise direction adjustment fig. 20
Lift the lever A and push the seat forwards or
backwards: in driving position your arms should rest on
the rim of the steering wheel.
Once you have released the adjustment
lever, always check that the seat is
locked on the guides by trying to move it back
and forth. If it is not locked, the seat may move
unexpectedly and make you lose control of the
vehicle.
WARNING
Page 38 of 287
34
KNOWING
YOUR CAR
SAFETY
STARTING
AND
DRIVING
WARNING
LIGHTS AND
MESSAGES
IN AN
EMERGENCY
MAINTENANCE
AND CARE
TECHNICAL
SPECIFICATIONS
INDEX
F0N0173mfig. 26F0N0174mfig. 27
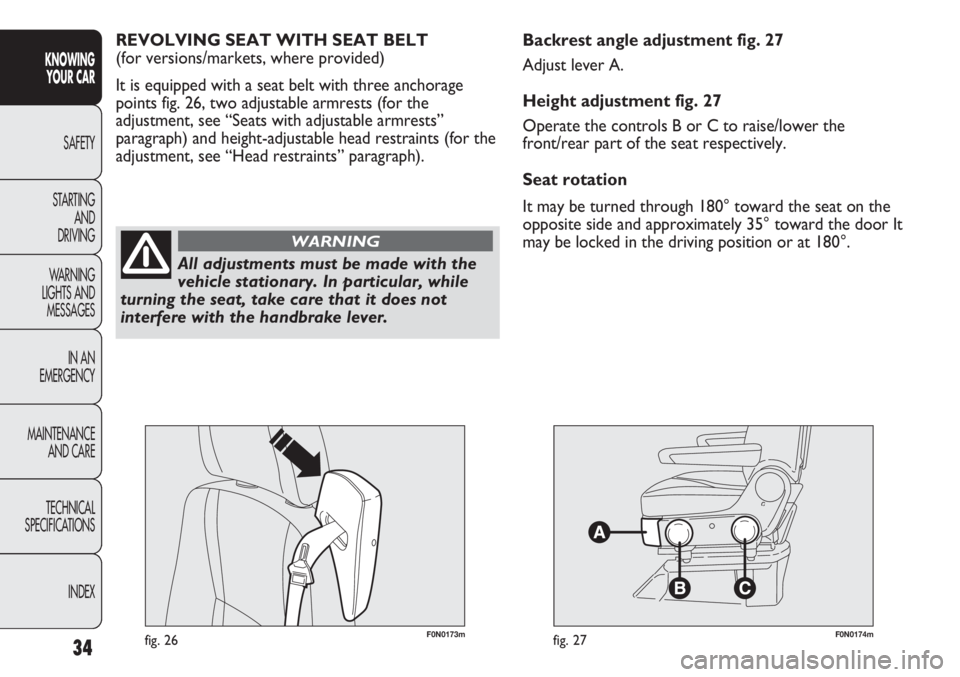
Backrest angle adjustment fig. 27
Adjust lever A.
Height adjustment fig. 27
Operate the controls B or C to raise/lower the
front/rear part of the seat respectively.
Seat rotation
It may be turned through 180° toward the seat on the
opposite side and approximately 35° toward the door It
may be locked in the driving position or at 180°. REVOLVING SEAT WITH SEAT BELT
(for versions/markets, where provided)
It is equipped with a seat belt with three anchorage
points fig. 26, two adjustable armrests (for the
adjustment, see “Seats with adjustable armrests”
paragraph) and height-adjustable head restraints (for the
adjustment, see “Head restraints” paragraph).
All adjustments must be made with the
vehicle stationary. In particular, while
turning the seat, take care that it does not
interfere with the handbrake lever.
WARNING
Page 39 of 287
35
KNOWING
YOUR CAR
SAFETY
STARTING
AND
DRIVING
WARNING
LIGHTS AND
MESSAGES
IN AN
EMERGENCY
MAINTENANCE
AND CARE
TECHNICAL
SPECIFICATIONS
INDEX
F0N0175mfig. 28F0N0213mfig. 29
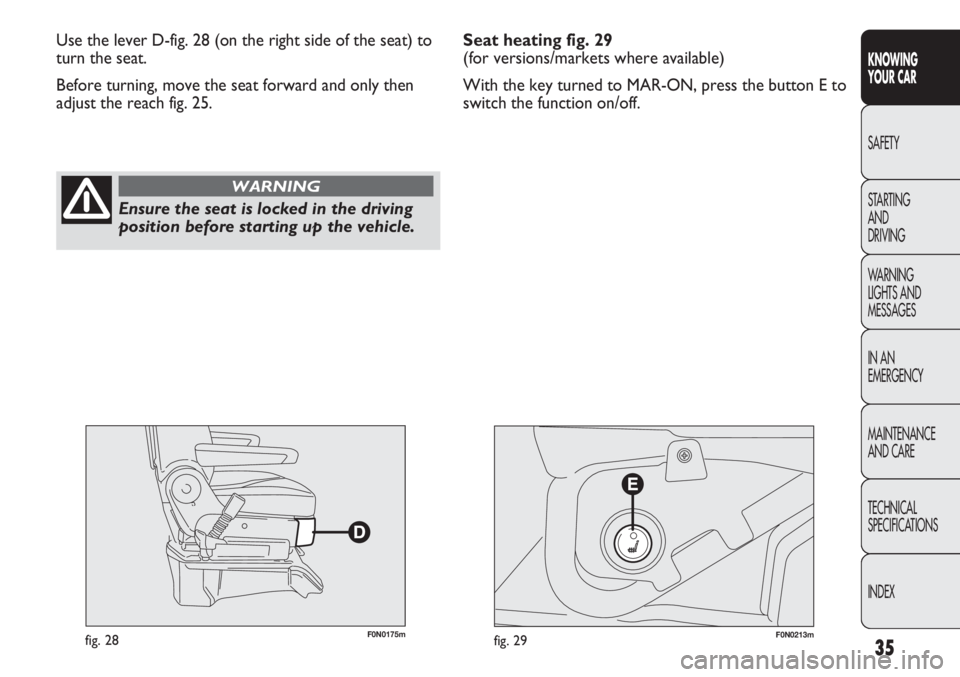
Use the lever D-fig. 28 (on the right side of the seat) to
turn the seat.
Before turning, move the seat forward and only then
adjust the reach fig. 25.
Ensure the seat is locked in the driving
position before starting up the vehicle.
WARNING
Seat heating fig. 29
(for versions/markets where available)
With the key turned to MAR-ON, press the button E to
switch the function on/off.
Page 43 of 287
39
KNOWING
YOUR CAR
SAFETY
STARTING
AND
DRIVING
WARNING
LIGHTS AND
MESSAGES
IN AN
EMERGENCY
MAINTENANCE
AND CARE
TECHNICAL
SPECIFICATIONS
INDEX
F0N0230mfig. 36
Do not travel with passengers seated in
the 3rdrow with the 2ndrow bench
folded over. Do not place objects of any type
on the backrest of the 2
ndbench with the row
folded over: in the event of impact or sharp
braking they could be thrown against the
occupants of the vehicle casing serious injury.
For more information, see the contents of the
adhesive plate located under the bench.
WARNING
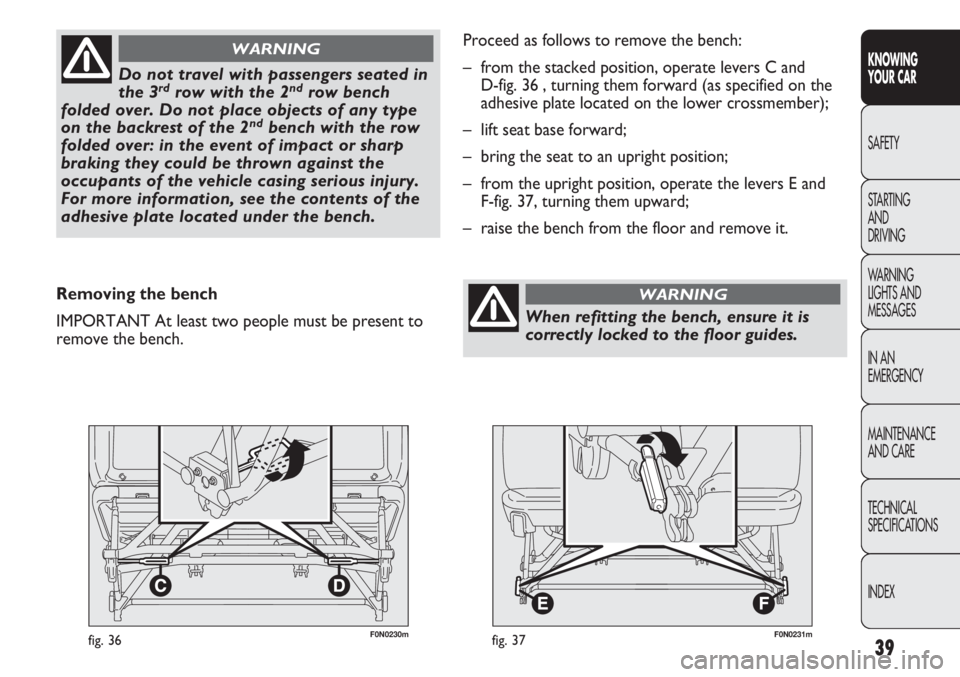
Removing the bench
IMPORTANT At least two people must be present to
remove the bench.
F0N0231mfig. 37
Proceed as follows to remove the bench:
– from the stacked position, operate levers C and
D-fig. 36 , turning them forward (as specified on the
adhesive plate located on the lower crossmember);
– lift seat base forward;
– bring the seat to an upright position;
– from the upright position, operate the levers E and
F-fig. 37, turning them upward;
– raise the bench from the floor and remove it.
When refitting the bench, ensure it is
correctly locked to the floor guides.
WARNING
Page 44 of 287
40
KNOWING
YOUR CAR
SAFETY
STARTING
AND
DRIVING
WARNING
LIGHTS AND
MESSAGES
IN AN
EMERGENCY
MAINTENANCE
AND CARE
TECHNICAL
SPECIFICATIONS
INDEX
To make the best use of the head restraint’s protective
action, adjust the backrest so that your torso is upright
and keep your head as close as possible to the head
restraint.
Head restraints must be adjusted so that
the head, rather than the neck, rests on
them. Only in this case they can protect your
head correctly.
WARNING
F0N0020mfig. 38
HEAD RESTRAINTS
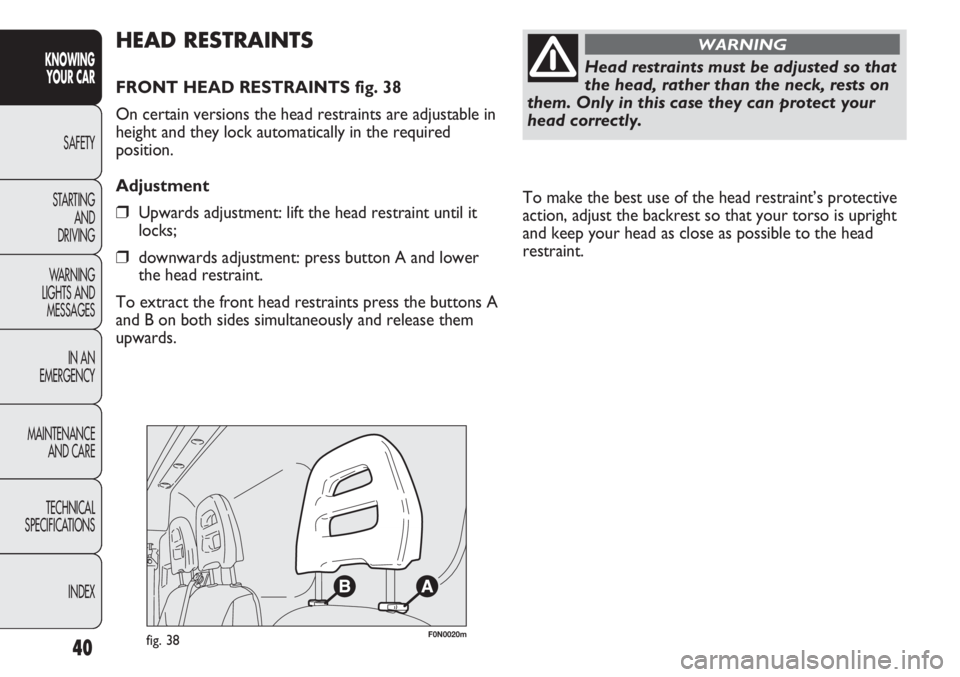
FRONT HEAD RESTRAINTS fig. 38
On certain versions the head restraints are adjustable in
height and they lock automatically in the required
position.
Adjustment
❒Upwards adjustment: lift the head restraint until it
locks;
❒downwards adjustment: press button A and lower
the head restraint.
To extract the front head restraints press the buttons A
and B on both sides simultaneously and release them
upwards.