remote control FIAT DUCATO 2012 Owner handbook (in English)
[x] Cancel search | Manufacturer: FIAT, Model Year: 2012, Model line: DUCATO, Model: FIAT DUCATO 2012Pages: 287, PDF Size: 4.5 MB
Page 103 of 287
99
KNOWING
YOUR CAR
SAFETY
STARTING
AND
DRIVING
WARNING
LIGHTS AND
MESSAGES
IN AN
EMERGENCY
MAINTENANCE
AND CARE
TECHNICAL
SPECIFICATIONS
INDEX
The LED comes on in the following cases:
❒after each door lock command generated by the
button D or by button
Áin the dashboard;
❒when the instrument panel is activated;
❒upon opening of one of the front doors;
❒when the door is locked at 20 km/h (if activated
from the menu).
The lock is turned off when one of the load
compartment doors is opened or on a door release
request (load compartment or centralised) or an
unlocking request from the remote control/door catch.
DEAD LOCK
(for versions/markets where provided)
This safety device inhibits the operation of:
❒interior handles;
❒locking/unlocking buttons A-B fig. 112;
thereby preventing the opening of the doors from inside
the passenger compartment if there has been a break-in
attempt (e.g. a window has been broken).
The dead lock device therefore offers the best possible
protection against break in attempts. We recommend
engaging it whenever the vehicle is parked and left
unattended.
Once the dead lock system is engaged it
is impossible to open the doors from
inside the vehicle. Therefore, before engaging
the system check that there is no one left inside.
If the remote control battery is flat, the system
can only be disengaged by using the metal insert
in either of the door locks as described
previously: in this case the device only remains
on for the rear doors.
WARNING
Device activation
The dead lock device is automatically activated on every
door when pressing the remote control button
Ábriefly
twice, fig. 109.
Device activation is indicated by 3 flashes of the
direction indicators and the flashing of the LED on
button A-fig. 112 on the dashboard.
If one of the doors is not perfectly shut, the dead lock
device will not be activated, thus preventing a person
getting into the car through the open door and, on
shutting it, remaining stuck inside the passenger
compartment.
Page 104 of 287
100
KNOWING
YOUR CAR
SAFETY
STARTING
AND
DRIVING
WARNING
LIGHTS AND
MESSAGES
IN AN
EMERGENCY
MAINTENANCE
AND CARE
TECHNICAL
SPECIFICATIONS
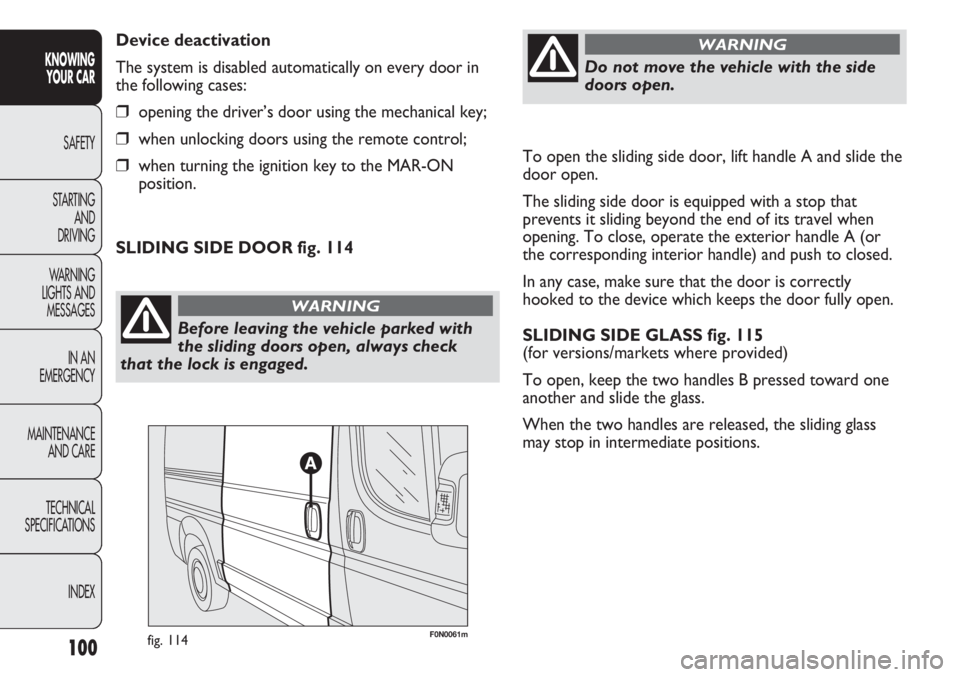
INDEXTo open the sliding side door, lift handle A and slide the
door open.
The sliding side door is equipped with a stop that
prevents it sliding beyond the end of its travel when
opening. To close, operate the exterior handle A (or
the corresponding interior handle) and push to closed.
In any case, make sure that the door is correctly
hooked to the device which keeps the door fully open.
SLIDING SIDE GLASS fig. 115
(for versions/markets where provided)
To open, keep the two handles B pressed toward one
another and slide the glass.
When the two handles are released, the sliding glass
may stop in intermediate positions. Device deactivation
The system is disabled automatically on every door in
the following cases:
❒opening the driver’s door using the mechanical key;
❒when unlocking doors using the remote control;
❒when turning the ignition key to the MAR-ON
position.
Before leaving the vehicle parked with
the sliding doors open, always check
that the lock is engaged.
WARNING
Do not move the vehicle with the side
doors open.
WARNING
SLIDING SIDE DOOR fig. 114
F0N0061mfig. 114
Page 105 of 287
101
KNOWING
YOUR CAR
SAFETY
STARTING
AND
DRIVING
WARNING
LIGHTS AND
MESSAGES
IN AN
EMERGENCY
MAINTENANCE
AND CARE
TECHNICAL
SPECIFICATIONS
INDEX
F0N0240mfig. 115F0N0176mfig. 116
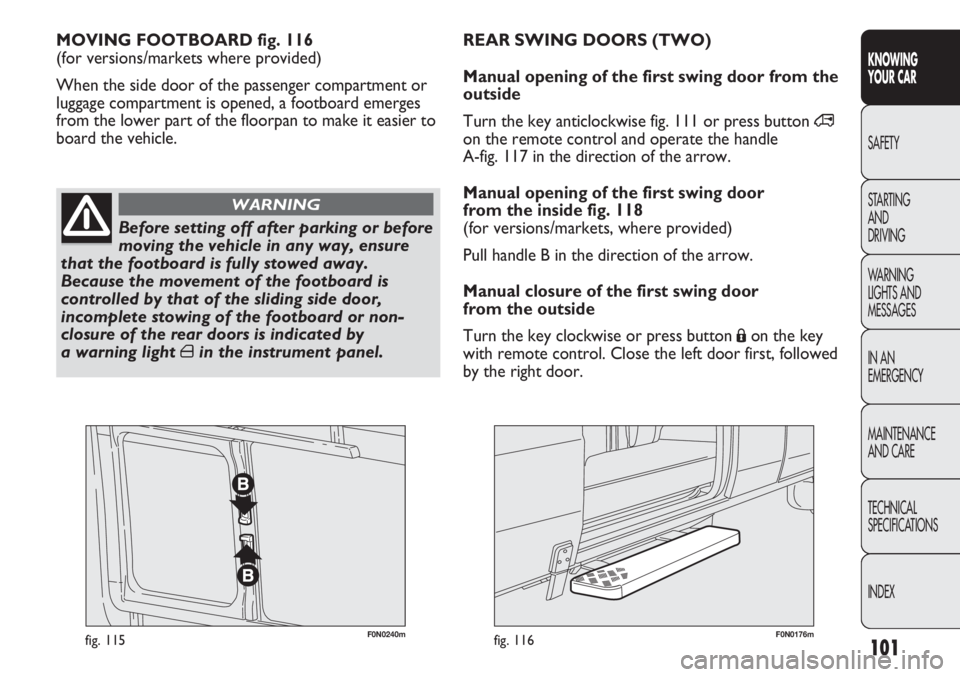
MOVING FOOTBOARD fig. 116
(for versions/markets where provided)
When the side door of the passenger compartment or
luggage compartment is opened, a footboard emerges
from the lower part of the floorpan to make it easier to
board the vehicle.
Before setting off after parking or before
moving the vehicle in any way, ensure
that the footboard is fully stowed away.
Because the movement of the footboard is
controlled by that of the sliding side door,
incomplete stowing of the footboard or non-
closure of the rear doors is indicated by
a warning light
´in the instrument panel.
WARNING
REAR SWING DOORS (TWO)
Manual opening of the first swing door from the
outside
Turn the key anticlockwise fig. 111 or press button
∞
on the remote control and operate the handle
A-fig. 117 in the direction of the arrow.
Manual opening of the first swing door
from the inside fig. 118
(for versions/markets, where provided)
Pull handle B in the direction of the arrow.
Manual closure of the first swing door
from the outside
Turn the key clockwise or press button
Áon the key
with remote control. Close the left door first, followed
by the right door.
Page 160 of 287
❒cover the vehicle with a piece of fabric or perforated
plastic sheet. Do not use compact plastic tarpaulins,
which prevent humidity from evaporating from the
surface of the vehicle;
❒inflate tyres to a pressure of +0.5 bar above the
normal specified pressure and check it at intervals;
❒if you don’t disconnect the battery from the electric
system, check its charge every month and recharge it
if the optical indicator shows a dark colour without
the central green area;
❒do not drain the engine cooling system.
IMPORTANT If the vehicle is equipped with an alarm
system, switch off the vehicle alarm with the remote
control.
LONG VEHICLE INACTIVITY
If the vehicle needs to be off the road for longer than
one month, the following precautions must be taken:
❒park the vehicle indoors in a dry and, possibly, well-
ventilated place;
❒engage a gear;
❒check that the handbrake is not engaged;
❒disconnect the negative battery terminal and check
battery charge. Repeat this check once every three
months during storage. Recharge if the optical
indicator shows a dark colour without the central
green area (see “Battery recharging” in the section
“Dashboard and controls”); If the vehicle is equipped
with a battery disconnection function (disconnector),
see the description of the procedure in the
“Controls” paragraph in the “Dashboard and
controls” section;
❒clean and protect the painted parts using protective
wax;
❒clean and protect the shiny metal parts using special
commercially-available compounds;
❒sprinkle talcum powder on the rubber windscreen
and rear window wiper blades and lift them off
the glass;
❒slightly open the windows;
156
CONOSCENZA
DEL
VEICOLO
SICUREZZA
AVVIAMENTO
E GUIDA
SPIE E
MESSAGGI
IN EMERGENZA
MANUTENZIONE
E CURA
DATI TECNICI
INDICE
Page 282 of 287
278
KNOWING
YOUR CAR
SAFETY
STARTING
AND
DRIVING
WARNING
LIGHTS AND
MESSAGES
IN AN
EMERGENCY
MAINTENANCE
AND CARE
TECHNICAL
SPECIFICATIONS
INDEX
– headlight alignment
corrector ............................. 107
Headlights (warning
for cleaning) ............................ 225
Heated rear window ............... 80
Heating and ventilation ...........45
– automatic climate control ... 54
– controls ................................ 46
– front window rapid
defrosting/demisting ...48-51-59
– heated rear window and
external rear view mirrors
defrosting/demisting .... 48-53
– interior air recirculation ... 49
– manual climate control ..... 49
– passenger compartment
air vents ............................... 46
Heavy use of the vehicle
(servicing) ................................ 208
Hill Holder system .................. 111
Identification plates ................. 227
– body paintwork .................. 228
– identification data ............... 227Ignition switch .......................... 12
– steering lock ........................ 13
In an emergency ....................... 169
Installation of electrical/
electronic devices .................. 121
Installing the tow hook ........... 151
– assembly diagrams....... 153-154
Interior fittings ......................... 84
Interiors (maintenance) .......... 225
“Isofix” child seat ..................... 134
Keys ........................................... 5
– Code card ........................... 5
– key with remote control .. 6
– key without remote
control ................................. 8
– replacing the battery ......... 8
Knowing your car .................... 3
Light clusters
– front (bulb replacement) .. 184
– rear (bulb replacement) ... 189
Load (warnings) ....................... 147
Load advice................................ 147Load compartment button .... 108
Load limiters ............................. 127
Lubricants (quantity and
products) .........................263-264
Main beam headlights
– bulb replacement ............... 185
– control ................................. 68
Main beam headlights
– bulb replacement ............... 185
– control ................................. 68
– flashing the headlights ....... 69
Maintenance and care ............. 205
– regular checks ..................... 208
– Scheduled servicing ........... 205
– Scheduled Servicing
Plan ...................................206-207
–Heavy use of the vehicle .... 208
Manual climate control ........... 49
Moving platform........................ 101
MSR (system) ............................ 112
MSR system................................ 112
Multifunction display ............... 18
Page 283 of 287
279
KNOWING
YOUR CAR
SAFETY
STARTING
AND
DRIVING
WARNING
LIGHTS AND
MESSAGES
IN AN
EMERGENCY
MAINTENANCE
AND CARE
TECHNICAL
SPECIFICATIONS
INDEX
Number plate lights (bulb
replacement) .......................... 192
Official type approval for radio
frequency remote control .... 271
On-board instruments
(panel) ..............................14-15
– engine coolant
temperature gauge ............. 16
– engine oil gauge .................. 17
– fuel level gauge..................... 16
– multifunction display ......... 18
– rev counter ......................... 15
– speedometer........................ 15
– trip computer ..................... 29
Paintwork
– identification plate ............. 228
– maintenance ........................ 224
Bodywork version ................. 229
Parking lights
– control ......................... 69-80
Parking sensors ........................ 116Passenger compartment
air vents ................................... 46
Performance ............................. 240
Pollen filter ................................ 217
Portable navigator socket ....... 91
Power socket ........................... 89
Preparation for “Isofix”
child seat ................................. 134
Pretensioners............................. 127
Protecting
the environment..................... 124
Quick tyre repair kit
“Fix & Go automatic” ........... 176
Radio .......................................... 119
Radio frequency
remote control:
official type approval ............. 269
Radio transmitters and mobile
phones ..................................... 121
Rain sensor ............................... 73
Raising the vehicle ................... 203
Rear double swing door ......... 101Rear fog light
– bulb replacement ....... 189-191
– control ................................. 80
Rear partition ........................... 87
Rear view mirrors.................... 42
– defrosting/demisting .......... 44
– electric adjustment ............ 42
– external ................................ 42
– interior ................................. 42
Refrigerated compartment .... 84
– Speed block .......................... 96
Refuelling (quantity
and products) .................263-264
Refuelling the vehicle .............. 122
Rev counter .............................. 15
Reversing lights (bulb
replacement) .......................... 189
Rim Protector (tyres).............. 234
Rims
– reading rim markings ......... 235
Roof lights
– bulb replacement ....... 193-194
– control ................................. 76