ABS FIAT DUCATO 2015 Owner handbook (in English)
[x] Cancel search | Manufacturer: FIAT, Model Year: 2015, Model line: DUCATO, Model: FIAT DUCATO 2015Pages: 367, PDF Size: 19.73 MB
Page 228 of 367

Right central pillar optional fuse box
fig. 230 - fig. 231
DEVICE PROTECTED FUSE AMPERE
AbsentF54 –
Heated seatsF55 15
Rear passenger power socket F56 15
Additional heater under the seat F57 10
Left heated rear window F58 15
Right heated rear window F59 15
AbsentF60 –
AbsentF61 –
AbsentF62 –
Additional passenger heater control F63 10
AbsentF64 –
Additional passenger heater fan F65 30
224
IN AN EMERGENCY
Page 229 of 367
BATTERY
RECHARGING
IMPORTANT The battery
recharging procedure is given as
information only. You are advised to
contact a Fiat Dealership to have
this operation carried out.
IMPORTANT After turning the
ignition key to STOP and having
closed the driver side door, wait at
least one minute before
disconnecting the electrical supply
from the battery. When
reconnecting the electrical supply
to the battery, make sure that
the ignition key is in the STOP
position and the driver side door is
closed.
Charging should be slow at a low
ampere rating for approximately 24
hours. Charging for a longer time
may damage the battery.
169) 170)
IN THE ABSENCE OF
START&STOP SYSTEM
To recharge, proceed as follows:
❒disconnect the negative battery
terminal;
❒connect the charger cables to the
battery terminals, observing the
polarity;
❒turn on the charger;
❒when it is recharged, turn the charger
off before disconnecting it from the
battery;
❒reconnect the negative battery
terminal.
WITH START&STOP
SYSTEM
To recharge, proceed as follows:
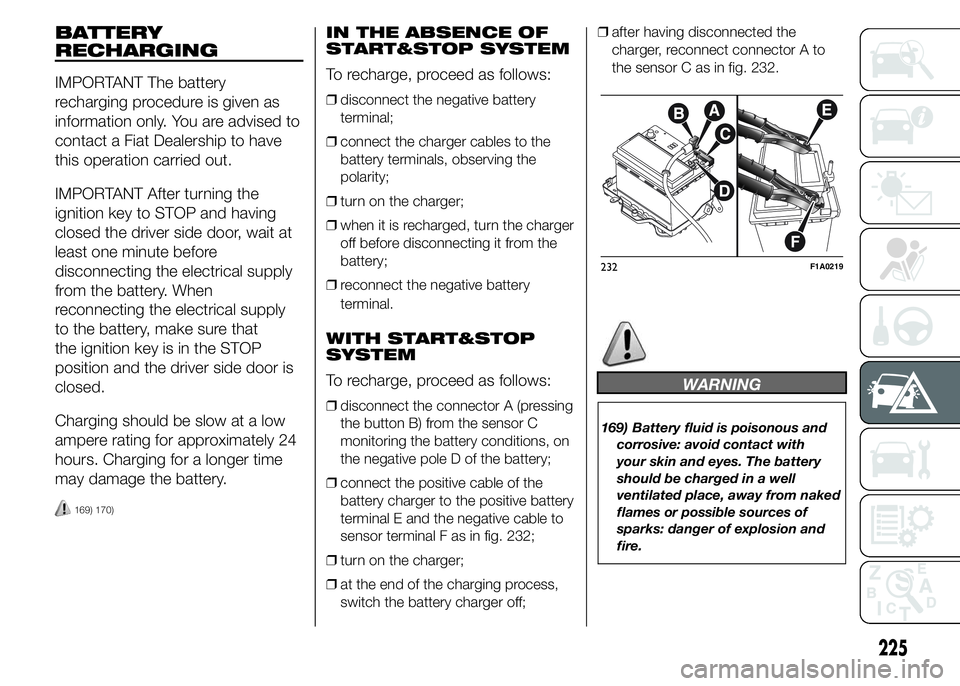
❒disconnect the connector A (pressing
the button B) from the sensor C
monitoring the battery conditions, on
the negative pole D of the battery;
❒connect the positive cable of the
battery charger to the positive battery
terminal E and the negative cable to
sensor terminal F as in fig. 232;
❒turn on the charger;
❒at the end of the charging process,
switch the battery charger off;❒after having disconnected the
charger, reconnect connector A to
the sensor C as in fig. 232.
WARNING
169) Battery fluid is poisonous and
corrosive: avoid contact with
your skin and eyes. The battery
should be charged in a well
ventilated place, away from naked
flames or possible sources of
sparks: danger of explosion and
fire.
232F1A0219
225
Page 231 of 367

The front ring is located in the tool
box beneath the passenger side
seat. On versions with Fix&Go
kit and without spare wheel, the
tool box is available only on request
for versions/markets where
provided.In the absence of the tool box the
vehicle front tow hook is housed
in the on-board documentation
container, together with the Owner
Handbook.
To use it, proceed as follows:
❒Open the flap A and remove it as
illustrated in fig. 234;
❒turn retaining knob B fig. 234
anticlockwise and remove it to allow
the box fig. 235 to come out;
❒take the screwdriver provided from
the box and prise up at the point
shown to raise the cap C fig. 237;
❒take the tow ring D from the box and
screw it onto the threaded pin fig.
237.
The rear ring B fig. 238 is located at
the point shown in the diagram.
WARNING
171) Screw on the tow hook and
check that it stops at the end
of travel position.
172) Before towing, switch off the
steering lock (see "Starting
device" paragraph under the
"Knowing your car" section).
173) Remember that the brake servo
and the electric power steering
are not available during towing
operations. Significantly greater
force must be exerted on the
brake pedal and on the steering
wheel to operate them.
174) Do not use flexible cables for
towing and avoid jerking. During
towing operations, make sure that
the fastened joint does not
damage adjoining components.
175) When towing the vehicle
comply with the specific rules of
the Highway Code regarding
the towing device and the
behaviour on the road.
176) Do not start the engine while
towing the vehicle.
236F1A0344
237F1A0223
238F1A0224
227
Page 244 of 367

BRAKE FLUID
186) 187)
50)
Undo the cap E fig. 239 - fig. 240 -
fig. 241 and check that the liquid
contained in the reservoir is at
the maximum level.
The fluid level in the reservoir must
not exceed the MAX mark.
Use the brake fluid shown in the
"Fluids and lubricants" table (see
"Technical Specifications").
NOTE Carefully clean the cap of the
reservoir and the surrounding
surface.
Take great care to ensure that
impurities do not enter the reservoir
when the plug is opened.
For topping-up, always use a funnel
with integrated filter with mesh
equal to or lower than 0.12 mm.IMPORTANT Brake fluid absorbs
moisture. For this reason, if the
vehicle is mainly used in areas with
a high degree of atmospheric
humidity, the fluid should be
replaced at more frequent intervals
than specified in the “Scheduled
Servicing Plan”.
IMPORTANT
47) When topping up, take care not
to mix up the various types of
fluids: they are not compatible
with each other and could
seriously damage the car.
48) The used engine oil and the filter
that has been replaced contain
substances that are harmful to
the environment. To change the
oil and filters, we advise you to
contact a Fiat Dealership.49) PARAFLU
UPantifreeze is used in
the engine cooling system. Use
fluid of the same type as that
contained in the cooling system
for any top-ups. PARAFLU
UP
cannot be mixed with any other
type of fluid. If this happens, do
not start the engine and contact a
Fiat Dealership.
50) Avoid allowing brake fluid, which
is extremely corrosive, to come
into contact with painted areas.
Should it happen, wash
immediately with water.
51) Do not press the power steering
end of travel lock for longer than 8
consecutive seconds with the
engine running because it will
cause noise and risk damaging
the system.
WARNING
180) Never smoke when performing
operations in the engine
compartment. Flammable gases
and fumes may be present and
risk igniting.
240
SERVICING AND MAINTENANCE
Page 324 of 367

115 MultiJet
(°)110 (°)/130
MultiJet150 MultiJet180 MultiJet
PowerPrescribed fuels and
original lubricants
Gearbox/differential casing
(litres):2,92.9 (M38
gearbox)2.9TUTELA TRANSMISSION
GEARTECH
Hydraulic braking circuit with
ABS (kg):0.6 0.6 0.6 0.6
TUTELA TOP 4
Hydraulic braking circuit with
ASR/ESP (kg):0.62 0.62 0.62 0.62
Hydraulic power steering: 1.5 1.5 1.5 1.5TUTELA TRANSMISSION
GI/E
Windscreen/headlight
washer reservoir:5.5 5.5 5.5 5.5Mixture of water and
TUTELA PROFESSIONAL
SC35
(°)Version for specific markets
320
TECHNICAL SPECIFICATIONS