sensor FIAT DUCATO 2016 Owner handbook (in English)
[x] Cancel search | Manufacturer: FIAT, Model Year: 2016, Model line: DUCATO, Model: FIAT DUCATO 2016Pages: 387, PDF Size: 20.76 MB
Page 130 of 387
Headlight sensor
sensitivity adjustment
(for versions/markets, where provided)
With this function it is possible to adjust
the rain headlight sensitivity according
to 3 levels.
To set the required sensitivity level,
proceed as follows:
– briefly press the MODE button: the
previously set sensitivity “level” starts to
flash on the display;
– press the
orbutton to
make the adjustment;
– press the MODE button briefly to
return to the menu screen or hold the
button down to return to the standard
screen without storing.
Cornering lights
(Activation/deactivation of
“Cornering lights”)
(for versions/markets, where provided)
This function activates/deactivates
("On"/"Off") the cornering lights (see the
description in the “Exterior lights”
paragraph).
Proceed as follows to activate/
deactivate the lights:
❒briefly press the MODE button. "On"
or "Off" flash on the display,
according to what has been
previously set;❒press
orto make your
choice;
❒briefly press the MODE button to
return to the menu screen or hold the
button down to return to the
standard screen without storing.
Rain sensor
(Rain sensor setting adjustment)
(for versions/markets, where provided)
This function allows you to adjust the
rain sensor sensitivity to 4 levels.
To set the required sensitivity level,
proceed as follows:
❒briefly press the MODE button. The
sensitivity “level” set previously
flashes on the display;
❒press the
orbutton to
make the adjustment;
❒briefly press the MODE button to
return to the menu screen or hold the
button down to return to the
standard screen without storing.Trip B On/Off (Trip B
data)
This function can be used to activate
(On) or deactivate (Off) the Trip B
display (partial trip).
For more information see the "Trip
computer" paragraph.
For activation/deactivation, proceed as
follows:
- briefly press the MODE button: ON or
OFF flashes on the display (depending
the previous setting);
- press the
orbutton to
select;
- press the MODE button briefly to
return to the menu screen or hold the
button down to return to the standard
screen without storing.
Traffic sign
This function allows you to activate (On)
or deactivate (Off) the Traffic Sign
function to recognise the traffic signs
(no overtaking or speed limits).
For activation/deactivation, proceed as
follows:
- briefly press the MODE button: ON or
OFF flashes on the display (depending
the previous setting);
126
KNOWING THE INSTRUMENT PANEL
Page 149 of 387
Warning lights on
panelWhat it means What to do
amberGENERAL FAILURE INDICATION
(Versions with multifunction display)
The warning light turns on in the following
circumstances:
❒If the fuel inertia cut-off switch is activated
❒Light failure (rear fog lamps, direction
indicators, brake lights, number plate lights,
side lights, daytime lights, main beam
automatism, trailer direction indicators, trailer
side lights)The failure relating to these lights could be: one or
more blown bulbs, a blown protection fuse or a
break in the electrical connection.
❒Airbag warning light failure (generic failure
warning light flashing)In this case, the warning light may not indicate
any faults with the restraint systems. Before
continuing, contact a Fiat Dealership immediately
to have the system checked.
❒Rain sensor failure
❒Diesel filter sensor failure
❒Trailer connection failure
❒Audio system failure
❒Engine oil pressure sensor failure
❒Parking sensor failure
❒Water in diesel fuel filterContact a Fiat Dealership as soon as possible to
have the fault fixed.
145
Page 158 of 387
What it means What to do
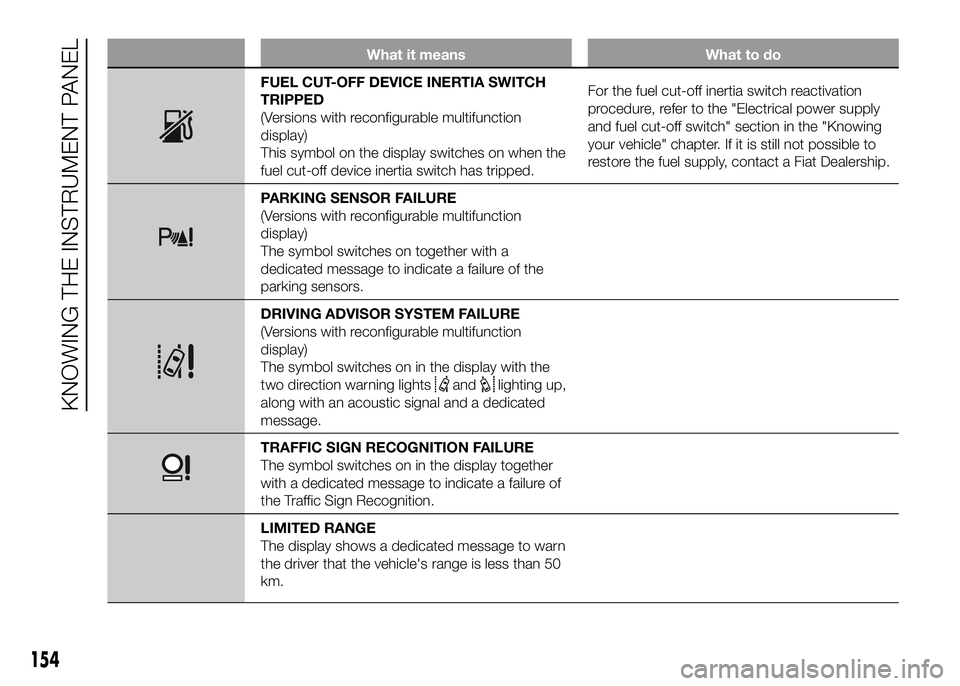
FUEL CUT-OFF DEVICE INERTIA SWITCH
TRIPPED
(Versions with reconfigurable multifunction
display)
This symbol on the display switches on when the
fuel cut-off device inertia switch has tripped.For the fuel cut-off inertia switch reactivation
procedure, refer to the "Electrical power supply
and fuel cut-off switch" section in the "Knowing
your vehicle" chapter. If it is still not possible to
restore the fuel supply, contact a Fiat Dealership.
PARKING SENSOR FAILURE
(Versions with reconfigurable multifunction
display)
The symbol switches on together with a
dedicated message to indicate a failure of the
parking sensors.
DRIVING ADVISOR SYSTEM FAILURE
(Versions with reconfigurable multifunction
display)
The symbol switches on in the display with the
two direction warning lights
andlighting up,
along with an acoustic signal and a dedicated
message.
TRAFFIC SIGN RECOGNITION FAILURE
The symbol switches on in the display together
with a dedicated message to indicate a failure of
the Traffic Sign Recognition.
LIMITED RANGE
The display shows a dedicated message to warn
the driver that the vehicle's range is less than 50
km.
154
KNOWING THE INSTRUMENT PANEL
Page 194 of 387
Traffic and road
conditions
Rather high consumption levels are
linked to situations with heavy traffic, for
instance when travelling in queues
with frequent use of the lower gears or
in cities with many traffic lights. Winding
mountain roads and rough road
surfaces also adversely affect
consumption.
Stops in traffic
During prolonged hold-ups (e.g. level
crossings) the engine should be
switched off.TOWING TRAILERS
IMPORTANT
INFORMATION
The vehicle must be provided with a
type-approved tow hook and adequate
electrical system to tow caravans or
trailers. Installation should be carried
out by specialised personnel who
will issue the required papers for
travelling on roads.
Install any specific and/or additional
door mirrors as specified by the
Highway Code.
Remember that when towing a trailer,
steep hills are harder to climb, the
braking spaces increase and overtaking
takes longer depending on the overall
weight.
Engage a low gear when driving
downhill, rather than constantly using
the brake.
The weight of the trailer on the vehicle
tow hook will reduce the loading
capacity of the vehicle by the same
amount. Consider the weight of the
trailer fully laden, including accessories
and luggage, to make sure you do
not exceed the maximum towable
weight (shown on the vehicle
registration document).Do not exceed the speed limits specific
to each country you are driving in, in
the case of vehicles towing trailers.
In any case, the top speed must not
exceed 100 km/h.
You are advised to fit a suitable
stabiliser to the trailer drawbar.
In the vehicles equipped with parking
sensors, after fitting the tow hook
malfunctioning warnings may be
displayed, as some parts (tow bar, ball
tow hook) may be within the sensor
detection range. In this case the
detection range must be adjusted or
the parking assistance function must be
deactivated.
140) 141)
INSTALLING THE TOW
HOOK
The towing device should be fastened
to the body by specialised personnel
according to any additional and/or
integrative information supplied by the
Manufacturer of the device.
The towing device must meet current
regulations with reference to Directive
94/20/EC and subsequent
amendments.
For any version the towing device used
must match the towable weight of the
vehicle on which it is to be installed.
190
STARTING AND DRIVING
Page 195 of 387
For the electric connection a standard
connector should be used which is
generally placed on a special bracket
normally fastened to the towing device,
and a special ECU for external trailer
light control must be installed on the
vehicle. For the electrical connection, 7
or 13 pin 12 V DC connections are to
be used (CUNA/UNI and ISO/DIN
Standards). Follow the instructions
provided by the vehicle manufacturer
and/or the tow hitch manufacturer.
An electric brake (or electric winch)
should be supplied directly by the
battery through a cable with a cross
section of no less than 2.5 mm
2.
IMPORTANT Electric brakes or other
devices must be used with engine
running.
In addition to the electrical branches,
the vehicle's electric system can only
be connected to the supply cable for an
electric brake and to the cable for an
internal light, though not above 15
W. For connections use the preset
control unit with battery cable no less
than 2.5 mm
2.IMPORTANT The trailer tow hook
contributes to the length of the vehicle.
When installing on long wheelbase
versions, it is only possible to install
removable tow hooks because the total
vehicle length limit of 6 metres is
exceeded.
If no trailer is fitted, the hook must be
removed from the attachment base and
it must not exceed the vehicle's
original length.
IMPORTANT If you wish to leave the
tow hook fitted without towing a trailer,
it is advisable to contact a Fiat
Dealership for the relevant system
update operations because the tow
hook could be detected as an obstacle
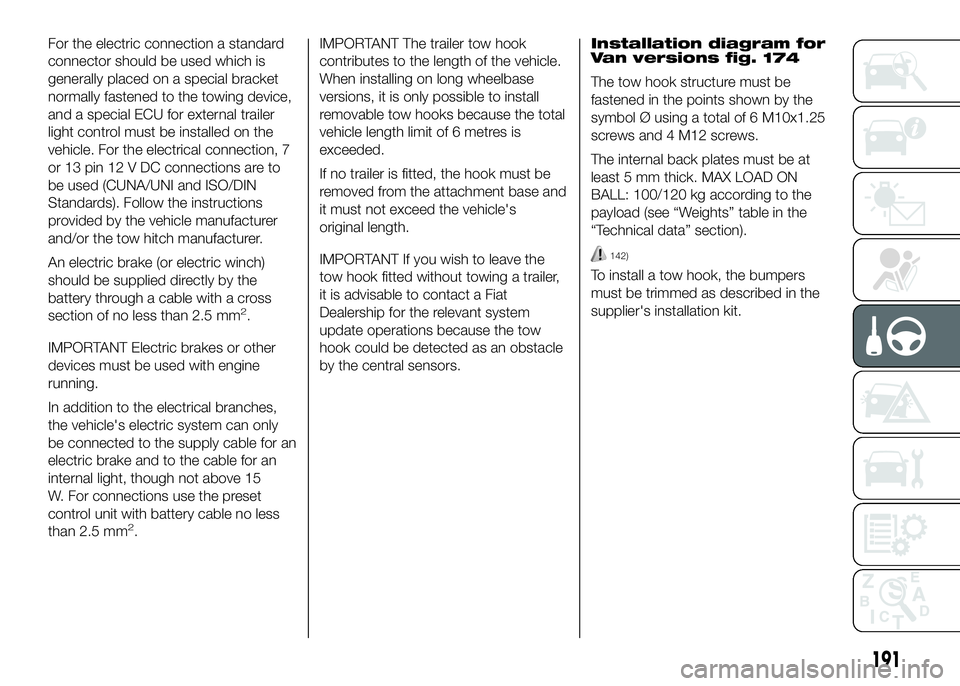
by the central sensors.Installation diagram for
Van versions fig. 174
The tow hook structure must be
fastened in the points shown by the
symbol Ø using a total of 6 M10x1.25
screws and 4 M12 screws.
The internal back plates must be at
least 5 mm thick. MAX LOAD ON
BALL: 100/120 kg according to the
payload (see “Weights” table in the
“Technical data” section).
142)
To install a tow hook, the bumpers
must be trimmed as described in the
supplier's installation kit.
191
Page 230 of 387
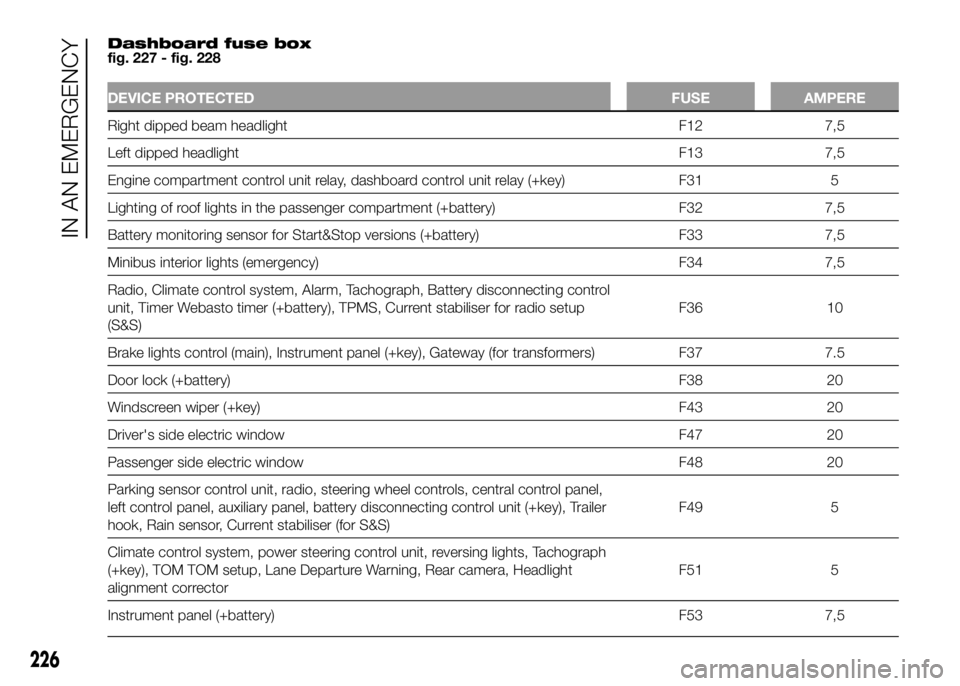
Dashboard fuse box
fig. 227 - fig. 228
DEVICE PROTECTED FUSE AMPERE
Right dipped beam headlight F12 7,5
Leftdipped headlight F13 7,5
Engine compartment control unit relay, dashboard control unit relay (+key) F31 5
Lighting of roof lights in the passenger compartment (+battery) F32 7,5
Battery monitoring sensor for Start&Stop versions (+battery) F33 7,5
Minibus interior lights (emergency) F34 7,5
Radio, Climate control system, Alarm, Tachograph, Battery disconnecting control
unit, Timer Webasto timer (+battery), TPMS, Current stabiliser for radio setup
(S&S)F36 10
Brake lights control (main), Instrument panel (+key), Gateway (for transformers) F37 7.5
Door lock (+battery) F38 20
Windscreen wiper (+key) F43 20
Driver's side electric window F47 20
Passenger side electric window F48 20
Parking sensor control unit, radio, steering wheel controls, central control panel,
left control panel, auxiliary panel, battery disconnecting control unit (+key), Trailer
hook, Rain sensor, Current stabiliser (for S&S)F49 5
Climate control system, power steering control unit, reversing lights, Tachograph
(+key), TOM TOM setup, Lane Departure Warning, Rear camera, Headlight
alignment correctorF51 5
Instrument panel (+battery) F53 7,5
226
IN AN EMERGENCY
Page 236 of 387
BATTERY
RECHARGING
IMPORTANT The battery recharging
procedure is given as information only.
You are advised to contact a Fiat
Dealership to have this operation
carried out.
IMPORTANT After turning the ignition
key to STOP and having closed the
driver side door, wait at least one
minute before disconnecting the
electrical supply from the battery. When
reconnecting the electrical supply to
the battery, make sure that the ignition
key is in the STOP position and the
driver side door is closed.
Charging should be slow at a low
ampere rating for approximately 24
hours. Charging for a longer time may
damage the battery.
174) 175)
IN THE ABSENCE OF
START&STOP SYSTEM
To recharge, proceed as follows:
❒disconnect the negative battery
terminal;
❒connect the charger cables to the
battery terminals, observing the
polarity;
❒turn on the charger;
❒when it is recharged, turn the charger
off before disconnecting it from the
battery;
❒reconnect the negative battery
terminal.
WITH START&STOP
SYSTEM
To recharge, proceed as follows:
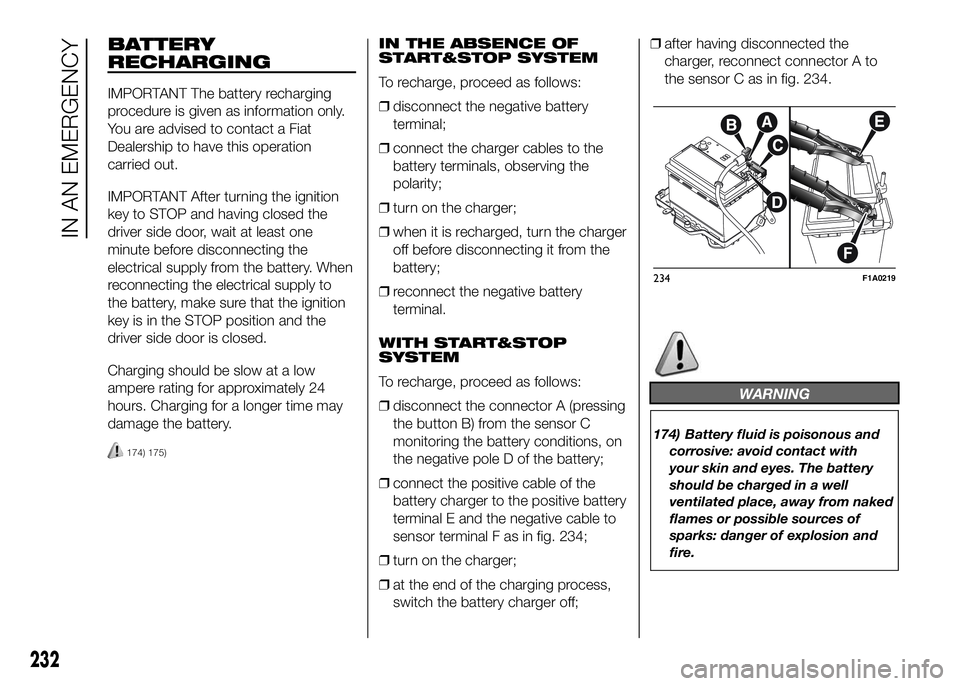
❒disconnect the connector A (pressing
the button B) from the sensor C
monitoring the battery conditions, on
the negative pole D of the battery;
❒connect the positive cable of the
battery charger to the positive battery
terminal E and the negative cable to
sensor terminal F as in fig. 234;
❒turn on the charger;
❒at the end of the charging process,
switch the battery charger off;❒after having disconnected the
charger, reconnect connector A to
the sensor C as in fig. 234.
WARNING
174) Battery fluid is poisonous and
corrosive: avoid contact with
your skin and eyes. The battery
should be charged in a well
ventilated place, away from naked
flames or possible sources of
sparks: danger of explosion and
fire.
234F1A0219
232
IN AN EMERGENCY
Page 254 of 387
188) Do not travel with the
windscreen washer reservoir
empty: the windscreen washer is
essential for improving visibility.
189) Some commercial windscreen
washer additives are flammable.
The engine compartment contains
hot parts which could start a fire
on contact.
190) Do not release the cap from
the extension without previously
extracting the system using the
ring.
191) Brake fluid is poisonous and
highly corrosive. In the event of
accidental contact, immediately
wash the affected parts with
water and mild soap. Then rinse
thoroughly. Call a doctor
immediately if swallowed.
192) The
symbol on the container
indicates a synthetic brake fluid,
which is different from a mineral
fluid. Using a mineral fluid will
damage the special rubber seals
of the braking system beyond
repair.
193) Prevent power steering fluid
from coming into contact with
hot engine parts: it is flammable.
IMPORTANT
3) Power steering fluid consumption
is extremely low; if another top-up
is required after only a short
period of time, have the system
checked for leaks at a Fiat
Dealership.
AIR CLEANER/
POLLEN FILTER
Have the air cleaner replaced by a Fiat
Dealership.
AIR CLEANER – DUSTY
ROADS
(for versions/markets, where provided)
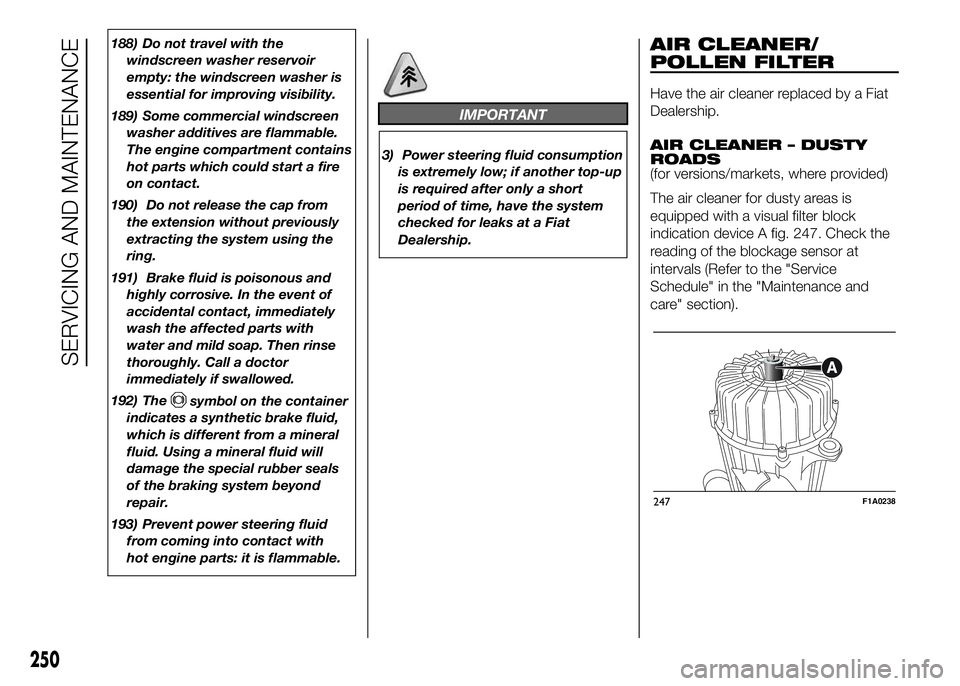
The air cleaner for dusty areas is
equipped with a visual filter block
indication device A fig. 247. Check the
reading of the blockage sensor at
intervals (Refer to the "Service
Schedule" in the "Maintenance and
care" section).
247F1A0238
250
SERVICING AND MAINTENANCE
Page 258 of 387
WHEELS AND TYRES
Check the pressure of each tyre,
including the space-saver wheel,
approximately every two weeks and
before long journeys: the pressure
should be checked with the tyre rested
and cold.
It is normal for the pressure to increase
when the vehicle is used; for the correct
tyre inflation pressure, see “Wheels” in
the “Technical specifications” section.
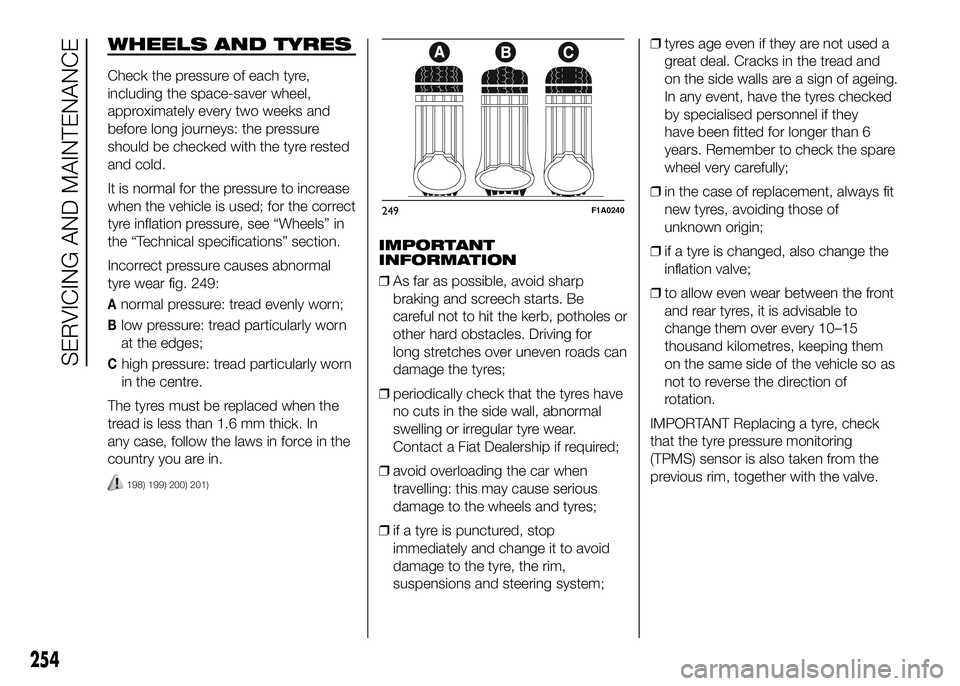
Incorrect pressure causes abnormal
tyre wear fig. 249:
Anormal pressure: tread evenly worn;
Blow pressure: tread particularly worn
at the edges;
Chigh pressure: tread particularly worn
in the centre.
The tyres must be replaced when the
tread is less than 1.6 mm thick. In
any case, follow the laws in force in the
country you are in.
198) 199) 200) 201)
IMPORTANT
INFORMATION
❒As far as possible, avoid sharp
braking and screech starts. Be
careful not to hit the kerb, potholes or
other hard obstacles. Driving for
long stretches over uneven roads can
damage the tyres;
❒periodically check that the tyres have
no cuts in the side wall, abnormal
swelling or irregular tyre wear.
Contact a Fiat Dealership if required;
❒avoid overloading the car when
travelling: this may cause serious
damage to the wheels and tyres;
❒if a tyre is punctured, stop
immediately and change it to avoid
damage to the tyre, the rim,
suspensions and steering system;❒tyres age even if they are not used a
great deal. Cracks in the tread and
on the side walls are a sign of ageing.
In any event, have the tyres checked
by specialised personnel if they
have been fitted for longer than 6
years. Remember to check the spare
wheel very carefully;
❒in the case of replacement, always fit
new tyres, avoiding those of
unknown origin;
❒if a tyre is changed, also change the
inflation valve;
❒to allow even wear between the front
and rear tyres, it is advisable to
change them over every 10–15
thousand kilometres, keeping them
on the same side of the vehicle so as
not to reverse the direction of
rotation.
IMPORTANT Replacing a tyre, check
that the tyre pressure monitoring
(TPMS) sensor is also taken from the
previous rim, together with the valve.
249F1A0240
254
SERVICING AND MAINTENANCE
Page 383 of 387
INDEX
A
BS .............................................. 81
Additional heater ............................ 41
Additional rear climate control
(Panorama/Combi) ....................... 47
Additional rear heating
(Panorama/Combi) ....................... 46
Advice for extending battery life...... 252
Air cleaner ...................................... 250
Air suspension ............................... 69
Arrangement possibilities for
Universal Isofix child restraint
system on seats of vehicle ........... 170
Ashtray .......................................... 66
ASR system ................................... 83
ASR (system) ................................. 83
Automatic climate control
system ......................................... 35
Automatic headlight sensor ............ 51
Battery (disconnector) ................... 61
Battery disconnector ...................... 61
Battery
– Replacement ............................. 251
Battery (recharging) ........................ 232
Battery replacement ....................... 251
body paintwork identification
plate............................................. 263
Bodywork
– Advice for preserving the
bodywork .................................. 257– Exterior and underbody
warranty .................................... 257
– Protection from atmospheric
agents ....................................... 257
Bodywork version .......................... 264
Bonnet ........................................... 78
Bottle replacement ......................... 211
Brake fluid ...................................... 249
Brakes
– specifications ............................ 269
Bulbs
– types of bulbs ........................... 214
Bump starting ................................ 202
Cab glove compartment ............... 68
Capucine ....................................... 68
Carrying children safely
– Arrangement possibilities for
child restraint systems ............... 166
– Child restraint systems .............. 164
– Safety regulations ...................... 167
Central locking ............................... 61
Changing a bulb............................. 212
Changing an interior bulb ............... 221
Chassis marking ............................ 262
Checking and restoring pressure .... 210
Checking levels .............................. 243
Cigar lighter.................................... 65
Clutch ............................................ 268
CO2 emissions............................... 345Compartment beneath
passenger side front seat ............. 65
Controls ......................................... 59
Cruise Control ................................ 54
Daytime Running Lights ................ 48
Dead lock ...................................... 72
Demanding vehicle use .................. 242
Desk/Book rest .............................. 67
Diesel particulate filter (DPF) ........... 113
Diffusers ......................................... 29
Dimensions .................................... 274
Dipped headlights .................... 48-217
Direction indicators ................... 50-218
Display
– Standard screen ........................ 122
Door pockets ................................. 64
Doors ............................................. 71
DPF (particulate filter) ..................... 113
Driving Advisor (system) ................. 90
Driving style.................................... 189
Electric windows ........................... 77
Electronic alarm ............................. 14
Engine codes ................................. 264
Engine coolant ............................... 247
Engine coolant temperature
indicator ....................................... 120
Engine............................................ 266
Engine marking .............................. 263
Engine oil ....................................... 247