ECO mode FIAT DUCATO 244 2002 3.G Connect NavPlus Manual
[x] Cancel search | Manufacturer: FIAT, Model Year: 2002, Model line: DUCATO 244, Model: FIAT DUCATO 244 2002 3.GPages: 246, PDF Size: 3.39 MB
Page 121 of 246
CONNECT Nav
120
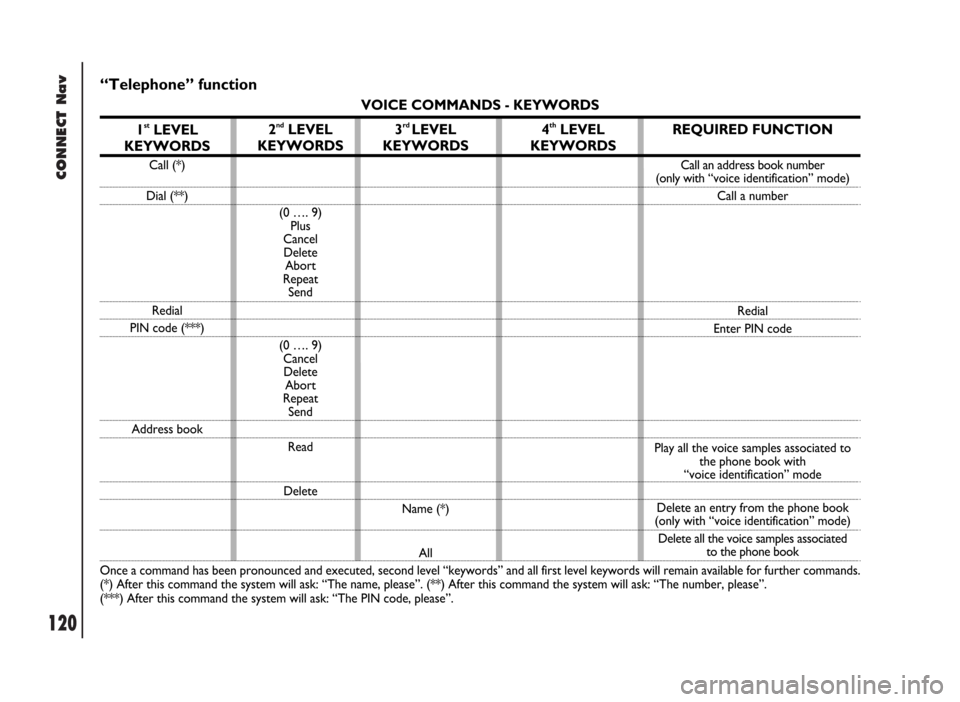
“Telephone” function
VOICE COMMANDS - KEYWORDS
1
stLEVEL
KEYWORDS
Call (*)
Dial (**)
Redial
PIN code (***)
Address book
Once a command has been pronounced and executed, second level “keywords” and all first level keywords will remain available for further commands.
(*) After this command the system will ask: “The name, please”. (**) After this command the system will ask: “The number, please”.
(***) After this command the system will ask: “The PIN code, please”.
2ndLEVEL
KEYWORDS
(0 …. 9)
Plus
Cancel
Delete
Abort
Repeat
Send
(0 …. 9)
Cancel
Delete
Abort
Repeat
Send
Read
Delete
3rd LEVEL
KEYWORDS
Name (*)
All
4thLEVEL
KEYWORDSREQUIRED FUNCTION
Call an address book number
(only with“voice identification” mode)
Call a number
Redial
Enter PIN code
Play all the voice samples associated to
the phone book with
“voice identification” mode
Delete an entry from the phone book
(only with “voice identification” mode)
Delete all the voice samples associated
to the phone book
Page 126 of 246
CONNECT Nav
125
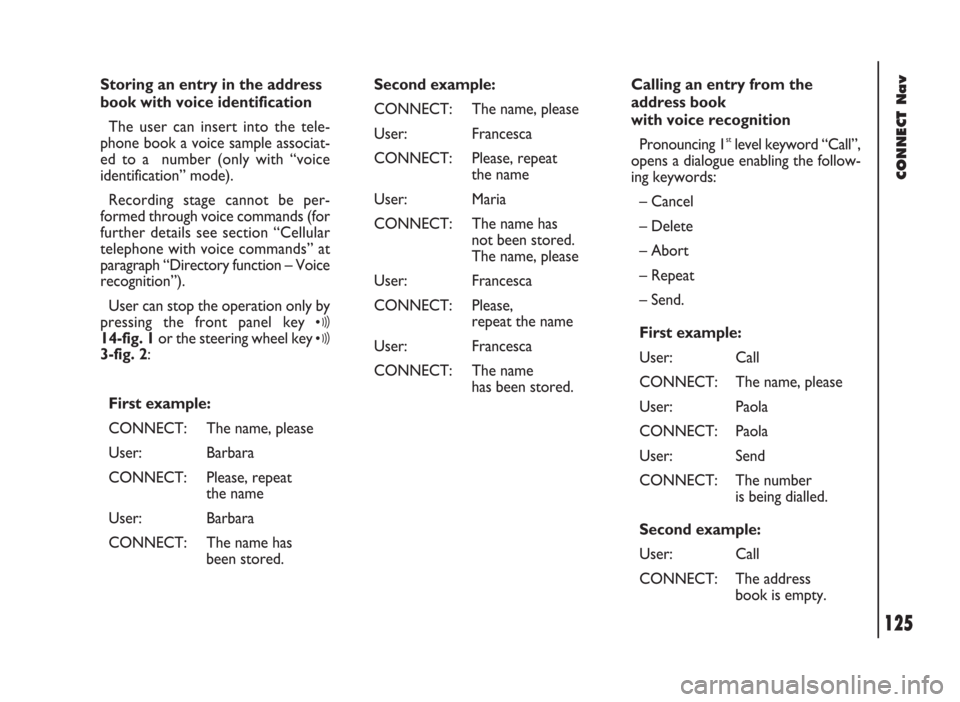
Storing an entry in the address
book with voice identification
The user can insert into the tele-
phone book a voice sample associat-
ed to a number (only with “voice
identification” mode).
Recording stage cannot be per-
formed through voice commands (for
further details see section “Cellular
telephone with voice commands” at
paragraph “Directory function – Voice
recognition”).
User can stop the operation only by
pressing the front panel key
ô14-fig. 1or the steering wheel key ô3-fig. 2:
First example:
CONNECT: The name, please
User: Barbara
CONNECT: Please, repeat
the name
User: Barbara
CONNECT: The name has
been stored.Second example:
CONNECT: The name, please
User: Francesca
CONNECT: Please, repeat
the name
User: Maria
CONNECT: The name has
not been stored.
The name, please
User: Francesca
CONNECT: Please,
repeat the name
User: Francesca
CONNECT: The name
has been stored.Calling an entry from the
address book
with voice recognition
Pronouncing 1
stlevel keyword “Call”,
opens a dialogue enabling the follow-
ing keywords:
– Cancel
– Delete
– Abort
– Repeat
– Send.
First example:
User: Call
CONNECT: The name, please
User: Paola
CONNECT: Paola
User: Send
CONNECT: The number
is being dialled.
Second example:
User: Call
CONNECT: The address
book is empty.
Page 131 of 246
CONNECT Nav
130
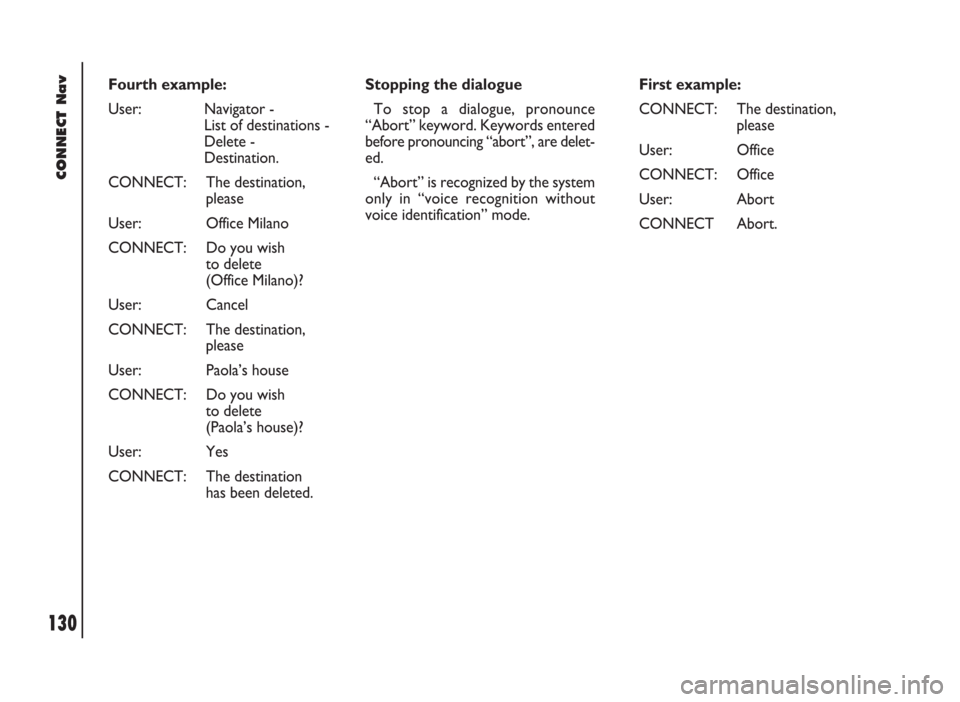
First example:
CONNECT: The destination,
please
User: Office
CONNECT: Office
User: Abort
CONNECT Abort. Fourth example:
User: Navigator -
List of destinations -
Delete -
Destination.
CONNECT: The destination,
please
User: Office Milano
CONNECT: Do you wish
to delete
(Office Milano)?
User: Cancel
CONNECT: The destination,
please
User: Paola’s house
CONNECT: Do you wish
to delete
(Paola’s house)?
User: Yes
CONNECT: The destination
has been deleted.Stopping the dialogue
To stop a dialogue, pronounce
“Abort” keyword. Keywords entered
before pronouncing “abort”, are delet-
ed.
“Abort” is recognized by the system
only in “voice recognition without
voice identification” mode.
Page 145 of 246

CONNECT Nav+
144
E.A.T. ..................................................................................... 218
VOICE RECOGNITION........................................... 219
GENERAL INFORMATION ........................................... 219
VOICE COMMANDS ...................................................... 220
Keywords – summary ....................................................... 220
VOICE COMMAND EXAMPLES .................................. 226
INFO AND ASSISTANCE SERVICES.............. 232
Infomobility function ......................................................... 233
Medical advice function .................................................... 235
Roadside assistance function ........................................... 236
Personal number function ............................................... 236
Emergency 112 function ................................................... 237
Settings functions ............................................................... 237
Calls for medical advice or
roadside assistance ............................................................ 238
TELECAMERA............................................................... 239
MAIN mode ........................................................................ 239
AUDIO mode ..................................................................... 240NAV mode .......................................................................... 241
Information and assistance service mode .................... 241
Voice recognition mode ................................................... 241
Page 150 of 246

CONNECT Nav+
149
FRONT PANEL CONTROLS fig. 1
Certain controls have multiple functions which depend on the system operating conditions active. Turning on the function
chosen is in some cases controlled by the push duration (short or long), as shown in the following table.
Legend Short push function Long push function (less than 1 second) (more than 1 second)
1 - 2 - 3 Numbers “1”, “2”, “3”, “4”, “5”, “6” of phone keypad Storing stations no.1-2-3-4-5-6
4 - 5 - 6Calling stored stations
7Number “7” of telephone keypad –
8Number “8” of telephone keypad –
9Number “9” of telephone keypad –
10Number “0” of telephone keypad Pause in playing an audio CD
Play/Stop audio CD
11 - *Symbol (*) of telephone keypad –
Radio mode: seeking first station
that can be tuned with lower frequency
CD mode: select previous track
12 - #Symbol (#) of telephone keypad –
Radio mode: seeking first station
that can be tuned with higher frequency
CD mode: select next track
13 -
òForwarding the phone call set Refusing the incoming call
Accepting the incoming call
Ending the call in progress
14 -ôVoice recognition function on/off Voice command memo
Page 151 of 246

CONNECT Nav+
150
Legend Short push function Long push function (less than 1 second) (more than 1 second)
15 - SRCOperating mode choice: –
FM1-FM2-FM3-LW-MW-CD
16System on/off (pressing the knob) –
Volume control (turning the knob)
17 - MAIN/DARKSelecting main screen Darkening monitor (stand-by)
18 - AUDIO/OFFSelecting radio screen. Turning radio on Turning radio off
19 - TEL/OFFSelecting phone screen. Turning telephone on Turning telephone off
20 - NAV/MUTESelecting navigation function Excluding navigator voice messages
(NAV/MUTE function)
Reset voice messages
21 - TRIPSelecting computer screen –
22Selecting functions (turning the knob). Confirming selected –
function (pressing the knob). Drop-down menu
on (pressing the knob with MAIN or navigation screen)
23 - ESCExit screen selected. Return to higher level –
of menu, deleting functions that have not been confirmed
24 - RPTRepetition of last navigator voice instruction –
25 -•Display of Information and Assistance Services menu –
26 -˚Eject navigator CD-ROM or Audio CD –
27Slot for SIM telephone card –
28Slot for navigator CD-ROM and Audio CD –
Page 156 of 246

CONNECT Nav+
155
CHOOSING THE
OPERATING MODE
The operating mode is selected
pressing one of the following keys
fig. 1:
– MAIN key 17= MAIN SCREEN
– AUDIO key 18= RADIO WITH
CD PLAYER
– TEL key 19= TELEPHONE
– NAV key 20= NAVIGATOR
– key 14= VOICE RECOGNITION
– TRIP key 21= ON-BOARD
COMPUTER
– key •25= CALL FOR INFOR-
MATION AND ASSISTANCE.
For each operating mode the corre-
sponding menu is shown on the dis-
play.CHOOSING THE MENU
FUNCTIONS
The different operating modes of the
CONNECT Nav+ allow access to dif-
ferent menus, with functions that in
turn show other submenus on the dis-
play and so on.
The procedures for choosing and
confirming the functions of the differ-
ent menus and submenus are howev-
er the same and they are described be-
low.
To go back to the previous screen
from a submenu or to exit the various
operating modes, press “ESC” 23-
fig. 1.Choosing a function
To select a function of the menu on
the display, simply turn the knob 22-
fig. 1in one of the two directions un-
til showing the function required.
Confirming the function chosen
To confirm the function selected,
press the knob 22-fig. 1.
IMPORTANTOn the menu or
submenu pages showing “OK”, to
store the functions chosen it is nec-
essary to exit the corresponding
screen confirming the “OK” function.
Leaving the page of the menu or sub-
menu with the “ESC” key 23-fig. 1,
the previous functions are restored in-
stead of the new settings.
Page 157 of 246
CONNECT Nav+
156
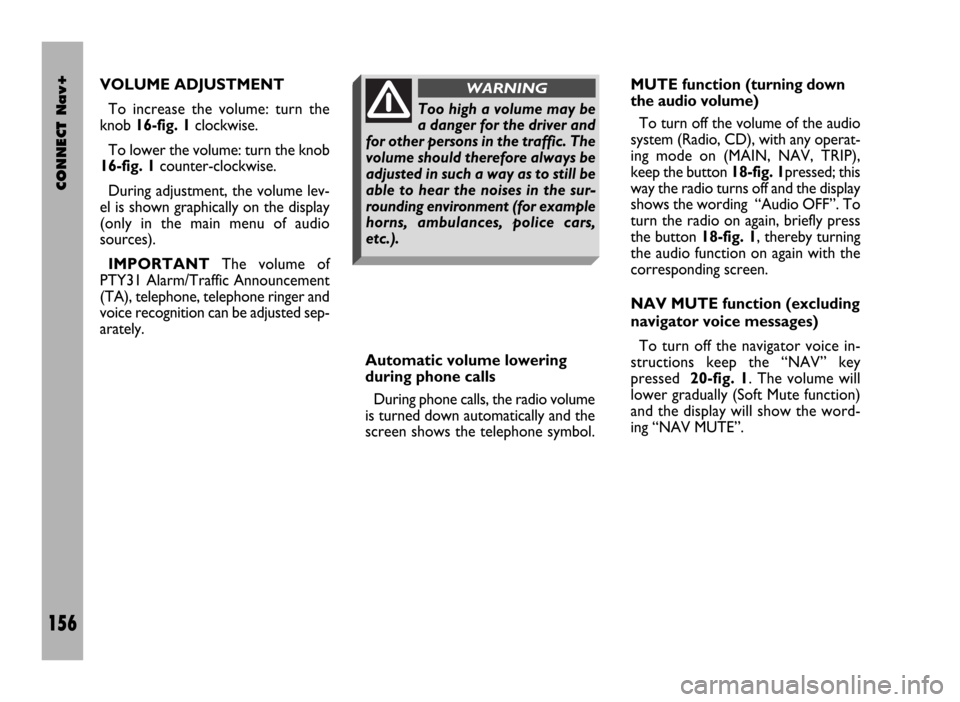
VOLUME ADJUSTMENT
To increase the volume: turn the
knob 16-fig. 1clockwise.
To lower the volume: turn the knob
16-fig. 1counter-clockwise.
During adjustment, the volume lev-
el is shown graphically on the display
(only in the main menu of audio
sources).
IMPORTANTThe volume of
PTY31 Alarm/Traffic Announcement
(TA), telephone, telephone ringer and
voice recognition can be adjusted sep-
arately.
Automatic volume lowering
during phone calls
During phone calls, the radio volume
is turned down automatically and the
screen shows the telephone symbol.MUTE function (turning down
the audio volume)
To turn off the volume of the audio
system (Radio, CD), with any operat-
ing mode on (MAIN, NAV, TRIP),
keep the button 18-fig. 1pressed; this
way the radio turns off and the display
shows the wording “Audio OFF”. To
turn the radio on again, briefly press
the button 18-fig. 1, thereby turning
the audio function on again with the
corresponding screen.
NAV MUTE function (excluding
navigator voice messages)
To turn off the navigator voice in-
structions keep the “NAV” key
pressed 20-fig. 1. The volume will
lower gradually (Soft Mute function)
and the display will show the word-
ing “NAV MUTE”.
Too high a volume may be
a danger for the driver and
for other persons in the traffic. The
volume should therefore always be
adjusted in such a way as to still be
able to hear the noises in the sur-
rounding environment (for example
horns, ambulances, police cars,
etc.).
WARNING
Page 161 of 246
CONNECT Nav+
160
DROP-DOWN
MENU
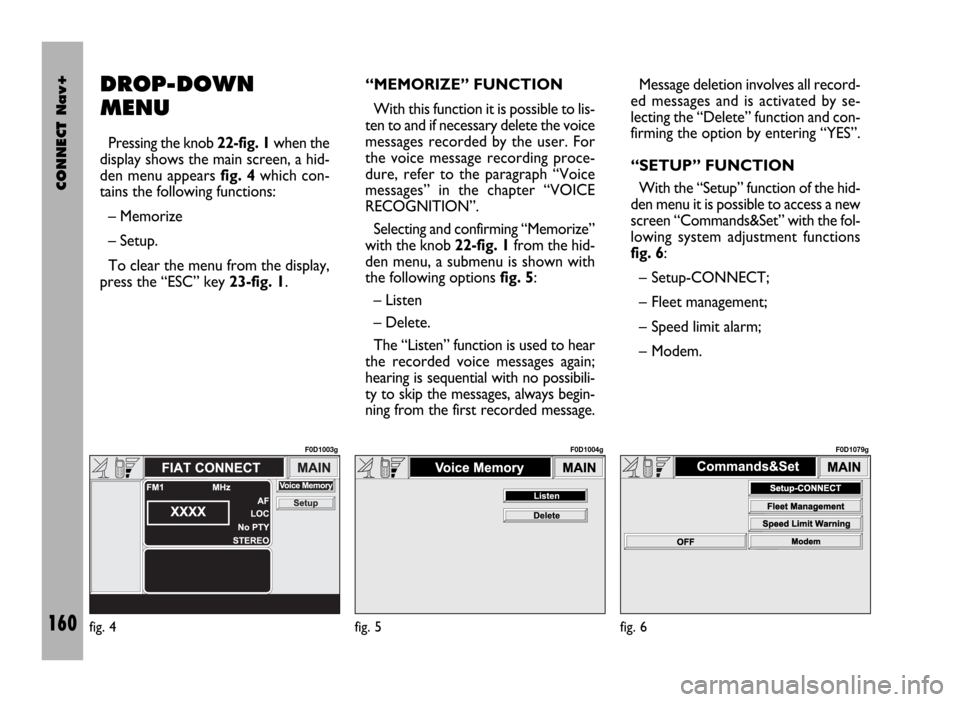
Pressing the knob 22-fig. 1when the
display shows the main screen, a hid-
den menu appears fig. 4which con-
tains the following functions:
– Memorize
– Setup.
To clear the menu from the display,
press the “ESC” key 23-fig. 1.“MEMORIZE” FUNCTION
With this function it is possible to lis-
ten to and if necessary delete the voice
messages recorded by the user. For
the voice message recording proce-
dure, refer to the paragraph “Voice
messages” in the chapter “VOICE
RECOGNITION”.
Selecting and confirming “Memorize”
with the knob 22-fig. 1from the hid-
den menu, a submenu is shown with
the following options fig. 5:
– Listen
– Delete.
The “Listen” function is used to hear
the recorded voice messages again;
hearing is sequential with no possibili-
ty to skip the messages, always begin-
ning from the first recorded message.Message deletion involves all record-
ed messages and is activated by se-
lecting the “Delete” function and con-
firming the option by entering “YES”.
“SETUP” FUNCTION
With the “Setup” function of the hid-
den menu it is possible to access a new
screen “Commands&Set” with the fol-
lowing system adjustment functions
fig. 6:
– Setup-CONNECT;
– Fleet management;
– Speed limit alarm;
– Modem.
fig. 4
F0D1003g
fig. 5
F0D1004g
fig. 6
F0D1079g
Page 169 of 246

CONNECT Nav+
168
IMPORTANTStarting the engine
when the modem function is on, will
cause the connection drop with data
loss as a consequence. Stooping the
engine has no effect on data transmis-
sion since the CONNECT Nav+ will
stay on for other 20 minutes. If a GSM
communication is in progress the sys-
tem will automatically activate a new
window for other 20 minutes. Long
GSM communications (with data
transmission) can run down the vehi-
cle battery.
Operation requirements
The modem function is operational
if the following conditions are present:
– CONNECT Nav+ on;
– SIM card inserted;
– sufficient credit;
– GSM coverage.Portable computer setting
SERIAL PORT SETTING
The computer serial port shall be set
for 9600bps data transmission speed.
For “Windows 95” proceed as fol-
lows:
– open “computer resources”
– open “control panel”
– open “system”
– open “peripheral control”
– select “com and LPT ports”
– select “COM1 communications
port”
– select “port setting”
– check: bit per second = 9600
data bit = 8
parity = no parity
stop bit = 1
flow control = Xon/Xoff
MODEM SETTING
The portable computer shall have the
modem. For “Windows 95” proceed
as follows:
– open “computer resources”
– open “control panel”
– open “modem”:
select add
select “modem types” = other
select “next” and follow the dis-
played instructions.