ECO mode FIAT DUCATO 244 2002 3.G Connect NavPlus Manual
[x] Cancel search | Manufacturer: FIAT, Model Year: 2002, Model line: DUCATO 244, Model: FIAT DUCATO 244 2002 3.GPages: 246, PDF Size: 3.39 MB
Page 173 of 246

CONNECT Nav+
172
The audio system is turned on by
pressing briefly the “AUDIO” key 18-
fig. 1which displays the main func-
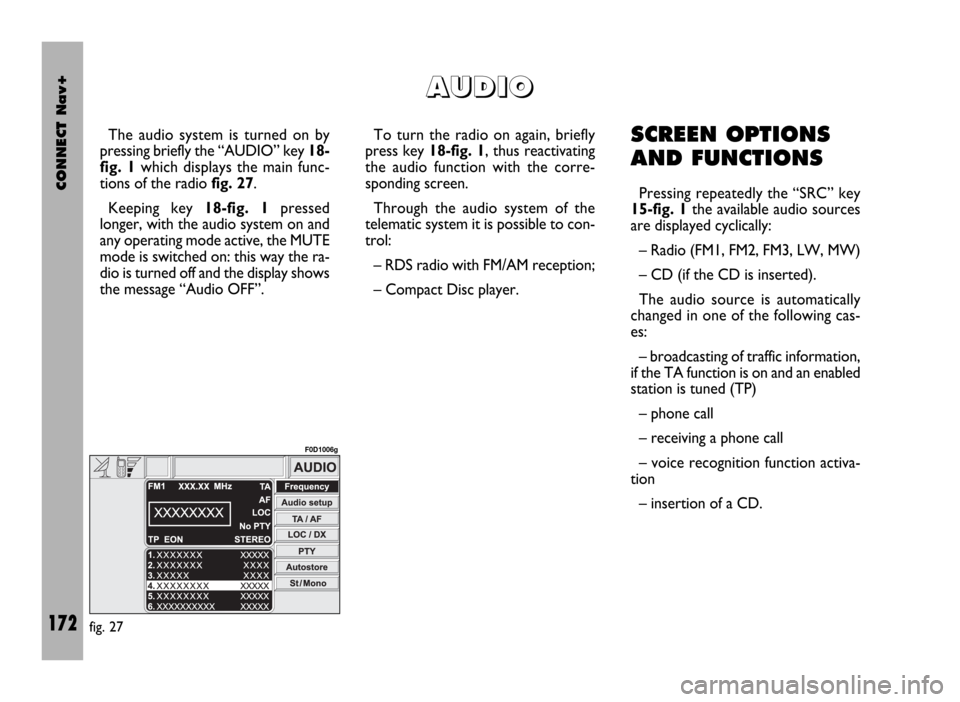
tions of the radio fig. 27.
Keeping key 18-fig. 1pressed
longer, with the audio system on and
any operating mode active, the MUTE
mode is switched on: this way the ra-
dio is turned off and the display shows
the message “Audio OFF”. To turn the radio on again, briefly
press key 18-fig. 1, thus reactivating
the audio function with the corre-
sponding screen.
Through the audio system of the
telematic system it is possible to con-
trol:
– RDS radio with FM/AM reception;
– Compact Disc player.SCREEN OPTIONS
AND FUNCTIONS
Pressing repeatedly the “SRC” key
15-fig. 1the available audio sources
are displayed cyclically:
– Radio (FM1, FM2, FM3, LW, MW)
– CD (if the CD is inserted).
The audio source is automatically
changed in one of the following cas-
es:
– broadcasting of traffic information,
if the TA function is on and an enabled
station is tuned (TP)
– phone call
– receiving a phone call
– voice recognition function activa-
tion
– insertion of a CD.
A A
U U
D D
I I
O O
fig. 27
F0D1006g
Page 181 of 246

CONNECT Nav+
180
“LOC/DX” FUNCTION
(TUNER SENSITIVITY
ADJUSTMENT)
With this function it is possible to
change the sensitivity of automatic ra-
dio station searching. When low sen-
sitivity “LOC” is set, only stations with
excellent reception are sought; when
high sensitivity “DX” is set, all the sta-
tions are sought. If you are in an area
with a large number of broadcasters
and you want the ones with the
strongest signal, choose low sensitivi-
ty “LOC”.
To choose between low or high
tuner sensitivity, repeatedly press the
knob 22-fig. 1after selecting the
“LOC/DX” function. The abbreviation
of the sensitivity chosen will be shown
on the display:
– LOC = low sensitivity;
– DX = high sensitivity.“PTY” FUNCTION
(CHOOSING A TYPE OF
PROGRAMME)
The PTY function (Program Type),
when present, makes it possible to
give priority to broadcasters trans-
mitting programmes classified accord-
ing to the type of PTY. PTY pro-
grammes may concern emergency an-
nouncements or various subjects (e.g.
music, news). To access the list of PTY
programmes, choose the and confirm
the PTY function with the knob 22-
fig. 1; the display will show the screen
with the list of PTY programmes
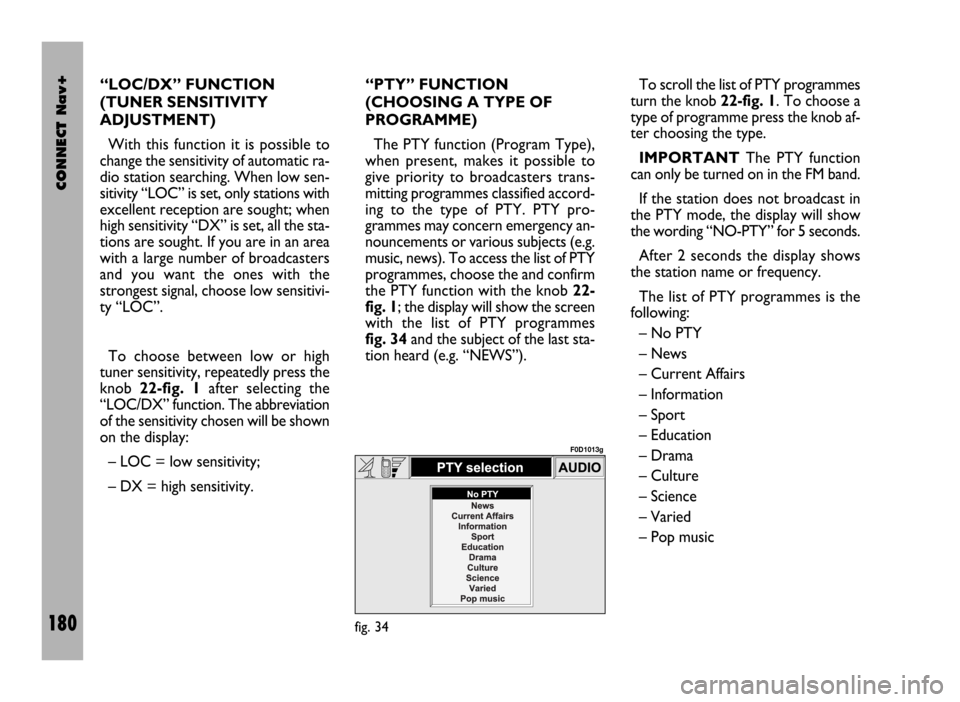
fig. 34and the subject of the last sta-
tion heard (e.g. “NEWS”). To scroll the list of PTY programmes
turn the knob 22-fig. 1. To choose a
type of programme press the knob af-
ter choosing the type.
IMPORTANTThe PTY function
can only be turned on in the FM band.
If the station does not broadcast in
the PTY mode, the display will show
the wording “NO-PTY” for 5 seconds.
After 2 seconds the display shows
the station name or frequency.
The list of PTY programmes is the
following:
– No PTY
– News
– Current Affairs
– Information
– Sport
– Education
– Drama
– Culture
– Science
– Varied
– Pop music
fig. 34
F0D1013g
Page 185 of 246

CONNECT Nav+
184
“TA” FUNCTION
(TRAFFIC INFORMATION)
To turn the TA function (Traffic An-
nouncement) on/off while listening to
a CD, press the knob 22-fig. 1after
selecting the function.
For the description of the function,
refer to the corresponding paragraph
in the “RADIO MODE” chapter.
“SCAN” FUNCTION
(BRIEF PLAYBACK)
The “Scan” function is turned on/off
pressing the knob 22-fig. 1after se-
lecting the function.
When this function is on, all the CD
tracks are played for about 10 seconds
in the actual sequence on the CD.
Press the knob again to turn the
function off 22-fig. 1.
The “Scan” function is turned off au-
tomatically when “Shuffle” is turned on.“SHUFFLE” FUNCTION
(RANDOM PLAYBACK)
The “Shuffle” function is turned on/off
pressing the knob 22-fig. 1after se-
lecting the function.
With this function on, the CD tracks
are played in random sequence. To
turn the function off press the knob
again 22-fig. 1. The “Shuffle” function
is turned off automatically when the
“Scan” function is turned on.
“CD SETUP” MENU
Choosing and activating “CD setup”
with the knob 22-fig. 1access is
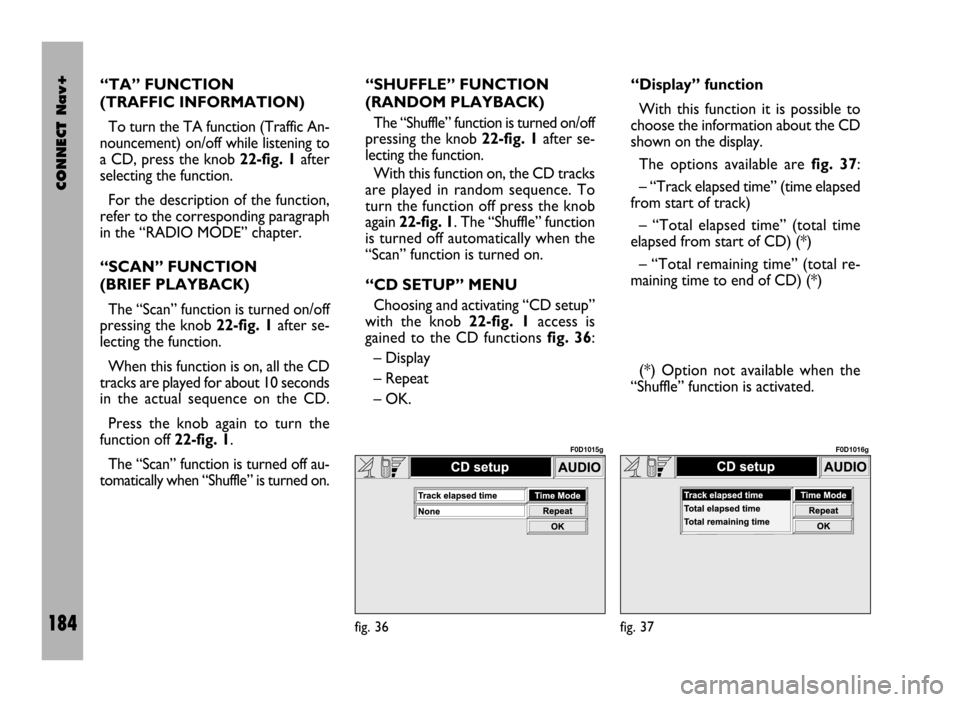
gained to the CD functions fig. 36:
– Display
– Repeat
– OK.“Display” function
With this function it is possible to
choose the information about the CD
shown on the display.
The options available are fig. 37:
– “Track elapsed time” (time elapsed
from start of track)
– “Total elapsed time” (total time
elapsed from start of CD) (*)
– “Total remaining time” (total re-
maining time to end of CD) (*)
(*) Option not available when the
“Shuffle” function is activated.
fig. 36
F0D1015g
fig. 37
F0D1016g
Page 190 of 246

CONNECT Nav+
189
– emergency call in progress warning
– credit available in case of a prepaid
SIM card (if the Network Provider
makes these data available).
During an incoming or outgoing call,
the lower part of the display provides
the following information:
– interlocutor’s name (if present in
the telephone directory) or telephone
number (for calls received, if available)
– interlocutor telephone number (if
made available by the network
provider)
– time from beginning of the call (mm
: ss - minutes and seconds).
Information provided in the display
lower part are replaced, at the end of
the call, by the telephone number di-
alling sector.ACCEPTING CALLS
Any incoming call while a conversa-
tion is in progress is shown on the dis-
play by the name (if present in the di-
rectory) and by the number (if avail-
able) of the caller and by the options
“Accept” or “Refuse”. To choose and
confirm the options use the knob 22-
fig. 1.
If the new call is accepted, the pre-
vious one will wait till the end of the
new call or till the interlocutor decides
to hang up.
If the incoming call is refused, the dis-
played message disappears and the
first telephone call continues with no
disturbance.
Incoming calls are signalled, regard-
less of the active mode of the inte-
grated system (radio, CD player etc.),
by a screen that shows the caller’s
name (if present in the directory) and
number (if available) and the prompt
to accept or refuse the call.
To accept the call, briefly press key
ò13-fig. 1, to refuse the call keep the
key pressed longer.
To interrupt a telephone call, press
key
ò13-fig. 1at length.TELEPHONE CALL
To make a telephone call, select the
“telephone” function using key 19-
fig. 1, then press key
ò13-fig. 1af-
ter dialling the telephone number us-
ing the keypad located on the control
panel left-hand side or after retriev-
ing it using one of the dedicated menu
functions (directory, frequent num-
bers, last received or called numbers).
When calling, the display left-hand
side shows information associated
with the call in progress, the vehicle
radio is switched off, connection is
made and, if the called person an-
swers, the call duration counter is
started.
To interrupt the forwarding of a
call, keep key
ò13-fig. 1pressed.
Page 196 of 246

CONNECT Nav+
195
Selecting a received message already
read or to be read, will display a new
screen with “Delete”, “Call” and “An-
swer” that shall be used to delete the
message, call the sender telephone
number or send him/her an answer
message. Press the “ESC” key to re-
turn to the previous screen 23-fig. 1.
“Center number” Function
This function is used to enter, the
SMS message service provider number
using the telephone keypad.
“NETWORK OPERATOR”
FUNCTION
This function, that may be accessed
from the second telephone menu
page, makes the following network
provider management options avail-
able:
– Select (to define the criteria for
choosing the operator)
– Operator (to select a provider,
when possible)
– OK (to confirm settings).“Select” function
This function is used to define the
criteria used to select the network
provider:
– Automatic
– Manual
– Preferential.
The “Automatic” provider selection
is performed directly by the telemat-
ic system based on the GSM field in-
tensity provided by each available
provider; therefore, the “Operator”
function is not available with this func-
tion.
The “Manual” selection allows the
user to select the preferred provider
using the “Operator” function but, in
case of insufficient GSM field, the tele-
phone will not be able to receive or
make calls.
The “Preferential” selection allows
the user to select the provider that the
system must select, using the “Oper-
ator” option, when the provided GSM
field is sufficient.“Operator” Function
This function is available in “Manu-
al” or “Preferential” mode only and it
is used to select and set the network
provider using knob 22-fig. 1.
“OK”
Selecting and confirming “OK” us-
ing knob 22-fig. 1the set type of se-
lection and provider name are stored.
“PIN” FUNCTION
This function is used to access the
“PIN” code setting page, through the
“Change PIN”, “Enable PIN Request”,
“Recall last PIN “ and “OK” options.
For obvious safety reasons in use of
the telephone, whenever the user
needs to access this menu functions,
the system requires entering the cur-
rent PIN.
Page 225 of 246

CONNECT Nav+
224
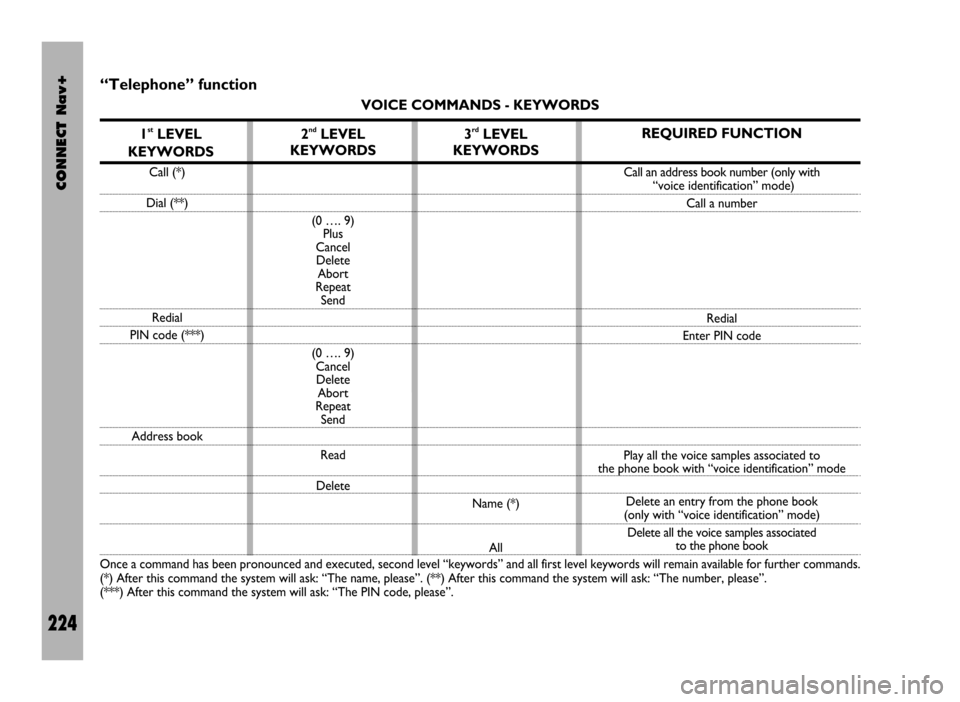
“Telephone” function
VOICE COMMANDS - KEYWORDS
1
stLEVEL
KEYWORDS
Call (*)
Dial (**)
Redial
PIN code (***)
Address book
Once a command has been pronounced and executed, second level “keywords” and all first level keywords will remain available for further commands.
(*) After this command the system will ask: “The name, please”. (**) After this command the system will ask: “The number, please”.
(***) After this command the system will ask: “The PIN code, please”.
3rdLEVEL
KEYWORDS
Name (*)
All
2ndLEVEL
KEYWORDS
(0 …. 9)
Plus
Cancel
Delete
Abort
Repeat
Send
(0 …. 9)
Cancel
Delete
Abort
Repeat
Send
Read
Delete
REQUIRED FUNCTION
Call an address book number (only with
“voice identification” mode)
Call a number
Redial
Enter PIN code
Play all the voice samples associated to
the phone book with “voice identification” mode
Delete an entry from the phone book
(only with “voice identification” mode)
Delete all the voice samples associated
to the phone book
Page 230 of 246

CONNECT Nav+
229
Storing an entry in the address
book with voice identification
The user can insert into the tele-
phone book a voice sample associat-
ed to a number (only with “voice
identification” mode).
Recording stage cannot be per-
formed through voice commands (for
further details see section “Cellular
telephone with voice commands” at
paragraph “Directory function – Voice
recognition”).
User can stop the operation only by
pressing the front panel key
ô2-fig. 1or the steering wheel key ô3-fig. 2:
First example:
CONNECT: The name, please
User: Barbara
CONNECT: Please, repeat
the name
User: Barbara
CONNECT: The name
has been stored.Second example:
CONNECT: The name, please
User: Francesca
CONNECT: Please, repeat
the name
User: Maria
CONNECT: The name has not
been stored.
The name, please
User: Francesca
CONNECT: Please, repeat
the name
User: Francesca
CONNECT: The name has
been stored.Calling an entry from
the address book
with voice recognition
Pronouncing 1
stlevel keyword “Call”,
opens a dialogue enabling the follow-
ing keywords:
– Cancel
– Delete
– Abort
– Repeat
– Send.
First example:
User: Call
CONNECT: The name, please
User: Paola
CONNECT: Paola
User: Send
CONNECT: The number
is being dialled.
Second example:
User: Call
CONNECT: The address book
is empty.
Page 232 of 246

CONNECT Nav+
231
Fourth example:
User: Address book -
Delete - Name
CONNECT: The name, please
User: Paola
CONNECT: Do you wish to
delete (Paola)?
User: Cancel
CONNECT: The name, please
User: Elena
CONNECT: Do you wish to
delete (Elena)?
User: Yes
CONNECT: The name has
been deleted.Stopping the dialogue
To stop a dialogue, pronounce
“Abort” keyword. Keywords entered
before pronouncing “abort”, are delet-
ed.
“Abort” is recognized by the system
only in “voice recognition without
voice identification” mode.First example:
CONNECT: The destination,
please
User: Office
CONNECT: Office
User: Abort
CONNECT Abort.
Page 241 of 246

CONNECT Nav+
240
AUDIO mode
When the telecamera image is dis-
played, the AUDIO mode is enabled:
– “AUDIO” key 18-fig. 1disabled;
– the active source (RADIO, CD)
stays on;
– audio volume setting, knob 16-fig.
1enabled;
– “SRC” key 15-fig. 1enabled;
– station tuning disabled.
TEL mode
When the telecamera image is dis-
played, the TEL mode is enabled:
– “TEL” key 19-fig. 1disabled;
– key ò13-fig. 1enabled.INCOMING CALL WITH DISPLAYED
TELECAMERA IMAGE
When the above condition occurs,
the following takes place:
– automatic display switching to TEL
mode display;
– incoming call number display (if
available);
– briefly press the òkey 13-fig. 1to
accept the incoming call or press it at
length to refuse the call. Just after
pressing the key (with reverse en-
gaged) the display returns to display
the telecamera image and if the in-
coming call is accepted the system will
enable the communication. If during
this phase there is another incoming
call, the display will show the TEL
mode again.
FORWARDING CALL WITH DISPLAYED
TELECAMERA IMAGE
Briefly press the òkey 13-fig. 1to
obtain the following:
– disable the telecamera image;
– display the last dialled number (see
“Cellular telephone” chapter); press
again the òkey 13-fig. 1to forward
a call within 10 seconds. Pressing
“ESC” 23-fig. 1will delete the last di-
alled number and activate the window
to be used for dialling (through the key-
pad) the required telephone number;
pressing the òkey 13-fig. 1again will
forward the call;
– press ESC 23-fig. 1at length to
return to the telecamera image (with
reverse gear engaged).
Page 242 of 246

CONNECT Nav+
241
NAV mode
When the telecamera image is dis-
played, the NAV mode voice com-
mands are inhibited. In this condition
the key
˚26-fig. 1for ejecting the
navigation CD is disabled.INFORMATION AND
ASSISTANCE SERVICES mode
When the telecamera image is dis-
played, the INFORMATION AND
ASSISTANCE SERVICES mode is en-
abled. Pressing the •key 25-fig. 1will
actually switch automatically the dis-
play to the corresponding page.
If the information and assistance ser-
vices are disabled (Targasysservices
not subscribed), the relevant message
will be displayed. Briefly pressing
“ESC” 23-fig. 1will delete the mes-
sage, pressing the key at length again
will reset the telecamera images (with
reverse gear engaged).
If the information and assistance ser-
vices are enabled (Targasys services
subscribed), prolonged pressing of the
“ESC” key 23-fig. 1will inhibit the
telecamera image displaying.
To restore the telecamera image dis-
playing, disengage and engage the re-
verse gear again.VOICE RECOGNITION mode
Reverse gear engagement will acti-
vate telecamera image displaying only
after the “voice recognition” session
(if active) is over.
During the telecamera image dis-
playing, the “voice recognition” mode
is inhibited.