Warning lights FIAT DUCATO 244 2005 3.G Owner's Manual
[x] Cancel search | Manufacturer: FIAT, Model Year: 2005, Model line: DUCATO 244, Model: FIAT DUCATO 244 2005 3.GPages: 258, PDF Size: 4.05 MB
Page 142 of 258
141IN AN EMERGENCY
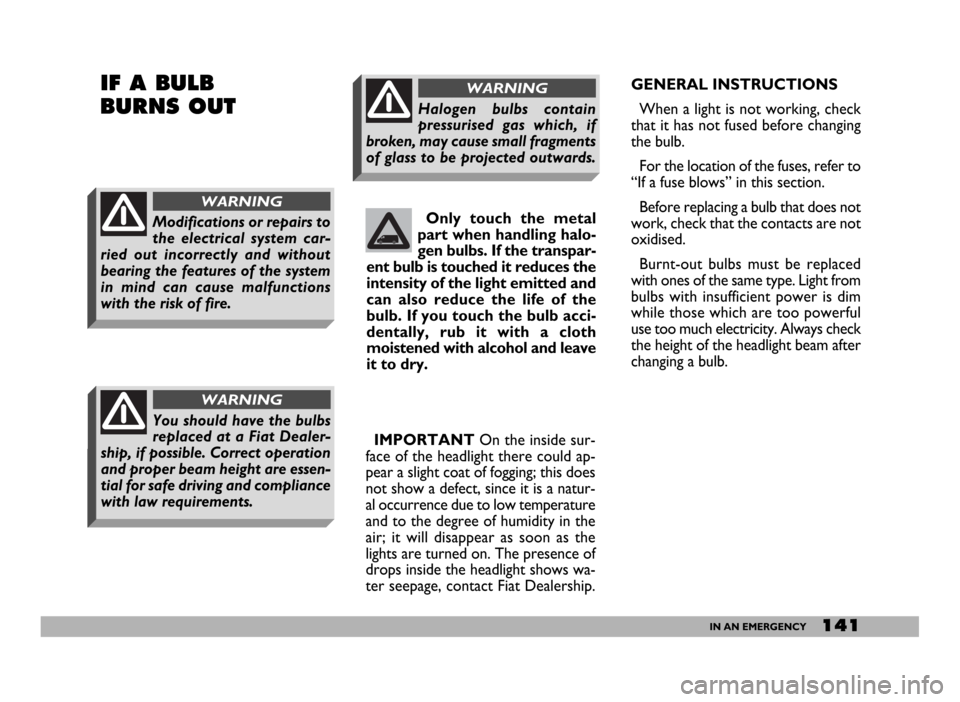
GENERAL INSTRUCTIONS
When a light is not working, check
that it has not fused before changing
the bulb.
For the location of the fuses, refer to
“If a fuse blows” in this section.
Before replacing a bulb that does not
work, check that the contacts are not
oxidised.
Burnt-out bulbs must be replaced
with ones of the same type. Light from
bulbs with insufficient power is dim
while those which are too powerful
use too much electricity. Always check
the height of the headlight beam after
changing a bulb. Only touch the metal
part when handling halo-
gen bulbs. If the transpar-
ent bulb is touched it reduces the
intensity of the light emitted and
can also reduce the life of the
bulb. If you touch the bulb acci-
dentally, rub it with a cloth
moistened with alcohol and leave
it to dry.IF A BULB
BURNS OUT
Modifications or repairs to
the electrical system car-
ried out incorrectly and without
bearing the features of the system
in mind can cause malfunctions
with the risk of fire.
WARNING
You should have the bulbs
replaced at a Fiat Dealer-
ship, if possible. Correct operation
and proper beam height are essen-
tial for safe driving and compliance
with law requirements.
WARNING
Halogen bulbs contain
pressurised gas which, if
broken, may cause small fragments
of glass to be projected outwards.
WARNING
IMPORTANTOn the inside sur-
face of the headlight there could ap-
pear a slight coat of fogging; this does
not show a defect, since it is a natur-
al occurrence due to low temperature
and to the degree of humidity in the
air; it will disappear as soon as the
lights are turned on. The presence of
drops inside the headlight shows wa-
ter seepage, contact Fiat Dealership.
Page 155 of 258
154IN AN EMERGENCY
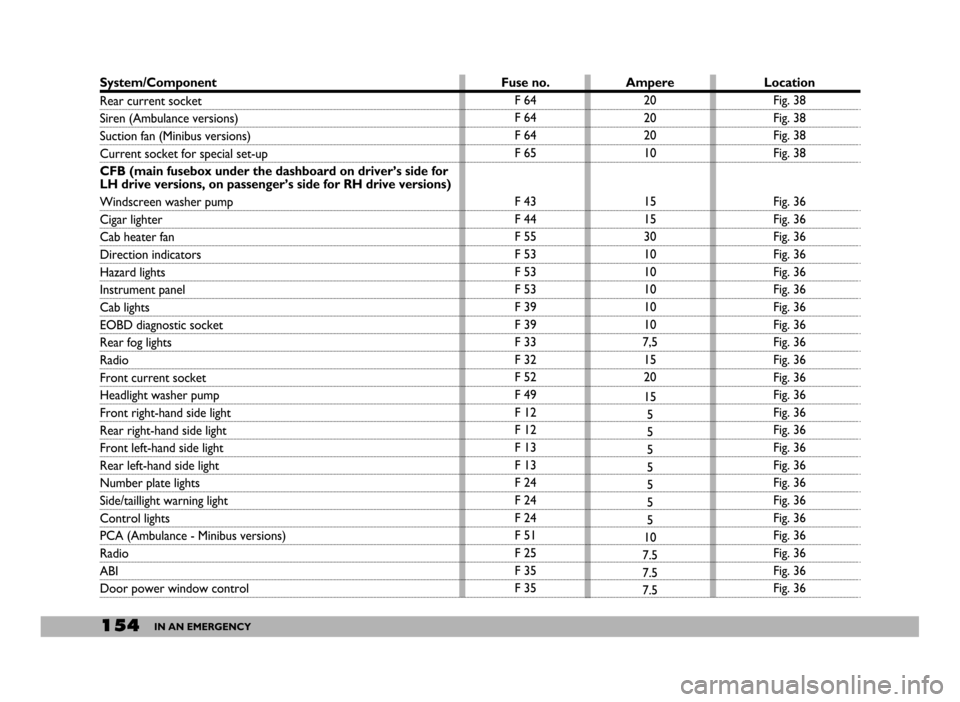
System/Component
Rear current socket
Siren (Ambulance versions)
Suction fan (Minibus versions)
Current socket for special set-up
CFB (main fusebox under the dashboard on driver’s side for
LH drive versions, on passenger’s side for RH drive versions)
Windscreen washer pump
Cigar lighter
Cab heater fan
Direction indicators
Hazard lights
Instrument panel
Cab lights
EOBD diagnostic socket
Rear fog lights
Radio
Front current socket
Headlight washer pump
Front right-hand side light
Rear right-hand side light
Front left-hand side light
Rear left-hand side light
Number plate lights
Side/taillight warning light
Control lights
PCA (Ambulance - Minibus versions)
Radio
ABI
Door power window controlLocation
Fig. 38
Fig. 38
Fig. 38
Fig. 38
Fig. 36
Fig. 36
Fig. 36
Fig. 36
Fig. 36
Fig. 36
Fig. 36
Fig. 36
Fig. 36
Fig. 36
Fig. 36
Fig. 36
Fig. 36
Fig. 36
Fig. 36
Fig. 36
Fig. 36
Fig. 36
Fig. 36
Fig. 36
Fig. 36
Fig. 36
Fig. 36 Ampere
20
20
20
10
15
15
30
10
10
10
10
10
7,5
15
20
15
5
5
5
5
5
5
5
10
7.5
7.5
7.5 Fuse no.
F 64
F 64
F 64
F 65
F 43
F 44
F 55
F 53
F 53
F 53
F 39
F 39
F 33
F 32
F 52
F 49
F 12
F 12
F 13
F 13
F 24
F 24
F 24
F 51
F 25
F 35
F 35
Page 161 of 258
160IN AN EMERGENCY
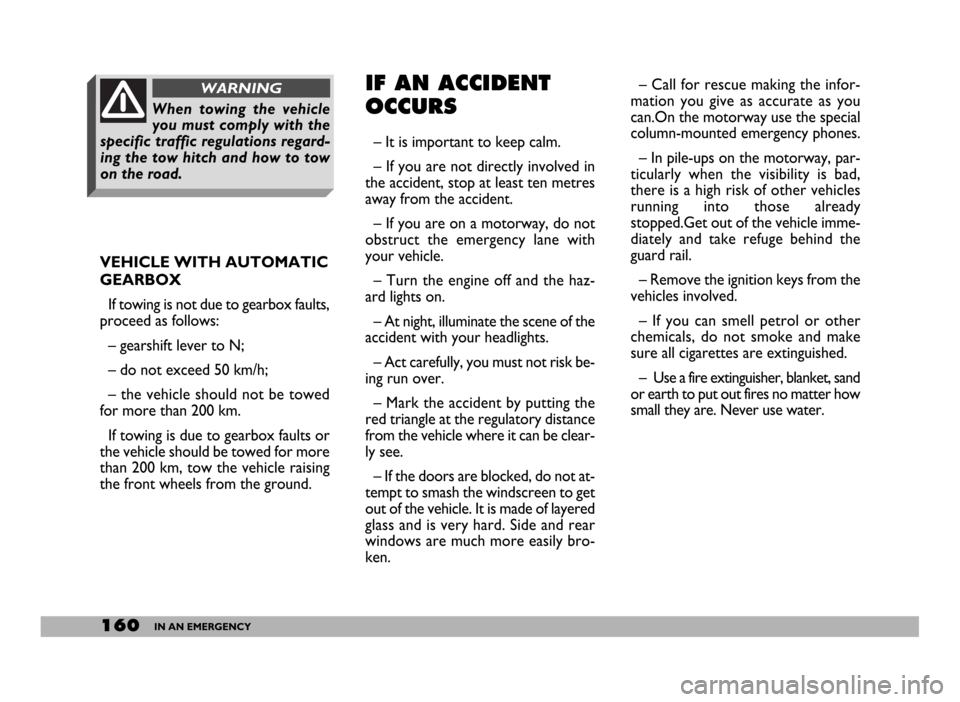
IF AN ACCIDENT
OCCURS
– It is important to keep calm.
– If you are not directly involved in
the accident, stop at least ten metres
away from the accident.
– If you are on a motorway, do not
obstruct the emergency lane with
your vehicle.
– Turn the engine off and the haz-
ard lights on.
– At night, illuminate the scene of the
accident with your headlights.
– Act carefully, you must not risk be-
ing run over.
– Mark the accident by putting the
red triangle at the regulatory distance
from the vehicle where it can be clear-
ly see.
– If the doors are blocked, do not at-
tempt to smash the windscreen to get
out of the vehicle. It is made of layered
glass and is very hard. Side and rear
windows are much more easily bro-
ken. VEHICLE WITH AUTOMATIC
GEARBOX
If towing is not due to gearbox faults,
proceed as follows:
– gearshift lever to N;
– do not exceed 50 km/h;
– the vehicle should not be towed
for more than 200 km.
If towing is due to gearbox faults or
the vehicle should be towed for more
than 200 km, tow the vehicle raising
the front wheels from the ground.– Call for rescue making the infor-
mation you give as accurate as you
can.On the motorway use the special
column-mounted emergency phones.
– In pile-ups on the motorway, par-
ticularly when the visibility is bad,
there is a high risk of other vehicles
running into those already
stopped.Get out of the vehicle imme-
diately and take refuge behind the
guard rail.
– Remove the ignition keys from the
vehicles involved.
– If you can smell petrol or other
chemicals, do not smoke and make
sure all cigarettes are extinguished.
– Use a fire extinguisher, blanket, sand
or earth to put out fires no matter how
small they are. Never use water.
When towing the vehicle
you must comply with the
specific traffic regulations regard-
ing the tow hitch and how to tow
on the road.
WARNING
Page 164 of 258
163VEHICLE MAINTENANCE
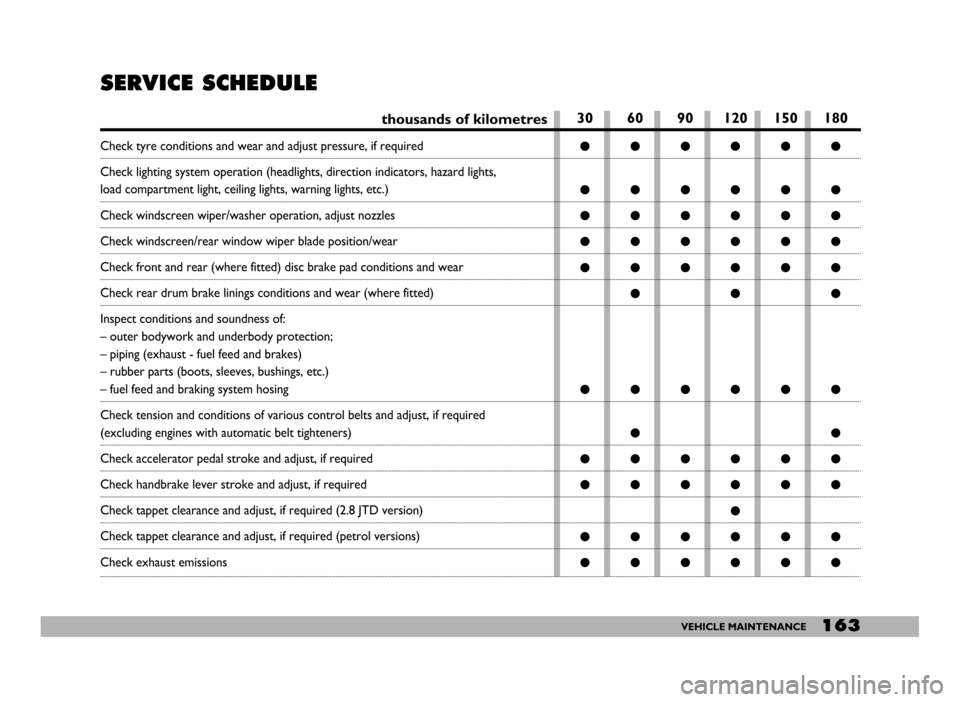
SERVICE SCHEDULE
thousands of kilometres
Check tyre conditions and wear and adjust pressure, if required
Check lighting system operation (headlights, direction indicators, hazard lights,
load compartment light, ceiling lights, warning lights, etc.)
Check windscreen wiper/washer operation, adjust nozzles
Check windscreen/rear window wiper blade position/wear
Check front and rear (where fitted) disc brake pad conditions and wear
Check rear drum brake linings conditions and wear (where fitted)
Inspect conditions and soundness of:
– outer bodywork and underbody protection;
– piping (exhaust - fuel feed and brakes)
– rubber parts (boots, sleeves, bushings, etc.)
– fuel feed and braking system hosing
Check tension and conditions of various control belts and adjust, if required
(excluding engines with automatic belt tighteners)
Check accelerator pedal stroke and adjust, if required
Check handbrake lever stroke and adjust, if required
Check tappet clearance and adjust, if required (2.8 JTD version)
Check tappet clearance and adjust, if required (petrol versions)
Check exhaust emissions
30 60 90 120 150 180
●●●●●●
●●●●●●
●●●●●●
●●●●●●
●●●●●●
●●●
●●●●●●
●●
●●●●●●
●●●●●●
●
●●●●●●
●●●●●●
Page 166 of 258
165VEHICLE MAINTENANCE
ANNUAL
INSPECTION
SCHEDULE
The following annual inspection
schedule is required for vehicles trav-
elling 15,000 Kmapprox. a year. The
schedule includes the following oper-
ations:
– check tyre condition and wear and
adjust pressure, if required (including
spare wheel);
– check operation of lights (head-
lights, direction indicators, hazard
lights, boot light, passenger compart-
ment light, instrument panel lights,
etc.);
– check windscreen wiper/washer
and adjust nozzles;
– check position and wear of wind-
screen/rear window wiper blades;
– check front pad conditions and
wear;
– check for bonnet and boot lock
cleanness, lever cleanness and lubri-
cation;– inspect conditions of: engine, gear-
box, transmission, piping (exhaust, fu-
el feed, brakes), rubber parts (boots,
sleeves, bushings, etc.), brake and fu-
el line hoses;
– check battery charge status;
– check conditions of various control
belts;
– check and top up fluid levels (en-
gine coolant, brakes, windscreen
washer, battery, etc.);
– check and top up engine oil;
– replace pollen filter.
ADDITIONAL
CHECKS
Every 1,000 km or before long
trips, check and top up as necessary:
– engine coolant level
– brake fluid level
– power steering fluid level
– battery electrolyte level
– windscreen washer fluid
– tyre pressure and conditions.
Every 3,000 km or before long
trips, check and top up as necessary:
engine oil
Every 10,000 kmor at cwarning
light coming on (diesel engines only):
bleed water from fuel filter.
You are recommended to use FL
Seleniaproducts designed and pro-
duced for Fiat vehicles (see the “Ca-
pacities” table in the “Technical Spec-
ifications” section).
Page 176 of 258
175VEHICLE MAINTENANCE
When working on the bat-
tery or near it, always wear
the proper goggles.
WARNING
Running the battery with
low fluid level can damage
the battery beyond repair and
could also cause its explosion.
WARNING
If the vehicle is to stand for
a long time in the cold, re-
move the battery and store it in a
warm place to avoid it freezing.
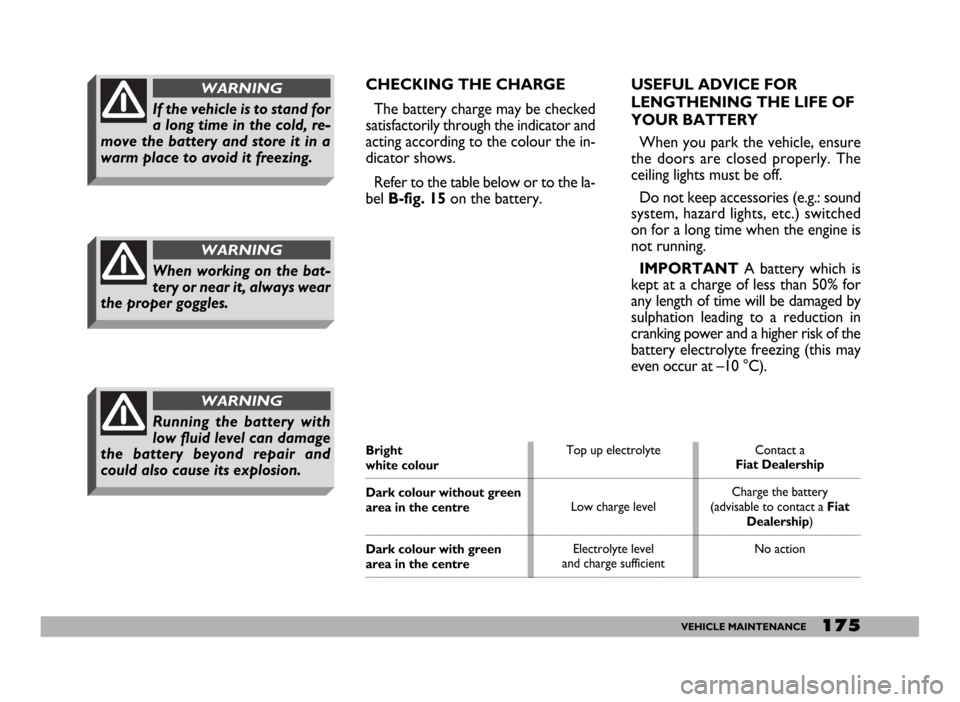
WARNINGCHECKING THE CHARGE
The battery charge may be checked
satisfactorily through the indicator and
acting according to the colour the in-
dicator shows.
Refer to the table below or to the la-
belB-fig. 15on the battery.USEFUL ADVICE FOR
LENGTHENING THE LIFE OF
YOUR BATTERY
When you park the vehicle, ensure
the doors are closed properly. The
ceiling lights must be off.
Do not keep accessories (e.g.: sound
system, hazard lights, etc.) switched
on for a long time when the engine is
not running.
IMPORTANTA battery which is
kept at a charge of less than 50% for
any length of time will be damaged by
sulphation leading to a reduction in
cranking power and a higher risk of the
battery electrolyte freezing (this may
even occur at –10 °C).
Bright white colour
Dark colour without green
area in the centre
Dark colour with green
area in the centreTop up electrolyte
Low charge level
Electrolyte level
and charge sufficientContact a
Fiat Dealership
Charge the battery
(advisable to contact a Fiat
Dealership)
No action
Page 252 of 258
251INDEX
Understanding rim markings ... 219
Understanding tyre markings ... 219
Using the automatic gearbox ... 110
Using the manual gearbox ........ 109
Vehicle maintenance........... 162
Vehicle storage ............................. 134
Ventilation...................................... 56
Warming up the engine
after it has just started ............. 107
Warning lights ............................. 35
Washing the vehicle ................... 182
Weights ......................................... 227
Wheel geometry ......................... 218
Wheels and tyres ........................ 178
- changing a wheel .................... 137
- inflation pressure ................... 220
- snow chains ............................ 133
- snow tyres .............................. 132
- spare wheel ............................. 218- understanding tyre
markings ................................... 219
- wheel geometry ..................... 218
Windows ...................................... 183
Windscreen washer ............ 66-181
Windscreen washer
fluid level .................................... 171
Windscreen
wiper (blades) ..................... 66-180
Writing/reading desk ................. 74