window FIAT DUCATO BASE CAMPER 2014 Owner handbook (in English)
[x] Cancel search | Manufacturer: FIAT, Model Year: 2014, Model line: DUCATO BASE CAMPER, Model: FIAT DUCATO BASE CAMPER 2014Pages: 367, PDF Size: 20.39 MB
Page 73 of 367
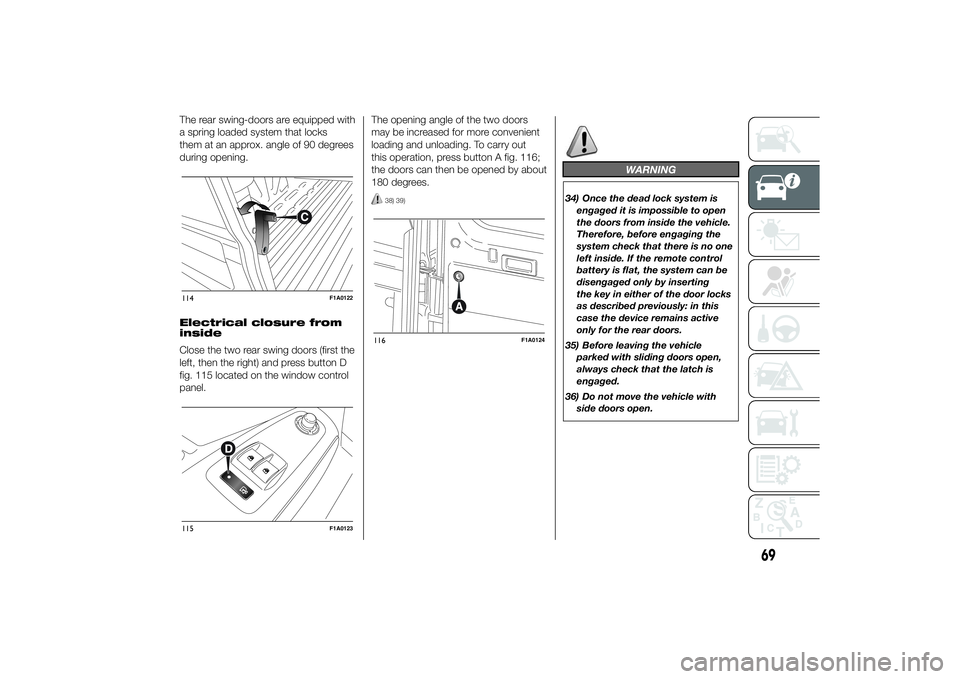
The rear swing-doors are equipped with
a spring loaded system that locks
them at an approx. angle of 90 degrees
during opening.
Electrical closure from
inside
Close the two rear swing doors (first the
left, then the right) and press button D
fig. 115 located on the window control
panel.The opening angle of the two doors
may be increased for more convenient
loading and unloading. To carry out
this operation, press button A fig. 116;
the doors can then be opened by about
180 degrees.
38) 39)
WARNING
34) Once the dead lock system is
engaged it is impossible to open
the doors from inside the vehicle.
Therefore, before engaging the
system check that there is no one
left inside. If the remote control
battery is flat, the system can be
disengaged only by inserting
the key in either of the door locks
as described previously: in this
case the device remains active
only for the rear doors.
35) Before leaving the vehicle
parked with sliding doors open,
always check that the latch is
engaged.
36) Do not move the vehicle with
side doors open.
114
F1A0122
115
F1A0123
116
F1A0124
69
Page 74 of 367
37) Before setting off after parking
or before moving the vehicle in
any way, ensure that the
footboard is fully stowed away. As
the movement of the platform is
linked to that of the sliding side
door, the
warning light in the
instrument panel comes on if it is
not fully retracted in the same
way as when the rear doors are
not shut.
38) This spring loaded system has
activation forces that were
designed for optimum comfort.
Accidental knocks or a strong
gust of wind may release the
springs and close the doors
spontaneously.
39) With the doors opened to 180
degrees, no locking system is
effective. Do not use this opening
with the vehicle parked on a
gradient or when it is windy.
ELECTRIC WINDOWSELECTRIC
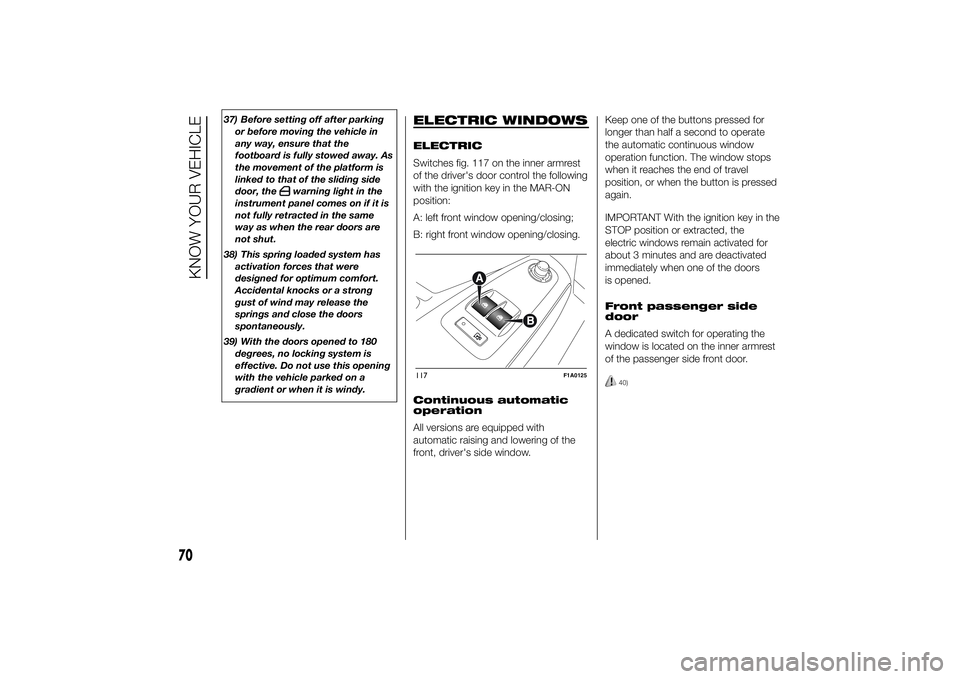
Switches fig. 117 on the inner armrest
of the driver's door control the following
with the ignition key in the MAR-ON
position:
A: left front window opening/closing;
B: right front window opening/closing.
Continuous automatic
operation
All versions are equipped with
automatic raising and lowering of the
front, driver's side window.Keep one of the buttons pressed for
longer than half a second to operate
the automatic continuous window
operation function. The window stops
when it reaches the end of travel
position, or when the button is pressed
again.
IMPORTANT With the ignition key in the
STOP position or extracted, the
electric windows remain activated for
about 3 minutes and are deactivated
immediately when one of the doors
is opened.
Front passenger side
door
A dedicated switch for operating the
window is located on the inner armrest
of the passenger side front door.
40)
117
F1A0125
70
KNOW YOUR VEHICLE
Page 75 of 367
WARNING
40) Incorrect use of the electric
windows may be dangerous.
Before and during operation,
always check that nobody is
exposed to the risk of being
injured either directly by the
moving window or through
objects getting caught or by being
hit. When leaving the vehicle,
always remove the key from the
ignition switch to avoid the risk of
injury to anyone remaining in
the car due to accidental
operation of the electric windows.
BONNETOPENING
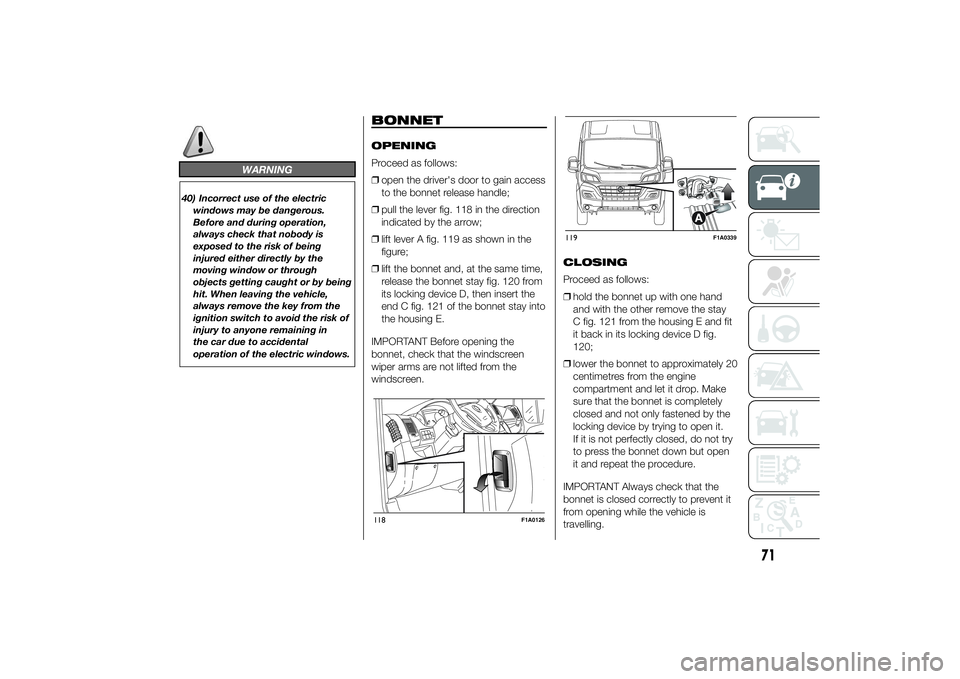
Proceed as follows:
❒open the driver's door to gain access
to the bonnet release handle;
❒pull the lever fig. 118 in the direction
indicated by the arrow;
❒lift lever A fig. 119 as shown in the
figure;
❒lift the bonnet and, at the same time,
release the bonnet stay fig. 120 from
its locking device D, then insert the
end C fig. 121 of the bonnet stay into
the housing E.
IMPORTANT Before opening the
bonnet, check that the windscreen
wiper arms are not lifted from the
windscreen.CLOSING
Proceed as follows:
❒hold the bonnet up with one hand
and with the other remove the stay
C fig. 121 from the housing E and fit
it back in its locking device D fig.
120;
❒lower the bonnet to approximately 20
centimetres from the engine
compartment and let it drop. Make
sure that the bonnet is completely
closed and not only fastened by the
locking device by trying to open it.
If it is not perfectly closed, do not try
to press the bonnet down but open
it and repeat the procedure.
IMPORTANT Always check that the
bonnet is closed correctly to prevent it
from opening while the vehicle is
travelling.118
F1A0126
119
F1A0339
71
Page 87 of 367
68) Tyre pressure must be checked
with tyres cold. Should it become
necessary for whatever reason
to check pressure with warm
tyres, do not reduce pressure
even if it is higher than the
prescribed value, but repeat the
check when tyres are cold.
69) The TPMS cannot indicate
sudden tyre pressure drops (for
example when a tyre bursts).
In this case, stop the car, braking
with caution and avoiding abrupt
steering.
70) The system only warns that the
tyre pressure is low: it is not able
to inflate them.
71) An insufficient tyre inflation
increases fuel consumption,
reduces the tread duration and
may affect the capacity of driving
safely.
72) Always refit the valve stem cap
after inspecting or adjusting tyre
pressure. This prevents dampness
or dirt from entering the valve
stem and thus the pressure
control sensor from being
damaged.73) The tyre repair kit (Fix&Go)
provided with the car (for
versions/markets, where
provided) is compatible with the
TPMS sensors; using sealants not
equivalent with that in the original
kit may adversely affect its
operation. If sealants not
equivalent with the original one
are used, it is recommended to
have the TPMS sensor operation
checked by a qualified repair
centre.
DRIVING ADVISOR(lane crossing warning)
(for versions/markets, where provided)
78) 75) 76)
The Driving Advisor is a warning system
that notifies the driver if he/she crosses
the lane because he/she has been
distracted.
A video sensor, fitted on the windscreen
near the interior rear view mirror,
detects the lane demarcation lines and
the position of the car in relation to
them.
IMPORTANT On cars with Driving
Advisor, it is advisable to contact a Fiat
Dealership should the windscreen
need to be replaced. If the repair is
carried out at a specialist window
replacement centre, it is still necessary
to go to a Fiat Dealership to have the
camera calibrated.
OPERATION
The system is always active when the
vehicle is started. It can be deactivated
or re-activated by pressing button A
fig. 127 on the dashboard (see
following description).
83
Page 169 of 367
SIDE BAGS
112) 113) 114) 115) 116) 117) 118) 119) 120) 121)
122) 123) 124)
The vehicle is fitted with front side bags
for driver and passenger (for versions/
markets where provided) for protecting
the chest and window bags (for
versions/markets where provided) for
protecting front and rear passengers'
heads.
Side bags (for versions/markets where
provided) protect occupants from
side impacts of medium-high severity,
by placing the bag between the
occupant and the internal parts of the
side structure of the vehicle. Non-
activation of side bags in other types of
collisions (front collisions, rear shunts,
roll-overs, etc...) is not a system
malfunction.
An electronic control unit causes the
bags to inflate in the event of a side
impact. The bags inflate
instantaneously placing themselves
between the occupants' bodies and the
structures which could cause injury.
They deflate immediately afterwards.Side bags (for versions/markets where
provided) are not a replacement of
but complementary to the belts, which
you are recommended to always wear,
as specified by law in Europe and
most non-European countries.
FRONT SIDE BAGS FOR
CHEST PROTECTION
(for versions/markets, where provided)
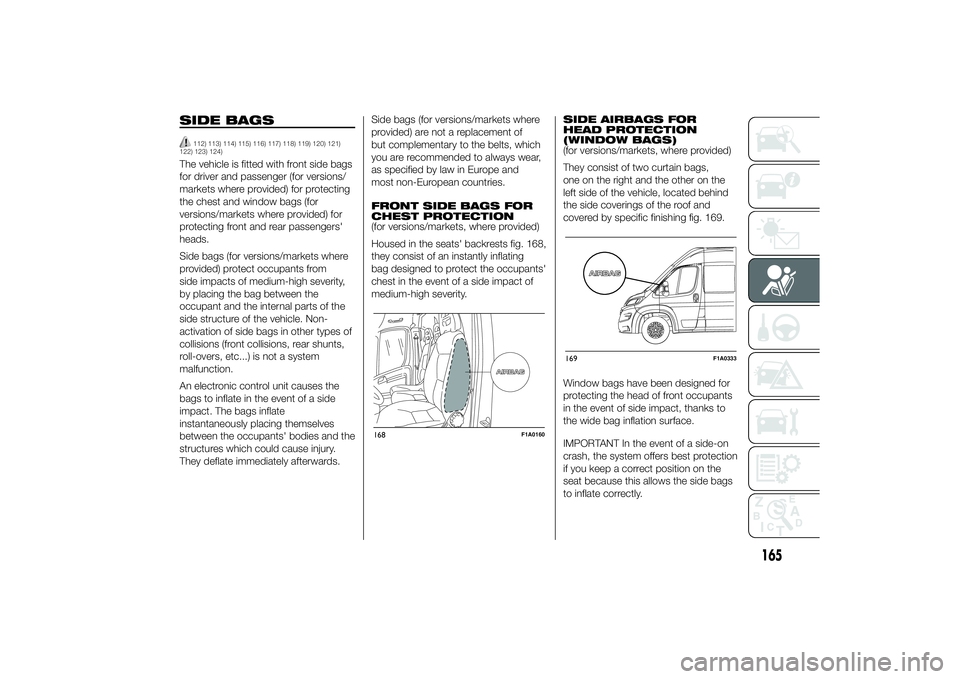
Housed in the seats' backrests fig. 168,
they consist of an instantly inflating
bag designed to protect the occupants'
chest in the event of a side impact of
medium-high severity.SIDE AIRBAGS FOR
HEAD PROTECTION
(WINDOW BAGS)
(for versions/markets, where provided)
They consist of two curtain bags,
one on the right and the other on the
left side of the vehicle, located behind
the side coverings of the roof and
covered by specific finishing fig. 169.
Window bags have been designed for
protecting the head of front occupants
in the event of side impact, thanks to
the wide bag inflation surface.
IMPORTANT In the event of a side-on
crash, the system offers best protection
if you keep a correct position on the
seat because this allows the side bags
to inflate correctly.
168
F1A0160
169
F1A0333
165
Page 170 of 367
IMPORTANT The front airbags and/or
side bags may be deployed if the
vehicle is subject to heavy knocks or
accidents involving the underbody area,
such as for example violent shocks,
against steps, kerbs or low obstacles,
vehicle falling into big potholes or
depressions in the road.
IMPORTANT A small amount of dust
will be released when the airbags
are deployed. The dust is not harmful
and does not indicate the beginning of
a fire. Furthermore, the surface of the
deployed bag and the interior of the
vehicle may be covered in a dusty
residue: this may irritate your skin and
eyes. Wash with mild soap and water in
the event of exposure.
IMPORTANT Should an accident occur
in which any of the safety devices are
activated, take the vehicle to a Fiat
Dealership to have the activated
devices replaced and to have the whole
system checked.
Every control, repair and replacement
operation concerning the airbags must
only be carried out at a Fiat Dealership.If you are having the vehicle scrapped,
have the system deactivated at a Fiat
Dealership first. If the vehicle changes
ownership, the new owner must be
informed of how to use the airbags and
the above warnings and also be given
this "Owner Handbook".
IMPORTANT Pretensioners, front
airbags and front side bags are
deployed differently according to the
type of collision. Failure to deploy
of one of the devices does not
necessarily indicate a system
malfunction.
WARNING
112) Never rest your head, arms or
elbows on the doors, on the
windows or in the window bag
area as this could cause injuries
during the inflation phase.
113) Never lean your head, arms and
elbows out of the window.114) If when turning the key to
MAR-ON the warning light
does not turn on or if it stays
on when travelling (together with
the message on the multifunction
display, for versions/markets
where provided), there could be a
fault in the safety systems; in
this event, airbags or
pretensioners may not trigger in
the case of impact or, in a lower
number of cases, they could be
triggered accidentally. Contact a
Fiat Dealership immediately to
have the system checked.
115) Do not cover the backrest of
the front or rear seats with covers
which are not suitable for use
with side bags.
116) Do not travel carrying objects in
your lap, in front of your chest or
between your lips (pipe, pencils,
etc.). They could cause severe
injury if the airbag is deployed.
117) Always drive keeping your
hands on the steering wheel rim
so that the airbag can inflate
freely if necessary. Do not drive
with your body bent forward.
Keep your back straight against
the backrest.
166
SAFETY
Page 180 of 367
SAVING FUELSome useful tips are given below for
fuel saving and reducing harmful
emissions of CO2 and other pollutants
(nitrogen oxides, unburnt
hydrocarbons, Particulate Matter (PM),
etc.).
GENERAL
CONSIDERATIONS
The general factors that affect fuel
consumption are listed below.
Vehicle maintenance
Have checks and adjustments carried
out in accordance with the “Scheduled
Servicing Plan”.Tyres
Check the tyre pressures at least once
every four weeks: if the pressure is
too low, consumption levels increase as
resistance to rolling is higher.
Unnecessary loads
Do not travel with an overloaded
luggage compartment. The weight of
the vehicle (especially when driving
in town) and its geometry greatly affect
fuel consumption and stability.
Roof rack/ski rack
Remove the roof rack or the ski rack
from the roof after use. These
accessories decrease aerodynamic
penetration of the vehicle and have a
negative effect on fuel consumption.
When transporting particularly large
objects, use a trailer if possible.Electric devices
Use electrical devices only for the
amount of time needed. The heated
rear window, additional headlights,
windscreen/rear window wipers and
heater fan need a considerable amount
of energy, therefore increasing fuel
consumption (by up to 25% in
the urban cycle).
Climate control system
Air conditioning leads to higher fuel
consumption (on average up to +20%).
If the temperature outside permits, try
and use the ventilation only.
Devices for
aerodynamic control
The use of non-certified spoilers may
adversely affect air drag and fuel
consumption.
176
STARTING AND DRIVING
Page 191 of 367
SNOW CHAINSThe use of snow chains should be in
compliance with local regulations of
each country.
Snow chains can be fitted to the tyres
of the front wheels (drive wheels) only.
Use of Lineaccessori Fiat snow chains
is recommended. Check the tension
of the snow chains after the first few
metres have been driven.
42)
IMPORTANT With snow chains, use the
accelerator with extreme care to
prevent, or to limit as much as possible,
slipping of the drive wheels that could
cause chain breakage, resulting in
damage to the car body or mechanical
components.
IMPORTANT For versions fitted with
225/75 R16 tyre, use snow chains with
max. thickness 16 mm.
When travelling on snowy roads with
snow chains, it may be helpful to turn
the ASR off: in fact, in these conditions,
the driving wheels skidding when
moving off gives you better traction.
IMPORTANT
42) Keep your speed down when
snow chains are fitted; do not
exceed 50 km/h. Avoid potholes,
steps and pavements and avoid
driving for long distances on
roads not covered with snow to
prevent damaging the vehicle and
the roadbed.
PROLONGED
VEHICLE INACTIVITYIf the vehicle needs to be off the road
for longer than one month, the following
precautions must be taken:
❒park the vehicle indoors in a dry and,
if possible, well-ventilated place;
❒engage a gear;
❒check that the handbrake is not
engaged;
❒disconnect the negative battery
terminal; if the vehicle is equipped
with a battery disconnection function
(disconnector), see the description
of the procedure in the "Controls"
paragraph in the "Dashboard and
controls" section;
❒clean and protect the painted parts
using protective wax;
❒clean and protect the shiny metal
parts using special compounds
available commercially;
❒sprinkle talcum powder on the
windscreen and rear window wiper
rubber blades and lift them off the
glass;
❒slightly open the windows;
187
Page 197 of 367
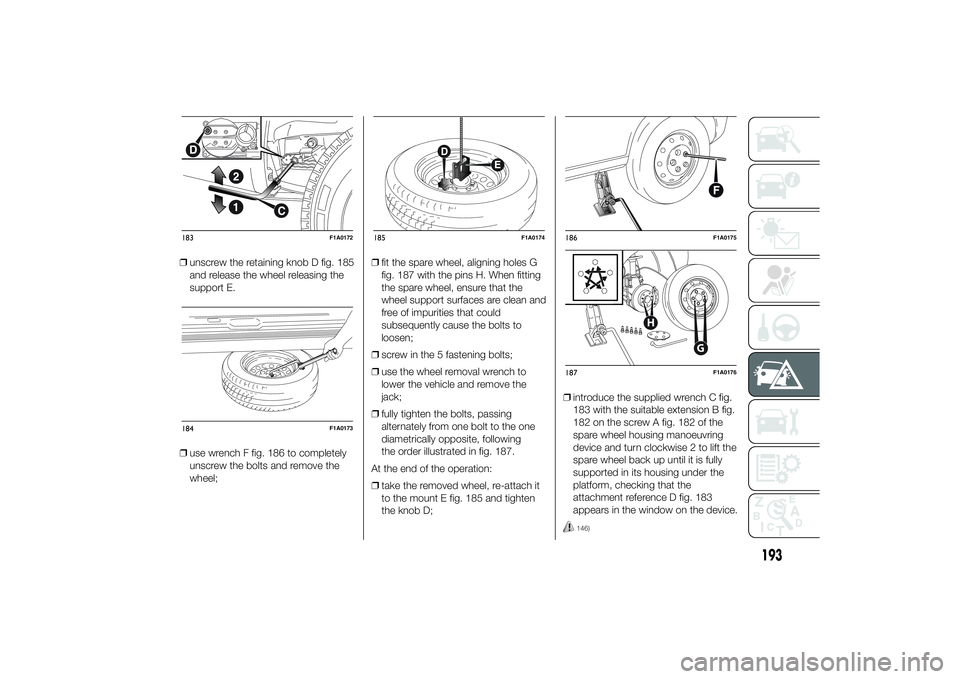
❒unscrew the retaining knob D fig. 185
and release the wheel releasing the
support E.
❒use wrench F fig. 186 to completely
unscrew the bolts and remove the
wheel;❒fit the spare wheel, aligning holes G
fig. 187 with the pins H. When fitting
the spare wheel, ensure that the
wheel support surfaces are clean and
free of impurities that could
subsequently cause the bolts to
loosen;
❒screw in the 5 fastening bolts;
❒use the wheel removal wrench to
lower the vehicle and remove the
jack;
❒fully tighten the bolts, passing
alternately from one bolt to the one
diametrically opposite, following
the order illustrated in fig. 187.
At the end of the operation:
❒take the removed wheel, re-attach it
to the mount E fig. 185 and tighten
the knob D;❒introduce the supplied wrench C fig.
183 with the suitable extension B fig.
182 on the screw A fig. 182 of the
spare wheel housing manoeuvring
device and turn clockwise 2 to lift the
spare wheel back up until it is fully
supported in its housing under the
platform, checking that the
attachment reference D fig. 183
appears in the window on the device.
146)
183
F1A0172
184
F1A0173
185
F1A0174
186
F1A0175
G
H
187
F1A0176
193
Page 198 of 367
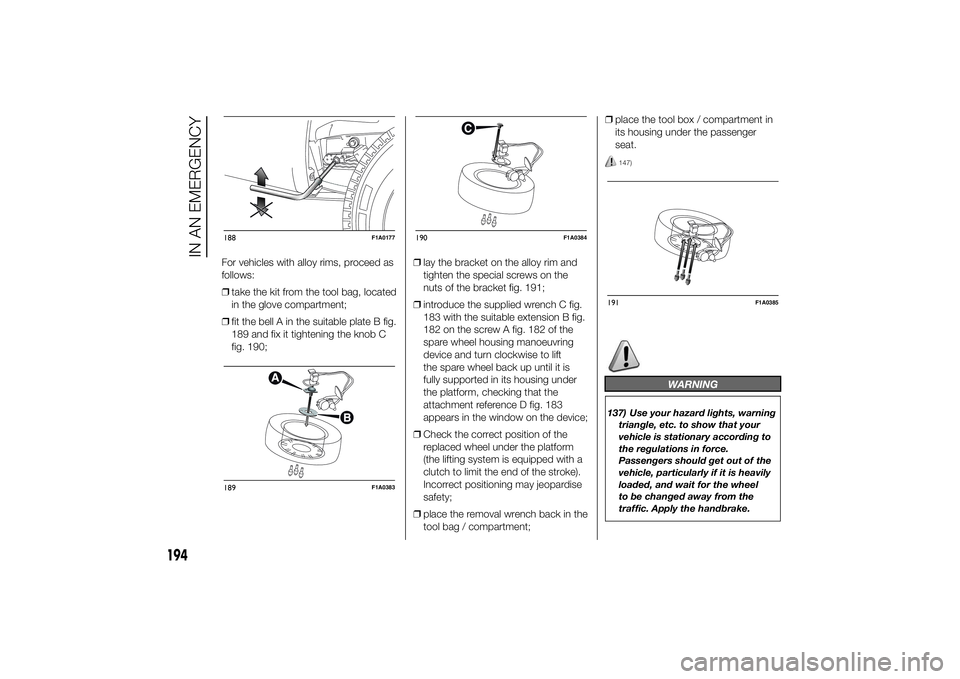
For vehicles with alloy rims, proceed as
follows:
❒take the kit from the tool bag, located
in the glove compartment;
❒fit the bell A in the suitable plate B fig.
189 and fix it tightening the knob C
fig. 190;❒lay the bracket on the alloy rim and
tighten the special screws on the
nuts of the bracket fig. 191;
❒introduce the supplied wrench C fig.
183 with the suitable extension B fig.
182 on the screw A fig. 182 of the
spare wheel housing manoeuvring
device and turn clockwise to lift
the spare wheel back up until it is
fully supported in its housing under
the platform, checking that the
attachment reference D fig. 183
appears in the window on the device;
❒Check the correct position of the
replaced wheel under the platform
(the lifting system is equipped with a
clutch to limit the end of the stroke).
Incorrect positioning may jeopardise
safety;
❒place the removal wrench back in the
tool bag / compartment;❒place the tool box / compartment in
its housing under the passenger
seat.
147)
WARNING
137) Use your hazard lights, warning
triangle, etc. to show that your
vehicle is stationary according to
the regulations in force.
Passengers should get out of the
vehicle, particularly if it is heavily
loaded, and wait for the wheel
to be changed away from the
traffic. Apply the handbrake.
188
F1A0177
189
F1A0383
190
F1A0384
191
F1A0385
194
IN AN EMERGENCY