buttons FIAT DUCATO BASE CAMPER 2015 Owner handbook (in English)
[x] Cancel search | Manufacturer: FIAT, Model Year: 2015, Model line: DUCATO BASE CAMPER, Model: FIAT DUCATO BASE CAMPER 2015Pages: 367, PDF Size: 19.73 MB
Page 12 of 367
.
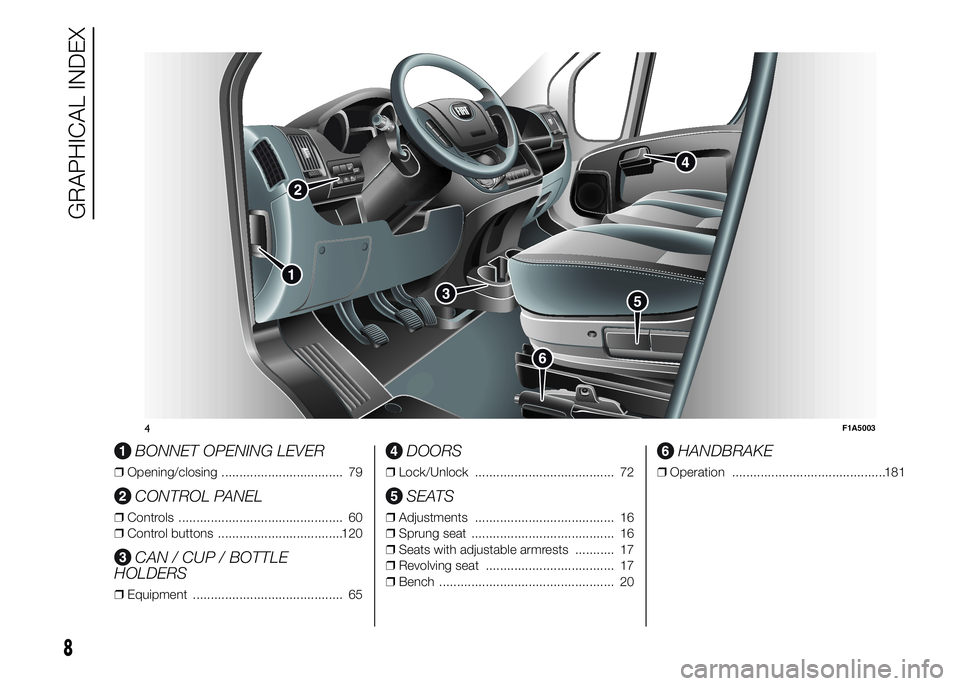
BONNET OPENING LEVER
❒Opening/closing .................................. 79
CONTROL PANEL
❒Controls .............................................. 60
❒Control buttons ...................................120
CAN / CUP / BOTTLE
HOLDERS
❒Equipment .......................................... 65
DOORS
❒Lock/Unlock ....................................... 72
SEATS
❒Adjustments ....................................... 16
❒Sprung seat ........................................ 16
❒Seats with adjustable armrests ........... 17
❒Revolving seat .................................... 17
❒Bench ................................................. 20
HANDBRAKE
❒Operation ...........................................181
M
ODE
4F1A5003
8
GRAPHICAL INDEX
Page 16 of 367
❒opening and closing of the fuel tank
cap.
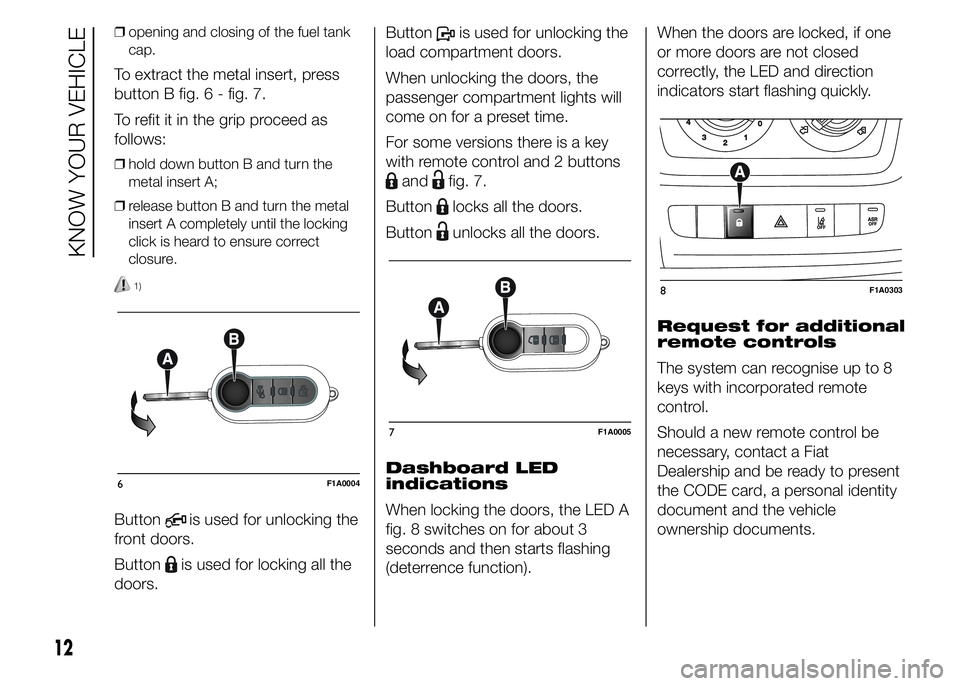
To extract the metal insert, press
button B fig. 6 - fig. 7.
To refit it in the grip proceed as
follows:
❒hold down button B and turn the
metal insert A;
❒release button B and turn the metal
insert A completely until the locking
click is heard to ensure correct
closure.
1)
Buttonis used for unlocking the
front doors.
Button
is used for locking all the
doors.Button
is used for unlocking the
load compartment doors.
When unlocking the doors, the
passenger compartment lights will
come on for a preset time.
For some versions there is a key
with remote control and 2 buttons
andfig. 7.
Button
locks all the doors.
Button
unlocks all the doors.
Dashboard LED
indications
When locking the doors, the LED A
fig. 8 switches on for about 3
seconds and then starts flashing
(deterrence function).When the doors are locked, if one
or more doors are not closed
correctly, the LED and direction
indicators start flashing quickly.
Request for additional
remote controls
The system can recognise up to 8
keys with incorporated remote
control.
Should a new remote control be
necessary, contact a Fiat
Dealership and be ready to present
the CODE card, a personal identity
document and the vehicle
ownership documents.
6F1A0004
7F1A0005
8F1A0303
12
KNOW YOUR VEHICLE
Page 28 of 367
IMPORTANT
2) The fabric upholstery of your
vehicle is designed to withstand
the normal wear and tear of your
vehicle for a long time. You are
however recommended to avoid
strong and/or continuous
scratching with clothing
accessories such as metal
buckles, studs, Velcro fastenings
and the like, as these items cause
stress of the cover fabric that
could lead to yarn breaking and
damage the upholstery.
HEAD RESTRAINTS
FRONT
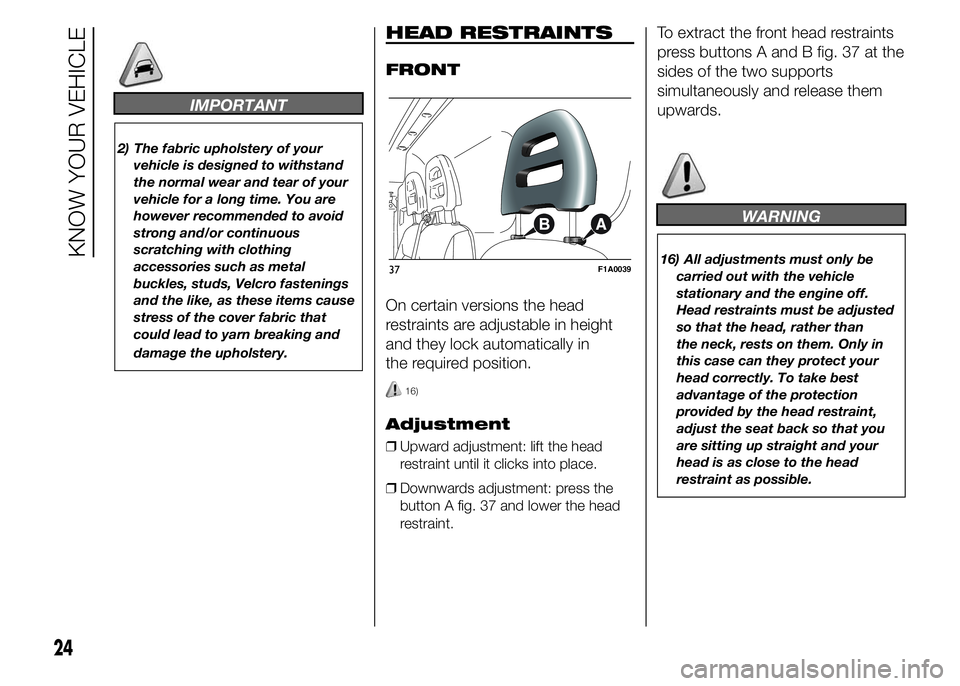
On certain versions the head
restraints are adjustable in height
and they lock automatically in
the required position.
16)
Adjustment
❒Upward adjustment: lift the head
restraint until it clicks into place.
❒Downwards adjustment: press the
button A fig. 37 and lower the head
restraint.
To extract the front head restraints
press buttons A and B fig. 37 at the
sides of the two supports
simultaneously and release them
upwards.
WARNING
16) All adjustments must only be
carried out with the vehicle
stationary and the engine off.
Head restraints must be adjusted
so that the head, rather than
the neck, rests on them. Only in
this case can they protect your
head correctly. To take best
advantage of the protection
provided by the head restraint,
adjust the seat back so that you
are sitting up straight and your
head is as close to the head
restraint as possible.37F1A0039
24
KNOW YOUR VEHICLE
Page 40 of 367
❒compressor activation (for cooling/
dehumidifying the air);
❒air recirculation.
All functions may be changed
manually. In other words, you may
select one or more functions and
change the parameters as required.
Automatic control of the manually
changed functions will be
suspended: the system will override
your settings only for safety-related
reasons (e.g. risk of misting).
Manual selections will always take
priority over automatic settings and
will be stored until the user
switches the system back to
automatic operation by pressing
the AUTO button again except for
the cases in which the system
will intervene for particular,
safety-related reasons.
You can adjust one function
manually without affecting the
automatic control of the others.The temperature of the air sent is
always controlled automatically,
depending on the temperature set
in the display (except when the
system is off or in certain conditions
when the compressor is switched
off).
The system allows the following
parameters and functions to be set
or altered manually: air
temperature, fan speed (continuous
variation); air distribution in seven
positions; compressor enablement;
fast defrosting/demisting function;
air recirculation; switching off the
system;
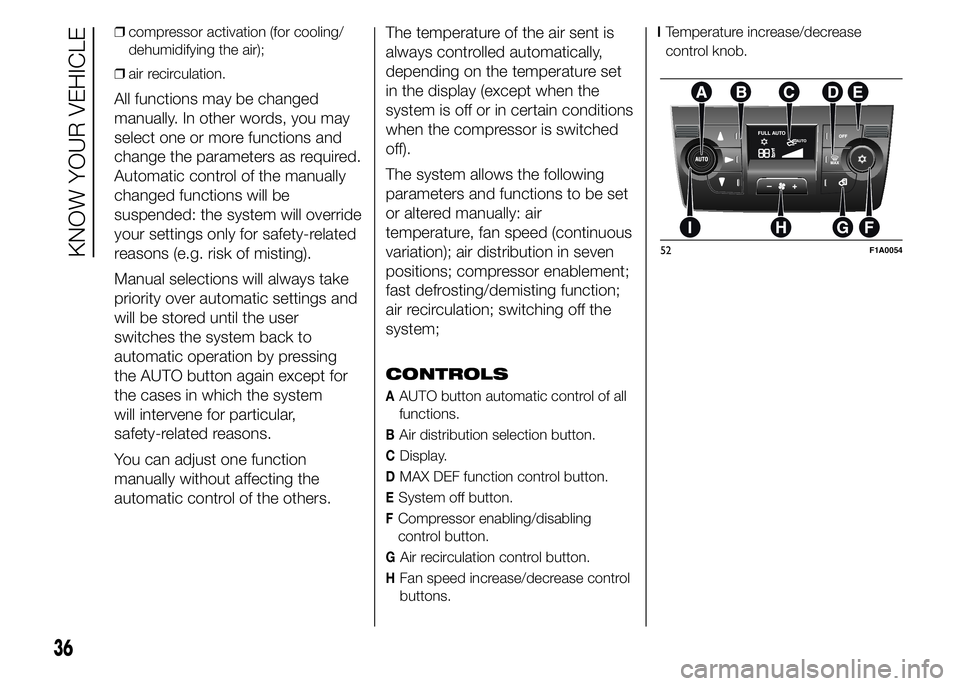
CONTROLS
AAUTO button automatic control of all
functions.
BAir distribution selection button.
CDisplay.
DMAX DEF function control button.
ESystem off button.
FCompressor enabling/disabling
control button.
GAir recirculation control button.
HFan speed increase/decrease control
buttons.
ITemperature increase/decrease
control knob.
52F1A0054
36
KNOW YOUR VEHICLE
Page 41 of 367
USING THE CLIMATE
CONTROL SYSTEM
The system can be started in
different ways, but it is advisable to
start by pressing the AUTO button
and then turning the knob to set
the temperature required on the
display. The system will start
running automatically in this way
and the set temperature will be
reached as quickly as possible. The
system will adjust the temperature,
the quantity and the distribution
of the air sent into the passenger
compartment and, by managing
the recirculation function, the
activation of the compressor.
During fully automatic operation,
the only manual intervention
required is the possible activation of
the following functions:
❒air recirculation, to keep the
function always either on or off;
❒
to speed up demisting/defrosting
of windscreen, rear window and
external rear view mirrors.
During fully automatic system
operation, you can change the set
temperature, air distribution and fan
speed at any time by using the
relevant buttons or knobs: the
system will automatically change its
settings to adjust to the new
requirements. During fully automatic
operation (FULL AUTO), the word
FULL will disappear if the air
distribution and/or flow rate and/or
engagement of the compressor
and/or recirculation settings are
changed. In this way, the functions
will switch from automatic to
manual control until the AUTO
button is pressed again. With one
or more functions turned on
manually, the adjustment of the
intake air temperature continues to
be managed automatically, except
with the compressor switched off: if
this is the case, the temperature
of the air sent into the passenger
compartment cannot be lower than
that of the outside air.CONTROLS
Air temperature
adjustment knob (I)
Turn the knob either clockwise or
counterclockwise to increase or
lower the requested temperature in
the passenger compartment.
The set temperature is shown on
the display.
Turn the knob either fully to the right
or fully to the left to the extreme HI
or LO position to turn the maximum
heating or maximum cooling
functions on:
❒HI function (maximum heating):
select by turning the temperature
knob clockwise beyond the
maximum value (32°C).
This function may be used to heat
up the passenger compartment
by exploiting the system's potential
to the full. In this event, the system
stops controlling the temperature
automatically and sets the air
mixing to maximum heating. The air
speed and distribution are fixed.
37
Page 42 of 367
In particular, if the heating fluid is
not sufficiently hot, the maximum
fan speed does not come on
straight away in order to limit the
intake of insufficiently hot air to the
passenger compartment.
All manual settings will be allowed
when this function is on.
To switch the function off, simply
turn the temperature knob
anticlockwise and set the required
temperature.
❒LO function (maximum cooling):
select by turning the temperature
knob anticlockwise beyond the
minimum value (16°C).
This function may be used to cool
down the passenger compartment
by exploiting the system's potential
to the full. In this event, the system
stops controlling the temperature
automatically and sets the air
mixing to maximum cooling. The air
speed and distribution are fixed.
All manual settings will be allowed
when this function is on.
To switch the function off, simply
turn the temperature knob
anticlockwise and set the required
temperature.Air distribution
buttons (B)
By pressing these buttons, it is
possible to set one of the seven
possible air distributions manually:
Air flow to the windscreen and
front side window vents to demist
or defrost them.
Air flow to the central and side
dashboard vents to ventilate chest
and face during the hot season.
Air flow to the front and rear
footwell vents. Thanks to the
natural tendency of hot air to rise,
this distribution pattern allows
the passenger compartment to
warm up as quickly as possible,
providing an immediate feeling
of warmth.
Air flow distributed between
footwell vents (hotter air) and
central and side dashboard vents
(cooler air). This distribution mode
is particularly useful in spring and
autumn on sunny days.
Air flow distributed between
the footwell vents and the
windscreen and front side window
defrosting/demisting vents. This
allows an adequate warming of the
passenger compartment and
prevents the windows from misting up.
Air flow distribution split
between the windscreen and front
side windows defrosting/demisting
vents and the central and side
dashboard vents as well as the
footwell vents. This distribution
makes it possible to maintain good
levels of comfort and keep the
passenger compartment sufficiently
cool (summer).
Air flow distributed between
windscreen and front side window
defroster/demister and central
and side dashboard vents. This
distribution allows good air diffusion
and maintains a good level of
comfort both in summer and winter.
The distribution set is shown by
the corresponding LEDs on the
selected buttons coming on.
38
KNOW YOUR VEHICLE
To restore automatic control of the
air distribution after a manual
selection, press the AUTO button.
Page 43 of 367
Fan speed adjustment
buttons (H)
Press the H button to increase or to
decrease the fan speed and
therefore the amount of air sent into
the passenger compartment,
though the required temperature
remains set.
The fan speed is shown by the lit
bars on the display:
❒Maximum fan speed = all the bars lit
up;
❒Minimum fan speed = one bar lit up.
The fan can only be excluded if
the climate control system
compressor has been switched off
by pressing the F button.
IMPORTANT To restore automatic
control of the fan speed after a
manual adjustment, press the
AUTO button.IMPORTANT At high vehicle
speeds, the dynamic effect may
increase the flow of air into the
passenger compartment which in
this case will not directly
correspond to the fan speed bar
display.
AUTO button (A)
(automatic operation)
Press AUTO to make the system
automatically adjust the quantity
and distribution of the air
introduced into the passenger
compartment. All previous manual
settings will be cancelled.
The message FULL AUTO will
appear on the front display in this
condition.
By manually adjusting at least one
of the functions automatically
managed by the system (air
recirculation, air distribution, fan
speed or switching off the
compressor), the word FULL will
disappear from the display,
indicating that the system is no
longer automatically controlling all
the functions (the temperature
will still be controlled automatically).IMPORTANT Should the system
(after manual settings) no longer be
able to guarantee the required
temperature set in the passenger
compartment, the set temperature
value will start flashing to indicate
the difficulties the system is
experiencing and then the word
AUTO will disappear.
To restore system automatic control
at any time, after one or more
manual adjustments, press the
AUTO button.
Air recirculation
on/off button (G)
The air recirculation is managed
according to the following operating
logic:
❒override on (inside air recirculation
always on), indicated by the LED
on button G and the
symbol on
the display;
❒override off (air recirculation
constantly off with air intake from the
outside), signalled by the LED in
the button switching off and by the
symbol in the display
disappearing.
39
Page 48 of 367
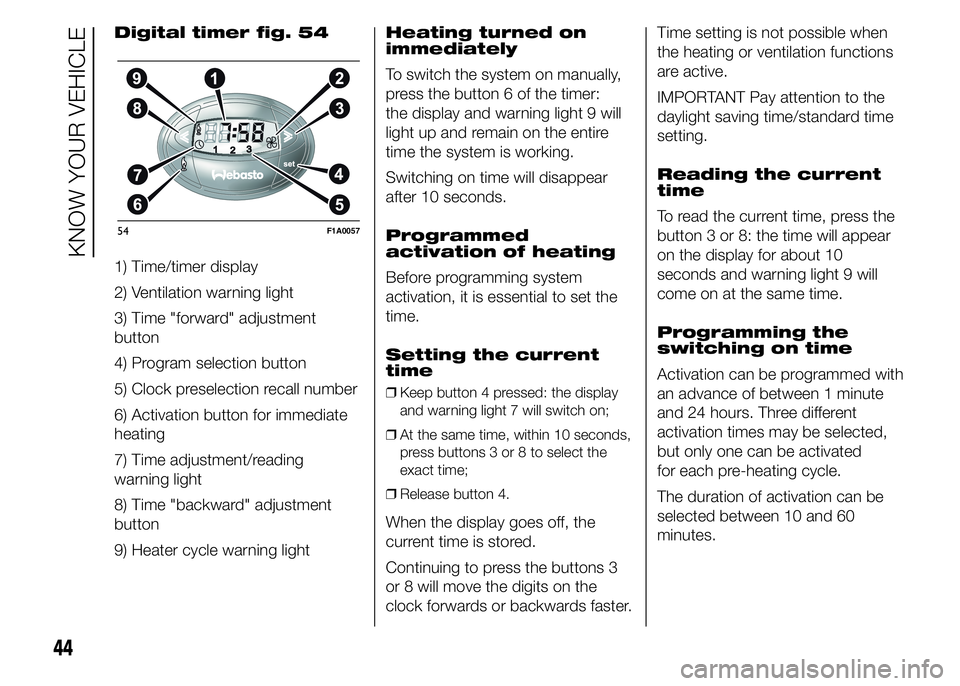
Digital timer fig. 54
1) Time/timer display
2) Ventilation warning light
3) Time "forward" adjustment
button
4) Program selection button
5) Clock preselection recall number
6) Activation button for immediate
heating
7) Time adjustment/reading
warning light
8) Time "backward" adjustment
button
9) Heater cycle warning lightHeating turned on
immediately
To switch the system on manually,
press the button 6 of the timer:
the display and warning light 9 will
light up and remain on the entire
time the system is working.
Switching on time will disappear
after 10 seconds.
Programmed
activation of heating
Before programming system
activation, it is essential to set the
time.
Setting the current
time
❒Keep button 4 pressed: the display
and warning light 7 will switch on;
❒At the same time, within 10 seconds,
press buttons 3 or 8 to select the
exact time;
❒Release button 4.
When the display goes off, the
current time is stored.
Continuing to press the buttons 3
or 8 will move the digits on the
clock forwards or backwards faster.Time setting is not possible when
the heating or ventilation functions
are active.
IMPORTANT Pay attention to the
daylight saving time/standard time
setting.
Reading the current
time
To read the current time, press the
button 3 or 8: the time will appear
on the display for about 10
seconds and warning light 9 will
come on at the same time.
Programming the
switching on time
Activation can be programmed with
an advance of between 1 minute
and 24 hours. Three different
activation times may be selected,
but only one can be activated
for each pre-heating cycle.
The duration of activation can be
selected between 10 and 60
minutes.
54F1A0057
44
KNOW YOUR VEHICLE
Page 49 of 367
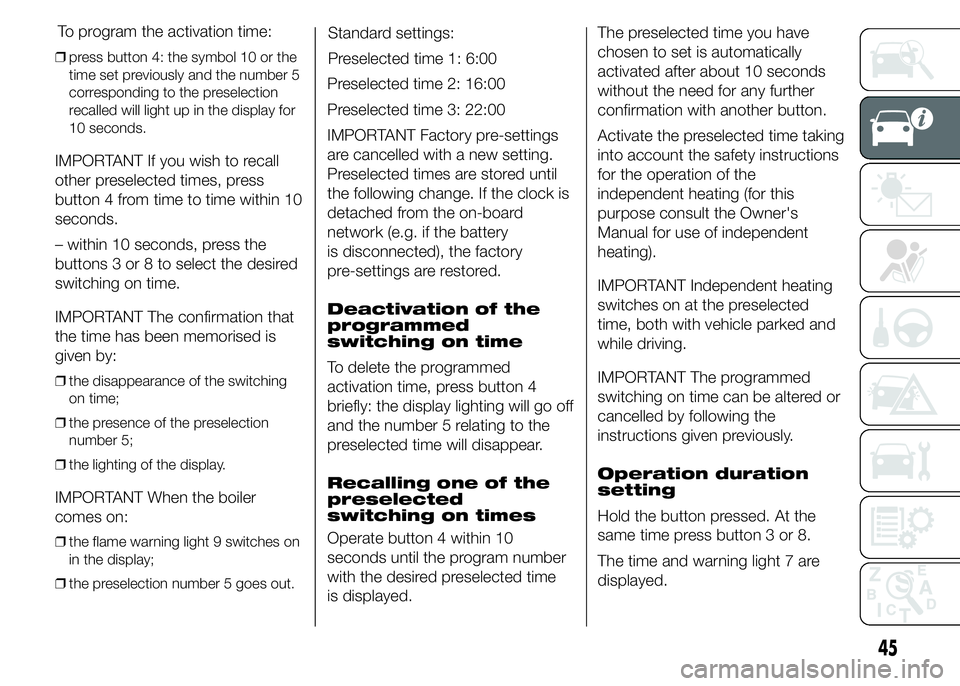
❒press button 4: the symbol 10 or the
time set previously and the number 5
corresponding to the preselection
recalled will light up in the display for
10 seconds.
IMPORTANT If you wish to recall
other preselected times, press
button 4 from time to time within 10
seconds.
– within 10 seconds, press the
buttons 3 or 8 to select the desired
switching on time.
IMPORTANT The confirmation that
the time has been memorised is
given by:
❒the disappearance of the switching
on time;
❒the presence of the preselection
number 5;
❒the lighting of the display.
IMPORTANT When the boiler
comes on:
❒the flame warning light 9 switches on
in the display;
❒the preselection number 5 goes out.
Standard settings:
Preselected time 1: 6:00
Preselected time 2: 16:00
Preselected time 3: 22:00
IMPORTANT Factory pre-settings
are cancelled with a new setting.
Preselected times are stored until
the following change. If the clock is
detached from the on-board
network (e.g. if the battery
is disconnected), the factory
pre-settings are restored.
Deactivation of the
programmed
switching on time
To delete the programmed
activation time, press button 4
briefly: the display lighting will go off
and the number 5 relating to the
preselected time will disappear.
Recalling one of the
preselected
switching on times
Operate button 4 within 10
seconds until the program number
with the desired preselected time
is displayed.The preselected time you have
chosen to set is automatically
activated after about 10 seconds
without the need for any further
confirmation with another button.
Activate the preselected time taking
into account the safety instructions
for the operation of the
independent heating (for this
purpose consult the Owner's
Manual for use of independent
heating).
IMPORTANT Independent heating
switches on at the preselected
time, both with vehicle parked and
while driving.
IMPORTANT The programmed
switching on time can be altered or
cancelled by following the
instructions given previously.
Operation duration
setting
Hold the button pressed. At the
same time press button 3 or 8.
The time and warning light 7 are
displayed.
45
To program the activation time:
Page 75 of 367
Automatic adjustment
When moving, the system
automatically shows that the
vehicle is in 'ride setting 0' and
keeps it constant.
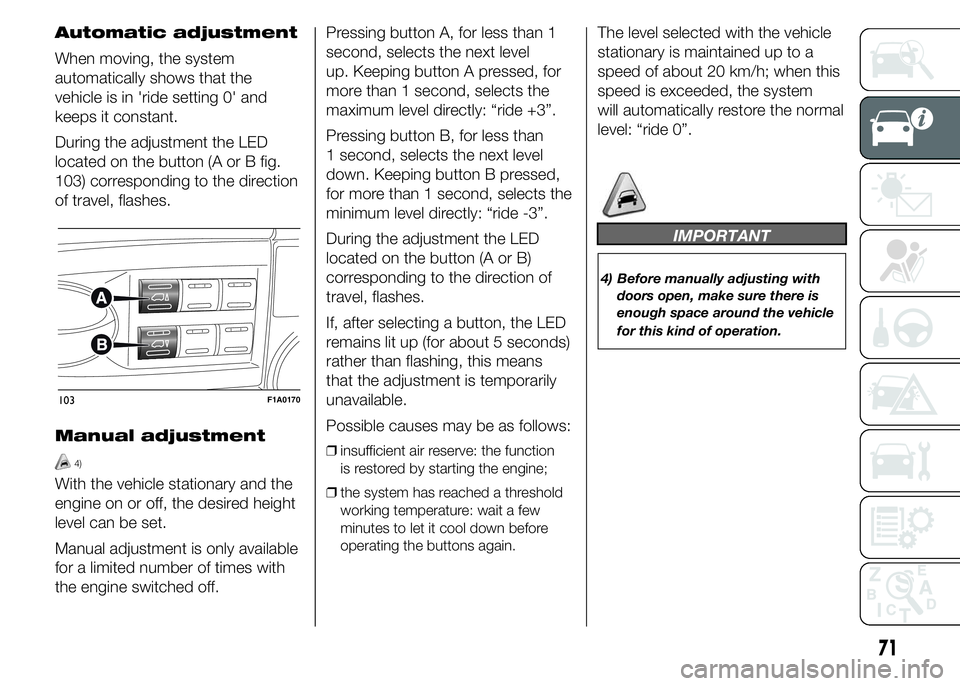
During the adjustment the LED
located on the button (A or B fig.
103) corresponding to the direction
of travel, flashes.
Manual adjustment
4)
With the vehicle stationary and the
engine on or off, the desired height
level can be set.
Manual adjustment is only available
for a limited number of times with
the engine switched off.Pressing button A, for less than 1
second, selects the next level
up. Keeping button A pressed, for
more than 1 second, selects the
maximum level directly: “ride +3”.
Pressing button B, for less than
1 second, selects the next level
down. Keeping button B pressed,
for more than 1 second, selects the
minimum level directly: “ride -3”.
During the adjustment the LED
located on the button (A or B)
corresponding to the direction of
travel, flashes.
If, after selecting a button, the LED
remains lit up (for about 5 seconds)
rather than flashing, this means
that the adjustment is temporarily
unavailable.
Possible causes may be as follows:
❒insufficient air reserve: the function
is restored by starting the engine;
❒the system has reached a threshold
working temperature: wait a few
minutes to let it cool down before
operating the buttons again.
The level selected with the vehicle
stationary is maintained up to a
speed of about 20 km/h; when this
speed is exceeded, the system
will automatically restore the normal
level: “ride 0”.
IMPORTANT
4) Before manually adjusting with
doors open, make sure there is
enough space around the vehicle
for this kind of operation.
103F1A0170
71