key FIAT FIORINO 2018 Owner handbook (in English)
[x] Cancel search | Manufacturer: FIAT, Model Year: 2018, Model line: FIORINO, Model: FIAT FIORINO 2018Pages: 196, PDF Size: 4.99 MB
Page 22 of 196
REAR VIEW
MIRRORS
INTERIOR MIRROR
(for versions/markets, where provided)
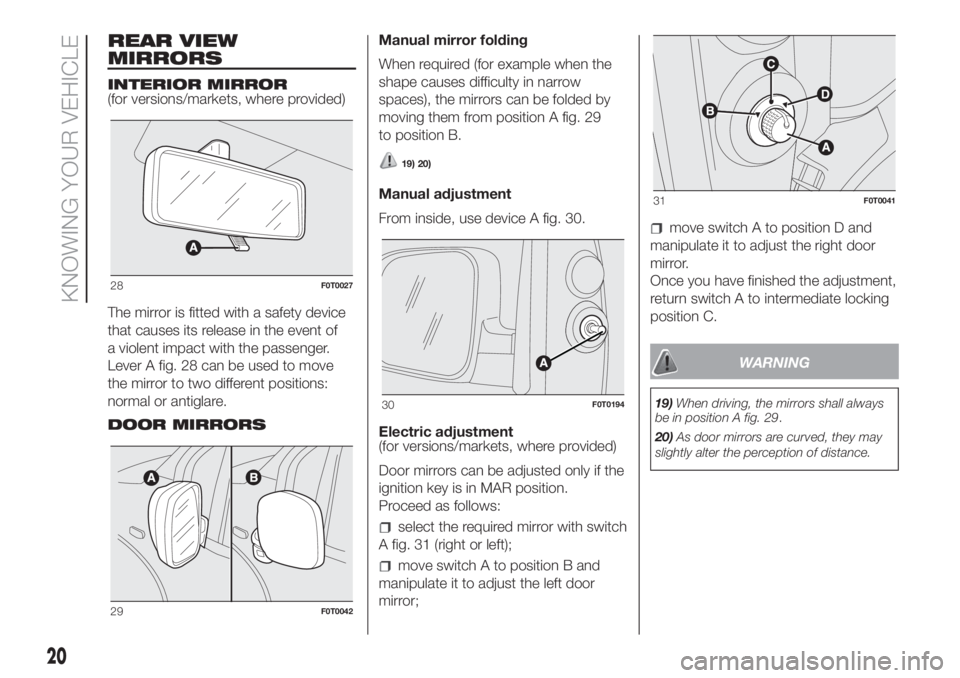
The mirror is fitted with a safety device
that causes its release in the event of
a violent impact with the passenger.
Lever A fig. 28 can be used to move
the mirror to two different positions:
normal or antiglare.
DOOR MIRRORSManual mirror folding
When required (for example when the
shape causes difficulty in narrow
spaces), the mirrors can be folded by
moving them from position A fig. 29
to position B.
19) 20)
Manual adjustment
From inside, use device A fig. 30.
Electric adjustment
(for versions/markets, where provided)
Door mirrors can be adjusted only if the
ignition key is in MAR position.
Proceed as follows:
select the required mirror with switch
A fig. 31 (right or left);
move switch A to position B and
manipulate it to adjust the left door
mirror;
move switch A to position D and
manipulate it to adjust the right door
mirror.
Once you have finished the adjustment,
return switch A to intermediate locking
position C.
WARNING
19)When driving, the mirrors shall always
be in position A fig. 29.
20)As door mirrors are curved, they may
slightly alter the perception of distance.
28F0T0027
29F0T0042
30F0T0194
31F0T0041
20
KNOWING YOUR VEHICLE
Page 23 of 196
EXTERIOR LIGHTS
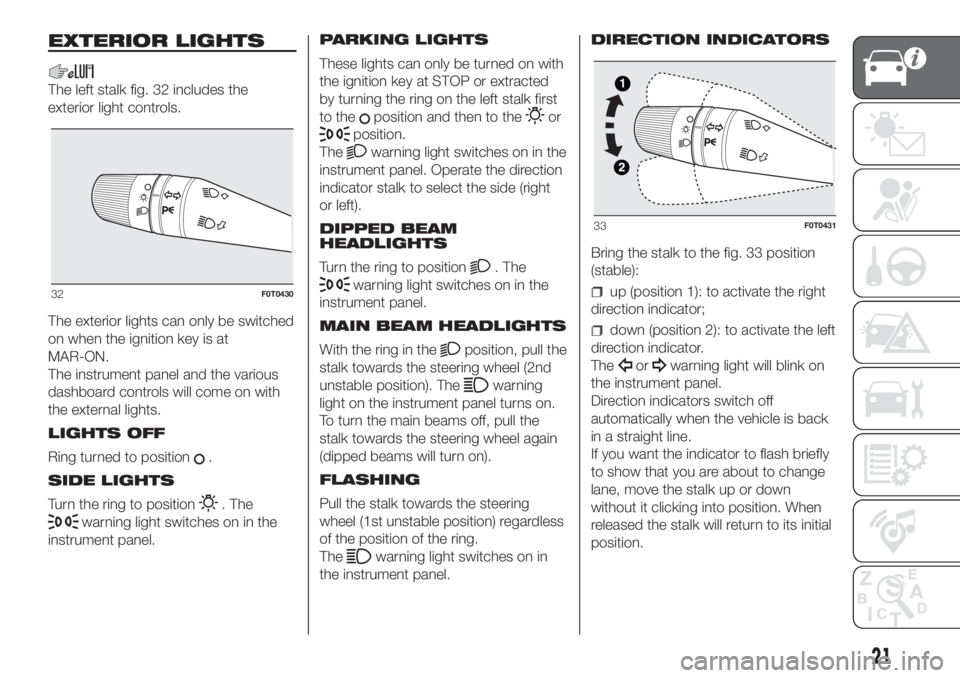
The left stalk fig. 32 includes the
exterior light controls.
The exterior lights can only be switched
on when the ignition key is at
MAR-ON.
The instrument panel and the various
dashboard controls will come on with
the external lights.
LIGHTS OFF
Ring turned to position
.
SIDE LIGHTS
Turn the ring to position
. The
warning light switches on in the
instrument panel.PARKING LIGHTS
These lights can only be turned on with
the ignition key at STOP or extracted
by turning the ring on the left stalk first
to the
position and then to theor
position.
The
warning light switches on in the
instrument panel. Operate the direction
indicator stalk to select the side (right
or left).
DIPPED BEAM
HEADLIGHTS
Turn the ring to position
. The
warning light switches on in the
instrument panel.
MAIN BEAM HEADLIGHTS
With the ring in the
position, pull the
stalk towards the steering wheel (2nd
unstable position). The
warning
light on the instrument panel turns on.
To turn the main beams off, pull the
stalk towards the steering wheel again
(dipped beams will turn on).
FLASHING
Pull the stalk towards the steering
wheel (1st unstable position) regardless
of the position of the ring.
The
warning light switches on in
the instrument panel.DIRECTION INDICATORS
Bring the stalk to the fig. 33 position
(stable):
up (position 1): to activate the right
direction indicator;
down (position 2): to activate the left
direction indicator.
The
orwarning light will blink on
the instrument panel.
Direction indicators switch off
automatically when the vehicle is back
in a straight line.
If you want the indicator to flash briefly
to show that you are about to change
lane, move the stalk up or down
without it clicking into position. When
released the stalk will return to its initial
position.
32F0T0430
33F0T0431
21
Page 24 of 196
Lane change function
If you wish to signal a lane change,
place the left stalk in the unstable
position for less than half a second.
The direction indicator on the side
selected will be activated for 3 flashes
and then go out automatically.
FOG LIGHTS
(for versions/markets, where provided)
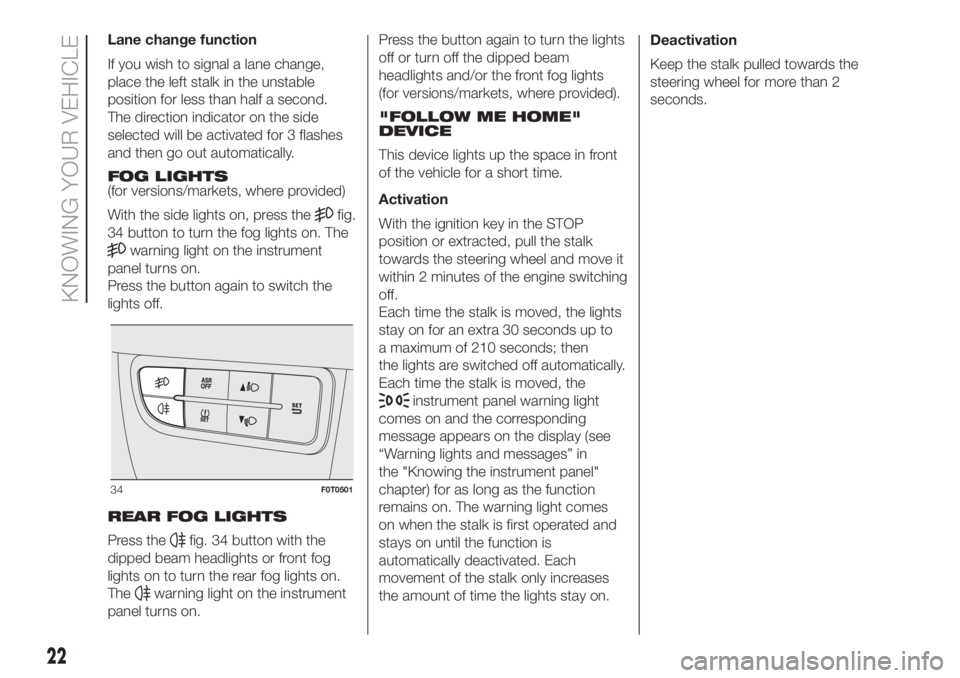
With the side lights on, press the
fig.
34 button to turn the fog lights on. The
warning light on the instrument
panel turns on.
Press the button again to switch the
lights off.
REAR FOG LIGHTS
Press the
fig. 34 button with the
dipped beam headlights or front fog
lights on to turn the rear fog lights on.
The
warning light on the instrument
panel turns on.Press the button again to turn the lights
off or turn off the dipped beam
headlights and/or the front fog lights
(for versions/markets, where provided).
"FOLLOW ME HOME"
DEVICE
This device lights up the space in front
of the vehicle for a short time.
Activation
With the ignition key in the STOP
position or extracted, pull the stalk
towards the steering wheel and move it
within 2 minutes of the engine switching
off.
Each time the stalk is moved, the lights
stay on for an extra 30 seconds up to
a maximum of 210 seconds; then
the lights are switched off automatically.
Each time the stalk is moved, the
instrument panel warning light
comes on and the corresponding
message appears on the display (see
“Warning lights and messages” in
the "Knowing the instrument panel"
chapter) for as long as the function
remains on. The warning light comes
on when the stalk is first operated and
stays on until the function is
automatically deactivated. Each
movement of the stalk only increases
the amount of time the lights stay on.Deactivation
Keep the stalk pulled towards the
steering wheel for more than 2
seconds.
34F0T0501
22
KNOWING YOUR VEHICLE
Page 26 of 196
With the vehicle stationary and the
ignition key either turned to STOP or
removed, the roof light is recharged for
a maximum of 15 minutes.
SWITCHING ROOF
LIGHTS ON/OFF
Cargo versions
The ceiling lights switch on/off in the
following ways:
Ceiling lights on without locking the
doors
Front ceiling light: comes on when the
front doors are opened.
Rear ceiling light: on manually.
Removable ceiling light (alternative to
rear ceiling light): on manually (fixed
part).
Ceiling lights off when locking the doors
Front and rear ceiling light (also with
optional removable ceiling light): off
(faded out) when the sliding side doors,
rear swing doors or front doors are
closed.
With independent load compartment
Front ceiling light: fades out when
the front doors are closed.
Rear ceiling light (also with optional
removable ceiling light): off (faded out)
closing the rear doors.Combi versions
The ceiling lights switch on/off in the
following ways:
Ceiling lights on without locking the
doors
Front ceiling light: comes on when the
front doors are opened.
Rear ceiling light: on manually.
Ceiling lights off when locking the doors
Front and rear ceiling light (also with
optional removable ceiling light): off
(faded out) when the sliding side doors,
rear swing doors or front doors are
closed.WINDOW WASHING
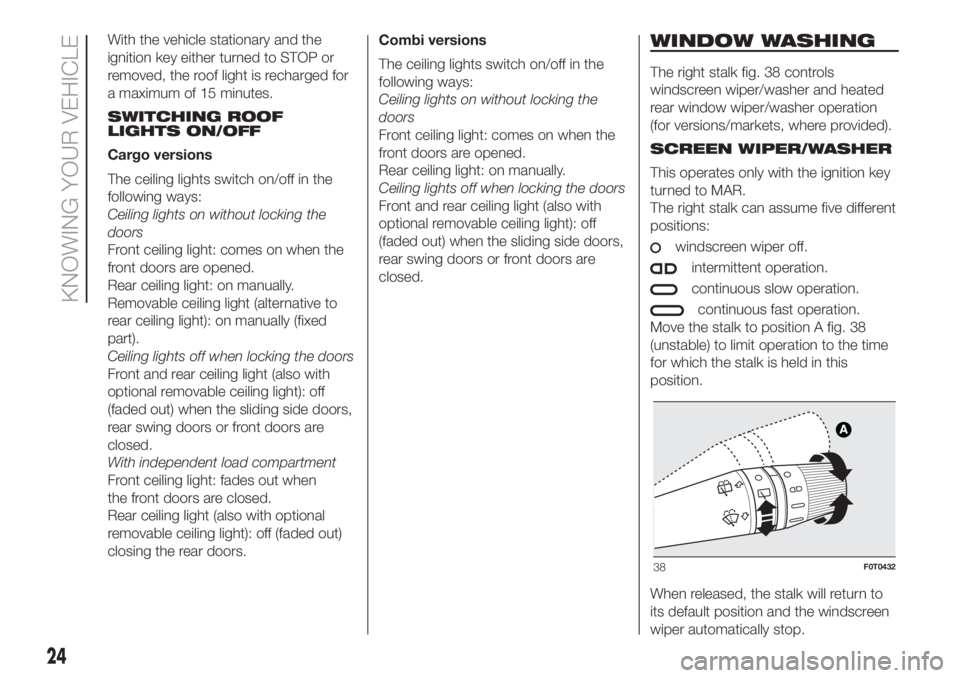
The right stalk fig. 38 controls
windscreen wiper/washer and heated
rear window wiper/washer operation
(for versions/markets, where provided).
SCREEN WIPER/WASHER
This operates only with the ignition key
turned to MAR.
The right stalk can assume five different
positions:
windscreen wiper off.
intermittent operation.
continuous slow operation.
continuous fast operation.
Move the stalk to position A fig. 38
(unstable) to limit operation to the time
for which the stalk is held in this
position.
When released, the stalk will return to
its default position and the windscreen
wiper automatically stop.
38F0T0432
24
KNOWING YOUR VEHICLE
Page 27 of 196
With the twist switch at, the
windscreen wiper will automatically
adapt to the speed of the vehicle.
With the windscreen wipers
operational, if reverse gear is engaged,
the rear window wiper is automatically
activated.
3)
“Smart washing” function
Pull the stalk towards the steering
wheel (unstable position) to operate the
windscreen washer.
Keeping the stalk pulled for more than
half a second, with just one movement
it is possible to operate the washer
jet and the wiper at the same time.
The windscreen wiper stops working
three strokes after the stalk is released.
A further stroke after approx. 6 seconds
completes the wiping cycle.
REAR WINDOW
WIPER/WASHER
(for versions/markets, where provided)
This operates only with the ignition
key turned to MAR.
Activation
Turn the ring nut to
to operate the
rear window wiper:
in intermittent mode when the
windscreen wiper is not operating;
in synchronous mode (at half the
speed of the windscreen wiper) when
the windscreen wiper is operating;
in continuous mode with reverse
gear engaged and the control active.
With the windscreen wiper on and
reverse gear engaged, rear window
wiping will be continuous.
Pushing the stalk towards the
dashboard (rocking position) will
activate the rear window washer jet.
Keep the stalk pushed for more than
half a second to activate the rear
window wiper as well. Releasing the
stalk will activate the smart washing
function, as described for the
windscreen wiper.
Deactivation
The function stops when the stalk is
released.
4)
WARNING
3)Do not use the windscreen wiper to
remove layers of snow or ice from the
windscreen. In such conditions, the
windscreen wiper may be subjected to
excessive stress and the motor cut-out
switch, which prevents operation for a few
seconds, may intervene. If operation is
not restored, contact a Fiat Dealership.4)Do not use the rear window wiper to
remove layers of snow or ice. In such
conditions, the screen wiper may be
subjected to excessive stress and the
motor cut-out switch, which prevents
operation for a few seconds, may
intervene. If operation is not restored,
contact a Fiat Dealership.
25
Page 29 of 196
IMPORTANT The heater will not turn on
if the battery voltage is too low.
WARNING
2)The air conditioning system uses R134a
or R1234yf refrigerant compatible with
the regulations in force in the countries
where the vehicle is sold. When charging,
only use the gas indicated on the
dedicated plate in the engine
compartment. The use of other coolants
affects the efficiency and condition of
the system. The lubricant used for the
compressor is also strictly linked to the
type of cooling gas, please refer to a Fiat
Dealership.
ELECTRIC WINDOWS
ELECTRIC FRONT
WINDOWS
(for versions/markets, where provided)
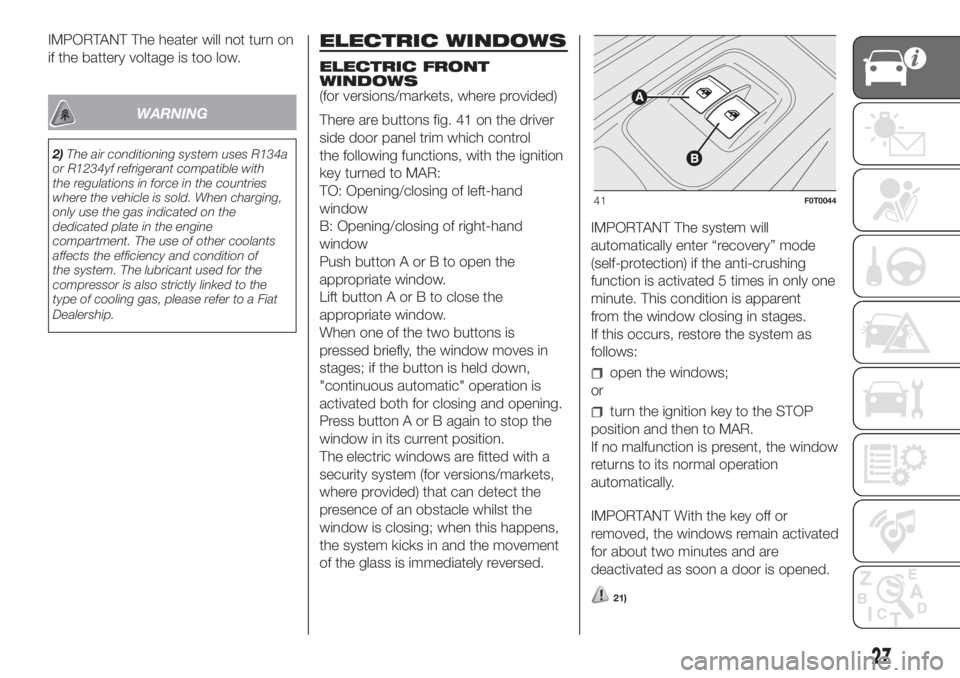
There are buttons fig. 41 on the driver
side door panel trim which control
the following functions, with the ignition
key turned to MAR:
TO: Opening/closing of left-hand
window
B: Opening/closing of right-hand
window
Push button A or B to open the
appropriate window.
Lift button A or B to close the
appropriate window.
When one of the two buttons is
pressed briefly, the window moves in
stages; if the button is held down,
"continuous automatic" operation is
activated both for closing and opening.
Press button A or B again to stop the
window in its current position.
The electric windows are fitted with a
security system (for versions/markets,
where provided) that can detect the
presence of an obstacle whilst the
window is closing; when this happens,
the system kicks in and the movement
of the glass is immediately reversed.IMPORTANT The system will
automatically enter “recovery” mode
(self-protection) if the anti-crushing
function is activated 5 times in only one
minute. This condition is apparent
from the window closing in stages.
If this occurs, restore the system as
follows:
open the windows;
or
turn the ignition key to the STOP
position and then to MAR.
If no malfunction is present, the window
returns to its normal operation
automatically.
IMPORTANT With the key off or
removed, the windows remain activated
for about two minutes and are
deactivated as soon a door is opened.
21)
41F0T0044
27
Page 30 of 196
MANUAL FRONT
WINDOWS
On some versions, the front windows
are opened and closed manually.
Wind the handle to open/close.
WARNING
21)Improper use of the electric windows
can be dangerous. Before and during their
operation ensure that passengers are not
at risk from the moving glass, either by
personal objects caught in the mechanism
or struck by it directly. When leaving the
car, always remove the ignition key to
avoid the risk of injury due to accidental
operation of the electric windows.
BONNET
OPENING
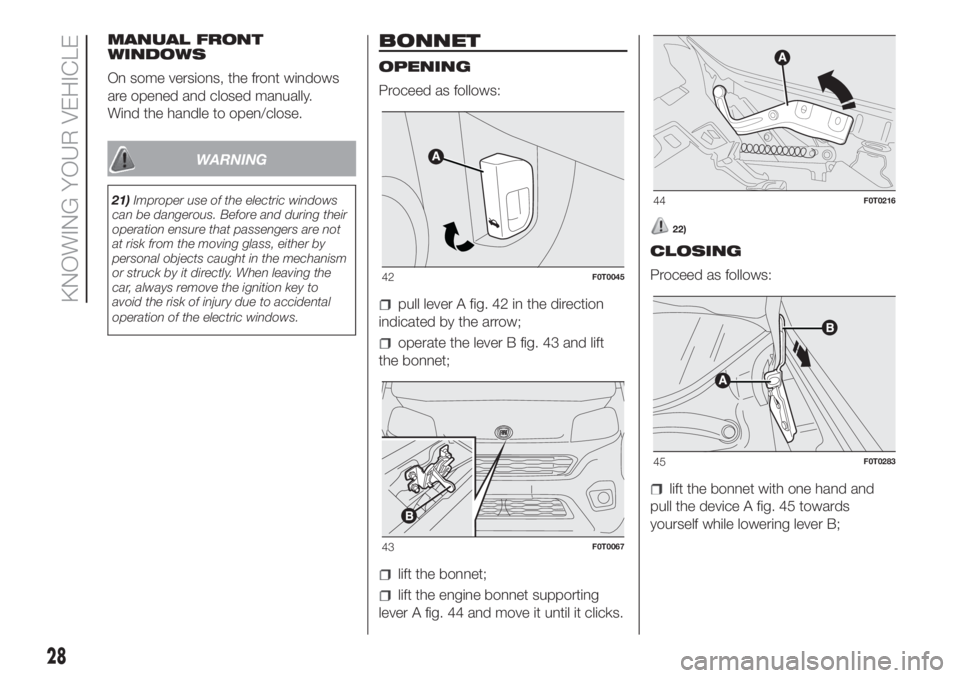
Proceed as follows:
pull lever A fig. 42 in the direction
indicated by the arrow;
operate the lever B fig. 43 and lift
the bonnet;
lift the bonnet;
lift the engine bonnet supporting
lever A fig. 44 and move it until it clicks.
22)
CLOSING
Proceed as follows:
lift the bonnet with one hand and
pull the device A fig. 45 towards
yourself while lowering lever B;
42F0T0045
43F0T0067
44F0T0216
45F0T0283
28
KNOWING YOUR VEHICLE
Page 38 of 196
WARNING
31)The Fiat Fiorino Natural Power is
equipped with a high pressure methane
fuel supply system, designed to operate at
a rated pressure of 200 bar. It is dangerous
to stretch the system with higher
pressures. To prevent damage to the
methane system parts when towing or
lifting the vehicle, follow the instructions in
the main handbook in the chapter: "Towing
the vehicle". If there is a problem with the
methane system, only contact a Fiat
Dealership. Do not alter the methane
system configuration or components. They
are designed exclusively for the Fiat
Fiorino Natural Power. The use of other
components or materials could cause
malfunctions and prejudice safety.
32)When oven painting, the cylinders must
be removed from the vehicle and refitted
by a Fiat Dealership. Although the methane
system has numerous safety features, it is
advisable to close the manual tap on the
cylinders every time the vehicle is not
in use for a long period, transported on
other vehicles or moved in an emergency
as a result of a breakdown or accident.
33)If gas is smelt, switch from methane
operation to petrol operation and
immediately go to a Fiat Dealerships to
have the vehicle checked and possible
system faults supply excluded.
WARNING
5)Regardless of the last fuel system used,
at the following engine starting, after the
initial petrol stage, the system will
automatically switch to methane.
6)At the time of the switching request
there will be a metallic noise from the
valves which are pressurising the circuit
(more obvious with the ignition key in
the MAR-ON position). For the switching
logic described above, a delay between the
valve ticking and the switching off of the
instrument panel indication is completely
normal.
7)Do not switch between the two
operating modes whilst starting the engine.
36
KNOWING YOUR VEHICLE
Page 44 of 196
DIGITAL DISPLAY
STANDARD SCREEN
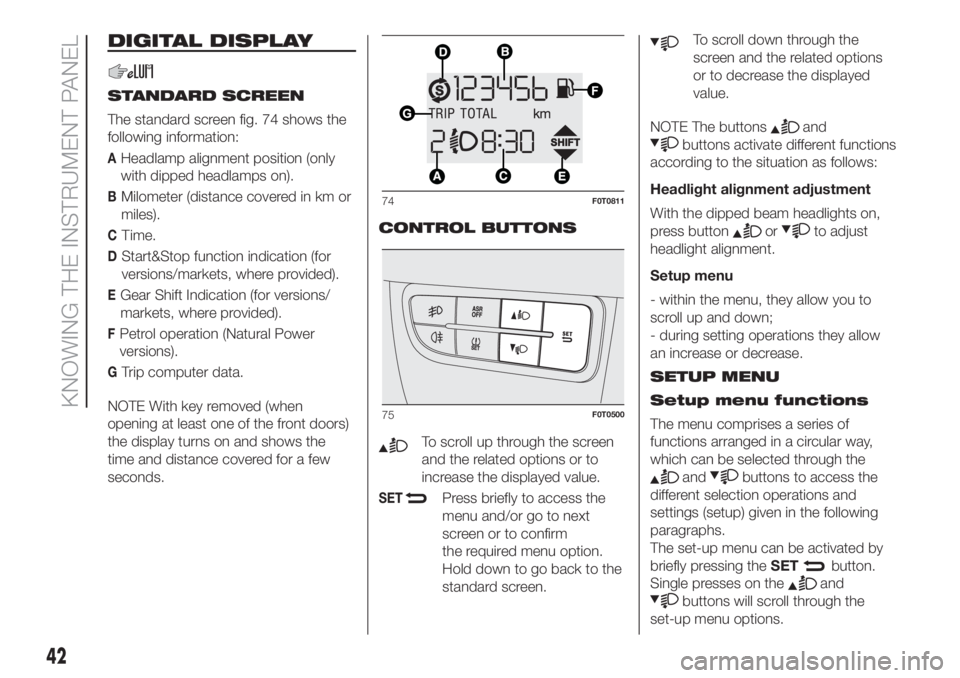
The standard screen fig. 74 shows the
following information:
AHeadlamp alignment position (only
with dipped headlamps on).
BMilometer (distance covered in km or
miles).
CTime.
DStart&Stop function indication (for
versions/markets, where provided).
EGear Shift Indication (for versions/
markets, where provided).
FPetrol operation (Natural Power
versions).
GTrip computer data.
NOTE With key removed (when
opening at least one of the front doors)
the display turns on and shows the
time and distance covered for a few
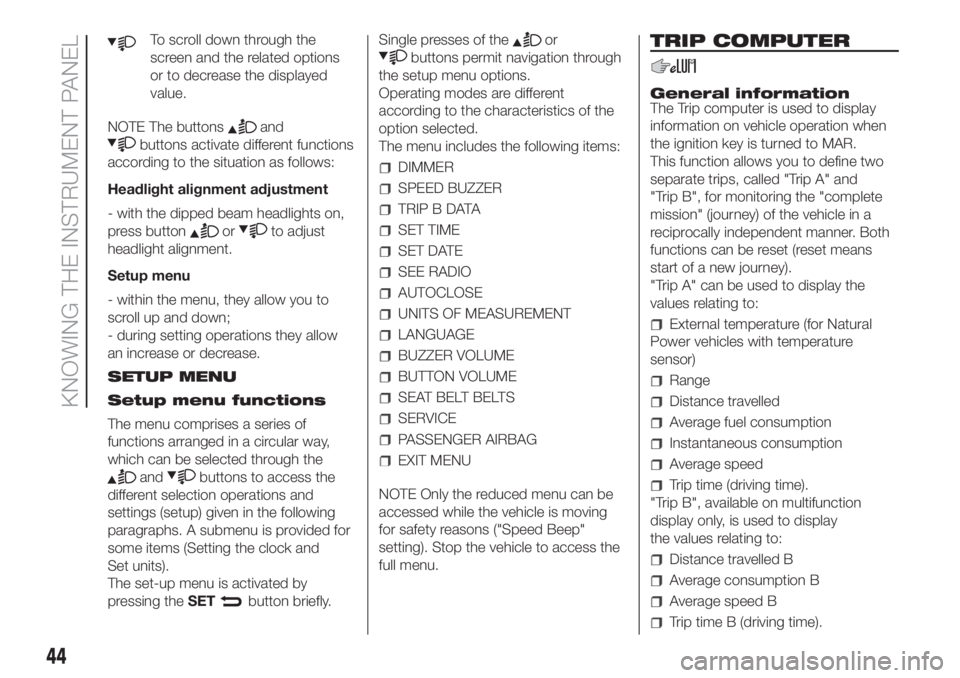
seconds.CONTROL BUTTONS
To scroll up through the screen
and the related options or to
increase the displayed value.
SETPress briefly to access the
menu and/or go to next
screen or to confirm
the required menu option.
Hold down to go back to the
standard screen.
To scroll down through the
screen and the related options
or to decrease the displayed
value.
NOTE The buttons
and
buttons activate different functions
according to the situation as follows:
Headlight alignment adjustment
With the dipped beam headlights on,
press button
orto adjust
headlight alignment.
Setup menu
- within the menu, they allow you to
scroll up and down;
- during setting operations they allow
an increase or decrease.
SETUP MENU
Setup menu functions
The menu comprises a series of
functions arranged in a circular way,
which can be selected through the
andbuttons to access the
different selection operations and
settings (setup) given in the following
paragraphs.
The set-up menu can be activated by
briefly pressing theSET
button.
Single presses on the
and
buttons will scroll through the
set-up menu options.
74F0T0811
75F0T0500
42
KNOWING THE INSTRUMENT PANEL
Page 46 of 196
To scroll down through the
screen and the related options
or to decrease the displayed
value.
NOTE The buttons
and
buttons activate different functions
according to the situation as follows:
Headlight alignment adjustment
- with the dipped beam headlights on,
press button
orto adjust
headlight alignment.
Setup menu
- within the menu, they allow you to
scroll up and down;
- during setting operations they allow
an increase or decrease.
SETUP MENU
Setup menu functions
The menu comprises a series of
functions arranged in a circular way,
which can be selected through the
andbuttons to access the
different selection operations and
settings (setup) given in the following
paragraphs. A submenu is provided for
some items (Setting the clock and
Set units).
The set-up menu is activated by
pressing theSET
button briefly.Single presses of the
or
buttons permit navigation through
the setup menu options.
Operating modes are different
according to the characteristics of the
option selected.
The menu includes the following items:
DIMMER
SPEED BUZZER
TRIP B DATA
SET TIME
SET DATE
SEE RADIO
AUTOCLOSE
UNITS OF MEASUREMENT
LANGUAGE
BUZZER VOLUME
BUTTON VOLUME
SEAT BELT BELTS
SERVICE
PASSENGER AIRBAG
EXIT MENU
NOTE Only the reduced menu can be
accessed while the vehicle is moving
for safety reasons ("Speed Beep"
setting). Stop the vehicle to access the
full menu.
TRIP COMPUTER
General information
The Trip computer is used to display
information on vehicle operation when
the ignition key is turned to MAR.
This function allows you to define two
separate trips, called "Trip A" and
"Trip B", for monitoring the "complete
mission" (journey) of the vehicle in a
reciprocally independent manner. Both
functions can be reset (reset means
start of a new journey).
"Trip A" can be used to display the
values relating to:
External temperature (for Natural
Power vehicles with temperature
sensor)
Range
Distance travelled
Average fuel consumption
Instantaneous consumption
Average speed
Trip time (driving time).
"Trip B", available on multifunction
display only, is used to display
the values relating to:
Distance travelled B
Average consumption B
Average speed B
Trip time B (driving time).
44
KNOWING THE INSTRUMENT PANEL