engine FIAT FIORINO 2019 Owner handbook (in English)
[x] Cancel search | Manufacturer: FIAT, Model Year: 2019, Model line: FIORINO, Model: FIAT FIORINO 2019Pages: 220, PDF Size: 6.22 MB
Page 126 of 220
WARNING
121)The information required by the
applicable regulation is indicated on the
Fix&Go kit package label. Carefully read
the label on the cartridge before use, avoid
improper use. The kit should be used by
adults and cannot be used by children.
122)IMPORTANT: Do not exceed 80 km/h.
Avoid sudden acceleration or braking.
The kit provides a temporary repair,
therefore the tyre must be examined and
repaired by a specialist as soon as
possible. Before using the kit, ensure that
the tyre is not excessively damaged and
that the rim is in good condition, otherwise
do not use it and call roadside assistance.
Do not remove foreign bodies from the
tyre. Do not let the compressor turned on
for more than 20 consecutive minutes -
overheating hazard.
WARNING
30)The sealant fluid is effective with
external temperatures between -40°C and
+55°C. The sealant has an expiry date. It
is possible to repair tyres which have been
damaged on tread up to a diameter of 6
mm. Show the cartridge and the label
to the personnel who will handle the tyre
treated with the tyre repair kit
CHANGING A BULB
GENERAL
INSTRUCTIONS
123) 124) 125) 126) 127)
Before replacing a bulb check the
contacts for oxidation;
burnt bulbs must be replaced by
others of the same type and power;
always check the headlight beam
direction after changing a bulb;
when a light is not working, check
that the corresponding fuse is intact
before replacing a bulb. For the location
of fuses, refer to the paragraph
"Replacing fuses" in this chapter.
IMPORTANT A slight misting may
appear on the internal surface of the
headlight: this does not indicate a fault
and is caused by low temperature
and the degree of humidity in the air.
Misting will rapidly disappear when the
headlights are switched on. The
presence of drops inside the headlights
indicates infiltration of water. Contact
a Fiat Dealership.
WARNING
123)Modifications or repairs to the electric
system that are not carried out properly
or do not take the system technical
specifications into account can cause
malfunctions leading to the risk of fire.
124)Halogen bulbs contain pressurised
gas, in the case of breakage they may
burst causing glass fragments to be
projected outwards.
125)Halogen bulbs must be handled
holding the metal part only. Touching the
transparent part of the bulb with your
fingers may reduce the intensity of the
emitted light and even reduce the lifespan
of the bulb. In the event of accidental
contact, wipe the bulb with a cloth
moistened with alcohol and let the bulb dry.
126)Where possible, it is advisable to
have bulbs changed at a Fiat Dealership.
The correct operation and direction of
the external lights are absolutely essential
for the safety of the car and of compliance
with the law.
127)Replace the bulbs with the engine
stopped and in a position in which it is not
danger for oncoming traffic and where
you perform the replacement safely (see
the “When parked” paragraph). Also ensure
that the engine is cold, to prevent the risk
of burns.
124
IN AN EMERGENCY
Page 134 of 220
REPLACING FUSES
GENERAL INFORMATION
128) 129) 130) 131) 132)
31)
Fuses protect the electrical system:
they intervene (blow) in the event of a
failure or improper action on the
system.
When a device does not work, check
the condition of its protection fuse: the
filament A fig. 161 must be intact.
If it is not, replace the blown fuse with
another with the same amperage (same
colour).
B intact fuse.
C fuse with damaged filament.
To change a fuse, use the tweezers D
located in the tool box or the Fix&Go
container (for versions/markets where
provided).Refer to the tables on the following
pages to identify the protective fuse.
ENGINE BAY FUSE BOX
The fuse box is on the right-hand side
of the engine.
Removing the fuse box lid
Proceed as follows:
remove protective cover A fig. 162
from the positive battery terminal by
lifting it upwards;
press the tab A fig. 163 and remove
the fuse box protective cover B;
move the cover towards the
headlight, turning it anticlockwise (as
shown by the arrow) and then remove it
fig. 164;
the fuse box can be accessed in this
manner fig. 166.
32)
161F0T0015
162F0T0171
163F0T0172
164F0T0173
132
IN AN EMERGENCY
Page 140 of 220
PROTECTED DEVICE - fig. 168 FUSE AMPERE
Cigar lighter/Passenger compartment power socket F94 15
AvailableF95 -
Cigar lighter/Passenger compartment power socket F96 15
Front seat heater (driver side) F97 10
Front seat heater (passenger side) F98 10
WARNING
128)If the replaced fuse blows again, contact a Fiat Dealership.
129)Never replace a fuse with another with a higher amp rating; DANGER OF FIRE.
130)If a general protection fuse (MEGA-FUSE, MIDI-FUSE) is activated, contact a Fiat Dealership.
131)Before replacing a fuse, make sure that the ignition key has been removed and that all the other services are switched off and/or
disengaged.
132)Contact Fiat Dealership if a safety system (airbags, brakes), engine system (engine, gearbox) or steering system general protection fuse
blows.
WARNING
31)Never replace a fuse with metal wires or anything else.
32)If you need to clean the engine compartment, take care not to directly hit the fuse box with the water jet.
138
IN AN EMERGENCY
Page 141 of 220
JUMP STARTING
If the warning lightremains on
continuously on the instrument panel,
contact the Fiat Dealership immediately.
JUMP STARTING
If the battery is flat, it is possible to start
the engine using an auxiliary battery
with the same capacity or a little higher
than the flat one.
Proceed as follows to start the vehicle
fig. 169:
connect the positive terminals (+
mark near the terminal) of the two
batteries using a suitable lead;
with a second lead, connect the
negative terminal (-) of the auxiliary
battery to an earthing point
on the
engine or the gearbox of the vehicle to
be started;
start the engine;
when the engine has been started,
remove the leads reversing the order
above.
If after a few attempts the engine does
not start, do not persist but contact
the nearest Fiat Dealership.
133)
33)
IMPORTANT Do not directly connect
the negative terminals of the two
batteries: sparks could ignite explosive
gas released from the battery. If the
auxiliary battery is installed on another
vehicle, avoid any metal parts on the
latter and the vehicle with the flat
battery from accidentally coming into
contact.
BUMP STARTING
Never bump start the engine by
pushing, towing or driving downhill.
This could cause fuel to flow into the
catalytic converter and damage it
beyond repair.
IMPORTANT Remember that the brake
booster and the power steering system
are not active until the engine is started,
so you will need to apply much more
force to the brake pedal or steering
wheel.
WARNING
133)This starting procedure must be
performed by expert personnel because
incorrect actions could cause electrical
discharge of considerable intensity.
Furthermore, battery fluid is poisonous and
corrosive: avoid contact with skin and
eyes. Keep naked flames and lighted
cigarettes away from the battery and do
not cause sparks.
WARNING
33)Never use a fast battery-charger to
start the engine as this could damage the
electronic systems of your vehicle,
particularly the ignition and engine fuel
supply control units.
169F0T0189
139
Page 142 of 220
FUEL CUT-OFF
SYSTEM
134)
This intervenes in the case of an impact
causing:
the interruption of the fuel supply
with the engine consequently cutting
out;
the automatic unlocking of the
doors;
turning on the lights inside the car.
When the system has been triggered,
the message “Fuel cut off, see
handbook” is displayed on some
versions.
IMPORTANT Check carefully for fuel
leaks, for instance in the engine
compartment, under the vehicle or near
the tank area.
After a crash, turn the ignition key to
STOP to avoid draining the battery.
The following procedure should be
carried out to restore the correct
operation of the vehicle:
turn the ignition key to MAR;
activate the right direction indicator;
deactivate the right direction
indicator;
activate the left direction indicator;
deactivate the left direction indicator;
activate the right direction indicator;
deactivate the right direction
indicator;
activate the left direction indicator;
deactivate the left direction indicator;
turn the ignition key to STOP.
Natural Power versions
In the event of an impact to the car, the
petrol and injection supply is cut off
immediately, causing the engine to cut
out and, as a result, the safety solenoid
valves to close.
WARNING
134)If, after an impact, you smell fuel or
notice leaks from the fuel system, do
not reactivate the system to avoid the risk
of fire.
TOWING THE
VEHICLE
The tow ring provided with the vehicle
is located in the tool box located behind
the left seat backrest (Cargo versions)
or in the boot (Combi versions).
ATTACHING THE TOW
HOOK
Proceed as follows:
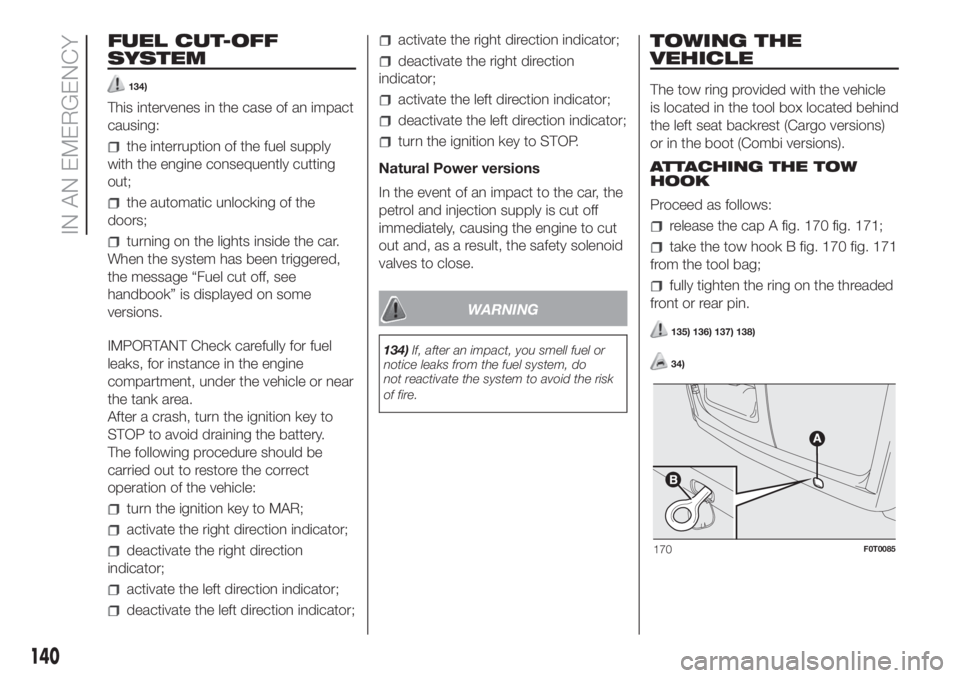
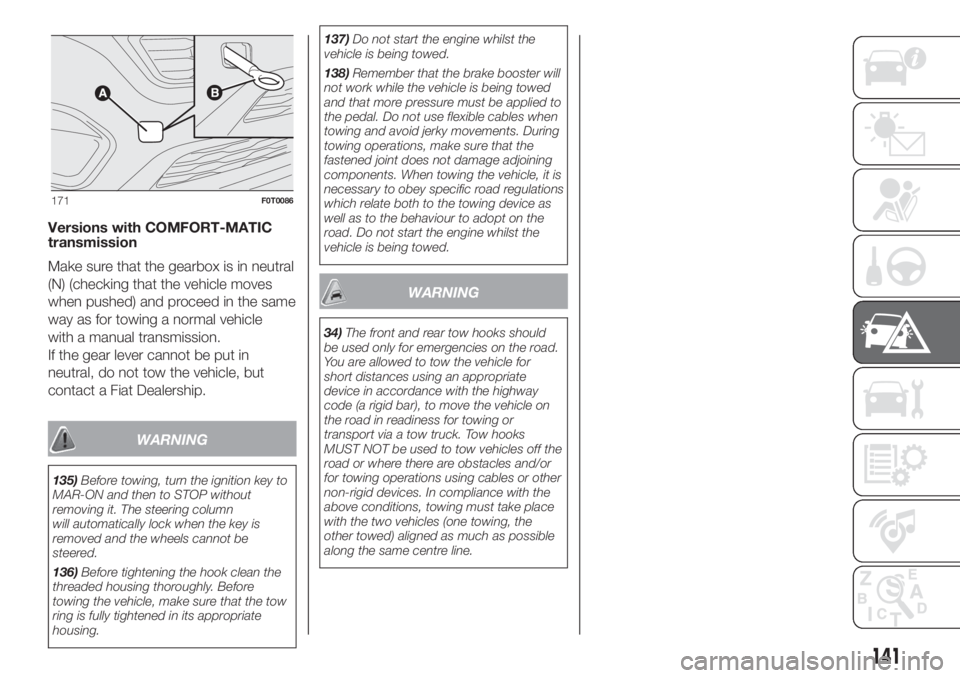
release the cap A fig. 170 fig. 171;
take the tow hook B fig. 170 fig. 171
from the tool bag;
fully tighten the ring on the threaded
front or rear pin.
135) 136) 137) 138)
34)
170F0T0085
140
IN AN EMERGENCY
Page 143 of 220
Versions with COMFORT-MATIC
transmission
Make sure that the gearbox is in neutral
(N) (checking that the vehicle moves
when pushed) and proceed in the same
way as for towing a normal vehicle
with a manual transmission.
If the gear lever cannot be put in
neutral, do not tow the vehicle, but
contact a Fiat Dealership.
WARNING
135)Before towing, turn the ignition key to
MAR-ON and then to STOP without
removing it. The steering column
will automatically lock when the key is
removed and the wheels cannot be
steered.
136)Before tightening the hook clean the
threaded housing thoroughly. Before
towing the vehicle, make sure that the tow
ring is fully tightened in its appropriate
housing.137)Do not start the engine whilst the
vehicle is being towed.
138)Remember that the brake booster will
not work while the vehicle is being towed
and that more pressure must be applied to
the pedal. Do not use flexible cables when
towing and avoid jerky movements. During
towing operations, make sure that the
fastened joint does not damage adjoining
components. When towing the vehicle, it is
necessary to obey specific road regulations
which relate both to the towing device as
well as to the behaviour to adopt on the
road. Do not start the engine whilst the
vehicle is being towed.
WARNING
34)The front and rear tow hooks should
be used only for emergencies on the road.
You are allowed to tow the vehicle for
short distances using an appropriate
device in accordance with the highway
code (a rigid bar), to move the vehicle on
the road in readiness for towing or
transport via a tow truck. Tow hooks
MUST NOT be used to tow vehicles off the
road or where there are obstacles and/or
for towing operations using cables or other
non-rigid devices. In compliance with the
above conditions, towing must take place
with the two vehicles (one towing, the
other towed) aligned as much as possible
along the same centre line.
171F0T0086
141
Page 146 of 220
SERVICE SCHEDULE
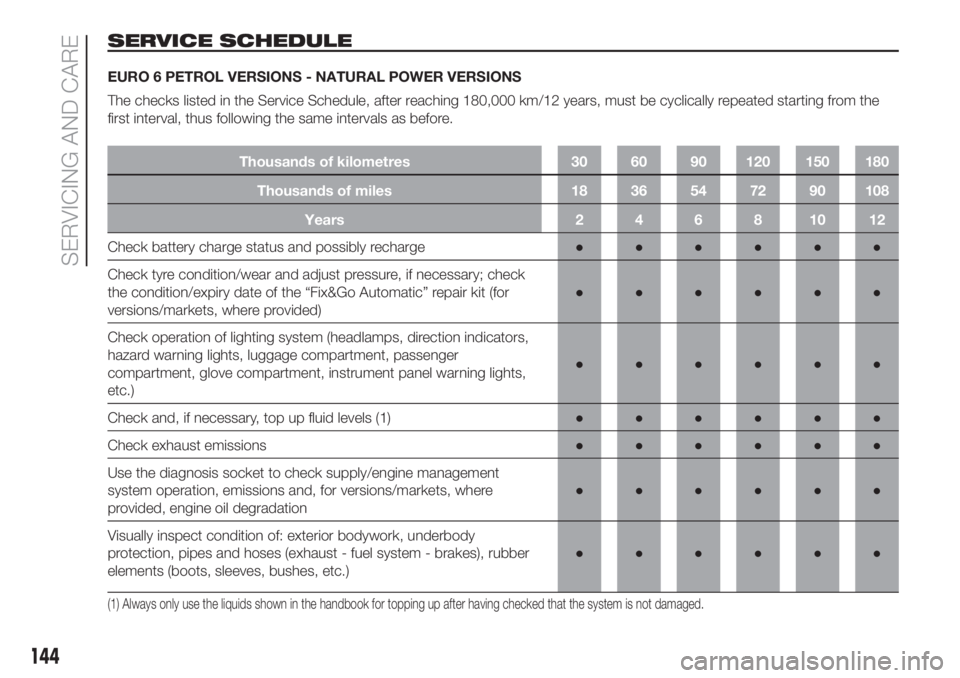
EURO 6 PETROL VERSIONS - NATURAL POWER VERSIONS
The checks listed in the Service Schedule, after reaching 180,000 km/12 years, must be cyclically repeated starting from the
first interval, thus following the same intervals as before.
Thousands of kilometres 30 60 90 120 150 180
Thousands of miles 18 36 54 72 90 108
Years 2 4 6 8 10 12
Check battery charge status and possibly recharge●●●●●●
Check tyre condition/wear and adjust pressure, if necessary; check
the condition/expiry date of the “Fix&Go Automatic” repair kit (for
versions/markets, where provided)●●●●●●
Check operation of lighting system (headlamps, direction indicators,
hazard warning lights, luggage compartment, passenger
compartment, glove compartment, instrument panel warning lights,
etc.)●●●●●●
Check and, if necessary, top up fluid levels (1)●●●●●●
Check exhaust emissions●●●●●●
Use the diagnosis socket to check supply/engine management
system operation, emissions and, for versions/markets, where
provided, engine oil degradation●●●●●●
Visually inspect condition of: exterior bodywork, underbody
protection, pipes and hoses (exhaust - fuel system - brakes), rubber
elements (boots, sleeves, bushes, etc.)●●●●●●
(1) Always only use the liquids shown in the handbook for topping up after having checked that the system is not damaged.
144
SERVICING AND CARE
Page 148 of 220
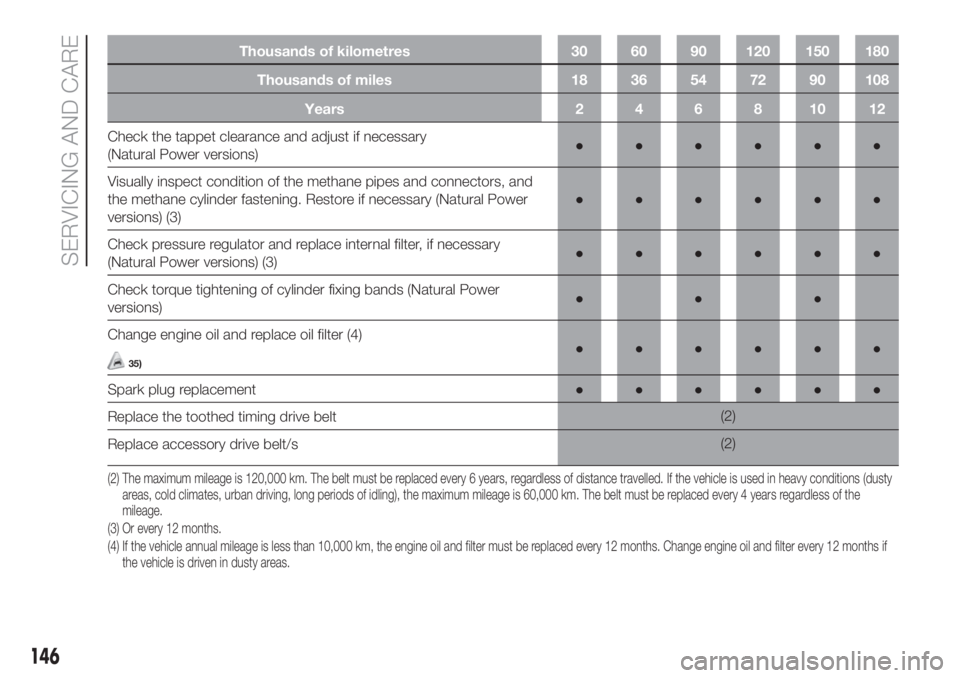
Thousands of kilometres 30 60 90 120 150 180
Thousands of miles 18 36 54 72 90 108
Years 2 4 6 8 10 12
Check the tappet clearance and adjust if necessary
(Natural Power versions)●●●●●●
Visually inspect condition of the methane pipes and connectors, and
the methane cylinder fastening. Restore if necessary (Natural Power
versions) (3)●●●●●●
Check pressure regulator and replace internal filter, if necessary
(Natural Power versions) (3)●●●●●●
Check torque tightening of cylinder fixing bands (Natural Power
versions)●●●
Change engine oil and replace oil filter (4)
35)●●●●●●
Spark plug replacement●●●●●●
Replace the toothed timing drive belt(2)
Replace accessory drive belt/s(2)
(3) Or every 12 months.
(4) If the vehicle annual mileage is less than 10,000 km, the engine oil and filter must be replaced every 12 months. Change engine oil and filter every 12months if
the vehicle is driven in dusty areas. (2) The maximum mileage is 120,000 km. The belt must be replaced every 6 years, regardless of distance travelled. If the vehicle is used in heavy conditions (dusty
areas, cold climates, urban driving, long periods of idling), the maximum mileage is 60,000 km. The belt must be replaced every 4 years regardless of the
mileage.
146
SERVICING AND CARE
Page 149 of 220
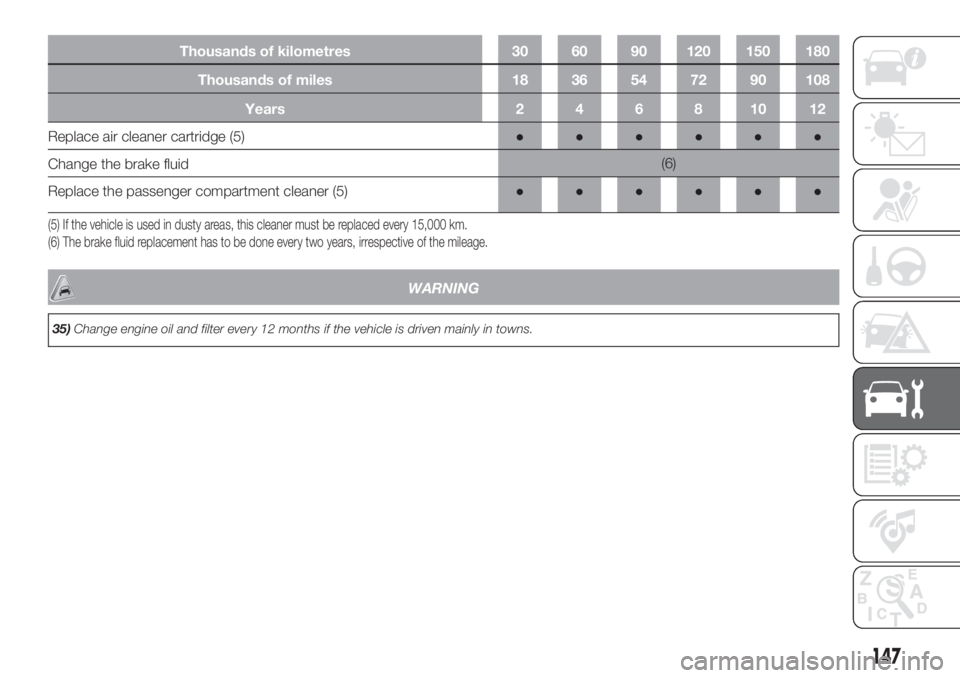
Thousands of kilometres 30 60 90 120 150 180
Thousands of miles 18 36 54 72 90 108
Years 2 4 6 8 10 12
Replace air cleaner cartridge (5)●●●●●●
Change the brake fluid(6)
Replace the passenger compartment cleaner (5)●●●●●●
(5) If the vehicle is used in dusty areas, this cleaner must be replaced every 15,000 km.
(6) The brake fluid replacement has to be done every two years, irrespective of the mileage.
WARNING
35)Change engine oil and filter every 12 months if the vehicle is driven mainly in towns.
147
Page 150 of 220
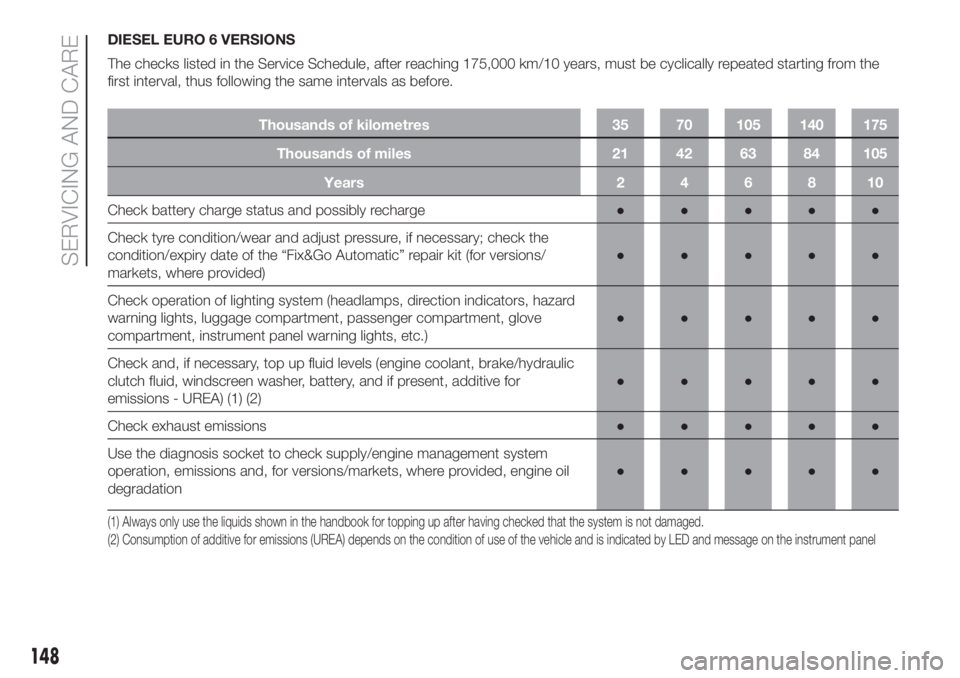
DIESEL EURO 6 VERSIONS
The checks listed in the Service Schedule, after reaching 175,000 km/10 years, must be cyclically repeated starting from the
first interval, thus following the same intervals as before.
Thousands of kilometres 35 70 105 140 175
Thousands of miles 21 42 63 84 105
Years 2 4 6 8 10
Check battery charge status and possibly recharge●●●●●
Check tyre condition/wear and adjust pressure, if necessary; check the
condition/expiry date of the “Fix&Go Automatic” repair kit (for versions/
markets, where provided)●●●●●
Check operation of lighting system (headlamps, direction indicators, hazard
warning lights, luggage compartment, passenger compartment, glove
compartment, instrument panel warning lights, etc.)●●●●●
Check and, if necessary, top up fluid levels (engine coolant, brake/hydraulic
clutch fluid, windscreen washer, battery, and if present, additive for
emissions - UREA) (1) (2)●●●●●
Check exhaust emissions●●●●●
Use the diagnosis socket to check supply/engine management system
operation, emissions and, for versions/markets, where provided, engine oil
degradation●●●●●
(1) Always only use the liquids shown in the handbook for topping up after having checked that the system is not damaged.
(2) Consumption of additive for emissions (UREA) depends on the condition of use of the vehicle and is indicated by LED and message on the instrument panel
148
SERVICING AND CARE