turn signal FIAT FREEMONT 2011 Owner handbook (in English)
[x] Cancel search | Manufacturer: FIAT, Model Year: 2011, Model line: FREEMONT, Model: FIAT FREEMONT 2011Pages: 267, PDF Size: 5.16 MB
Page 19 of 267

REMOTE KEYLESS ENTRY (RKE)
The RKE system allows you to lock or unlock the
doors and liftgate from distances up to approximately
10 m using a hand-held Key Fob with RKE transmitter.
The RKE transmitter does not need to be pointed at
the vehicle to activate the system.
NOTE:Driving at speeds 8 km/h and above disables
the system from responding to all RKE transmitter
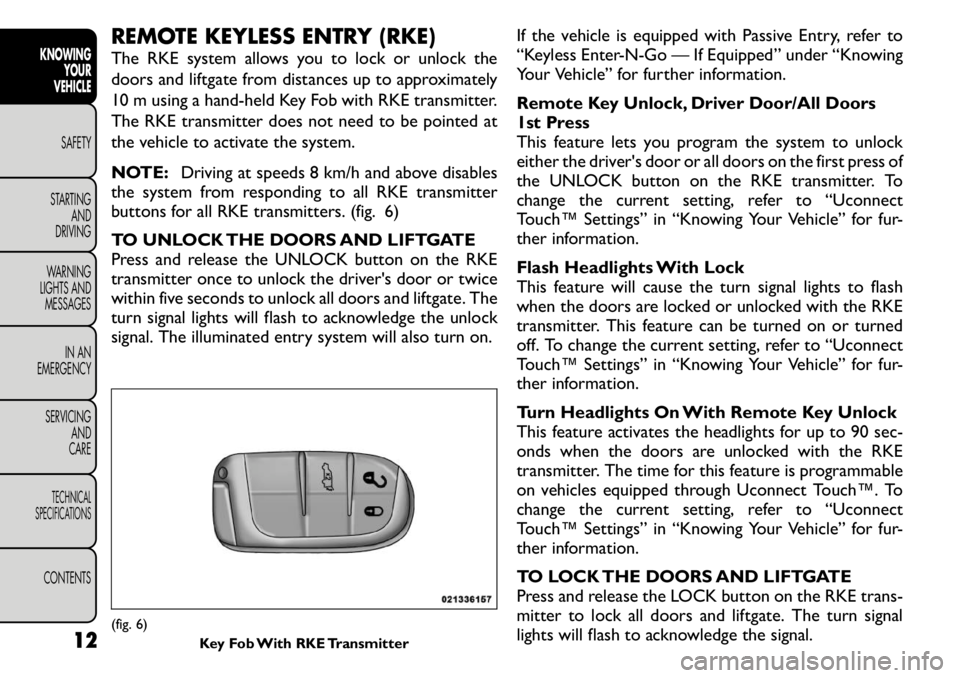
buttons for all RKE transmitters. (fig. 6)
TO UNLOCK THE DOORS AND LIFTGATE
Press and release the UNLOCK button on the RKE
transmitter once to unlock the driver's door or twice
within five seconds to unlock all doors and liftgate. The
turn signal lights will flash to acknowledge the unlock
signal. The illuminated entry system will also turn on. If the vehicle is equipped with Passive Entry, refer to
“Keyless Enter-N-Go — If Equipped” under “Knowing
Your Vehicle” for further information.
Remote Key Unlock, Driver Door/All Doors
1st Press
This feature lets you program the system to unlock
either the driver's door or all doors on the first press of
the UNLOCK button on the RKE transmitter. To
change the current setting, refer to “Uconnect
Touch™ Settings” in “Knowing Your Vehicle” for fur-
ther information.
Flash Headlights With Lock
This feature will cause the turn signal lights to flash
when the doors are locked or unlocked with the RKE
transmitter. This feature can be turned on or turned
off. To change the current setting, refer to “Uconnect
Touch™ Settings” in “Knowing Your Vehicle” for fur-
ther information.
Turn Headlights On With Remote Key Unlock
This feature activates the headlights for up to 90 sec-
onds when the doors are unlocked with the RKE
transmitter. The time for this feature is programmable
on vehicles equipped through Uconnect Touch™. To
change the current setting, refer to “Uconnect
Touch™ Settings” in “Knowing Your Vehicle” for fur-
ther information.
TO LOCK THE DOORS AND LIFTGATE
Press and release the LOCK button on the RKE trans-
mitter to lock all doors and liftgate. The turn signal
lights will flash to acknowledge the signal.(fig. 6)
Key Fob With RKE Transmitter
12
KNOWING
YOUR
VEHICLE
SAFETY
STARTING AND
DRIVING
WARNING
LIGHTS AND
MESSAGES
IN AN
EMERGENCY
SERVICING AND
CARETECHNICAL
SPECIFICATIONSCONTENTS
Page 21 of 267

GENERAL INFORMATION
Transmitter and receivers operate on a carrier fre-
quency of 434 MHz as required by EEC regulations.
These devices must be certified to conform to specific
regulations in each individual country. Two sets of
regulations are involved: ETS (European Telecommuni-
cation Standard) 300–220, which most countries use,
and German BZT federal regulation 225Z125, which is
based on ETC 300–220 but has additional unique re-
quirements. Other defined requirements are noted in
ANNEX VI of COMMISSION DIRECTIVE 95/56/EC.
Operation is subject to the following conditions:
• This device may not cause harmful interference.
• This device must accept any interference received,including interference that may cause undesired operation.
If your RKE transmitter fails to operate from a normal
distance, check for these two conditions:
1. A weak battery in the transmitter. The expected life of the battery is a minimum of three years.
2. Closeness to a radio transmitter such as a radio station tower, airport transmitter, and some mobile
or CB radios. VEHICLE SECURITY ALARM — IF EQUIPPED
The Vehicle Security Alarm (VSA) system monitors the
vehicle doors, hood, and liftgate for unauthorized en-
try and the ignition switch for unauthorized operation.
If something triggers the alarm, the system will prevent
the vehicle from starting, sound the horn intermit-
tently, flash the headlights and taillights, and flash the
Vehicle Security Light in the instrument cluster.
REARMING OF THE SYSTEM
If something triggers the alarm, and no action is taken
to disarm it, the system will turn off the horn after
approximately 29 seconds, turn off all of the visual
signals after one minute, and then the system will
rearm itself.
TO ARM THE SYSTEM
Follow these steps to arm the theft alarm:
1. Remove the key from the ignition system (refer to
"Starting Procedures" in "Starting And Driving" for
further information).
• For vehicles equipped with Keyless Enter-N-Go,
make sure the vehicle ignition system is "OFF".
• For vehicles not equipped with Keyless Enter-N-Go,
make sure the vehicle ignition system is "OFF" and the
key is physically removed from the ignition.
2. Perform one of the following methods to lock the vehicle:
14
KNOWING YOUR
VEHICLE
SAFETY
STARTING AND
DRIVING
WARNING
LIGHTS AND
MESSAGES
IN AN
EMERGENCY
SERVICING AND
CARETECHNICAL
SPECIFICATIONSCONTENTS
Page 23 of 267

PREMIUM SECURITY SYSTEM — IF EQUIPPED
The Premium Security system monitors the doors,
hood latch, and liftgate for unauthorized entry and the
ignition switch for unauthorized operation. The system
also includes a dual function intrusion sensor and
vehicle tilt sensor. The intrusion sensor monitors the
vehicle interior for motion. The vehicle tilt sensor
monitors the vehicle for any tilting actions (tow away,
tire removal, ferry transport, etc). A siren with battery
backup which senses interruptions of power and com-
munications is also included.
In the event that something triggers the security sys-
tem, the siren will sound for 29 seconds and the
headlights will turn on and the turn signal and side
repeater lights will flash for an additional 34 seconds.
The system will repeat this sequence for up to 8
security violations in any mode (door ajar, motion,
hood ajar, etc.) before having to rearm the system. At
the end of any particular trigger event, the lights will
continue to flash for 26 seconds.
To Arm The System
Follow these steps to arm the theft alarm:
1. Remove the key from the ignition system (refer to"Starting Procedures" in "Starting And Operating"
for further information).
• For vehicles equipped with Keyless Enter-N-Go,
make sure the vehicle ignition system is "OFF". • For vehicles not equipped with Keyless Enter-N-Go,
make sure the vehicle ignition system is "OFF" and the
key is physically removed from the ignition.
2. Perform one of the following methods to lock the
vehicle:
• Press LOCK on the interior power door lock
switch with the driver and/or passenger door open.
• Press the LOCK button on the exterior Passive Entry
Door Handle with a valid Key Fob available in the same
exterior zone (refer to "Keyless Enter-N-Go" in
"Things To Know Before Starting Your Vehicle" for
further information).
• Press the LOCK button on the Remote Keyless Entry
(RKE) transmitter.
3. If any doors are open, close them.
To Disarm The System
The Vehicle Security Alarm can be disarmed using any
of the following methods:
• Press the UNLOCK button on the Remote Keyless Entry (RKE) transmitter.
• Grasp the Passive Entry Unlock Door Handle with a valid key fob available in the same exterior zone (if
equipped, refer to "Keyless Enter-N-Go" in "Things
To Know Before Starting Your Vehicle" for further
information).
• Cycle the vehicle ignition system out of the OFF position.
16
KNOWING YOUR
VEHICLE
SAFETY
STARTING AND
DRIVING
WARNING
LIGHTS AND
MESSAGES
IN AN
EMERGENCY
SERVICING AND
CARETECHNICAL
SPECIFICATIONSCONTENTS
Page 26 of 267

SELECT ButtonPress and release the SELECT button for
access to main menus or sub-menus. Press
and hold the SELECT button for two seconds
to reset features.
BACK Button Press the BACK button to scroll back to a
previous menu or sub-menu.
ELECTRONIC VEHICLE INFORMATION
CENTER (EVIC) DISPLAYS
When the appropriate conditions exist, the EVIC dis-
plays the following messages:
• Turn Signal On (with a continuous warning chime if the vehicle is driven more than 1.6 km with either
turn signal on)
• Left Front Turn Signal Light Out (with a single chime)
• Left Rear Turn Signal Light Out (with a single chime)
• Right Front Turn Signal Light Out (with a single chime)
• Right Rear Turn Signal Light Out (with a single chime)
• RKE Battery Low (with a single chime)
• Personal Settings Not Available – Vehicle Not in PARK
• Left/Right Front Door Ajar (one or more doors open, with a single chime if speed is above 1.6 km/h)
• Left/Right Rear Door Ajar (one or more doors open, with a single chime if speed is above 1.6 km/h) • Door(s) Ajar (with a single chime if vehicle is in
motion)
• Liftgate Ajar (with a single chime)
• Low Washer Fluid (with a single chime)
• Ignition or Accessory On
• Vehicle Not in Park
• Key Left Vehicle
• Key Not Detected
• Low Tire Pressure
• Service Tire Pressure
• ECO (Fuel Saver Indicator) — if equipped
• Channel # Transmit
• Channel # Training
• Channel # Trained
• Clearing Channels
• Channels Cleared
• Did Not Train
• Check Gascap (refer to “Adding Fuel” in “Technical Specifications”)
• Oil Change Required (with a single chime)
EVIC WHITE TELLTALE LIGHTS
This area will show reconfigurable white caution tell-
tales. These telltales include:
Shift Lever Status
The shift lever status “P,R,N,D,L,5,4,3,2,1” are dis-
played indicating the shift lever position. Telltales
“5,4,3,2,1” indicate the Autostick™ feature has been
engaged and the gear selected is displayed. For further
19KNOWING
YOURVEHICLESAFETY
STARTING ANDDRIVING
WARNING
LIGHTS AND
MESSAGES
IN AN
EMERGENCY
SERVICING AND
CARETECHNICAL
SPECIFICATIONSCONTENTS
Page 35 of 267

Headlights with Wipers soft-key, select On or Off
followed by pressing the arrow back soft-key.
Auto High Beams
Press the Auto High Beams soft-key to change this
display. When this feature is selected, the high beam
headlights will deactivate automatically under certain
conditions. To make your selection, press the Auto
High Beams soft-key, select ON or OFF followed by
pressing the arrow back soft-key. Refer to “Lights/
SmartBeam™ — If Equipped” in “Knowing Your Ve-
hicle” for further information.
Daytime Running Lights
Press the Daytime Running Lights soft-key to change
this display. When this feature is selected, the head-
lights will turn on whenever the engine is running. To
make your selection, press the Daytime Running Lights
soft-key, select ON or OFF followed by pressing the
arrow back soft-key.
Flash Headlights with Lock
Press the Flash Headlights with Lock soft-key to change
this display. When this feature is selected, the front and
rear turn signals will flash when the doors are locked or
unlocked with the RKE transmitter. To make your
selection, press the Flash Headlights with Lock soft-
key, select On or Off followed by pressing the arrow
back soft-key.Doors & Locks
Auto Unlock on Exit
Press the Auto Unlock on Exit soft-key to change this
display. When this feature is selected, all doors will
unlock when the vehicle is stopped and the transmis-
sion is in the PARK or NEUTRAL position and the
driver's door is opened. To make your selection, press
the Auto Unlock on Exit soft-key, select On or Off
followed by pressing the arrow back soft-key.
Flash Lights with Lock
Press the Flash Lights with Lock soft-key to change this
display. When this feature is selected, the front and
rear turn signals will flash when the doors are locked or
unlocked with the RKE transmitter. To make your
selection, press the Flash Lights with Lock soft-key,
select On or Off followed by pressing the arrow back
soft-key.
Remote Door Unlock Order
Press the Remote Door Unlock Order soft-key to
change this display. When
Unlock Driver Door Only
On 1st Press is selected, only the driver's door will
unlock on the first press of the RKE transmitter UN-
LOCK button. When Driver Door 1st Press is se-
lected, you must press the RKE transmitter UNLOCK
button twice to unlock the passenger's doors. When
Unlock All Doors On 1st Press is selected, all of the
doors will unlock on the first press of the RKE trans-
mitter UNLOCK button.
28
KNOWING YOUR
VEHICLE
SAFETY
STARTING AND
DRIVING
WARNING
LIGHTS AND
MESSAGES
IN AN
EMERGENCY
SERVICING AND
CARETECHNICAL
SPECIFICATIONSCONTENTS
Page 42 of 267

Headlight Dip (Traffic Changeover)
Low beam headlights have more control of upward
light and direct most of their light downward and either
to the right for right hand drive countries or to the left
for left hand drive countries to provide safe forward
visibility without excessive glare.
Flash Headlights With Lock
When this feature is selected, the front and rear turn
signals will flash when the doors are locked or unlocked
with the RKE transmitter. To make your selection,
press the Flash Headlights with Lock soft-key, select
On or Off followed by pressing the arrow back soft-key.
Doors & Locks
Auto Unlock on Exit
When this feature is selected, all doors will unlock
when the vehicle is stopped and the transmission is in
the PARK or NEUTRAL position and the driver's door
is opened. To make your selection, press the Auto
Unlock on Exit soft-key, select On or Off followed by
pressing the arrow back soft-key.
Flash Headlight with Lock
When this feature is selected, the front and rear turn
signals will flash when the doors are locked or unlocked
with the RKE transmitter. To make your selection,
press the Flash Lights with Lock soft-key, select On or
Off followed by pressing the arrow back soft-key. 1st Press of Key Fob UnlocksWhen
Unlock Driver Door Only On 1st Press is
selected, only the driver's door will unlock on the first
press of the RKE transmitter UNLOCK button. When
Driver Door 1st Press is selected, you must press the
RKE transmitter UNLOCK button twice to unlock the
passenger's doors. When Unlock All Doors On 1st
Press is selected, all of the doors will unlock on the
first press of the RKE transmitter UNLOCK button.
NOTE: If the vehicle is equipped with Keyless Enter-
N-Go (Passive Entry) and the EVIC is programmed to
Unlock All Doors 1st Press, all doors will unlock no
matter which Passive Entry equipped door handle is
grasped. If Driver Door 1st Press is programmed, only
the driver’s door will unlock when the driver’s door is
grasped. With Passive Entry, if Driver Door 1st Press is
programmed touching the handle more than once will
only result in the driver’s door opening. If driver door
first is selected, once the driver door is opened, the
interior door lock/unlock switch can be used to unlock
all doors (or use RKE transmitter).
Passive Entry
This feature allows you to lock and unlock the vehicle’s
door(s) without having to press the RKE transmitter
lock or unlock buttons. To make your selection, press
the Passive Entry soft-key, select ON or OFF followed
by pressing the arrow back soft-key. Refer to “Keyless
Enter-N-Go” in “Knowing Your Vehicle”.
35
KNOWING
YOURVEHICLESAFETY
STARTING ANDDRIVING
WARNING
LIGHTS AND
MESSAGES
IN AN
EMERGENCY
SERVICING AND
CARETECHNICAL
SPECIFICATIONSCONTENTS
Page 75 of 267

NOTE:The fog lights will operate with the low beam
headlights or parking lights on. However, selecting the
high beam headlights will turn off the fog lights.
MULTIFUNCTION LEVER
The multifunction lever controls the operation of the
turn signals, headlight beam selection and passing lights.
The multifunction lever is located on the left side of the
steering column.
TURN SIGNALS
Move the multifunction lever up or down and the
arrows on each side of the instrument cluster flash to
show proper operation of the front and rear turn signallights.
NOTE:
• If either light remains on and does not flash, or there
is a very fast flash rate, check for a defective outside
light bulb. If an indicator fails to light when the lever is
moved, it would suggest that the indicator bulb is
defective.
• A “Turn Signal On” message will appear in the EVIC
(if equipped) and a continuous chime will sound if the
vehicle is driven more than 1.6 km with either turn
signal on.
LANE CHANGE ASSIST
Tap the lever up or down once, without moving beyond
the detent, and the turn signal (right or left) will flash
three times then automatically turn off. HIGH/LOW BEAM SWITCH
Push the multifunction lever away from you to switch
the headlights to high beam. Pull the multifunction lever
toward you to switch the headlights back to low beam.
FLASH-TO-PASS
You can signal another vehicle with your headlights by
lightly pulling the multifunction lever toward you. This
will turn on the high beams headlights until the lever is
released.
INTERIOR LIGHTS
The interior lights come on when a door is opened.
To protect the battery, the interior lights will turn off
automatically 10 minutes after the ignition switch is
moved to the LOCK position. This will occur if the
interior lights were switched on manually or are on
because a door is open. This includes the glove box
light, but not the trunk light. To restore interior light
operation, either turn the ignition switch ON or cycle
the light switch.
DIMMER CONTROLS
The dimmer control is part of the headlight switch and
is located on the left side of the instrument panel.
(fig. 52)
Rotating the left dimmer control upward with the
parking lights or headlights on will increase the bright-
ness of the instrument panel lights.
68
KNOWING YOUR
VEHICLE
SAFETY
STARTING AND
DRIVING
WARNING
LIGHTS AND
MESSAGES
IN AN
EMERGENCY
SERVICING AND
CARETECHNICAL
SPECIFICATIONSCONTENTS
Page 85 of 267

POWER SUNROOF SWITCH — IF EQUIPPED
Refer to “Power Sunroof ” for further information.HAZARD WARNING FLASHERS
The Hazard Warning flasher switch is located in the
instrument panel switch bank, above the climate con-
trols.
Press the switch to turn on the Hazard Warning
flasher. When the switch is activated, all direc-
tional turn signals will flash on and off to warn
oncoming traffic of an emergency. Press the switch a
second time to turn off the Hazard Warning flashers.
This is an emergency warning system and it should not
be used when the vehicle is in motion. Use it when your
vehicle is disabled and it is creating a safety hazard for
other motorists.
When you must leave the vehicle to seek assistance,
the Hazard Warning flashers will continue to operate
even though the ignition is placed in the OFF position.
NOTE: With extended use the Hazard Warning
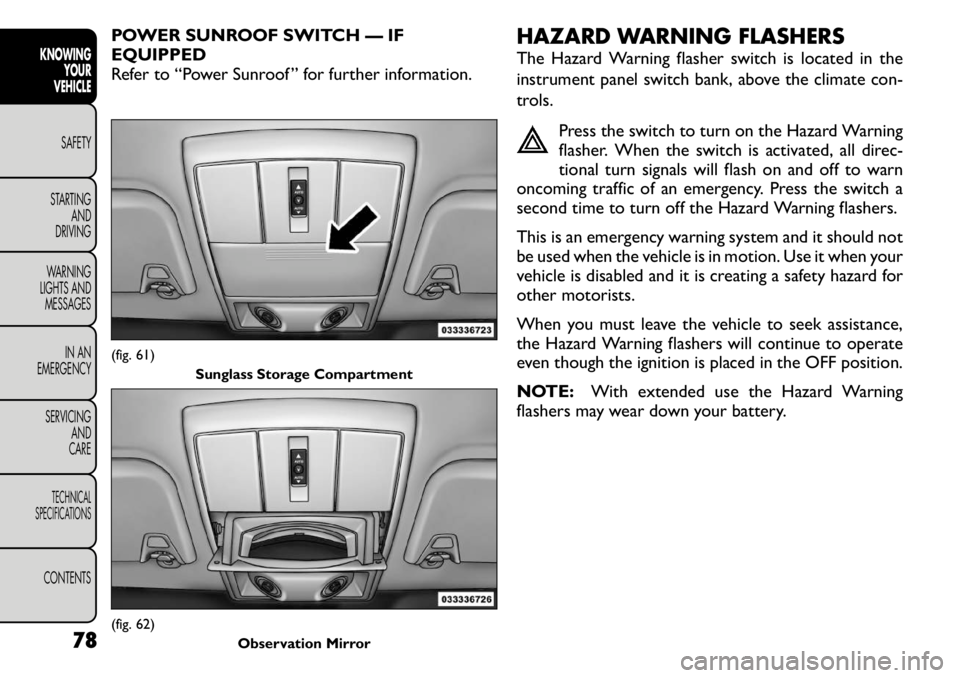
flashers may wear down your battery.(fig. 61)
Sunglass Storage Compartment(fig. 62) Observation Mirror
78
KNOWINGYOUR
VEHICLE
SAFETY
STARTING AND
DRIVING
WARNING
LIGHTS AND
MESSAGES
IN AN
EMERGENCY
SERVICING AND
CARETECHNICAL
SPECIFICATIONSCONTENTS
Page 114 of 267

• The ABS motor running (it may continue to run for ashort time after the stop),
• The clicking sound of solenoid valves,
• Brake pedal pulsations, and
• A slight drop or fall away of the brake pedal at the end of the stop.
These are all normal characteristics of ABS.
WARNING!
The ABS contains sophisticated elec-
tronic equipment that may be suscep-
tible to interference caused by improperly in-
stalled or high output radio transmitting
equipment . This interference can cause possible
loss of anti-lock braking capability. Installation
of such equipment should be performed by quali-
fied professionals.
Pumping of the Anti-Lock Brakes will diminish
their effectiveness and may lead to an accident .
Pumping makes the stopping distance longer. Just
press firmly on your brake pedal when you need
to slow down or stop.
The ABS cannot prevent the natural laws of
physics from acting on the vehicle, nor can it
increase braking or steering efficiency beyond
that afforded by the condition of the vehicle
brakes and tires or the traction afforded.
(Continued)(Continued)
The ABS cannot prevent accidents, including
those resulting from excessive speed in turns,
following another vehicle too closely, or hydro-
planing.
The capabilities of an ABS equipped vehicle
must never be exploited in a reckless or danger-
ous manner, which could jeopardize the user's
safety or the safety of others.
All vehicle wheels and tires must be the same size and
type and tires must be properly inflated to produce
accurate signals for the computer.
Anti-Lock Brake Light The Anti-Lock Brake Light monitors the ABS.
The light will turn on when the ignition
switch is turned to the ON position and may
stay on for as long as four seconds.
If the ABS Light remains on or comes on while driving,
it indicates that the Anti-Lock portion of the brake
system is not functioning and that service is required.
However, the conventional brake system will continue
to operate normally if the Brake System Warning Light
is not on.
If the ABS Light is on, the brake system should be
serviced as soon as possible to restore the benefits of
Anti-Lock brakes. If the ABS Light does not come on
when the ignition switch is turned to the ON position,
have the light repaired as soon as possible.
107KNOWING
YOURVEHICLESAFETY
STARTING ANDDRIVING
WARNING
LIGHTS AND
MESSAGES
IN AN
EMERGENCY
SERVICING AND
CARETECHNICAL
SPECIFICATIONSCONTENTS
Page 122 of 267

• The TPMS should not be used as a tire pressure
gauge while adjusting your tire pressure.
• Driving on a significantly under-inflated tire causes
the tire to overheat and can lead to tire failure. Under-
inflation also reduces fuel efficiency and tire tread life,
and may affect the vehicle’s handling and stopping
ability.
• The TPMS is not a substitute for proper tire mainte-
nance, and it is the driver’s responsibility to maintain
correct tire pressure using an accurate tire pressure
gauge, even if under-inflation has not reached the level
to trigger illumination of the Tire Pressure Monitoring
Telltale Light.
• Seasonal temperature changes will affect tire pres-
sure, and the TPMS will monitor the actual tire pres-
sure in the tire.
BASE SYSTEM
The Tire Pressure Monitor System (TPMS) uses wire-
less technology with wheel rim mounted electronic
sensors to monitor tire pressure levels. Sensors,
mounted to each wheel as part of the valve stem,
transmit tire pressure readings to the receiver module.
NOTE:It is particularly important for you to check
the tire pressure in all of the tires on your vehicle
monthly and to maintain the proper pressure.
The TPMS consists of the following components:
• Receiver Module
• Four Tire Pressure Monitoring Sensors • Tire Pressure Monitoring Telltale Light
Tire Pressure Monitoring Low Pressure
Warnings
The Tire Pressure Monitoring Telltale Light will
illuminate in the instrument cluster and a chime
will sound when tire pressure is low in one or
more of the four active road tires. Should this occur,
you should stop as soon as possible, check the inflation
pressure of each tire on your vehicle, and inflate each
tire to the vehicle’s recommended cold placard pres-
sure value. Once the system receives the updated tire
pressures, the system will automatically update and the
Tire Pressure Monitoring Telltale Light will turn off.
The vehicle may need to be driven for up to 20 minutes
above 25 km/h in order for the TPMS to receive this
information.
Check TPMS Warning
When a system fault is detected, the Tire Pressure
Monitoring Telltale Light will flash on and off for 75 sec-
onds and then remain on solid. The system fault will
also sound a chime. If the ignition switch is cycled, this
sequence will repeat, providing the system fault still
exists. The Tire Pressure Monitoring Telltale Light will
turn off when the fault condition no longer exists. A
system fault can occur due to any of the following:
1. Jamming due to electronic devices or driving next to facilities emitting the same Radio Frequencies as the
TPMS sensors.
2. Installing some form of aftermarket window tinting that affects radio wave signals.
115KNOWING
YOURVEHICLESAFETY
STARTING ANDDRIVING
WARNING
LIGHTS AND
MESSAGES
IN AN
EMERGENCY
SERVICING AND
CARETECHNICAL
SPECIFICATIONSCONTENTS