FIAT FREEMONT 2012 Owner handbook (in English)
Manufacturer: FIAT, Model Year: 2012, Model line: FREEMONT, Model: FIAT FREEMONT 2012Pages: 332, PDF Size: 5.61 MB
Page 171 of 332
All occupants, including the driver, should
not operate a vehicle or sit in a vehicle's
seat until the head restraints are placed
in their proper positions in order to minimize the
risk of neck injury in the event of an accident .
NOTE: For more information on properly adjusting
and positioning the head restraint, refer to “Adjusting
Active Head Restraints” in “Knowing Your Vehicle”. Resetting Active Head Restraints (AHR)
If the Active Head Restraints are triggered in an acci-
dent, you must reset the head restraint on the driver’s
and front passenger seat. You can recognize when the
Active Head Restraint has been triggered by the fact
that they have moved forward (as shown in step three
of the resetting procedure).
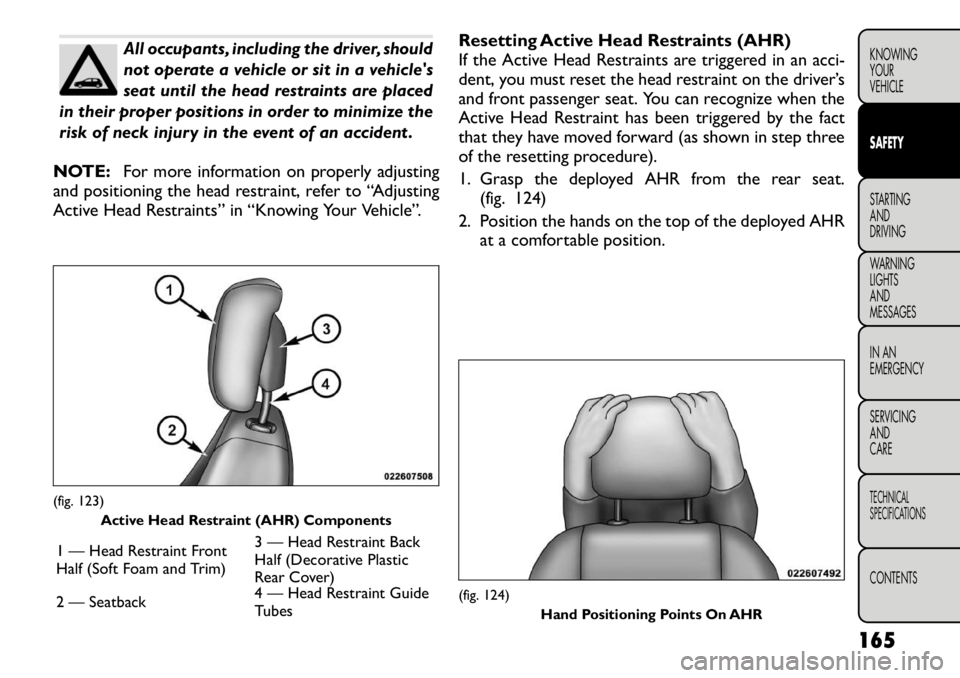
1. Grasp the deployed AHR from the rear seat.
(fig. 124)
2. Position the hands on the top of the deployed AHR at a comfortable position.
(fig. 123) Active Head Restraint (AHR) Components
1 — Head Restraint Front
Half (Soft Foam and Trim) 3 — Head Restraint Back
Half (Decorative Plastic
Rear Cover)
2 — Seatback 4 — Head Restraint Guide
Tubes
(fig. 124)
Hand Positioning Points On AHR
165
KNOWING
YOURVEHICLESAFETYSTARTING ANDDRIVING
WARNING LIGHTSAND
MESSAGES
IN AN
EMERGENCY
SERVICING AND
CARETECHNICAL
SPECIFICATIONSCONTENTS
Page 172 of 332
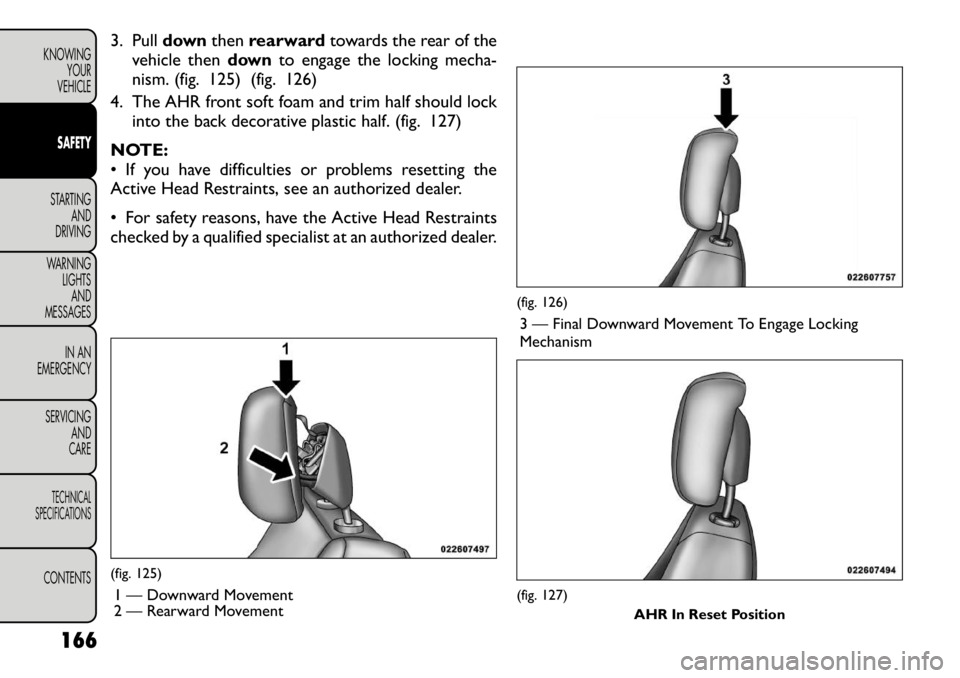
3. Pulldownthenrearward towards the rear of the
vehicle then downto engage the locking mecha-
nism. (fig. 125) (fig. 126)
4. The AHR front soft foam and trim half should lock into the back decorative plastic half. (fig. 127)
NOTE:
• If you have difficulties or problems resetting the
Active Head Restraints, see an authorized dealer.
• For safety reasons, have the Active Head Restraints
checked by a qualified specialist at an authorized dealer.(fig. 125) 1 — Downward Movement
2 — Rearward Movement
(fig. 126)3 — Final Downward Movement To Engage Locking Mechanism(fig. 127) AHR In Reset Position
166
KNOWING YOUR
VEHICLESAFETYSTARTING AND
DRIVING
WARNING LIGHTSAND
MESSAGES
IN AN
EMERGENCY
SERVICING AND
CARETECHNICAL
SPECIFICATIONSCONTENTS
Page 173 of 332
ACTIVE HOOD SYSTEM (for versions/
markets, where provided)
The Active Hood system is intended to enhance pe-
destrian protection by elevating the vehicle’s hood
upon an impact with a pedestrian or other object. The
system is automatically activated when the vehicle is
moving within a specified vehicle speed range. In order
to detect a range of pedestrians, other objects that are
impacted may result in an Active Hood deployment.
Deployment Sensors And Controls
The Electronic Pedestrian Protection Module (EPPM)
determines if deployment of the actuators in a frontal
impact is required. Based on the impact sensors signals,
the EPPM determines when to deploy the actuators.
The impact sensors are located within the front bum-
per area.
The EPPM monitors the readiness of the electronic
parts of the Active Hood system whenever the ignition
switch is in the START or ON/RUN position. If the key
is in the LOCK position, in the ACC position, or not in
the ignition, the Active Hood system is not on and the
Active Hood will not deploy.
The EPPM contains a backup power supply system that
may deploy the actuators even if the battery loses
power or it becomes disconnected prior to
deployment.Service Active Hood System
If the EPPM has deployed the Active Hood, or if it
detects a malfunction in any part of the system, it turns
on the Air Bag Warning Light and it will display the
“SERVICE ACTIVE HOOD” message in the Electronic
Vehicle Information Center (EVIC), for versions/
markets, where provided. A single chime will sound if
the Air Bag Warning Light comes on again after initial
startup. It also includes diagnostics that will illuminate
the Air Bag Warning Light if a malfunction is noted that
could affect the Active Hood system. The diagnostics
also record the nature of the malfunction. If the Air Bag
Warning Light is illuminated, or if “SERVICE ACTIVE
HOOD” appears in the EVIC, see your authorized
dealer.
In the event of an Active Hood deployment, the vehicle
should be serviced by an authorized dealer. The hood
hinges must be serviced and the actuator assemblies
replaced to restore system functionality.
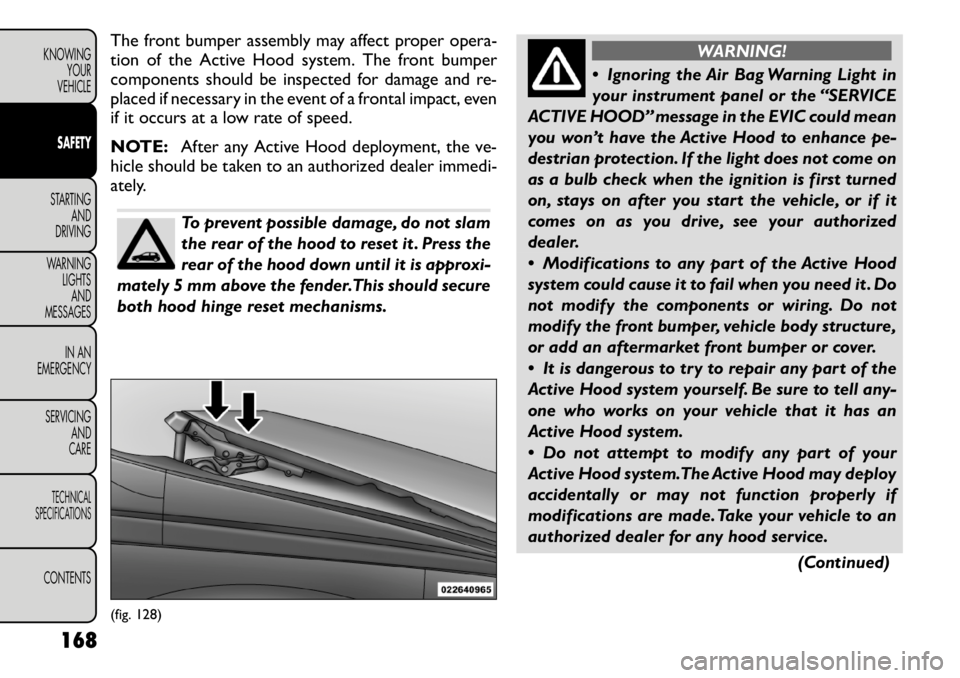
Following an Active Hood deployment, the hood posi-
tion can be temporarily reset by pushing down at the
rear edge over the hood hinges as the internal pressure
of each actuator is relieved. The temporary hood reset
position is intended to improve forward driving visibil-
ity over the hood until the vehicle can be serviced. The
temporary hood reset position will leave the hood
approximately 5 mm above the fender surface.
(fig. 128)
167
KNOWING
YOURVEHICLESAFETYSTARTING ANDDRIVING
WARNING LIGHTSAND
MESSAGES
IN AN
EMERGENCY
SERVICING AND
CARETECHNICAL
SPECIFICATIONSCONTENTS
Page 174 of 332
The front bumper assembly may affect proper opera-
tion of the Active Hood system. The front bumper
components should be inspected for damage and re-
placed if necessary in the event of a frontal impact, even
if it occurs at a low rate of speed.
NOTE:After any Active Hood deployment, the ve-
hicle should be taken to an authorized dealer immedi-
ately.
To prevent possible damage, do not slam
the rear of the hood to reset it . Press the
rear of the hood down until it is approxi-
mately 5 mm above the fender.This should secure
both hood hinge reset mechanisms.
WARNING!
Ignoring the Air Bag Warning Light in
your instrument panel or the “SERVICE
ACTIVE HOOD” message in the EVIC could mean
you won’t have the Active Hood to enhance pe-
destrian protection. If the light does not come on
as a bulb check when the ignition is first turned
on, stays on after you start the vehicle, or if it
comes on as you drive, see your authorized
dealer.
Modifications to any part of the Active Hood
system could cause it to fail when you need it . Do
not modify the components or wiring. Do not
modify the front bumper, vehicle body structure,
or add an aftermarket front bumper or cover.
It is dangerous to try to repair any part of the
Active Hood system yourself. Be sure to tell any-
one who works on your vehicle that it has an
Active Hood system.
Do not attempt to modify any part of your
Active Hood system.The Active Hood may deploy
accidentally or may not function properly if
modifications are made. Take your vehicle to an
authorized dealer for any hood service.
(Continued)
(fig. 128)
168
KNOWING YOUR
VEHICLESAFETYSTARTING AND
DRIVING
WARNING LIGHTSAND
MESSAGES
IN AN
EMERGENCY
SERVICING AND
CARETECHNICAL
SPECIFICATIONSCONTENTS
Page 175 of 332
(Continued)
Drivers must be aware of pedestrians. Always
be sure to check for pedestrians, animals, other
vehicles, and obstructions.You are responsible for
safety and must continue to pay attention to
your surroundings. Failure to do so can result in
serious injury or death.
ENHANCED SEAT BELT USE REMINDER
SYSTEM (BELTALERT
®)
BeltAlert
®is a feature intended to remind the driver
and front passenger (for versions/markets, where pro-
vided with front passenger BeltAlert
®) to fasten their
seat belts. This feature is active whenever the ignition is
on. If the driver or front seat passenger is unbelted, the
Seat Belt Reminder Light will turn on and remain on
until both front seat belts are fastened. BeltAlert
®
triggers within 60 seconds of vehicle speed over
8 km/h. The reminder sequence lasts for 96 seconds or
until the respective seat belts are fastened. After the
sequence completes, the Seat Belt Reminder Light
remains illuminated until front belts are fastened. The
driver should instruct all other occupants to fasten
their seat belts. If a front seat belt is unbuckled while
traveling at speeds greater than 8 km/h, BeltAlert
®will
chime as a single notification and illuminate the Seat
Belt Reminder Light, then will proceed to the 96 sec-
ond reminder sequence. The front passenger seat BeltAlert
®is not active when
the front passenger seat is unoccupied. BeltAlert
®may
be triggered when an animal or heavy object is on the
front passenger seat or when the seat is folded flat (for
versions/markets, where provided). It is recommended
that pets be restrained in the rear seat in pet harnesses
or pet carriers that are secured by seat belts, and cargo
is properly stowed.
NOTE:
• The BeltAlert
®can be enabled or disabled by your
authorized dealer.
• The manufacturer of this vehicle does not recom-
mend deactivating the BeltAlert
®.
• If the BeltAlert
®
is deactivated, the Seat Belt Re-
minder Light will continue to illuminate as long as the
driver's seat belt is unbuckled/retracted.
SEAT BELTS AND PREGNANT WOMEN
We recommend that pregnant women use the seat
belts throughout their pregnancy. Keeping the mother
safe is the best way to keep the baby safe.
Pregnant women should wear the lap part of the belt
across the thighs and as snug across the hips as pos-
sible. Keep the belt low so that it does not come across
the abdomen. That way the strong bones of the hips
will take the force if there is an accident.
169
KNOWING
YOURVEHICLESAFETYSTARTING ANDDRIVING
WARNING LIGHTSAND
MESSAGES
IN AN
EMERGENCY
SERVICING AND
CARETECHNICAL
SPECIFICATIONSCONTENTS
Page 176 of 332
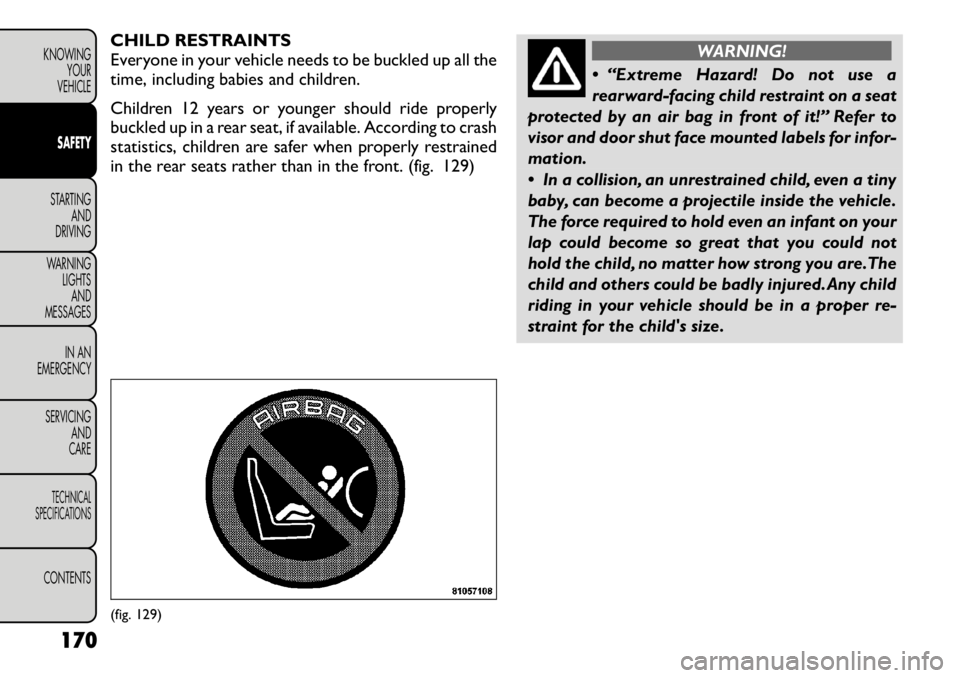
CHILD RESTRAINTS
Everyone in your vehicle needs to be buckled up all the
time, including babies and children.
Children 12 years or younger should ride properly
buckled up in a rear seat, if available. According to crash
statistics, children are safer when properly restrained
in the rear seats rather than in the front. (fig. 129)
WARNING!
“Extreme Hazard! Do not use a
rearward-facing child restraint on a seat
protected by an air bag in front of it!” Refer to
visor and door shut face mounted labels for infor-
mation.
In a collision, an unrestrained child, even a tiny
baby, can become a projectile inside the vehicle.
The force required to hold even an infant on your
lap could become so great that you could not
hold the child, no matter how strong you are.The
child and others could be badly injured. Any child
riding in your vehicle should be in a proper re-
straint for the child's size.
(fig. 129)
170
KNOWING YOUR
VEHICLESAFETYSTARTING AND
DRIVING
WARNING LIGHTSAND
MESSAGES
IN AN
EMERGENCY
SERVICING AND
CARETECHNICAL
SPECIFICATIONSCONTENTS
Page 177 of 332
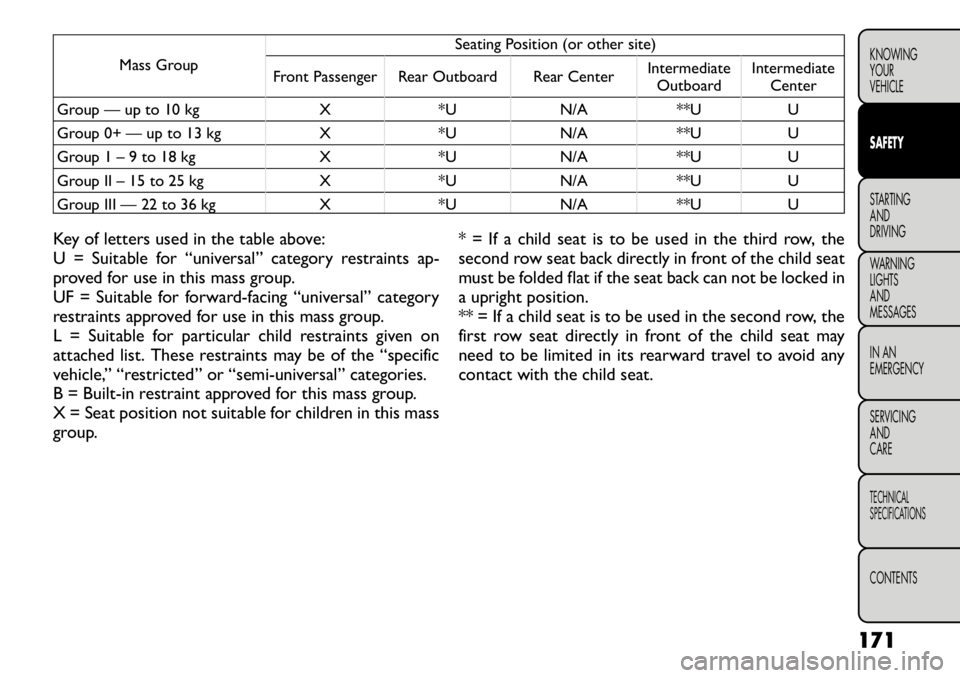
Mass GroupSeating Position (or other site)
Front Passenger Rear Outboard Rear Center Intermediate
Outboard Intermediate
Center
Group — up to 10 kg X *U N/A **U U
Group 0+ — up to 13 kg X *U N/A **U U
Group 1 – 9 to 18 kg X *U N/A **U U
Group II – 15 to 25 kg X *U N/A **U U
Group III — 22 to 36 kg X *U N/A **U U
Key of letters used in the table above:
U = Suitable for “universal” category restraints ap-
proved for use in this mass group.
UF = Suitable for forward-facing “universal” category
restraints approved for use in this mass group.
L = Suitable for particular child restraints given on
attached list. These restraints may be of the “specific
vehicle,” “restricted” or “semi-universal” categories.
B = Built-in restraint approved for this mass group.
X = Seat position not suitable for children in this mass
group. * = If a child seat is to be used in the third row, the
second row seat back directly in front of the child seat
must be folded flat if the seat back can not be locked in
a upright position.
** = If a child seat is to be used in the second row, the
first row seat directly in front of the child seat may
need to be limited in its rearward travel to avoid any
contact with the child seat.
171
KNOWING
YOURVEHICLESAFETYSTARTING ANDDRIVING
WARNING LIGHTSAND
MESSAGES
IN AN
EMERGENCY
SERVICING AND
CARETECHNICAL
SPECIFICATIONSCONTENTS
Page 178 of 332
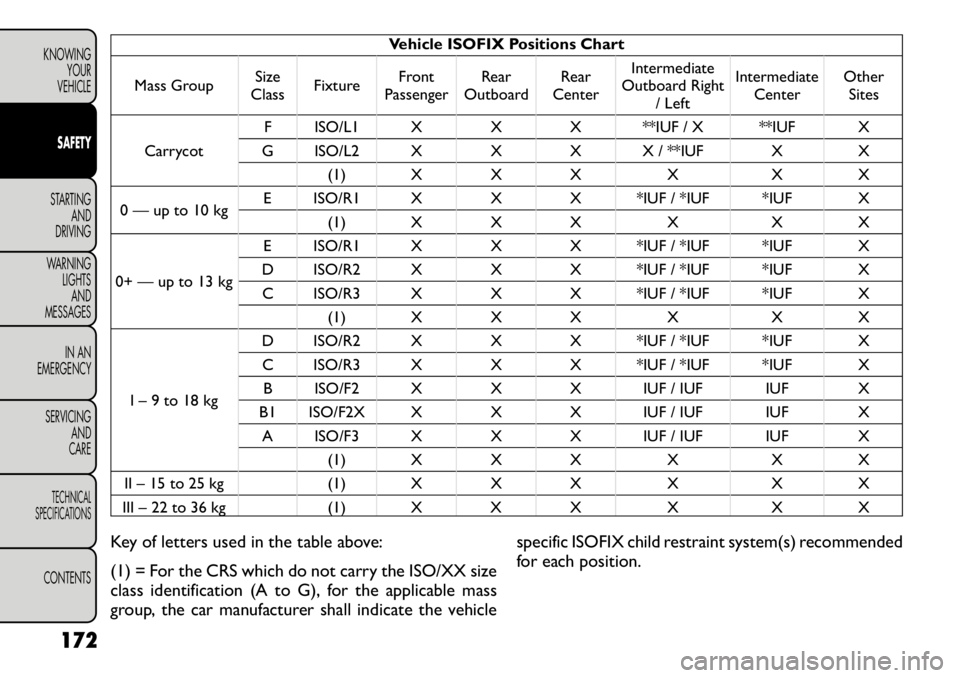
Vehicle ISOFIX Positions Chart
Mass Group Size
Class Fixture Front
Passenger Rear
Outboard Rear
Center Intermediate
Outboard Right / Left Intermediate
Center Other
Sites
Carrycot F ISO/L1 X X X **IUF / X **IUF X
G ISO/L2 X X X X / **IUF X X (1) X X X X X X
0 — up to 10 kg E ISO/R1 X X X *IUF / *IUF *IUF X
(1) X X X X X X
0+ — up to 13 kg E ISO/R1 X X X *IUF / *IUF *IUF X
D ISO/R2 X X X *IUF / *IUF *IUF X C ISO/R3 X X X *IUF / *IUF *IUF X (1) X X X X X X
I – 9 to 18 kg D ISO/R2 X X X *IUF / *IUF *IUF X
C ISO/R3 X X X *IUF / *IUF *IUF X B ISO/F2 X X X IUF / IUF IUF X
B1 ISO/F2X X X X IUF / IUF IUF X
A ISO/F3 X X X IUF / IUF IUF X (1) X X X X X X
II – 15 to 25 kg (1) X X X X X X
III – 22 to 36 kg (1) X X X X X X
Key of letters used in the table above:
(1) = For the CRS which do not carry the ISO/XX size
class identification (A to G), for the applicable mass
group, the car manufacturer shall indicate the vehicle specific ISOFIX child restraint system(s) recommended
for each position.
172
KNOWING YOUR
VEHICLESAFETYSTARTING AND
DRIVING
WARNING LIGHTSAND
MESSAGES
IN AN
EMERGENCY
SERVICING AND
CARETECHNICAL
SPECIFICATIONSCONTENTS
Page 179 of 332
IUF = Suitable for ISOFIX forward child restraints
systems of universal category approved for use in the
mass group.
IL = Suitable for particular ISOFIX child restraint sys-
tems (CRS) given in the attached list. These ISOFIX
CRS are those of the “specific vehicle”, “restricted” or
“semi-universal” catagories.
X = ISOFIX position not suitable for ISOFIX child
restraint systems in this mass group and / or this sizeclass.
* = Seats in front of child restraint seats may need to be
adjusted forward to install the child restraint seat.
** = No access to 3rd row seating positions if Carrycot
is installed in vehicle.
There are different sizes and types of restraints for
children from newborn size to the child almost large
enough for an adult safety belt. Always check the child
seat Owner's Manual to ensure you have the correct
seat for your child. Use the restraint that is correct for
your child.
Infants And Child Restraints
Safety experts recommend that children ride
rearward-facing in the vehicle until they are two years
old or until they reach either the height or weight limit
of their rear facing child safety seat. Two types of child
restraints can be used rearward-facing: infant carriers
and convertible child seats.
The infant carrier is only used rearward-facing in the
vehicle. It is recommended for children from birth untilthey reach the weight or height limit of the infant
carrier. Convertible child seats can be used either
rearward-facing or forward-facing in the vehicle. Con-
vertible child seats often have a higher weight limit in
the rearward-facing direction than infant carriers do, so
they can be used rearward-facing by children who have
outgrown their infant carrier but are still less than at
least two years old. Children should remain rearward-
facing until they reach the highest weight or height
allowed by their convertible child seat. Both types of
child restraints are held in the vehicle by the lap/
shoulder belt or the ISOFIX child restraint anchor
system. Refer to “ISOFIX — Child Seat Anchorage
System”.
WARNING!
Rearward-facing child seats must never
be used in the front seat of a vehicle with
the front passenger air bag unless the air bag is
turned off. An air bag deployment could cause
severe injury or death to infants in this position.
Older Children And Child Restraints
Children who are two years old or who have outgrown
their rear-facing convertible child seat can ride
forward-facing in the vehicle. Forward-facing child
seats and convertible child seats used in the forward-
facing direction are for children who are over two years
old or who have outgrown the rear-facing weight or
height limit of their rear-facing convertible child seat. 173
KNOWING
YOURVEHICLESAFETYSTARTING ANDDRIVING
WARNING LIGHTSAND
MESSAGES
IN AN
EMERGENCY
SERVICING AND
CARETECHNICAL
SPECIFICATIONSCONTENTS
Page 180 of 332
Children should remain in a forward-facing child seat
with a harness for as long as possible, up to the highest
weight or height allowed by the child seat. These child
seats are also held in the vehicle by the lap/shoulder
belt or the ISOFIX child restraint anchorage system.
Refer to “ISOFIX — Child Seat Anchorage System”.
All children whose weight or height is above the
forward-facing limit for the child seat should use a
belt-positioning booster seat until the vehicle’s seat
belts fit properly. If the child cannot sit with knees bent
over the vehicle's seat cushion while the child's back is
against the seatback, they should use a belt-positioning
booster seat. The child and belt-positioning booster
seat are held in the vehicle by the lap/shoulder belt.
Integrated Child Booster Seat (for
versions/markets, where provided)
The Integrated Child Booster Seat is located in each
outboard second-row passenger seat. The Booster
Seat is designed for children weighing between 22 and
39 kg and between 119 cm and 145 cm tall.
To position a child into the Integrated Child Booster
Seat follow these steps:
1. Slide the second row seat to the full rear position touse the Integrated Child Booster Seat.
NOTE: The second row bench with Integrated Child
Booster Seat must remain in the full rear position
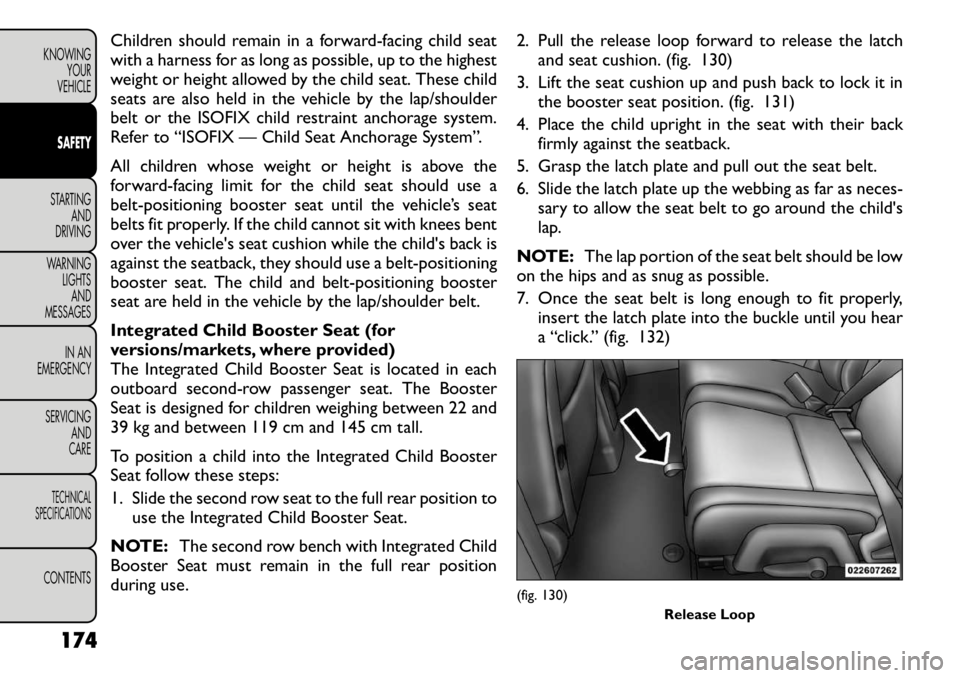
during use. 2. Pull the release loop forward to release the latch
and seat cushion. (fig. 130)
3. Lift the seat cushion up and push back to lock it in the booster seat position. (fig. 131)
4. Place the child upright in the seat with their back firmly against the seatback.
5. Grasp the latch plate and pull out the seat belt.
6. Slide the latch plate up the webbing as far as neces- sary to allow the seat belt to go around the child's
lap.
NOTE: The lap portion of the seat belt should be low
on the hips and as snug as possible.
7. Once the seat belt is long enough to fit properly,
insert the latch plate into the buckle until you hear
a “click.” (fig. 132)
(fig. 130) Release Loop
174
KNOWING YOUR
VEHICLESAFETYSTARTING AND
DRIVING
WARNING LIGHTSAND
MESSAGES
IN AN
EMERGENCY
SERVICING AND
CARETECHNICAL
SPECIFICATIONSCONTENTS