FIAT FREEMONT 2012 Owner handbook (in English)
Manufacturer: FIAT, Model Year: 2012, Model line: FREEMONT, Model: FIAT FREEMONT 2012Pages: 332, PDF Size: 5.61 MB
Page 211 of 332
SIX-SPEED AUTOMATIC TRANSMISSION
The shift lever position display (located in the instru-
ment panel cluster) indicates the transmission gear
range. You must press the brake pedal to move the shift
lever out of the PARK position (refer to “Brake/
Transmission Shift Interlock System” in this section).
To drive, move the shift lever from PARK or NEUTRAL
to the DRIVE position.
The electronically-controlled transmission provides a
precise shift schedule. The transmission electronics are
self-calibrating; therefore, the first few shifts on a new
vehicle may be somewhat abrupt. This is a normal
condition, and precision shifts will develop within a few
hundred kilometers.
Shifting from DRIVE to PARK or REVERSE should be
done only after the accelerator pedal is released and
the vehicle is stopped. Be sure to keep your foot on the
brake pedal when moving the shift lever between thesegears.
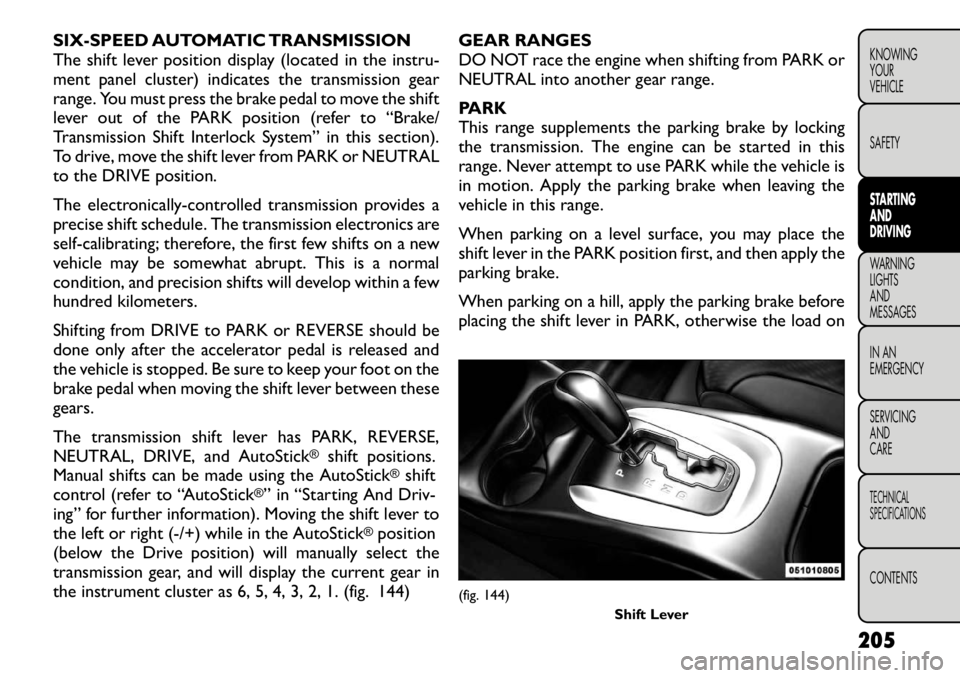
The transmission shift lever has PARK, REVERSE,
NEUTRAL, DRIVE, and AutoStick
®
shift positions.
Manual shifts can be made using the AutoStick
®shift
control (refer to “AutoStick
®” in “Starting And Driv-
ing” for further information). Moving the shift lever to
the left or right (-/+) while in the AutoStick
®position
(below the Drive position) will manually select the
transmission gear, and will display the current gear in
the instrument cluster as 6, 5, 4, 3, 2, 1. (fig. 144) GEAR RANGES
DO NOT race the engine when shifting from PARK or
NEUTRAL into another gear range.
PARK
This range supplements the parking brake by locking
the transmission. The engine can be started in this
range. Never attempt to use PARK while the vehicle is
in motion. Apply the parking brake when leaving the
vehicle in this range.
When parking on a level surface, you may place the
shift lever in the PARK position first, and then apply the
parking brake.
When parking on a hill, apply the parking brake before
placing the shift lever in PARK, otherwise the load on
(fig. 144)
Shift Lever
205
KNOWING
YOURVEHICLE SAFETYSTARTING ANDDRIVINGWARNING LIGHTSAND
MESSAGES
IN AN
EMERGENCY
SERVICING AND
CARETECHNICAL
SPECIFICATIONSCONTENTS
Page 212 of 332
the transmission locking mechanism may make it diffi-
cult to move the shift lever out of PARK. As an added
precaution, turn the front wheels toward the curb on a
downhill grade and away from the curb on an uphill
grade.
WARNING!
Never use the PARK position as a sub-
stitute for the parking brake. Always ap-
ply the parking brake fully when parked to guard
against vehicle movement and possible injury or
damage.
Your vehicle could move and injure you and
others if it is not completely in PARK. Check by
trying to move the shift lever rearward (with the
brake pedal released) after you have placed it in
PARK. Make sure the transmission is in PARK
before leaving the vehicle.
It is dangerous to move the shift lever out of
PARK or NEUTRAL if the engine speed is higher
than idle speed. If your foot is not firmly pressing
the brake pedal, the vehicle could accelerate
quickly forward or in reverse.You could lose con-
trol of the vehicle and hit someone or something.
Only shift into gear when the engine is idling
normally and your foot is firmly pressing the
brake pedal.
(Continued)(Continued)
Unintended movement of a vehicle could injure
those in or near the vehicle. As with all vehicles,
you should never exit a vehicle while the engine is
running. Before exiting a vehicle, always apply
the parking brake, shift the transmission into
PARK, and turn the engine off.When the ignition
is in the OFF position, the shift lever is locked in
PARK, securing the vehicle against unwanted
movement .
When leaving the vehicle, always lock your
vehicle.
Never leave children alone in a vehicle, or with
access to an unlocked vehicle.
Allowing children to be in a vehicle unattended
is dangerous for a number of reasons. A child or
others could be seriously or fatally injured. Chil-
dren should be warned not to touch the parking
brake, brake pedal or the shift lever.
Do not leave the key fob in or near the vehicle,
and do not leave Keyless Enter-N-Go in the ACC
or ON/RUN mode. A child could operate power
windows, other controls, or move the vehicle.
206
KNOWING YOUR
VEHICLE
SAFETYSTARTING AND
DRIVINGWARNING LIGHTSAND
MESSAGES
IN AN
EMERGENCY
SERVICING AND
CARETECHNICAL
SPECIFICATIONSCONTENTS
Page 213 of 332
Before moving the shift lever out of
PARK, you must turn the ignition switch
from the LOCK/OFF position to the ON/
RUN position, and also press the brake pedal.
Otherwise, damage to the shift lever could result .
DO NOT race the engine when shifting from
PARK or NEUTRAL into another gear range, as
this can damage the drivetrain.
The following indicators should be used to ensure that
you have engaged the shift lever into the PARK posi-tion:
• When shifting into PARK, firmly move the shift lever all the way forward and to the left until it stops and is
fully seated.
• Look at the shift lever position display and verify that it indicates the PARK position.
• With brake pedal released, verify that the shift lever will not move out of PARK.
REVERSE
This range is for moving the vehicle backward. Shift into
REVERSE only after the vehicle has come to a complete
stop. NEUTRAL
Use this range when the vehicle is standing for pro-
longed periods with the engine running. The engine
may be started in this range. Set the parking brake and shift the transmission into PARK if you must leave the
vehicle.
WARNING!
Do not coast in NEUTRAL and never
turn off the ignition to coast down a hill.
These are unsafe practices that limit your re-
sponse to changing traffic or road conditions.You
might lose control of the vehicle and have a
collision.Towing the vehicle, coasting, or driving
for any other reason with the transmis-
sion in NEUTRAL can result in severe
transmission damage. Refer to “Recreational Tow-
ing” in “Starting And Driving” and “Towing A Dis-
abled Vehicle” in “In An Emergency” for further
information.
DRIVE
This range should be used for most city and highway
driving. It provides the smoothest upshifts and down-
shifts, and the best fuel economy. The transmission
automatically upshifts through underdrive first, second,
third, and fourth gears, direct fifth gear and overdrive
sixth gear. The DRIVE position provides optimum driv-
ing characteristics under all normal operating condi-tions.
207
KNOWING
YOURVEHICLE SAFETYSTARTING ANDDRIVINGWARNING LIGHTSAND
MESSAGES
IN AN
EMERGENCY
SERVICING AND
CARETECHNICAL
SPECIFICATIONSCONTENTS
Page 214 of 332

When frequent transmission shifting occurs (such as
when operating the vehicle under heavy loading condi-
tions, in hilly terrain, traveling into strong head winds,
or while towing heavy trailers), use the AutoStick
®
mode (refer to “AutoStick
®” in “Starting And Driving”
for further information) to select a lower gear. Under
these conditions, using a lower gear will improve per-
formance and extend transmission life by reducing
excessive shifting and heat buildup.
During cold temperatures, transmission operation may
be modified depending on engine and transmission
temperature as well as vehicle speed. This feature
improves warm up time of the engine and transmission
to achieve maximum efficiency. Engagement of the
torque converter clutch is inhibited until the transmis-
sion fluid is warm (refer to the “Note” under “Torque
Converter Clutch” in this section). During extremely
cold temperatures (
Page 215 of 332
• the transmission fluid has reached an adequate tem-perature,
• the engine coolant has reached an adequate tem- perature, and
• vehicle speed is sufficiently high.
Torque Converter Clutch
A feature designed to improve fuel economy has been
included in the automatic transmission on your vehicle.
A clutch within the torque converter engages auto-
matically at calibrated speeds. This may result in a
slightly different feeling or response during normal
operation in the upper gears. When the vehicle speed
drops or during some accelerations, the clutch auto-
matically disengages.
NOTE: The torque converter clutch will not engage
until the transmission fluid and engine coolant are
warm [usually after 1.6 to 4.8 km of driving]. Because
the engine speed is higher when the torque converter
clutch is not engaged, it may seem as if the transmission
is not shifting into Overdrive when cold. This is normal.
Using the AutoStick
®feature, when the transmission
is sufficiently warm, will demonstrate that the trans-
mission is able to shift into and out of Overdrive. ALL WHEEL DRIVE (AWD) (for
versions/markets, where
provided)
This feature provides on-demand All-Wheel Drive
(AWD). The system is automatic with no driver inputs
or additional driving skills required. Under normal
driving conditions, the front wheels provide most of
the traction. If the front wheels begin to lose traction,
power is shifted automatically to the rear wheels. The
greater the front wheel traction loss, the greater the
power transfer to the rear wheels.
Additionally, on dry pavement under heavy throttle
input (where one may have no wheel spin), torque will
be sent to the rear in a pre-emptive effort to improve
vehicle launch and performance characteristics.
All wheels must have the same size and
type tires. Unequal tire sizes must not be
used. Unequal tire size may cause failure
of the power transfer unit .
209
KNOWING
YOURVEHICLE SAFETYSTARTING ANDDRIVINGWARNING LIGHTSAND
MESSAGES
IN AN
EMERGENCY
SERVICING AND
CARETECHNICAL
SPECIFICATIONSCONTENTS
Page 216 of 332
DRIVING ON SLIPPERY SURFACES
ACCELERATION
Rapid acceleration on snow covered, wet, or other
slippery surfaces may cause the driving wheels to pull
erratically to the right or left. This phenomenon occurs
when there is a difference in the surface traction under
the front (driving) wheels.
WARNING!
Rapid acceleration on slippery surfaces
is dangerous. Unequal traction can
cause sudden pulling of the front wheels. You
could lose control of the vehicle and possibly
have a collision. Accelerate slowly and carefully
whenever there is likely to be poor traction (ice,
snow, wet , mud, loose sand, etc .). TRACTION
When driving on wet or slushy roads, it is possible for
a wedge of water to build up between the tire and road
surface. This is hydroplaning and may cause partial or
complete loss of vehicle control and stopping ability. To
reduce this possibility, the following precautions should
be observed:
1. Slow down during rainstorms or when the roads are
slushy.
2. Slow down if the road has standing water or puddles.
3. Replace the tires when tread wear indicators first become visible.
4. Keep tires properly inflated.
5. Maintain sufficient distance between your vehicle and the vehicle in front of you to avoid a collision in
a sudden stop.
210
KNOWING YOUR
VEHICLE
SAFETYSTARTING AND
DRIVINGWARNING LIGHTSAND
MESSAGES
IN AN
EMERGENCY
SERVICING AND
CARETECHNICAL
SPECIFICATIONSCONTENTS
Page 217 of 332
DRIVING THROUGH WATER
Driving through water more than a few centimeters
deep will require extra caution to ensure safety and
prevent damage to your vehicle.
FLOWING/RISING WATER
WARNING!
Do not drive on, or cross, a road or a
path where water is flowing and/or rising
(as in storm run-off ). Flowing water can wear
away the road or path's surface and cause your
vehicle to sink into deeper water. Furthermore,
flowing and/or rising water can carry your vehicle
away swiftly. Failure to follow this warning may
result in injuries that are serious or fatal to you,
your passengers, and others around you.
Shallow Standing Water
Although your vehicle is capable of driving through
shallow standing water, consider the following Caution
and Warning before doing so.
Always check the depth of the standing
water before driving through it . Never
drive through standing water that is
deeper than the bottom of the tire rims mounted
on the vehicle.
Determine the condition of the road or the path
that is under water, and if there are any obstacles
in the way, before driving through the standing
water.
Do not exceed 8 km/h when driving through
standing water.This will minimize wave effects. Driving through standing water may
cause damage to your vehicle’s drivetrain
components. Always inspect your vehi-
cle’s fluids (i.e., engine oil, transmission, axle, etc .)
for signs of contamination (i.e., fluid that is milky
or foamy in appearance) after driving through
standing water. Do not continue to operate the
vehicle if any fluid appears contaminated, as this
may result in further damage. Such damage is not
covered by the New Vehicle Limited Warranty.
Getting water inside your vehicle’s engine can
cause it to lock up and stall out , and cause serious
internal damage to the engine. Such damage is
not covered by the New Vehicle Limited Warranty.
211
KNOWING
YOURVEHICLE SAFETYSTARTING ANDDRIVINGWARNING LIGHTSAND
MESSAGES
IN AN
EMERGENCY
SERVICING AND
CARETECHNICAL
SPECIFICATIONSCONTENTS
Page 218 of 332
WARNING!
Driving through standing water limits
your vehicle’s traction capabilities. Do
not exceed 8 km/h when driving through standing
water.
Driving through standing water limits your ve-
hicle’s braking capabilities, which increases stop-
ping distances. Therefore, after driving through
standing water, drive slowly and lightly press on
the brake pedal several times to dry the brakes.
Getting water inside your vehicle’s engine can
cause it to lock up and stall out , and leave you
stranded.
Failure to follow these warnings may result in
injuries that are serious or fatal to you, your
passengers, and others around you. VEHICLE STORAGE
If you will not be using your vehicle for more than
21 days you may want to take steps to preserve your
battery. You may:
• Remove the IOD (Ignition Off-Draw) mini-fuses
from the Totally Integrated Power Module located in
the engine compartment.
• Or, disconnect the battery negative cable.
212
KNOWING YOUR
VEHICLE
SAFETYSTARTING AND
DRIVINGWARNING LIGHTSAND
MESSAGES
IN AN
EMERGENCY
SERVICING AND
CARETECHNICAL
SPECIFICATIONSCONTENTS
Page 219 of 332
TRAILER TOWING
In this section, you will find safety tips and information
on limits to the type of towing you can reasonably do
with your vehicle. Before towing a trailer, carefully
review this information to tow your load as efficiently
and safely as possible.
To maintain warranty coverage, follow the require-
ments and recommendations in this manual concerning
vehicles used for trailer towing.
COMMON TOWING DEFINITIONS
The following trailer towing related definitions will
assist you in understanding the following information:
Gross Vehicle Weight Rating (GVWR)
The GVWR is the total allowable weight of your
vehicle. This includes driver, passengers, cargo, and
tongue weight. The total load must be limited so that
you do not exceed the GVWR.
Gross Trailer Weight (GTW)
The GTW is the weight of the trailer plus the weight of
all cargo, consumables, and equipment (permanent or
temporary) loaded in or on the trailer in its "loaded and
ready for operation" condition. The recommended way
to measure GTW is to put your fully loaded trailer on
a vehicle scale. The entire weight of the trailer must be
supported by the scale.Gross Combination Weight Rating (GCWR)
The GCWR is the total permissible weight of your
vehicle and trailer when weighed in combination.
NOTE:
The GCWR rating includes a 68 kg allowance
for the presence of a driver.
Gross Axle Weight Rating (GAWR)
The GAWR is the maximum capacity of the front and
rear axles. Distribute the load over the front and rear
axles evenly. Make sure that you do not exceed either
front or rear GAWR.
WARNING!
It is important that you do not exceed
the maximum front or rear GAWR. A
dangerous driving condition can result if either
rating is exceeded. You could lose control of the
vehicle and have an accident .
Tongue Weight (TW)
The tongue weight is the downward force exerted on
the hitch ball by the trailer. In most cases, it should not
be less than 7% or more than 10% of the trailer load.
Tongue weight must not exceed the lesser of either the
hitch certification rating, or the trailer tongue chassis
rating. It should never be less than 4% of the trailer
load, and not less than 25 kg. You must consider tongue
load as part of the load on your vehicle and its’ GAWR.
213
KNOWING
YOURVEHICLE SAFETYSTARTING ANDDRIVINGWARNING LIGHTSAND
MESSAGES
IN AN
EMERGENCY
SERVICING AND
CARETECHNICAL
SPECIFICATIONSCONTENTS
Page 220 of 332
WARNING!
An improperly adjusted hitch system
may reduce handling, stability and brak-
ing performance and could result in an accident .
Consult with your hitch and trailer manufacturer
or a reputable trailer/dealer for additional infor-
mation.
Frontal Area
The frontal area is the maximum height multiplied by
the maximum width of the front of a trailer.
Trailer Sway Control
Refer to “TSC (Trailer Sway Control)” under “Knowing
Your Vehicle/Electronic Brake Control System” for
further information.
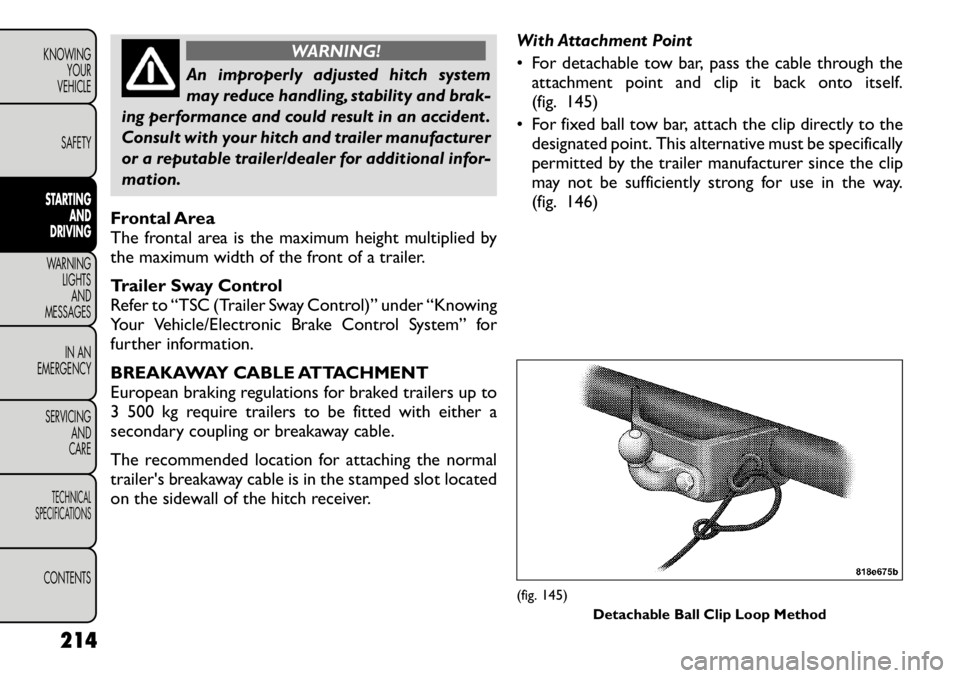
BREAKAWAY CABLE ATTACHMENT
European braking regulations for braked trailers up to
3 500 kg require trailers to be fitted with either a
secondary coupling or breakaway cable.
The recommended location for attaching the normal
trailer's breakaway cable is in the stamped slot located
on the sidewall of the hitch receiver. With Attachment Point
• For detachable tow bar, pass the cable through the
attachment point and clip it back onto itself.
(fig. 145)
• For fixed ball tow bar, attach the clip directly to the designated point. This alternative must be specifically
permitted by the trailer manufacturer since the clip
may not be sufficiently strong for use in the way.
(fig. 146)
(fig. 145)
Detachable Ball Clip Loop Method
214
KNOWING YOUR
VEHICLE
SAFETYSTARTING AND
DRIVINGWARNING LIGHTSAND
MESSAGES
IN AN
EMERGENCY
SERVICING AND
CARETECHNICAL
SPECIFICATIONSCONTENTS