door lock FIAT FREEMONT 2012 Owner handbook (in English)
[x] Cancel search | Manufacturer: FIAT, Model Year: 2012, Model line: FREEMONT, Model: FIAT FREEMONT 2012Pages: 332, PDF Size: 5.61 MB
Page 35 of 332
and Display button followed by pressing the arrow back
soft-key.
Hill Start Assist (for versions/markets, whereprovided)
Press the Hill Start Assist soft-key to change this
display. When this feature is selected, the Hill Start
Assist (HSA) system is active. Refer to “Electronic
Brake Control System” in “Starting And Driving” for
system function and operating information. To make
your selection, press the Hill Start Assist soft-key,
select On or Off followed by pressing the arrow back
soft-key.
Lights
Headlight Off Delay (for versions/markets, where provided)
Press the Headlight Off Delay soft-key to change this
display. When this feature is selected, the driver can
choose to have the headlights remain on for 0, 30, 60,
or 90 seconds when exiting the vehicle. To change the
Headlight Off Delay status press the 0, 30, 60 or 90
soft-key followed by pressing the arrow back soft-key.
Illuminated Approach (for versions/markets, where provided)
Press the Illuminated Approach soft-key to change this
display. When this feature is selected, the headlights
will activate and remain on for 0, 30, 60, or 90 seconds
when the doors are unlocked with the RKE transmit-
ter. To change the Illuminated Approach status press the 0, 30, 60 or 90 soft-key followed by pressing the
arrow back soft-key.
Headlights with Wipers (for versions/markets,
where provided)
Press the Headlights with Wipers soft-key to change
this display. When this feature is selected, and the
headlight switch is in the AUTO position, the head-
lights will turn on approximately 10 seconds after the
wipers are turned on. The headlights will also turn off
when the wipers are turned off if they were turned on
by this feature. To make your selection, press the
Headlights with Wipers soft-key, select On or Off
followed by pressing the arrow back soft-key.
Auto High Beams (for versions/markets, where provided)
Press the Auto High Beams soft-key to change this
display. When this feature is selected, the high beam
headlights will deactivate automatically under certain
conditions. To make your selection, press the Auto
High Beams soft-key, select ON or OFF followed by
pressing the arrow back soft-key. Refer to “Lights/
SmartBeam™ (for versions/markets, where provided)”
in “Knowing Your Vehicle” for further information.
Flash Headlights with Lock (for versions/ markets, where provided)
Press the Flash Headlights with Lock soft-key to change
this display. When this feature is selected, the front and
rear turn signals will flash when the doors are locked or
unlocked with the RKE transmitter. To make your
29
KNOWING
YOURVEHICLESAFETY
STARTING ANDDRIVING
WARNING LIGHTSAND
MESSAGES
IN AN
EMERGENCY
SERVICING AND
CARETECHNICAL
SPECIFICATIONSCONTENTS
Page 36 of 332
selection, press the Flash Headlights with Lock soft-
key, select On or Off followed by pressing the arrow
back soft-key.
Doors & Locks
Auto Unlock on Exit (for versions/markets,where provided)
Press the Auto Unlock on Exit soft-key to change this
display. When this feature is selected, all doors will
unlock when the vehicle is stopped and the transmis-
sion is in the PARK or NEUTRAL position and the
driver's door is opened. To make your selection, press
the Auto Unlock on Exit soft-key, select On or Off
followed by pressing the arrow back soft-key.
Flash Lights with Lock (for versions/markets,
where provided)
Press the Flash Lights with Lock soft-key to change this
display. When this feature is selected, the front and
rear turn signals will flash when the doors are locked or
unlocked with the RKE transmitter. To make your
selection, press the Flash Lights with Lock soft-key,
select On or Off followed by pressing the arrow back
soft-key.
Remote Door Unlock Order (for versions/ markets, where provided)
Press the Remote Door Unlock Order soft-key to
change this display. When Unlock Driver Door Only
On 1st Press is selected, only the driver's door will
unlock on the first press of the RKE transmitter UN- LOCK button. When Driver Door 1st Press is se-
lected, you must press the RKE transmitter UNLOCK
button twice to unlock the passenger's doors. When
Unlock All Doors On 1st Press
is selected, all of the
doors will unlock on the first press of the RKE trans-
mitter UNLOCK button.
NOTE: If the vehicle is equipped with Keyless Enter-
N-Go (Passive Entry) and the EVIC is programmed to
Unlock All Doors 1st Press, all doors will unlock no
matter which Passive Entry equipped door handle is
grasped. If Driver Door 1st Press is programmed, only
the driver’s door will unlock when the driver’s door is
grasped. With Passive Entry, if Driver Door 1st Press is
programmed touching the handle more than once will
only result in the driver’s door opening. If driver door
first is selected, once the driver door is opened, the
interior door lock/unlock switch can be used to unlock
all doors (or use RKE transmitter).
Passive Entry (Keyless Enter-N-Go) (for versions/markets, where provided)
Press the Passive Entry soft-key to change this display.
This feature allows you to lock and unlock the vehicle’s
door(s) without having to press the RKE transmitter
lock or unlock buttons. To make your selection, press
the Passive Entry soft-key, select ON or OFF followed
by pressing the arrow back soft-key. Refer to “Keyless
Enter-N-Go” in “Knowing Your Vehicle”.
30
KNOWING YOUR
VEHICLE
SAFETY
STARTING AND
DRIVING
WARNING LIGHTSAND
MESSAGES
IN AN
EMERGENCY
SERVICING AND
CARETECHNICAL
SPECIFICATIONSCONTENTS
Page 39 of 332
Audio
Equalizer (for versions/markets, where provided)
Press the Equalizer soft-key to change this display.
When in this display you may adjust the Bass, Mid and
Treble settings. Adjust the settings with the + and –
setting soft-keys or by selecting any point on the scale
in between the + and – soft-keys followed by pressing
the arrow back soft-key.
NOTE:Bass/mid/treble allow the you to simply slide
your finger up/down to change the setting as well as
press directly on the desired setting.
Balance / Fade (for versions/markets, where provided)
Press the Balance / Fade soft-key to change this display.
When in this display you may adjust the Balance and
Fade settings.
Speed Adjusted Volume (for versions/markets,
where provided)
Press the Speed Adjusted Volume soft-key to change
this display. Decreases volume relative to vehicle
speed. To change the Speed Adjusted Volume press the
Off, 1, 2 or 3 soft-key followed by pressing the arrow
back soft-key.
Surround Sound (for versions/markets, where
provided)
Press the Surround Sound soft-key to change this
display. Provides simulated surround sound mode. To
make your selection, press the Surround Sound soft- key, select ON or OFF followed by pressing the arrow
back soft-key.
Phone / Bluetooth
Paired Devices (for versions/markets, where
provided)
This feature shows which phones are paired to the
Phone/Bluetooth system. For further information, re-
fer to the Uconnect Touch™ Supplement.
CUSTOMER PROGRAMMABLE FEATURES
— Uconnect Touch™ SYSTEM 8.4 SETTINGS
In this mode the Uconnect Touch™ system allows you
to access programmable features that may be equipped
such as Display, Clock, Safety/Assistance, Lights, Doors
& Locks, Auto-On Comfort , Engine Off Operation,
Compass Settings, Audio and Phone/Bluetooth set-tings.
NOTE: Only one touchscreen area may be selected
at a time. (fig. 14)
When making a selection, scroll up or down until the
preferred setting is highlighted, then press and release
the preferred setting until a check-mark appears next
to the setting, showing that setting has been selected.
Display
Display Mode (for versions/markets, where provided)
When in this display you may select one of the auto
display settings. To change Mode status press and
33
KNOWING
YOURVEHICLESAFETY
STARTING ANDDRIVING
WARNING LIGHTSAND
MESSAGES
IN AN
EMERGENCY
SERVICING AND
CARETECHNICAL
SPECIFICATIONSCONTENTS
Page 42 of 332
and Display, or turned OFF. To change the Park Assist
status press and release the Off, Sound Only or Sounds
and Display button followed by pressing the arrow back
soft-key.
Parkview Backup Camera (for versions/markets,where provided)
Your vehicle may be equipped with the ParkView
®
Rear Back Up Camera that allows you to see an
on-screen image of the rear surroundings of your
vehicle whenever the shift lever is put into REVERSE.
The image will be displayed on the radio touchscreen
display along with a caution note to “check entire
surroundings” across the top of the screen. After five
seconds this note will disappear. The ParkView
®cam-
era is located on the rear of the vehicle above the rear
License plate. To make your selection, press the Park-
view Backup Camera soft-key, select On or Off fol-
lowed by pressing the arrow back soft-key.
Hill Start Assist (for versions/markets, where provided)
When this feature is selected, the Hill Start Assist
(HSA) system is active. Refer to “Electronic Brake
Control System” in “Starting And Driving” for system
function and operating information. To make your
selection, press the Hill Start Assist soft-key, select On
or Off followed by pressing the arrow back soft-key. Lights
Headlight Off Delay (for versions/markets,
where provided)
When this feature is selected, the driver can choose to
have the headlights remain on for 0, 30, 60, or 90 sec-
onds when exiting the vehicle. To change the Headlight
Off Delay status press the 0, 30, 60 or 90 soft-key
followed by pressing the arrow back soft-key.
Headlight Illumination on Approach (for versions/markets, where provided)
When this feature is selected, the headlights will acti-
vate and remain on for 0, 30, 60, or 90 seconds when
the doors are unlocked with the RKE transmitter. To
change the Illuminated Approach status press the 0, 30,
60 or 90 soft-key followed by pressing the arrow back
soft-key.
Headlights with Wipers (for versions/markets, where provided)
When this feature is selected, and the headlight switch
is in the AUTO position, the headlights will turn on
approximately 10 seconds after the wipers are turned
on. The headlights will also turn off when the wipers
are turned off if they were turned on by this feature. To
make your selection, press the Headlights with Wipers
soft-key, select On or Off followed by pressing the
arrow back soft-key.
36
KNOWING YOUR
VEHICLE
SAFETY
STARTING AND
DRIVING
WARNING LIGHTSAND
MESSAGES
IN AN
EMERGENCY
SERVICING AND
CARETECHNICAL
SPECIFICATIONSCONTENTS
Page 43 of 332
Auto Dim High Beams (for versions/markets,where provided)
When this feature is selected, the high beam headlights
will deactivate automatically under certain conditions.
To make your selection, press the Auto High Beams
soft-key, select ON or OFF followed by pressing the
arrow back soft-key. Refer to “Lights/SmartBeam™
(for versions/markets, where provided)” in “Knowing
Your Vehicle” for further information.
Headlight Dip (Traffic Changeover) (for versions/markets, where provided)
Low beam headlights have more control of upward
light and direct most of their light downward and either
to the right for right hand drive countries or to the left
for left hand drive countries to provide safe forward
visibility without excessive glare.
Flash Headlights With Lock (for versions/ markets, where provided)
When this feature is selected, the front and rear turn
signals will flash when the doors are locked or unlocked
with the RKE transmitter. To make your selection,
press the Flash Headlights with Lock soft-key, select
On or Off followed by pressing the arrow back soft-key.
Doors & Locks
Auto Unlock on Exit (for versions/markets, where provided)
When this feature is selected, all doors will unlock
when the vehicle is stopped and the transmission is in the PARK or NEUTRAL position and the driver's door
is opened. To make your selection, press the Auto
Unlock on Exit soft-key, select On or Off followed by
pressing the arrow back soft-key.
Flash Headlight with Lock (for versions/markets,
where provided)
When this feature is selected, the front and rear turn
signals will flash when the doors are locked or unlocked
with the RKE transmitter. To make your selection,
press the Flash Lights with Lock soft-key, select On or
Off followed by pressing the arrow back soft-key.
1st Press of Key Fob Unlocks (for versions/markets, where provided)
When Unlock Driver Door Only On 1st Press is
selected, only the driver's door will unlock on the first
press of the RKE transmitter UNLOCK button. When
Driver Door 1st Press is selected, you must press the
RKE transmitter UNLOCK button twice to unlock the
passenger's doors. When Unlock All Doors On 1st
Press is selected, all of the doors will unlock on the
first press of the RKE transmitter UNLOCK button.
NOTE: If the vehicle is equipped with Keyless Enter-
N-Go (Passive Entry) and the EVIC is programmed to
Unlock All Doors 1st Press, all doors will unlock no
matter which Passive Entry equipped door handle is
grasped. If Driver Door 1st Press is programmed, only
the driver’s door will unlock when the driver’s door is
grasped. With Passive Entry, if Driver Door 1st Press is
programmed touching the handle more than once will
37
KNOWING
YOURVEHICLESAFETY
STARTING ANDDRIVING
WARNING LIGHTSAND
MESSAGES
IN AN
EMERGENCY
SERVICING AND
CARETECHNICAL
SPECIFICATIONSCONTENTS
Page 44 of 332
only result in the driver’s door opening. If driver door
first is selected, once the driver door is opened, the
interior door lock/unlock switch can be used to unlock
all doors (or use RKE transmitter).
Passive Entry (for versions/markets, whereprovided)
This feature allows you to lock and unlock the vehicle’s
door(s) without having to press the RKE transmitter
lock or unlock buttons. To make your selection, press
the Passive Entry soft-key, select ON or OFF followed
by pressing the arrow back soft-key. Refer to “Keyless
Enter-N-Go” in “Knowing Your Vehicle”.
Engine Off Options
Engine Off Power Delay (for versions/markets,
where provided)
When this feature is selected, the power window
switches, radio, Uconnect™ phone system (for
versions/markets, where provided), DVD video system
(for versions/markets, where provided), power sunroof
(for versions/markets, where provided), and power
outlets will remain active for up to 10 minutes after the
ignition is cycled OFF. Opening either front vehicle
door will cancel this feature. To change the Engine Off
Power Delay status press the 0 seconds, 45 seconds,
5 minutes or 10 minutes soft-key followed by pressing
the arrow back soft-key. Headlight Off Delay (for versions/markets,
where provided)
When this feature is selected, the driver can choose to
have the headlights remain on for 0, 30, 60, or 90 sec-
onds when exiting the vehicle. To change the Headlight
Off Delay status press the 0, 30, 60 or 90 soft-key
followed by pressing the arrow back soft-key.
Compass Settings
Variance (for versions/markets, where provided)
Compass Variance is the difference between Magnetic
North and Geographic North. To compensate for the
differences the variance should be set for the zone
where the vehicle is driven, per the zone map. Once
properly set, the compass will automatically compen-
sate for the differences, and provide the most accurate
compass heading.
NOTE: Keep magnetic materials away from the top
of the instrument panel, such as iPod's, Mobile Phones,
Laptops and Radar Detectors. This is where the com-
pass module is located, and it can cause interference
with the compass sensor, and it may give false readings.
(fig. 15)
38
KNOWING YOUR
VEHICLE
SAFETY
STARTING AND
DRIVING
WARNING LIGHTSAND
MESSAGES
IN AN
EMERGENCY
SERVICING AND
CARETECHNICAL
SPECIFICATIONSCONTENTS
Page 58 of 332
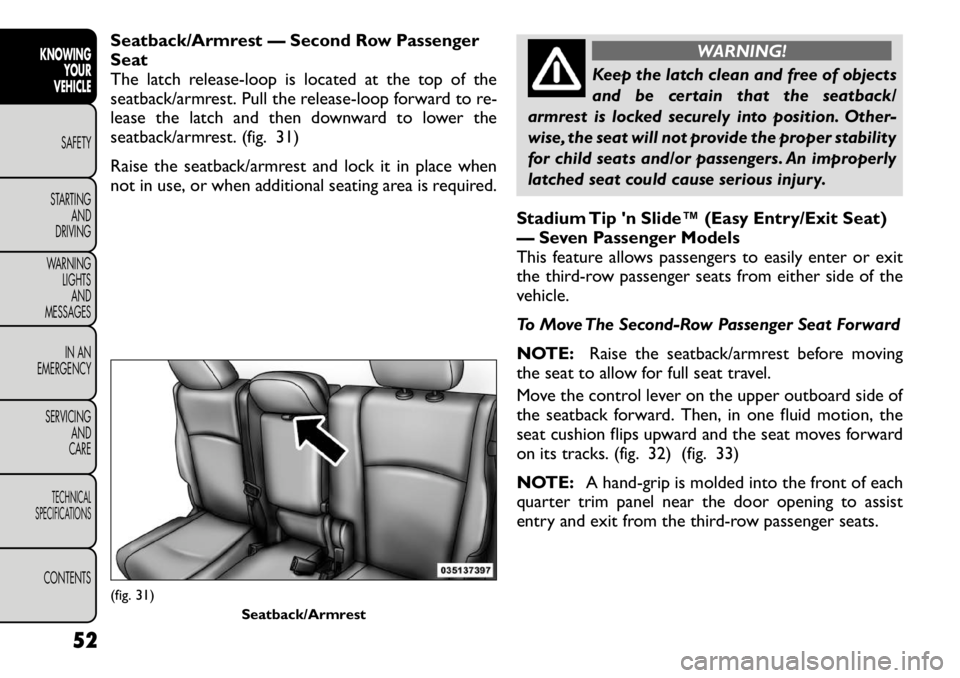
Seatback/Armrest — Second Row Passenger Seat
The latch release-loop is located at the top of the
seatback/armrest. Pull the release-loop forward to re-
lease the latch and then downward to lower the
seatback/armrest. (fig. 31)
Raise the seatback/armrest and lock it in place when
not in use, or when additional seating area is required.
WARNING!
Keep the latch clean and free of objects
and be certain that the seatback/
armrest is locked securely into position. Other-
wise, the seat will not provide the proper stability
for child seats and/or passengers. An improperly
latched seat could cause serious injury.
Stadium Tip 'n Slide™ (Easy Entry/Exit Seat)
— Seven Passenger Models
This feature allows passengers to easily enter or exit
the third-row passenger seats from either side of the
vehicle.
To Move The Second-Row Passenger Seat Forward
NOTE: Raise the seatback/armrest before moving
the seat to allow for full seat travel.
Move the control lever on the upper outboard side of
the seatback forward. Then, in one fluid motion, the
seat cushion flips upward and the seat moves forward
on its tracks. (fig. 32) (fig. 33)
NOTE: A hand-grip is molded into the front of each
quarter trim panel near the door opening to assist
entry and exit from the third-row passenger seats.
(fig. 31)
Seatback/Armrest
52
KNOWING YOUR
VEHICLE
SAFETY
STARTING AND
DRIVING
WARNING LIGHTSAND
MESSAGES
IN AN
EMERGENCY
SERVICING AND
CARETECHNICAL
SPECIFICATIONSCONTENTS
Page 79 of 332
the headlight switch once and the front fog lights come
on. Press the switch a second time and the rear fog
lights will come on (front fog lights stay on). Press the
switch a third time and the rear fog lights turn off (front
fog stays on). Press the switch a fourth times and the
front fog turns off. For vehicles without front fog, rear
fog will activate on the first press.
An indicator light in the instrument cluster illuminates
when the fog lights are turned on.
NOTE:The fog lights will operate with the low beam
headlights or parking lights on. However, selecting the
high beam headlights will turn off the fog lights.
MULTIFUNCTION LEVER
The multifunction lever controls the operation of the
turn signals, headlight beam selection and passing lights.
The multifunction lever is located on the left side of the
steering column.
TURN SIGNALS
Move the multifunction lever up or down and the
arrows on each side of the instrument cluster flash to
show proper operation of the front and rear turn signallights.
NOTE:
• If either light remains on and does not flash, or there
is a very fast flash rate, check for a defective outside
light bulb. If an indicator fails to light when the lever is
moved, it would suggest that the indicator bulb is
defective. • A “Turn Signal On” message will appear in the EVIC
(for versions/markets, where provided) and a continu-
ous chime will sound if the vehicle is driven more than
1.6 km with either turn signal on.
LANE CHANGE ASSIST
Tap the lever up or down once, without moving beyond
the detent, and the turn signal (right or left) will flash
three times then automatically turn off.
HIGH/LOW BEAM SWITCH
Push the multifunction lever away from you to switch
the headlights to high beam. Pull the multifunction lever
toward you to switch the headlights back to low beam.
FLASH-TO-PASS
You can signal another vehicle with your headlights by
lightly pulling the multifunction lever toward you. This
will turn on the high beams headlights until the lever is
released.
INTERIOR LIGHTS
The interior lights come on when a door is opened.
To protect the battery, the interior lights will turn off
automatically 10 minutes after the ignition switch is
moved to the LOCK position. This will occur if the
interior lights were switched on manually or are on
because a door is open. This includes the glove box
light, but not the trunk light. To restore interior light
operation, either turn the ignition switch ON or cycle
the light switch.
73
KNOWING
YOURVEHICLESAFETY
STARTING ANDDRIVING
WARNING LIGHTSAND
MESSAGES
IN AN
EMERGENCY
SERVICING AND
CARETECHNICAL
SPECIFICATIONSCONTENTS
Page 81 of 332
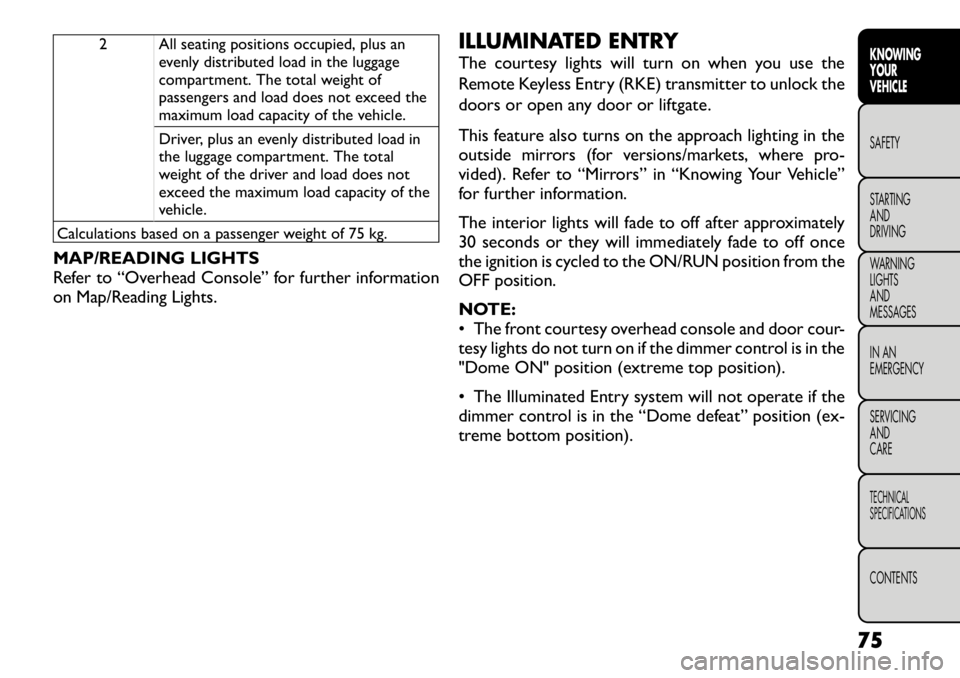
2 All seating positions occupied, plus anevenly distributed load in the luggage
compartment. The total weight of
passengers and load does not exceed the
maximum load capacity of the vehicle.
Driver, plus an evenly distributed load in
the luggage compartment. The total
weight of the driver and load does not
exceed the maximum load capacity of the
vehicle.
Calculations based on a passenger weight of 75 kg.
MAP/READING LIGHTS
Refer to “Overhead Console” for further information
on Map/Reading Lights. ILLUMINATED ENTRY
The courtesy lights will turn on when you use the
Remote Keyless Entry (RKE) transmitter to unlock the
doors or open any door or liftgate.
This feature also turns on the approach lighting in the
outside mirrors (for versions/markets, where pro-
vided). Refer to “Mirrors” in “Knowing Your Vehicle”
for further information.
The interior lights will fade to off after approximately
30 seconds or they will immediately fade to off once
the ignition is cycled to the ON/RUN position from the
OFF position.
NOTE:
• The front courtesy overhead console and door cour-
tesy lights do not turn on if the dimmer control is in the
"Dome ON" position (extreme top position).
• The Illuminated Entry system will not operate if the
dimmer control is in the “Dome defeat” position (ex-
treme bottom position).
75
KNOWING
YOURVEHICLESAFETY
STARTING ANDDRIVING
WARNING LIGHTSAND
MESSAGES
IN AN
EMERGENCY
SERVICING AND
CARETECHNICAL
SPECIFICATIONSCONTENTS
Page 89 of 332
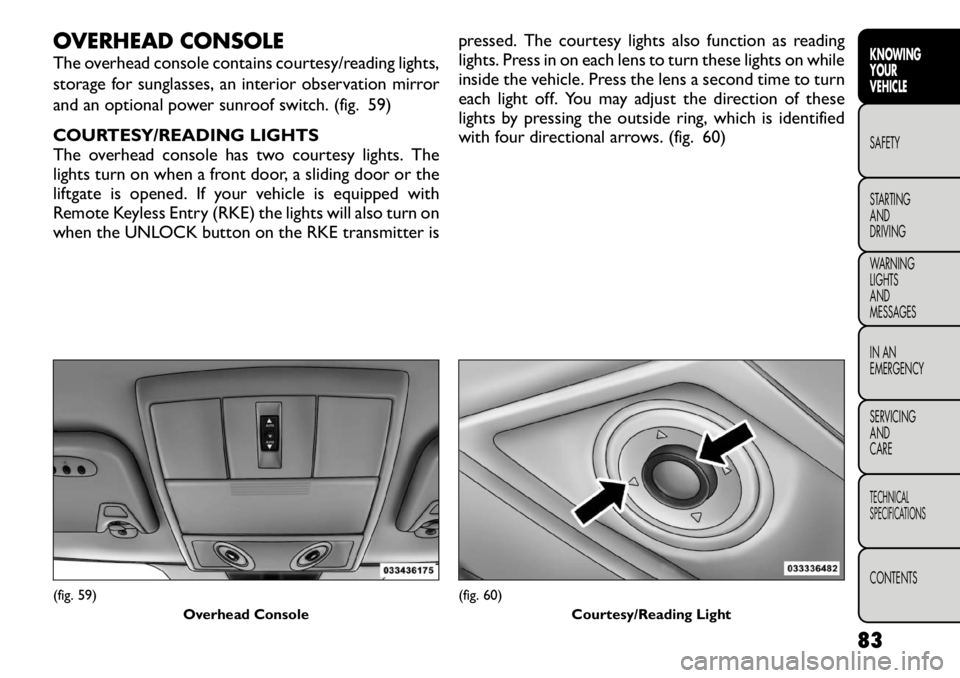
OVERHEAD CONSOLE
The overhead console contains courtesy/reading lights,
storage for sunglasses, an interior observation mirror
and an optional power sunroof switch. (fig. 59)
COURTESY/READING LIGHTS
The overhead console has two courtesy lights. The
lights turn on when a front door, a sliding door or the
liftgate is opened. If your vehicle is equipped with
Remote Keyless Entry (RKE) the lights will also turn on
when the UNLOCK button on the RKE transmitter ispressed. The courtesy lights also function as reading
lights. Press in on each lens to turn these lights on while
inside the vehicle. Press the lens a second time to turn
each light off. You may adjust the direction of these
lights by pressing the outside ring, which is identified
with four directional arrows. (fig. 60)(fig. 59)
Overhead Console
(fig. 60)Courtesy/Reading Light
83
KNOWING
YOURVEHICLESAFETY
STARTING ANDDRIVING
WARNING LIGHTSAND
MESSAGES
IN AN
EMERGENCY
SERVICING AND
CARETECHNICAL
SPECIFICATIONSCONTENTS