technical specification FIAT FREEMONT 2012 Owner handbook (in English)
[x] Cancel search | Manufacturer: FIAT, Model Year: 2012, Model line: FREEMONT, Model: FIAT FREEMONT 2012Pages: 332, PDF Size: 5.61 MB
Page 238 of 332
WARNING!
Take care to avoid the radiator cooling
fan whenever the hood is raised. It can
start anytime the ignition switch is ON.You can
be injured by moving fan blades.
Remove any metal jewelry such as watch bands
or bracelets that might make an inadvertent
electrical contact .You could be seriously injured.
Batteries contain sulfuric acid that can burn
your skin or eyes and generate hydrogen gas
which is flammable and explosive. Keep open
flames or sparks away from the battery.
1. Set the parking brake, shift the automatic transmis- sion into PARK and turn the ignition to LOCK.
2. Turn off the heater, radio, and all unnecessary elec- trical accessories.
3. Remove the protective cover over the remote posi- tive (+)battery post. To remove the cover, press
the locking tab and pull upward on the cover.
4. If using another vehicle to jump-start the battery, park the vehicle within the jumper cables reach, set
the parking brake and make sure the ignition is OFF.
WARNING!
Do not allow vehicles to touch each
other as this could establish a ground
connection and personal injury could result .
JUMP-STARTING PROCEDURE
WARNING!
Failure to follow this procedure could
result in personal injury or property
damage due to battery explosion.Failure to follow these procedures could
result in damage to the charging system
of the booster vehicle or the discharged
vehicle.
1. Connect the positive (+)end of the jumper cable to
the remote positive (+)post of the discharged
vehicle.
2. Connect the opposite end of the positive (+)
jumper cable to the positive (+)post of the booster
battery.
3. Connect the negative end (-)of the jumper cable to
the negative (-)post of the booster battery.
4. Connect the opposite end of the negative (-)
jumper cable to the remote negative (-)post of the
vehicle with the discharged battery.
232
KNOWING YOUR
VEHICLE
SAFETY
STARTING AND
DRIVING
WARNING LIGHTSAND
MESSAGES
IN AN
EMERGENCY
SERVICING AND
CARETECHNICAL
SPECIFICATIONSCONTENTS
Page 239 of 332
WARNING!
Do not connect the cable to the negative
post(-)of the discharged battery. The
resulting electrical spark could cause the battery
to explode and could result in personal injury.
5. Start the engine in the vehicle that has the booster battery, let the engine idle a few minutes, and then
start the engine in the vehicle with the discharged
battery.
Once the engine is started, remove the jumper
cables in the reverse sequence:
6. Disconnect the negative (-)jumper cable from the
remote negative (-)post of the vehicle with the
discharged battery.
7. Disconnect the negative end (-)of the jumper cable
from the negative (-)post of the booster battery.
8. Disconnect the opposite end of the positive (+)
jumper cable from the positive (+)post of the
booster battery.
9. Disconnect the positive (+)end of the jumper cable
from the remote positive (+)post of the discharged
vehicle.
10. Reinstall the protective cover over the remote positive (+)battery post of the discharged vehicle. If frequent jump-starting is required to start your
vehicle, you should have the battery and charging
system inspected at your authorized dealer.
Accessories that can be plugged into the
vehicle power outlets draw power from
the vehicle’s battery, even when not in
use (i.e., cellular phones, etc .). Eventually, if
plugged in long enough, the vehicle’s battery will
discharge sufficiently to degrade battery life
and/or prevent the engine from starting.
233
KNOWING
YOURVEHICLE SAFETY
STARTING ANDDRIVING
WARNING LIGHTSAND
MESSAGESIN AN
EMERGENCYSERVICING AND
CARETECHNICAL
SPECIFICATIONSCONTENTS
Page 240 of 332
JACKING AND TIRE CHANGING
WARNING!
Do not attempt to change a tire on the
side of the vehicle close to moving traf-
fic . Pull far enough off the road to avoid the
danger of being hit when operating the jack or
changing the wheel.
Being under a jacked-up vehicle is dangerous.
The vehicle could slip off the jack and fall on you.
You could be crushed. Never put any part of your
body under a vehicle that is on a jack. If you need
to get under a raised vehicle, take it to a service
center where it can be raised on a lift .
Never start or run the engine while the vehicle
is on a jack.
The jack is designed to be used as a tool for
changing tires only.The jack should not be used to
lift the vehicle for service purposes. The vehicle
should be jacked on a firm level surface only.
Avoid ice or slippery areas. JACK LOCATION
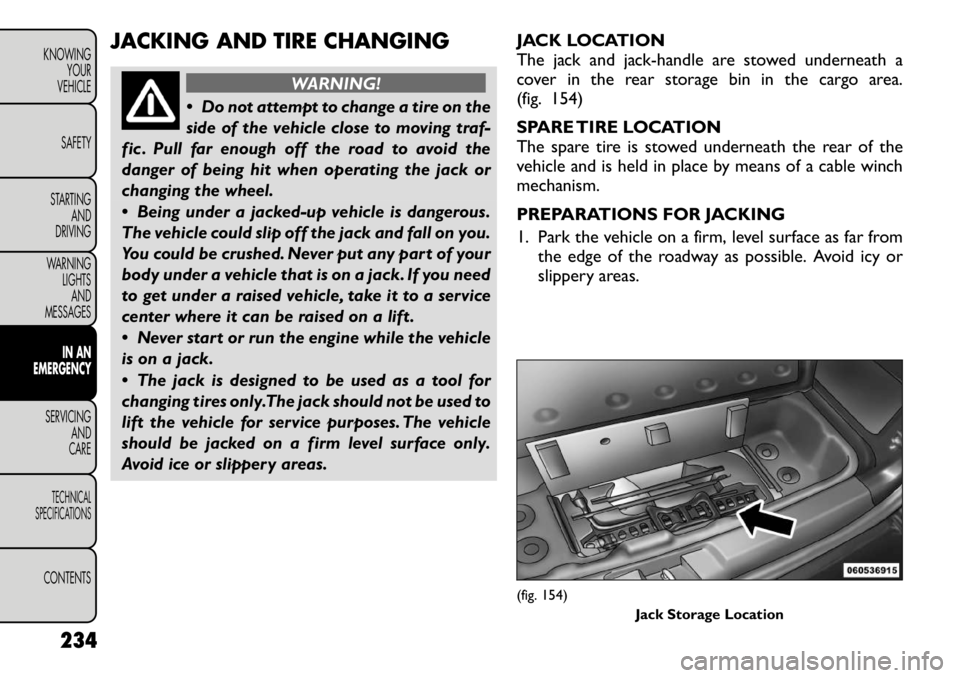
The jack and jack-handle are stowed underneath a
cover in the rear storage bin in the cargo area.
(fig. 154)
SPARE TIRE LOCATION
The spare tire is stowed underneath the rear of the
vehicle and is held in place by means of a cable winchmechanism.
PREPARATIONS FOR JACKING
1. Park the vehicle on a firm, level surface as far from
the edge of the roadway as possible. Avoid icy or
slippery areas.
(fig. 154)
Jack Storage Location
234
KNOWING YOUR
VEHICLE
SAFETY
STARTING AND
DRIVING
WARNING LIGHTSAND
MESSAGES
IN AN
EMERGENCY
SERVICING AND
CARETECHNICAL
SPECIFICATIONSCONTENTS
Page 241 of 332
WARNING!
Do not attempt to change a tire on the
side of the vehicle close to moving traf-
fic . Pull far enough off the road to avoid the
danger of being hit when operating the jack or
changing the wheel.
2. Turn on the Hazard Warning flashers.
3. Set the parking brake.
4. Place the shift lever in PARK.
5. Turn OFF the ignition. 6. Block both the front and rear ofthe wheel diagonally opposite of
the jacking position. For example,
if changing the right front tire,
block the left rear wheel.
NOTE: Passengers should not remain in the vehicle
when the vehicle is being jacked.
SPARE TIRE REMOVAL
NOTE: On seven-passenger models, fold the third-
row passenger seats flat. This will provide more space
when accessing the jacking tools and when operating
the winch mechanism.
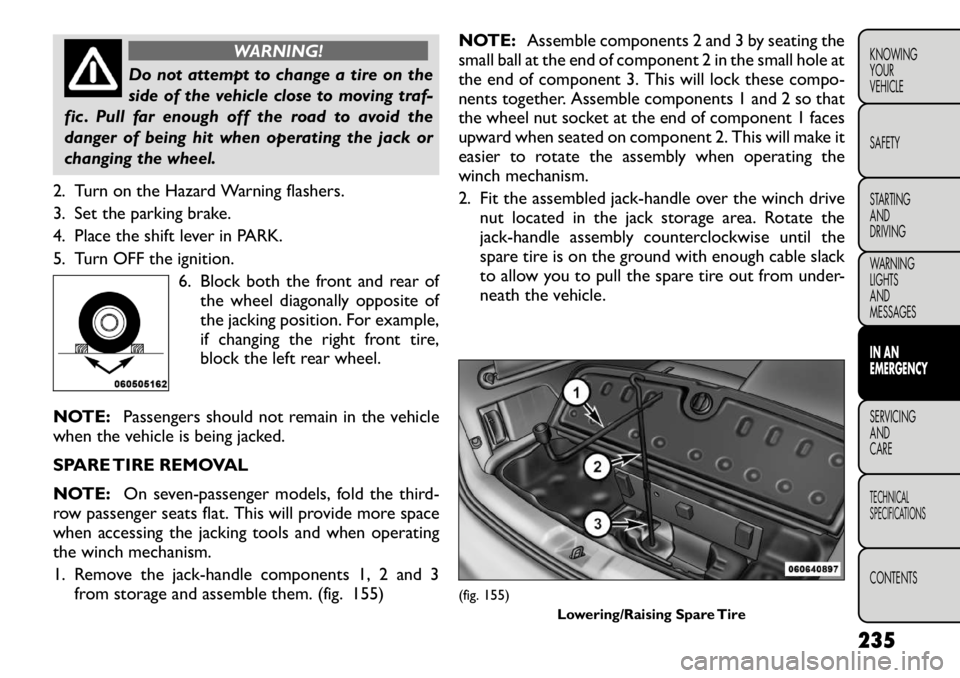
1. Remove the jack-handle components 1, 2 and 3 from storage and assemble them. (fig. 155) NOTE:
Assemble components 2 and 3 by seating the
small ball at the end of component 2 in the small hole at
the end of component 3. This will lock these compo-
nents together. Assemble components 1 and 2 so that
the wheel nut socket at the end of component 1 faces
upward when seated on component 2. This will make it
easier to rotate the assembly when operating the
winch mechanism.
2. Fit the assembled jack-handle over the winch drive nut located in the jack storage area. Rotate the
jack-handle assembly counterclockwise until the
spare tire is on the ground with enough cable slack
to allow you to pull the spare tire out from under-
neath the vehicle.
(fig. 155) Lowering/Raising Spare Tire
235
KNOWING
YOURVEHICLE SAFETY
STARTING ANDDRIVING
WARNING LIGHTSAND
MESSAGESIN AN
EMERGENCYSERVICING AND
CARETECHNICAL
SPECIFICATIONSCONTENTS
Page 242 of 332
The winch mechanism is designed for use
with the jack-handle only. Use of an air
wrench or other power tools is not rec-
ommended and it can damage the winch.
3. Pull the spare tire out from underneath the vehicle and raise it upright so the tire's tread is on the
ground.
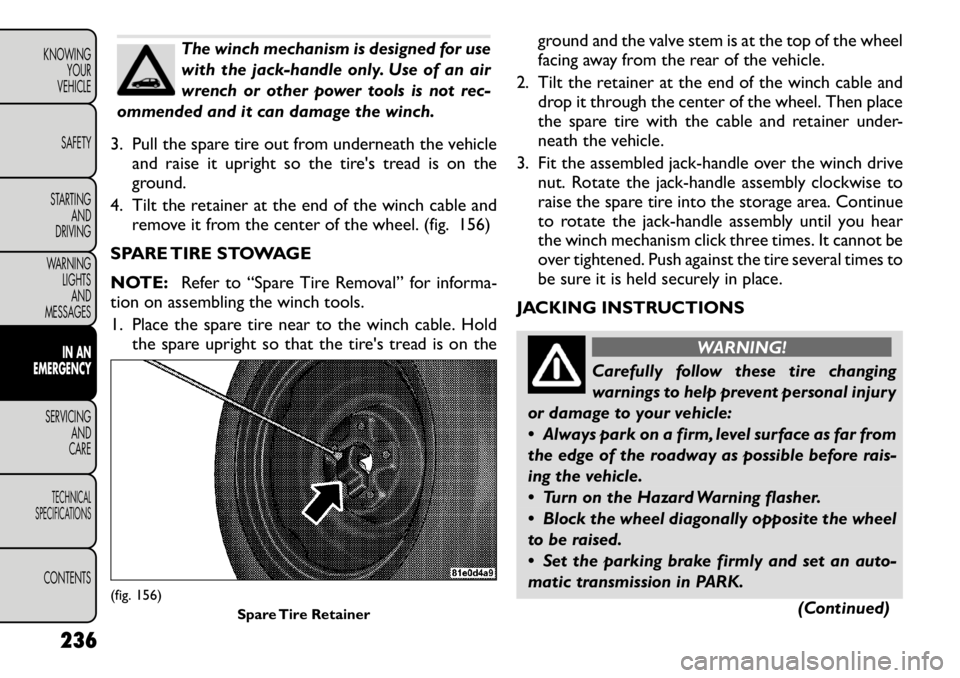
4. Tilt the retainer at the end of the winch cable and remove it from the center of the wheel. (fig. 156)
SPARE TIRE STOWAGE
NOTE: Refer to “Spare Tire Removal” for informa-
tion on assembling the winch tools.
1. Place the spare tire near to the winch cable. Hold
the spare upright so that the tire's tread is on the ground and the valve stem is at the top of the wheel
facing away from the rear of the vehicle.
2. Tilt the retainer at the end of the winch cable and drop it through the center of the wheel. Then place
the spare tire with the cable and retainer under-
neath the vehicle.
3. Fit the assembled jack-handle over the winch drive nut. Rotate the jack-handle assembly clockwise to
raise the spare tire into the storage area. Continue
to rotate the jack-handle assembly until you hear
the winch mechanism click three times. It cannot be
over tightened. Push against the tire several times to
be sure it is held securely in place.
JACKING INSTRUCTIONS
WARNING!
Carefully follow these tire changing
warnings to help prevent personal injury
or damage to your vehicle:
Always park on a firm, level surface as far from
the edge of the roadway as possible before rais-
ing the vehicle.
Turn on the Hazard Warning flasher.
Block the wheel diagonally opposite the wheel
to be raised.
Set the parking brake firmly and set an auto-
matic transmission in PARK.
(Continued)
(fig. 156)Spare Tire Retainer
236
KNOWING YOUR
VEHICLE
SAFETY
STARTING AND
DRIVING
WARNING LIGHTSAND
MESSAGES
IN AN
EMERGENCY
SERVICING AND
CARETECHNICAL
SPECIFICATIONSCONTENTS
Page 243 of 332
(Continued)
Never start or run the engine with the vehicle
on a jack.
Do not let anyone sit in the vehicle when it is on
a jack.
Do not get under the vehicle when it is on a
jack.
Only use the jack in the positions indicated and
for lifting this vehicle during a tire change.
If working on or near a roadway, be extremely
careful of motor traffic .
To assure that spare tires, flat or inflated, are
securely stowed, spares must be stowed with the
valve stem facing the ground.
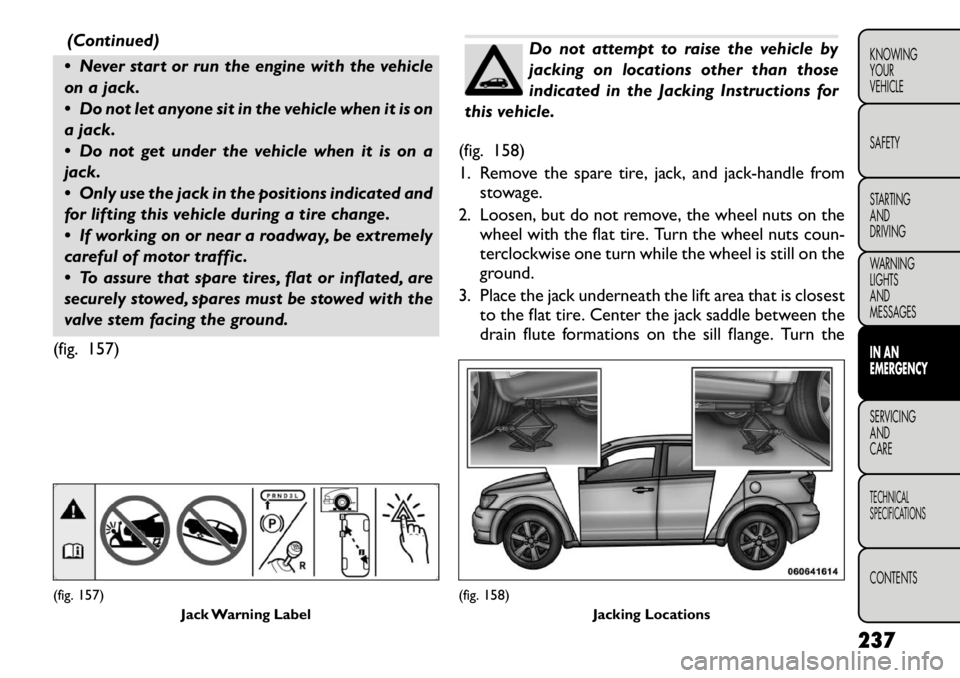
(fig. 157)
Do not attempt to raise the vehicle by
jacking on locations other than those
indicated in the Jacking Instructions for
this vehicle.
(fig. 158)
1. Remove the spare tire, jack, and jack-handle from stowage.
2. Loosen, but do not remove, the wheel nuts on the wheel with the flat tire. Turn the wheel nuts coun-
terclockwise one turn while the wheel is still on the
ground.
3. Place the jack underneath the lift area that is closest to the flat tire. Center the jack saddle between the
drain flute formations on the sill flange. Turn the
(fig. 157)
Jack Warning Label
(fig. 158) Jacking Locations
237
KNOWING
YOURVEHICLE SAFETY
STARTING ANDDRIVING
WARNING LIGHTSAND
MESSAGESIN AN
EMERGENCYSERVICING AND
CARETECHNICAL
SPECIFICATIONSCONTENTS
Page 244 of 332
jack screw clockwise to firmly engage the jack saddle
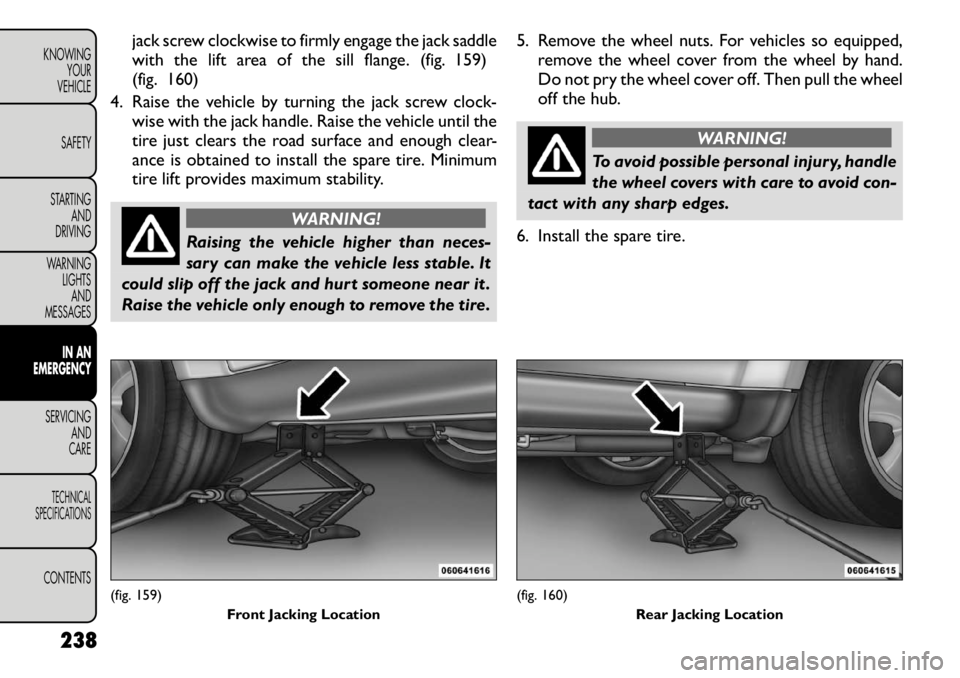
with the lift area of the sill flange. (fig. 159)
(fig. 160)
4. Raise the vehicle by turning the jack screw clock- wise with the jack handle. Raise the vehicle until the
tire just clears the road surface and enough clear-
ance is obtained to install the spare tire. Minimum
tire lift provides maximum stability.
WARNING!
Raising the vehicle higher than neces-
sary can make the vehicle less stable. It
could slip off the jack and hurt someone near it .
Raise the vehicle only enough to remove the tire. 5. Remove the wheel nuts. For vehicles so equipped,
remove the wheel cover from the wheel by hand.
Do not pry the wheel cover off. Then pull the wheel
off the hub.
WARNING!
To avoid possible personal injury, handle
the wheel covers with care to avoid con-
tact with any sharp edges.
6. Install the spare tire.
(fig. 159) Front Jacking Location
(fig. 160) Rear Jacking Location
238
KNOWING YOUR
VEHICLE
SAFETY
STARTING AND
DRIVING
WARNING LIGHTSAND
MESSAGES
IN AN
EMERGENCY
SERVICING AND
CARETECHNICAL
SPECIFICATIONSCONTENTS
Page 246 of 332
WARNING!
A loose tire or jack, thrown forward in a
collision or hard stop could endanger the
occupants of the vehicle. Always stow the jack
parts and the spare tire in the places provided.
Have the deflated (flat) tire repaired or replaced
immediately.
11. Place the deflated (flat) tire in the cargo area. Do
not stow the deflated tire in the spare tire
stowage location. Have the deflated (flat) tire
repaired or replaced as soon as possible.
12. To stow the winch cable and retainer, fit the assembled jack-handle over the winch drive nut.
Rotate the jack-handle assembly clockwise until
you hear the winch mechanism click three times. It
cannot be over tightened.
13. Stow the jack-handle and jack.
14. Check the tire pressure as soon as possible. Adjust the tire pressure as required.
ROAD TIRE INSTALLATION
Vehicles Equipped With Wheel Covers
1. Mount the road tire on the axle.
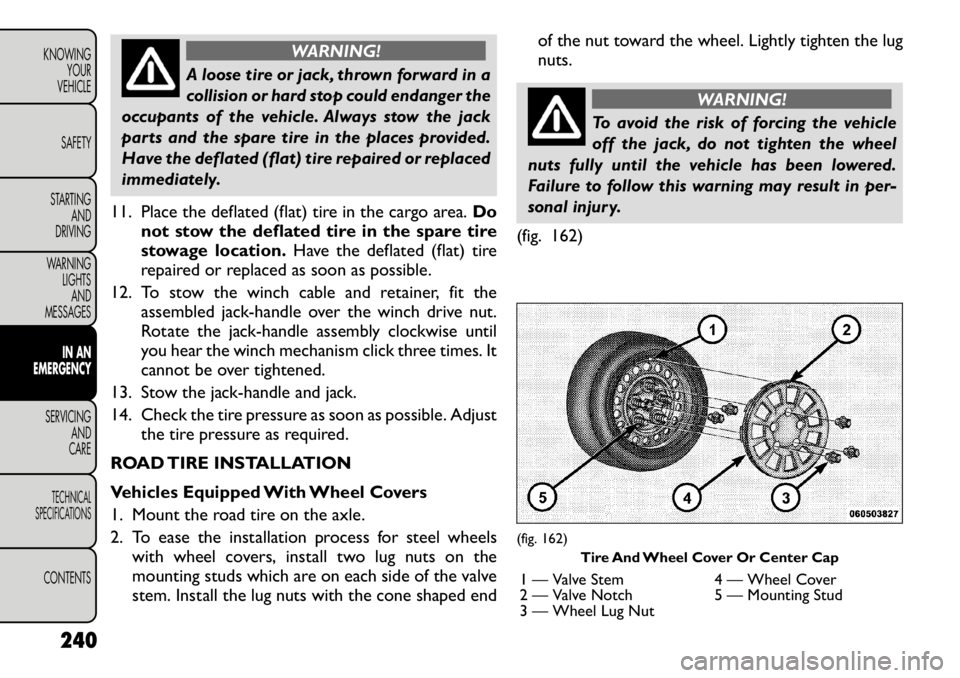
2. To ease the installation process for steel wheels with wheel covers, install two lug nuts on the
mounting studs which are on each side of the valve
stem. Install the lug nuts with the cone shaped end of the nut toward the wheel. Lightly tighten the lug
nuts.
WARNING!
To avoid the risk of forcing the vehicle
off the jack, do not tighten the wheel
nuts fully until the vehicle has been lowered.
Failure to follow this warning may result in per-
sonal injury.
(fig. 162)
(fig. 162) Tire And Wheel Cover Or Center Cap
1 — Valve Stem 4 — Wheel Cover
2 — Valve Notch 5 — Mounting Stud
3 — Wheel Lug Nut
240
KNOWING YOUR
VEHICLE
SAFETY
STARTING AND
DRIVING
WARNING LIGHTSAND
MESSAGES
IN AN
EMERGENCY
SERVICING AND
CARETECHNICAL
SPECIFICATIONSCONTENTS
Page 249 of 332
Selecting Air ModeTurn the Mode Select Knob (5) to this posi-
tion for air pump operation only. Use the
Black Air Pump Hose (7) when selecting this
mode.
Selecting Sealant Mode Turn the Mode Select Knob (5) to
this position to inject the TIREFIT
Sealant and to inflate the tire. Use
the Sealant Hose (clear hose) (6)
when selecting this mode.
Using The Power Button Push and release the Power Button (4) once
to turn On the TIREFIT kit. Push and release
the Power Button (4) again to turn Off the
TIREFIT kit.
Using The Deflation Button Press the Deflation Button (2) to reduce the
air pressure in the tire if it becomes
over-inflated.
TIREFIT Usage Precautions
• Replace the TIREFIT Sealant Bottle (1) and Sealant Hose (6) prior to the expiration date (printed on the
bottle label) to assure optimum operation of the
system. Refer to “Sealing a Tire with TIREFIT” sec-
tion (F) “Sealant Bottle and Hose Replacement”. • The Sealant Bottle (1) and Sealant Hose (6) are a one
tire application use. After each use, always replace
these components immediately at an authorized
dealer.
• When the TIREFIT sealant is in a liquid form, clean water, and a damp cloth will remove the material
from the vehicle or tire and wheel components.
Once the sealant dries, it can easily be peeled off and
properly discarded.
• For optimum performance, make sure the valve stem on the wheel is free of debris before connecting the
TIREFIT kit.
• You can use the TIREFIT air pump to inflate bicycle tires. The kit also comes with two needles, located in
the Accessory Storage Compartment (on the bot-
tom of the air pump) for inflating sport balls, rafts, or
similar inflatable items. However, use only the Air
Pump Hose (7) and make sure the Mode Select Knob
(5) is in the Air Mode when inflating such items to
avoid injecting sealant into them. The TIREFIT Seal-
ant is only intended to seal punctures less than 6 mm
diameter in the tread of your vehicle.
• Do not lift or carry the TIREFIT kit by the hoses.
243KNOWING
YOURVEHICLE SAFETY
STARTING ANDDRIVING
WARNING LIGHTSAND
MESSAGESIN AN
EMERGENCYSERVICING AND
CARETECHNICAL
SPECIFICATIONSCONTENTS
Page 250 of 332
WARNING!
Do not attempt to seal a tire on the
side of the vehicle closest to traffic . Pull
far enough off the road to avoid the danger of
being hit when using the TIREFIT kit .
Do not use TIREFIT or drive the vehicle under
the following circumstances:
� If the puncture in the tire tread is approximately
6 mm or larger.
� If the tire has any sidewall damage.
� If the tire has any damage from driving with e x-
tremely low tire pressure.
� If the tire has any damage from driving on a flat
tire.
� If the wheel has any damage.
� If you are unsure of the condition of the tire or the
wheel. Keep TIREFIT away from open flames or heat
source.
A loose TIREFIT kit thrown forward in a c olli-
sion or hard stop could endanger the occupants
of the vehicle. Always stow the TIREFIT kit in the
place provided. Failure to follow these warnings
can result in injuries that are serious or fatal to
you, your passengers, and others around you.
(Continued)(Continued)
Take care not to allow the contents of TIREFIT
to come in contact with hair, eyes, or clothing.
TIREFIT is harmful if inhaled, swallowed, or ab-
sorbed through the skin. It causes skin, eye, and
respiratory irritation. Flush immediately with
plenty of water if there is any contact with eyes
or skin. Change clothing as soon as possible, if
there is any contact with clothing.
TIREFIT Sealant solution contains latex. In case
of an allergic reaction or rash, consult a physician
immediately. Keep TIREFIT out of reach of chil-
dren. If swallowed, rinse mouth immediately with
plenty of water and drink plenty of water. Do not
induce vomiting! Consult a physician
immediately.
Sealing A Tire With TIREFIT
(A) Whenever You Stop To Use TIREFIT:
1. Pull over to a safe location and turn on the vehicle’s Hazard Warning flashers.
2. Verify that the valve stem (on the wheel with the deflated tire) is in a position that is near to the
ground. This will allow the TIREFIT Hoses (6) and
(7) to reach the valve stem and keep the TIREFIT kit
flat on the ground. This will provide the best posi-
tioning of the kit when injecting the sealant into the
deflated tire and running the air pump. Move the
244
KNOWING YOUR
VEHICLE
SAFETY
STARTING AND
DRIVING
WARNING LIGHTSAND
MESSAGES
IN AN
EMERGENCY
SERVICING AND
CARETECHNICAL
SPECIFICATIONSCONTENTS