fuel pressure FIAT FREEMONT 2012 Owner handbook (in English)
[x] Cancel search | Manufacturer: FIAT, Model Year: 2012, Model line: FREEMONT, Model: FIAT FREEMONT 2012Pages: 332, PDF Size: 5.61 MB
Page 25 of 332
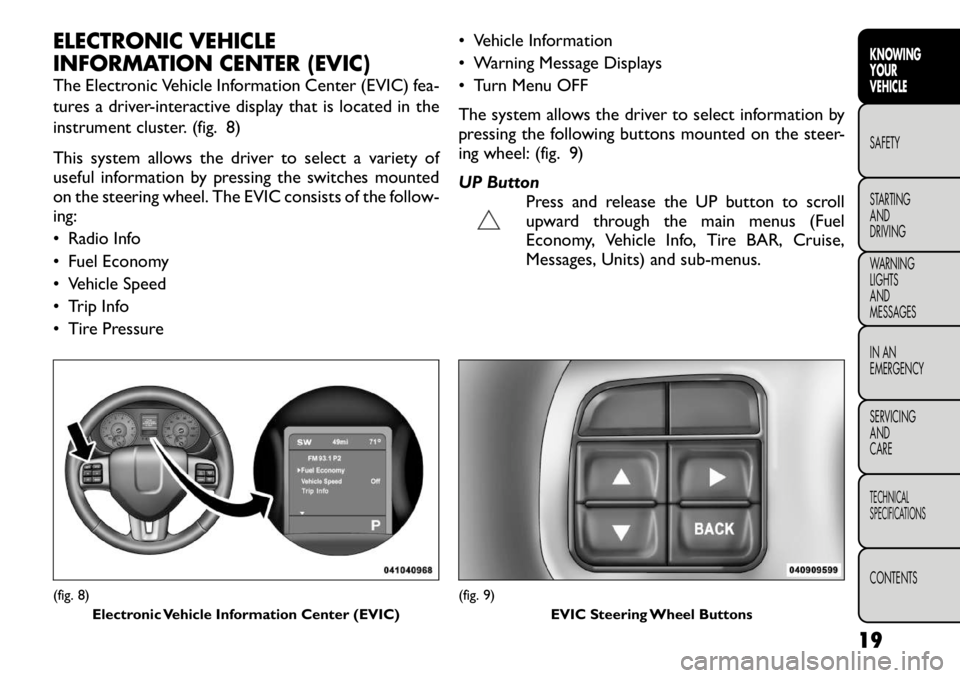
ELECTRONIC VEHICLE
INFORMATION CENTER (EVIC)
The Electronic Vehicle Information Center (EVIC) fea-
tures a driver-interactive display that is located in the
instrument cluster. (fig. 8)
This system allows the driver to select a variety of
useful information by pressing the switches mounted
on the steering wheel. The EVIC consists of the follow-ing:
• Radio Info
• Fuel Economy
• Vehicle Speed
• Trip Info
• Tire Pressure• Vehicle Information
• Warning Message Displays
• Turn Menu OFF
The system allows the driver to select information by
pressing the following buttons mounted on the steer-
ing wheel: (fig. 9)
UP Button
Press and release the UP button to scroll
upward through the main menus (Fuel
Economy, Vehicle Info, Tire BAR, Cruise,
Messages, Units) and sub-menus.(fig. 8)
Electronic Vehicle Information Center (EVIC)
(fig. 9) EVIC Steering Wheel Buttons
19KNOWING
YOURVEHICLESAFETY
STARTING ANDDRIVING
WARNING LIGHTSAND
MESSAGES
IN AN
EMERGENCY
SERVICING AND
CARETECHNICAL
SPECIFICATIONSCONTENTS
Page 26 of 332
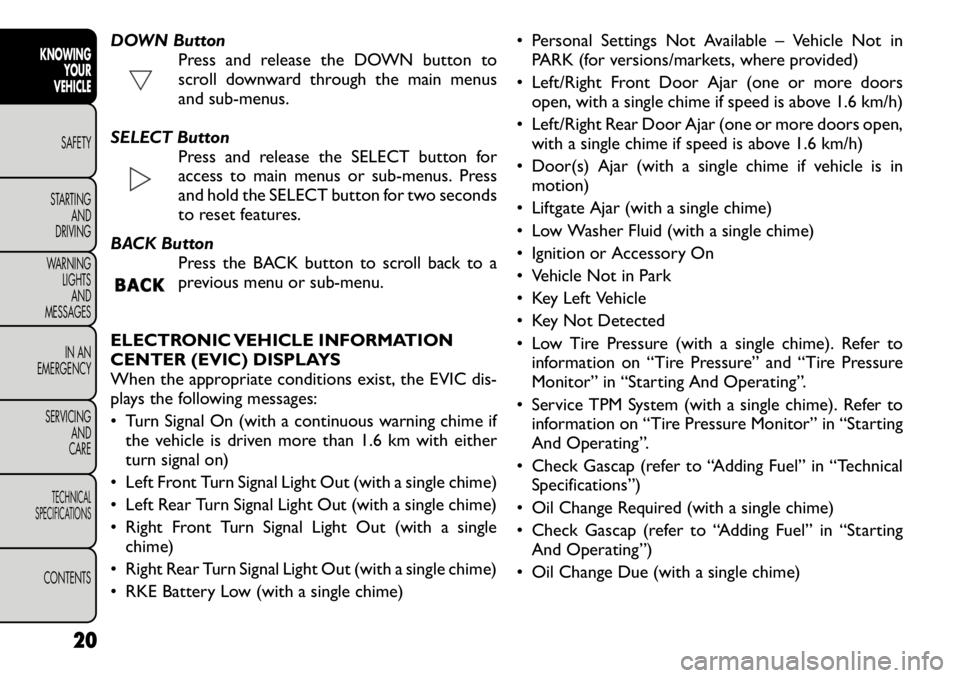
DOWN ButtonPress and release the DOWN button to
scroll downward through the main menus
and sub-menus.
SELECT Button Press and release the SELECT button for
access to main menus or sub-menus. Press
and hold the SELECT button for two seconds
to reset features.
BACK Button Press the BACK button to scroll back to a
previous menu or sub-menu.
ELECTRONIC VEHICLE INFORMATION
CENTER (EVIC) DISPLAYS
When the appropriate conditions exist, the EVIC dis-
plays the following messages:
• Turn Signal On (with a continuous warning chime if the vehicle is driven more than 1.6 km with either
turn signal on)
• Left Front Turn Signal Light Out (with a single chime)
• Left Rear Turn Signal Light Out (with a single chime)
• Right Front Turn Signal Light Out (with a single chime)
• Right Rear Turn Signal Light Out (with a single chime)
• RKE Battery Low (with a single chime) • Personal Settings Not Available – Vehicle Not in
PARK (for versions/markets, where provided)
• Left/Right Front Door Ajar (one or more doors open, with a single chime if speed is above 1.6 km/h)
• Left/Right Rear Door Ajar (one or more doors open, with a single chime if speed is above 1.6 km/h)
• Door(s) Ajar (with a single chime if vehicle is in motion)
• Liftgate Ajar (with a single chime)
• Low Washer Fluid (with a single chime)
• Ignition or Accessory On
• Vehicle Not in Park
• Key Left Vehicle
• Key Not Detected
• Low Tire Pressure (with a single chime). Refer to information on “Tire Pressure” and “Tire Pressure
Monitor” in “Starting And Operating”.
• Service TPM System (with a single chime). Refer to information on “Tire Pressure Monitor” in “Starting
And Operating”.
• Check Gascap (refer to “Adding Fuel” in “Technical Specifications”)
• Oil Change Required (with a single chime)
• Check Gascap (refer to “Adding Fuel” in “Starting And Operating”)
• Oil Change Due (with a single chime)
20
KNOWING YOUR
VEHICLE
SAFETY
STARTING AND
DRIVING
WARNING LIGHTSAND
MESSAGES
IN AN
EMERGENCY
SERVICING AND
CARETECHNICAL
SPECIFICATIONSCONTENTS
Page 130 of 332
NOTE:
• The TPMS is not intended to replace normal tire care
and maintenance, or to provide warning of a tire failure
or condition.
• The TPMS should not be used as a tire pressure
gauge while adjusting your tire pressure.
• Driving on a significantly under-inflated tire causes
the tire to overheat and can lead to tire failure. Under-
inflation also reduces fuel efficiency and tire tread life,
and may affect the vehicle’s handling and stopping
ability.
• The TPMS is not a substitute for proper tire mainte-
nance, and it is the driver’s responsibility to maintain
correct tire pressure using an accurate tire pressure
gauge, even if under-inflation has not reached the level
to trigger illumination of the Tire Pressure Monitoring
Telltale Light.
• Seasonal temperature changes will affect tire pres-
sure, and the TPMS will monitor the actual tire pres-
sure in the tire.
BASE SYSTEM
The Tire Pressure Monitor System (TPMS) uses wire-
less technology with wheel rim mounted electronic
sensors to monitor tire pressure levels. Sensors,
mounted to each wheel as part of the valve stem,
transmit tire pressure readings to the receiver module.NOTE:
It is particularly important for you to check
the tire pressure in all of the tires on your vehicle
monthly and to maintain the proper pressure.
The TPMS consists of the following components:
• Receiver Module
• Four Tire Pressure Monitoring Sensors
• Tire Pressure Monitoring Telltale Light
Tire Pressure Monitoring Low Pressure
Warnings
The Tire Pressure Monitoring Telltale Light will
illuminate in the instrument cluster and a chime
will sound when tire pressure is low in one or
more of the four active road tires. Should this occur,
you should stop as soon as possible, check the inflation
pressure of each tire on your vehicle, and inflate each
tire to the vehicle’s recommended cold placard pres-
sure value. Once the system receives the updated tire
pressures, the system will automatically update and the
Tire Pressure Monitoring Telltale Light will turn off.
The vehicle may need to be driven for up to 20 minutes
above 25 km/h in order for the TPMS to receive this
information.
Check TPMS Warning
When a system fault is detected, the Tire Pressure
Monitoring Telltale Light will flash on and off for 75 sec-
onds and then remain on solid. The system fault will
also sound a chime. If the ignition switch is cycled, this
sequence will repeat, providing the system fault still
124
KNOWING YOUR
VEHICLE
SAFETY
STARTING AND
DRIVING
WARNING LIGHTSAND
MESSAGES
IN AN
EMERGENCY
SERVICING AND
CARETECHNICAL
SPECIFICATIONSCONTENTS
Page 200 of 332
(Continued)
Never place or install floor mats or other floor
coverings in the vehicle that cannot be properly
secured to prevent them from moving and inter-
fering with the pedals or the ability to control the
vehicle.
Never put floor mats or other floor coverings
on top of already installed floor mats. Additional
floor mats and other coverings will reduce the
size of the pedal area and interfere with the
pedals.
Check mounting of mats on a regular basis.
Always properly reinstall and secure floor mats
that have been removed for cleaning.
Always make sure that objects cannot fall into
the driver footwell while the vehicle is moving.
Objects can become trapped under the brake
pedal and accelerator pedal causing a loss of
vehicle control.
If required, mounting posts must be properly
installed, if not equipped from the factory.
Failure to properly follow floor mat installation
or mounting can cause interference with the
brake pedal and accelerator pedal operation
causing loss of control of the vehicle. PERIODIC SAFETY CHECKS YOU SHOULD
MAKE OUTSIDE THE VEHICLE
Tires
Examine tires for excessive tread wear and uneven
wear patterns. Check for stones, nails, glass, or other
objects lodged in the tread or sidewall. Inspect the
tread for cuts and cracks. Inspect sidewalls for cuts,
cracks and bulges. Check the wheel nuts for tightness.
Check the tires (including spare) for proper cold infla-
tion pressure.
Lights
Have someone observe the operation of exterior lights
while you work the controls. Check Turn Signal and
High Beam Indicator Lights on the instrument panel.
Door Latches
Check for positive closing, latching, and locking.
Fluid Leaks
Check area under vehicle after overnight parking for
fuel, engine coolant, oil, or other fluid leaks. Also, if
gasoline fumes are detected or if fuel, power steering
fluid, or brake fluid leaks are suspected, the cause
should be located and corrected immediately.
194
KNOWING YOUR
VEHICLESAFETYSTARTING AND
DRIVING
WARNING LIGHTSAND
MESSAGES
IN AN
EMERGENCY
SERVICING AND
CARETECHNICAL
SPECIFICATIONSCONTENTS
Page 233 of 332
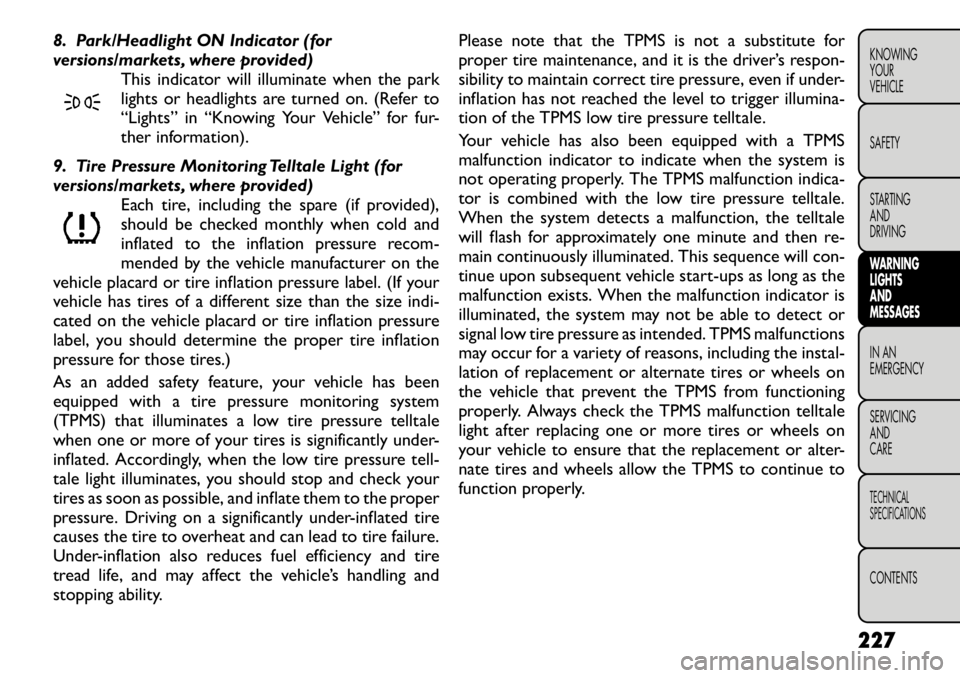
8. Park/Headlight ON Indicator (for
versions/markets, where provided)This indicator will illuminate when the park
lights or headlights are turned on. (Refer to
“Lights” in “Knowing Your Vehicle” for fur-
ther information).
9. Tire Pressure Monitoring Telltale Light (for
versions/markets, where provided) Each tire, including the spare (if provided),
should be checked monthly when cold and
inflated to the inflation pressure recom-
mended by the vehicle manufacturer on the
vehicle placard or tire inflation pressure label. (If your
vehicle has tires of a different size than the size indi-
cated on the vehicle placard or tire inflation pressure
label, you should determine the proper tire inflation
pressure for those tires.)
As an added safety feature, your vehicle has been
equipped with a tire pressure monitoring system
(TPMS) that illuminates a low tire pressure telltale
when one or more of your tires is significantly under-
inflated. Accordingly, when the low tire pressure tell-
tale light illuminates, you should stop and check your
tires as soon as possible, and inflate them to the proper
pressure. Driving on a significantly under-inflated tire
causes the tire to overheat and can lead to tire failure.
Under-inflation also reduces fuel efficiency and tire
tread life, and may affect the vehicle’s handling and
stopping ability. Please note that the TPMS is not a substitute for
proper tire maintenance, and it is the driver’s respon-
sibility to maintain correct tire pressure, even if under-
inflation has not reached the level to trigger illumina-
tion of the TPMS low tire pressure telltale.
Your vehicle has also been equipped with a TPMS
malfunction indicator to indicate when the system is
not operating properly. The TPMS malfunction indica-
tor is combined with the low tire pressure telltale.
When the system detects a malfunction, the telltale
will flash for approximately one minute and then re-
main continuously illuminated. This sequence will con-
tinue upon subsequent vehicle start-ups as long as the
malfunction exists. When the malfunction indicator is
illuminated, the system may not be able to detect or
signal low tire pressure as intended. TPMS malfunctions
may occur for a variety of reasons, including the instal-
lation of replacement or alternate tires or wheels on
the vehicle that prevent the TPMS from functioning
properly. Always check the TPMS malfunction telltale
light after replacing one or more tires or wheels on
your vehicle to ensure that the replacement or alter-
nate tires and wheels allow the TPMS to continue to
function properly.
227KNOWING
YOURVEHICLE SAFETY
STARTING ANDDRIVINGWARNING LIGHTSAND
MESSAGESIN AN
EMERGENCY
SERVICING AND
CARETECHNICAL
SPECIFICATIONSCONTENTS
Page 270 of 332
SERVICING AND CARE
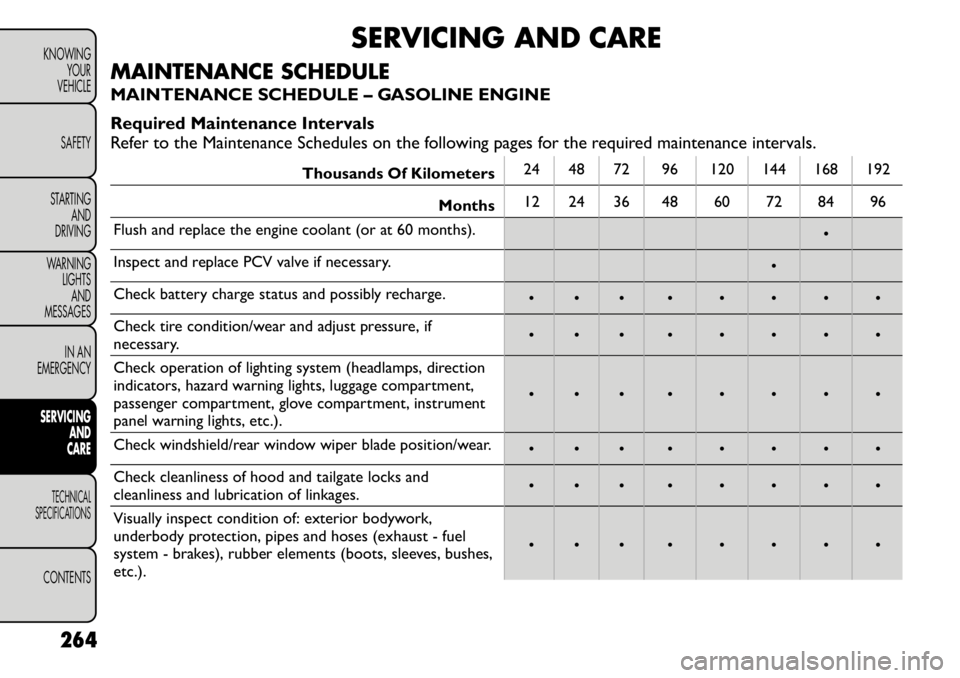
MAINTENANCE SCHEDULE
MAINTENANCE SCHEDULE – GASOLINE ENGINE
Required Maintenance Intervals
Refer to the Maintenance Schedules on the following pages for the required maintenance intervals.
Thousands Of Kilometers 24 48 72 96 120 144 168 192
Months 12 24 36 48 60 72 84 96
Flush and replace the engine coolant (or at 60 months). •
Inspect and replace PCV valve if necessary. •
Check battery charge status and possibly recharge. • • • • • • • •
Check tire condition/wear and adjust pressure, if
necessary. • • • • • • • •
Check operation of lighting system (headlamps, direction
indicators, hazard warning lights, luggage compartment,
passenger compartment, glove compartment, instrument
panel warning lights, etc.). • • • • • • • •
Check windshield/rear window wiper blade position/wear. • • • • • • • •
Check cleanliness of hood and tailgate locks and
cleanliness and lubrication of linkages. • • • • • • • •
Visually inspect condition of: exterior bodywork,
underbody protection, pipes and hoses (exhaust - fuel
system - brakes), rubber elements (boots, sleeves, bushes,
etc.). • • • • • • • •
264
KNOWING YOUR
VEHICLE
SAFETY
STARTING AND
DRIVING
WARNING LIGHTS
AND
MESSAGES
IN AN
EMERGENCYSERVICING AND
CARETECHNICAL
SPECIFICATIONSCONTENTS
Page 272 of 332
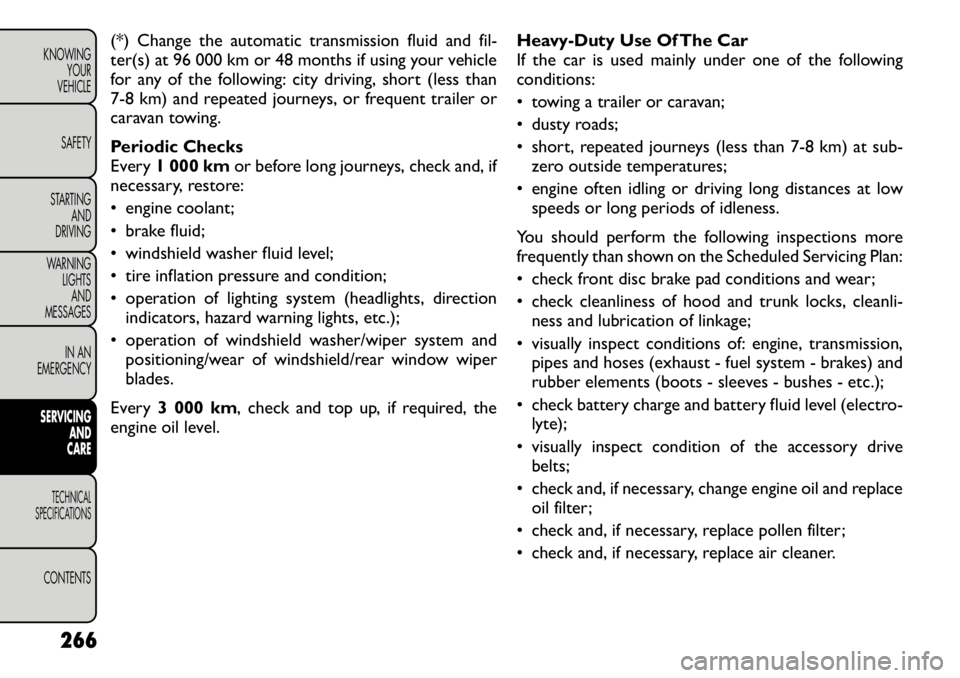
(*) Change the automatic transmission fluid and fil-
ter(s) at 96 000 km or 48 months if using your vehicle
for any of the following: city driving, short (less than
7-8 km) and repeated journeys, or frequent trailer or
caravan towing.
Periodic Checks
Every1 000 km or before long journeys, check and, if
necessary, restore:
• engine coolant;
• brake fluid;
• windshield washer fluid level;
• tire inflation pressure and condition;
• operation of lighting system (headlights, direction
indicators, hazard warning lights, etc.);
• operation of windshield washer/wiper system and positioning/wear of windshield/rear window wiper
blades.
Every 3 000 km , check and top up, if required, the
engine oil level. Heavy-Duty Use Of The Car
If the car is used mainly under one of the followingconditions:
• towing a trailer or caravan;
• dusty roads;
• short, repeated journeys (less than 7-8 km) at sub-
zero outside temperatures;
• engine often idling or driving long distances at low speeds or long periods of idleness.
You should perform the following inspections more
frequently than shown on the Scheduled Servicing Plan:
• check front disc brake pad conditions and wear;
• check cleanliness of hood and trunk locks, cleanli- ness and lubrication of linkage;
• visually inspect conditions of: engine, transmission, pipes and hoses (exhaust - fuel system - brakes) and
rubber elements (boots - sleeves - bushes - etc.);
• check battery charge and battery fluid level (electro- lyte);
• visually inspect condition of the accessory drive belts;
• check and, if necessary, change engine oil and replace oil filter;
• check and, if necessary, replace pollen filter;
• check and, if necessary, replace air cleaner.
266
KNOWING YOUR
VEHICLE
SAFETY
STARTING AND
DRIVING
WARNING LIGHTSAND
MESSAGES
IN AN
EMERGENCYSERVICING AND
CARETECHNICAL
SPECIFICATIONSCONTENTS
Page 273 of 332
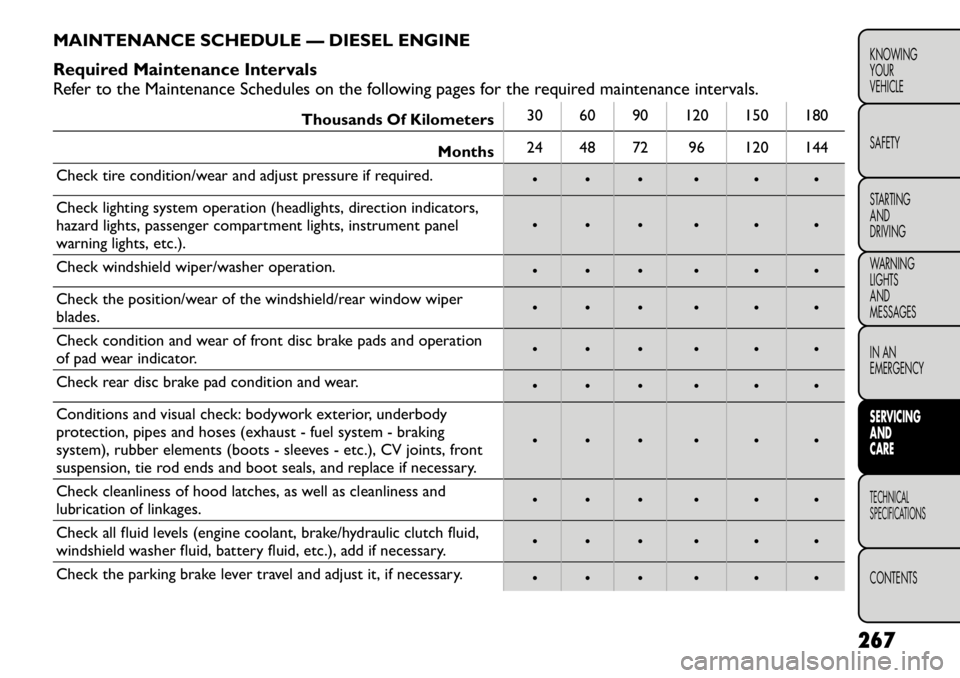
MAINTENANCE SCHEDULE — DIESEL ENGINE
Required Maintenance Intervals
Refer to the Maintenance Schedules on the following pages for the required maintenance intervals.
Thousands Of Kilometers30 60 90 120 150 180
Months 24 48 72 96 120 144
Check tire condition/wear and adjust pressure if required. • • • • • •
Check lighting system operation (headlights, direction indicators,
hazard lights, passenger compartment lights, instrument panel
warning lights, etc.). • • • • • •
Check windshield wiper/washer operation. • • • • • •
Check the position/wear of the windshield/rear window wiper
blades. • • • • • •
Check condition and wear of front disc brake pads and operation
of pad wear indicator. • • • • • •
Check rear disc brake pad condition and wear. • • • • • •
Conditions and visual check: bodywork exterior, underbody
protection, pipes and hoses (exhaust - fuel system - braking
system), rubber elements (boots - sleeves - etc.), CV joints, front
suspension, tie rod ends and boot seals, and replace if necessary. • • • • • •
Check cleanliness of hood latches, as well as cleanliness and
lubrication of linkages. • • • • • •
Check all fluid levels (engine coolant, brake/hydraulic clutch fluid,
windshield washer fluid, battery fluid, etc.), add if necessary. • • • • • •
Check the parking brake lever travel and adjust it, if necessary. • • • • • •
267
KNOWING
YOURVEHICLE SAFETY
STARTING ANDDRIVING
WARNING LIGHTSAND
MESSAGES
IN AN
EMERGENCYSERVICING AND
CARETECHNICAL
SPECIFICATIONSCONTENTS
Page 275 of 332
** If the car is used for less than 10 000 km per year, it
is necessary to replace engine oil and cartridge every
12 months.
*** The actual interval for replacement of engine oil
and cartridge depends by vehicle usage conditions and
is shown through a gauge or a message (if available) on
the dashboard or at least every 24 months.
Failure to perform the required mainte-
nance items may result in damage to the
vehicle.
Regular Checks
Every 1,000 km or before long journeys, check and top
up the following if necessary:
• engine coolant fluid, brake fluid, windshield washer fluid and power steering fluid;
• tire pressure and condition;
• operation of lighting system (headlights, direction indicators, hazard lights, etc.);
• operation of the windshield wiper/washer system, position and wear of windshield/rear window wiper
blades;
• Check and add, if required, the engine oil level every 3,000 km. Use Of The Car Under Heavy Conditions
If you use the car mainly under one of the followingconditions:
• trailer or caravan towing;
• dusty roads;
• short (less than 7-8 km) and repeated journeys in
sub-zero temperatures;
• frequent engine idling, travelling long distances at low speeds or long term inactivity, perform the following
inspections more frequently than shown on the
Maintenance Schedule;
• check front disc brake pad condition and wear;
• check cleanliness of hood latches, as well as cleanli- ness and lubrication of linkages;
• visually inspect the conditions of: engine, transmis- sion, pipes and tubes (exhaust - fuel - brakes), rubber
parts (boots, sleeves, etc.);
• check battery charge and liquid level (electrolyte);
• visually inspect the condition of auxiliary drive belts;
• check and if necessary change engine oil and oil filter;
• check pollen filter and replace it, if required;
• check air filter and replace, if required;
• check fuel filter and replace, if required.
269
KNOWING
YOURVEHICLE SAFETY
STARTING ANDDRIVING
WARNING LIGHTSAND
MESSAGES
IN AN
EMERGENCYSERVICING AND
CARETECHNICAL
SPECIFICATIONSCONTENTS
Page 278 of 332
MAINTENANCE PROCEDURES
The pages that follow contain therequiredmainte-
nance services determined by the engineers who de-
signed your vehicle.
Besides those maintenance items specified in the fixed
maintenance schedule, there are other components
which may require servicing or replacement in the
future.
Failure to properly maintain your ve-
hicle or perform repairs and service when
necessary could result in more costly re-
pairs, damage to other components or negatively
impact vehicle performance. Immediately have
potential malfunctions examined by an autho-
rized dealership or qualified repair center.
Your vehicle has been built with improved fluids
that protect the performance and durability of
your vehicle and also allow extended mainte-
nance intervals. Do not use chemical flushes in
these components as the chemicals can damage
your engine, transmission, power steering or air
conditioning. Such damage is not covered by the
New Vehicle Limited Warranty. If a flush is needed
because of component malfunction, use only the
specified fluid for the flushing procedure. ENGINE OIL
Checking Oil Level – Gasoline Engine
To assure proper engine lubrication, the engine oil
must be maintained at the correct level. Check the oil
level at regular intervals, such as every fuel stop.
The best time to check the engine oil level is about five
minutes after a fully warmed engine is shut off. Do not
check oil level before starting the engine after it has sat
overnight. Checking engine oil level when the engine is
cold will give you an incorrect reading.
Checking the oil while the vehicle is on level ground
and only when the engine is hot, will improve the
accuracy of the oil level readings. Maintain the oil level
between the range markings on the dipstick. Either the
range markings consist of a crosshatch zone marked
SAFE or a crosshatch zone marked with MIN at the low
end of the range and MAX at the high end of the range.
Adding 1 Liter of oil when the reading is at the low end
of the range marking will raise the oil level to the high
end of the range marking.
Do not overfill the engine. Overfilling the
engine will cause oil aeration, which can
lead to loss of oil pressure and an in-
crease in oil temperature.This could damage your
engine.Also, be sure the oil fill cap is replaced and
tightened after adding oil.
272
KNOWING YOUR
VEHICLE
SAFETY
STARTING AND
DRIVING
WARNING LIGHTSAND
MESSAGES
IN AN
EMERGENCYSERVICING AND
CARETECHNICAL
SPECIFICATIONSCONTENTS