radio FIAT FREEMONT 2012 Owner handbook (in English)
[x] Cancel search | Manufacturer: FIAT, Model Year: 2012, Model line: FREEMONT, Model: FIAT FREEMONT 2012Pages: 332, PDF Size: 5.61 MB
Page 15 of 332
KEY FOB
The Key Fob also contains the Remote Keyless Entry
(RKE) transmitter and an emergency key, which stores
in the rear of the Key Fob.
The emergency key allows for entry into the vehicle
should the battery in the vehicle or the Key Fob go
dead. The emergency key is also for locking the glove
box. You can keep the emergency key with you when
valet parking.
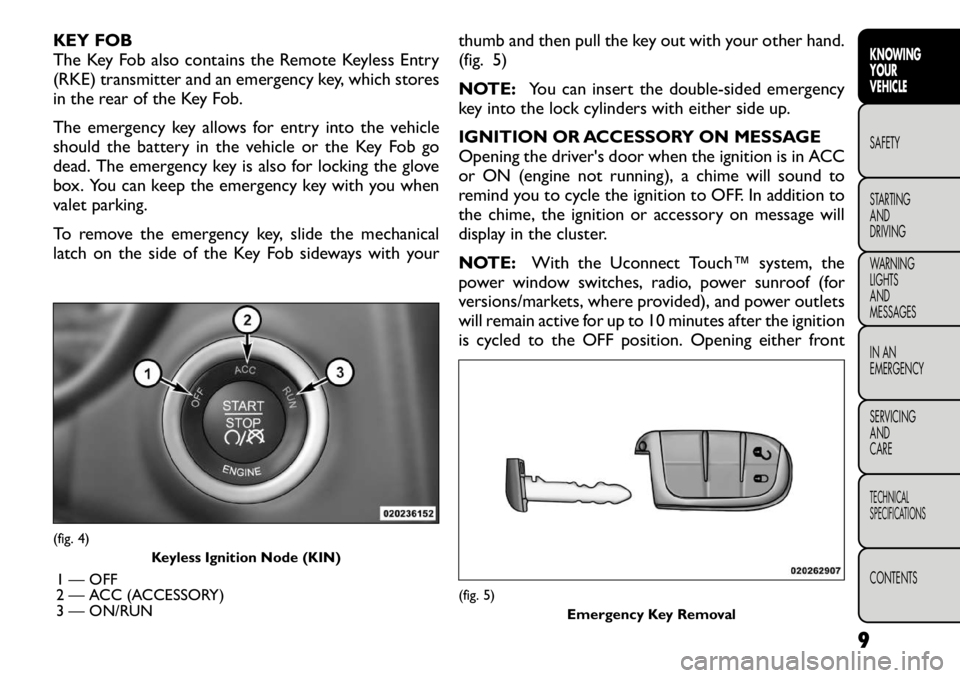
To remove the emergency key, slide the mechanical
latch on the side of the Key Fob sideways with yourthumb and then pull the key out with your other hand.
(fig. 5)
NOTE:
You can insert the double-sided emergency
key into the lock cylinders with either side up.
IGNITION OR ACCESSORY ON MESSAGE
Opening the driver's door when the ignition is in ACC
or ON (engine not running), a chime will sound to
remind you to cycle the ignition to OFF. In addition to
the chime, the ignition or accessory on message will
display in the cluster.
NOTE: With the Uconnect Touch™ system, the
power window switches, radio, power sunroof (for
versions/markets, where provided), and power outlets
will remain active for up to 10 minutes after the ignition
is cycled to the OFF position. Opening either front(fig. 4)
Keyless Ignition Node (KIN)
1 — OFF
2 — ACC (ACCESSORY)
3 — ON/RUN
(fig. 5) Emergency Key Removal
9
KNOWING
YOURVEHICLESAFETY
STARTING ANDDRIVING
WARNING LIGHTSAND
MESSAGES
IN AN
EMERGENCY
SERVICING AND
CARETECHNICAL
SPECIFICATIONSCONTENTS
Page 20 of 332
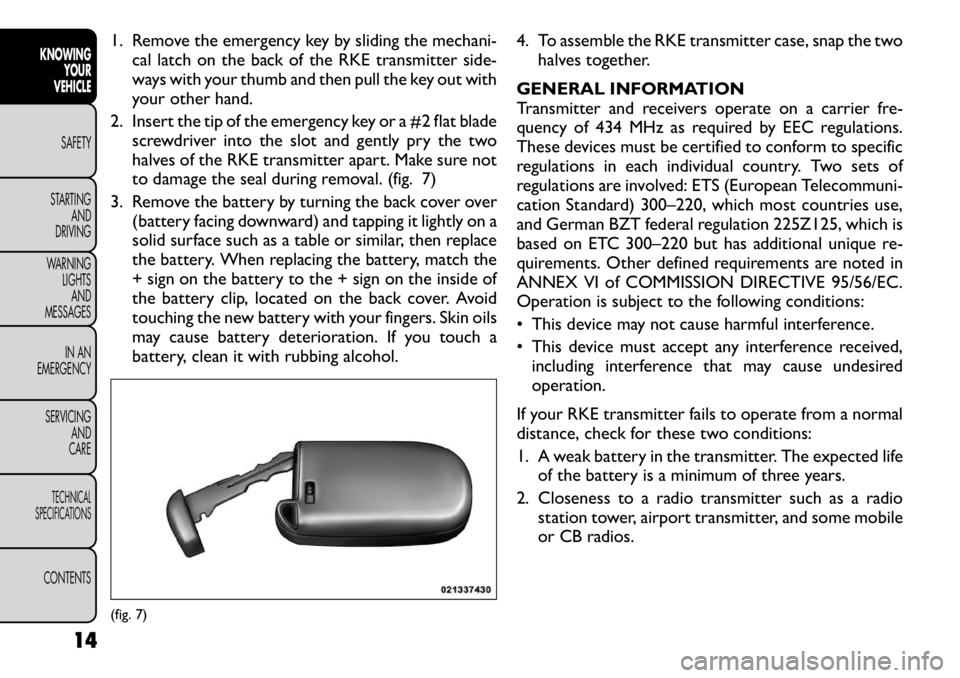
1. Remove the emergency key by sliding the mechani-cal latch on the back of the RKE transmitter side-
ways with your thumb and then pull the key out with
your other hand.
2. Insert the tip of the emergency key or a #2 flat blade screwdriver into the slot and gently pry the two
halves of the RKE transmitter apart. Make sure not
to damage the seal during removal. (fig. 7)
3. Remove the battery by turning the back cover over (battery facing downward) and tapping it lightly on a
solid surface such as a table or similar, then replace
the battery. When replacing the battery, match the
+ sign on the battery to the + sign on the inside of
the battery clip, located on the back cover. Avoid
touching the new battery with your fingers. Skin oils
may cause battery deterioration. If you touch a
battery, clean it with rubbing alcohol. 4. To assemble the RKE transmitter case, snap the two
halves together.
GENERAL INFORMATION
Transmitter and receivers operate on a carrier fre-
quency of 434 MHz as required by EEC regulations.
These devices must be certified to conform to specific
regulations in each individual country. Two sets of
regulations are involved: ETS (European Telecommuni-
cation Standard) 300–220, which most countries use,
and German BZT federal regulation 225Z125, which is
based on ETC 300–220 but has additional unique re-
quirements. Other defined requirements are noted in
ANNEX VI of COMMISSION DIRECTIVE 95/56/EC.
Operation is subject to the following conditions:
• This device may not cause harmful interference.
• This device must accept any interference received, including interference that may cause undesired operation.
If your RKE transmitter fails to operate from a normal
distance, check for these two conditions:
1. A weak battery in the transmitter. The expected life of the battery is a minimum of three years.
2. Closeness to a radio transmitter such as a radio station tower, airport transmitter, and some mobile
or CB radios.(fig. 7)
14
KNOWING YOUR
VEHICLE
SAFETY
STARTING AND
DRIVING
WARNING LIGHTSAND
MESSAGES
IN AN
EMERGENCY
SERVICING AND
CARETECHNICAL
SPECIFICATIONSCONTENTS
Page 25 of 332
ELECTRONIC VEHICLE
INFORMATION CENTER (EVIC)
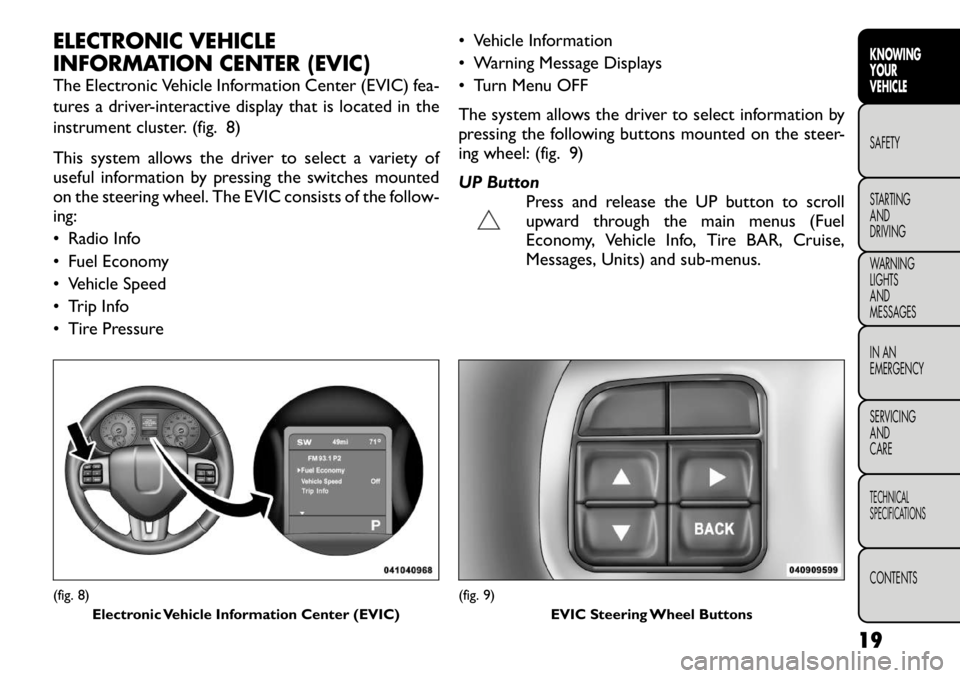
The Electronic Vehicle Information Center (EVIC) fea-
tures a driver-interactive display that is located in the
instrument cluster. (fig. 8)
This system allows the driver to select a variety of
useful information by pressing the switches mounted
on the steering wheel. The EVIC consists of the follow-ing:
• Radio Info
• Fuel Economy
• Vehicle Speed
• Trip Info
• Tire Pressure• Vehicle Information
• Warning Message Displays
• Turn Menu OFF
The system allows the driver to select information by
pressing the following buttons mounted on the steer-
ing wheel: (fig. 9)
UP Button
Press and release the UP button to scroll
upward through the main menus (Fuel
Economy, Vehicle Info, Tire BAR, Cruise,
Messages, Units) and sub-menus.(fig. 8)
Electronic Vehicle Information Center (EVIC)
(fig. 9) EVIC Steering Wheel Buttons
19KNOWING
YOURVEHICLESAFETY
STARTING ANDDRIVING
WARNING LIGHTSAND
MESSAGES
IN AN
EMERGENCY
SERVICING AND
CARETECHNICAL
SPECIFICATIONSCONTENTS
Page 34 of 332

Units (for versions/markets, where provided)
Press the Units soft-key to change this display. When in
this display you may select to have the EVIC, odometer,
and navigation system (for versions/markets, where
provided) changed between US and Metric units of
measure. Press US or Metric followed by pressing the
arrow back soft-key. Then, as you continue, the infor-
mation will display in the selected units of measure.
Voice Response (for versions/markets, whereprovided)
Press the Voice Response soft-key to change this dis-
play. When in this display you may change the Voice
Response Length settings. To change the Voice Re-
sponse Length press and release the Brief or Long
soft-key followed by pressing the arrow back soft-key.
Touch Screen Beep (for versions/markets, where provided)
Press the Touch Screen Beep soft-key to change this
display. When in this display you may turn on or shut off
the sound heard when a touch screen button (soft-key)
is pressed. To change the Touch Screen Beep setting
press and release the On or Off soft-key followed by
pressing the arrow back soft-key. Clock
Set Time (for versions/markets, where provided)
Press the Set Time soft-key to change this display.
When in this display you may select the time display
settings. To make your selection, press the Set Time soft-key, adjust the hours and minutes using the up and
down soft-keys, select AM or PM, select 12 hr or 24 hr
followed by pressing the arrow back soft-key when all
selections are complete.
Show Time Status (for versions/markets, where
provided)
Press the Show Time Status soft-key to change this
display. When in this display you may turn on or shut off
the digital clock in the status bar. To change the Show
Time Status setting press and release the On or Off
soft-key followed by pressing the arrow back soft-key.
Sync Time (for versions/markets, where provided)
Press the Sync Time soft-key to change this display.
When in this display you may automatically have the
radio set the time. To change the Sync Time setting
press and release the On or Off soft-key followed by
pressing the arrow back soft-key.
Safety / Assistance
Park Assist (for versions/markets, where provided)
Press the Park Assist soft-key to change this display.
The Rear Park Assist system will scan for objects
behind the vehicle when the transmission shift lever is
in REVERSE and the vehicle speed is less than 18 km/h.
The system can be enabled with Sound Only, Sound
and Display, or turned OFF. To change the Park Assist
status press and release the Off, Sound Only or Sounds
28
KNOWING YOUR
VEHICLE
SAFETY
STARTING AND
DRIVING
WARNING LIGHTSAND
MESSAGES
IN AN
EMERGENCY
SERVICING AND
CARETECHNICAL
SPECIFICATIONSCONTENTS
Page 37 of 332

Heated Seats
Auto Heated Seats (for versions/markets, whereprovided)
Press the Auto Heated Seats soft-key to change this
display. When this feature is selected the driver's
heated seat will automatically turn on when tempera-
tures are below 4.4° C. To make your selection, press
the Auto Heated Seats soft-key, select On or Off
followed by pressing the arrow back soft-key.
Engine Off Options
Headlight Off Delay (for versions/markets, where provided)
Press the Headlight Off Delay soft-key to change this
display. When this feature is selected, the driver can
choose to have the headlights remain on for 0, 30, 60,
or 90 seconds when exiting the vehicle. To change the
Headlight Off Delay status press the 0, 30, 60 or 90
soft-key followed by pressing the arrow back soft-key.
Engine Off Power Delay (for versions/markets, where provided)
Press the Engine Off Power Delay soft-key to change
this display. When this feature is selected, the power
window switches, radio, Uconnect™ phone system
(for versions/markets, where provided), DVD video
system (for versions/markets, where provided), power
sunroof (for versions/markets, where provided), and
power outlets will remain active for up to 10 minutes
after the ignition is cycled to OFF. Opening either front vehicle door will cancel this feature. To change the
Engine Off Power Delay status press the 0 seconds,
45 seconds, 5 minutes or 10 minutes soft-key followed
by pressing the arrow back soft-key.
Compass Settings
Variance (for versions/markets, where provided)
Press the Variance soft-key to change this display.
Compass Variance is the difference between Magnetic
North and Geographic North. To compensate for the
differences the variance should be set for the zone
where the vehicle is driven, per the zone map. Once
properly set, the compass will automatically compen-
sate for the differences, and provide the most accurate
compass heading.
NOTE:
Keep magnetic materials away from the top
of the instrument panel, such as iPod's, Mobile Phones,
Laptops and Radar Detectors. This is where the com-
pass module is located, and it can cause interference
with the compass sensor, and it may give false readings.
(fig. 13)
31
KNOWING
YOURVEHICLESAFETY
STARTING ANDDRIVING
WARNING LIGHTSAND
MESSAGES
IN AN
EMERGENCY
SERVICING AND
CARETECHNICAL
SPECIFICATIONSCONTENTS
Page 41 of 332

Touchscreen Beep (for versions/markets, whereprovided)
When in this display you may turn on or shut off the
sound heard when a touch screen button (soft-key) is
pressed. To change the Touch Screen Beep setting
press and release the On or Off soft-key followed by
pressing the arrow back soft-key.
Navigation Turn-By-Turn in Cluster (for
versions/markets, where provided)
When this feature is selected, the turn-by-turn direc-
tions will appear in the display as the vehicle ap-
proaches a designated turn within a programmed
route. To make your selection, press the Navigation
Turn-By-Turn in Cluster soft-key, select On or Off
followed by pressing the arrow back soft-key. Clock
Sync Time with GPS (for versions/markets, where provided)
When in this display you may automatically have the
radio set the time. To change the Sync Time setting
press and release the On or Off soft-key followed by
pressing the arrow back soft-key.
Set Time Hours (for versions/markets, where provided)
When in this display you may select the time display
settings. To make your selection, press the Set Time
soft-key, adjust the hours using the up and down soft-keys, followed by pressing the arrow back soft-key
when all selections are complete.
Set Time Minutes (for versions/markets, where
provided)
When in this display you may select the time display
settings. To make your selection, press the Set Time
soft-key, adjust the minutes using the up and down
soft-keys, followed by pressing the arrow back soft-key
when all selections are complete.
Time Format (for versions/markets, where provided)
When in this display you may select the time display
settings. To make your selection, press the Set Time
soft-key, select 12 hr or 24 hr followed by pressing the
arrow back soft-key when all selections are complete.
Show Time in Status Bar (for versions/markets, where provided)
When in this display you may turn on or shut off the
digital clock in the status bar. To change the Show Time
Status setting press and release the On or Off soft-key
followed by pressing the arrow back soft-key.
Safety / Assistance
Park Assist (for versions/markets, where provided)
The Rear Park Assist system will scan for objects
behind the vehicle when the transmission shift lever is
in REVERSE and the vehicle speed is less than 18 km/h.
The system can be enabled with Sound Only, Sound
35
KNOWING
YOURVEHICLESAFETY
STARTING ANDDRIVING
WARNING LIGHTSAND
MESSAGES
IN AN
EMERGENCY
SERVICING AND
CARETECHNICAL
SPECIFICATIONSCONTENTS
Page 42 of 332

and Display, or turned OFF. To change the Park Assist
status press and release the Off, Sound Only or Sounds
and Display button followed by pressing the arrow back
soft-key.
Parkview Backup Camera (for versions/markets,where provided)
Your vehicle may be equipped with the ParkView
®
Rear Back Up Camera that allows you to see an
on-screen image of the rear surroundings of your
vehicle whenever the shift lever is put into REVERSE.
The image will be displayed on the radio touchscreen
display along with a caution note to “check entire
surroundings” across the top of the screen. After five
seconds this note will disappear. The ParkView
®cam-
era is located on the rear of the vehicle above the rear
License plate. To make your selection, press the Park-
view Backup Camera soft-key, select On or Off fol-
lowed by pressing the arrow back soft-key.
Hill Start Assist (for versions/markets, where provided)
When this feature is selected, the Hill Start Assist
(HSA) system is active. Refer to “Electronic Brake
Control System” in “Starting And Driving” for system
function and operating information. To make your
selection, press the Hill Start Assist soft-key, select On
or Off followed by pressing the arrow back soft-key. Lights
Headlight Off Delay (for versions/markets,
where provided)
When this feature is selected, the driver can choose to
have the headlights remain on for 0, 30, 60, or 90 sec-
onds when exiting the vehicle. To change the Headlight
Off Delay status press the 0, 30, 60 or 90 soft-key
followed by pressing the arrow back soft-key.
Headlight Illumination on Approach (for versions/markets, where provided)
When this feature is selected, the headlights will acti-
vate and remain on for 0, 30, 60, or 90 seconds when
the doors are unlocked with the RKE transmitter. To
change the Illuminated Approach status press the 0, 30,
60 or 90 soft-key followed by pressing the arrow back
soft-key.
Headlights with Wipers (for versions/markets, where provided)
When this feature is selected, and the headlight switch
is in the AUTO position, the headlights will turn on
approximately 10 seconds after the wipers are turned
on. The headlights will also turn off when the wipers
are turned off if they were turned on by this feature. To
make your selection, press the Headlights with Wipers
soft-key, select On or Off followed by pressing the
arrow back soft-key.
36
KNOWING YOUR
VEHICLE
SAFETY
STARTING AND
DRIVING
WARNING LIGHTSAND
MESSAGES
IN AN
EMERGENCY
SERVICING AND
CARETECHNICAL
SPECIFICATIONSCONTENTS
Page 44 of 332

only result in the driver’s door opening. If driver door
first is selected, once the driver door is opened, the
interior door lock/unlock switch can be used to unlock
all doors (or use RKE transmitter).
Passive Entry (for versions/markets, whereprovided)
This feature allows you to lock and unlock the vehicle’s
door(s) without having to press the RKE transmitter
lock or unlock buttons. To make your selection, press
the Passive Entry soft-key, select ON or OFF followed
by pressing the arrow back soft-key. Refer to “Keyless
Enter-N-Go” in “Knowing Your Vehicle”.
Engine Off Options
Engine Off Power Delay (for versions/markets,
where provided)
When this feature is selected, the power window
switches, radio, Uconnect™ phone system (for
versions/markets, where provided), DVD video system
(for versions/markets, where provided), power sunroof
(for versions/markets, where provided), and power
outlets will remain active for up to 10 minutes after the
ignition is cycled OFF. Opening either front vehicle
door will cancel this feature. To change the Engine Off
Power Delay status press the 0 seconds, 45 seconds,
5 minutes or 10 minutes soft-key followed by pressing
the arrow back soft-key. Headlight Off Delay (for versions/markets,
where provided)
When this feature is selected, the driver can choose to
have the headlights remain on for 0, 30, 60, or 90 sec-
onds when exiting the vehicle. To change the Headlight
Off Delay status press the 0, 30, 60 or 90 soft-key
followed by pressing the arrow back soft-key.
Compass Settings
Variance (for versions/markets, where provided)
Compass Variance is the difference between Magnetic
North and Geographic North. To compensate for the
differences the variance should be set for the zone
where the vehicle is driven, per the zone map. Once
properly set, the compass will automatically compen-
sate for the differences, and provide the most accurate
compass heading.
NOTE: Keep magnetic materials away from the top
of the instrument panel, such as iPod's, Mobile Phones,
Laptops and Radar Detectors. This is where the com-
pass module is located, and it can cause interference
with the compass sensor, and it may give false readings.
(fig. 15)
38
KNOWING YOUR
VEHICLE
SAFETY
STARTING AND
DRIVING
WARNING LIGHTSAND
MESSAGES
IN AN
EMERGENCY
SERVICING AND
CARETECHNICAL
SPECIFICATIONSCONTENTS
Page 65 of 332
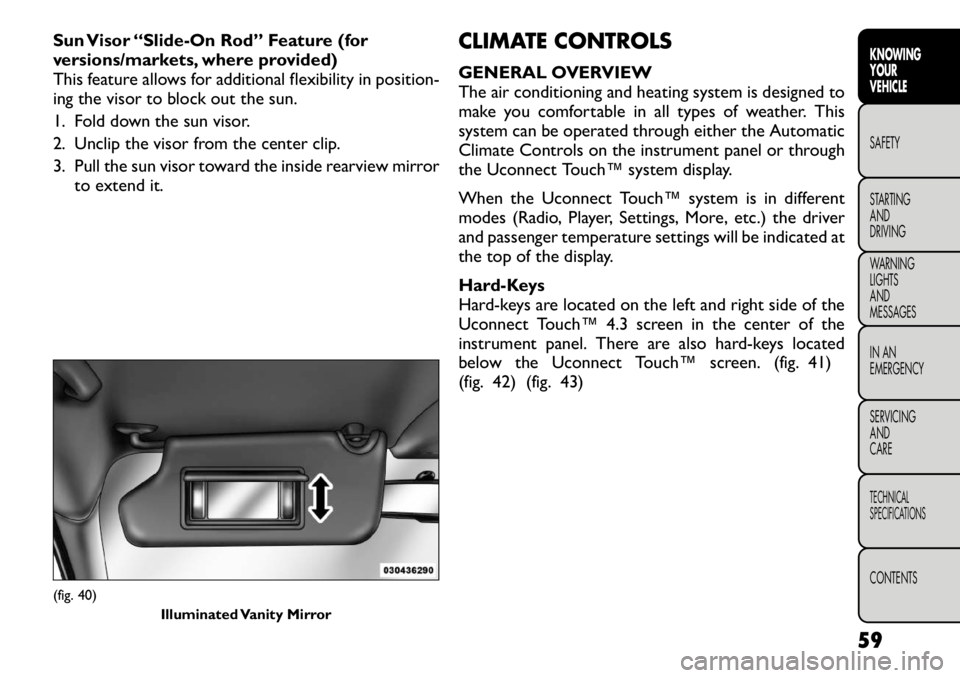
Sun Visor “Slide-On Rod” Feature (for
versions/markets, where provided)
This feature allows for additional flexibility in position-
ing the visor to block out the sun.
1. Fold down the sun visor.
2. Unclip the visor from the center clip.
3. Pull the sun visor toward the inside rearview mirrorto extend it. CLIMATE CONTROLS
GENERAL OVERVIEW
The air conditioning and heating system is designed to
make you comfortable in all types of weather. This
system can be operated through either the Automatic
Climate Controls on the instrument panel or through
the Uconnect Touch™ system display.
When the Uconnect Touch™ system is in different
modes (Radio, Player, Settings, More, etc.) the driver
and passenger temperature settings will be indicated at
the top of the display.
Hard-Keys
Hard-keys are located on the left and right side of the
Uconnect Touch™ 4.3 screen in the center of the
instrument panel. There are also hard-keys located
below the Uconnect Touch™ screen. (fig. 41)
(fig. 42) (fig. 43)(fig. 40)
Illuminated Vanity Mirror
59
KNOWING
YOURVEHICLESAFETY
STARTING ANDDRIVING
WARNING LIGHTSAND
MESSAGES
IN AN
EMERGENCY
SERVICING AND
CARETECHNICAL
SPECIFICATIONSCONTENTS
Page 80 of 332
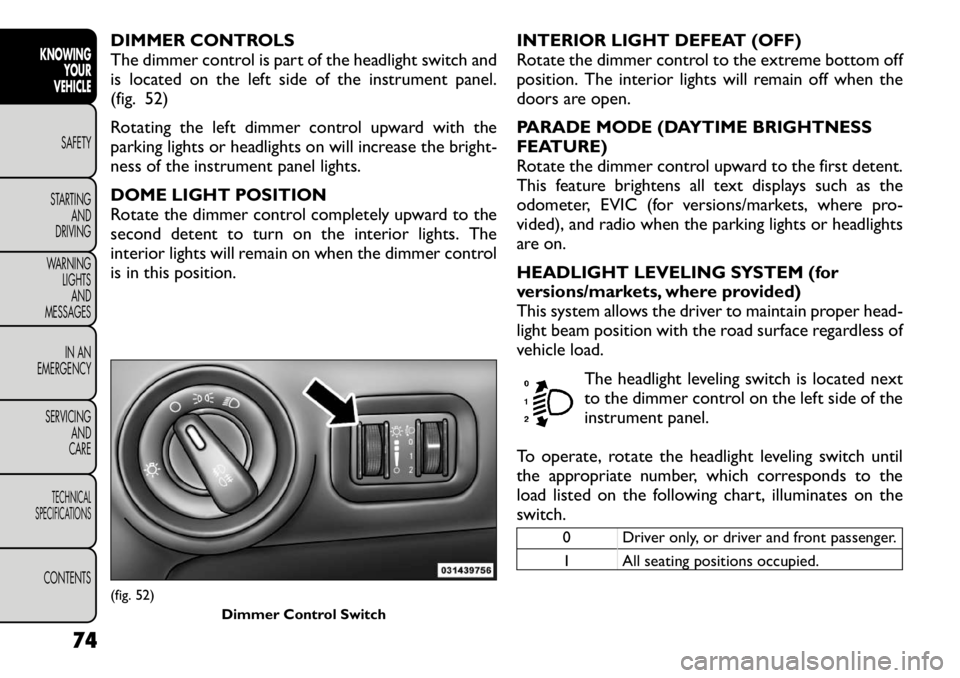
DIMMER CONTROLS
The dimmer control is part of the headlight switch and
is located on the left side of the instrument panel.
(fig. 52)
Rotating the left dimmer control upward with the
parking lights or headlights on will increase the bright-
ness of the instrument panel lights.
DOME LIGHT POSITION
Rotate the dimmer control completely upward to the
second detent to turn on the interior lights. The
interior lights will remain on when the dimmer control
is in this position.INTERIOR LIGHT DEFEAT (OFF)
Rotate the dimmer control to the extreme bottom off
position. The interior lights will remain off when the
doors are open.
PARADE MODE (DAYTIME BRIGHTNESS
FEATURE)
Rotate the dimmer control upward to the first detent.
This feature brightens all text displays such as the
odometer, EVIC (for versions/markets, where pro-
vided), and radio when the parking lights or headlights
are on.
HEADLIGHT LEVELING SYSTEM (for
versions/markets, where provided)
This system allows the driver to maintain proper head-
light beam position with the road surface regardless of
vehicle load.
The headlight leveling switch is located next
to the dimmer control on the left side of the
instrument panel.
To operate, rotate the headlight leveling switch until
the appropriate number, which corresponds to the
load listed on the following chart, illuminates on the
switch.
0 Driver only, or driver and front passenger.
1 All seating positions occupied.
(fig. 52) Dimmer Control Switch
74
KNOWINGYOUR
VEHICLE
SAFETY
STARTING AND
DRIVING
WARNING LIGHTSAND
MESSAGES
IN AN
EMERGENCY
SERVICING AND
CARETECHNICAL
SPECIFICATIONSCONTENTS