tow FIAT FREEMONT 2013 Owner handbook (in English)
[x] Cancel search | Manufacturer: FIAT, Model Year: 2013, Model line: FREEMONT, Model: FIAT FREEMONT 2013Pages: 352, PDF Size: 5.22 MB
Page 210 of 352
NOTE:If the ignition switch is left in the ACC or
RUN (engine not running) position and the transmis-
sion is in PARK, the system will automatically time out
after 30 minutes of inactivity and the ignition will switch
to the OFF position.
ENGINE START/STOP Button Functions –
With Driver’s Foot OFF The Brake Pedal (In
PARK Or NEUTRAL Position)
The ENGINE START/STOP button operates similar to
an ignition switch. It has four positions, OFF, ACC,
RUN and START. To change the ignition switch posi-
tions without starting the vehicle and use the accesso-
ries follow these steps.
Starting with the ignition switch in the OFF position:
Press the ENGINE START/STOP button once to change the ignition switch to the ACC position,
Press the ENGINE START/STOP button a second time to change the ignition switch to the RUN
position,
Press the ENGINE START/STOP button a third time to return the ignition switch to the OFF position. EXTREME COLD WEATHER (BELOW
�29°C)
To ensure reliable starting at these temperatures, use
of an externally powered electric engine block heater is
recommended.
IF ENGINE FAILS TO START
WARNING!
N
ever pour fuel or other flammable
liquids into the throttle body air inlet
opening in an attempt to start the vehicle. This
could result in a flash fire causing serious per-
sonal injury.
Do not attempt to push or tow your vehicle to
get it started. Unburned fuel could enter the
catalytic converter and once the engine has
started, ignite and damage the converter and
vehicle. If the vehicle has a discharged battery,
booster cables may be used to obtain a start from
a booster battery or the battery in another ve-
hicle.This type of start can be dangerous if done
improperly. Refer to “Jump Starting” in “In An
Emergency” for further information.
204
KNOWING YOUR
VEHICLE
SAFETY
STARTING AND
DRIVING
WARNING LIGHTSAND
MESSA
GES
IN AN
EMERGENCY
SERVICING AND
CARETECHNICAL
SPECIFICATIONSCONTENTS
Page 214 of 352
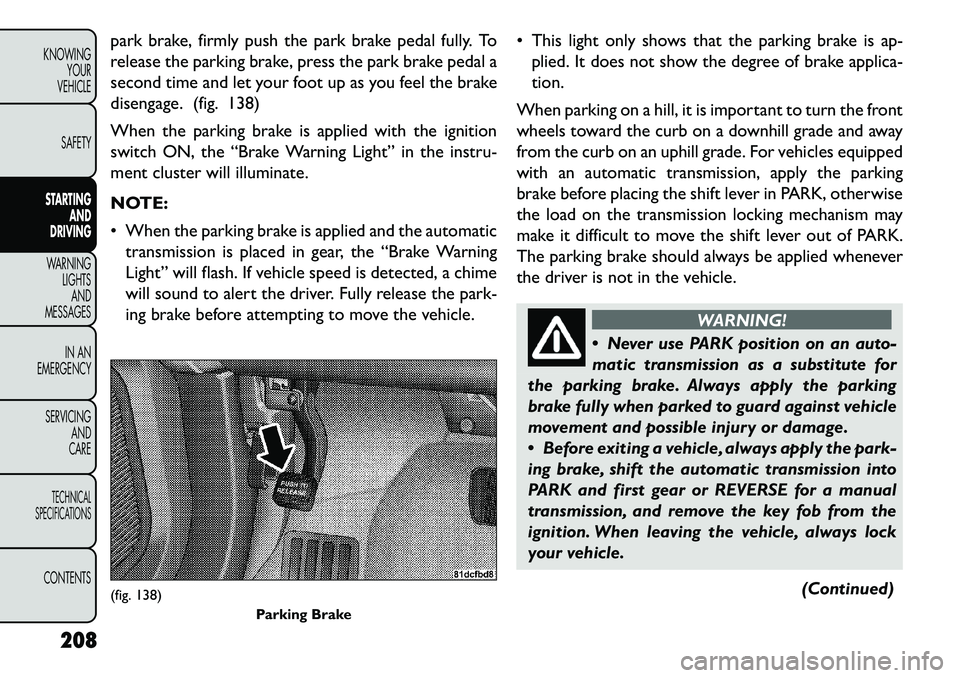
park brake, firmly push the park brake pedal fully. To
release the parking brake, press the park brake pedal a
second time and let your foot up as you feel the brake
disengage. (fig. 138)
When the parking brake is applied with the ignition
switch ON, the “Brake Warning Light” in the instru-
ment cluster will illuminate.
NOTE:
When the parking brake is applied and the automatictransmission is placed in gear, the “Brake Warning
Light” will flash. If vehicle speed is detected, a chime
will sound to alert the driver. Fully release the park-
ing brake before attempting to move the vehicle. This light only shows that the parking brake is ap-
plied. It does not show the degree of brake applica-
tion.
When parking on a hill, it is important to turn the front
wheels toward the curb on a downhill grade and away
from the curb on an uphill grade. For vehicles equipped
with an automatic transmission, apply the parking
brake before placing the shift lever in PARK, otherwise
the load on the transmission locking mechanism may
make it difficult to move the shift lever out of PARK.
The parking brake should always be applied whenever
the driver is not in the vehicle.
WARNING!
N
ever use PARK position on an auto-
matic transmission as a substitute for
the parking brake. Always apply the parking
brake fully when parked to guard against vehicle
movement and possible injury or damage.
Before exiting a vehicle, always apply the park-
ing brake, shift the automatic transmission into
PARK and first gear or REVERSE for a manual
transmission, and remove the key fob from the
ignition. When leaving the vehicle, always lock
your vehicle.
(Continued)
(fig. 138)Parking Brake
208
KNOWING YOUR
VEHICLE
SAFETY
STARTING AND
DRIVING
WARNING LIGHTSAND
MESSA
GES
IN AN
EMERGENCY
SERVICING AND
CARETECHNICAL
SPECIFICATIONSCONTENTS
Page 219 of 352
turned to the ON/RUN position (engine running or
not) and the brake pedal must be pressed.
GEAR RANGES
DO NOT race the engine when shifting from PARK or
NEUTRAL into another gear range.
NOTE:After selecting any gear range, wait a mo-
ment to allow the selected gear to engage before
accelerating. This is especially important when the
engine is cold.
PARK
This range supplements the parking brake by locking
the transmission. The engine can be started in this
range. Never attempt to use PARK while the vehicle is
in motion. Apply the parking brake when leaving the
vehicle in this range.
When parking on a level surface, you may place the
shift lever in PARK first, and then apply the parking
brake.
When parking on a hill, apply the parking brake before
placing the shift lever in PARK, otherwise the load on
the transmission locking mechanism may make it diffi-
cult to move the shift lever out of PARK. As an added
precaution, turn the front wheels toward the curb on a
downhill grade and away from the curb on an uphill
grade.
WARNING!
N
ever use the PARK position as a
substitute for the parking brake. Always
apply the parking brake fully when parked to
guard against vehicle movement and possible
injury or damage.
Your vehicle could move and injure you and
others if it is not completely in PARK. Check by
trying to move the shift lever rearward (with the
brake pedal released) after you have placed it in
PARK. Make sure the transmission is in PARK
before leaving the vehicle.
It is dangerous to move the shift lever out of
PARK or NEUTRAL if the engine speed is higher
than idle speed. If your foot is not firmly pressing
the brake pedal, the vehicle could accelerate
quickly forward or in reverse.You could lose con-
trol of the vehicle and hit someone or something.
Only shift into gear when the engine is idling
normally and your foot is firmly pressing the
brake pedal.
(Continued)
213
KNOWING
YOUR
VEHICLE
SAFETY
STARTING
AND
DRIVING
WARNING
LIGHTS
AND
MESSAGES
IN AN
EMERGENCY
SERVICING
AND
CARETECHNICAL
SPECIFICATIONSCONTENTS
Page 221 of 352
may be started in this range. Apply the parking brake
and shift the transmission into PARK if you must leave
the vehicle.
WARNING!
Do not coast in NEUTRAL and never
t
urn off the ignition to coast down a hill.
These are unsafe practices that limit your re-
sponse to changing traffic or road conditions.You
might lose control of the vehicle and have a
collision.Towing the vehicle, coasting, or driving
for any other reason with the transmis-
sion in NEUTRAL can result in severe
transmission damage. Refer to “Recreational Tow-
ing” in “Starting and Driving” and “Towing A Dis-
abled Vehicle” in “In An Emergency” for further
information.
DRIVE
This range should be used for most city and highway
driving. It provides the smoothest upshifts and down-
shifts, and the best fuel economy. The transmission
automatically upshifts through all forward gears. The
DRIVE position provides optimum driving characteris-
tics under all normal operating conditions. When frequent transmission shifting occurs (such as
when operating the vehicle under heavy loading condi-
tions, in hilly terrain, traveling into strong head winds,
or while towing heavy trailers), use the AutoStick
®
shift control (refer to “AutoStick
®” in this section) to
select a lower gear. Under these conditions, using a
lower gear will improve performance and extend trans-
mission life by reducing excessive shifting and heat
buildup.
If the transmission temperature exceeds normal oper-
ating limits, the powertrain controller will modify the
transmission shift schedule and expand the range of
torque converter clutch engagement. This is done to
prevent transmission damage due to overheating.
During cold temperatures, transmission operation may
be modified depending on engine and transmission
temperature as well as vehicle speed. This feature
improves warm up time of the engine and transmission
to achieve maximum efficiency. Engagement of the
torque converter clutch is inhibited until the transmis-
sion fluid is warm (refer to the “Note” under “Torque
Converter Clutch” in this section). During extremely
cold temperatures (27°C or below), operation may
briefly be limited to second gear only. Normal opera-
tion will resume once the transmission temperature
has risen to a suitable level.
215
KNOWING
YOUR
VEHICLE
SAFETY
STARTING
AND
DRIVING
WARNING
LIGHTS
AND
MESSAGES
IN AN
EMERGENCY
SERVICING
AND
CARETECHNICAL
SPECIFICATIONSCONTENTS
Page 224 of 352
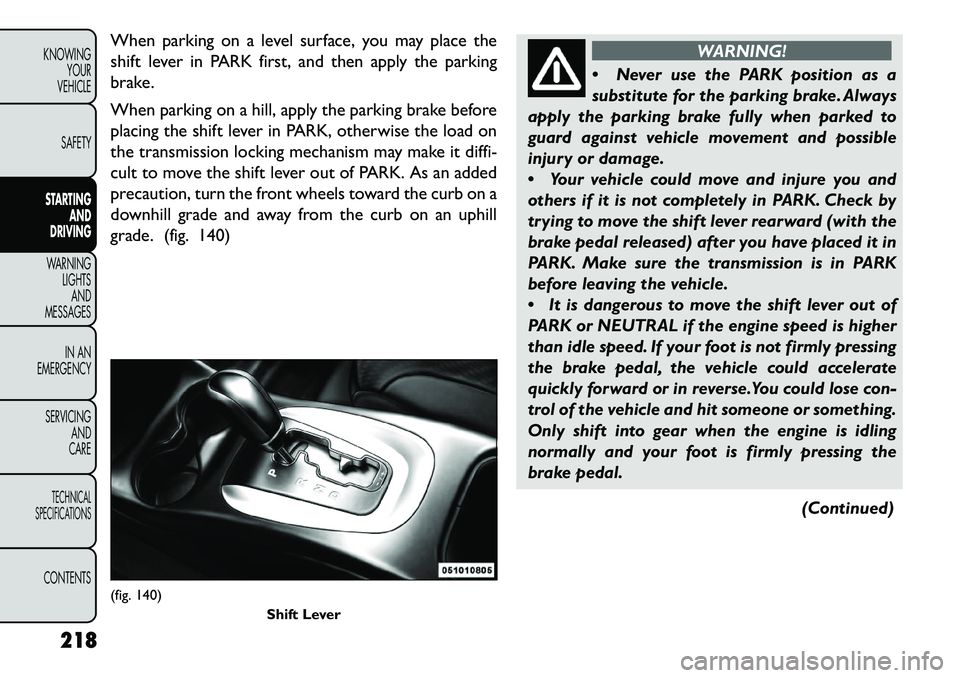
When parking on a level surface, you may place the
shift lever in PARK first, and then apply the parking
brake.
When parking on a hill, apply the parking brake before
placing the shift lever in PARK, otherwise the load on
the transmission locking mechanism may make it diffi-
cult to move the shift lever out of PARK. As an added
precaution, turn the front wheels toward the curb on a
downhill grade and away from the curb on an uphill
grade. (fig. 140)
WARNING!
N
ever use the PARK position as a
substitute for the parking brake. Always
apply the parking brake fully when parked to
guard against vehicle movement and possible
injury or damage.
Your vehicle could move and injure you and
others if it is not completely in PARK. Check by
trying to move the shift lever rearward (with the
brake pedal released) after you have placed it in
PARK. Make sure the transmission is in PARK
before leaving the vehicle.
It is dangerous to move the shift lever out of
PARK or NEUTRAL if the engine speed is higher
than idle speed. If your foot is not firmly pressing
the brake pedal, the vehicle could accelerate
quickly forward or in reverse.You could lose con-
trol of the vehicle and hit someone or something.
Only shift into gear when the engine is idling
normally and your foot is firmly pressing the
brake pedal.
(Continued)
(fig. 140)Shift Lever
218
KNOWING YOUR
VEHICLE
SAFETY
STARTING AND
DRIVING
WARNING LIGHTSAND
MESSA
GES
IN AN
EMERGENCY
SERVICING AND
CARETECHNICAL
SPECIFICATIONSCONTENTS
Page 226 of 352
WARNING!
Do not coast in NEUTRAL and never
t
urn off the ignition to coast down a hill.
These are unsafe practices that limit your re-
sponse to changing traffic or road conditions.You
might lose control of the vehicle and have a
collision.Towing the vehicle, coasting, or driving
for any other reason with the transmis-
sion in NEUTRAL can result in severe
transmission damage. Refer to “Recreational Tow-
ing” in “Starting and Driving” and “Towing A Dis-
abled Vehicle” in “In An Emergency” for further
information.
DRIVE
This range should be used for most city and highway
driving. It provides the smoothest upshifts and down-
shifts, and the best fuel economy. The transmission
automatically upshifts through underdrive first, second,
third, and fourth gears, direct fifth gear and overdrive
sixth gear. The DRIVE position provides optimum driv-
ing characteristics under all normal operating condi-
tions.
When frequent transmission shifting occurs (such as
when operating the vehicle under heavy loading condi- tions, in hilly terrain, traveling into strong head winds,
or while towing heavy trailers), use the AutoStick
®
shift control (refer to “AutoStick
®” in “Starting And
Driving” for further information) to select a lower gear.
Under these conditions, using a lower gear will im-
prove performance and extend transmission life by
reducing excessive shifting and heat buildup.
During cold temperatures, transmission operation may
be modified depending on engine and transmission
temperature as well as vehicle speed. This feature
improves warm up time of the engine and transmission
to achieve maximum efficiency. Engagement of the
torque converter clutch is inhibited until the transmis-
sion fluid is warm (refer to the “Note” under “Torque
Converter Clutch” in this section). During extremely
cold temperatures (27°C or below), operation may
briefly be limited to third gear only. Normal operation
will resume once the transmission temperature has
risen to a suitable level.
Transmission Limp Home Mode
Transmission function is monitored electronically for
abnormal conditions. If a condition is detected that
could result in transmission damage, Transmission
Limp Home Mode is activated. In this mode, the trans-
mission remains in third gear regardless of which for-
ward gear is selected. PARK, REVERSE, and NEUTRAL
will continue to operate. The Malfunction Indicator
220
KNOWING YOUR
VEHICLE
SAFETY
STARTING AND
DRIVING
WARNING LIGHTSAND
MESSA
GES
IN AN
EMERGENCY
SERVICING AND
CARETECHNICAL
SPECIFICATIONSCONTENTS
Page 231 of 352
WARNING!
Dr
iving through standing water limits
your vehicle’s traction capabilities. Do
not exceed 8 km/h when driving through standing
water.
Driving through standing water limits your
vehicle’s braking capabilities, which increases
stopping distances. Therefore, after driving
through standing water, drive slowly and lightly
press on the brake pedal several times to dry the
brakes.
Getting water inside your vehicle’s engine can
cause it to lock up and stall out , and leave you
stranded.
Failure to follow these warnings may result in
injuries that are serious or fatal to you, your
passengers, and others around you. TRAILER TOWING
In this section you will find safety tips and information
on limits to the type of towing you can reasonably do
with your vehicle. Before towing a trailer, carefully
review this information to tow your load as efficiently
and safely as possible.
To maintain warranty coverage, follow the require-
ments and recommendations in this manual concerning
vehicles used for trailer towing.
COMMON TOWING DEFINITIONS
The following trailer towing related definitions will
assist you in understanding the following information:
Gross Vehicle Weight Rating (GVWR)
The GVWR is the total allowable weight of your
vehicle. This includes driver, passengers, cargo, and
tongue weight. The total load must be limited so that
you do not exceed the GVWR.
Gross Trailer Weight (GTW)
The GTW is the weight of the trailer plus the weight of
all cargo, consumables and equipment (permanent or
temporary) loaded in or on the trailer in its "loaded and
ready for operation" condition. The recommended way
to measure GTW is to put your fully loaded trailer on
a vehicle scale. The entire weight of the trailer must be
supported by the scale.
225
KNOWING
YOUR
VEHICLE
SAFETY
STARTING
AND
DRIVING
WARNING
LIGHTS
AND
MESSAGES
IN AN
EMERGENCY
SERVICING
AND
CARETECHNICAL
SPECIFICATIONSCONTENTS
Page 233 of 352
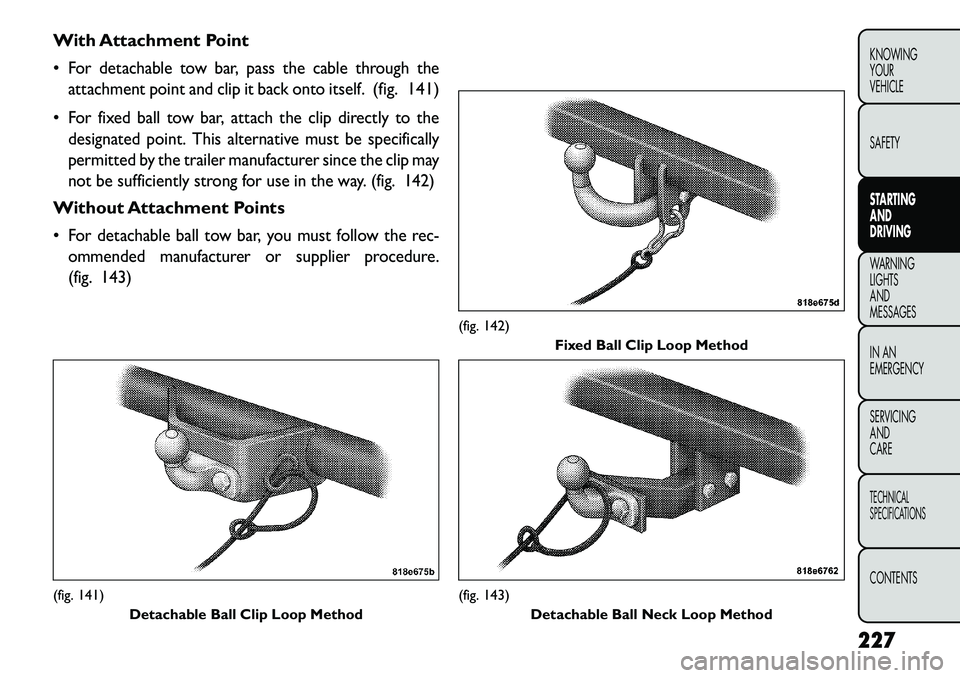
With Attachment Point
For detachable tow bar, pass the cable through the
attachment point and clip it back onto itself.
(fig. 141)
For fixed ball tow bar, attach the clip directly to the
designated point. This alternative must be specifically
permitted by the trailer manufacturer since the clip may
not be sufficiently strong for use in the way. (fig. 142)Without Attachment Points
For detachable ball tow bar, you must follow the rec-
ommended manufacturer or supplier procedure.
(fig. 143)(fig. 141) Detachable Ball Clip Loop Method
(fig. 142) Fixed Ball Clip Loop Method(fig. 143)
Detachable Ball Neck Loop Method
227
KNOWING
YOUR
VEHICLE
SAFETY
STARTING
AND
DRIVING
WARNING
LIGHTS
AND
MESSA
GES
IN AN
EMERGENCY
SERVICING
AND
CARETECHNICAL
SPECIFICATIONSCONTENTS
Page 234 of 352
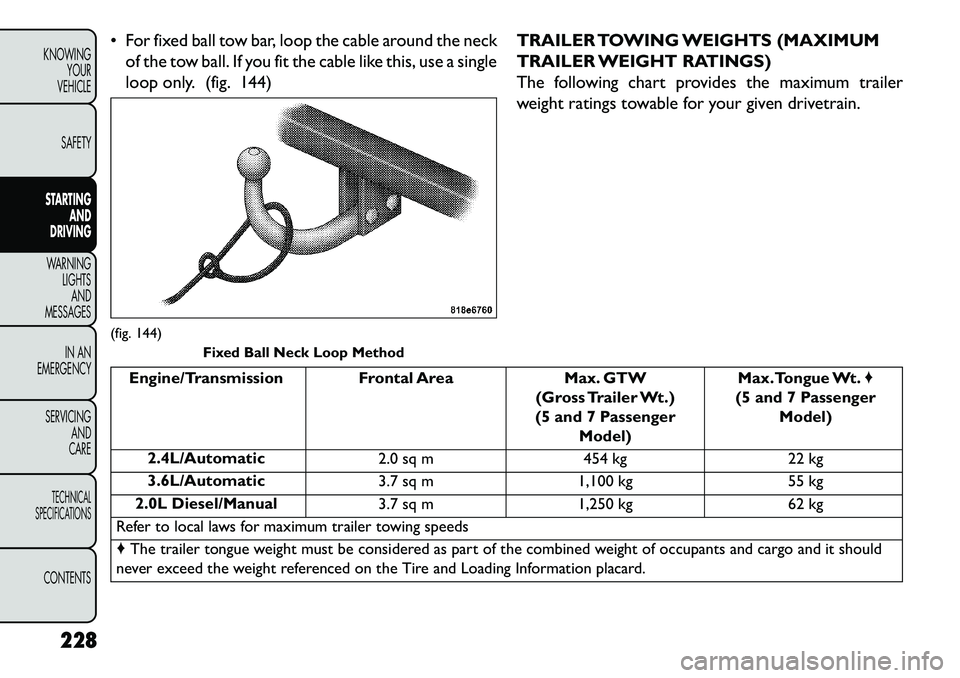
For fixed ball tow bar, loop the cable around the neckof the tow ball. If you fit the cable like this, use a single
loop only. (fig. 144) TRAILER TOWING WEIGHTS (MAXIMUM
TRAILER WEIGHT RATINGS)
The following chart provides the maximum trailer
weight ratings towable for your given drivetrain.
Engine/Transmission Frontal Area
Max. GTW
(Gross Trailer Wt.)
(5 and 7 Passenger Model) Max.Tongue Wt.
♦
(5 and 7 Passenger Model)
2.4L/Automatic 2.0 sq m454 kg22 kg
3.6L/Automatic 3.7 sq m1,100 kg 55 kg
2.0L Diesel/Manual 3.7 sq m1,250 kg 62 kg
Refer to local laws for maximum trailer towing speeds
♦ The trailer tongue weight must be considered as part of the combined weight of occupants and cargo and it should
never exceed the weight referenced on the Tire and Loading Information placard.
(fig. 144) Fixed Ball Neck Loop Method
228
KNOWING YOUR
VEHICLE
SAFETY
STARTING AND
DRIVING
WARNING LIGHTSAND
MESSA
GES
IN AN
EMERGENCY
SERVICING AND
CARETECHNICAL
SPECIFICATIONSCONTENTS
Page 235 of 352
TRAILER AND TONGUE WEIGHT
Loads balanced over the wheels or heavier in the rear
can cause the trailer to swayseverelyside to side
which will cause loss of control of the vehicle and
trailer. Failure to load trailers heavier in front is the
cause of many trailer accidents.
Never exceed the maximum tongue weight stamped
on your trailer hitch.
Consider the following items when computing the
weight on the rear axle of the vehicle:
The tongue weight of the trailer.
The weight of any other type of cargo or equipment
put in or on your vehicle.
The weight of the driver and all passengers.
NOTE: Remember that everything put into or on the
trailer adds to the load on your vehicle. Also, additional
factory-installed options or dealer-installed options
must be considered as part of the total load on your
vehicle. Refer to the Tire and Loading Information
placard, located on the face of the driver's door or on
the driver's side “B” pillar, for the maximum combined
weight of occupants and cargo for your vehicle. TOWING REQUIREMENTS
To promote proper break-in of your new vehicle drive-
train components the following guidelines are recom-
mended:
Do not tow a trailer at all during the
first 805 km the new vehicle is driven.The
engine, axle or other parts could be dam-
aged.
Then, during the first 805 km that a trailer is
towed, do not drive over 80 km/h and do not make
starts at full throttle. This helps the engine and
other parts of the vehicle wear in at the heavier
loads.
Perform the maintenance listed in the Maintenance
Schedule. When towing a trailer, never exceed the
GAWR ratings.
229
KNOWING
YOUR
VEHICLE
SAFETY
STARTING
AND
DRIVING
WARNING
LIGHTS
AND
MESSAGES
IN AN
EMERGENCY
SERVICING
AND
CARETECHNICAL
SPECIFICATIONSCONTENTS