spare tire FIAT FREEMONT 2013 Owner handbook (in English)
[x] Cancel search | Manufacturer: FIAT, Model Year: 2013, Model line: FREEMONT, Model: FIAT FREEMONT 2013Pages: 352, PDF Size: 5.22 MB
Page 138 of 352

NOTE:
1. The compact spare tire does not have a tire pres-sure monitoring sensor. Therefore, the TPMS will
not monitor the pressure in the compact spare tire.
2. If you install the compact spare tire in place of a road tire that has a pressure below the low-pressure
warning limit, a chime will sound and the TPMS
Telltale Light will turn on upon the next ignition
switch cycle.
3. After driving the vehicle for up to 20 minutes above 25 km/h, the TPMS Telltale Light will flash on and off
for 75 seconds and then remain on solid.
4. For each subsequent ignition switch cycle, a chime will sound and the TPMS Telltale Light will flash on
and off for 75 seconds and then remain on solid.
5. Once you repair or replace the original road tire and reinstall it on the vehicle in place of the compact
spare, the TPMS will update automatically and the
TPMS Telltale Light will turn off, as long as no tire
pressure is below the low-pressure warning limit in
any of the four active road tires. The vehicle may
need to be driven for up to 20 minutes above
25 km/h in order for the TPMS to receive this
information. TPMS Deactivation And Reactivation
The TPMS can be deactivated if replacing all four wheel
and tire assemblies (road tires) with wheel and tire
assemblies that do not have TPMS Sensors, such as
when installing winter wheel and tire assemblies on
your vehicle.
To deactivate the TPMS, first, replace all four wheel and
tire assemblies (road tires) with those not equipped
with TPM Sensors. Then, drive the vehicle for at least
20 minutes above 25 km/h. The TPMS will chime and
the TPM Telltale Light will flash on and off for 75
seconds and then remain on solid. Upon the next
ignition switch cycle, the TPMS will no longer chime or
turn on the Tire Pressure Monitoring Telltale Light.
To reactivate the TPMS, first, replace all four wheel and
tire assemblies (road tires) with those equipped with
TPM Sensors. Then, drive the vehicle for up to 20
minutes above 25 km/h. The TPMS will chime and the
Tire Pressure Monitoring Telltale Light will flash on and
off for 75 seconds.
PREMIUM SYSTEM (for versions/markets,
where provided)
The Tire Pressure Monitor System (TPMS) uses wire-
less technology with wheel rim mounted electronic
sensors to monitor tire pressure levels. Sensors,
mounted to each wheel as part of the valve stem,
transmit tire pressure readings to the receiver module.
132
KNOWING YOUR
VEHICLE
SAFETY
S
TARTING AND
DRIVING
WARNING LIGHTSAND
MESSAGES
IN AN
EMERGENCY
SERVICING AND
CARETECHNICAL
SPECIFICATIONSCONTENTS
Page 140 of 352

3. Lots of snow or ice around the wheels or wheelhousings.
4. Using tire chains on the vehicle.
5. Using wheels/tires not equipped with TPMS sen- sors.
NOTE:
1. The compact spare tire does not have a tire pres- sure monitoring sensor. Therefore, the TPMS will
not monitor the pressure in the compact spare tire.
2. If you install the compact spare tire in place of a road tire that has a pressure below the low-pressure
warning limit, upon the next ignition switch cycle,
the TPMS Telltale Light will remain on and a chime
will sound. In addition, the graphic in the EVIC will
still display a flashing pressure value.
3. After driving the vehicle for up to 20 minutes above 25 km/h, the TPMS Telltale Light will flash on and off
for 75 seconds and then remain on solid. In addition,
the EVIC will display a "CHECK TPM SYSTEM"
message for three seconds and then display dashes
(- -) in place of the pressure value.
4. For each subsequent ignition switch cycle, a chime will sound, the TPMS Telltale Light will flash on and
off for 75 seconds and then remain on solid, and the
EVIC will display a "CHECK TPM SYSTEM" message for three seconds and then display dashes (- -) in
place of the pressure value.
5. Once you repair or replace the original road tire and reinstall it on the vehicle in place of the compact
spare, the TPMS will update automatically. In addi-
tion, the TPMS Telltale Light will turn off and the
graphic in the EVIC will display a new pressure value
instead of dashes (- -), as long as no tire pressure is
below the low-pressure warning limit in any of the
four active road tires. The vehicle may need to be
driven for up to 20 minutes above 25 km/h in order
for the TPMS to receive this information.
TPMS Deactivation And Reactivation
The TPMS can be deactivated if replacing all four wheel
and tire assemblies (road tires) with wheel and tire
assemblies that do not have TPMS Sensors, such as
when installing winter wheel and tire assemblies on
your vehicle.
To deactivate the TPMS, first, replace all four wheel and
tire assemblies (road tires) with those not equipped
with TPM Sensors. Then, drive the vehicle for 20
minutes above 25 km/h. The TPMS will chime and the
Tire Pressure Monitoring Telltale Light will flash on and
off for 75 seconds and then remain on solid. In addition,
the Electronic Vehicle Information Center (EVIC) will
display a “CHECK TPM SYSTEM” text message, and
the graphic will display “- -“ in place of four tire
134
KNOWING YOUR
VEHICLE
SAFETY
S
TARTING AND
DRIVING
WARNING LIGHTSAND
MESSAGES
IN AN
EMERGENCY
SERVICING AND
CARETECHNICAL
SPECIFICATIONSCONTENTS
Page 207 of 352
PERIODIC SAFETY CHECKS YOU SHOULD
MAKE OUTSIDE THE VEHICLE
Tires
Examine tires for excessive tread wear and uneven
wear patterns. Check for stones, nails, glass, or other
objects lodged in the tread or sidewall. Inspect the
tread for cuts and cracks. Inspect sidewalls for cuts,
cracks and bulges. Check the wheel nuts for tightness.
Check the tires (including spare) for proper cold infla-
tion pressure.
Lights
Have someone observe the operation of brake lights
and exterior lights while you work the controls. Check
turn signal and high beam indicator lights on the instru-
ment panel.Door Latches
Check for positive closing, latching, and locking.
Fluid Leaks
Check area under vehicle after overnight parking for
fuel, engine coolant, oil, or other fluid leaks. Also, if
gasoline fumes are detected or if fuel, power steering
fluid, or brake fluid leaks are suspected, the cause
should be located and corrected immediately.
201
KNOWING
YOUR
VEHICLE
SAFETY
STARTING
AND
DRIVING
WARNING
LIGHTS
AND
MESSAGES
IN AN
EMERGENCY
SERVICING
AND
CARETECHNICAL
SPECIFICATIONSCONTENTS
Page 236 of 352
WARNING!
Improper towing can lead to an injury
ac
cident . Follow these guidelines to
make your trailer towing as safe as possible:
Make certain that the load is secured in the trailer
and that it will not shift during travel.When trailering
cargo that is not fully secured, dynamic load shifts can
occur that may be difficult for the driver to control.
You could lose control of your vehicle and have an
accident .
All trailer hitches should be professionally
installed on your vehicle.
When hauling cargo or towing a trailer, do not
overload your vehicle or trailer. Overloading can
cause a loss of control, poor performance, or
damage to brakes, axle, engine, transmission,
steering, suspension, chassis structure, or tires.
Safety chains must always be used between
your vehicle and trailer. Always connect the
chains to the frame or hook retainers of the
vehicle hitch. Cross the chains under the trailer
tongue and allow enough slack for turning cor-
ners.
(Continued)(Continued)
Vehicles with trailers should not be parked on
a grade. When parking, apply the parking brake
on the tow vehicle. Always, block or "chock" the
trailer wheels.
GCWR must not be exceeded.
Total weight must be distributed between the
tow vehicle and the trailer such that the following
four ratings are not exceeded:
1. GVWR
2. GTW
3. GAWR
4. Tongue weight rating for the trailer hitch uti- lized.
Towing Requirements – Tires
– Do not attempt to tow a trailer while using a compact spare tire.
– Proper tire inflation pressures are essential for the safe and satisfactory operation of your vehicle. Refer
to “Tires – General Information” in “Technical Speci-
fications” for proper tire inflation procedures.
– Check the trailer tires for proper tire inflation pres- sures before trailer usage.
230
KNOWING YOUR
VEHICLE
SAFETY
STARTING AND
DRIVING
WARNING LIGHTSAND
MESSA
GES
IN AN
EMERGENCY
SERVICING AND
CARETECHNICAL
SPECIFICATIONSCONTENTS
Page 247 of 352
8. Park/Headlight ON IndicatorThis indicator will illuminate when the park
lights or headlights are turned on. (Refer to
“Lights” in “Knowing Your Vehicle” for fur-
ther information).
9. Tire Pressure Monitoring Telltale Light Each tire, including the spare (if provided),
should be checked monthly when cold and
inflated to the inflation pressure recom-
mended by the vehicle manufacturer on the
vehicle placard or tire inflation pressure label.
As an added safety feature, your vehicle has been
equipped with a tire pressure monitoring system
(TPMS) that illuminates a low tire pressure telltale
when one or more of your tires is significantly under-
inflated. Accordingly, when the low tire pressure tell-
tale light illuminates, you should stop and check your
tires as soon as possible, and inflate them to the proper
pressure. Driving on a significantly under-inflated tire
causes the tire to overheat and can lead to tire failure.
Under-inflation also reduces fuel efficiency and tire
tread life, and may affect the vehicle’s handling and
stopping ability. Please note that the TPMS is not a substitute for
proper tire maintenance, and it is the driver’s respon-
sibility to maintain correct tire pressure, even if under-
inflation has not reached the level to trigger illumina-
tion of the TPMS low tire pressure telltale.
Your vehicle has also been equipped with a TPMS
malfunction indicator to indicate when the system is
not operating properly. The TPMS malfunction indica-
tor is combined with the low tire pressure telltale.
When the system detects a malfunction, the telltale
will flash for approximately one minute and then re-
main continuously illuminated. This sequence will con-
tinue upon subsequent vehicle start-ups as long as the
malfunction exists. When the malfunction indicator is
illuminated, the system may not be able to detect or
signal low tire pressure as intended. TPMS malfunctions
may occur for a variety of reasons, including the instal-
lation of replacement or alternate tires or wheels on
the vehicle that prevent the TPMS from functioning
properly. Always check the TPMS malfunction telltale
light after replacing one or more tires or wheels on
your vehicle to ensure that the replacement or alter-
nate tires and wheels allow the TPMS to continue to
function properly.
241KNOWING
YOUR
VEHICLE
SAFETY
STARTING
AND
DRIVING
WARNING
LIGHTS
AND
MESSA
GES
IN AN
EMERGENC Y
SERVICING
AND
CARETECHNICAL
SPECIFICATIONSCONTENTS
Page 254 of 352

JACKING AND TIRE CHANGING
WARNING!
Do
not attempt to change a tire on
the side of the vehicle close to moving
traffic . Pull far enough off the road to avoid the
danger of being hit when operating the jack or
changing the wheel.
Being under a jacked-up vehicle is dangerous.
The vehicle could slip off the jack and fall on you.
You could be crushed. Never put any part of your
body under a vehicle that is on a jack. If you need
to get under a raised vehicle, take it to a service
center where it can be raised on a lift .
Never start or run the engine while the vehicle
is on a jack.
The jack is designed to be used as a tool for
changing tires only.The jack should not be used to
lift the vehicle for service purposes. The vehicle
should be jacked on a firm level surface only.
Avoid ice or slippery areas.
Jack Location
The jack and jack-handle are stowed underneath a
cover in the rear storage bin in the cargo area. (fig. 150)Spare Tire Location
The spare tire is stowed underneath the rear of the
vehicle and is held in place by means of a cable winch
mechanism.
Preparations For Jacking
1. Park the vehicle on a firm, level surface as far from
the edge of the roadway as possible. Avoid icy or
slippery areas.
(fig. 150) Jack Storage Location
248
KNOWING YOUR
VEHICLE
SAFETY
STARTING AND
DRIVING
WARNING LIGHTSAND
MESSAGES
IN AN
EMERGENC
Y
SERVICING AND
C
ARETECHNICAL
SPECIFICATIONSCONTENTS
Page 255 of 352

WARNING!
Do not attempt to change a tire on the
si
de of the vehicle close to moving traf-
fic . Pull far enough off the road to avoid the
danger of being hit when operating the jack or
changing the wheel.
2. Turn on the Hazard Warning flashers.
3. Set the parking brake.
4. Place the shift lever in PARK (automatic transmis- sion) or in GEAR (manual transmission) .
5. Turn OFF the ignition.
Block both the front and rear of the
wheel diagonally opposite of the
jacking position. For example, if
changing the right front tire, block
the left rear wheel.
NOTE: Passengers should not remain in the vehicle
when the vehicle is being jacked. Spare Tire Removal
NOTE:
On seven-passenger models, fold the third-
row passenger seats flat. This will provide more space
when accessing the jacking tools and when operating
the winch mechanism.
1. Remove the jack-handle components 1, 2 and 3 from storage and assemble them. (fig. 151)
(fig. 151) Lowering/Raising Spare Tire
249
KNOWING
YOUR
VEHICLE
SAFETY
STARTING
AND
DRIVING
WARNING
LIGHTS
AND
MESSAGES
IN AN
EMERGENCY
SERVICING
AND
C ARETECHNICAL
SPECIFICATIONSCONTENTS
Page 256 of 352
NOTE:Assemble components 2 and 3 by seating the
small ball at the end of component 2 in the small hole at
the end of component 3. This will lock these compo-
nents together. Assemble components 1 and 2 so that
the wheel nut socket at the end of component 1 faces
upward when seated on component 2. This will make it
easier to rotate the assembly when operating the
winch mechanism.
2. Fit the assembled jack-handle over the winch drive nut located in the jack storage area. Rotate the
jack-handle assembly counterclockwise until the
spare tire is on the ground with enough cable slack
to allow you to pull the spare tire out from under-
neath the vehicle.
The winch mechanism is designed for use
with the jack-handle only. Use of an air
wrench or other power tools is not rec-
ommended and it can damage the winch.
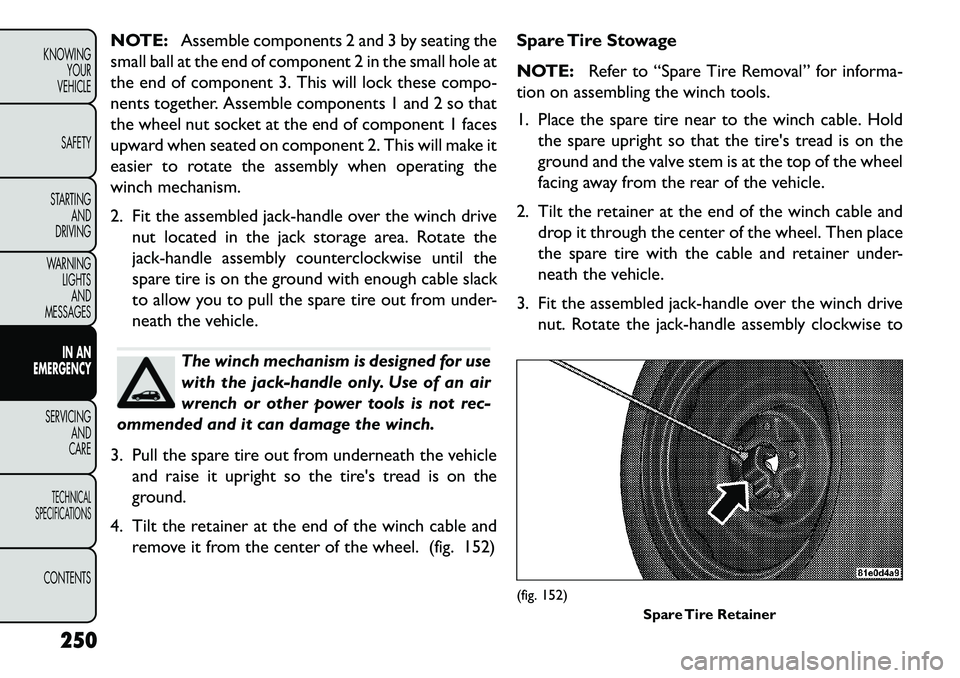
3. Pull the spare tire out from underneath the vehicle and raise it upright so the tire's tread is on the
ground.
4. Tilt the retainer at the end of the winch cable and remove it from the center of the wheel. (fig. 152) Spare Tire Stowage
NOTE:
Refer to “Spare Tire Removal” for informa-
tion on assembling the winch tools.
1. Place the spare tire near to the winch cable. Hold the spare upright so that the tire's tread is on the
ground and the valve stem is at the top of the wheel
facing away from the rear of the vehicle.
2. Tilt the retainer at the end of the winch cable and drop it through the center of the wheel. Then place
the spare tire with the cable and retainer under-
neath the vehicle.
3. Fit the assembled jack-handle over the winch drive nut. Rotate the jack-handle assembly clockwise to
(fig. 152) Spare Tire Retainer
250
KNOWING YOUR
VEHICLE
SAFETY
STARTING AND
DRIVING
WARNING LIGHTSAND
MESSAGES
IN AN
EMERGENC
Y
SERVICING AND
C
ARETECHNICAL
SPECIFICATIONSCONTENTS
Page 257 of 352

raise the spare tire into the storage area. Continue
to rotate the jack-handle assembly until you hear
the winch mechanism click three times. It cannot be
over tightened. Push against the tire several times to
be sure it is held securely in place.
JACKING INSTRUCTIONS
WARNING!
Carefully follow these tire changing
w
arnings to help prevent personal injury
or damage to your vehicle:
Always park on a firm, level surface as far from the
edge of the roadway as possible before raising the
vehicle.
Turn on the Hazard Warning flashers.
Block the wheel diagonally opposite the wheel
to be raised.
Set the parking brake firmly and set an auto-
matic transmission in PARK; a manual transmis-
sion in REVERSE.
Never start or run the engine with the vehicle
on a jack.
Do not let anyone sit in the vehicle when it is
on a jack.
(Continued)(Continued)
Do not get under the vehicle when it is on a
jack. If you need to get under a raised vehicle,
take it to a service center where it can be raised
on a lift .
Only use the jack in the positions indicated
and for lifting this vehicle during a tire change.
If working on or near a roadway, be extremely
careful of motor traffic .
To assure that spare tires, flat or inflated, are
securely stowed, spares must be stowed with the
valve stem facing the ground.
(fig. 153)
(fig. 153) Jack Warning Label
251
KNOWING
YOUR
VEHICLE
SAFETY
STARTING
AND
DRIVING
WARNING
LIGHTS
AND
MESSAGES
IN AN
EMERGENCY
SERVICING
AND
C ARETECHNICAL
SPECIFICATIONSCONTENTS
Page 258 of 352
Do not attempt to raise the vehicle by
jacking on locations other than those
indicated in the Jacking Instructions for
this vehicle.
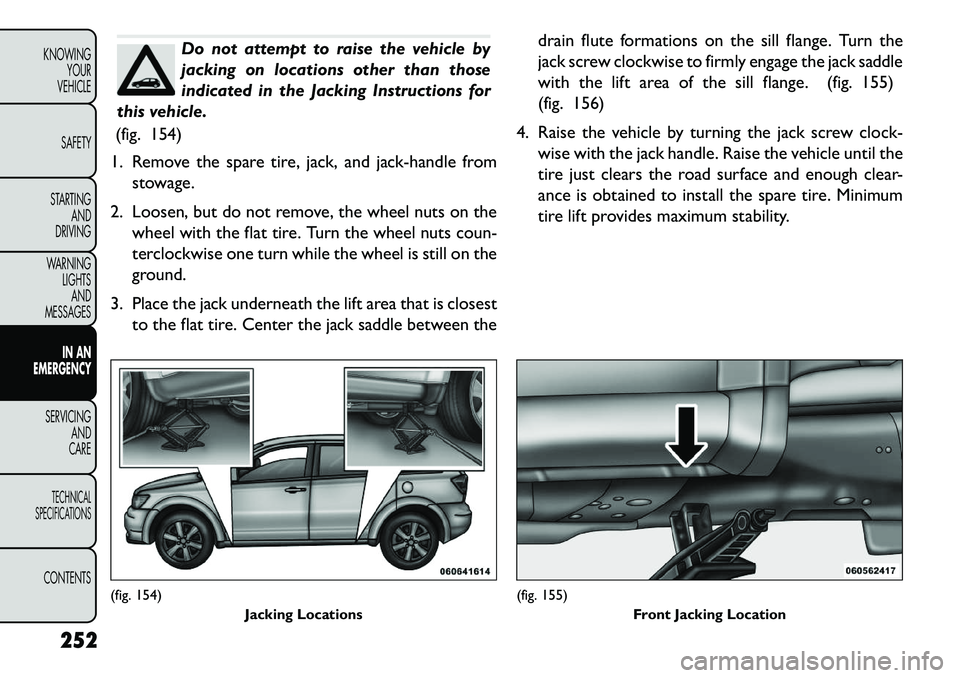
(fig. 154)
1. Remove the spare tire, jack, and jack-handle from stowage.
2. Loosen, but do not remove, the wheel nuts on the wheel with the flat tire. Turn the wheel nuts coun-
terclockwise one turn while the wheel is still on the
ground.
3. Place the jack underneath the lift area that is closest to the flat tire. Center the jack saddle between the drain flute formations on the sill flange. Turn the
jack screw clockwise to firmly engage the jack saddle
with the lift area of the sill flange. (fig. 155)
(fig. 156)
4. Raise the vehicle by turning the jack screw clock- wise with the jack handle. Raise the vehicle until the
tire just clears the road surface and enough clear-
ance is obtained to install the spare tire. Minimum
tire lift provides maximum stability.
(fig. 154) Jacking Locations
(fig. 155)Front Jacking Location
252
KNOWING YOUR
VEHICLE
SAFETY
STARTING AND
DRIVING
WARNING LIGHTSAND
MESSAGES
IN AN
EMERGENC
Y
SERVICING AND
C
ARETECHNICAL
SPECIFICATIONSCONTENTS