start stop button FIAT FREEMONT 2013 Owner handbook (in English)
[x] Cancel search | Manufacturer: FIAT, Model Year: 2013, Model line: FREEMONT, Model: FIAT FREEMONT 2013Pages: 352, PDF Size: 5.22 MB
Page 12 of 352
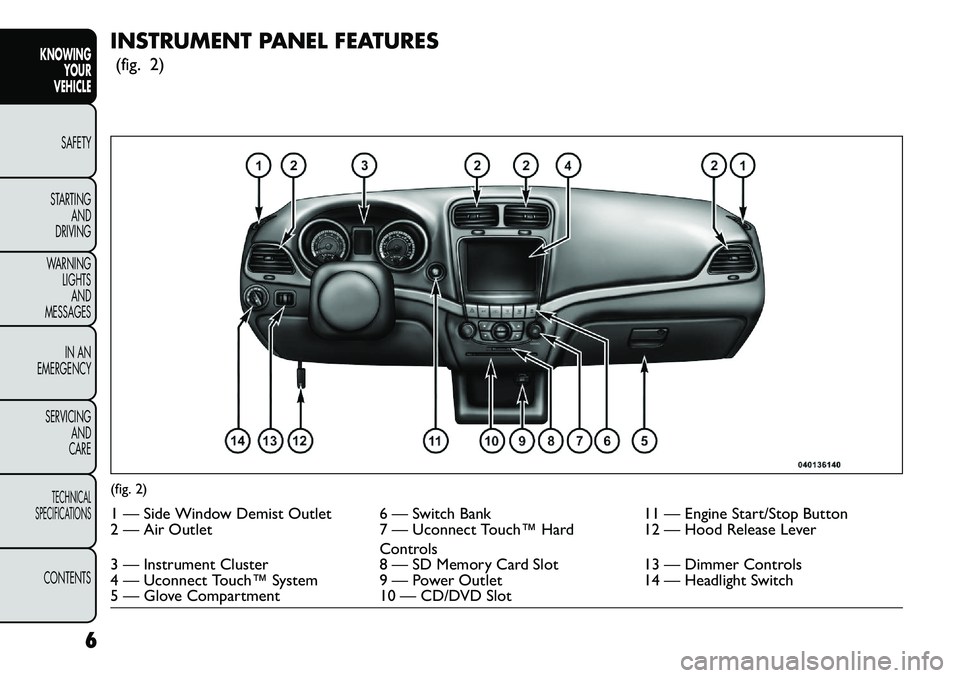
INSTRUMENT PANEL FEATURES(fig. 2)(fig. 2)1 — Side Window Demist Outlet 6 — Switch Bank 11 — Engine Start/Stop Button
2 — Air Outlet 7 — Uconnect Touch™ Hard
Controls 12 — Hood Release Lever
3 — Instrument Cluster 8 — SD Memory Card Slot13 — Dimmer Controls
4 — Uconnect Touch™ System 9 — Power Outlet 14 — Headlight Switch
5 — Glove Compartment 10 — CD/DVD Slot
6
KNOWING YOUR
VEHICLE
SAFETY
S
TARTING AND
DRIVING
WARNING LIGHTSAND
MESSAGES
IN AN
EMERGENCY
SERVICING AND
CARETECHNICAL
SPECIFICATIONSCONTENTS
Page 14 of 352
rises to the “H” mark, safely pull over and stop the
vehicle. If the Air Conditioning A/C system is on, turn
it off. Also, shift the transmission into NEUTRAL and
idle the vehicle. If the needle remains on the “H” mark,
turn the engine OFF immediately and call for service.
Do not leave your vehicle unattended
with the engine running, as you would not
be able to react to the temperature indi-
cator light if the engine overheats. A WORD ABOUT YOUR KEYS
Your vehicle uses a keyless ignition system. This system
consists of a Key Fob with Remote Keyless Entry (RKE)
transmitter and a Keyless Ignition Node (KIN).
Keyless Enter-N-Go Feature™
This vehicle is equipped with the Keyless Enter-N-
Go™ feature, refer to “Starting Procedures” in “Start-
ing And Driving” for further information.
KEYLESS IGNITION NODE (KIN)
This feature allows the driver to operate the ignition
switch with the push of a button, as long as the Remote
Keyless Entry (RKE) transmitter is in the passenger
compartment.
The Keyless Ignition Node (KIN) has four operating
positions, three of which are labeled and will illuminate
when in position. The three positions are OFF, ACC,
and ON/RUN. The fourth position is START. During
start RUN will illuminate.
8
KNOWING YOUR
VEHICLE
SAFETY
S
TARTING AND
DRIVING
WARNING LIGHTSAND
MESSAGES
IN AN
EMERGENCY
SERVICING AND
CARETECHNICAL
SPECIFICATIONSCONTENTS
Page 15 of 352
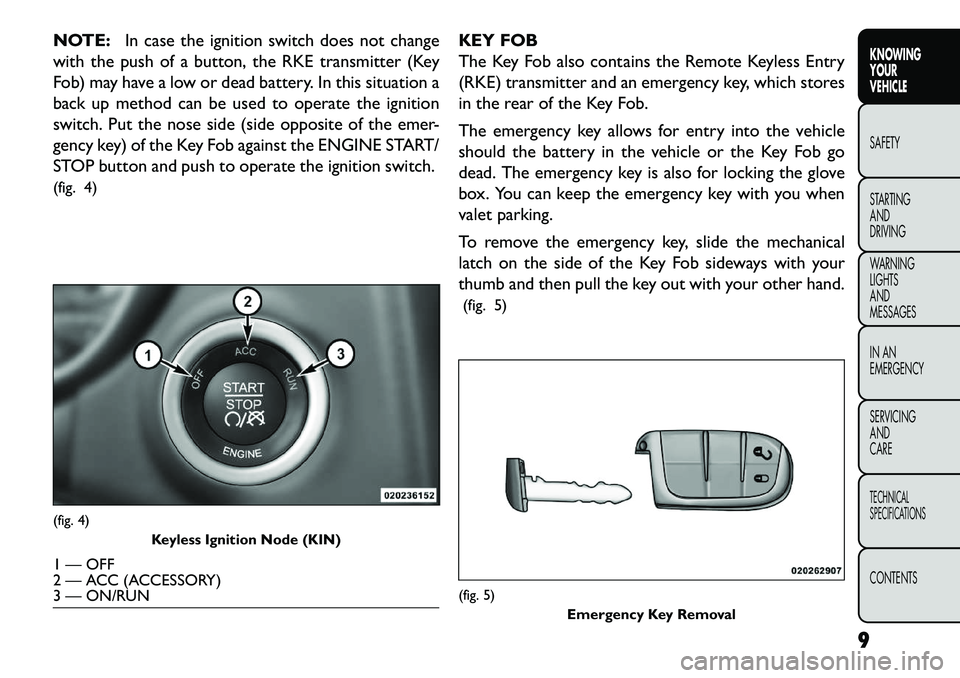
NOTE:In case the ignition switch does not change
with the push of a button, the RKE transmitter (Key
Fob) may have a low or dead battery. In this situation a
back up method can be used to operate the ignition
switch. Put the nose side (side opposite of the emer-
gency key) of the Key Fob against the ENGINE START/
STOP button and push to operate the ignition switch.
(fig. 4) KEY FOB
The Key Fob also contains the Remote Keyless Entry
(RKE) transmitter and an emergency key, which stores
in the rear of the Key Fob.
The emergency key allows for entry into the vehicle
should the battery in the vehicle or the Key Fob go
dead. The emergency key is also for locking the glove
box. You can keep the emergency key with you when
valet parking.
To remove the emergency key, slide the mechanical
latch on the side of the Key Fob sideways with your
thumb and then pull the key out with your other hand.
(fig. 5)(fig. 4) Keyless Ignition Node (KIN)1 — OFF
2 — ACC (ACCESSORY)
3 — ON/RUN
(fig. 5)
Emergency Key Removal
9
KNOWING
YOUR
VEHICLE
SAFETY
S
TARTING
AND
DRIVING
WARNING
LIGHTS
AND
MESSAGES
IN AN
EMERGENCY
SERVICING
AND
CARETECHNICAL
SPECIFICATIONSCONTENTS
Page 22 of 352
the same exterior zone (refer to "Keyless Enter-N-
Go™" in "Knowing Your Vehicle" for further infor-
mation).
Press the LOCK button on the Remote Keyless
Entry (RKE) transmitter.
3. If any doors are open, close them.
TO DISARM THE SYSTEM
The Vehicle Security Alarm can be disarmed using any
of the following methods:
Press the UNLOCK button on the Remote Keyless Entry (RKE) transmitter.
Grasp the Passive Entry Unlock Door Handle with a valid key fob available in the same exterior zone
(refer to "Keyless EnterNGo™" in "Knowing Your
Vehicle" for further information).
Cycle the vehicle ignition system out of the OFF position by pressing the Keyless EnterNGo™
Start/Stop button (requires at least one valid Key Fob
in the vehicle).
NOTE:
The driver's door key cylinder and the liftgate button on the RKE transmitter cannot arm or disarm the
Vehicle Security Alarm. The Vehicle Security Alarm remains armed during
power liftgate entry. Pressing the liftgate button will
not disarm the Vehicle Security Alarm. If someone
enters the vehicle through the liftgate and opens any
door the alarm will sound.
When the Vehicle Security Alarm is armed, the interior power door lock switches will not unlock
the doors.
The Vehicle Security Alarm is designed to protect your
vehicle; however, you can create conditions where the
system will give you a false alarm. If one of the previ-
ously described arming sequences has occurred, the
Vehicle Security Alarm will arm regardless of whether
you are in the vehicle or not. If you remain in the
vehicle and open a door, the alarm will sound. If this
occurs, disarm the Vehicle Security Alarm.
If the Vehicle Security Alarm is armed and the battery
becomes disconnected, the Vehicle Security Alarm will
remain armed when the battery is reconnected; the
exterior lights will flash, the horn will sound. If this
occurs, disarm the Vehicle Security Alarm.
SECURITY SYSTEM MANUAL OVERRIDE
The Vehicle Security Alarm will not arm if you lock the
doors using the manual door lock plunger.
16
KNOWING YOUR
VEHICLE
SAFETY
S
TARTING AND
DRIVING
WARNING LIGHTSAND
MESSAGES
IN AN
EMERGENCY
SERVICING AND
CARETECHNICAL
SPECIFICATIONSCONTENTS
Page 24 of 352
TO DISARM THE SYSTEM
The Vehicle Security Alarm can be disarmed using any
of the following methods:
Press the UNLOCK button on the Remote KeylessEntry (RKE) transmitter.
Grasp the Passive Entry Unlock Door Handle with a valid key fob available in the same exterior zone
(refer to "Keyless EnterNGo™" in "Knowing Your
Vehicle" for further information).
Cycle the vehicle ignition system out of the OFF position by pressing the Keyless EnterNGo™
Start/Stop button (requires at least one valid Key Fob
in the vehicle).
NOTE:
The driver's door key cylinder and the liftgate button on the RKE transmitter cannot arm or disarm the
Vehicle Security Alarm.
When the Vehicle Security Alarm is armed, the interior power door lock switches will not unlock
the doors. The Vehicle Security Alarm is designed to protect your
vehicle; however, you can create conditions where the
system will give you a false alarm. If one of the previ-
ously described arming sequences has occurred, the
Vehicle Security Alarm will arm regardless of whether
you are in the vehicle or not. If you remain in the
vehicle and open a door, the alarm will sound. If this
occurs, disarm the Vehicle Security Alarm.
If the Vehicle Security Alarm is armed and the battery
becomes disconnected, the Vehicle Security Alarm will
remain armed when the battery is reconnected; the
exterior lights will flash, the horn will sound. If this
occurs, disarm the Vehicle Security Alarm.
SECURITY SYSTEM MANUAL OVERRIDE
The system will not arm if you lock the doors using the
manual door lock plunger.
18
KNOWING YOUR
VEHICLE
SAFETY
S
TARTING AND
DRIVING
WARNING LIGHTSAND
MESSAGES
IN AN
EMERGENCY
SERVICING AND
CARETECHNICAL
SPECIFICATIONSCONTENTS
Page 155 of 352
RemoteControl Button Standard Screens
Menu Screens
AM/FM/
MW/LW SAT–
Audio HDD–
HardDisc
Drive DISC/
DVD AUX/AUX1/AUX2
Mode
Select Menu Screen
Setup
Play/
Pause Not
AvailableNot
AvailableNot
AvailablePause if
playing,
else
resume
playAudio:
Pause if
playing/
resumeNot
Available
Not
AvailableNot
Available
Video
Play: Pause if
playing/
resume
Video
Menu: Activate
selected
item
Stop Not
AvailableNot
AvailableNot
AvailableStop Stop
Not
AvailableNot
AvailableNot
Available
Mute Mute/Unmute Headphones
Slow Not
AvailableNot
AvailableNot
AvailableNot
AvailableAudio:
Not
AvailableNot
AvailableNot
AvailableNot
Available
Video
Play: Slow play/
resume
Video
Menu: Not
Available
Status Not
AvailableNot
AvailableSlow
Mode and
Content
InfoNot
Available
Audio:
Not
AvailableAudio:
Not
AvailableNot
Available
Not
Available
Video
Play: Show
Mode Info
Video:
Show
Mode Info
149
KNOWING
YOUR
VEHICLE
SAFETY
STARTING
AND
DRIVING
WARNING
LIGHTS
AND
MESSAGES
IN AN
EMERGENCY
SERVICING
AND
CARETECHNICAL
SPECIFICATIONSCONTENTS
Page 157 of 352
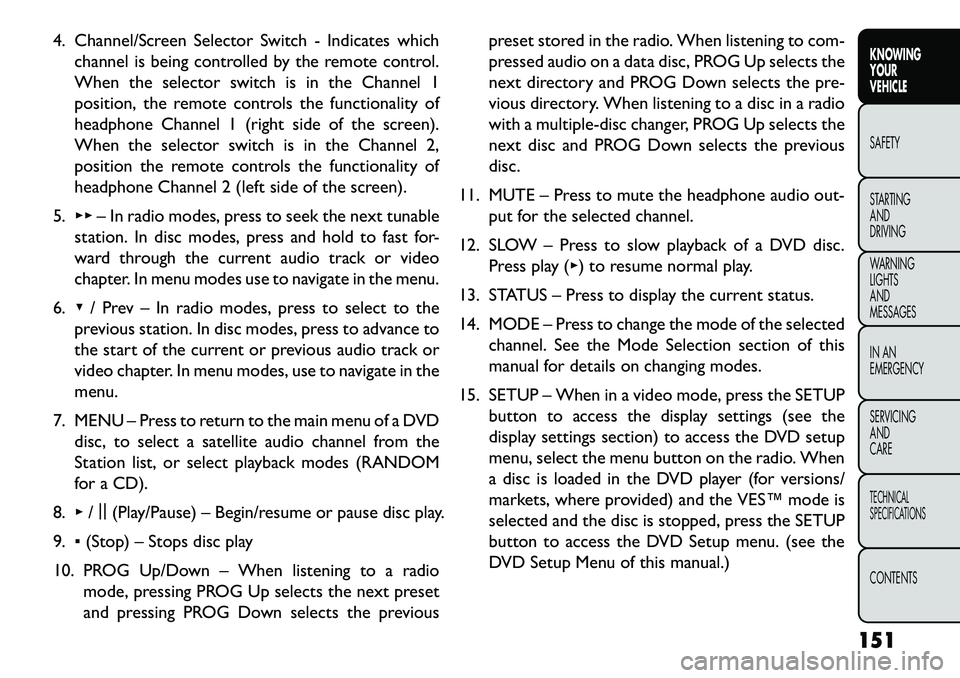
4. Channel/Screen Selector Switch - Indicates whichchannel is being controlled by the remote control.
When the selector switch is in the Channel 1
position, the remote controls the functionality of
headphone Channel 1 (right side of the screen).
When the selector switch is in the Channel 2,
position the remote controls the functionality of
headphone Channel 2 (left side of the screen).
5. ▸▸ – In radio modes, press to seek the next tunable
station. In disc modes, press and hold to fast for-
ward through the current audio track or video
chapter. In menu modes use to navigate in the menu.
6. ▾/ Prev – In radio modes, press to select to the
previous station. In disc modes, press to advance to
the start of the current or previous audio track or
video chapter. In menu modes, use to navigate in the
menu.
7. MENU – Press to return to the main menu of a DVD disc, to select a satellite audio channel from the
Station list, or select playback modes (RANDOM
for a CD).
8. ▸/||
(Play/Pause) – Begin/resume or pause disc play.
9. ▪(Stop) – Stops disc play
10. PROG Up/Down – When listening to a radio mode, pressing PROG Up selects the next preset
and pressing PROG Down selects the previous preset stored in the radio. When listening to com-
pressed audio on a data disc, PROG Up selects the
next directory and PROG Down selects the pre-
vious directory. When listening to a disc in a radio
with a multiple-disc changer, PROG Up selects the
next disc and PROG Down selects the previous
disc.
11. MUTE – Press to mute the headphone audio out- put for the selected channel.
12. SLOW – Press to slow playback of a DVD disc. Press play (▸) to resume normal play.
13. STATUS – Press to display the current status.
14. MODE – Press to change the mode of the selected channel. See the Mode Selection section of this
manual for details on changing modes.
15. SETUP – When in a video mode, press the SETUP button to access the display settings (see the
display settings section) to access the DVD setup
menu, select the menu button on the radio. When
a disc is loaded in the DVD player (for versions/
markets, where provided) and the VES™ mode is
selected and the disc is stopped, press the SETUP
button to access the DVD Setup menu. (see the
DVD Setup Menu of this manual.)
151
KNOWING
YOUR
VEHICLE
SAFETY
STARTING
AND
DRIVING
WARNING
LIGHTS
AND
MESSAGES
IN AN
EMERGENCY
SERVICING
AND
CARETECHNICAL
SPECIFICATIONSCONTENTS
Page 209 of 352
(Continued)
Do not leave the key fob in or near the vehicle,
and do not leave Keyless Enter-N-Go™ in the
ACC or ON/RUN mode.A child could operate
power windows, other controls, or move the ve-
hicle.
Do not leave animals or children inside parked
vehicles in hot weather; interior heat buildup
may cause serious injury or death.
KEYLESS ENTERNGO™
This feature allows the driver to op-
erate the ignition switch with the
push of a button, as long as the Re-
mote Keyless Entry (RKE) transmit-
ter is in the passenger compartment.
NORMAL STARTING – GASOLINE ENGINE
Using The ENGINE START/STOP Button
1. The transmission must be in PARK or NEUTRAL.
2. Press and hold the brake pedal while pressing the ENGINE START/STOP button once.
3. The system takes over and attempts to start the vehicle. If the vehicle fails to start, the starter will
disengage automatically after 10 seconds. 4. If you wish to stop the cranking of the engine prior
to the engine starting, press the button again.
NOTE: Normal starting of either a cold or a warm
engine is obtained without pumping or pressing the
accelerator pedal.
To Turn Off The Engine Using ENGINE
START/STOP Button
1. Place the shift lever in PARK, then press and release the ENGINE START/STOP button.
2. The ignition switch will return to the OFF position.
3. If the shift lever is not in PARK and the vehicle speed is above 8 km/h, the ENGINE START/STOP button
must be held for two seconds before the engine
shuts off. The ignition switch position will remain in
the ACC position until the shift lever is in PARK and
the button is pressed twice to the OFF position. If
the shift lever is not in PARK and the ENGINE
START/STOP button is pressed once, the EVIC will
display a “Vehicle Not In Park” message and the
engine will remain running. Never leave a vehicle out
of the PARK position, or it could roll.
203KNOWING
YOUR
VEHICLE
SAFETY
STARTING
AND
DRIVING
WARNING
LIGHTS
AND
MESSA
GES
IN AN
EMERGENCY
SERVICING
AND
CARETECHNICAL
SPECIFICATIONSCONTENTS
Page 210 of 352
NOTE:If the ignition switch is left in the ACC or
RUN (engine not running) position and the transmis-
sion is in PARK, the system will automatically time out
after 30 minutes of inactivity and the ignition will switch
to the OFF position.
ENGINE START/STOP Button Functions –
With Driver’s Foot OFF The Brake Pedal (In
PARK Or NEUTRAL Position)
The ENGINE START/STOP button operates similar to
an ignition switch. It has four positions, OFF, ACC,
RUN and START. To change the ignition switch posi-
tions without starting the vehicle and use the accesso-
ries follow these steps.
Starting with the ignition switch in the OFF position:
Press the ENGINE START/STOP button once to change the ignition switch to the ACC position,
Press the ENGINE START/STOP button a second time to change the ignition switch to the RUN
position,
Press the ENGINE START/STOP button a third time to return the ignition switch to the OFF position. EXTREME COLD WEATHER (BELOW
�29°C)
To ensure reliable starting at these temperatures, use
of an externally powered electric engine block heater is
recommended.
IF ENGINE FAILS TO START
WARNING!
N
ever pour fuel or other flammable
liquids into the throttle body air inlet
opening in an attempt to start the vehicle. This
could result in a flash fire causing serious per-
sonal injury.
Do not attempt to push or tow your vehicle to
get it started. Unburned fuel could enter the
catalytic converter and once the engine has
started, ignite and damage the converter and
vehicle. If the vehicle has a discharged battery,
booster cables may be used to obtain a start from
a booster battery or the battery in another ve-
hicle.This type of start can be dangerous if done
improperly. Refer to “Jump Starting” in “In An
Emergency” for further information.
204
KNOWING YOUR
VEHICLE
SAFETY
STARTING AND
DRIVING
WARNING LIGHTSAND
MESSA
GES
IN AN
EMERGENCY
SERVICING AND
CARETECHNICAL
SPECIFICATIONSCONTENTS
Page 211 of 352
Clearing A Flooded Engine (Using ENGINE
START/STOP Button)
If the engine fails to start after you have followed the
“Normal Starting” or “Extreme Cold Weather" proce-
dures, it may be flooded. To clear any excess fuel:
1. Press and hold the brake pedal.
2. Press the accelerator pedal all the way to the floorand hold it.
3. Press and release the ENGINE START/STOP button once.
The starter motor will engage automatically, run for 10
seconds, and then disengage. Once this occurs, release
the accelerator pedal and the brake pedal, wait 10 to 15
seconds, then repeat the “Normal Starting” proce-
dure.
AFTER STARTING
The idle speed is controlled automatically and it will
decrease as the engine warms up. NORMAL STARTING – DIESEL ENGINE
Using The ENGINE START/STOP Button
1. Turn the ignition switch to the ON position by
pressing the ENGINE START/STOP button twice.
2. Watch the “Wait To Start Indicator Light” in the instrument cluster. Refer to “Instrument Cluster” in
“Warning Lights And Messages” for further infor-
mation. It will illuminate for two to ten seconds or
more, depending on engine temperature. When the
“Wait To Start Indicator Light” goes out, the engine
is ready to start.
3. DO NOT press the accelerator. To start the engine, the transmission must be in PARK or NEUTRAL.
Press the brake pedal (automatic transmission only)
or press and hold the clutch pedal (manual transmis-
sion only) while pressing and holding the ENGINE
START/STOP button. Release the button when the
engine starts.
NOTE: The starter motor may need to remain
engaged for up to 30 seconds in very cold conditions
until the engine is started. If the vehicle does not start,
release the button. Wait for 25-30 seconds and then
try to start again.
205
KNOWING
YOUR
VEHICLE
SAFETY
STARTING
AND
DRIVING
WARNING
LIGHTS
AND
MESSAGES
IN AN
EMERGENCY
SERVICING
AND
CARETECHNICAL
SPECIFICATIONSCONTENTS