stop start FIAT FREEMONT 2014 1.G Owner's Manual
[x] Cancel search | Manufacturer: FIAT, Model Year: 2014, Model line: FREEMONT, Model: FIAT FREEMONT 2014 1.GPages: 388, PDF Size: 4.13 MB
Page 146 of 388
ESC ACTIVATION/MALFUNCTION
INDICATOR LIGHT AND ESC OFF
INDICATOR LIGHTThe “ESC Activation/Malfunction Indicator
Light” in the instrument cluster will come on
when the ignition switch is turned to the ON
position. It should go out with the engine
running. If the “ESC Activation/Malfunction Indicator
Light” comes on continuously with the engine running,
a malfunction has been detected in the ESC system. If
this light remains on after several ignition cycles, and
the vehicle has been driven several kilometers at
speeds greater than 48 km/h, see your authorized
dealer as soon as possible to have the problem diag-
nosed and corrected.
The “ESC Activation/Malfunction Indicator Light” (lo-
cated in the instrument cluster) starts to flash as soon
as the tires lose traction and the ESC system becomes
active. The “ESC Activation/Malfunction Indicator
Light” also flashes when TCS is active. If the “ESC
Activation/Malfunction Indicator Light” begins to flash
during acceleration, ease up on the accelerator and
apply as little throttle as possible. Be sure to adapt your
speed and driving to the prevailing road conditions. NOTE:
• The “ESC Activation/Malfunction Indicator Light”
and the “ESC OFF Indicator Light” come on momen-
tarily each time the ignition switch is turned ON.
• Each time the ignition is turned ON, the ESC system will be ON even if it was turned off previously.
• The ESC system will make buzzing or clicking sounds when it is active. This is normal; the sounds will stop
when ESC becomes inactive following the maneuver
that caused the ESC activation.
The “ESC OFF Indicator Light” indicates the
Electronic Stability Control (ESC) is in Partial
OFF mode.
Hill Start Assist (HSA)
The HSA system is designed to assist the driver when
starting a vehicle from a stop on a hill. HSA will
maintain the level of brake pressure the driver applied
for a short period of time after the driver takes their
foot off of the brake pedal. If the driver does not apply
the throttle during this short period of time, the
system will release brake pressure and the vehicle will
roll down the hill. The system will release brake pres-
sure in proportion to the amount of throttle applied as
the vehicle starts to move in the intended direction of
travel.
140
KNOWING YOUR
VEHICLE
SAFETY
STARTING AND
DRIVING
W
ARNING LIGHTS AND
MESSAGES
IN AN
EMERGENCY
SERVICING AND CARE
TECHNICAL
SPECIFICATIONS
CONTENTS
Page 147 of 388
HSA Activation Criteria
The following criteria must be met in order for HSA to
activate:
• Vehicle must be stopped.
• Vehicle must be on a 6% (approximate) grade orgreater hill.
• Gear selection matches vehicle uphill direction (i.e., vehicle facing uphill is in forward gear; vehicle backing
uphill is in REVERSE gear).
WARNING!
There may be situations on minor hills
with a
loaded vehicle, or while pulling a
trailer where the system will not activate and
slight rolling may occur, which could cause a
collision with another vehicle or object . Always
remember the driver is responsible for braking
the vehicle.
HSA will work in REVERSE and all forward gears when
the activation criteria have been met. The system will
not activate if the vehicle is placed in NEUTRAL or
PARK. Towing With HSA
HSA will provide assistance when starting on a grade
when pulling a trailer.
WARNING!
• If you use a trailer brake controller
wit h
your trailer, your trailer brakes may
be activated and deactivated with the brake
switch. If so, when the brake pedal is released,
there may not be enough brake pressure to hold
the vehicle and trailer on a hill and this could
cause a collision with another vehicle or object
behind you. In order to avoid rolling down the hill
while resuming acceleration, manually activate
the trailer brake prior to releasing the brake
pedal. Always remember the driver is responsible
for braking the vehicle.
• HSA is not a parking brake. If you stop the
vehicle on a hill without putting the transmission
in PARK and using the parking brake, it will roll
down the hill and could cause a collision with
another vehicle or object . Always remember to
use the parking brake while parking on a hill, and
that the driver is responsible for braking the
vehicle.
141
KNOWING
YOUR
VEHICLE
SAFETY
STARTING
AND
DRIVING
W
ARNING
LIGHTS
AND
MESSAGES
IN AN
EMERGENCY
SERVICING
AND CARE
TECHNICAL
SPECIFICATIONS
CONTENTS
Page 148 of 388
HSA Off
If you wish to turn off the HSA system, it can be done
using the Customer Programmable Features in the
Electronic Vehicle Information Center (EVIC). Refer to
“Electronic Vehicle Information Center (EVIC)” in
“Knowing your vehicle” for further information.
TRAILER SWAY CONTROL (TSC)
TSC uses sensors in the vehicle to recognize an exces-
sively swaying trailer. TSC activates automatically once
the excessively swaying trailer is recognized. When
TSC is functioning, the “ESC Activation/Malfunction
Indicator Light” will flash, the engine power will be
reduced, and you will feel the brake being applied to
individual wheels in an attempt to stop the trailer from
swaying.NOTE:
The TSC is disabled when the ESC system is in
the “Partial Off ” mode.
WARNING!
• TSC cannot stop all trailers from
sw ayin
g. Always use caution when tow-
ing a trailer and follow the tongue weight recom-
mendations. Refer to “Trailer Towing” in “Starting
and Driving” for further information.
• If TSC activates while towing a trailer, stop the
vehicle at the nearest safe location and adjust
the trailer load to eliminate the trailer sway.
• Failure to follow these warnings can result in an
accident or serious personal injury.
142
KNOWING YOUR
VEHICLE
SAFETY
STARTING AND
DRIVING
W
ARNING LIGHTS AND
MESSAGES
IN AN
EMERGENCY
SERVICING AND CARE
TECHNICAL
SPECIFICATIONS
CONTENTS
Page 153 of 388
NOTE:
• The TPMS is not intended to replace normal tire careand maintenance, or to provide warning of a tire
failure or condition.
• The TPMS should not be used as a tire pressure gauge while adjusting your tire pressure.
• Driving on a significantly under-inflated tire causes the tire to overheat and can lead to tire failure.
Under-inflation also reduces fuel efficiency and tire
tread life, and may affect the vehicle’s handling and
stopping ability.
• The TPMS is not a substitute for proper tire mainte- nance, and it is the driver’s responsibility to maintain
correct tire pressure using an accurate tire pressure
gauge, even if under-inflation has not reached the
level to trigger illumination of the Tire Pressure
Monitoring Telltale Light.
• Seasonal temperature changes will affect tire pres- sure, and the TPMS will monitor the actual tire
pressure in the tire.
BASE SYSTEM
The Tire Pressure Monitor System (TPMS) uses wireless
technology with wheel rim mounted electronic sensors
to monitor tire pressure levels. Sensors, mounted to each
wheel as part of the valve stem, transmit tire pressure
readings to the receiver module.
NOTE: It is particularly important for you to check
the tire pressure in all of the tires on your vehicle
monthly and to maintain the proper pressure.
The TPMS consists of the following components:
• Receiver Module
• Four Tire Pressure Monitoring Sensors
• Tire Pressure Monitoring Telltale Light
Tire Pressure Monitoring Low Pressure
Warnings
The Tire Pressure Monitoring Telltale Light will
illuminate in the instrument cluster and a chime
will sound when tire pressure is low in one or more of
the four active road tires. Should this occur, you should
stop as soon as possible, check the inflation pressure of
each tire on your vehicle, and inflate each tire to the
vehicle’s recommended cold placard pressure value.
Once the system receives the updated tire pressures,
the system will automatically update and the Tire
Pressure Monitoring Telltale Light will turn off. The
vehicle may need to be driven for up to 20 minutes
above 25 km/h in order for the TPMS to receive this
information.
147
KNOWING
YOUR
VEHICLE
SAFETY
STARTING
AND
DRIVING
W
ARNING
LIGHTS
AND
MESSAGES
IN AN
EMERGENCY
SERVICING
AND CARE
TECHNICAL
SPECIFICATIONS
CONTENTS
Page 156 of 388
Tire Pressure Monitoring Low Pressure
WarningsThe Tire Pressure Monitoring Telltale Light will
illuminate in the instrument cluster and a chime
will sound when tire pressure is low in one or more of
the four active road tires. In addition, the Electronic
Vehicle Information Center (EVIC) will display a
graphic showing the pressure values of each tire with
the low tire pressure values in a different color. An
"Inflate Tire to XXX" message will also be displayed.
Should this occur, you should stop as soon as possible
and inflate the tires with low pressure (those displayed
in a different color in the EVIC graphic) to the vehicle’s
recommended cold placard pressure value as shown in
the "Inflate Tire to XXX" message. Once the system
receives the updated tire pressures, the system will
automatically update, the graphic display in the EVIC
will return to the original color, and the Tire Pressure
Monitoring Telltale Light will turn off. The vehicle may
need to be driven for up to 20 minutes above 25 km/h
in order for the TPMS to receive this information. ServiceTPMS Warning
When a system fault is detected, the Tire Pressure
Monitoring Telltale Light will flash on and off for 75 sec-
onds and then remain on solid. The system fault will
also sound a chime. In addition, the EVIC will display a
"SERVICE TPM SYSTEM" message for a minimum of
five seconds and then display dashes (- -) in place of the
pressure value to indicate which sensor is not being
received.
If the ignition switch is cycled, this sequence will repeat,
providing the system fault still exists. If the system fault
no longer exists, the Tire Pressure Monitoring Telltale
Light will no longer flash, and the "SERVICE TPM
SYSTEM" message will no longer display, and a pressure
value will display in place of the dashes. A system fault
can occur due to any of the following:
1. Jamming due to electronic devices or driving next to
facilities emitting the same radio frequencies as the
TPMS sensors.
2. Installing some form of aftermarket window tinting that affects radio wave signals.
3. Lots of snow or ice around the wheels or wheel housings.
150
KNOWING YOUR
VEHICLE
SAFETY
STARTING AND
DRIVING
W
ARNING LIGHTS AND
MESSAGES
IN AN
EMERGENCY
SERVICING AND CARE
TECHNICAL
SPECIFICATIONS
CONTENTS
Page 164 of 388
•Park Assist is only a parking aid and it is
unable to recognize every obstacle, in-
cluding small obstacles. Parking curbs
might be temporarily detected or not detected at
all. Obstacles located above or below the sensors
will not be detected when they are in close prox-
imity.
• The vehicle must be driven slowly when using
Park Assist in order to be able to stop in time when
an obstacle is detected. It is recommended that
the driver looks over his/her shoulder when using
Park Assist .
WARNING!
• Drivers must be careful when backing
up e v
en when using Park Assist . Always
check carefully behind your vehicle, look behind
you, and be sure to check for pedestrians, ani-
mals, other vehicles, obstructions, and blind spots
before backing up.You are responsible for safety
and must continue to pay attention to your sur-
roundings. Failure to do so can result in serious
injury or death.
(Continued)(Continued)
• Before using Park Assist , it is strongly recom-
mended that the ball mount and hitch ball as-
sembly is disconnected from the vehicle when the
vehicle is not used for towing. Failure to do so can
result in injury or damage to vehicles or obstacles
because the hitch ball will be much closer to the
obstacle than the rear fascia when the loud-
speaker sounds the continuous tone. Also, the
sensors could detect the ball mount and hitch ball
assembly, depending on its size and shape, giving
a false indication that an obstacle is behind the
vehicle.
158
KNOWING YOUR
VEHICLE
SAFETY
STARTING AND
DRIVING
W
ARNING LIGHTS AND
MESSAGES
IN AN
EMERGENCY
SERVICING AND CARE
TECHNICAL
SPECIFICATIONS
CONTENTS
Page 166 of 388
•To avoid vehicle damage, ParkView®
should only be used as a parking aid.The
ParkView®cameraisunabletoviewev-
ery obstacle or object in your drive path.
• To avoid vehicle damage, the vehicle must be
driven slowly when using ParkView® to be able to
stop in time when an obstacle is seen. It is recom-
mended that the driver look frequently over his/
her shoulder when using ParkView®.
NOTE: If snow, ice, mud, or any foreign substance
builds up on the camera lens, clean the lens, rinse with
water, and dry with a soft cloth. Do not cover the lens.
TURNING PARKVIEW® ON OR OFF —
WITH TOUCH SCREEN
Perform the following steps on the touch screen to
turn the Parkview® Backup Camera ON or OFF:
1. Press the “More” soft-key.
2. Press the “Settings” soft-key.
3. Press the “Safety & Driving Assistance” soft-key.
4. Press the check box soft key next to “Parkview® Backup Camera” to enable/disable.NAVIGATION SYSTEM
(for versions/markets, where
provided)
Refer to your Uconnect® User Manual.
160
KNOWING YOUR
VEHICLE
SAFETY
STARTING AND
DRIVING
W
ARNING LIGHTS AND
MESSAGES
IN AN
EMERGENCY
SERVICING AND CARE
TECHNICAL
SPECIFICATIONS
CONTENTS
Page 172 of 388
Using The Remote Control
1. Press the MODE button on the Remote Control.
2. While looking at the Video Screen, highlight DISCby either pressing Up/Down/Left/Right buttons or
by repeatedly pressing the MODE button, then
press ENTER.
NOTE:
• The VES™ system will retain the last setting when turned off.
• Viewing a DVD on the Touchscreen radio screen is not available in some regions or locations, the vehicle
must be stopped, and the shift lever must be in the
PARK position for vehicles with automatic transmis-
sion. In vehicles with manual transmission the park-
ing brake must be engaged even when the vehicle is
parked. Refer to local and state laws.
• Touching the screen on a Touchscreen radio while a DVD is playing brings up basic remote control func-
tions for DVD play such as scene selection, Play,
Pause, FF, RW, and Stop. Pressing the X in the upper
corner will turn off the remote control screen func-
tions. Using The Touch-Screen Radio Controls
1. Touch the “MORE” soft-key.
2. Touch the “Rear Entertainment” soft-key to display
the Rear Entertainment Controls.
3. If the Rear Entertainment is turned off, touch the “Power” soft-key.
4. Touch the “1” or “2” Source soft-key based on the channel you want to change and touch the “Disc”
soft-key. To exit touch the “X” at the top right of
the screen.
NOTE: Touching the screen on a Touch-Screen radio
while a DVD is playing full screen brings up basic
control functions for DVD play such as DVD Menu,
Seek Up/Down, Navigating through the menus, Exit.
The basic control functions screen will time out and
disappear from the screen.
166
KNOWING YOUR
VEHICLE
SAFETY
STARTING AND
DRIVING
W
ARNING LIGHTS AND
MESSAGES
IN AN
EMERGENCY
SERVICING AND CARE
TECHNICAL
SPECIFICATIONS
CONTENTS
Page 175 of 388
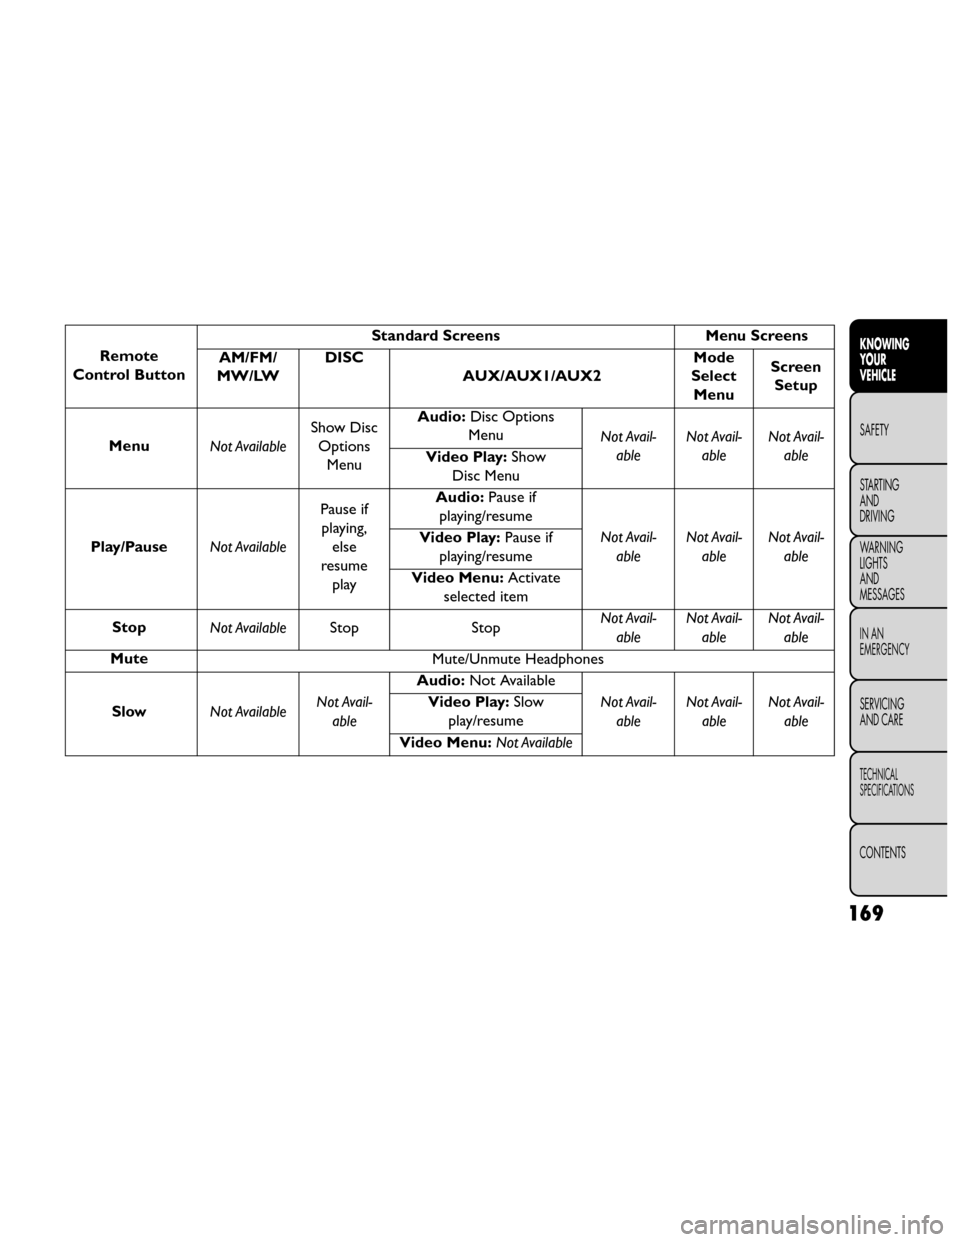
Remote
Control Button Standard Screens
Menu Screens
AM/FM/
MW/LW DISC
AUX/AUX1/AUX2 Mode
Select Menu Screen
Setup
Menu Not AvailableShow Disc
Options Menu Audio:
Disc Options
Menu Not Avail-
able Not Avail-
able Not Avail-
able
Video Play: Show
Disc Menu
Play/Pause Not AvailablePause if
playing, else
resume play Audio:
Pause if
playing/resume
Not Avail-able Not Avail-
able Not Avail-
able
Video Play:
Pause if
playing/resume
Video Menu: Activate
selected item
Stop Not Available Stop StopNot Avail-
able Not Avail-
able Not Avail-
able
Mute Mute/Unmute Headphones
Slow Not Available Not Avail-
able Audio:
Not Available
Not Avail-able Not Avail-
able Not Avail-
able
Video Play:
Slow
play/resume
Video Menu: Not Available
169
KNOWING
YOUR
VEHICLE
SAFETY
STARTING
AND
DRIVING
W
ARNING
LIGHTS
AND
MESSAGES
IN AN
EMERGENCY
SERVICING
AND CARE
TECHNICAL
SPECIFICATIONS
CONTENTS
Page 177 of 388
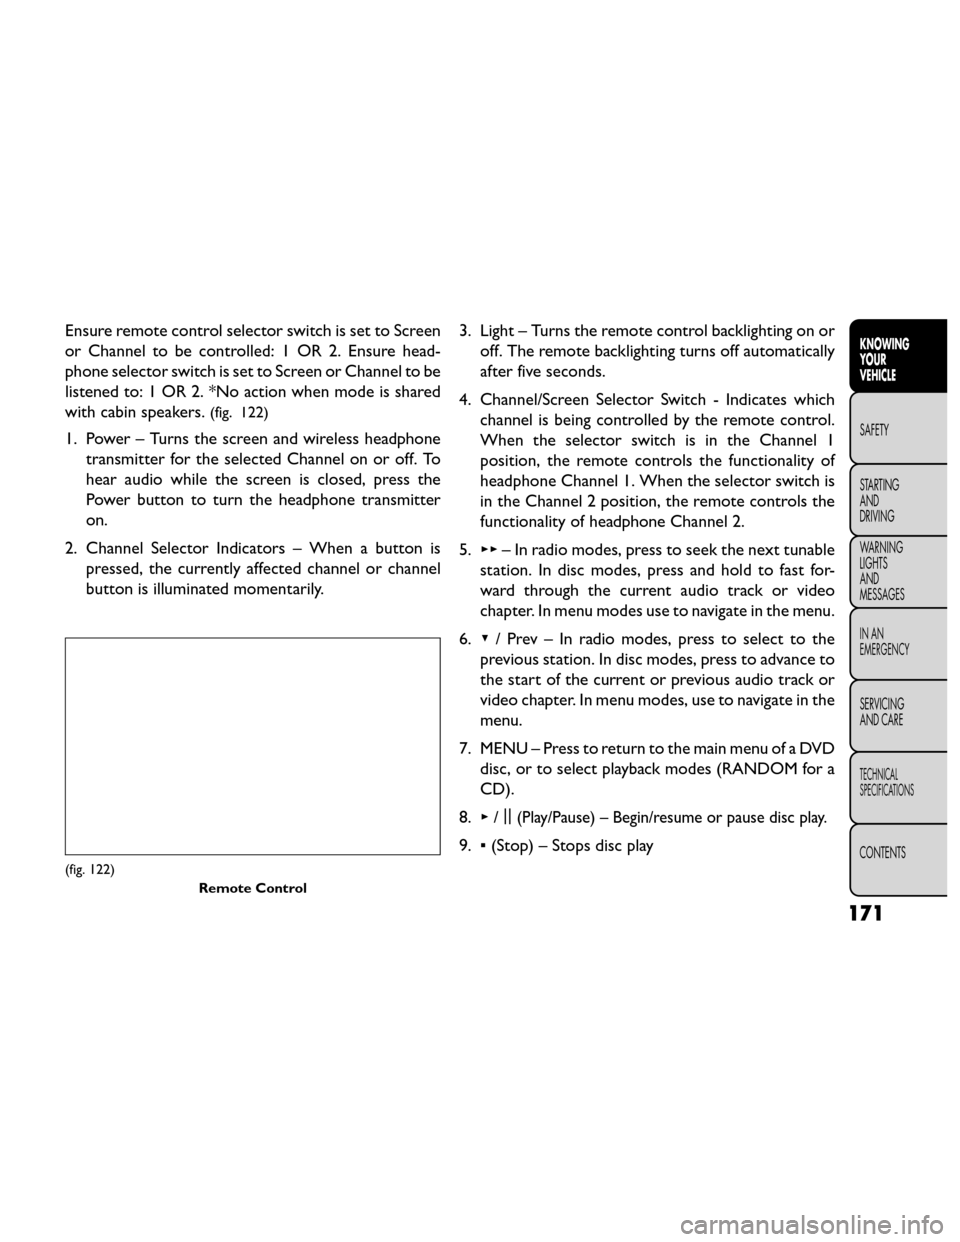
Ensure remote control selector switch is set to Screen
or Channel to be controlled: 1 OR 2. Ensure head-
phone selector switch is set to Screen or Channel to be
listened to: 1 OR 2. *No action when mode is shared
with cabin speakers.
(fig. 122)
1. Power – Turns the screen and wireless headphonetransmitter for the selected Channel on or off. To
hear audio while the screen is closed, press the
Power button to turn the headphone transmitter
on.
2. Channel Selector Indicators – When a button is pressed, the currently affected channel or channel
button is illuminated momentarily. 3. Light – Turns the remote control backlighting on or
off. The remote backlighting turns off automatically
after five seconds.
4. Channel/Screen Selector Switch - Indicates which channel is being controlled by the remote control.
When the selector switch is in the Channel 1
position, the remote controls the functionality of
headphone Channel 1. When the selector switch is
in the Channel 2 position, the remote controls the
functionality of headphone Channel 2.
5. ▸▸ – In radio modes, press to seek the next tunable
station. In disc modes, press and hold to fast for-
ward through the current audio track or video
chapter. In menu modes use to navigate in the menu.
6. ▾/ Prev – In radio modes, press to select to the
previous station. In disc modes, press to advance to
the start of the current or previous audio track or
video chapter. In menu modes, use to navigate in the
menu.
7. MENU – Press to return to the main menu of a DVD disc, or to select playback modes (RANDOM for a
CD).
8. ▸/||
(Play/Pause) – Begin/resume or pause disc play.
9.
▪(Stop) – Stops disc play
(fig. 122)
Remote Control
171
KNOWING
YOUR
VEHICLE
SAFETY
STARTING
AND
DRIVING
W
ARNING
LIGHTS
AND
MESSAGES
IN AN
EMERGENCY
SERVICING
AND CARE
TECHNICAL
SPECIFICATIONS
CONTENTS