engine FIAT FREEMONT 2015 1.G Workshop Manual
[x] Cancel search | Manufacturer: FIAT, Model Year: 2015, Model line: FREEMONT, Model: FIAT FREEMONT 2015 1.GPages: 412, PDF Size: 3.37 MB
Page 260 of 412
AUTOSTICK
AutoStick is a driver-interactive transmission feature
providing manual shift control, giving you more control
of the vehicle. AutoStick allows you to maximize en-
gine braking, eliminate undesirable upshifts and down-
shifts, and improve overall vehicle performance.
This system can also provide you with more control
during passing, city driving, cold slippery conditions,
mountain driving, trailer towing, and many other situ-
ations.
OPERATION
When the shift lever is in the AutoStick position
(below the DRIVE position), it can be moved from side
to side. This allows the driver to manually select the
transmission gear being used. Moving the shift lever to
the left (-) triggers a downshift and to the right (+) an
upshift. The current gear will be displayed in the instru-
ment cluster.In AutoStick mode, the transmission will shift up or
down when the driver moves the shift lever to the right
(+) or left (-), unless an engine lugging or overspeed
condition would result. It will remain in the selected
gear until another upshift or downshift is chosen,
except as described below.
• The transmission will automatically upshift when
necessary to prevent engine over-speed.
• The transmission will automatically downshift as the vehicle slows (to prevent engine lugging) and will
display the current gear.
• The transmission will automatically downshift to first gear when coming to a stop. After a stop, the driver
should manually upshift (+) the transmission as the
vehicle is accelerated.
• You can start out, from a stop, in first or second gear. Tapping (+) (at a stop) will allow starting in second
gear. Starting out in second gear is helpful in snow or
icy conditions.
254
KNOWING YOUR
VEHICLE
SAFETY
STARTING AND
DRIVING
WARNING LIGHTSAND
MESSAGES
INAN
EMERGENC
Y
SERVICING AND CARE
TECHNICAL
SPECIFICATIONS
CONTENTS
Page 261 of 412
• If a requested downshift would cause the engine toover-speed, that shift will not occur.
• Avoid using speed control when AutoStick is en- gaged.
• Transmission shifting will be more noticeable when AutoStick is engaged.
• The system may revert to automatic shift mode if a fault or overheat condition is detected.
To disengage AutoStick mode, return the shift lever to
the DRIVE position. You can shift in or out of the
AutoStick position at any time without taking your foot
off the accelerator pedal.
WARNING!
Do not downshift for additional engine
brakin g
on a slippery surface. The drive
wheels could lose their grip and the vehicle could
skid, causing a collision or personal injury.
ALL WHEEL DRIVE (AWD) (for
versions/markets, where
provided)
This feature provides on-demand All-Wheel Drive
(AWD). The system is automatic with no driver inputs
or additional driving skills required. Under normal
driving conditions, the front wheels provide most of
the traction. If the front wheels begin to lose traction,
power is shifted automatically to the rear wheels. The
greater the front wheel traction loss, the greater the
power transfer to the rear wheels.
Additionally, on dry pavement under heavy throttle
input (where one may have no wheel spin), torque will
be sent to the rear in a pre-emptive effort to improve
vehicle launch and performance characteristics.
All wheels must have the same size and
type tires. Unequal tire sizes must not be
used. Unequal tire size may cause failure
of the power transfer unit .
255
KNOWING
YOUR
VEHICLE
SAFETY
STARTING
AND
DRIVING
WARNING
LIGHTS
AND
MESSAGES
IN AN
EMERGENC
Y
SERVICING
AND CARE
TECHNICAL
SPECIFICATIONS
CONTENTS
Page 263 of 412
DRIVING THROUGH WATER
Driving through water more than a few centimeters
deep will require extra caution to ensure safety and
prevent damage to your vehicle.
FLOWING/RISING WATER
WARNING!
Do not drive on, or cross, a road or a
path w
here water is flowing and/or rising
(as in storm run-off ). Flowing water can wear
away the road or path's surface and cause your
vehicle to sink into deeper water. Furthermore,
flowing and/or rising water can carry your vehicle
away swiftly. Failure to follow this warning may
result in injuries that are serious or fatal to you,
your passengers, and others around you.
Shallow Standing Water
Although your vehicle is capable of driving through
shallow standing water, consider the following Caution
and Warning before doing so.
• Always check the depth of the standing
water before driving through it . Never
drive through standing water that is
deeper than the bottom of the tire rims mounted
on the vehicle.
• Determine the condition of the road or the path
that is under water and if there are any obstacles
in the way before driving through the standing
water.
• Do not exceed 8 km/h when driving through
standing water.This will minimize wave effects.
• Driving through standing water may cause
damage to your vehicle’s drivetrain components.
Always inspect your vehicle’s fluids (i.e., engine
oil, transmission, axle, etc .) for signs of contami-
nation (i.e., fluid that is milky or foamy in appear-
ance) after driving through standing water. Do not
continue to operate the vehicle if any fluid ap-
pears contaminated, as this may result in further
damage. Such damage is not covered by the New
Vehicle Limited Warranty.
• Getting water inside your vehicle’s engine can
cause it to lock up and stall out , and cause serious
internal damage to the engine. Such damage is
not covered by the New Vehicle Limited Warranty.
257
KNOWING
YOUR
VEHICLE
SAFETY
STARTING
AND
DRIVING
WARNING
LIGHTS
AND
MESSAGES
IN AN
EMERGENC
Y
SERVICING
AND CARE
TECHNICAL
SPECIFICATIONS
CONTENTS
Page 264 of 412
WARNING!
• Driving through standing water limits
y our
vehicle’s traction capabilities. Do
not exceed 8 km/h when driving through standing
water.
• Driving through standing water limits your ve-
hicle’s braking capabilities, which increases stop-
ping distances. Therefore, after driving through
standing water, drive slowly and lightly press on
the brake pedal several times to dr y the brakes.
• Getting water inside your vehicle’s engine can
cause it to lock up and stall out , and leave you
stranded.
• Failure to follow these warnings may result in
injuries that are serious or fatal to you, your
passengers, and others around you.
TRAILER TOWING
In this section you will find safety tips and information
on limits to the type of towing you can reasonably do
with your vehicle. Before towing a trailer, carefully
review this information to tow your load as efficiently
and safely as possible.
To maintain the New Vehicle Limited Warranty cover-
age, follow the requirements and recommendations in
this manual concerning vehicles used for trailer towing.
COMMON TOWING DEFINITIONS
The following trailer towing related definitions will
assist you in understanding the following information:
Gross Vehicle Weight Rating (GVWR)
The GVWR is the total allowable weight of your
vehicle. This includes driver, passengers, cargo, and
tongue weight. The total load must be limited so that
you do not exceed the GVWR.
258
KNOWING YOUR
VEHICLE
SAFETY
STARTING AND
DRIVING
WARNING LIGHTSAND
MESSAGES
INAN
EMERGENC
Y
SERVICING AND CARE
TECHNICAL
SPECIFICATIONS
CONTENTS
Page 268 of 412
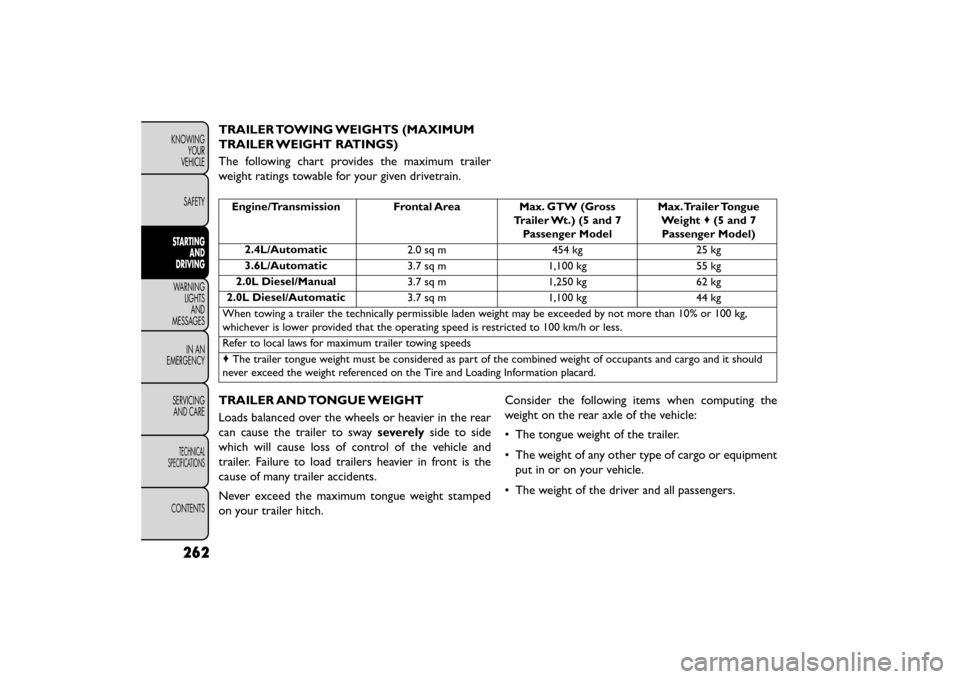
TRAILER TOWING WEIGHTS (MAXIMUM
TRAILER WEIGHT RATINGS)
The following chart provides the maximum trailer
weight ratings towable for your given drivetrain.
Engine/Transmission Frontal AreaMax. GTW (Gross
Trailer Wt.) (5 and 7 Passenger Model Max.Trailer Tongue
Weight ♦(5 and 7
Passenger Model)
2.4L/Automatic 2.0 sq m454 kg25 kg
3.6L/Automatic 3.7 sq m1,100 kg 55 kg
2.0L Diesel/Manual 3.7 sq m1,250 kg 62 kg
2.0L Diesel/Automatic 3.7 sq m1,100 kg 44 kg
When towing a trailer the technically permissible laden weight may be exceeded by not more than 10% or 100 kg,
whichever is lower provided that the operating speed is restricted to 100 km/h or less.
Refer to local laws for maximum trailer towing speeds
♦ The trailer tongue weight must be considered as part of the combined weight of occupants and cargo and it should
never exceed the weight referenced on the Tire and Loading Information placard.
TRAILER AND TONGUE WEIGHT
Loads balanced over the wheels or heavier in the rear
can cause the trailer to sway severelyside to side
which will cause loss of control of the vehicle and
trailer. Failure to load trailers heavier in front is the
cause of many trailer accidents.
Never exceed the maximum tongue weight stamped
on your trailer hitch. Consider the following items when computing the
weight on the rear axle of the vehicle:
• The tongue weight of the trailer.
• The weight of any other type of cargo or equipment
put in or on your vehicle.
• The weight of the driver and all passengers.
262
KNOWING YOUR
VEHICLE
SAFETY
STARTING AND
DRIVING
WARNING LIGHTSAND
MESSAGES
INAN
EMERGENC
Y
SERVICING AND CARE
TECHNICAL
SPECIFICATIONS
CONTENTS
Page 269 of 412
NOTE:Remember that everything put into or on the
trailer adds to the load on your vehicle. Also, additional
factory-installed options or dealer-installed options
must be considered as part of the total load on your
vehicle. Refer to the Tire and Loading Information
placard, located on the face of the driver's door or on
the driver's side “B” pillar, for the maximum combined
weight of occupants and cargo for your vehicle.
TOWING REQUIREMENTS
To promote proper break-in of your new vehicle drive-
train components the following guidelines are recom-
mended:
• Do not tow a trailer at all during the
first 805 km the new vehicle is driven.The
engine, axle or other parts could be dam-
aged.
• Then, during the first 805 km that a trailer is
towed, do not drive over 80 km/h and do not make
starts at full throttle. This helps the engine and
other parts of the vehicle wear in at the heavier
loads.
Perform the maintenance listed in the Maintenance
Schedule. When towing a trailer, never exceed the
GAWR ratings.
WARNING!
Improper towing can lead to an injury
acci den
t . Follow these guidelines to
make your trailer towing as safe as possible:
• Make certain that the load is secured in the
trailer and that it will not shift during travel.
When trailering cargo that is not fully secured,
dynamic load shifts can occur that may be diffi-
cult for the driver to control.You could lose con-
trol of your vehicle and have an accident .
• All trailer hitches should be professionally in-
stalled on your vehicle.
• When hauling cargo or towing a trailer, do not
overload your vehicle or trailer. Overloading can
cause a loss of control, poor performance, or
damage to brakes, axle, engine, transmission,
steering, suspension, chassis structure, or tires.
• Safety chains must always be used between
your vehicle and trailer. Always connect the
chains to the frame or hook retainers of the
vehicle hitch. Cross the chains under the trailer
tongue and allow enough slack for turning cor-
ners.
(Continued)
263
KNOWING
YOUR
VEHICLE
SAFETY
STARTING
AND
DRIVING
WARNING
LIGHTS
AND
MESSAGES
INAN
EMERGENC
Y
SERVICING
AND CARE
TECHNICAL
SPECIFICATIONS
CONTENTS
Page 274 of 412
TOWING TIPS
Before setting out on a trip, practice turning, stopping,
and backing up the trailer in an area located away from
heavy traffic.
Manual Transmission (for versions/markets,
where provided)
If using a manual transmission vehicle for trailer towing,
all starts must be in FIRST gear to avoid clutch slippage.
Automatic Transmission (for versions/
markets,where provided)
The DRIVE range can be selected when towing. How-
ever, if frequent shifting occurs while in DRIVE, use the
AutoStick® shift control to manually select a lower
gear.
NOTE:Using a lower gear while operating the vehicle
under heavy loading conditions will improve perfor-
mance and extend transmission life by reducing exces-
sive shifting and heat build up. This action will also
provide better engine braking.
If you REGULARLY tow a trailer for more than 45
minutes of continuous operation, then change the
transmission fluid and filter as specified for “police,
taxi, fleet, or frequent trailer towing.” Refer to the
“Maintenance Schedule” for the proper maintenance
intervals. NOTE:
Check the transmission fluid level (four-speed
transmission only) before towing. The six-speed trans-
mission does not require a fluid level check before
towing. If, however, you notice fluid leakage or trans-
mission malfunction, see your authorized dealer imme-
diately for assistance.
Electronic Speed Control
• Do not use in hilly terrain or with heavy loads.
• When using the speed control, if you experience speed drops greater than 16 km/h, disengage until
you can get back to cruising speed.
• Use speed control in flat terrain and with light loads to maximize fuel efficiency.
AutoStick®
• When using the AutoStick® shift control, select the highest gear that allows for adequate performance
and avoids frequent downshifts. For example, choose
“4” if the desired speed can be maintained. Choose
“3” or “2” if needed to maintain the desired speed.
• To prevent excess heat generation, avoid continuous driving at high RPM. Reduce vehicle speed as neces-
sary to avoid extended driving at high RPM. Return
to a higher gear or vehicle speed when grade and
road conditions allow.
268
KNOWING YOUR
VEHICLE
SAFETY
STARTING AND
DRIVING
WARNING LIGHTSAND
MESSAGES
INAN
EMERGENC
Y
SERVICING AND CARE
TECHNICAL
SPECIFICATIONS
CONTENTS
Page 275 of 412
Cooling System
To reduce potential for engine and transmission over-
heating, take the following actions:
City Driving
When stopped for short periods, shift the transmission
into NEUTRAL and increase engine idle speed.
Highway Driving
Reduce speed.
Air Conditioning
Turn off temporarily.
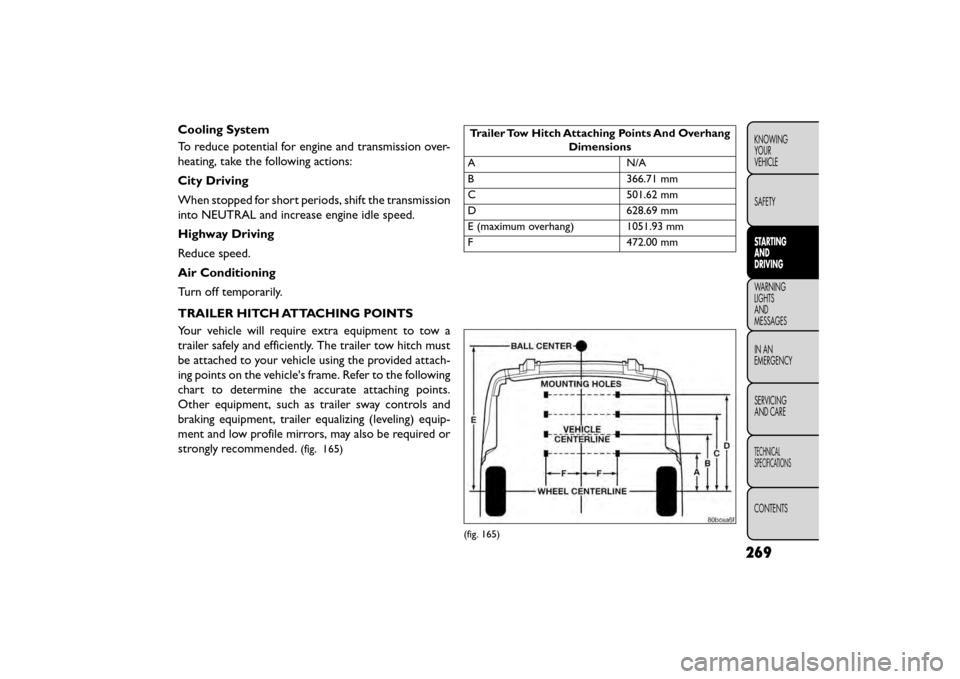
TRAILER HITCH ATTACHING POINTS
Your vehicle will require extra equipment to tow a
trailer safely and efficiently. The trailer tow hitch must
be attached to your vehicle using the provided attach-
ing points on the vehicle's frame. Refer to the following
chart to determine the accurate attaching points.
Other equipment, such as trailer sway controls and
braking equipment, trailer equalizing (leveling) equip-
ment and low profile mirrors, may also be required or
strongly recommended.
(fig. 165)
Trailer Tow Hitch Attaching Points And OverhangDimensions
A N/A
B 366.71 mm
C 501.62 mm
D 628.69 mm
E (maximum overhang) 1051.93 mm
F 472.00 mm
(fig. 165)
269
KNOWING
YOUR
VEHICLE
SAFETY
STARTING
AND
DRIVING
WARNING
LIGHTS
AND
MESSAGES
IN AN
EMERGENC
Y
SERVICING
AND CARE
TECHNICAL
SPECIFICATIONS
CONTENTS
Page 279 of 412
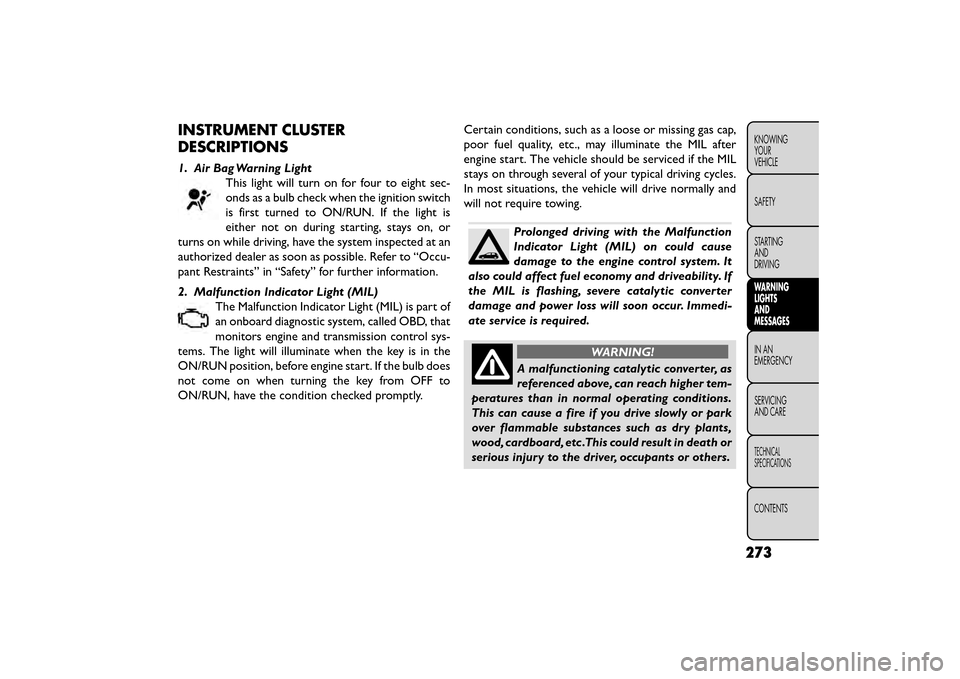
INSTRUMENT CLUSTER
DESCRIPTIONS
1. Air Bag Warning LightThis light will turn on for four to eight sec-
onds as a bulb check when the ignition switch
is first turned to ON/RUN. If the light is
either not on during starting, stays on, or
turns on while driving, have the system inspected at an
authorized dealer as soon as possible. Refer to “Occu-
pant Restraints” in “Safety” for further information.
2. Malfunction Indicator Light (MIL) The Malfunction Indicator Light (MIL) is part of
an onboard diagnostic system, called OBD, that
monitors engine and transmission control sys-
tems. The light will illuminate when the key is in the
ON/RUN position, before engine start. If the bulb does
not come on when turning the key from OFF to
ON/RUN, have the condition checked promptly. Certain conditions, such as a loose or missing gas cap,
poor fuel quality, etc., may illuminate the MIL after
engine start. The vehicle should be serviced if the MIL
stays on through several of your typical driving cycles.
In most situations, the vehicle will drive normally and
will not require towing.
Prolonged driving with the Malfunction
Indicator Light (MIL) on could cause
damage to the engine control system. It
also could affect fuel economy and driveability. If
the MIL is flashing, severe catalytic converter
damage and power loss will soon occur. Immedi-
ate service is required.
WARNING!
A malfunctioning catalytic converter, as
referen c
ed above, can reach higher tem-
peratures than in normal operating conditions.
This can cause a fire if you drive slowly or park
over flammable substances such as dry plants,
wood, cardboard, etc .This could result in death or
serious injury to the driver, occupants or others.
273
KNOWING
YOUR
VEHICLE
SAFETY
STARTING
AND
DRIVING
WARNING
LIGHTS
AND
MESSAGES
IN AN
EMERGENC
Y
SERVICING
AND
CARE
TECHNICAL
SPECIFICATIONS
CONTENTS
Page 280 of 412
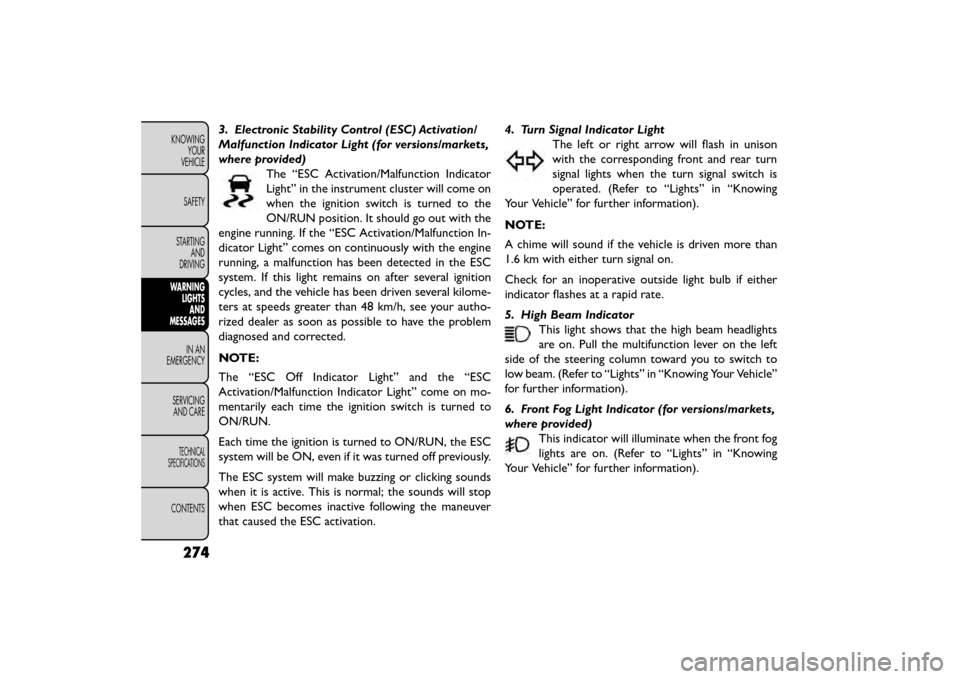
3. Electronic Stability Control (ESC) Activation/
Malfunction Indicator Light (for versions/markets,
where provided)The “ESC Activation/Malfunction Indicator
Light” in the instrument cluster will come on
when the ignition switch is turned to the
ON/RUN position. It should go out with the
engine running. If the “ESC Activation/Malfunction In-
dicator Light” comes on continuously with the engine
running, a malfunction has been detected in the ESC
system. If this light remains on after several ignition
cycles, and the vehicle has been driven several kilome-
ters at speeds greater than 48 km/h, see your autho-
rized dealer as soon as possible to have the problem
diagnosed and corrected.
NOTE:
The “ESC Off Indicator Light” and the “ESC
Activation/Malfunction Indicator Light” come on mo-
mentarily each time the ignition switch is turned to
ON/RUN.
Each time the ignition is turned to ON/RUN, the ESC
system will be ON, even if it was turned off previously.
The ESC system will make buzzing or clicking sounds
when it is active. This is normal; the sounds will stop
when ESC becomes inactive following the maneuver
that caused the ESC activation. 4. Turn Signal Indicator Light
The left or right arrow will flash in unison
with the corresponding front and rear turn
signal lights when the turn signal switch is
operated. (Refer to “Lights” in “Knowing
Your Vehicle” for further information).
NOTE:
A chime will sound if the vehicle is driven more than
1.6 km with either turn signal on.
Check for an inoperative outside light bulb if either
indicator flashes at a rapid rate.
5. High Beam Indicator This light shows that the high beam headlights
are on. Pull the multifunction lever on the left
side of the steering column toward you to switch to
low beam. (Refer to “Lights” in “Knowing Your Vehicle”
for further information).
6. Front Fog Light Indicator (for versions/markets,
where provided) This indicator will illuminate when the front fog
lights are on. (Refer to “Lights” in “Knowing
Your Vehicle” for further information).
274
KNOWING YOUR
VEHICLE
SAFETY
STARTING AND
DRIVING
WARNING LIGHTSAND
MESSAGES
INAN
EMERGENC
Y
SERVICING AND
CARE
TECHNICAL
SPECIFICATIONS
CONTENTS