check engine light FIAT FREEMONT 2016 1.G User Guide
[x] Cancel search | Manufacturer: FIAT, Model Year: 2016, Model line: FREEMONT, Model: FIAT FREEMONT 2016 1.GPages: 412, PDF Size: 3.36 MB
Page 256 of 412
WARNING!
• Never use the PARK position as a sub-
s t
itute for the parking brake. Always ap-
ply the parking brake fully when parked to guard
against vehicle movement and possible injury or
damage.
• Your vehicle could move and injure you and
others if it is not completely in PARK. Check by
trying to move the shift lever out of PARK with
the brake pedal released. Make sure the trans-
mission is in PARK before leaving the vehicle.
• It is dangerous to shift out of PARK or NEU-
TRAL if the engine speed is higher than idle
speed. If your foot is not firmly pressing the brake
pedal, the vehicle could accelerate quickly for-
ward or in reverse. You could lose control of the
vehicle and hit someone or something. Only shift
into gear when the engine is idling normally and
your foot is firmly pressing the brake pedal.
(Continued)
WARNING! (Continued)
• Unintended movement of a vehicle could injure
those in or near the vehicle. As with all vehicles,
you should never exit a vehicle while the engine is
running. Before exiting a vehicle, always apply
the parking brake, shift the transmission into
PARK, turn the engine OFF, and remove the Key
Fob.When the ignition is in the OFF position, the
transmission is locked in the PARK, securing the
vehicle against unwanted movement .
• When leaving the vehicle, always make sure the
ignition is in the OFF position, remove the key fob
from the vehicle, and lock the vehicle.
• Never leave children alone in a vehicle, or with
access to an unlocked vehicle. Allowing children
to be in a vehicle unattended is dangerous for a
number of reasons. A child or others could be
seriously or fatally injured. Children should be
warned not to touch the parking brake, brake
pedal or the shift lever.
• Do not leave the Key Fob in or near the vehicle
(or in a location accessible to children), and do
not leave the ignition in the ACC or ON/RUN
position. A child could operate power windows,
other controls, or move the vehicle.
250
KNOWING YOUR
VEHICLE
SAFETY
STARTING AND
DRIVING
WARNING LIGHTSAND
MESSAGES
INAN
EMERGENC
Y
SERVICING AND CARE
TECHNICAL
SPECIFICATIONS
CONTENTS
Page 263 of 412
DRIVING THROUGH WATER
Driving through water more than a few centimeters
deep will require extra caution to ensure safety and
prevent damage to your vehicle.
FLOWING/RISING WATER
WARNING!
Do not drive on, or cross, a road or a
path w
here water is flowing and/or rising
(as in storm run-off ). Flowing water can wear
away the road or path's surface and cause your
vehicle to sink into deeper water. Furthermore,
flowing and/or rising water can carry your vehicle
away swiftly. Failure to follow this warning may
result in injuries that are serious or fatal to you,
your passengers, and others around you.
Shallow Standing Water
Although your vehicle is capable of driving through
shallow standing water, consider the following Caution
and Warning before doing so.
• Always check the depth of the standing
water before driving through it . Never
drive through standing water that is
deeper than the bottom of the tire rims mounted
on the vehicle.
• Determine the condition of the road or the path
that is under water and if there are any obstacles
in the way before driving through the standing
water.
• Do not exceed 8 km/h when driving through
standing water.This will minimize wave effects.
• Driving through standing water may cause
damage to your vehicle’s drivetrain components.
Always inspect your vehicle’s fluids (i.e., engine
oil, transmission, axle, etc .) for signs of contami-
nation (i.e., fluid that is milky or foamy in appear-
ance) after driving through standing water. Do not
continue to operate the vehicle if any fluid ap-
pears contaminated, as this may result in further
damage. Such damage is not covered by the New
Vehicle Limited Warranty.
• Getting water inside your vehicle’s engine can
cause it to lock up and stall out , and cause serious
internal damage to the engine. Such damage is
not covered by the New Vehicle Limited Warranty.
257
KNOWING
YOUR
VEHICLE
SAFETY
STARTING
AND
DRIVING
WARNING
LIGHTS
AND
MESSAGES
IN AN
EMERGENC
Y
SERVICING
AND CARE
TECHNICAL
SPECIFICATIONS
CONTENTS
Page 274 of 412
TOWING TIPS
Before setting out on a trip, practice turning, stopping,
and backing up the trailer in an area located away from
heavy traffic.
Manual Transmission (for versions/markets,
where provided)
If using a manual transmission vehicle for trailer towing,
all starts must be in FIRST gear to avoid clutch slippage.
Automatic Transmission (for versions/
markets,where provided)
The DRIVE range can be selected when towing. How-
ever, if frequent shifting occurs while in DRIVE, use the
AutoStick® shift control to manually select a lower
gear.
NOTE:Using a lower gear while operating the vehicle
under heavy loading conditions will improve perfor-
mance and extend transmission life by reducing exces-
sive shifting and heat build up. This action will also
provide better engine braking.
If you REGULARLY tow a trailer for more than 45
minutes of continuous operation, then change the
transmission fluid and filter as specified for “police,
taxi, fleet, or frequent trailer towing.” Refer to the
“Maintenance Schedule” for the proper maintenance
intervals. NOTE:
Check the transmission fluid level (four-speed
transmission only) before towing. The six-speed trans-
mission does not require a fluid level check before
towing. If, however, you notice fluid leakage or trans-
mission malfunction, see your authorized dealer imme-
diately for assistance.
Electronic Speed Control
• Do not use in hilly terrain or with heavy loads.
• When using the speed control, if you experience speed drops greater than 16 km/h, disengage until
you can get back to cruising speed.
• Use speed control in flat terrain and with light loads to maximize fuel efficiency.
AutoStick®
• When using the AutoStick® shift control, select the highest gear that allows for adequate performance
and avoids frequent downshifts. For example, choose
“4” if the desired speed can be maintained. Choose
“3” or “2” if needed to maintain the desired speed.
• To prevent excess heat generation, avoid continuous driving at high RPM. Reduce vehicle speed as neces-
sary to avoid extended driving at high RPM. Return
to a higher gear or vehicle speed when grade and
road conditions allow.
268
KNOWING YOUR
VEHICLE
SAFETY
STARTING AND
DRIVING
WARNING LIGHTSAND
MESSAGES
INAN
EMERGENC
Y
SERVICING AND CARE
TECHNICAL
SPECIFICATIONS
CONTENTS
Page 279 of 412
INSTRUMENT CLUSTER
DESCRIPTIONS
1. Air Bag Warning LightThis light will turn on for four to eight sec-
onds as a bulb check when the ignition switch
is first turned to ON/RUN. If the light is
either not on during starting, stays on, or
turns on while driving, have the system inspected at an
authorized dealer as soon as possible. Refer to “Occu-
pant Restraints” in “Safety” for further information.
2. Malfunction Indicator Light (MIL) The Malfunction Indicator Light (MIL) is part of
an onboard diagnostic system, called OBD, that
monitors engine and transmission control sys-
tems. The light will illuminate when the key is in the
ON/RUN position, before engine start. If the bulb does
not come on when turning the key from OFF to
ON/RUN, have the condition checked promptly. Certain conditions, such as a loose or missing gas cap,
poor fuel quality, etc., may illuminate the MIL after
engine start. The vehicle should be serviced if the MIL
stays on through several of your typical driving cycles.
In most situations, the vehicle will drive normally and
will not require towing.
Prolonged driving with the Malfunction
Indicator Light (MIL) on could cause
damage to the engine control system. It
also could affect fuel economy and driveability. If
the MIL is flashing, severe catalytic converter
damage and power loss will soon occur. Immedi-
ate service is required.
WARNING!
A malfunctioning catalytic converter, as
referen c
ed above, can reach higher tem-
peratures than in normal operating conditions.
This can cause a fire if you drive slowly or park
over flammable substances such as dry plants,
wood, cardboard, etc .This could result in death or
serious injury to the driver, occupants or others.
273
KNOWING
YOUR
VEHICLE
SAFETY
STARTING
AND
DRIVING
WARNING
LIGHTS
AND
MESSAGES
IN AN
EMERGENC
Y
SERVICING
AND
CARE
TECHNICAL
SPECIFICATIONS
CONTENTS
Page 280 of 412
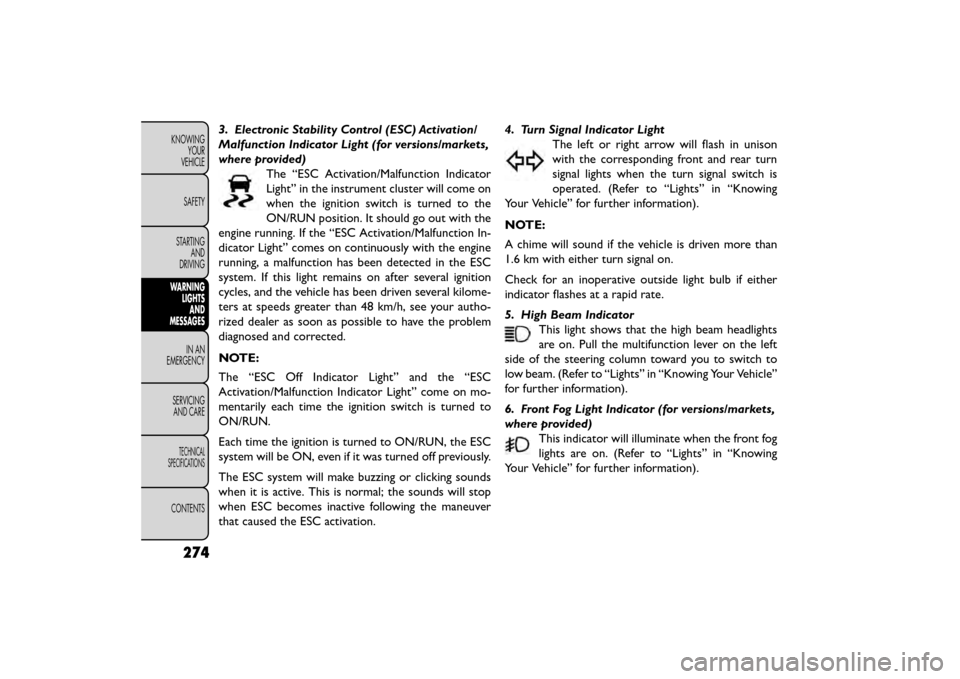
3. Electronic Stability Control (ESC) Activation/
Malfunction Indicator Light (for versions/markets,
where provided)The “ESC Activation/Malfunction Indicator
Light” in the instrument cluster will come on
when the ignition switch is turned to the
ON/RUN position. It should go out with the
engine running. If the “ESC Activation/Malfunction In-
dicator Light” comes on continuously with the engine
running, a malfunction has been detected in the ESC
system. If this light remains on after several ignition
cycles, and the vehicle has been driven several kilome-
ters at speeds greater than 48 km/h, see your autho-
rized dealer as soon as possible to have the problem
diagnosed and corrected.
NOTE:
The “ESC Off Indicator Light” and the “ESC
Activation/Malfunction Indicator Light” come on mo-
mentarily each time the ignition switch is turned to
ON/RUN.
Each time the ignition is turned to ON/RUN, the ESC
system will be ON, even if it was turned off previously.
The ESC system will make buzzing or clicking sounds
when it is active. This is normal; the sounds will stop
when ESC becomes inactive following the maneuver
that caused the ESC activation. 4. Turn Signal Indicator Light
The left or right arrow will flash in unison
with the corresponding front and rear turn
signal lights when the turn signal switch is
operated. (Refer to “Lights” in “Knowing
Your Vehicle” for further information).
NOTE:
A chime will sound if the vehicle is driven more than
1.6 km with either turn signal on.
Check for an inoperative outside light bulb if either
indicator flashes at a rapid rate.
5. High Beam Indicator This light shows that the high beam headlights
are on. Pull the multifunction lever on the left
side of the steering column toward you to switch to
low beam. (Refer to “Lights” in “Knowing Your Vehicle”
for further information).
6. Front Fog Light Indicator (for versions/markets,
where provided) This indicator will illuminate when the front fog
lights are on. (Refer to “Lights” in “Knowing
Your Vehicle” for further information).
274
KNOWING YOUR
VEHICLE
SAFETY
STARTING AND
DRIVING
WARNING LIGHTSAND
MESSAGES
INAN
EMERGENC
Y
SERVICING AND
CARE
TECHNICAL
SPECIFICATIONS
CONTENTS
Page 289 of 412
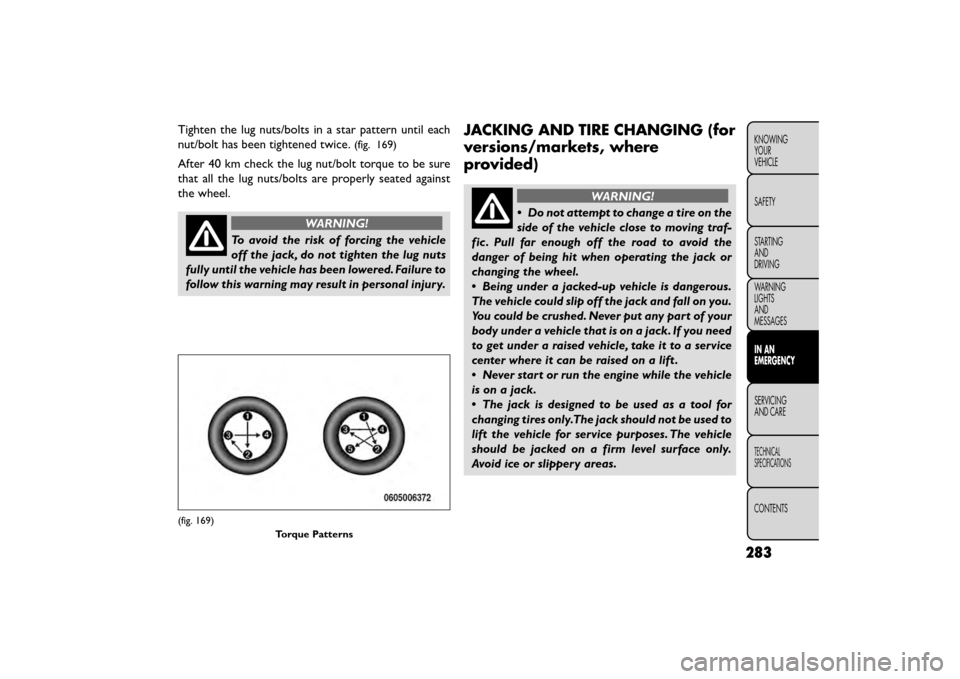
Tighten the lug nuts/bolts in a star pattern until each
nut/bolt has been tightened twice.
(fig. 169)
After 40 km check the lug nut/bolt torque to be sure
that all the lug nuts/bolts are properly seated against
the wheel.
WARNING!
To avoid the risk of forcing the vehicle
off t
he jack, do not tighten the lug nuts
fully until the vehicle has been lowered. Failure to
follow this warning may result in personal injury.
JACKING AND TIRE CHANGING (for
versions/markets, where
provided)
WARNING!
• Do not attempt to change a tire on the
si de
of the vehicle close to moving traf-
fic . Pull far enough off the road to avoid the
danger of being hit when operating the jack or
changing the wheel.
• Being under a jacked-up vehicle is dangerous.
The vehicle could slip off the jack and fall on you.
You could be crushed. Never put any part of your
body under a vehicle that is on a jack. If you need
to get under a raised vehicle, take it to a service
center where it can be raised on a lift .
• Never start or run the engine while the vehicle
is on a jack.
• The jack is designed to be used as a tool for
changing tires only.The jack should not be used to
lift the vehicle for service purposes. The vehicle
should be jacked on a firm level surface only.
Avoid ice or slippery areas.
(fig. 169)
Torque Patterns
283
KNOWING
YOUR
VEHICLE
SAFETY
STARTING
AND
DRIVING
WARNING
LIGHTS
AND
MESSAGES
IN AN
EMERGENCY
SERVICING
AND
CARE
TECHNICAL
SPECIFICATIONS
CONTENTS
Page 303 of 412
NOTE:Do not remove foreign objects (e.g., screws or
nails) from the tire.
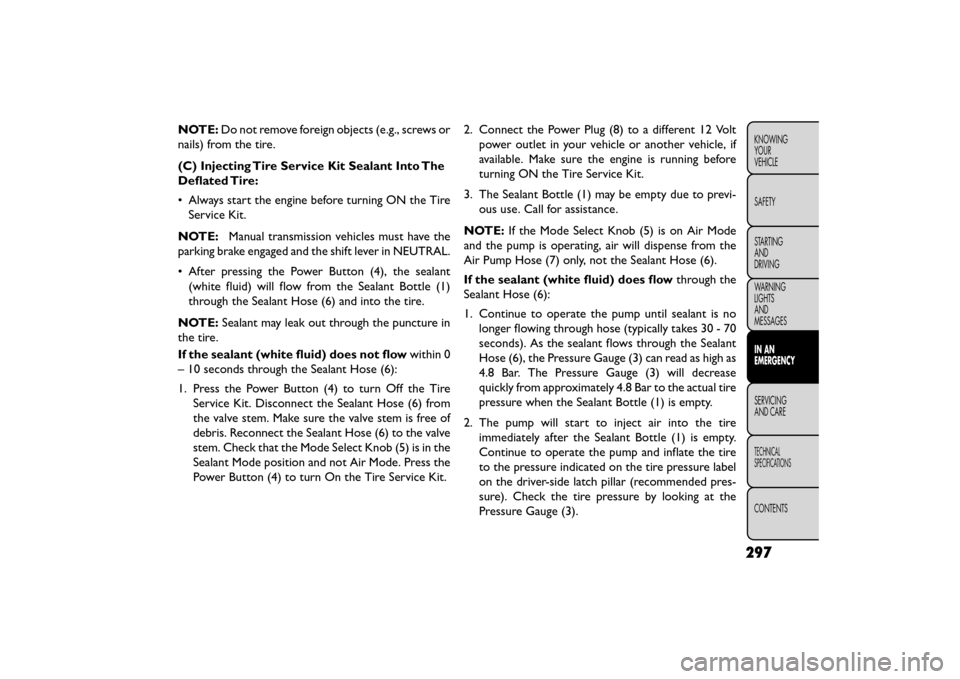
(C) Injecting Tire Service Kit Sealant Into The
Deflated Tire:
• Always start the engine before turning ON the Tire Service Kit.
NOTE: Manual transmission vehicles must have the
parking brake engaged and the shift lever in NEUTRAL.
• After pressing the Power Button (4), the sealant (white fluid) will flow from the Sealant Bottle (1)
through the Sealant Hose (6) and into the tire.
NOTE: Sealant may leak out through the puncture in
the tire.
If the sealant (white fluid) does not flow within 0
– 10 seconds through the Sealant Hose (6):
1. Press the Power Button (4) to turn Off the Tire Service Kit. Disconnect the Sealant Hose (6) from
the valve stem. Make sure the valve stem is free of
debris. Reconnect the Sealant Hose (6) to the valve
stem. Check that the Mode Select Knob (5) is in the
Sealant Mode position and not Air Mode. Press the
Power Button (4) to turn On the Tire Service Kit. 2. Connect the Power Plug (8) to a different 12 Volt
power outlet in your vehicle or another vehicle, if
available. Make sure the engine is running before
turning ON the Tire Service Kit.
3. The Sealant Bottle (1) may be empty due to previ- ous use. Call for assistance.
NOTE: If the Mode Select Knob (5) is on Air Mode
and the pump is operating, air will dispense from the
Air Pump Hose (7) only, not the Sealant Hose (6).
If the sealant (white fluid) does flow through the
Sealant Hose (6):
1. Continue to operate the pump until sealant is no longer flowing through hose (typically takes 30 - 70
seconds). As the sealant flows through the Sealant
Hose (6), the Pressure Gauge (3) can read as high as
4.8 Bar. The Pressure Gauge (3) will decrease
quickly from approximately 4.8 Bar to the actual tire
pressure when the Sealant Bottle (1) is empty.
2. The pump will start to inject air into the tire immediately after the Sealant Bottle (1) is empty.
Continue to operate the pump and inflate the tire
to the pressure indicated on the tire pressure label
on the driver-side latch pillar (recommended pres-
sure). Check the tire pressure by looking at the
Pressure Gauge (3).
297
KNOWING
YOUR
VEHICLE
SAFETY
STARTING
AND
DRIVING
WARNING
LIGHTS
AND
MESSAGES
IN AN
EMERGENCY
SER VICING
AND
CARE
TECHNICAL
SPECIFICATIONS
CONTENTS
Page 328 of 412
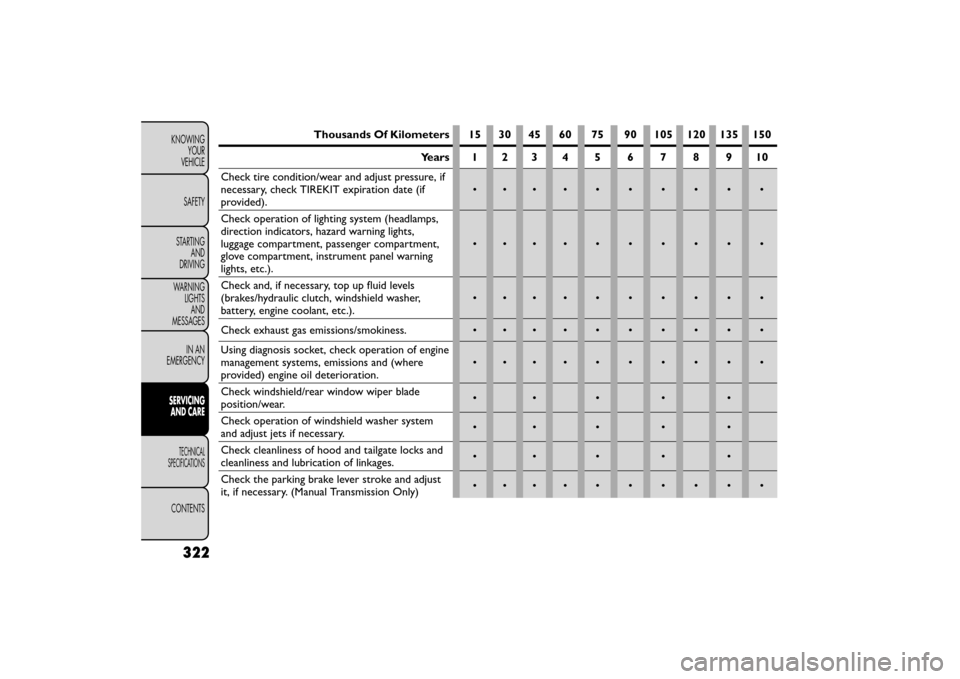
Thousands Of Kilometers 15 30 45 60 75 90 105 120 135 150Years 1 2 3 4 5678910
Check tire condition/wear and adjust pressure, if
necessary, check TIREKIT expiration date (if
provided). ••••••••••
Check operation of lighting system (headlamps,
direction indicators, hazard warning lights,
luggage compartment, passenger compartment,
glove compartment, instrument panel warning
lights, etc.). ••••••••••
Check and, if necessary, top up fluid levels
(brakes/hydraulic clutch, windshield washer,
battery, engine coolant, etc.). ••••••••••
Check exhaust gas emissions/smokiness. • • • • ••••••
Using diagnosis socket, check operation of engine
management systems, emissions and (where
provided) engine oil deterioration. ••••••••••
Check windshield/rear window wiper blade
position/wear. •••••
Check operation of windshield washer system
and adjust jets if necessary. •••••
Check cleanliness of hood and tailgate locks and
cleanliness and lubrication of linkages. •••••
Check the parking brake lever stroke and adjust
it, if necessary. (Manual Transmission Only) ••••••••••
322
KNOWING
YOUR
VEHICLE
SAFETY
STARTING AND
DRIVING
WARNING LIGHTSAND
MESSAGES
IN AN
EMERGENCY
SERVICINGAND C ARE
TECHNICAL
SPECIFICATIONS
CONTENTS
Page 329 of 412
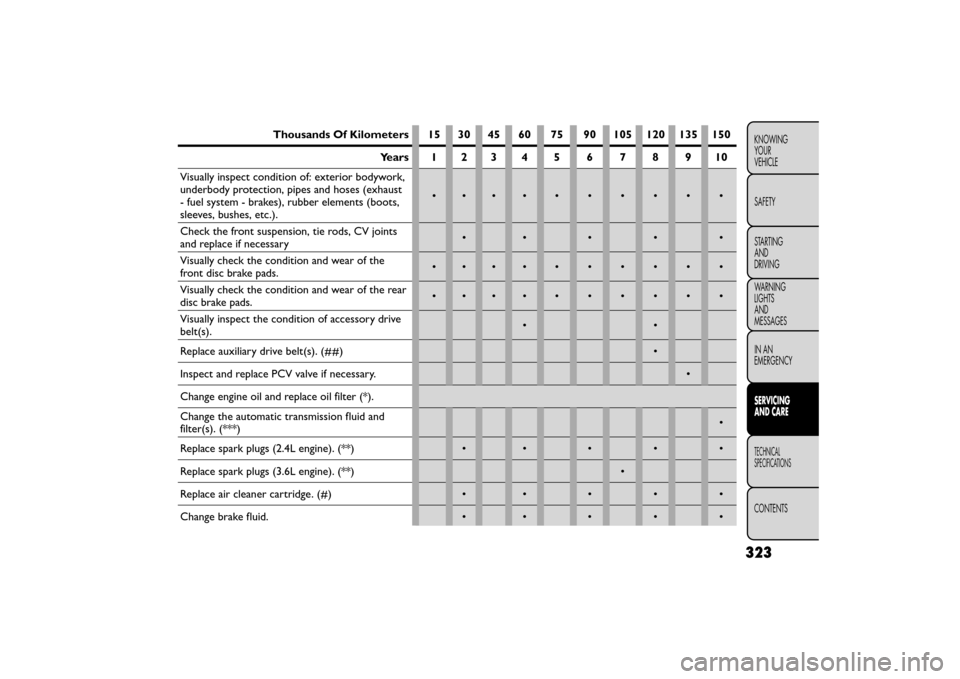
Thousands Of Kilometers 15 30 45 60 75 90 105 120 135 150Years 1 2 3 4 5678910
Visually inspect condition of: exterior bodywork,
underbody protection, pipes and hoses (exhaust
- fuel system - brakes), rubber elements (boots,
sleeves, bushes, etc.). ••••••••••
Check the front suspension, tie rods, CV joints
and replace if necessary •••••
Visually check the condition and wear of the
front disc brake pads. ••••••••••
Visually check the condition and wear of the rear
disc brake pads. ••••••••••
Visually inspect the condition of accessory drive
belt(s). ••
Replace auxiliary drive belt(s). (##) •
Inspect and replace PCV valve if necessary. •
Change engine oil and replace oil filter (*).
Change the automatic transmission fluid and
filter(s). (***) •
Replace spark plugs (2.4L engine). (**) • • • • •
Replace spark plugs (3.6L engine). (**) •
Replace air cleaner cartridge. (#) • • • • •
Change brake fluid. • • • • •
323
KNOWING
YOUR
VEHICLE
SAFETY
STARTING
AND
DRIVING
WARNING
LIGHTS
AND
MESSAGES
IN AN
EMERGENCY
SERVICING
AND C ARE
TECHNICAL
SPECIFICATIONS
CONTENTS
Page 330 of 412
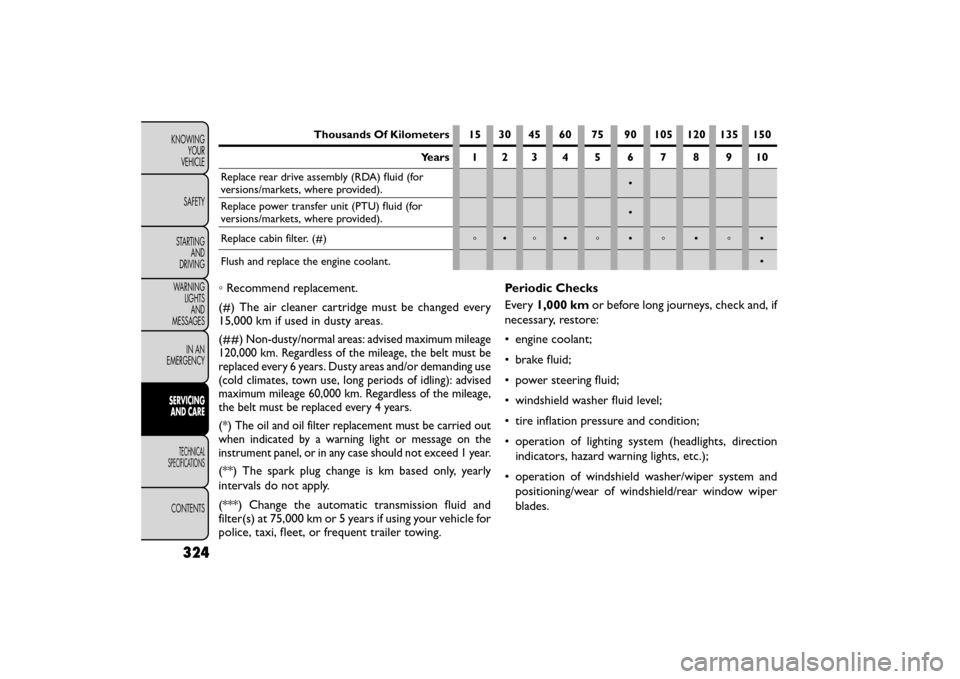
Thousands Of Kilometers 15 30 45 60 75 90 105 120 135 150Years 1 2 3 4 5678910
Replace rear drive assembly (RDA) fluid (for
versions/markets, where provided). •
Replace power transfer unit (PTU) fluid (for
versions/markets, where provided). •
Replace cabin filter. (#) ◦•◦ • ◦ •◦•◦•
Flush and replace the engine coolant. •
◦Recommend replacement.
(#) The air cleaner cartridge must be changed every
15,000 km if used in dusty areas.
(##)
Non-dusty/normal areas: advised maximum mileage
120,000 km. Regardless of the mileage, the belt must be
replaced every 6 years. Dusty areas and/or demanding use
(cold climates, town use, long periods of idling): advised
maximum mileage 60,000 km. Regardless of the mileage,
the belt must be replaced every 4 years.
(*)The oil and oil filter replacement must be carried out
when indicated by a warning light or message on the
instrument panel, or in any case should not exceed 1 year.
(**) The spark plug change is km based only, yearly
intervals do not apply.
(***) Change the automatic transmission fluid and
filter(s) at 75,000 km or 5 years if using your vehicle for
police, taxi, fleet, or frequent trailer towing. Periodic Checks
Every
1,000 km or before long journeys, check and, if
necessary, restore:
• engine coolant;
• brake fluid;
• power steering fluid;
• windshield washer fluid level;
• tire inflation pressure and condition;
• operation of lighting system (headlights, direction indicators, hazard warning lights, etc.);
• operation of windshield washer/wiper system and positioning/wear of windshield/rear window wiper
blades.
324
KNOWING YOUR
VEHICLE
SAFETY
STARTING AND
DRIVING
WARNING LIGHTSAND
MESSAGES
IN AN
EMERGENCY
SERVICINGAND C ARE
TECHNICAL
SPECIFICATIONS
CONTENTS