ECO mode FIAT FULLBACK 2017 Owner handbook (in English)
[x] Cancel search | Manufacturer: FIAT, Model Year: 2017, Model line: FULLBACK, Model: FIAT FULLBACK 2017Pages: 312, PDF Size: 12.31 MB
Page 164 of 312
vehicle speeds. When this happens, a
buzzer sounds to indicate that a
downshift is not going to take place.
NOTE Downward shifts are made
automatically when the vehicle slows
down. When the vehicle stops, 1st gear
is automatically selected.
NOTE When driving away on a slippery
road, push the selector lever forward
into the ŌĆ£+ (SHIFT UP)ŌĆØ position. This
cause the transmission to shift into the
2nd gear which is better for smooth
driving away on a slippery road. Push
the selector lever to the ŌĆ£ŌĆö (SHIFT
DOWN)ŌĆØ side to shift back to the 1st
gear.
NOTE If the A/T fluid temperature is
high, the protection function operates.
In this case, the transmission may
refuse to perform an upshift when the
selector lever or the shift paddles are
operated to the ŌĆ£+ (SHIFT UP)ŌĆØ position
in sports mode, or it may automatically
downshift.
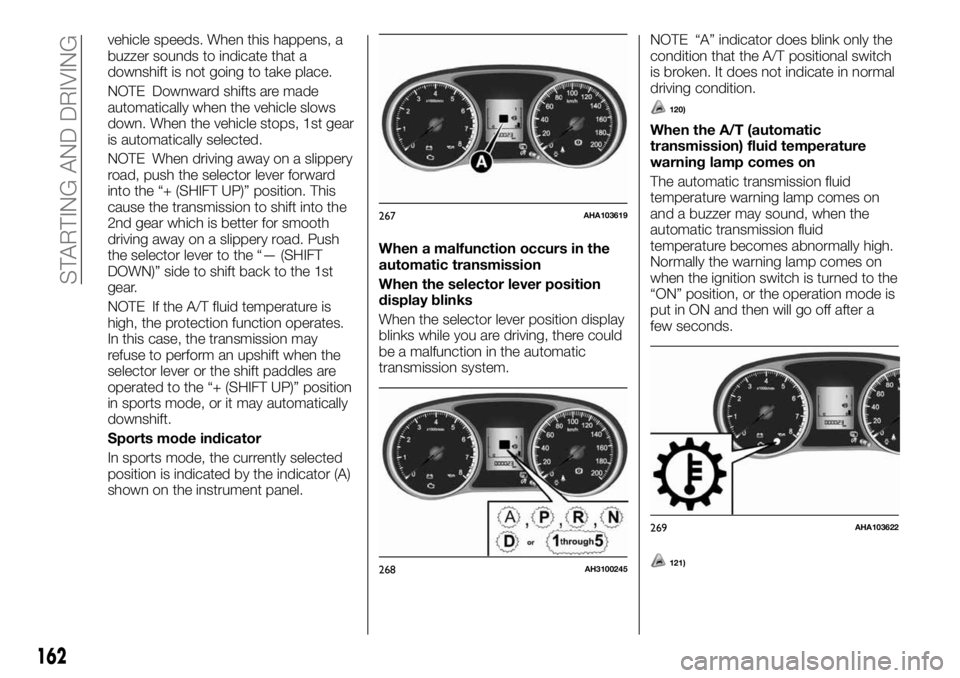
Sports mode indicator
In sports mode, the currently selected
position is indicated by the indicator (A)
shown on the instrument panel.When a malfunction occurs in the
automatic transmission
When the selector lever position
display blinks
When the selector lever position display
blinks while you are driving, there could
be a malfunction in the automatic
transmission system.NOTE ŌĆ£AŌĆØ indicator does blink only the
condition that the A/T positional switch
is broken. It does not indicate in normal
driving condition.
120)
When the A/T (automatic
transmission) fluid temperature
warning lamp comes on
The automatic transmission fluid
temperature warning lamp comes on
and a buzzer may sound, when the
automatic transmission fluid
temperature becomes abnormally high.
Normally the warning lamp comes on
when the ignition switch is turned to the
ŌĆ£ONŌĆØ position, or the operation mode is
put in ON and then will go off after a
few seconds.
121)
267AHA103619
268AH3100245
269AHA103622
162
STARTING AND DRIVING
Page 166 of 312
119)For vehicles equipped with the shift
paddles, do not use the left- and right-hand
shift paddles at the same time. Doing so
could cause a shift of gear ratio that you do
not expect.
120)If the selector lever position display
blinks while you are driving, it is likely that a
safety device is operating because of a
malfunction in the automatic transmission.
Have the vehicle inspected by a Fiat
Dealership as soon as possible.
121)If the lamp comes on, reduce the
engine speed and stop the vehicle in a safe
area. Then set the selector lever to ŌĆ£PŌĆØ
(PARK) position and idle the engine until the
warning lamp goes off. When the warning
lamp goes off, resume normal driving. If the
warning lamp does not go off, we
recommend you to have your vehicle
inspected by a Fiat Dealership.
122)Before selecting a gear with the
engine running and the vehicle stationary,
fully depress the brake pedal to prevent the
vehicle from creeping. The vehicle will begin
to move as soon as the gear is engaged,
especially when the engine speed is high,
at fast idle or with the air conditioner
operating, the brakes should only be
released when you are ready to drive away.
123)Depress the brake pedal with the right
foot at all times. Using the left foot could
cause driver movement delay in case of an
emergency.
124)To prevent sudden acceleration, never
race the engine when shifting from the ŌĆ£PŌĆØ
(PARK) or ŌĆ£NŌĆØ (NEUTRAL) position.
125)Operating the accelerator pedal while
the other foot is resting on the brake pedal
will affect braking efficiency and may cause
premature wear of brake pads.126)Use the selector lever in the correct
shift position in accordance with driving
conditions. Never coast downhill backward
with the selector lever in the {ŌĆ£DŌĆØ (DRIVE) or
sports mode} or coast forward with the
selector lever in the ŌĆ£RŌĆØ (REVERSE)
position. The engine may stop and the
unexpected increase in brake pedal effort
and steering wheel weight could lead to an
accident.
127)Do not race the engine with brake
pedal pressed when the vehicle is
stationary. This can damage the A/T. Also,
when you depress the accelerator pedal
while holding down the brake pedal with
the selector lever in the ŌĆ£PŌĆØ (PARK), ŌĆ£NŌĆØ
(NEUTRAL) or ŌĆ£DŌĆØ (DRIVE) position, the
engine revolutions may not rise as high as
when performing the same operation with
the selector lever in the ŌĆ£NŌĆØ (NEUTRAL)
position.
128)Never hold the vehicle stationary on a
hill using the accelerator pedal (without
using the brake pedal). Always apply the
parking brake and/or service brakes.EASY SELECT 4WD
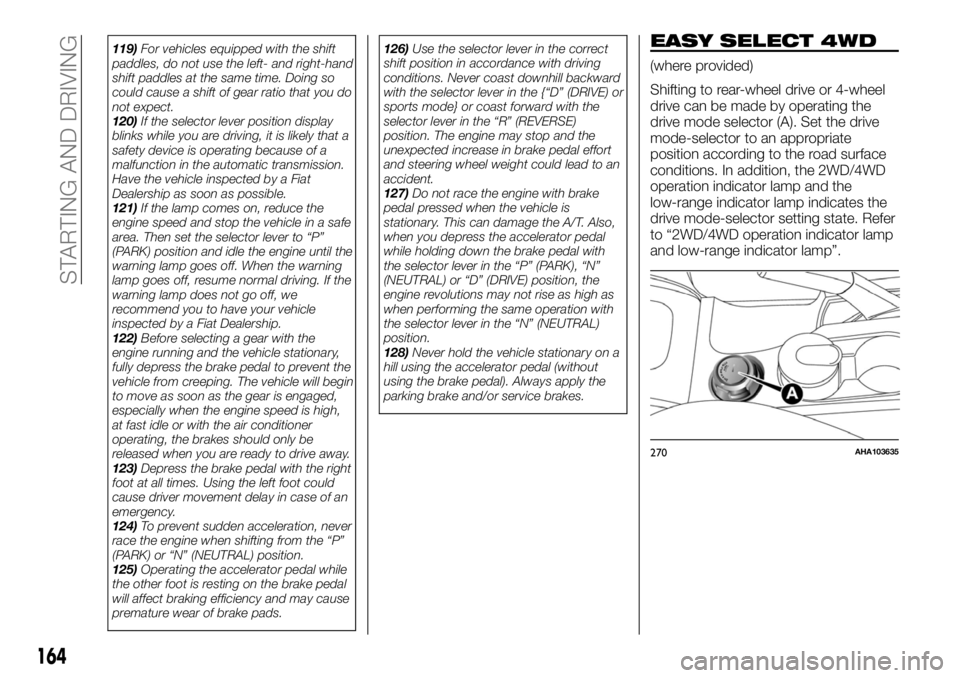
(where provided)
Shifting to rear-wheel drive or 4-wheel
drive can be made by operating the
drive mode selector (A). Set the drive
mode-selector to an appropriate
position according to the road surface
conditions. In addition, the 2WD/4WD
operation indicator lamp and the
low-range indicator lamp indicates the
drive mode-selector setting state. Refer
to ŌĆ£2WD/4WD operation indicator lamp
and low-range indicator lampŌĆØ.
270AHA103635
164
STARTING AND DRIVING
Page 171 of 312
131)Do not operate the drive
mode-selector while the rear wheels of the
vehicle are slipping on snow or ice.
132)If a problem is detected in the transfer
system, a safety device will activate. The
2WD/4WD operation indicator blinks (twice
per second), and transfer shifting will
become impossible. Park your vehicle in a
safe place, turn off the engine for a few
moments. Restart the engine. The lamp
should resume normal operation. If the
lamp continue to blink, have the vehicle
checked by a Fiat Dealership as soon as
possible.SUPER SELECT 4WD
II
(where provided)
Shifting to rear-wheel drive or 4-wheel
drive can be made by operating the
drive mode-selector (A). Set the drive
mode-selector to an appropriate
position according to the road surface
conditions. In addition, the 2WD/4WD
operation indicator lamp and low-range
indicator lamp indicates the drive
mode-selector setting state. Refer to
ŌĆ£2WD/4WD operation indicator lamp
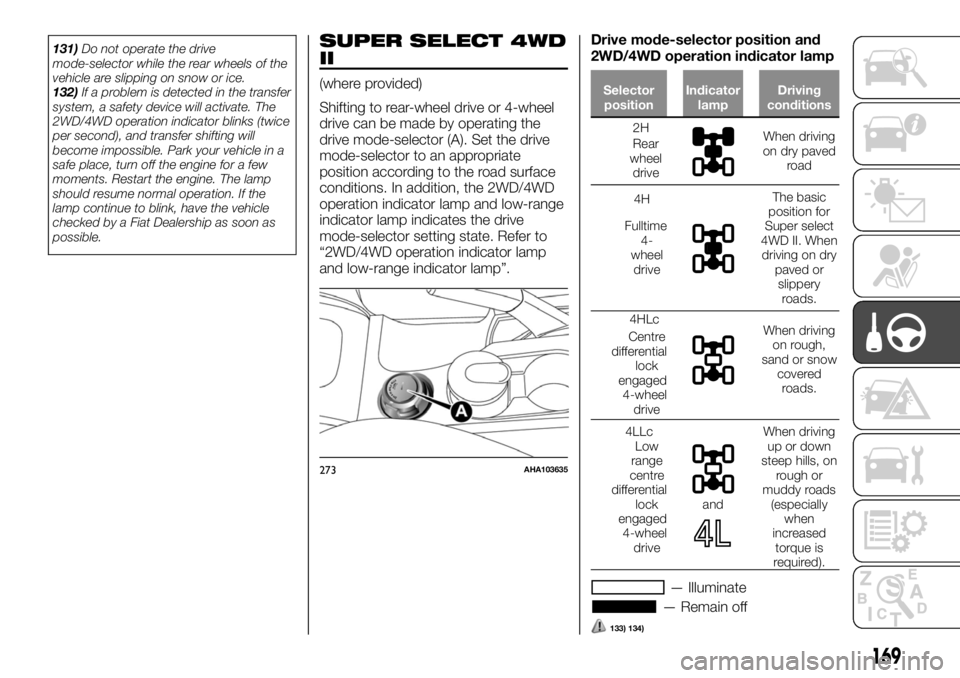
and low-range indicator lampŌĆØ.Drive mode-selector position and
2WD/4WD operation indicator lampSelector
positionIndicator
lampDriving
conditions
2H
Rear
wheel
driveWhen driving
on dry paved
road
4H
Fulltime
4-
wheel
drive
The basic
position for
Super select
4WD II. When
driving on dry
paved or
slippery
roads.
4HLc
Centre
differential
lock
engaged
4-wheel
drive
When driving
on rough,
sand or snow
covered
roads.
4LLc
Low
range
centre
differential
lock
engaged
4-wheel
drive
and
When driving
up or down
steep hills, on
rough or
muddy roads
(especially
when
increased
torque is
required).
ŌĆö Illuminate
ŌĆö Remain off
133) 134)
273AHA103635
169
Page 176 of 312
NOTE If the low range lamp blinks
when you attempt to make a ŌĆ£4HLcŌĆØ
<-> ŌĆ£4LLcŌĆØ selection, a ŌĆ£4HLcŌĆØ <->
ŌĆ£4LLcŌĆØ selection cannot be made. Stop
the vehicle and release the accelerator
pedal. Next, hold down the clutch pedal
(with manual transmission) or place the
selector lever in the ŌĆ£NŌĆØ (NEUTRAL)
position (with automatic transmission)
and make the range selection again.
NOTE The ESC function is suspended
while ŌĆ£4LLcŌĆØ is selected
indicator
lamp is illuminated while these functions
are suspended. It does not indicate a
problem. When ŌĆ£2HŌĆØ or ŌĆ£4HŌĆØ or ŌĆ£4HLcŌĆØ
is selected, this lamp goes out and
function again. Refer to ŌĆ£ESC indicator
lamp, ESC OFF indicator lampŌĆØ.
136)
IMPORTANT
133)The ŌĆ£4LLcŌĆØ range gives maximum
torque for low-speed driving on steep
slopes, as well as sandy, muddy, and other
difficult surfaces. On vehicles with
automatic transmission, do not exceed
speeds of approximately 70 km/h in ŌĆ£4LLcŌĆØ
range.
134)Do not drive your vehicle in the
ŌĆ£4HLcŌĆØ or ŌĆ£4LLcŌĆØ position on dry paved
roads and highways. Doing so may result in
excessive tyre wear, increased fuel
consumption, and possible noise
generation. It may also increase the
differential oil temperature, which may
damage the drive system. Further, the drive
train will be subjected to excessive loading,
resulting in oil leakage, component seizure,
or other serious problems. On dry paved
roads and highways, drive the vehicle in
ŌĆ£2HŌĆØ or ŌĆ£4HŌĆØ only.
135)Do not operate the drive
mode-selector while the rear wheels of the
vehicle are slipping on snow or ice.
136)If a problem is detected in the transfer
system, a safety device will activate. The
front and rear wheel lamps will go out, the
centre differential lock lamp will blink rapidly
(twice per second), and transfer shifting will
become impossible fig. 276. Park your
vehicle in a safe place, turn off the engine
for a few moments. Restart the engine. The
lamp should resume normal operation. If
the lamps continue to blink, have the
vehicle checked by a Fiat Dealership as
soon as possible.
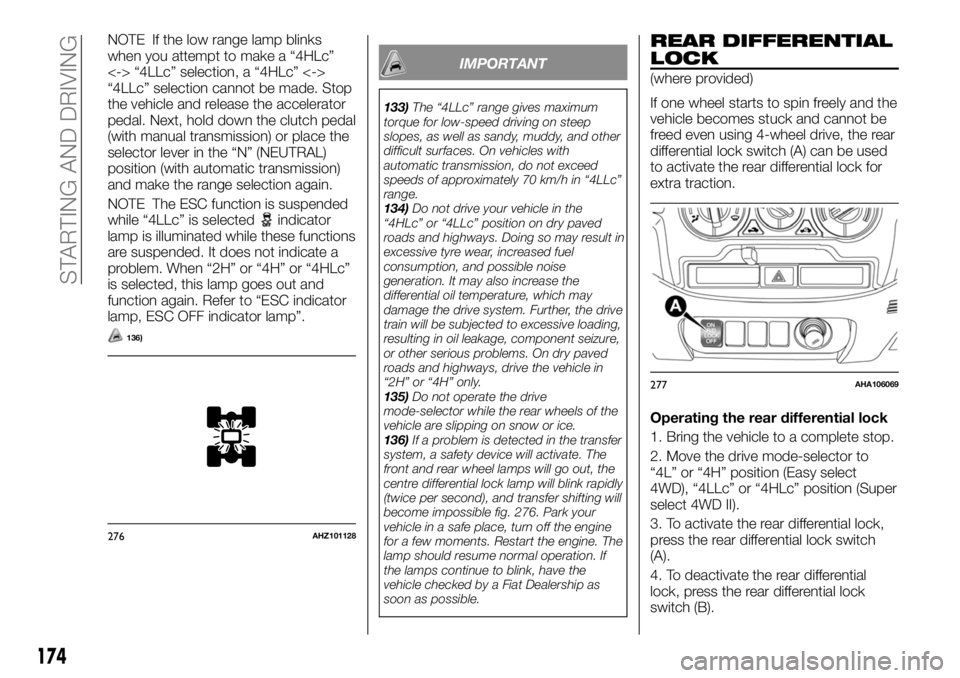
REAR DIFFERENTIAL
LOCK
(where provided)
If one wheel starts to spin freely and the
vehicle becomes stuck and cannot be
freed even using 4-wheel drive, the rear
differential lock switch (A) can be used
to activate the rear differential lock for
extra traction.
Operating the rear differential lock
1. Bring the vehicle to a complete stop.
2. Move the drive mode-selector to
ŌĆ£4LŌĆØ or ŌĆ£4HŌĆØ position (Easy select
4WD), ŌĆ£4LLcŌĆØ or ŌĆ£4HLcŌĆØ position (Super
select 4WD II).
3. To activate the rear differential lock,
press the rear differential lock switch
(A).
4. To deactivate the rear differential
lock, press the rear differential lock
switch (B).
276AHZ101128
277AHA106069
174
STARTING AND DRIVING
Page 177 of 312
137)
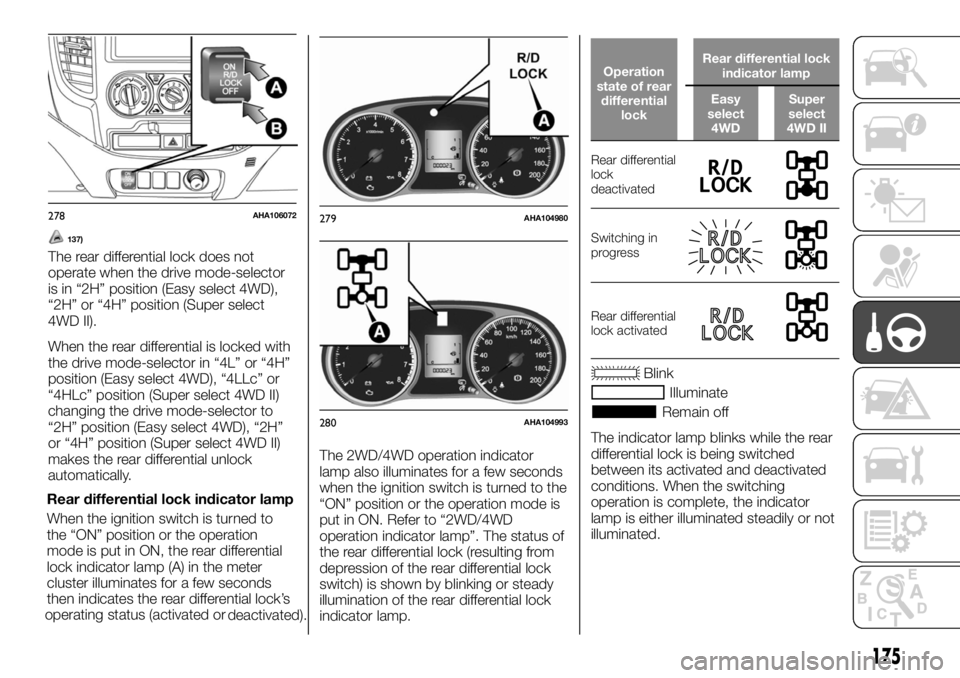
The rear differential lock does not
operate when the drive mode-selector
is in ŌĆ£2HŌĆØ position (Easy select 4WD),
ŌĆ£2HŌĆØ or ŌĆ£4HŌĆØ position (Super select
4WD II).
When the rear differential is locked with
the drive mode-selector in ŌĆ£4LŌĆØ or ŌĆ£4HŌĆØ
position (Easy select 4WD), ŌĆ£4LLcŌĆØ or
ŌĆ£4HLcŌĆØ position (Super select 4WD II)
changing the drive mode-selector to
ŌĆ£2HŌĆØ position (Easy select 4WD), ŌĆ£2HŌĆØ
or ŌĆ£4HŌĆØ position (Super select 4WD II)
makes the rear differential unlock
automatically.
Rear differential lock indicator lamp
When the ignition switch is turned to
the ŌĆ£ONŌĆØ position or the operation
mode is put in ON, the rear differential
lock indicator lamp (A) in the meter
cluster illuminates for a few seconds
then indicates the rear differential lockŌĆÖs
operating status (activated or
deactivated).The 2WD/4WD operation indicator
lamp also illuminates for a few seconds
when the ignition switch is turned to the
ŌĆ£ONŌĆØ position or the operation mode is
put in ON. Refer to ŌĆ£2WD/4WD
operation indicator lampŌĆØ. The status of
the rear differential lock (resulting from
depression of the rear differential lock
switch) is shown by blinking or steady
illumination of the rear differential lock
indicator lamp.
Operation
state of rear
differential
lockRear differential lock
indicator lamp
Easy
select
4WDSuper
select
4WD II
Rear differential
lock
deactivated
Switching in
progress
Rear differential
lock activated
Blink
Illuminate
Remain off
The indicator lamp blinks while the rear
differential lock is being switched
between its activated and deactivated
conditions. When the switching
operation is complete, the indicator
lamp is either illuminated steadily or not
illuminated.
278AHA106072279AHA104980
280AHA104993
175
Page 180 of 312
139)Use the rear differential lock only as an
emergency measure when the vehicle is
stuck and cannot be freed with the drive
mode-selector in ŌĆ£4LŌĆØ or ŌĆ£4HŌĆØ position
(Easy select 4WD) or in ŌĆ£4LLcŌĆØ or ŌĆ£4HLcŌĆØ
position (Super select 4WD II). Deactivate
the rear differential lock immediately after
using it.4 WHEEL DRIVE
OPERATION
By selecting 4-wheel drive, both axles
of the vehicle are rigidly connected with
each other. This improves the traction
characteristics. When turning sharp
corners or moving forward and
backward repeatedly, however, the
drive line is stressed, which is felt as a
braking effect. A 4-wheel drive vehicle
can accelerate more quickly and
smoothly.
However, note that the braking distance
is not shorter than that of a rear-wheel
drive vehicle.
When using 4-wheel drive on rough
roads (snow, mud, sand, etc.), it is
important to operate the vehicle
correctly.
NOTE The driving posture should be
more upright and closer to the wheel
than usual; adjust the seat to a good
position for easy steering and pedal
operation. Be sure to wear the seat
belt.
NOTE After driving on rough roads,
check each part of the vehicle and
wash it thoroughly with water. Refer to
ŌĆ£Vehicle careŌĆØ and ŌĆ£Inspection and
maintenance following rough road
operationŌĆØ.Driving on dry paved road and
highway
Select ŌĆ£2HŌĆØ position (Easy select 4WD),
ŌĆ£2HŌĆØ or ŌĆ£4HŌĆØ position (Super select
4WD II) to drive on the dry paved road.
Especially on dry highway, never select
the ŌĆ£4HŌĆØ or ŌĆ£4LŌĆØ position (Easy select
4WD), ŌĆ£4HLcŌĆØ or ŌĆ£4LLcŌĆØ position (Super
select 4WD II).
140)
Driving on snowy or icy roads
Set the drive mode-selector to ŌĆ£4HŌĆØ
position (Easy select 4WD), ŌĆ£4HŌĆØ or
ŌĆ£4HLcŌĆØ position in accordance with the
road conditions (Super select 4WD II)
and then gradually depress the
accelerator pedal for a smooth start.
Keep the pressure on the accelerator
pedal as constant as possible, and
drive at low speed.
NOTE The use of snow tyres and/or
tyre chains is recommended.
NOTE Maintain a safe distance
between vehicles, avoid sudden
braking, and use engine braking
(downshifting).
141)
Driving on sandy or muddy roads
Set the drive mode-selector to ŌĆ£4HŌĆØ or
ŌĆ£4LŌĆØ position (Easy select 4WD), ŌĆ£4HLcŌĆØ
or ŌĆ£4LLcŌĆØ position (Super select 4WD II)
and then gradually depress the
accelerator pedal for a smooth start.
Keep the pressure on the accelerator
178
STARTING AND DRIVING
Page 181 of 312
pedal as constant as possible, and
drive at low speed.
142) 143)
232)
NOTE Avoid sudden braking,
acceleration, and turning; such
operations could result in the vehicle
becoming stuck.
NOTE If the vehicle becomes stuck in
sandy or muddy roads, it can often be
moved a rocking motion. Move the
selector lever rhythmically between the
ŌĆ£DŌĆØ (DRIVE) and ŌĆ£RŌĆØ (REVERSE)
position (with manual transmission,
between 1st and Reverse), while
applying slight pressure to the
accelerator pedal.
NOTE It is recommended to start the
vehicle with parking brake partially, but
not completely, applied by slightly
pulling the parking brake lever. After the
vehicle has become free, do not forget
to release the parking brake.
NOTE If it is necessary to drive in
extremely muddy conditions, the use of
tyre chains is recommended. Because
the extent of muddy conditions is
difficult to judge and the vehicle could
become bogged down very deeply,
operation should be at a low speed. If
possible, get out of the vehicle and
check the conditions ahead before
proceeding.NOTE Driving over roads in coastal
areas or roads on which anti-skid
preparations have been spread can
cause rust on the vehicle; wash the
vehicle thoroughly as soon as possible
after such use.
Climbing sharp grades
Set the drive mode-selector to ŌĆ£4LŌĆØ
position (Easy select 4WD), ŌĆ£4LLcŌĆØ
position (Super select 4WD II) to
maximize the engine torque.
233) 234)
NOTE Choose as smooth a slope as
possible with few stones or other
obstacles.
NOTE Before attempting to drive up
the slope, walk up it to confirm that the
vehicle can handle the grade.
Descending sharp grades
Set the drive mode-selector to ŌĆ£4LŌĆØ
position (Easy select 4WD), ŌĆ£4LLcŌĆØ
position (Super select 4WD II), use the
engine brake (downshifting) and
descend slowly.
235)
NOTE When descending a sharp
grade, if the brakes are applied
suddenly because of an obstacle
encountered, control of the vehicle
could be lost. Before descending the
slope, walk down it and confirm the
path.NOTE Before descending a grade, it is
necessary to choose the appropriate
gear. Avoid changing gears or
depressing the clutch while descending
the grade.
NOTE Fiat is not responsible to the
operator for any damage or injury
caused or liability incurred by the
improper and negligent operation of a
vehicle. All techniques of vehicle
operation described herein depend on
the skill and experience of the operator
and other participating parties and any
deviation from the recommended
operation instructions above is at their
own risk.
Turning sharp corners
When turning a sharp corner in ŌĆ£4HŌĆØ or
ŌĆ£4LŌĆØ position (Easy select 4WD), ŌĆ£4HLcŌĆØ
or ŌĆ£4LLcŌĆØ position (Super select 4WD II)
at low speed, a slight difference in
steering may be experienced similar to
as if the brakes were applied. This is
called tight corner braking and results
from each of the 4 tyres being at a
different distance from the corner.
Crossing a stream
4-wheel drive vehicles are not
necessarily waterproof. If the electrical
circuits become wet, further operation
of the vehicle will be impossible;
therefore, avoid crossing streams
unless absolutely necessary. If crossing
a stream is unavoidable, use the
following procedure:
Check depths of a stream and
179
Page 182 of 312
geographical features before
attempting to cross a stream and
ford the stream where the water is
as shallow as practicable.Set the
drive mode-selector to ŌĆ£4LŌĆØ
position (Easy select 4WD), ŌĆ£4LLcŌĆØ
position (Super select 4WD II).Drive
slowly at a speed of approximately
5 km/h to avoid splashing too
much water.
144) 145)
Inspection and maintenance
following rough road operation
After operating the vehicle in rough road
conditions, be sure to perform the
following inspection and maintenance
procedures:
Check that the vehicle has not been
damaged by rocks, gravel, etc.
Carefully wash the vehicle with water.
Drive the vehicle slowly while lightly
depressing the brake pedal in order to
dry out the brakes. If the brakes still do
not function properly, contact a Fiat
Dealership as soon as possible to have
the brakes checked.
Remove the insects, dried grass, etc.
clogging the radiator core and the A/T
oil cooler.
After crossing a stream, be sure to have
the following items inspected at a Fiat
Dealership and take the necessary
measures:
Check the brake system and, if
necessary, have it serviced.
Check the engine, transmission,
transfer, and differential oil or grease
level and turbidity. If the oil or grease is
milky, it indicates water contamination.
Replace it with new oil or grease.
Grease the propeller shaft.
Check the inside of the vehicle. If
ingress of water is found, dry the carpet
etc.
Inspect the headlamps. If the
headlamp bulb is flooded with water,
have the headlamp drained off.
IMPORTANT
140)Selecting ŌĆ£4HŌĆØ or ŌĆ£4LŌĆØ position (Easy
select 4WD), ŌĆ£4HLcŌĆØ or ŌĆ£4LLcŌĆØ position
(Super select 4WD II) to drive on dry paved
road will increase the fuel consumption with
possible noise generation and early tyre
wear. It may also increase the differential oil
temperature, resulting in possible damage
to the driving system. Further, the drive
train will be subjected to excessive loading,
possibly leading to oil leakage, component
seizure, or other serious faults.
141)Avoid sudden braking, sudden
acceleration, and sharp turning; such
operations could cause skidding and
spinouts.142)Do not force the vehicle or drive
recklessly on sandy surfaces. In
comparison with normal road surfaces, the
engine and other drive-system components
are put under excessive strain when driving
on such a surface, and this could lead to
accidents.
143)If any of following conditions occur
while the vehicle is being driven,
immediately park your vehicle in a safe
place and follow these procedures: the
needle in the temperature gauge
approaches the overheating zone. Refer to
ŌĆ£Engine overheatingŌĆØ; automatic
transmission fluid temperature warning
lamp comes on. Refer to ŌĆ£When the A/T
(automatic transmission) fluid temperature
warning lamp comes onŌĆØ.
144)Never cross a stream where the water
is deep. Do not change gears while
crossing the stream. Frequent crossing of
streams can adversely affect the life span
of the vehicle; we recommend you to take
the necessary measures to prepare,
inspect, and repair the vehicle.
145)After crossing a stream, apply the
brakes to be sure they are functioning
properly. If the brakes are wet and not
functioning properly, dry them out by
driving slowly while lightly depressing the
brake pedal. Inspect each part of the
vehicle carefully.
180
STARTING AND DRIVING
Page 198 of 312
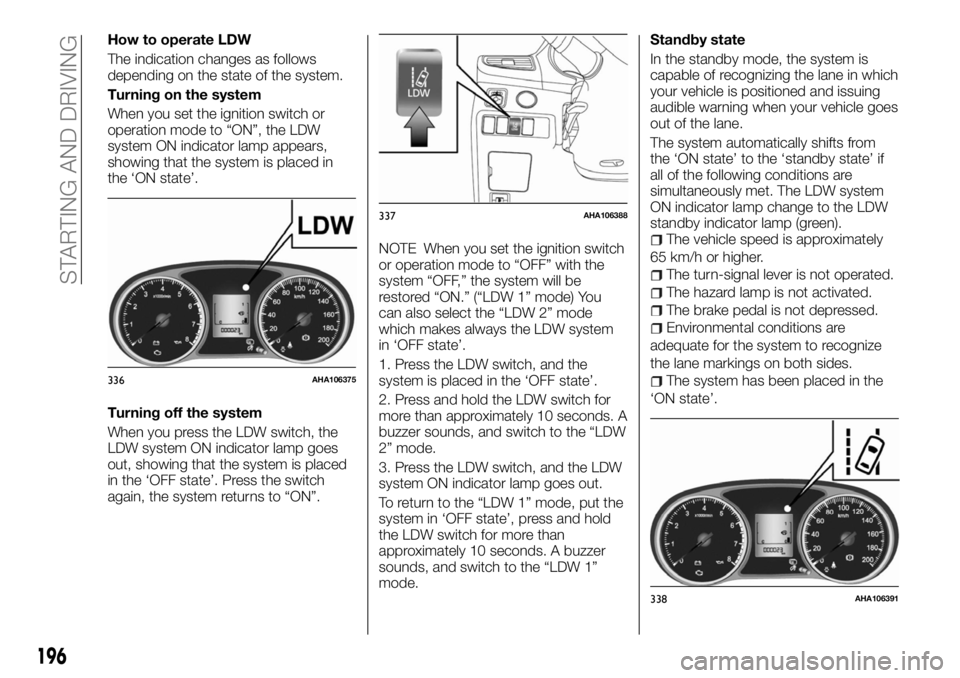
How to operate LDW
The indication changes as follows
depending on the state of the system.
Turning on the system
When you set the ignition switch or
operation mode to ŌĆ£ONŌĆØ, the LDW
system ON indicator lamp appears,
showing that the system is placed in
the ŌĆśON stateŌĆÖ.
Turning off the system
When you press the LDW switch, the
LDW system ON indicator lamp goes
out, showing that the system is placed
in the ŌĆśOFF stateŌĆÖ. Press the switch
again, the system returns to ŌĆ£ONŌĆØ.NOTE When you set the ignition switch
or operation mode to ŌĆ£OFFŌĆØ with the
system ŌĆ£OFF,ŌĆØ the system will be
restored ŌĆ£ON.ŌĆØ (ŌĆ£LDW 1ŌĆØ mode) You
can also select the ŌĆ£LDW 2ŌĆØ mode
which makes always the LDW system
in ŌĆśOFF stateŌĆÖ.
1. Press the LDW switch, and the
system is placed in the ŌĆśOFF stateŌĆÖ.
2. Press and hold the LDW switch for
more than approximately 10 seconds. A
buzzer sounds, and switch to the ŌĆ£LDW
2ŌĆØ mode.
3. Press the LDW switch, and the LDW
system ON indicator lamp goes out.
To return to the ŌĆ£LDW 1ŌĆØ mode, put the
system in ŌĆśOFF stateŌĆÖ, press and hold
the LDW switch for more than
approximately 10 seconds. A buzzer
sounds, and switch to the ŌĆ£LDW 1ŌĆØ
mode.Standby state
In the standby mode, the system is
capable of recognizing the lane in which
your vehicle is positioned and issuing
audible warning when your vehicle goes
out of the lane.
The system automatically shifts from
the ŌĆśON stateŌĆÖ to the ŌĆśstandby stateŌĆÖ if
all of the following conditions are
simultaneously met. The LDW system
ON indicator lamp change to the LDW
standby indicator lamp (green).
The vehicle speed is approximately
65 km/h or higher.
The turn-signal lever is not operated.
The hazard lamp is not activated.
The brake pedal is not depressed.
Environmental conditions are
adequate for the system to recognize
the lane markings on both sides.
The system has been placed in the
ŌĆśON stateŌĆÖ.336AHA106375
337AHA106388
338AHA106391
196
STARTING AND DRIVING
Page 199 of 312
NOTE The system stays in the ŌĆ£ONŌĆØ
state for about 7 seconds after the
hazard lamp has stopped flashing or
the turn-signal lever has returned to the
home position.
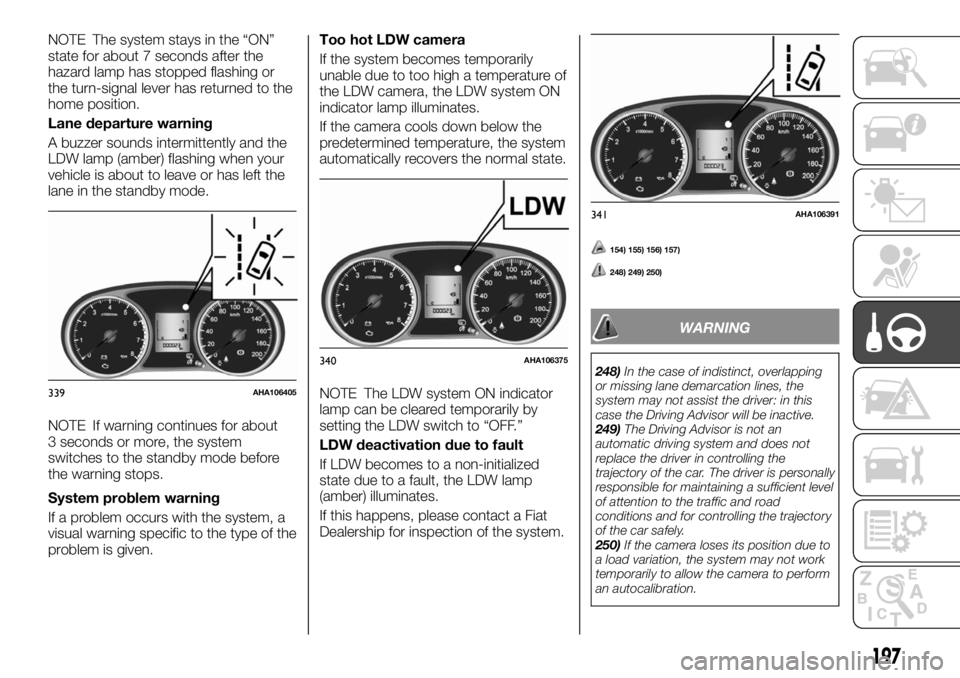
Lane departure warning
A buzzer sounds intermittently and the
LDW lamp (amber) flashing when your
vehicle is about to leave or has left the
lane in the standby mode.
NOTE If warning continues for about
3 seconds or more, the system
switches to the standby mode before
the warning stops.
System problem warning
If a problem occurs with the system, a
visual warning specific to the type of the
problem is given.Too hot LDW camera
If the system becomes temporarily
unable due to too high a temperature of
the LDW camera, the LDW system ON
indicator lamp illuminates.
If the camera cools down below the
predetermined temperature, the system
automatically recovers the normal state.
NOTE The LDW system ON indicator
lamp can be cleared temporarily by
setting the LDW switch to ŌĆ£OFF.ŌĆØ
LDW deactivation due to fault
If LDW becomes to a non-initialized
state due to a fault, the LDW lamp
(amber) illuminates.
If this happens, please contact a Fiat
Dealership for inspection of the system.
154) 155) 156) 157)
248) 249) 250)
WARNING
248)In the case of indistinct, overlapping
or missing lane demarcation lines, the
system may not assist the driver: in this
case the Driving Advisor will be inactive.
249)The Driving Advisor is not an
automatic driving system and does not
replace the driver in controlling the
trajectory of the car. The driver is personally
responsible for maintaining a sufficient level
of attention to the traffic and road
conditions and for controlling the trajectory
of the car safely.
250)If the camera loses its position due to
a load variation, the system may not work
temporarily to allow the camera to perform
an autocalibration.
339AHA106405
340AHA106375
341AHA106391
197