check engine light FIAT FULLBACK 2017 Owner handbook (in English)
[x] Cancel search | Manufacturer: FIAT, Model Year: 2017, Model line: FULLBACK, Model: FIAT FULLBACK 2017Pages: 312, PDF Size: 12.31 MB
Page 4 of 312
READ THIS CAREFULLY
REFUELLING
Only refuel with automotive diesel conforming to the European specification EN590. The use of other products or mixtures may damage the
engine beyond repair and consequently invalidate the warranty, due to the damage caused.
STARTING THE ENGINE
Make sure that the handbrake is engaged; set the gear lever to neutral; fully depress the clutch pedal without pressing the accelerator, then
turn the ignition key to MAR-ON and wait for the warning lightsandto switch off; turn the ignition key to AVV and release it as soon as
the engine has started.
PARKING ON FLAMMABLE MATERIAL
The catalytic converter develops high temperatures during operation. Do not park on grass, dry leaves, pine needles or other flammable
material: fire hazard.
RESPECTING THE ENVIRONMENT
The vehicle is fitted with a system that allows continuous diagnosis of the emission-related components in order to help protect the
environment.
ELECTRICAL ACCESSORIES
If, after buying the vehicle, you decide to add electrical accessories (with the risk of gradually draining the battery), visit a Fiat Dealership. They
can calculate the overall electrical requirement and check that the vehicle's electrical system can support the required load.
SCHEDULED SERVICING
Correct maintenance enables the vehicle to perfectly maintain performance and safety characteristics, its environmental friendliness and low
running costs over time.
Page 11 of 312
GRAPHICAL INDEX
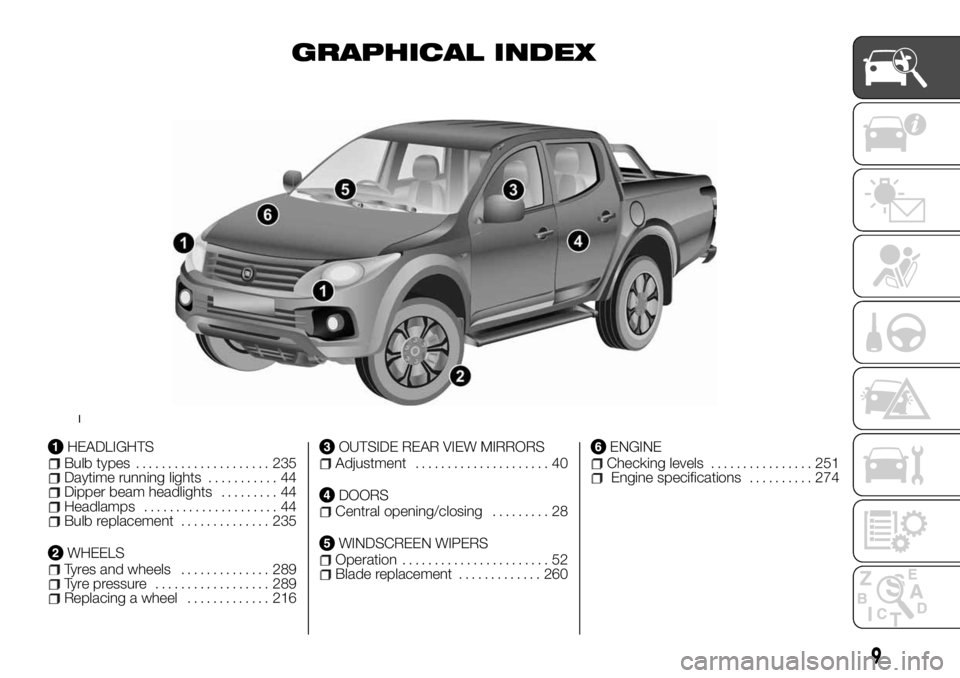
HEADLIGHTSBulb types..................... 235Daytime running lights........... 44Dipper beam headlights......... 44Headlamps..................... 44Bulb replacement.............. 235
WHEELSTyres and wheels.............. 289Tyre pressure.................. 289Replacing a wheel............. 216
OUTSIDE REAR VIEW MIRRORSAdjustment..................... 40
DOORSCentral opening/closing......... 28
WINDSCREEN WIPERSOperation....................... 52Blade replacement............. 260
ENGINEChecking levels................ 251Engine specifications.......... 274
1
9
Page 46 of 312
WARNING
56)As the driver's exterior mirror is curved,
it may slightly alter the perception of
distance of the reflected image. Further, the
reflective surface of the lower part of the
exterior mirrors is parabolic to increase the
field of view. The reflected image size is
thus reduced and gives the impression that
the reflected item is further away than it
actually is.
57)Do not attempt to adjust the rear view
mirrors while driving. This can be
dangerous. Always adjust the mirrors
before driving.
58)Your vehicle is equipped with convex
type mirrors. Remind that objects that you
see in the mirror will look smaller and
farther away compared to a normal flat
mirror. Do not use this mirror to estimate
distance of following vehicles when
changing lanes.
59)Do not drive the vehicle with the mirror
folded in. The lack of rearward visibility
normally provided by the mirror could lead
to an accident.
IMPORTANT
20)It is possible to retract and extend the
mirrors by hand. After retracting a mirror
using the mirror retractor switch, however,
you should extend it by using the switch
again, not by hand. If you extended the
mirror by hand after retracting it using the
switch, it would not properly lock in
position. As a result, it could move because
of the wind or vibration while you are
driving, taking away your rearward visibility.
EXTERNAL LIGHTS
COMBINATION
HEADLAMPS AND
DIPPER SWITCH
Headlamps
NOTE Do not leave the lamps on for a
long time while the engine is stationary
(not running). A run-down battery could
result.
NOTE When it rains, or when the
vehicle has been washed, the inside of
the lens sometimes becomes foggy, but
this does not indicate a functional
problem. When the lamp is switched
on, the heat will remove the fog.
However, if water gathers inside the
lamp, we recommend you to have
checked.
Type 1
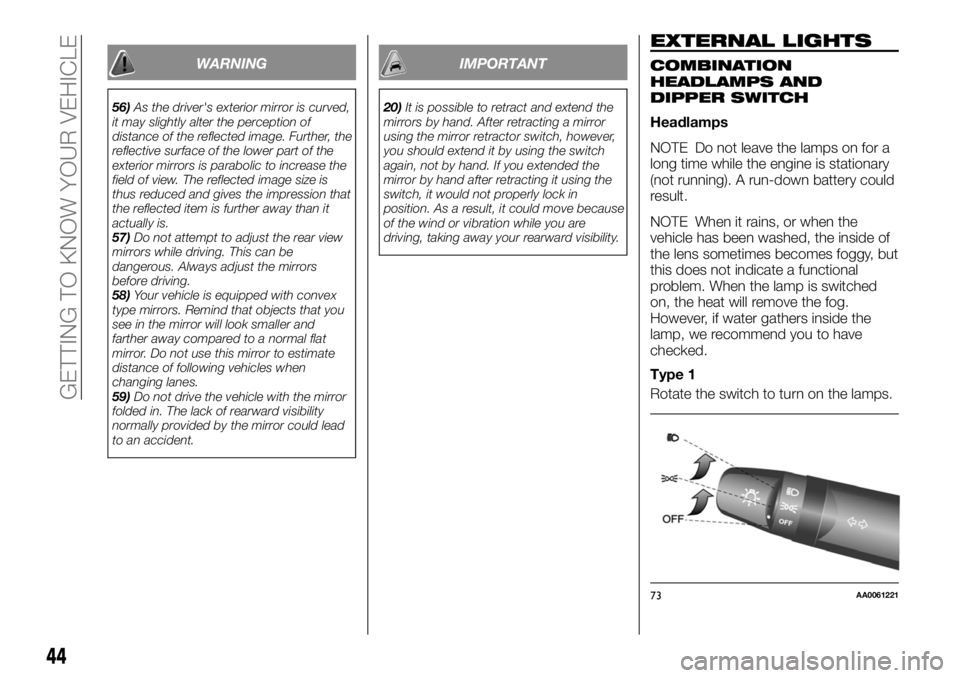
Rotate the switch to turn on the lamps.
73AA0061221
44
GETTING TO KNOW YOUR VEHICLE
Page 76 of 312
ENGINE
COMPARTMENT
To open
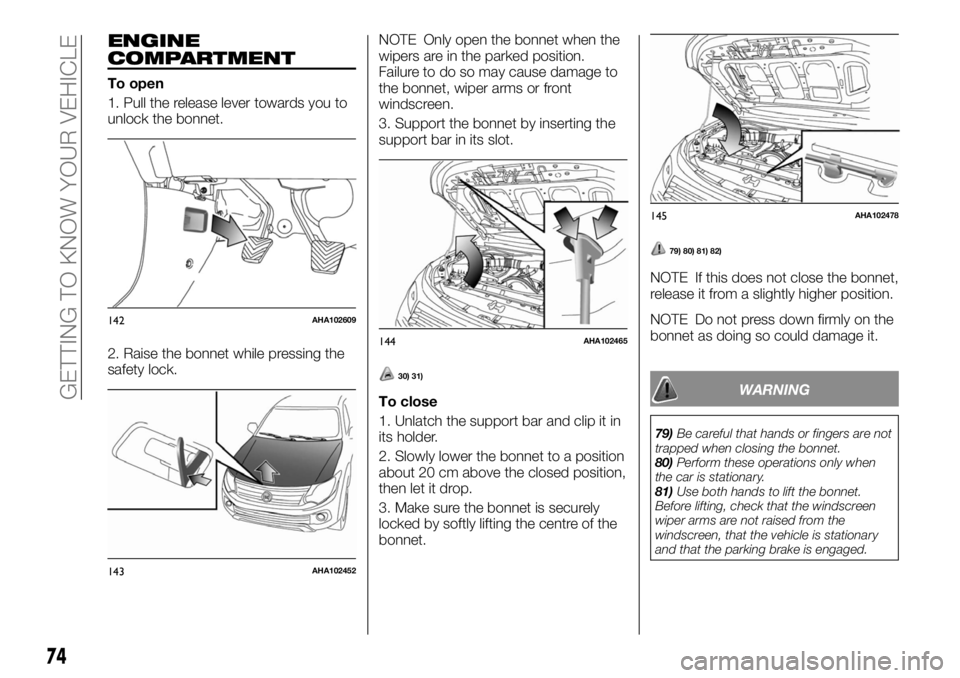
1. Pull the release lever towards you to
unlock the bonnet.
2. Raise the bonnet while pressing the
safety lock.NOTE Only open the bonnet when the
wipers are in the parked position.
Failure to do so may cause damage to
the bonnet, wiper arms or front
windscreen.
3. Support the bonnet by inserting the
support bar in its slot.
30) 31)
To close
1. Unlatch the support bar and clip it in
its holder.
2. Slowly lower the bonnet to a position
about 20 cm above the closed position,
then let it drop.
3. Make sure the bonnet is securely
locked by softly lifting the centre of the
bonnet.
79) 80) 81) 82)
NOTE If this does not close the bonnet,
release it from a slightly higher position.
NOTE Do not press down firmly on the
bonnet as doing so could damage it.
WARNING
79)Be careful that hands or fingers are not
trapped when closing the bonnet.
80)Perform these operations only when
the car is stationary.
81)Use both hands to lift the bonnet.
Before lifting, check that the windscreen
wiper arms are not raised from the
windscreen, that the vehicle is stationary
and that the parking brake is engaged.
142AHA102609
143AHA102452
144AHA102465
145AHA102478
74
GETTING TO KNOW YOUR VEHICLE
Page 78 of 312
86)Do not carry unnecessary objects on
the flatbed. Particularly if the vehicle is
driven in cities, where frequent stopping
and starting is necessary, supplementary
loads on the vehicle may have major
repercussions on fuel consumption.
Furthermore, do not travel with
unnecessary luggage, loads etc. on the
roof: the increased air resistance will
increase fuel consumption.
87)Using a lower gear when travelling with
heavy loads will improve vehicle
performance and extend the life of the
gearbox, limiting gear shifts and
overheating. This action ensures better
exhaust braking.
88)All precautions must be adopted to
prevent danger to other road users if the
load protrudes beyond the contour of the
vehicle. The rear and side protrusion must
be indicated according to the laws in force
in the country. The load must not
compromise stability of the vehicle or cover
lights, visual indicators or identifying plates.
Poles, bars and similar loads which are
difficult to see arranged horizontally must
not protrude beyond the contour of the
vehicle.TRAILER TOWING
In order to tow a trailer with your
vehicle, when having a trailer towing
device mounted that meets all relevant
regulations in your area, consult a Fiat
Dealership.
Check that your towbar coupling ball
does not obscure your vehicle’s licence
plate when the trailer or caravan is
disconnected. If it obscures the licence
plate, please remove the towbar
coupling ball. And if the towbar
coupling ball is lockable by using a key
or any kind of tools, please remove the
coupling ball and use a towbar coupling
ball which can be removed or
repositioned without the use of a key or
any kind of tools instead.
The regulations concerning the towing
of a trailer may differ from country to
country. You are advised to obey the
regulations in each area.
NOTE If you are going to tow a trailer,
pay careful attention to the following
points.
89)
Maximum towable weight with
brake and maximum trailernose
weight
Never exceed the maximum towable
weight with brake and the maximum
trailer-nose weight as listed in the
specifications. (Refer to “Vehicle
weight”.
If you tow a trailer at an altitude of more
than 1,000 m above sea-level, reduce
your weight by 10 % of the gross
combination weight for every increase
of 1,000 m above sea-level, as the
engine output is lowered owing to
decrease in atmospheric pressure.
76
GETTING TO KNOW YOUR VEHICLE
Page 107 of 312
WARNING
115)In the following situations, brake
performance may be compromised or the
vehicle may become unstable if brakes are
applied suddenly; consequently, avoid
driving at high speeds or applying the
brakes suddenly. Furthermore, immediately
the vehicle should be brought to a stop in a
safe location and we recommend you to
have it checked. 1 – The brake warning
lamp does not illuminate when the parking
brake is applied or does not turn off when
the parking brake is released.2–The
brake warning lamp and the ABS warning
lamp illuminate at the same time. For
details, refer to “ABS warning lamp”. 3 –
The brake warning lamp remains
illuminated while driving.
116)The vehicle should be brought to a
halt in the following manner when brake
performance has deteriorated. 1 – Depress
the brake pedal harder than usual. Even if
the brake pedal moves down to the very
end of its possible stroke, keep it pressed
down hard. 2 – Should the brakes fail, use
engine braking to reduce your speed and
carefully pull the parking brake lever.
Depress the brake pedal to operate the
stop lamp to alert the vehicles behind you.
IMPORTANT
46)This warning lightwill flash after
starting or during prolonged cranking to
indicate a fault with the glow plug heating
system. If the engine starts, the vehicle can
be used as normal, but a Fiat Dealership
must be contacted as soon as possible.
47)If the diesel preheat indicator lamp
comes on after the engine is started, the
engine speed may not rise above the idling
speed because of fuel freezing. In this case,
keep the engine idling for about
10 minutes, then turn off the ignition switch
or put in OFF the operation mode, and
immediately turn it on or put in ON again to
confirm that the diesel preheat indicator
lamp is off.
48)When this indicator lamp blinks,
electronic stability control function or active
traction control function is operating, which
means that the road is slippery or that your
vehicle’s wheels are beginning to slip. If this
happens, drive slower with less accelerator
input.49)If an abnormal condition occurs in the
system while driving, the
indicator lamp
will illuminate. In these cases, follow these
procedures:1–Ifthetemperature in the
braking system continues to increase due
to continuous brake control on a slippery
road surface, the
indicator lamp will
blink, and operation of the active traction
control function will be suspended to
protect the brake system (the engine
control of the traction control function and
normal brake operation will not be
affected.) Park your vehicle in a safe place.
When the temperature in the braking
system has come down, the indicator lamp
will go off and the electronic stability control
function and active traction control function
will start operating again.2–Ifthe
indicator lamp does not go out even
through the above procedure is followed,
there could be a problem in the system.
Stop the engine and start the engine again
and check whether the
indicator lamp
goes out. If the indicator lamp goes out,
there is no abnormal condition.3–Ifthe
indicator lamp illuminates even after
your vehicle is driven a short distance after
re-starting the engine, we recommend you
to have your vehicle checked as soon as
possible.
50)Prolonged driving with this lamp on
may cause further damage to the emission
control system. It could also affect fuel
economy and drivability.
51)If the lamp does not illuminate when the
ignition switch is turned to the “ON”
position or the operation mode is put in
ON, we recommend you to have the
system checked.
105
Page 146 of 312
ECONOMICAL
DRIVING
For economical driving, there are some
technical requirements that have to be
met. The prerequisite for low fuel
consumption is a properly adjusted
engine. In order to achieve longer life of
the vehicle and the most economical
operation, we recommend you to have
the vehicle checked at regular intervals
in accordance with the service
standards.
Fuel economy and generation of
exhaust gas and noise are highly
influenced by personal driving habits as
well as the particular operating
conditions. The following points should
be observed in order to minimize wear
of brakes, tyres and engine as well as
to reduce environmental pollution.
Starting the engine
Avoid sudden acceleration and sudden
starts, as they will increase fuel
consumption.
Shifting
Shift only at an appropriate speed and
engine speed. Always use the highest
shift position possible.
The transfer shift lever or the drive
modeselector should be set to “2H”
when driving 4WD vehicles on normal
roads and express ways to obtain best
possible fuel economy.City traffic
Frequent starting and stopping increases
the average fuel consumption. Use roads
with smooth traffic flow whenever
possible. When driving on congested
roads, avoid use of a low shift position at
high engine speeds.
Idling
The vehicle consumes fuel even during
idling. Avoid extended idling whenever
possible.
Speed
At higher the vehicle speed, more fuel is
consumed. Avoid driving at full speed.
Even a slight release of the accelerator
pedal will save a significant amount of
fuel.
Tyre inflation pressure
Check the tyre inflation pressures at
regular intervals. Low tyre inflation
pressure increases road resistance and
fuel consumption. In addition, low tyre
pressures adversely affect tyre wear
and driving stability.
Cargo loads
Do not drive with unnecessary articles
in the luggage compartment. Especially
during city driving where frequent
starting and stopping is necessary, the
increased weight of the vehicle will
greatly affect fuel consumption. Also
avoid driving with unnecessary luggage
or carriers, etc., on the roof; the
increased air resistance will increase
fuel consumption.Cold engine starting
Starting of a cold engine consumes
more fuel. Unnecessary fuel
consumption is also caused by keeping
a hot engine running. After the engine is
started, commence driving as soon as
possible.
Cooler or air conditioning
The use of the air conditioner will
increase the fuel consumption.
144
STARTING AND DRIVING
Page 181 of 312
pedal as constant as possible, and
drive at low speed.
142) 143)
232)
NOTE Avoid sudden braking,
acceleration, and turning; such
operations could result in the vehicle
becoming stuck.
NOTE If the vehicle becomes stuck in
sandy or muddy roads, it can often be
moved a rocking motion. Move the
selector lever rhythmically between the
“D” (DRIVE) and “R” (REVERSE)
position (with manual transmission,
between 1st and Reverse), while
applying slight pressure to the
accelerator pedal.
NOTE It is recommended to start the
vehicle with parking brake partially, but
not completely, applied by slightly
pulling the parking brake lever. After the
vehicle has become free, do not forget
to release the parking brake.
NOTE If it is necessary to drive in
extremely muddy conditions, the use of
tyre chains is recommended. Because
the extent of muddy conditions is
difficult to judge and the vehicle could
become bogged down very deeply,
operation should be at a low speed. If
possible, get out of the vehicle and
check the conditions ahead before
proceeding.NOTE Driving over roads in coastal
areas or roads on which anti-skid
preparations have been spread can
cause rust on the vehicle; wash the
vehicle thoroughly as soon as possible
after such use.
Climbing sharp grades
Set the drive mode-selector to “4L”
position (Easy select 4WD), “4LLc”
position (Super select 4WD II) to
maximize the engine torque.
233) 234)
NOTE Choose as smooth a slope as
possible with few stones or other
obstacles.
NOTE Before attempting to drive up
the slope, walk up it to confirm that the
vehicle can handle the grade.
Descending sharp grades
Set the drive mode-selector to “4L”
position (Easy select 4WD), “4LLc”
position (Super select 4WD II), use the
engine brake (downshifting) and
descend slowly.
235)
NOTE When descending a sharp
grade, if the brakes are applied
suddenly because of an obstacle
encountered, control of the vehicle
could be lost. Before descending the
slope, walk down it and confirm the
path.NOTE Before descending a grade, it is
necessary to choose the appropriate
gear. Avoid changing gears or
depressing the clutch while descending
the grade.
NOTE Fiat is not responsible to the
operator for any damage or injury
caused or liability incurred by the
improper and negligent operation of a
vehicle. All techniques of vehicle
operation described herein depend on
the skill and experience of the operator
and other participating parties and any
deviation from the recommended
operation instructions above is at their
own risk.
Turning sharp corners
When turning a sharp corner in “4H” or
“4L” position (Easy select 4WD), “4HLc”
or “4LLc” position (Super select 4WD II)
at low speed, a slight difference in
steering may be experienced similar to
as if the brakes were applied. This is
called tight corner braking and results
from each of the 4 tyres being at a
different distance from the corner.
Crossing a stream
4-wheel drive vehicles are not
necessarily waterproof. If the electrical
circuits become wet, further operation
of the vehicle will be impossible;
therefore, avoid crossing streams
unless absolutely necessary. If crossing
a stream is unavoidable, use the
following procedure:
Check depths of a stream and
179
Page 182 of 312
geographical features before
attempting to cross a stream and
ford the stream where the water is
as shallow as practicable.Set the
drive mode-selector to “4L”
position (Easy select 4WD), “4LLc”
position (Super select 4WD II).Drive
slowly at a speed of approximately
5 km/h to avoid splashing too
much water.
144) 145)
Inspection and maintenance
following rough road operation
After operating the vehicle in rough road
conditions, be sure to perform the
following inspection and maintenance
procedures:
Check that the vehicle has not been
damaged by rocks, gravel, etc.
Carefully wash the vehicle with water.
Drive the vehicle slowly while lightly
depressing the brake pedal in order to
dry out the brakes. If the brakes still do
not function properly, contact a Fiat
Dealership as soon as possible to have
the brakes checked.
Remove the insects, dried grass, etc.
clogging the radiator core and the A/T
oil cooler.
After crossing a stream, be sure to have
the following items inspected at a Fiat
Dealership and take the necessary
measures:
Check the brake system and, if
necessary, have it serviced.
Check the engine, transmission,
transfer, and differential oil or grease
level and turbidity. If the oil or grease is
milky, it indicates water contamination.
Replace it with new oil or grease.
Grease the propeller shaft.
Check the inside of the vehicle. If
ingress of water is found, dry the carpet
etc.
Inspect the headlamps. If the
headlamp bulb is flooded with water,
have the headlamp drained off.
IMPORTANT
140)Selecting “4H” or “4L” position (Easy
select 4WD), “4HLc” or “4LLc” position
(Super select 4WD II) to drive on dry paved
road will increase the fuel consumption with
possible noise generation and early tyre
wear. It may also increase the differential oil
temperature, resulting in possible damage
to the driving system. Further, the drive
train will be subjected to excessive loading,
possibly leading to oil leakage, component
seizure, or other serious faults.
141)Avoid sudden braking, sudden
acceleration, and sharp turning; such
operations could cause skidding and
spinouts.142)Do not force the vehicle or drive
recklessly on sandy surfaces. In
comparison with normal road surfaces, the
engine and other drive-system components
are put under excessive strain when driving
on such a surface, and this could lead to
accidents.
143)If any of following conditions occur
while the vehicle is being driven,
immediately park your vehicle in a safe
place and follow these procedures: the
needle in the temperature gauge
approaches the overheating zone. Refer to
“Engine overheating”; automatic
transmission fluid temperature warning
lamp comes on. Refer to “When the A/T
(automatic transmission) fluid temperature
warning lamp comes on”.
144)Never cross a stream where the water
is deep. Do not change gears while
crossing the stream. Frequent crossing of
streams can adversely affect the life span
of the vehicle; we recommend you to take
the necessary measures to prepare,
inspect, and repair the vehicle.
145)After crossing a stream, apply the
brakes to be sure they are functioning
properly. If the brakes are wet and not
functioning properly, dry them out by
driving slowly while lightly depressing the
brake pedal. Inspect each part of the
vehicle carefully.
180
STARTING AND DRIVING
Page 184 of 312
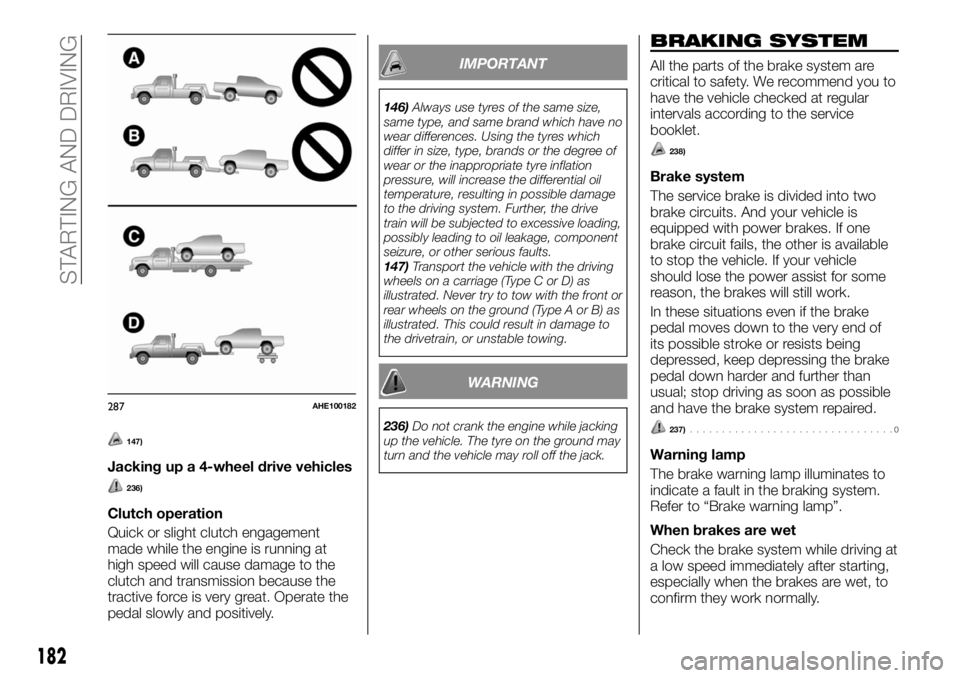
147)
Jacking up a 4-wheel drive vehicles
236)
Clutch operation
Quick or slight clutch engagement
made while the engine is running at
high speed will cause damage to the
clutch and transmission because the
tractive force is very great. Operate the
pedal slowly and positively.
IMPORTANT
146)Always use tyres of the same size,
same type, and same brand which have no
wear differences. Using the tyres which
differ in size, type, brands or the degree of
wear or the inappropriate tyre inflation
pressure, will increase the differential oil
temperature, resulting in possible damage
to the driving system. Further, the drive
train will be subjected to excessive loading,
possibly leading to oil leakage, component
seizure, or other serious faults.
147)Transport the vehicle with the driving
wheels on a carriage (Type C or D) as
illustrated. Never try to tow with the front or
rear wheels on the ground (Type A or B) as
illustrated. This could result in damage to
the drivetrain, or unstable towing.
WARNING
236)Do not crank the engine while jacking
up the vehicle. The tyre on the ground may
turn and the vehicle may roll off the jack.
BRAKING SYSTEM
All the parts of the brake system are
critical to safety. We recommend you to
have the vehicle checked at regular
intervals according to the service
booklet.
238)
Brake system
The service brake is divided into two
brake circuits. And your vehicle is
equipped with power brakes. If one
brake circuit fails, the other is available
to stop the vehicle. If your vehicle
should lose the power assist for some
reason, the brakes will still work.
In these situations even if the brake
pedal moves down to the very end of
its possible stroke or resists being
depressed, keep depressing the brake
pedal down harder and further than
usual; stop driving as soon as possible
and have the brake system repaired.
237)................................0
Warning lamp
The brake warning lamp illuminates to
indicate a fault in the braking system.
Refer to “Brake warning lamp”.
When brakes are wet
Check the brake system while driving at
a low speed immediately after starting,
especially when the brakes are wet, to
confirm they work normally.
287AHE100182
182
STARTING AND DRIVING