ESP FIAT FULLBACK 2018 Owner handbook (in English)
[x] Cancel search | Manufacturer: FIAT, Model Year: 2018, Model line: FULLBACK, Model: FIAT FULLBACK 2018Pages: 316, PDF Size: 10.52 MB
Page 173 of 316
136)If a problem is detected in the transfer
system, a safety device will activate. The
2WD/4WD operation indicator blinks (twice
per second), and transfer shifting will
become impossible. Park your vehicle in a
safe place, turn off the engine for a few
moments. Restart the engine. The lamp
should resume normal operation. If the
lamp continue to blink, have the vehicle
checked by a Fiat Dealership as soon as
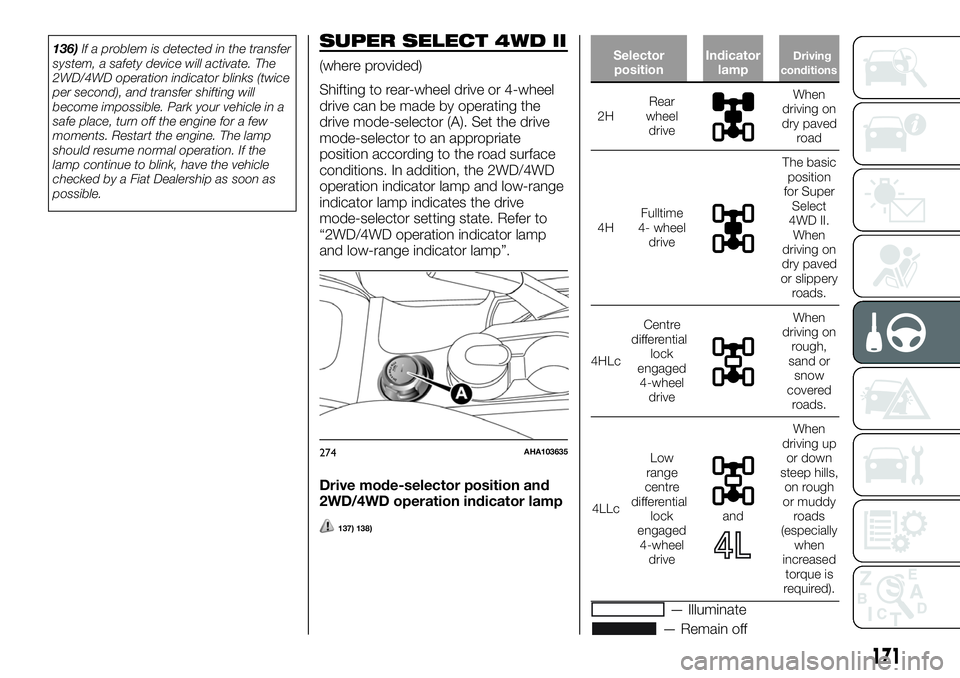
possible.SUPER SELECT 4WD II
(where provided)
Shifting to rear-wheel drive or 4-wheel
drive can be made by operating the
drive mode-selector (A). Set the drive
mode-selector to an appropriate
position according to the road surface
conditions. In addition, the 2WD/4WD
operation indicator lamp and low-range
indicator lamp indicates the drive
mode-selector setting state. Refer to
“2WD/4WD operation indicator lamp
and low-range indicator lamp”.
Drive mode-selector position and
2WD/4WD operation indicator lampSelector
positionIndicator
lampDriving
conditions
2HRear
wheel
drive
When
driving on
dry paved
road
4HFulltime
4- wheel
drive
The basic
position
for Super
Select
4WD II.
When
driving on
dry paved
or slippery
roads.
4HLcCentre
differential
lock
engaged
4-wheel
drive
When
driving on
rough,
sand or
snow
covered
roads.
4LLcLow
range
centre
differential
lock
engaged
4-wheel
drive
and
When
driving up
or down
steep hills,
on rough
or muddy
roads
(especially
when
increased
torque is
required).
— Illuminate
— Remain off
274AHA103635
171
137) 138)
Page 183 of 316
143)Use the rear differential lock only as an
emergency measure when the vehicle is
stuck and cannot be freed with the transfer
shift lever or the drive mode-selector in “4L”
or “4H” position (Easy Select 4WD) or in
“4LLc” or “4HLc” position (Super Select
4WD II). Deactivate the rear differential lock
immediately after using it.4 WHEEL DRIVE
OPERATION
By selecting 4-wheel drive, both axles
of the vehicle are rigidly connected with
each other. This improves the traction
characteristics. When turning sharp
corners or moving forward and
backward repeatedly, however, the
drive line is stressed, which is felt as a
braking effect. A 4-wheel drive vehicle
can accelerate more quickly and
smoothly.
However, note that the braking distance
is not shorter than that of a rear-wheel
drive vehicle.
When using 4-wheel drive on rough
roads (snow, mud, sand, etc.), it is
important to operate the vehicle
correctly.
NOTE The driving posture should be
more upright and closer to the wheel
than usual; adjust the seat to a good
position for easy steering and pedal
operation. Be sure to wear the seat
belt.
NOTE After driving on rough roads,
check each part of the vehicle and
wash it thoroughly with water. Refer to
“Vehicle care” and “Inspection and
maintenance following rough road
operation”.Driving on dry paved road and
highway
Select “2H” position (Easy Select 4WD),
“2H” or “4H” position (Super Select
4WD II) to drive on the dry paved road.
Especially on dry highway, never select
the “4H” or “4L” position (Easy Select
4WD), “4HLc” or “4LLc” position (Super
Select 4WD II).
144)
Driving on snowy or icy roads
Set the drive mode-selector to “4H”
position (Easy Select 4WD), “4H” or
“4HLc” position in accordance with the
road conditions (Super Select 4WD II)
and then gradually depress the
accelerator pedal for a smooth start.
Keep the pressure on the accelerator
pedal as constant as possible, and
drive at low speed.
NOTE The use of snow tyres and/or
tyre chains is recommended.
NOTE Maintain a safe distance
between vehicles, avoid sudden
braking, and use engine braking
(downshifting).
145)
Driving on sandy or muddy roads
Set the drive mode-selector to “4H” or
“4L” position (Easy Select 4WD),
“4HLc” or “4LLc” position (Super Select
4WD II) and then gradually depress the
accelerator pedal for a smooth start.
Keep the pressure on the accelerator
181
Page 184 of 316
pedal as constant as possible, and
drive at low speed.
146) 147)
239)
NOTE Avoid sudden braking,
acceleration, and turning; such
operations could result in the vehicle
becoming stuck.
NOTE If the vehicle becomes stuck in
sandy or muddy roads, it can often be
moved a rocking motion. Move the
selector lever rhythmically between the
“D” (DRIVE) and “R” (REVERSE)
position (with manual transmission,
between 1st and Reverse), while
applying slight pressure to the
accelerator pedal.
NOTE It is recommended to start the
vehicle with parking brake partially, but
not completely, applied by slightly
pulling the parking brake lever. After the
vehicle has become free, do not forget
to release the parking brake.
NOTE If it is necessary to drive in
extremely muddy conditions, the use of
tyre chains is recommended. Because
the extent of muddy conditions is
difficult to judge and the vehicle could
become bogged down very deeply,
operation should be at a low speed. If
possible, get out of the vehicle and
check the conditions ahead before
proceeding.NOTE Driving over roads in coastal
areas or roads on which anti-skid
preparations have been spread can
cause rust on the vehicle; wash the
vehicle thoroughly as soon as possible
after such use.
Climbing sharp grades
Set the drive mode-selector to “4L”
position (Easy Select 4WD), “4LLc”
position (Super Select 4WD II) to
maximize the engine torque.
240) 241)
NOTE Choose as smooth a slope as
possible with few stones or other
obstacles.
NOTE Before attempting to drive up
the slope, walk up it to confirm that the
vehicle can handle the grade.
Descending sharp grades
Set the drive mode-selector to “4L”
position (Easy Select 4WD), “4LLc”
position (Super Select 4WD II), use the
engine brake (downshifting) and
descend slowly.
242)
NOTE When descending a sharp
grade, if the brakes are applied
suddenly because of an obstacle
encountered, control of the vehicle
could be lost. Before descending the
slope, walk down it and confirm the
path.NOTE Before descending a grade, it is
necessary to choose the appropriate
gear. Avoid changing gears or
depressing the clutch while descending
the grade.
NOTE FCA is not responsible to the
operator for any damage or injury
caused or liability incurred by the
improper and negligent operation of a
vehicle. All techniques of vehicle
operation described herein depend on
the skill and experience of the operator
and other participating parties and any
deviation from the recommended
operation instructions above is at their
own risk.
Turning sharp corners
When turning a sharp corner in “4H” or
“4L” position (Easy Select 4WD),
“4HLc” or “4LLc” position (Super Select
4WD II) at low speed, a slight difference
in steering may be experienced similar
to as if the brakes were applied. This is
called tight corner braking and results
from each of the 4 tyres being at a
different distance from the corner.
Crossing a stream
4-wheel drive vehicles are not
necessarily waterproof. If the electrical
circuits become wet, further operation
of the vehicle will be impossible;
therefore, avoid crossing streams
unless absolutely necessary. If crossing
a stream is unavoidable, use the
following procedure:
182
STARTING AND DRIVING
Page 187 of 316
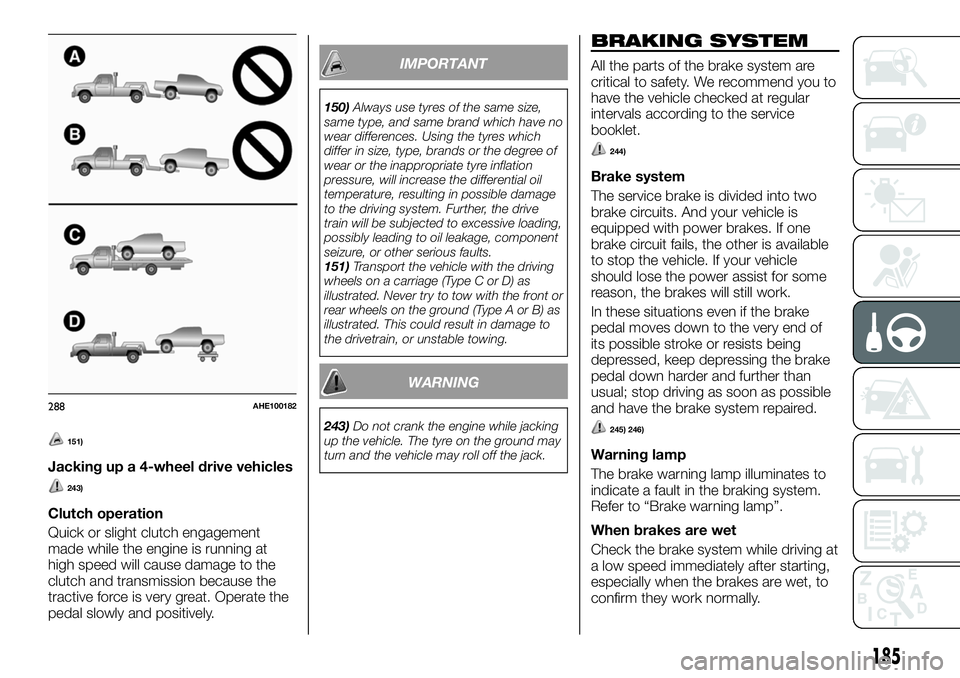
151)
Jacking up a 4-wheel drive vehicles
243)
Clutch operation
Quick or slight clutch engagement
made while the engine is running at
high speed will cause damage to the
clutch and transmission because the
tractive force is very great. Operate the
pedal slowly and positively.
IMPORTANT
150)Always use tyres of the same size,
same type, and same brand which have no
wear differences. Using the tyres which
differ in size, type, brands or the degree of
wear or the inappropriate tyre inflation
pressure, will increase the differential oil
temperature, resulting in possible damage
to the driving system. Further, the drive
train will be subjected to excessive loading,
possibly leading to oil leakage, component
seizure, or other serious faults.
151)Transport the vehicle with the driving
wheels on a carriage (Type C or D) as
illustrated. Never try to tow with the front or
rear wheels on the ground (Type A or B) as
illustrated. This could result in damage to
the drivetrain, or unstable towing.
WARNING
243)Do not crank the engine while jacking
up the vehicle. The tyre on the ground may
turn and the vehicle may roll off the jack.
BRAKING SYSTEM
All the parts of the brake system are
critical to safety. We recommend you to
have the vehicle checked at regular
intervals according to the service
booklet.
244)
Brake system
The service brake is divided into two
brake circuits. And your vehicle is
equipped with power brakes. If one
brake circuit fails, the other is available
to stop the vehicle. If your vehicle
should lose the power assist for some
reason, the brakes will still work.
In these situations even if the brake
pedal moves down to the very end of
its possible stroke or resists being
depressed, keep depressing the brake
pedal down harder and further than
usual; stop driving as soon as possible
and have the brake system repaired.
245) 246)
Warning lamp
The brake warning lamp illuminates to
indicate a fault in the braking system.
Refer to “Brake warning lamp”.
When brakes are wet
Check the brake system while driving at
a low speed immediately after starting,
especially when the brakes are wet, to
confirm they work normally.
288AHE100182
185
Page 199 of 316
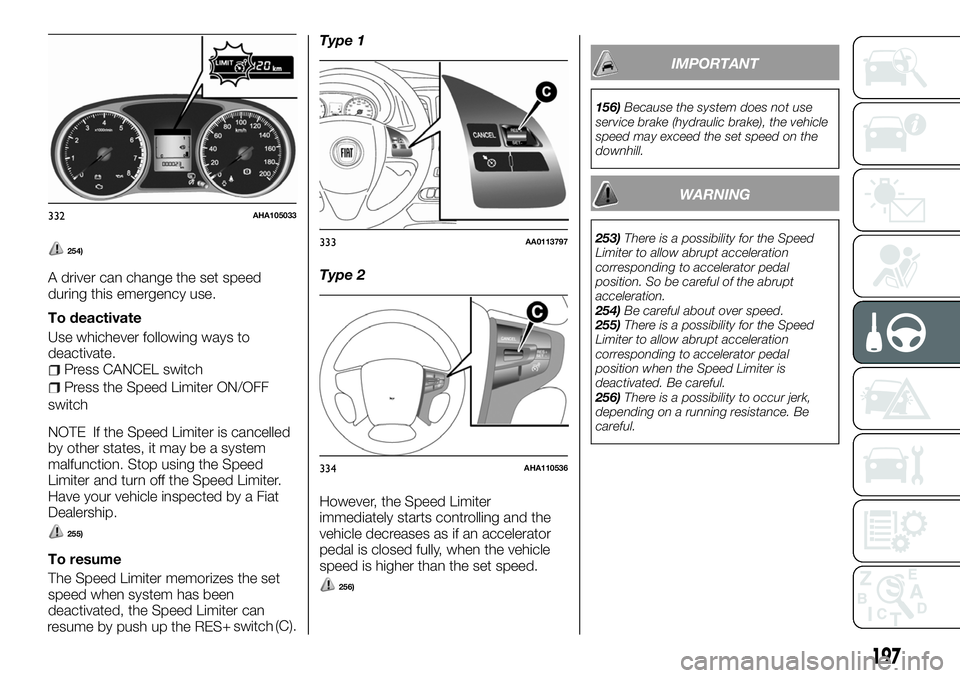
254)
A driver can change the set speed
during this emergency use.
To deactivate
Use whichever following ways to
deactivate.
Press CANCEL switch
Press the Speed Limiter ON/OFF
switch
NOTE If the Speed Limiter is cancelled
by other states, it may be a system
malfunction. Stop using the Speed
Limiter and turn off the Speed Limiter.
Have your vehicle inspected by a Fiat
Dealership.
255)
To resume
The Speed Limiter memorizes the set
speed when system has been
deactivated, the Speed Limiter can
resume by push up the RES(C).Type 1
Type 2
However, the Speed Limiter
immediately starts controlling and the
vehicle decreases as if an accelerator
pedal is closed fully, when the vehicle
speed is higher than the set speed.
256)
IMPORTANT
156)Because the system does not use
service brake (hydraulic brake), the vehicle
speed may exceed the set speed on the
downhill.
WARNING
253)There is a possibility for the Speed
Limiter to allow abrupt acceleration
corresponding to accelerator pedal
position. So be careful of the abrupt
acceleration.
254)Be careful about over speed.
255)There is a possibility for the Speed
Limiter to allow abrupt acceleration
corresponding to accelerator pedal
position when the Speed Limiter is
deactivated. Be careful.
256)There is a possibility to occur jerk,
depending on a running resistance. Be
careful.
332AHA105033
333AA0113797
334AHA110536
197
+ switch
Page 202 of 316
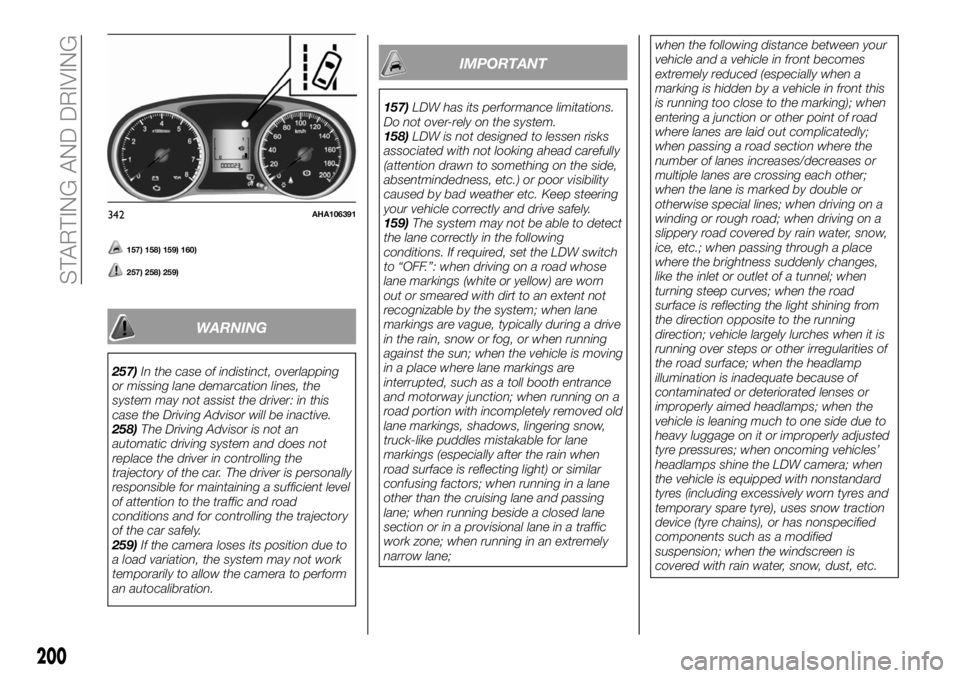
157) 158) 159) 160)
257) 258) 259)
WARNING
257)In the case of indistinct, overlapping
or missing lane demarcation lines, the
system may not assist the driver: in this
case the Driving Advisor will be inactive.
258)The Driving Advisor is not an
automatic driving system and does not
replace the driver in controlling the
trajectory of the car. The driver is personally
responsible for maintaining a sufficient level
of attention to the traffic and road
conditions and for controlling the trajectory
of the car safely.
259)If the camera loses its position due to
a load variation, the system may not work
temporarily to allow the camera to perform
an autocalibration.
IMPORTANT
157)LDW has its performance limitations.
Do not over-rely on the system.
158)LDW is not designed to lessen risks
associated with not looking ahead carefully
(attention drawn to something on the side,
absentmindedness, etc.) or poor visibility
caused by bad weather etc. Keep steering
your vehicle correctly and drive safely.
159)The system may not be able to detect
the lane correctly in the following
conditions. If required, set the LDW switch
to “OFF.”: when driving on a road whose
lane markings (white or yellow) are worn
out or smeared with dirt to an extent not
recognizable by the system; when lane
markings are vague, typically during a drive
in the rain, snow or fog, or when running
against the sun; when the vehicle is moving
in a place where lane markings are
interrupted, such as a toll booth entrance
and motorway junction; when running on a
road portion with incompletely removed old
lane markings, shadows, lingering snow,
truck-like puddles mistakable for lane
markings (especially after the rain when
road surface is reflecting light) or similar
confusing factors; when running in a lane
other than the cruising lane and passing
lane; when running beside a closed lane
section or in a provisional lane in a traffic
work zone; when running in an extremely
narrow lane;when the following distance between your
vehicle and a vehicle in front becomes
extremely reduced (especially when a
marking is hidden by a vehicle in front this
is running too close to the marking); when
entering a junction or other point of road
where lanes are laid out complicatedly;
when passing a road section where the
number of lanes increases/decreases or
multiple lanes are crossing each other;
when the lane is marked by double or
otherwise special lines; when driving on a
winding or rough road; when driving on a
slippery road covered by rain water, snow,
ice, etc.; when passing through a place
where the brightness suddenly changes,
like the inlet or outlet of a tunnel; when
turning steep curves; when the road
surface is reflecting the light shining from
the direction opposite to the running
direction; vehicle largely lurches when it is
running over steps or other irregularities of
the road surface; when the headlamp
illumination is inadequate because of
contaminated or deteriorated lenses or
improperly aimed headlamps; when the
vehicle is leaning much to one side due to
heavy luggage on it or improperly adjusted
tyre pressures; when oncoming vehicles’
headlamps shine the LDW camera; when
the vehicle is equipped with nonstandard
tyres (including excessively worn tyres and
temporary spare tyre), uses snow traction
device (tyre chains), or has nonspecified
components such as a modified
suspension; when the windscreen is
covered with rain water, snow, dust, etc.
342AHA106391
200
STARTING AND DRIVING
Page 206 of 316
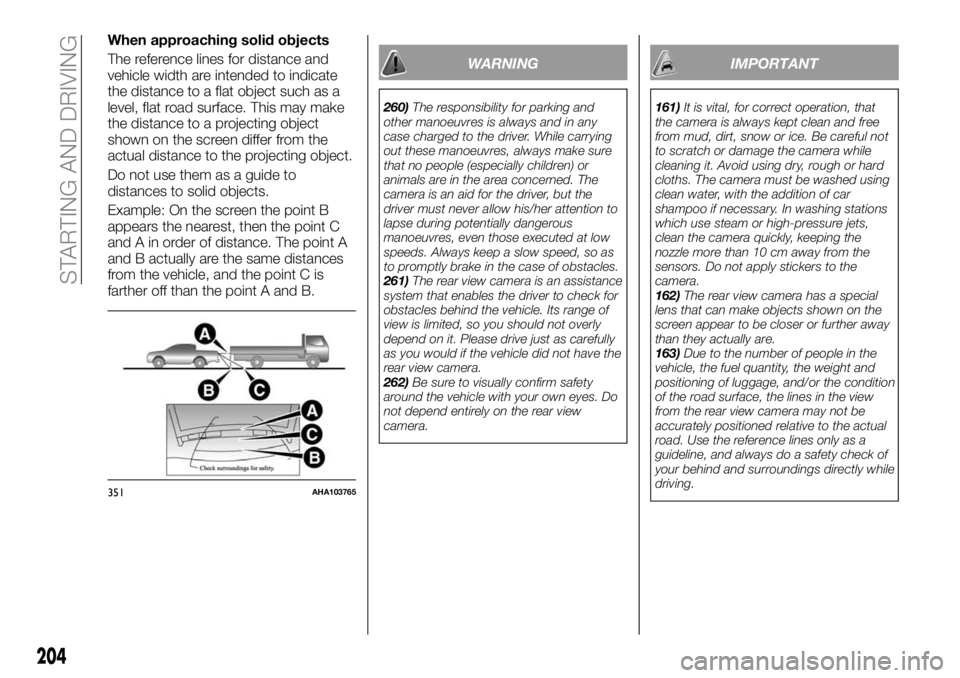
When approaching solid objects
The reference lines for distance and
vehicle width are intended to indicate
the distance to a flat object such as a
level, flat road surface. This may make
the distance to a projecting object
shown on the screen differ from the
actual distance to the projecting object.
Do not use them as a guide to
distances to solid objects.
Example: On the screen the point B
appears the nearest, then the point C
and A in order of distance. The point A
and B actually are the same distances
from the vehicle, and the point C is
farther off than the point A and B.
WARNING
260)The responsibility for parking and
other manoeuvres is always and in any
case charged to the driver. While carrying
out these manoeuvres, always make sure
that no people (especially children) or
animals are in the area concerned. The
camera is an aid for the driver, but the
driver must never allow his/her attention to
lapse during potentially dangerous
manoeuvres, even those executed at low
speeds. Always keep a slow speed, so as
to promptly brake in the case of obstacles.
261)The rear view camera is an assistance
system that enables the driver to check for
obstacles behind the vehicle. Its range of
view is limited, so you should not overly
depend on it. Please drive just as carefully
as you would if the vehicle did not have the
rear view camera.
262)Be sure to visually confirm safety
around the vehicle with your own eyes. Do
not depend entirely on the rear view
camera.
IMPORTANT
161)It is vital, for correct operation, that
the camera is always kept clean and free
from mud, dirt, snow or ice. Be careful not
to scratch or damage the camera while
cleaning it. Avoid using dry, rough or hard
cloths. The camera must be washed using
clean water, with the addition of car
shampoo if necessary. In washing stations
which use steam or high-pressure jets,
clean the camera quickly, keeping the
nozzle more than 10 cm away from the
sensors. Do not apply stickers to the
camera.
162)The rear view camera has a special
lens that can make objects shown on the
screen appear to be closer or further away
than they actually are.
163)Due to the number of people in the
vehicle, the fuel quantity, the weight and
positioning of luggage, and/or the condition
of the road surface, the lines in the view
from the rear view camera may not be
accurately positioned relative to the actual
road. Use the reference lines only as a
guideline, and always do a safety check of
your behind and surroundings directly while
driving.
351AHA103765
204
STARTING AND DRIVING
Page 208 of 316
ERA GLONASS
(where provided)
ERA-GLONASS is a system designed
to reduce the severity of accidents. The
location and vehicle information is
transmitted from the system to the
emergency call centre in case of an
accident or sudden illness, and the
emergency call centre arranges for
despatch of emergency vehicles as
required.
263) 264) 265) 266)
NOTE This system reports to the
emergency call centre, but does not
directly arrange an emergency vehicle
or pass to the road service. This system
helps an emergency call for a traffic
accident or sudden illness, but does
not have a function to protect the
occupants.
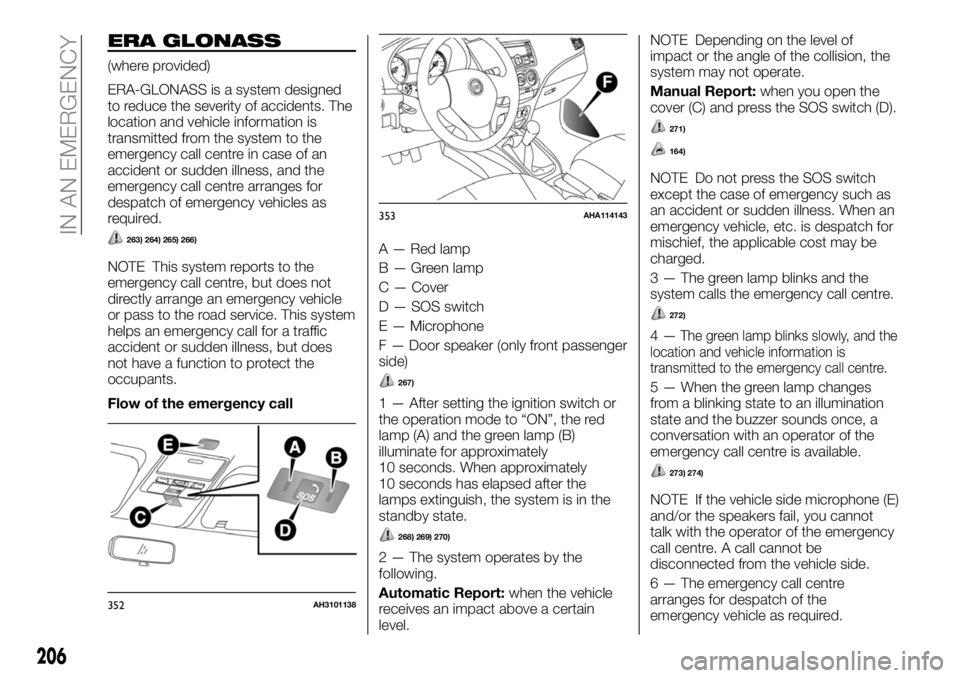
Flow of the emergency callA — Red lamp
B — Green lamp
C — Cover
D — SOS switch
E — Microphone
F — Door speaker (only front passenger
side)
267)
1 — After setting the ignition switch or
the operation mode to “ON”, the red
lamp (A) and the green lamp (B)
illuminate for approximately
10 seconds. When approximately
10 seconds has elapsed after the
lamps extinguish, the system is in the
standby state.
268) 269) 270)
2 — The system operates by the
following.
Automatic Report:when the vehicle
receives an impact above a certain
level.NOTE Depending on the level of
impact or the angle of the collision, the
system may not operate.
Manual Report:when you open the
cover (C) and press the SOS switch (D).
271)
164)
NOTE Do not press the SOS switch
except the case of emergency such as
an accident or sudden illness. When an
emergency vehicle, etc. is despatch for
mischief, the applicable cost may be
charged.
3 — The green lamp blinks and the
system calls the emergency call centre.
272)
4—The green lamp blinks slowly, and the
location and vehicle information is
transmitted to the emergency call centre.
5 — When the green lamp changes
from a blinking state to an illumination
state and the buzzer sounds once, a
conversation with an operator of the
emergency call centre is available.
273) 274)
NOTE If the vehicle side microphone (E)
and/or the speakers fail, you cannot
talk with the operator of the emergency
call centre. A call cannot be
disconnected from the vehicle side.
6 — The emergency call centre
arranges for despatch of the
emergency vehicle as required.
352AH3101138
353AHA114143
206
IN AN EMERGENCY
Page 235 of 316
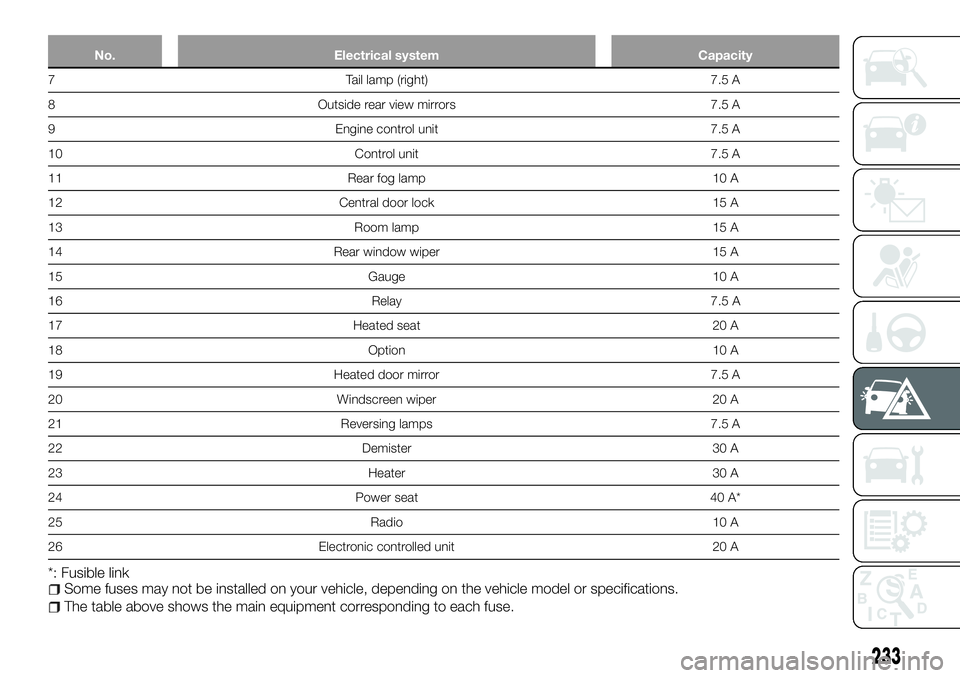
No. Electrical system Capacity
7 Tail lamp (right) 7.5 A
8 Outside rear view mirrors 7.5 A
9 Engine control unit 7.5 A
10 Control unit 7.5 A
11 Rear fog lamp 10 A
12 Central door lock 15 A
13 Room lamp 15 A
14 Rear window wiper 15 A
15 Gauge 10 A
16 Relay 7.5 A
17 Heated seat 20 A
18 Option 10 A
19 Heated door mirror 7.5 A
20 Windscreen wiper 20 A
21 Reversing lamps 7.5 A
22 Demister 30 A
23 Heater 30 A
24 Power seat 40 A*
25 Radio 10 A
26 Electronic controlled unit 20 A
*: Fusible linkSome fuses may not be installed on your vehicle, depending on the vehicle model or specifications.
The table above shows the main equipment corresponding to each fuse.
233
Page 238 of 316
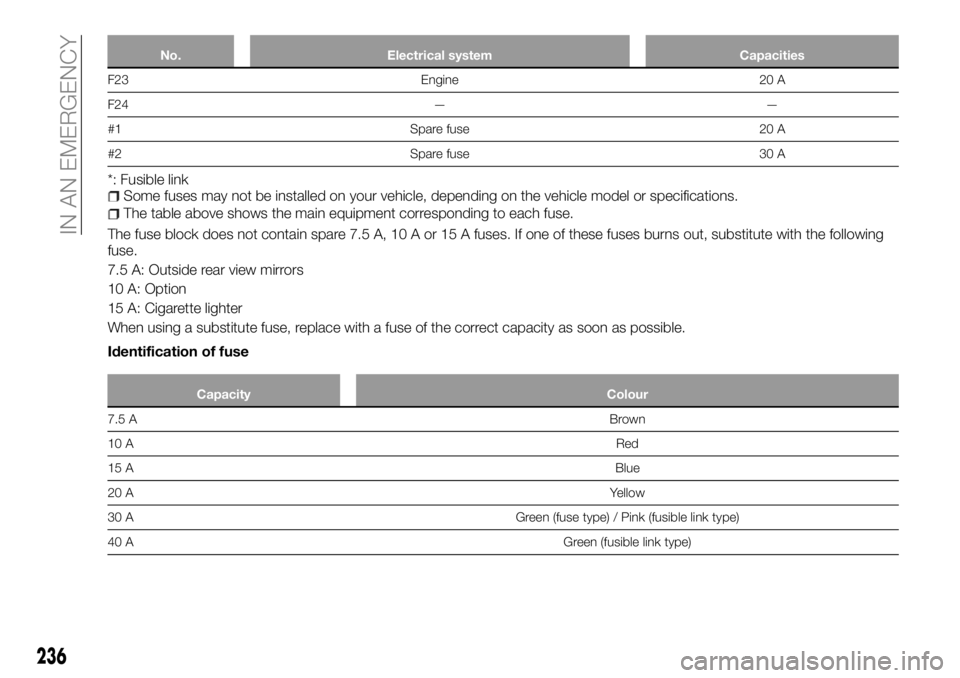
No. Electrical system Capacities
F23 Engine 20 A
F24 — —
#1 Spare fuse 20 A
#2 Spare fuse 30 A
*: Fusible linkSome fuses may not be installed on your vehicle, depending on the vehicle model or specifications.
The table above shows the main equipment corresponding to each fuse.
The fuse block does not contain spare 7.5 A, 10 A or 15 A fuses. If one of these fuses burns out, substitute with the following
fuse.
7.5 A: Outside rear view mirrors
10 A: Option
15 A: Cigarette lighter
When using a substitute fuse, replace with a fuse of the correct capacity as soon as possible.
Identification of fuse
Capacity Colour
7.5 ABrown
10 ARed
15 ABlue
20 AYellow
30 A Green (fuse type) / Pink (fusible link type)
40 AGreen (fusible link type)
236
IN AN EMERGENCY