buttons FIAT IDEA 2008 1.G Owners Manual
[x] Cancel search | Manufacturer: FIAT, Model Year: 2008, Model line: IDEA, Model: FIAT IDEA 2008 1.GPages: 210, PDF Size: 3.64 MB
Page 5 of 210
4
SAFETY
DEVICES
CORRECT USE
OF THE CAR
WARNING
LIGHTS AND
MESSAGES
IN AN
EMERGENCY
CAR
MAINTENANCE
TECHNICAL
SPECIFICATIONS
INDEX
DASHBOARD
AND CONTROLSDASHBOARD........................................................................ 5
INSTRUMENT PANEL ....................................................... 7
SYMBOLS ............................................................................... 9
THE FIAT CODE SYSTEM ................................................. 9
KEY KIT AND DOOR LOCKING .................................. 10
IGNITION SWITCH ............................................................ 18
INSTRUMENTS ..................................................................... 19
MULTIFUNCTION DISPLAY ........................................... 20
RECONFIGURABLE MULTIFUNCTION DISPLAY ... 23
ADJUSTMENT OF THE WHEEL ...................................... 36
ADJUSTMENT OF THE SEATS ......................................... 36
HEAD RESTRAINTS ............................................................ 41
REARVIEW MIRRORS ......................................................... 42
HEATING/CLIMATE
CONTROL SYSTEM ........................................................... 44
HEATING AND VENTILATION ...................................... 45
MANUAL CLIMATE CONTROL SYSTEM ................... 48
AUTOMATIC TWO-ZONE CLIMATE
CONTROL SYSTEM ........................................................... 51
EXTERNAL LIGHTS............................................................. 58
WINDOW WASHING ....................................................... 60
CRUISE CONTROL ............................................................ 63CEILING LIGHTS ................................................................. 64
LIGHT CONTROL BUTTONS ......................................... 66
INERTIAL FUEL CUT- OFF SWITCH ............................. 67
INTERIOR FITTINGS ......................................................... 68
SMOKERS’ KIT ...................................................................... 71
SUNROOF.............................................................................. 72
POWER WINDOWS ......................................................... 74
REAR WINDOW WINDERS ............................................ 75
BOOT ...................................................................................... 76
BONNET ................................................................................ 80
ROOF RACK/SKI RACK .................................................... 81
HEADLIGHTS ........................................................................ 82
ABS SYSTEM ......................................................................... 83
EOBD SYSTEM ..................................................................... 84
SOUND SYSTEM .................................................................. 85
ACCESSORIES PURCHASED BY THE OWNER ......... 86
“DUALDRIVE” ELECTRIC POWER
STEERING SYSTEM ............................................................. 87
PARKING SENSORS ........................................................... 88
AT THE FILLING STATION ............................................. 90
PROTECTING THE ENVIRONMENT ............................ 92
DD D
A A
S S
H H
B B
O O
A A
R R
D D
A A
N N
D D
C C
O O
N N
T T
R R
O O
L L
S S
001-035 idea GB 1 ed 10-07-2008 8:27 Pagina 4
Page 6 of 210
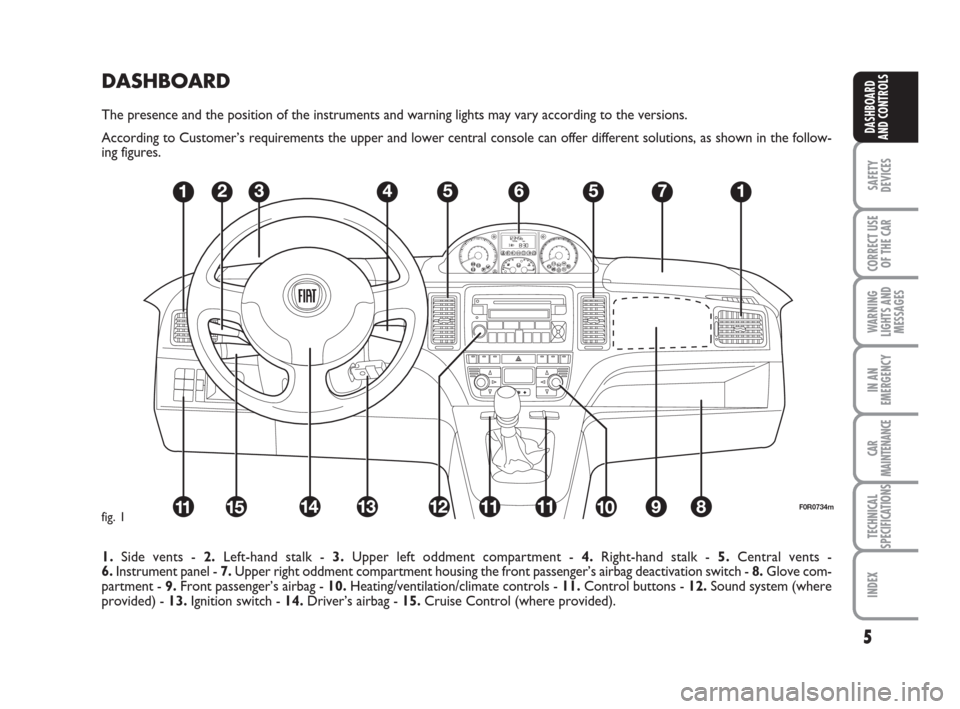
DASHBOARD
The presence and the position of the instruments and warning lights may vary according to the versions.
According to Customer’s requirements the upper and lower central console can offer different solutions, as shown in the follow-
ing figures.
1.Side vents - 2.Left-hand stalk - 3.Upper left oddment compartment - 4.Right-hand stalk - 5.Central vents -
6.Instrument panel - 7.Upper right oddment compartment housing the front passenger’s airbag deactivation switch - 8.Glove com-
partment - 9.Front passenger’s airbag - 10.Heating/ventilation/climate controls - 11.Control buttons - 12.Sound system (where
provided) - 13.Ignition switch - 14.Driver’s airbag - 15.Cruise Control (where provided).
5
SAFETY
DEVICES
CORRECT USE
OF THE CAR
WARNING
LIGHTS AND
MESSAGES
IN AN
EMERGENCY
CAR
MAINTENANCE
TECHNICAL
SPECIFICATIONS
INDEX
DASHBOARD
AND CONTROLS
F0R0734mfig. 1
001-035 idea GB 1 ed 10-07-2008 8:27 Pagina 5
Page 22 of 210
21
SAFETY
DEVICES
CORRECT USE
OF THE CAR
WARNING
LIGHTS AND
MESSAGES
IN AN
EMERGENCY
CAR
MAINTENANCE
TECHNICAL
SPECIFICATIONS
INDEX
DASHBOARD
AND CONTROLS
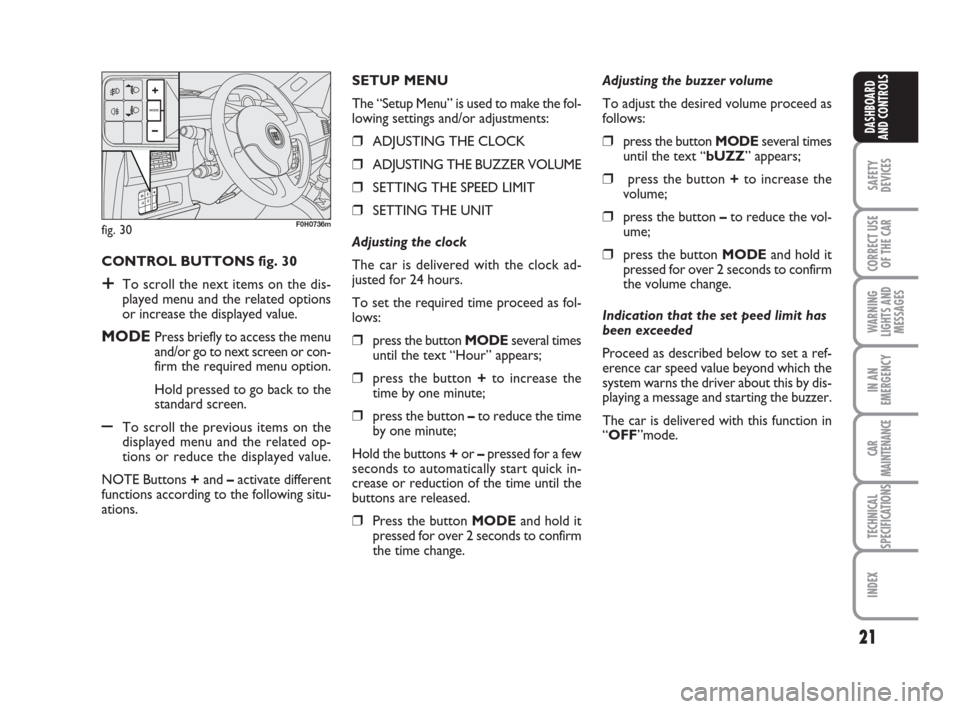
CONTROL BUTTONS fig. 30
+To scroll the next items on the dis-
played menu and the related options
or increase the displayed value.
MODEPress briefly to access the menu
and/or go to next screen or con-
firm the required menu option.
Hold pressed to go back to the
standard screen.
–To scroll the previous items on the
displayed menu and the related op-
tions or reduce the displayed value.
NOTE Buttons +and –activate different
functions according to the following situ-
ations.Adjusting the buzzer volume
To adjust the desired volume proceed as
follows:
❒press the button MODEseveral times
until the text “bUZZ” appears;
❒press the button +to increase the
volume;
❒press the button –to reduce the vol-
ume;
❒press the button MODEand hold it
pressed for over 2 seconds to confirm
the volume change.
Indication that the set peed limit has
been exceeded
Proceed as described below to set a ref-
erence car speed value beyond which the
system warns the driver about this by dis-
playing a message and starting the buzzer.
The car is delivered with this function in
“OFF”mode. SETUP MENU
The “Setup Menu” is used to make the fol-
lowing settings and/or adjustments:
❒ADJUSTING THE CLOCK
❒ADJUSTING THE BUZZER VOLUME
❒SETTING THE SPEED LIMIT
❒SETTING THE UNIT
Adjusting the clock
The car is delivered with the clock ad-
justed for 24 hours.
To set the required time proceed as fol-
lows:
❒press the button MODEseveral times
until the text “Hour” appears;
❒press the button +to increase the
time by one minute;
❒press the button –to reduce the time
by one minute;
Hold the buttons +or –pressed for a few
seconds to automatically start quick in-
crease or reduction of the time until the
buttons are released.
❒Press the button MODEand hold it
pressed for over 2 seconds to confirm
the time change.
fig. 30F0H0736m
001-035 idea GB 1 ed 10-07-2008 8:27 Pagina 21
Page 24 of 210
23
SAFETY
DEVICES
CORRECT USE
OF THE CAR
WARNING
LIGHTS AND
MESSAGES
IN AN
EMERGENCY
CAR
MAINTENANCE
TECHNICAL
SPECIFICATIONS
INDEX
DASHBOARD
AND CONTROLS
fig. 31F0H09000m
MULTIFUNCTIONAL
DISPLAY
(on three-line comfort
panel)
The car can be equipped with a multi-
function display that shows useful infor-
mation for car driving according to the
settings made.
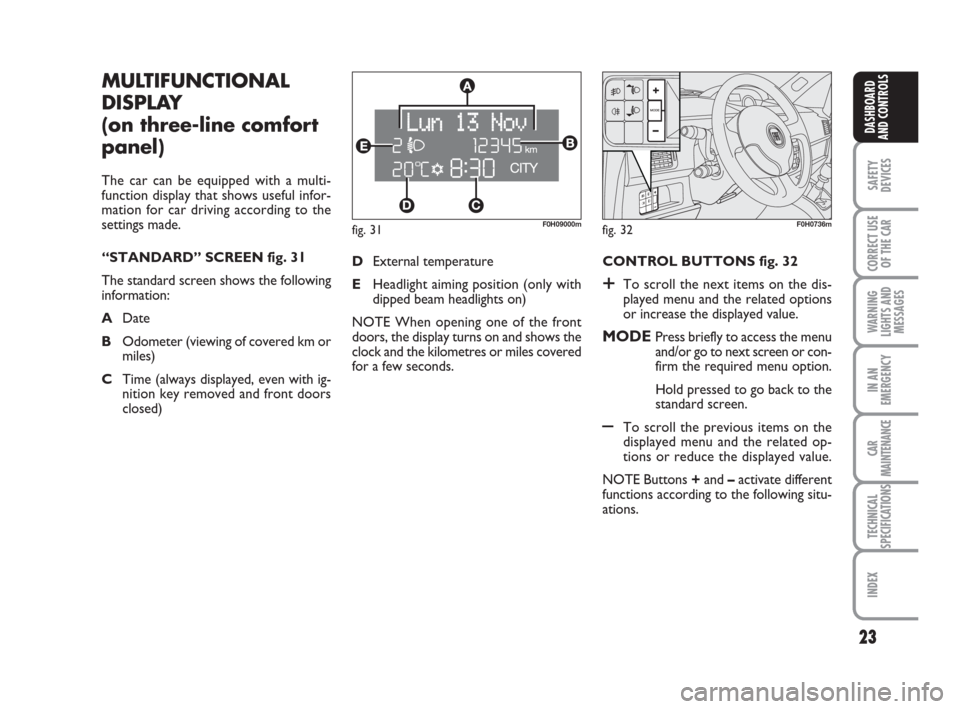
“STANDARD” SCREEN fig. 31
The standard screen shows the following
information:
ADate
BOdometer (viewing of covered km or
miles)
CTime (always displayed, even with ig-
nition key removed and front doors
closed)CONTROL BUTTONS fig. 32
+To scroll the next items on the dis-
played menu and the related options
or increase the displayed value.
MODEPress briefly to access the menu
and/or go to next screen or con-
firm the required menu option.
Hold pressed to go back to the
standard screen.
–To scroll the previous items on the
displayed menu and the related op-
tions or reduce the displayed value.
NOTE Buttons +and –activate different
functions according to the following situ-
ations. DExternal temperature
EHeadlight aiming position (only with
dipped beam headlights on)
NOTE When opening one of the front
doors, the display turns on and shows the
clock and the kilometres or miles covered
for a few seconds.
fig. 32F0H0736m
001-035 idea GB 1 ed 10-07-2008 8:27 Pagina 23
Page 25 of 210
24
SAFETY
DEVICES
CORRECT USE
OF THE CAR
WARNING
LIGHTS AND
MESSAGES
IN AN
EMERGENCY
CAR
MAINTENANCE
TECHNICAL
SPECIFICATIONS
INDEX
DASHBOARD
AND CONTROLS
Adjustment of headlight aiming
device (only with dipped beam
headlights on)
– when the standard screen is enabled, the
headlight aiming device can be regulated
(refer to paragraph “Headlights” in this
section).
Setup menu
– to scroll the previous and next items in
the menu;
– to increase or decrease values during
setting operations.
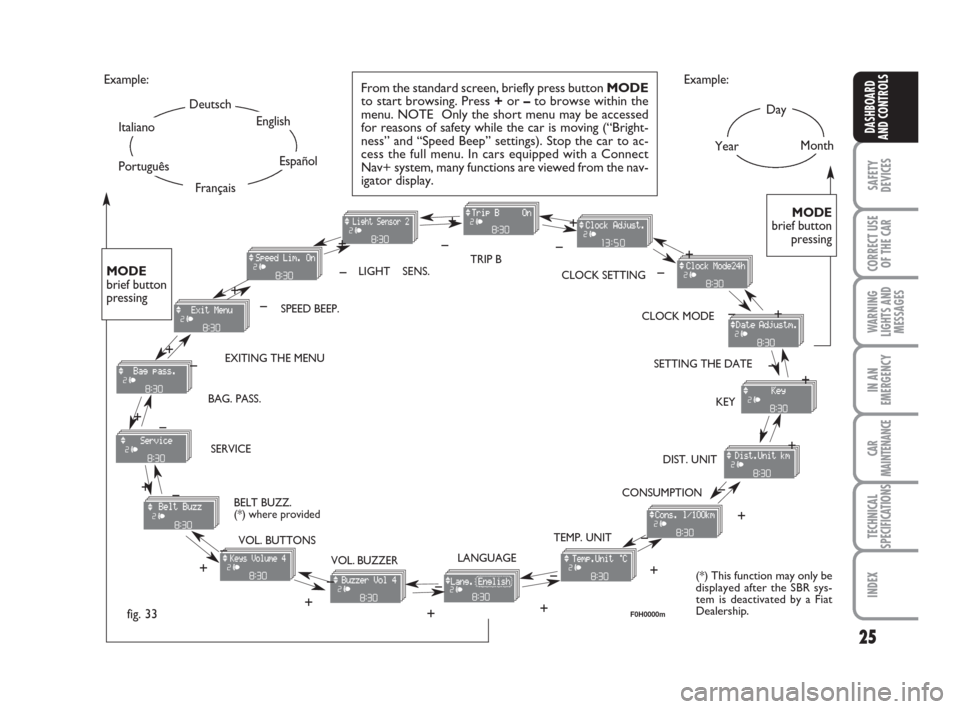
SETUP MENU fig. 33
The menu comprises a series of functions
arranged in a cycle which can be selected
through buttons +and –to access the dif-
ferent “select” operations and settings
(setup) described in the following para-
graphs.
The setup menu is activated by pressing
briefly button MODE.
Intermittent pressing of buttons +and –
enables scrolling of the setup menu op-
tions.
Handling modes are different according to
the characteristic of the option selected.Selecting the “Set Date”
and “Set time”
– Briefly press button MODEto select
the first value to be changed (e.g. hours
/minutes or year / month / day).
– Press buttons +and –(by single press-
ing) to select the new setting.
– Briefly press button MODEto store the
new setting and at the same time go to the
next setup menu option. If the processed
option is the last one, the system brings
you back to the previously selected option
of the main menu.
Prolonged pressing of the button
MODE enables:
– exiting the setup menu page and saving
of the changes already stored by the dri-
ver (and confirmed by briefly pressing the
button MODE).
The setup menu page is timed. Only the
changes saved by the user by briefly press-
ing MODEare saved when the menu is
automatically closed. NOTE If the Connect Nav+ system is in-
stalled, only the following functions can be
adjusted/set from the Instrument Panel:
“Brightness”, “Speed Beep”, Light Sen-
sors” (where provided), “Seat belt
Buzzer” and “Passenger’s Airbag”. The
other functions are displayed on the Con-
nect Nav+ system which is used to ad-
just/set them.
Selecting a menu option
– Briefly press button MODEto select
the menu option that needs to be
changed.
– Press buttons +and –(by single press-
ing) to select the new setting.
– Briefly press button MODEto store the
new setting and at the same time go back
to the previously selected menu option.
001-035 idea GB 1 ed 10-07-2008 8:27 Pagina 24
Page 26 of 210
25
SAFETY
DEVICES
CORRECT USE
OF THE CAR
WARNING
LIGHTS AND
MESSAGES
IN AN
EMERGENCY
CAR
MAINTENANCE
TECHNICAL
SPECIFICATIONS
INDEX
DASHBOARD
AND CONTROLS
Day
YearMonth Example:
CONSUMPTION EXITING THE MENUSPEED BEEP.CLOCK SETTING LIGHT SENS.TRIP B
CLOCK MODE
SETTING THE DATE
KEY
DIST. UNIT
VOL. BUTTONS
VOL. BUZZER SERVICE
LANGUAGETEMP. UNIT
Example:
– +
+– – –
+ +
–
–
+
+++
–––
+ +
–
MODE
brief button
pressing
From the standard screen, briefly press button MODE
to start browsing. Press +or –to browse within the
menu. NOTE Only the short menu may be accessed
for reasons of safety while the car is moving (“Bright-
ness” and “Speed Beep” settings). Stop the car to ac-
cess the full menu. In cars equipped with a Connect
Nav+ system, many functions are viewed from the nav-
igator display.
–
+ +
–
MODE
brief button
pressing
Deutsch
English
Español
Italiano
Português
Français
(*) This function may only be
displayed after the SBR sys-
tem is deactivated by a Fiat
Dealership.
fig. 33
+
– +
–+
–
+
–
+ –
BELT BUZZ.
(*) where provided BAG. PASS.
F0H0000m
001-035 idea GB 1 ed 10-07-2008 8:27 Pagina 25
Page 27 of 210
26
SAFETY
DEVICES
CORRECT USE
OF THE CAR
WARNING
LIGHTS AND
MESSAGES
IN AN
EMERGENCY
CAR
MAINTENANCE
TECHNICAL
SPECIFICATIONS
INDEX
DASHBOARD
AND CONTROLS
Speed limit (Speed beep)
This function enables setting of the car
speed limit (km/h or mph). When this lim-
it is exceeded the driver is immediately
alerted (see section “Warning lights and
messages”).
To set the speed limit, proceed as follows:
– briefly press button MODE: the display
will show the wording “Speed Beep”;
– press button +or –to select speed lim-
it activation (On) or deactivation (Off);
– if the function is on, press buttons +or
–to select the required speed limit and
then press MODEto confirm.To cancel the setting, proceed as follows:
– briefly press button MODE: ON flash-
es on the display;
– press button +: OFF flashes on the dis-
play;
– briefly press button MODEto go back
to the menu screen or press the button
for a prolonged time to go back to the
standard screen without storing the set-
tings. Note The speed may be set in the range
from 30 to 250 km/h, or from 20 to 155
mph according to the previously chosen
unit (see “Setting the distance unit”) de-
scribed below. The setting will in-
crease/decrease by 5 units each time but-
ton +/–is pressed. Hold button +/–
pressed to increase/decrease the setting
rapidly. Complete the setting by briefly
pressing the button when you approach
the required value.
– briefly press button MODEto go back
to the menu screen or press the button
for a prolonged time to go back to the
standard screen without storing the set-
tings.
001-035 idea GB 1 ed 10-07-2008 8:27 Pagina 26
Page 32 of 210
31
SAFETY
DEVICES
CORRECT USE
OF THE CAR
WARNING
LIGHTS AND
MESSAGES
IN AN
EMERGENCY
CAR
MAINTENANCE
TECHNICAL
SPECIFICATIONS
INDEX
DASHBOARD
AND CONTROLS
Adjusting the button volume
(Button Vol.)
This function enables setting the volume
of the roger-beep accompanying the acti-
vation of buttons MODE, +and – ac-
cording to 8 levels.
To adjust the desired volume proceed as
follows:
– briefly press button MODE: the previ-
ously set volume “level” starts flashing on
the display;
– press button +or –to set the volume
level;
– briefly press button MODEto go back
to the menu screen or press the button
for a prolonged time to go back to the
standard screen without storing the set-
tings.
S.B.R. buzzer reactivation
(Belt Buzzer) (where provided)
This function can only be displayed after
Fiat Dealership has deactivated the S.B.R.
system (see paragraph “S.B.R. system” in
section “Safety devices”).The indications will appear more fre-
quently when there are 200 km left. For
1.3 Multijet versions refer to the instruc-
tions provided in the “Scheduled Servic-
ing Plan” in section “Car Maintenance” for
air filter, engine oil and engine oil filter re-
placement. The indication will appear in
kilometres or miles according to the unit
settings. When the next scheduled ser-
vicing is near, the message “Service” will
appear on the display followed by the
number of kilometres or miles or days left
before servicing when the key is turned to
MAR. The “Scheduled Servicing” message
shows information in either kilometres
(km) or miles (mi) or in days (dd) de-
pending on the deadline showing up first.
Go to the Fiat Dealership where the ser-
vicing operations envisaged in the “Sched-
uled Service Plan” or “Yearly Inspection
Plan” will be performed and the message
will be reset. Scheduled Servicing (Service)
This function enables viewing of informa-
tion on proper car servicing depending on
the kilometres travelled or daily intervals.
This information is consulted as follows:
– briefly press button MODE: the display
shows service requirements in km or mi
according to the previous setting (see
paragraph “Distance unit”);
– press button +or –to view the service
interval in days;
– briefly press button MODEto go back
to the menu screen or press the button
for a prolonged time to go back to the
standard screen.
Note According to the “Scheduled Ser-
vicing Plan” the car must be serviced every
20,000 km (or equivalent mileage) or on
a yearly basis. This message appears au-
tomatically when the key is positioned on
MARafter travelling for 2,000 km (or
equivalent mileage) or 30 days after the
deadline. It appears every 200 km (or
equivalent mileage) or 3 days.
001-035 idea GB 1 ed 10-07-2008 8:27 Pagina 31
Page 33 of 210
32
SAFETY
DEVICES
CORRECT USE
OF THE CAR
WARNING
LIGHTS AND
MESSAGES
IN AN
EMERGENCY
CAR
MAINTENANCE
TECHNICAL
SPECIFICATIONS
INDEX
DASHBOARD
AND CONTROLS
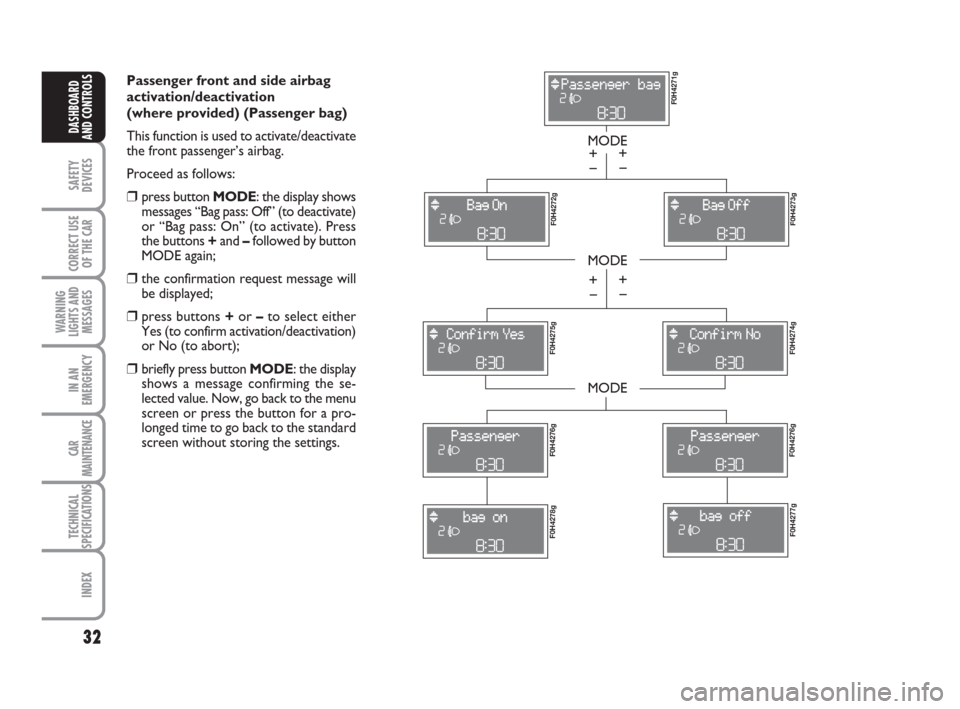
Passenger front and side airbag
activation/deactivation
(where provided) (Passenger bag)
This function is used to activate/deactivate
the front passenger’s airbag.
Proceed as follows:
❒press button MODE: the display shows
messages “Bag pass: Off” (to deactivate)
or “Bag pass: On” (to activate). Press
the buttons +and –followed by button
MODE again;
❒the confirmation request message will
be displayed;
❒press buttons +or –to select either
Yes (to confirm activation/deactivation)
or No (to abort);
❒briefly press button MODE: the display
shows a message confirming the se-
lected value. Now, go back to the menu
screen or press the button for a pro-
longed time to go back to the standard
screen without storing the settings.
MODE
MODE
MODE
– +
F0H4271g F0H4272g
F0H4273g F0H4275g
F0H4274g F0H4276gF0H4276g
F0H4278gF0H4277g
– +
– +
– +
001-035 idea GB 1 ed 10-07-2008 8:27 Pagina 32
Page 53 of 210
52
SAFETY
DEVICES
CORRECT USE
OF THE CAR
WARNING
LIGHTS AND
MESSAGES
IN AN
EMERGENCY
CAR
MAINTENANCE
TECHNICAL
SPECIFICATIONS
INDEX
DASHBOARD
AND CONTROLS
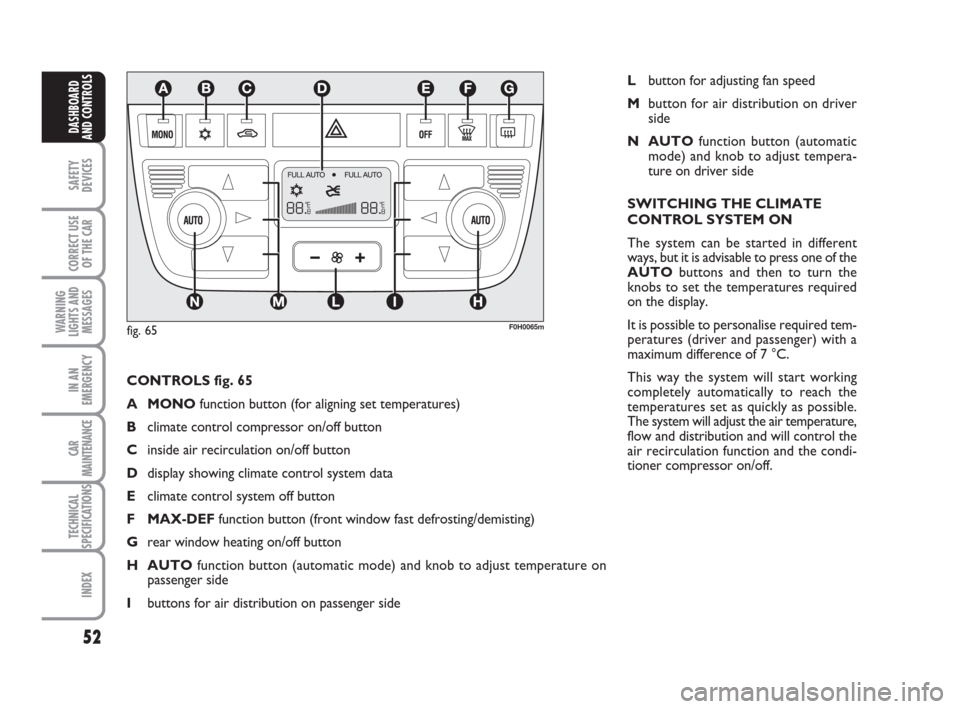
CONTROLS fig. 65
A MONOfunction button (for aligning set temperatures)
Bclimate control compressor on/off button
Cinside air recirculation on/off button
Ddisplay showing climate control system data
Eclimate control system off button
F MAX-DEFfunction button (front window fast defrosting/demisting)
Grear window heating on/off button
H AUTOfunction button (automatic mode) and knob to adjust temperature on
passenger side
Ibuttons for air distribution on passenger side
F0H0065m
Lbutton for adjusting fan speed
Mbutton for air distribution on driver
side
N AUTOfunction button (automatic
mode) and knob to adjust tempera-
ture on driver side
SWITCHING THE CLIMATE
CONTROL SYSTEM ON
The system can be started in different
ways, but it is advisable to press one of the
AUTObuttons and then to turn the
knobs to set the temperatures required
on the display.
It is possible to personalise required tem-
peratures (driver and passenger) with a
maximum difference of 7 °C.
This way the system will start working
completely automatically to reach the
temperatures set as quickly as possible.
The system will adjust the air temperature,
flow and distribution and will control the
air recirculation function and the condi-
tioner compressor on/off.
fig. 65
036-092 idea GB 1 ed 10-07-2008 16:12 Pagina 52