FIAT IDEA 2012 1.G Service Manual
Manufacturer: FIAT, Model Year: 2012, Model line: IDEA, Model: FIAT IDEA 2012 1.GPages: 210, PDF Size: 3.65 MB
Page 41 of 210
40
SAFETY
DEVICES
CORRECT USE
OF THE CAR
WARNING
LIGHTS AND
MESSAGES
IN AN
EMERGENCY
CAR
MAINTENANCE
TECHNICAL
SPECIFICATIONS
INDEX
DASHBOARD
AND CONTROLS
For maximum safety, keep
the back of your seat up-
right, lean back into it and make sure
the seat belt fits closely across your
hips.
WARNING
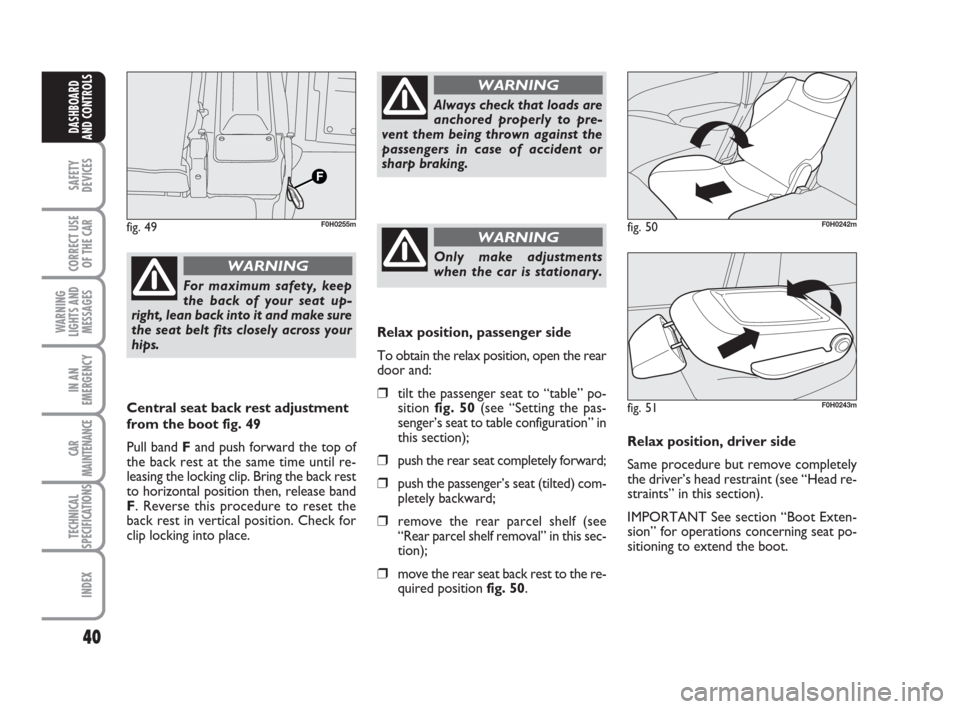
Central seat back rest adjustment
from the boot fig. 49
Pull band Fand push forward the top of
the back rest at the same time until re-
leasing the locking clip. Bring the back rest
to horizontal position then, release band
F. Reverse this procedure to reset the
back rest in vertical position. Check for
clip locking into place.
Always check that loads are
anchored properly to pre-
vent them being thrown against the
passengers in case of accident or
sharp braking.
WARNING
Only make adjustments
when the car is stationary.
WARNINGfig. 49F0H0255m
Relax position, passenger side
To obtain the relax position, open the rear
door and:
❒tilt the passenger seat to “table” po-
sition fig. 50(see “Setting the pas-
senger’s seat to table configuration” in
this section);
❒push the rear seat completely forward;
❒push the passenger’s seat (tilted) com-
pletely backward;
❒remove the rear parcel shelf (see
“Rear parcel shelf removal” in this sec-
tion);
❒move the rear seat back rest to the re-
quired position fig. 50.Relax position, driver side
Same procedure but remove completely
the driver’s head restraint (see “Head re-
straints” in this section).
IMPORTANT See section “Boot Exten-
sion” for operations concerning seat po-
sitioning to extend the boot.
fig. 50F0H0242m
fig. 51F0H0243m
036-092 idea GB 1 ed 10-07-2008 16:12 Pagina 40
Page 42 of 210
41
SAFETY
DEVICES
CORRECT USE
OF THE CAR
WARNING
LIGHTS AND
MESSAGES
IN AN
EMERGENCY
CAR
MAINTENANCE
TECHNICAL
SPECIFICATIONS
INDEX
DASHBOARD
AND CONTROLS
HEAD RESTRAINTS
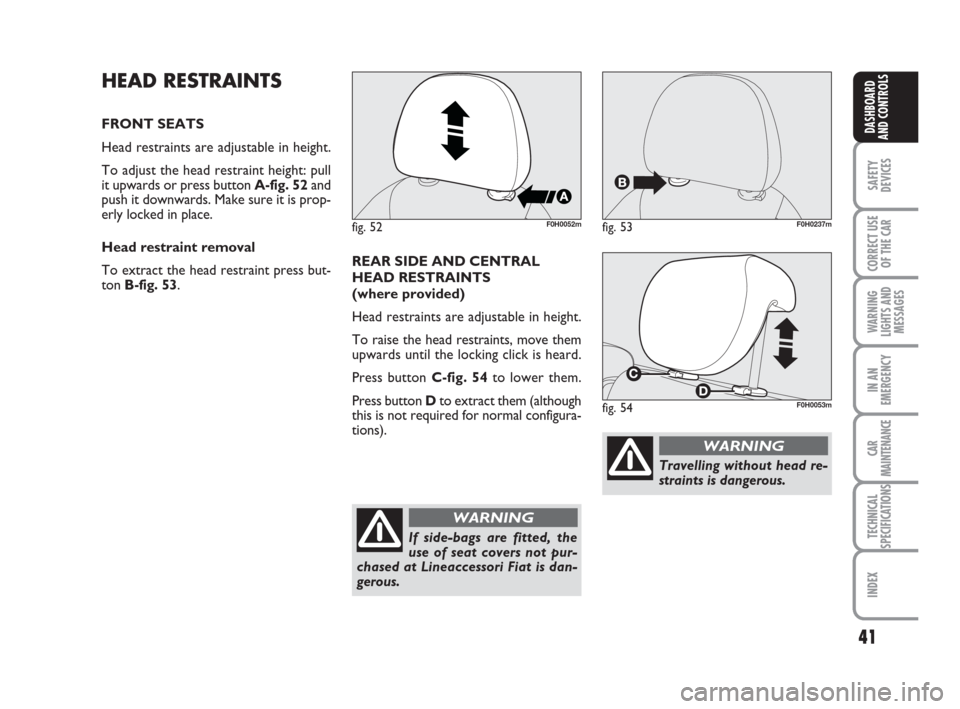
FRONT SEATS
Head restraints are adjustable in height.
To adjust the head restraint height: pull
it upwards or press button A-fig. 52and
push it downwards. Make sure it is prop-
erly locked in place.
Head restraint removal
To extract the head restraint press but-
ton B-fig. 53.
fig. 52F0H0052mfig. 53F0H0237m
fig. 54F0H0053m
REAR SIDE AND CENTRAL
HEAD RESTRAINTS
(where provided)
Head restraints are adjustable in height.
To raise the head restraints, move them
upwards until the locking click is heard.
Press button C-fig. 54to lower them.
Press button Dto extract them (although
this is not required for normal configura-
tions).
If side-bags are fitted, the
use of seat covers not pur-
chased at Lineaccessori Fiat is dan-
gerous.
WARNING
Travelling without head re-
straints is dangerous.
WARNING
036-092 idea GB 1 ed 10-07-2008 16:12 Pagina 41
Page 43 of 210
42
SAFETY
DEVICES
CORRECT USE
OF THE CAR
WARNING
LIGHTS AND
MESSAGES
IN AN
EMERGENCY
CAR
MAINTENANCE
TECHNICAL
SPECIFICATIONS
INDEX
DASHBOARD
AND CONTROLS
Remember that the head re-
straints should be adjusted
to support the back of your head and
not your neck. Only in this position
do they exert their protective action.
WARNING
To optimise head restraint
protective action, adjust the
seat back upright and keep your head
as close as possible to the head re-
straint.
WARNING
When refitting the head re-
straint, check for proper po-
sitioning and locking.
WARNING
Saddle-shaped rear head re-
straints optimise visibility
and shall always be set in the position
of use by rear passengers.
WARNING
REARVIEW MIRRORS
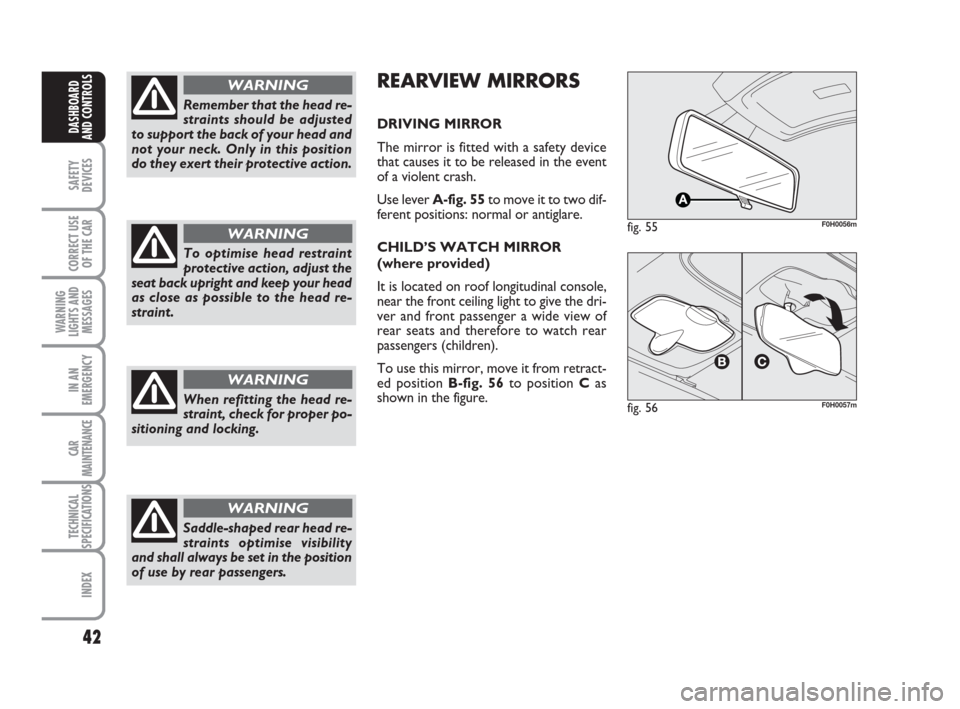
DRIVING MIRROR
The mirror is fitted with a safety device
that causes it to be released in the event
of a violent crash.
Use lever A-fig. 55to move it to two dif-
ferent positions: normal or antiglare.
CHILD’S WATCH MIRROR
(where provided)
It is located on roof longitudinal console,
near the front ceiling light to give the dri-
ver and front passenger a wide view of
rear seats and therefore to watch rear
passengers (children).
To use this mirror, move it from retract-
ed position B-fig. 56to position Cas
shown in the figure.
fig. 55F0H0056m
fig. 56F0H0057m
036-092 idea GB 1 ed 10-07-2008 16:12 Pagina 42
Page 44 of 210
43
SAFETY
DEVICES
CORRECT USE
OF THE CAR
WARNING
LIGHTS AND
MESSAGES
IN AN
EMERGENCY
CAR
MAINTENANCE
TECHNICAL
SPECIFICATIONS
INDEX
DASHBOARD
AND CONTROLS
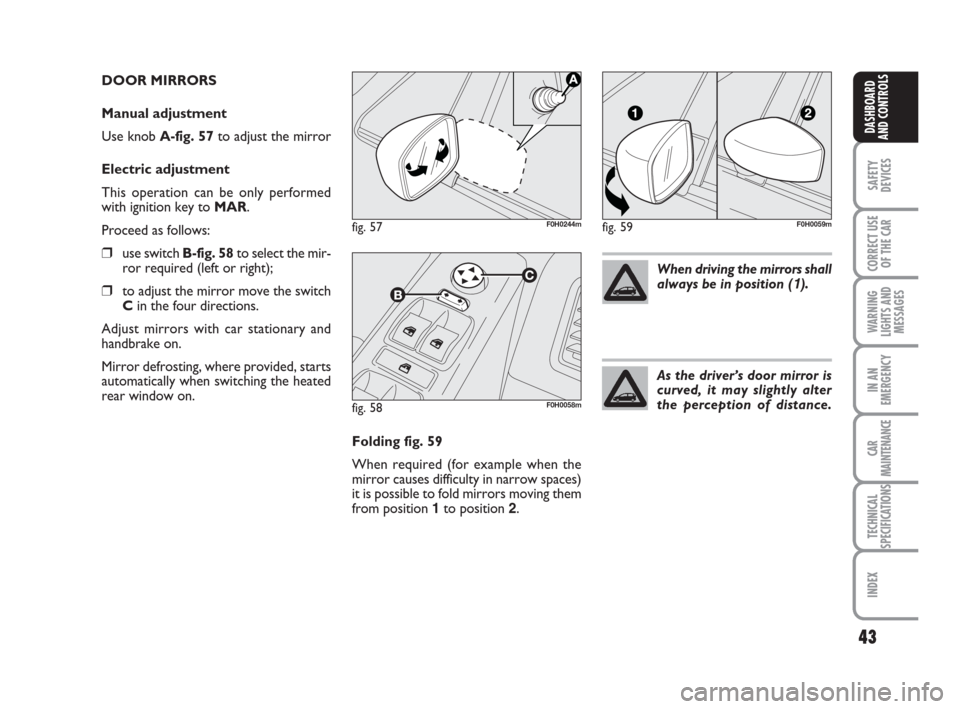
DOOR MIRRORS
Manual adjustment
Use knob A-fig. 57to adjust the mirror
Electric adjustment
This operation can be only performed
with ignition key to MAR.
Proceed as follows:
❒use switch B-fig. 58to select the mir-
ror required (left or right);
❒to adjust the mirror move the switch
Cin the four directions.
Adjust mirrors with car stationary and
handbrake on.
Mirror defrosting, where provided, starts
automatically when switching the heated
rear window on.
fig. 57F0H0244m
fig. 58F0H0058m
fig. 59F0H0059m
Folding fig. 59
When required (for example when the
mirror causes difficulty in narrow spaces)
it is possible to fold mirrors moving them
from position 1to position 2.When driving the mirrors shall
always be in position (
1).
As the driver’s door mirror is
curved, it may slightly alter
the perception of distance.
036-092 idea GB 1 ed 10-07-2008 16:12 Pagina 43
Page 45 of 210

44
SAFETY
DEVICES
CORRECT USE
OF THE CAR
WARNING
LIGHTS AND
MESSAGES
IN AN
EMERGENCY
CAR
MAINTENANCE
TECHNICAL
SPECIFICATIONS
INDEX
DASHBOARD
AND CONTROLS
HEATING/CLIMATE CONTROL SYSTEM
1Fixed vents for defrosting/demisting side windows - 2Side adjustable outlets - 3Fixed vents for defrosting/demisting windscreen
- 4Centre adjustable outlets - 5Lower vents - 6Lower vents for rear passengers.
F0H0738mfig. 60
036-092 idea GB 1 ed 10-07-2008 16:12 Pagina 44
Page 46 of 210
45
SAFETY
DEVICES
CORRECT USE
OF THE CAR
WARNING
LIGHTS AND
MESSAGES
IN AN
EMERGENCY
CAR
MAINTENANCE
TECHNICAL
SPECIFICATIONS
INDEX
DASHBOARD
AND CONTROLS
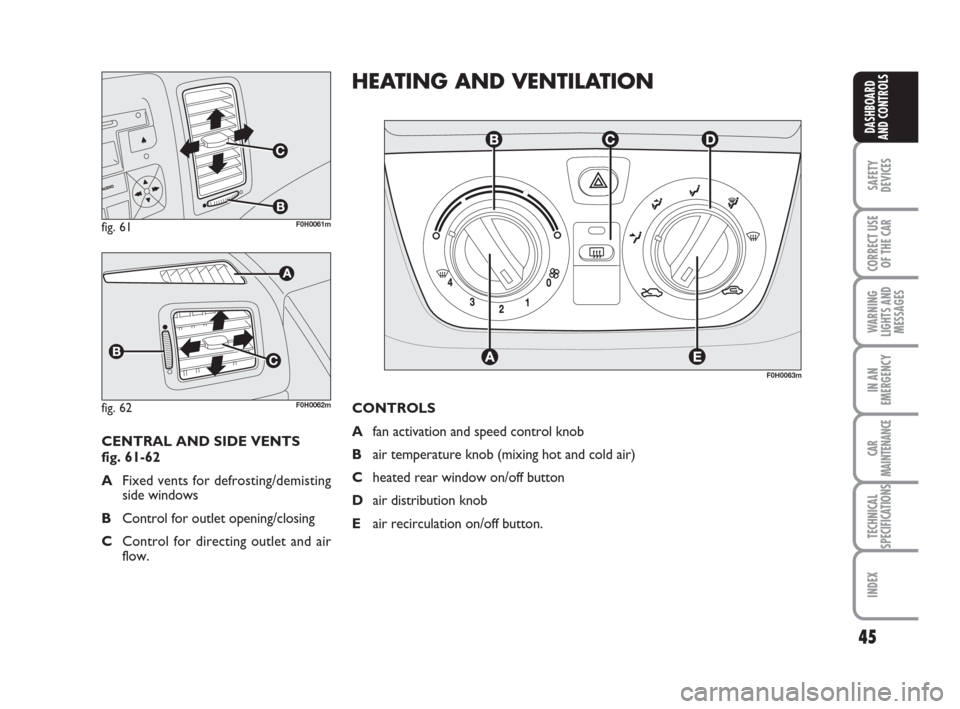
fig. 61F0H0061m
fig. 62F0H0062m
CENTRAL AND SIDE VENTS
fig. 61-62
AFixed vents for defrosting/demisting
side windows
BControl for outlet opening/closing
CControl for directing outlet and air
flow.
F0H0063m
HEATING AND VENTILATION
CONTROLS
Afan activation and speed control knob
Bair temperature knob (mixing hot and cold air)
Cheated rear window on/off button
Dair distribution knob
Eair recirculation on/off button.
036-092 idea GB 1 ed 10-07-2008 16:12 Pagina 45
Page 47 of 210
46
SAFETY
DEVICES
CORRECT USE
OF THE CAR
WARNING
LIGHTS AND
MESSAGES
IN AN
EMERGENCY
CAR
MAINTENANCE
TECHNICAL
SPECIFICATIONS
INDEX
DASHBOARD
AND CONTROLS
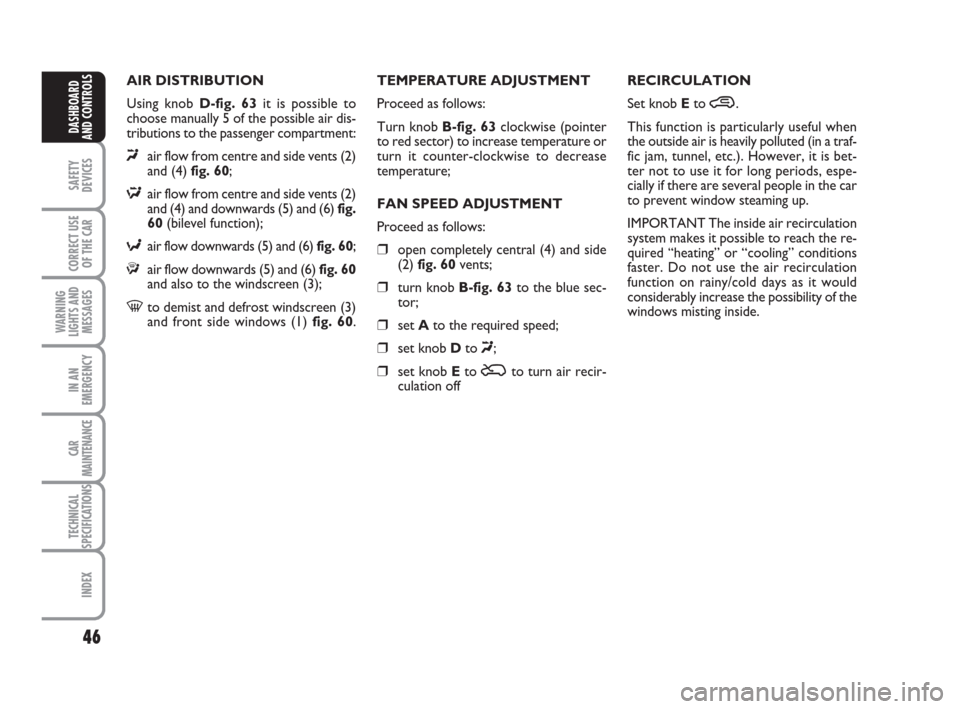
AIR DISTRIBUTION
Using knob D-fig. 63it is possible to
choose manually 5 of the possible air dis-
tributions to the passenger compartment:
«air flow from centre and side vents (2)
and (4) fig. 60;
Δair flow from centre and side vents (2)
and (4) and downwards (5) and (6) fig.
60(bilevel function);
≈air flow downwards (5) and (6) fig. 60;
ƒair flow downwards (5) and (6) fig. 60
and also to the windscreen (3);
-to demist and defrost windscreen (3)
and front side windows (1) fig. 60.TEMPERATURE ADJUSTMENT
Proceed as follows:
Turn knob B-fig. 63clockwise (pointer
to red sector) to increase temperature or
turn it counter-clockwise to decrease
temperature;
FAN SPEED ADJUSTMENT
Proceed as follows:
❒open completely central (4) and side
(2) fig. 60vents;
❒turn knob B-fig. 63to the blue sec-
tor;
❒set Ato the required speed;
❒set knob Dto «;
❒set knob Eto Úto turn air recir-
culation offRECIRCULATION
Set knob Eto ….
This function is particularly useful when
the outside air is heavily polluted (in a traf-
fic jam, tunnel, etc.). However, it is bet-
ter not to use it for long periods, espe-
cially if there are several people in the car
to prevent window steaming up.
IMPORTANT The inside air recirculation
system makes it possible to reach the re-
quired “heating” or “cooling” conditions
faster. Do not use the air recirculation
function on rainy/cold days as it would
considerably increase the possibility of the
windows misting inside.
036-092 idea GB 1 ed 10-07-2008 16:12 Pagina 46
Page 48 of 210
47
SAFETY
DEVICES
CORRECT USE
OF THE CAR
WARNING
LIGHTS AND
MESSAGES
IN AN
EMERGENCY
CAR
MAINTENANCE
TECHNICAL
SPECIFICATIONS
INDEX
DASHBOARD
AND CONTROLS
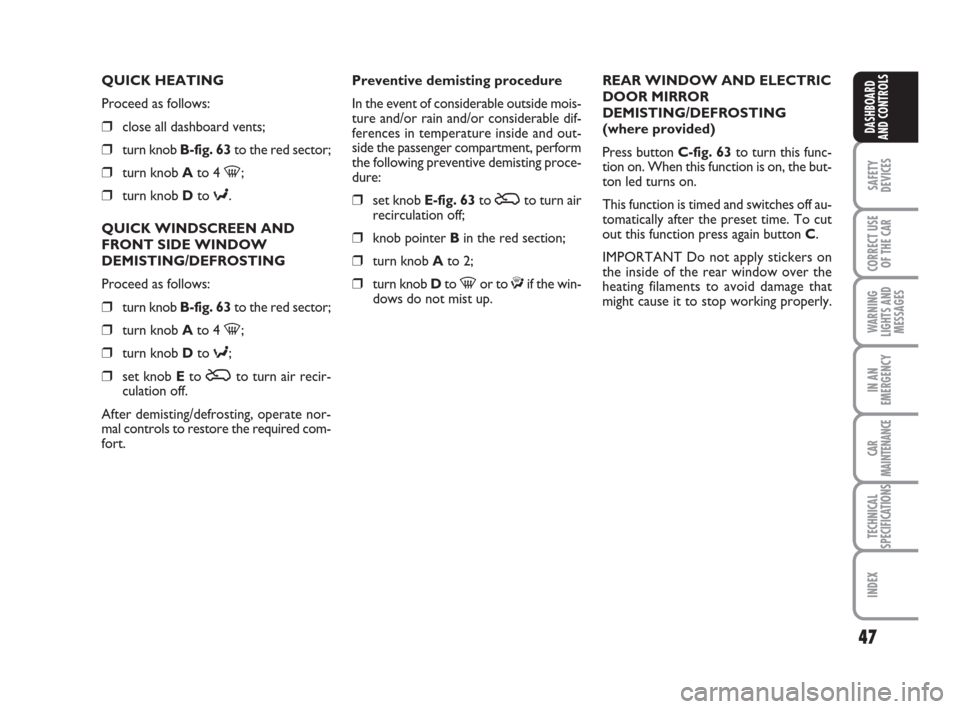
QUICK HEATING
Proceed as follows:
❒close all dashboard vents;
❒turn knob B-fig. 63to the red sector;
❒turn knob Ato 4 -;
❒turn knob Dto ≈.
QUICK WINDSCREEN AND
FRONT SIDE WINDOW
DEMISTING/DEFROSTING
Proceed as follows:
❒turn knob B-fig. 63to the red sector;
❒turn knob Ato 4 -;
❒turn knob Dto ≈;
❒set knob Eto Úto turn air recir-
culation off.
After demisting/defrosting, operate nor-
mal controls to restore the required com-
fort.Preventive demisting procedure
In the event of considerable outside mois-
ture and/or rain and/or considerable dif-
ferences in temperature inside and out-
side the passenger compartment, perform
the following preventive demisting proce-
dure:
❒set knob E-fig. 63to Úto turn air
recirculation off;
❒knob pointer Bin the red section;
❒turn knob Ato 2;
❒turn knob Dto -or to ƒif the win-
dows do not mist up. REAR WINDOW AND ELECTRIC
DOOR MIRROR
DEMISTING/DEFROSTING
(where provided)
Press button C-fig. 63to turn this func-
tion on. When this function is on, the but-
ton led turns on.
This function is timed and switches off au-
tomatically after the preset time. To cut
out this function press again button C.
IMPORTANT Do not apply stickers on
the inside of the rear window over the
heating filaments to avoid damage that
might cause it to stop working properly.
036-092 idea GB 1 ed 10-07-2008 16:12 Pagina 47
Page 49 of 210
48
SAFETY
DEVICES
CORRECT USE
OF THE CAR
WARNING
LIGHTS AND
MESSAGES
IN AN
EMERGENCY
CAR
MAINTENANCE
TECHNICAL
SPECIFICATIONS
INDEX
DASHBOARD
AND CONTROLS
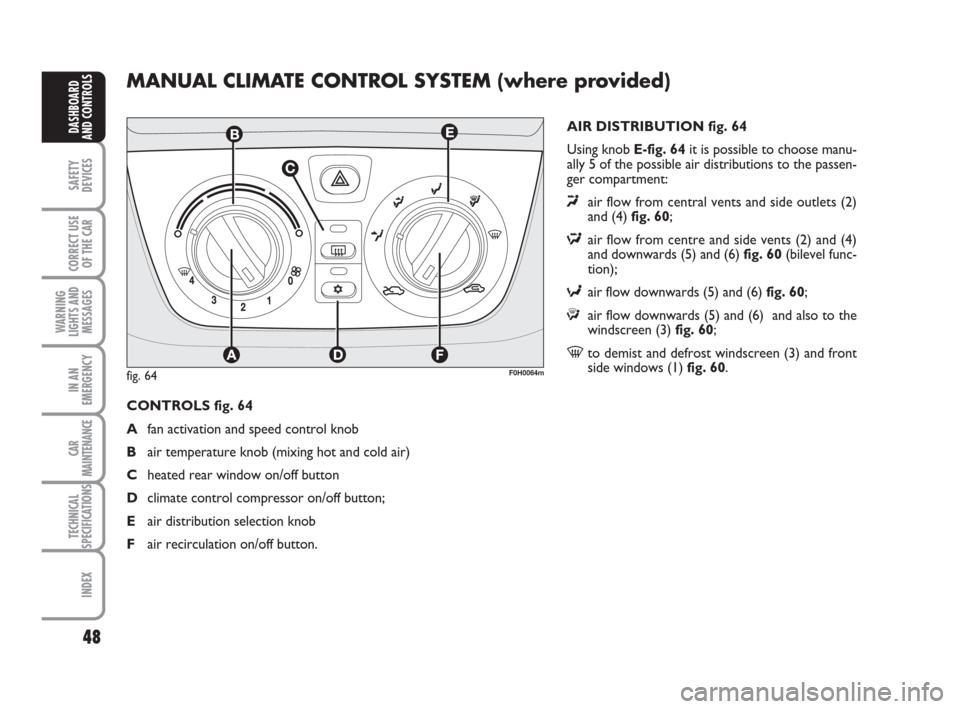
MANUAL CLIMATE CONTROL SYSTEM (where provided)
AIR DISTRIBUTION fig. 64
Using knob E-fig. 64it is possible to choose manu-
ally 5 of the possible air distributions to the passen-
ger compartment:
«air flow from central vents and side outlets (2)
and (4) fig. 60;
Δair flow from centre and side vents (2) and (4)
and downwards (5) and (6) fig. 60(bilevel func-
tion);
≈air flow downwards (5) and (6) fig. 60;
ƒair flow downwards (5) and (6) and also to the
windscreen (3) fig. 60;
-to demist and defrost windscreen (3) and front
side windows (1) fig. 60.
CONTROLS fig. 64
Afan activation and speed control knob
Bair temperature knob (mixing hot and cold air)
Cheated rear window on/off button
Dclimate control compressor on/off button;
Eair distribution selection knob
Fair recirculation on/off button.
F0H0064mfig. 64
036-092 idea GB 1 ed 10-07-2008 16:12 Pagina 48
Page 50 of 210
49
SAFETY
DEVICES
CORRECT USE
OF THE CAR
WARNING
LIGHTS AND
MESSAGES
IN AN
EMERGENCY
CAR
MAINTENANCE
TECHNICAL
SPECIFICATIONS
INDEX
DASHBOARD
AND CONTROLS
TEMPERATURE ADJUSTMENT
Proceed as follows:
Turn knob B-fig. 64clockwise (pointer
to red sector) to increase temperature or
turn it counter-clockwise to decrease
temperature;
FAN SPEED ADJUSTMENT
Proceed as follows:
❒open completely central (4) and side
(2) fig. 60vents;
❒turn knob B-fig. 64to the blue sec-
tor;
❒set Ato the required speed;
❒set knob Eto «;
❒set knob Fto Úto turn air recir-
culation off.RECIRCULATION
Set knob F-fig. 64to Ú.
This function is particularly useful when
the outside air is heavily polluted (in a traf-
fic jam, tunnel, etc.). However, it is bet-
ter not to use it for long periods, espe-
cially if there are several people in the car
to prevent window steaming up.
IMPORTANT The inside air recirculation
system makes it possible to reach the re-
quired “heating” or “cooling” conditions
faster. Do not use the air recirculation
function on rainy/cold days as it would
considerably increase the possibility of the
windows misting inside.
QUICK HEATING
Proceed as follows:
❒close all dashboard vents;
❒turn knob B-fig. 64to the red sector;
❒turn knob Ato 4 -;
❒turn knob Eto «.QUICK WINDSCREEN AND
FRONT SIDE WINDOW
DEMISTING/DEFROSTING
Proceed as follows:
❒turn knob B-fig. 64to the red sector;
❒turn knob Ato 4 -;
❒turn knob Eto «;
❒set knob Fto Úto turn air recir-
culation off.
After demisting/defrosting, operate the
controls to restore the required comfort.
Preventive demisting procedure
In the event of considerable outside mois-
ture and/or rain and/or considerable dif-
ferences in temperature inside and out-
side the passenger compartment, perform
the following preventive demisting proce-
dure:
❒set knob F-fig. 64 to Úto turn air
recirculation off;
❒turn knob Bto the red sector;
❒turn knob Ato 2;
036-092 idea GB 1 ed 10-07-2008 16:12 Pagina 49