technical specifications FIAT LINEA 2007 1.G Manual Online
[x] Cancel search | Manufacturer: FIAT, Model Year: 2007, Model line: LINEA, Model: FIAT LINEA 2007 1.GPages: 230, PDF Size: 3.31 MB
Page 85 of 230
84
SAFETY
DEVICES
CORRECT USE
OF THE
CAR
WARNING
LIGHTS AND
MESSAGES
IN AN
EMERGENCY
CAR
MAINTENANCE
TECHNICAL
SPECIFICATIONS
INDEX
DASHBOARD
AND CONTROLS
Hold one of the buttons pressed for
longer than half a second to operate the
automatic continuous window operation
function. The window will stop when its
reached end of travel or when the but-
ton is pressed again.
The system conforms to
the forthcoming standard
2000/4/EC concerning the safety of
passengers leaning out of the pas-
senger compartment.
WARNINGIMPORTANT With ignition key at STOP
or removed, the power windows remain
activated for about 2 minutes and are de-
activated immediately the moment a door
is opened.
Important On some versions, pressing the
remote control button
Ëfor over 2 sec-
onds will open the windows whereas
pressing the remote control button
Áfor
over 2 seconds will close them.
Page 86 of 230
85
SAFETY
DEVICES
CORRECT USE
OF THE
CAR
WARNING
LIGHTS AND
MESSAGES
IN AN
EMERGENCY
CAR
MAINTENANCE
TECHNICAL
SPECIFICATIONS
INDEX
DASHBOARD
AND CONTROLS
Power window system initialisation
Safety system shall be re-initialised after
disconnecting the battery or if the rele-
vant protection fuse is blown.
Initialisation procedure:
❒fully close manually the window to ini-
tialise;
❒rafter the window has reached the up-
per end of travel, hold the up button
pressed for at least one second.
Incorrect use of the power
windows may be dangerous.
Before operation, always check that
no-one is exposed to the risk of being
injured by directly by the moving win-
dow or objects getting caught and
dragged. When leaving the car, al-
ways remove the key from the igni-
tion device to avoid the risk of injury
due to accidental operation of the
power windows.
WARNING
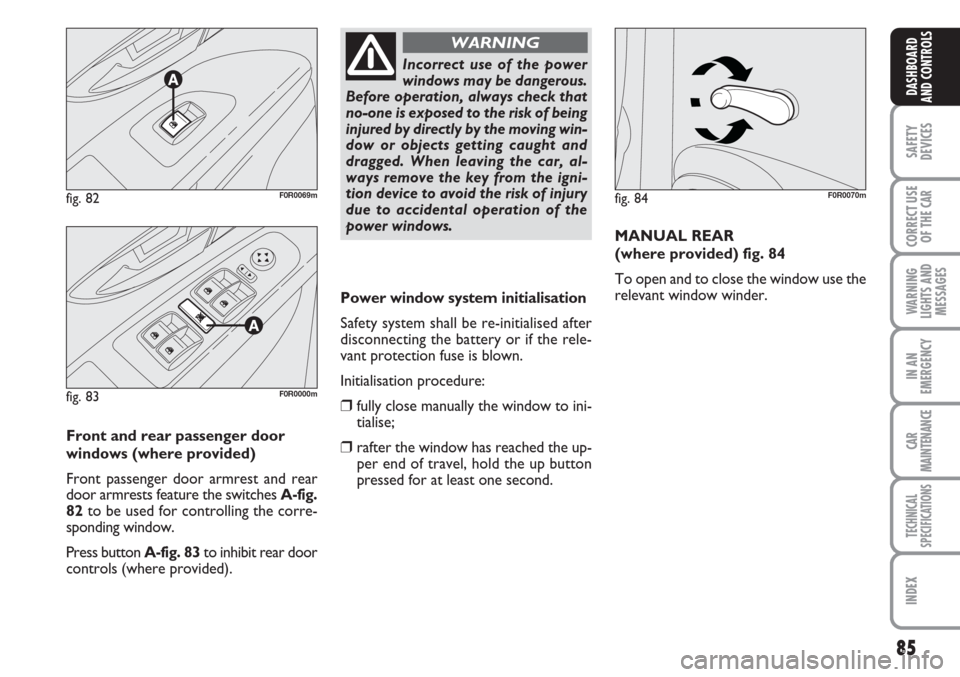
Front and rear passenger door
windows (where provided)
Front passenger door armrest and rear
door armrests feature the switches A-fig.
82to be used for controlling the corre-
sponding window.
Press button A-fig. 83to inhibit rear door
controls (where provided).MANUAL REAR
(where provided) fig. 84
To open and to close the window use the
relevant window winder.
fig. 84F0R0070mfig. 82F0R0069m
fig. 83F0R0000m
Page 87 of 230
86
SAFETY
DEVICES
CORRECT USE
OF THE
CAR
WARNING
LIGHTS AND
MESSAGES
IN AN
EMERGENCY
CAR
MAINTENANCE
TECHNICAL
SPECIFICATIONS
INDEX
DASHBOARD
AND CONTROLS
BOOT
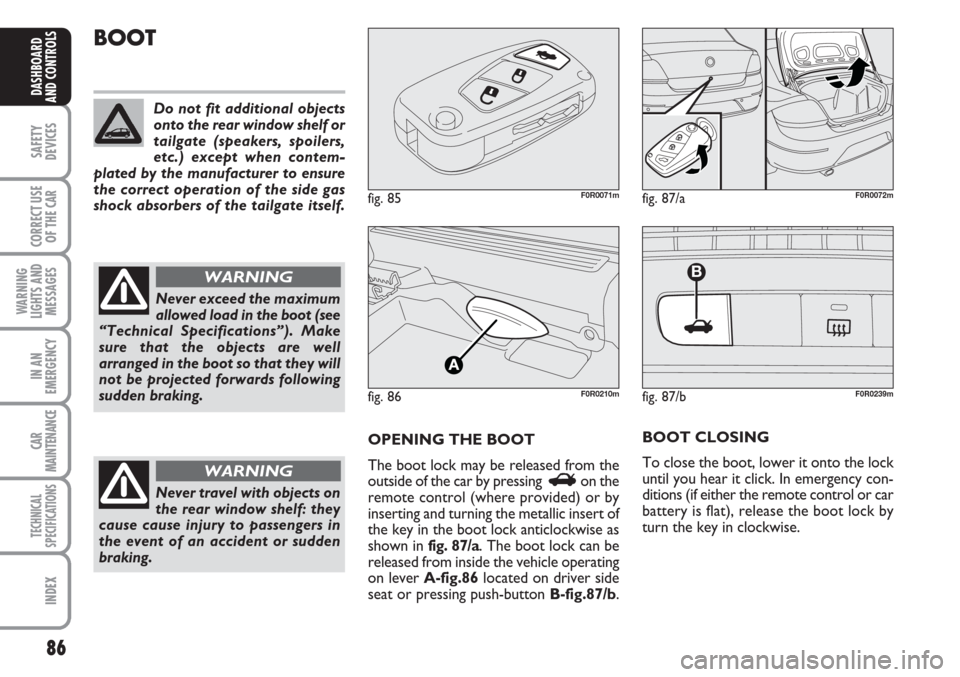
OPENING THE BOOT
The boot lock may be released from the
outside of the car by pressing
Ron the
remote control (where provided) or by
inserting and turning the metallic insert of
the key in the boot lock anticlockwise as
shown in fig. 87/a. The boot lock can be
released from inside the vehicle operating
on lever A-fig.86 located on driver side
seat or pressing push-button B-fig.87/b.BOOT CLOSING
To close the boot, lower it onto the lock
until you hear it click. In emergency con-
ditions (if either the remote control or car
battery is flat), release the boot lock by
turn the key in clockwise.
fig. 85F0R0071m
fig. 86F0R0210m
fig. 87/aF0R0072m
Do not fit additional objects
onto the rear window shelf or
tailgate (speakers, spoilers,
etc.) except when contem-
plated by the manufacturer to ensure
the correct operation of the side gas
shock absorbers of the tailgate itself.
Never exceed the maximum
allowed load in the boot (see
“Technical Specifications”). Make
sure that the objects are well
arranged in the boot so that they will
not be projected forwards following
sudden braking.
WARNING
Never travel with objects on
the rear window shelf: they
cause cause injury to passengers in
the event of an accident or sudden
braking.
WARNING
fig. 87/b
B
F0R0239m
Page 88 of 230
87
SAFETY
DEVICES
CORRECT USE
OF THE
CAR
WARNING
LIGHTS AND
MESSAGES
IN AN
EMERGENCY
CAR
MAINTENANCE
TECHNICAL
SPECIFICATIONS
INDEX
DASHBOARD
AND CONTROLS
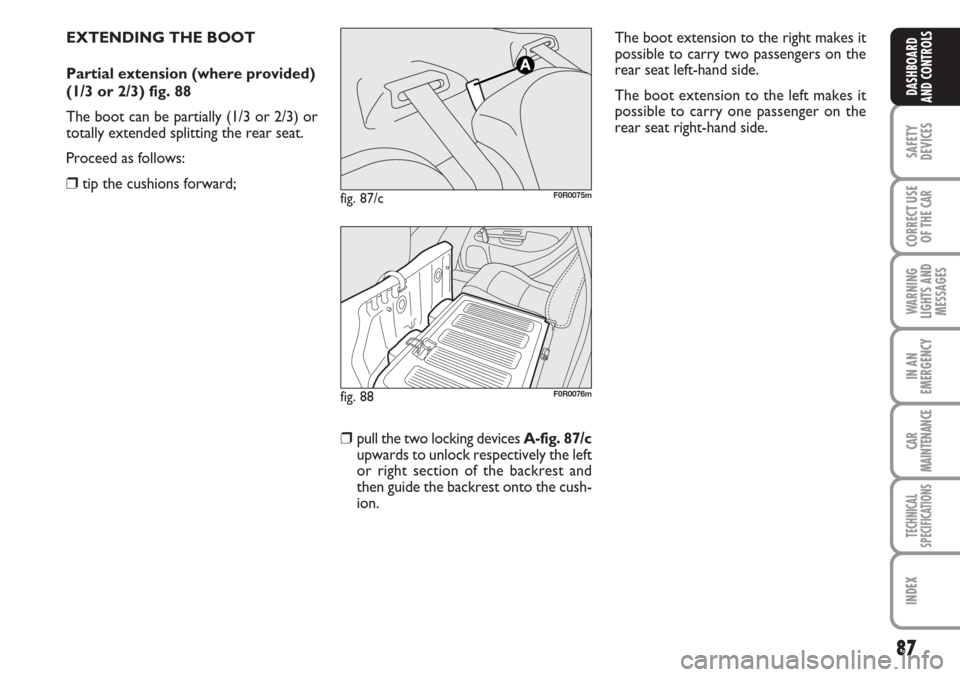
EXTENDING THE BOOT
Partial extension (where provided)
(1/3 or 2/3) fig. 88
The boot can be partially (1/3 or 2/3) or
totally extended splitting the rear seat.
Proceed as follows:
❒tip the cushions forward;fig. 87/cF0R0075m
fig. 88F0R0076m
❒pull the two locking devices A-fig. 87/c
upwards to unlock respectively the left
or right section of the backrest and
then guide the backrest onto the cush-
ion.The boot extension to the right makes it
possible to carry two passengers on the
rear seat left-hand side.
The boot extension to the left makes it
possible to carry one passenger on the
rear seat right-hand side.
Page 89 of 230
88
SAFETY
DEVICES
CORRECT USE
OF THE
CAR
WARNING
LIGHTS AND
MESSAGES
IN AN
EMERGENCY
CAR
MAINTENANCE
TECHNICAL
SPECIFICATIONS
INDEX
DASHBOARD
AND CONTROLS
fig. 90F0R0078m
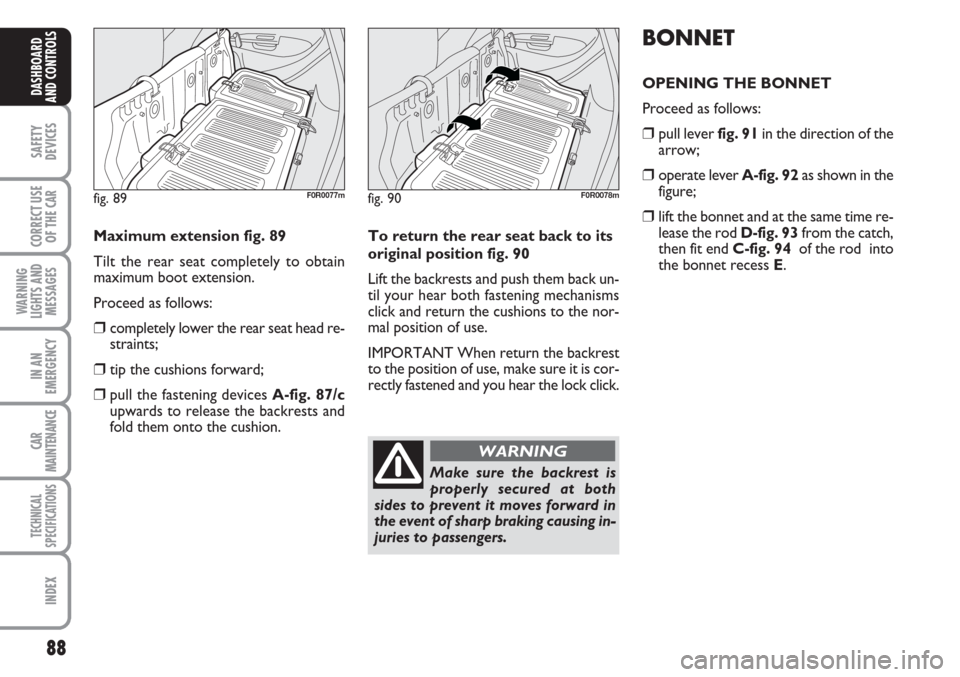
To return the rear seat back to its
original position fig. 90
Lift the backrests and push them back un-
til your hear both fastening mechanisms
click and return the cushions to the nor-
mal position of use.
IMPORTANT When return the backrest
to the position of use, make sure it is cor-
rectly fastened and you hear the lock click. Maximum extension fig. 89
Tilt the rear seat completely to obtain
maximum boot extension.
Proceed as follows:
❒completely lower the rear seat head re-
straints;
❒tip the cushions forward;
❒pull the fastening devices A-fig. 87/c
upwards to release the backrests and
fold them onto the cushion.
fig. 89F0R0077m
Make sure the backrest is
properly secured at both
sides to prevent it moves forward in
the event of sharp braking causing in-
juries to passengers.
WARNING
BONNET
OPENING THE BONNET
Proceed as follows:
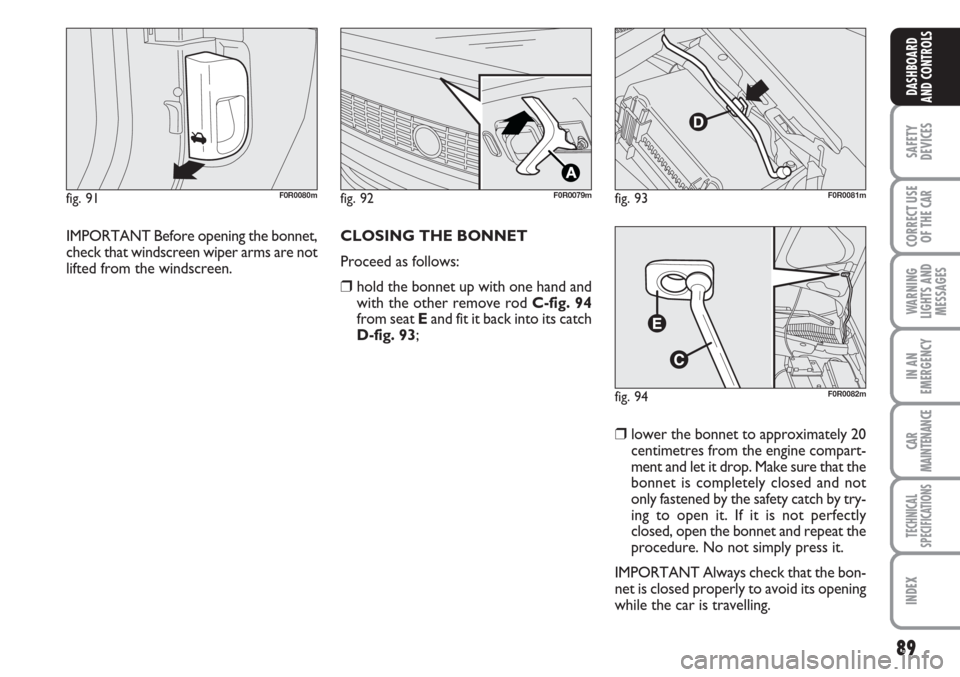
❒pull lever fig. 91in the direction of the
arrow;
❒operate lever A-fig. 92as shown in the
figure;
❒lift the bonnet and at the same time re-
lease the rod D-fig. 93from the catch,
then fit end C-fig. 94 of the rod into
the bonnet recess E.
Page 90 of 230
89
SAFETY
DEVICES
CORRECT USE
OF THE
CAR
WARNING
LIGHTS AND
MESSAGES
IN AN
EMERGENCY
CAR
MAINTENANCE
TECHNICAL
SPECIFICATIONS
INDEX
DASHBOARD
AND CONTROLS
IMPORTANT Before opening the bonnet,
check that windscreen wiper arms are not
lifted from the windscreen.CLOSING THE BONNET
Proceed as follows:
❒hold the bonnet up with one hand and
with the other remove rod C-fig. 94
from seat Eand fit it back into its catch
D-fig. 93;
❒lower the bonnet to approximately 20
centimetres from the engine compart-
ment and let it drop. Make sure that the
bonnet is completely closed and not
only fastened by the safety catch by try-
ing to open it. If it is not perfectly
closed, open the bonnet and repeat the
procedure. No not simply press it.
IMPORTANT Always check that the bon-
net is closed properly to avoid its opening
while the car is travelling.
fig. 91F0R0080mfig. 92F0R0079m
fig. 94F0R0082m
fig. 93F0R0081m
Page 91 of 230
90
SAFETY
DEVICES
CORRECT USE
OF THE
CAR
WARNING
LIGHTS AND
MESSAGES
IN AN
EMERGENCY
CAR
MAINTENANCE
TECHNICAL
SPECIFICATIONS
INDEX
DASHBOARD
AND CONTROLS
The bonnet must always be
perfectly closed while trav-
elling for reasons of safety. Make sure
that the bonnet is perfectly closed
and that the lock is engaged. If you
discover that the bonnet is not per-
fectly closed while travelling, stop im-
mediately and close the bonnet in the
correct manner.
WARNING
The bonnet may drop sud-
denly if the supporting rod is
not in correct position.
WARNING
Perform these operations
when the car is stationary
only.
WARNING
ROOF RACK/SKI RACK
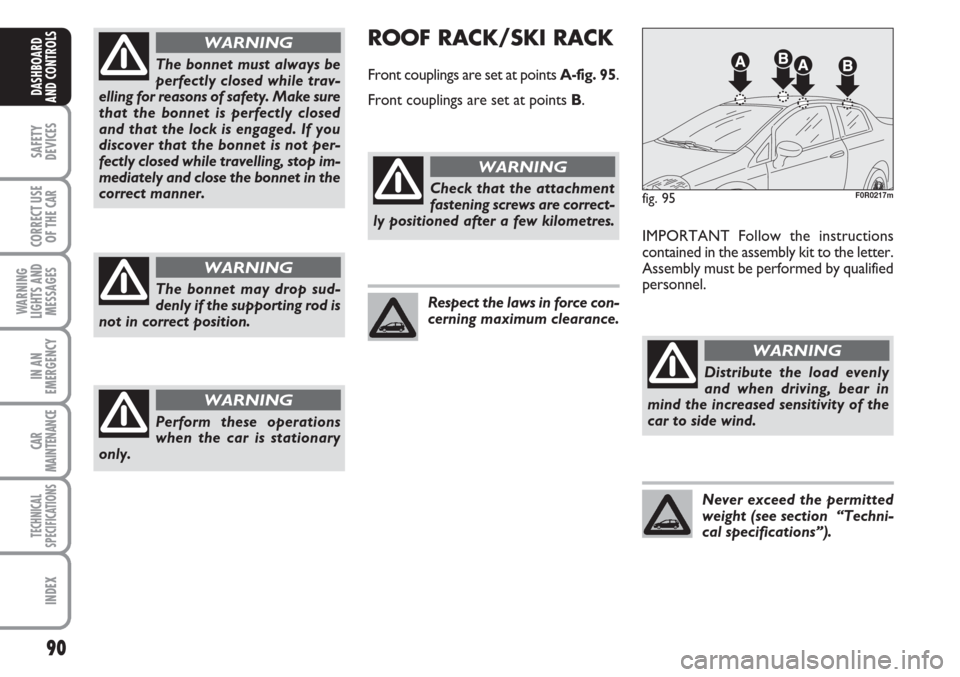
Front couplings are set at points A-fig. 95.
Front couplings are set at points B.
IMPORTANT Follow the instructions
contained in the assembly kit to the letter.
Assembly must be performed by qualified
personnel.
fig. 95F0R0217mCheck that the attachment
fastening screws are correct-
ly positioned after a few kilometres.
WARNING
Respect the laws in force con-
cerning maximum clearance.
Distribute the load evenly
and when driving, bear in
mind the increased sensitivity of the
car to side wind.
WARNING
Never exceed the permitted
weight (see section “Techni-
cal specifications”).
Page 92 of 230
91
SAFETY
DEVICES
CORRECT USE
OF THE
CAR
WARNING
LIGHTS AND
MESSAGES
IN AN
EMERGENCY
CAR
MAINTENANCE
TECHNICAL
SPECIFICATIONS
INDEX
DASHBOARD
AND CONTROLS
HEADLIGHTS
BEAM DIRECTION
Correction direction of the headlights is
essentially for the comfort and safety of
the driver and the other road users. The
headlights must be correctly directed to
ensure the best visibility conditions when
the headlights are on. Contact Fiat Deal-
ership to have the headlights properly ad-
justed.
HEADLIGHT AIMING DEVICE
This device works with the key at MAR
and the dipped beam headlights on. The
car will slant backwards when it is loaded,
raising the light beam. The beams must
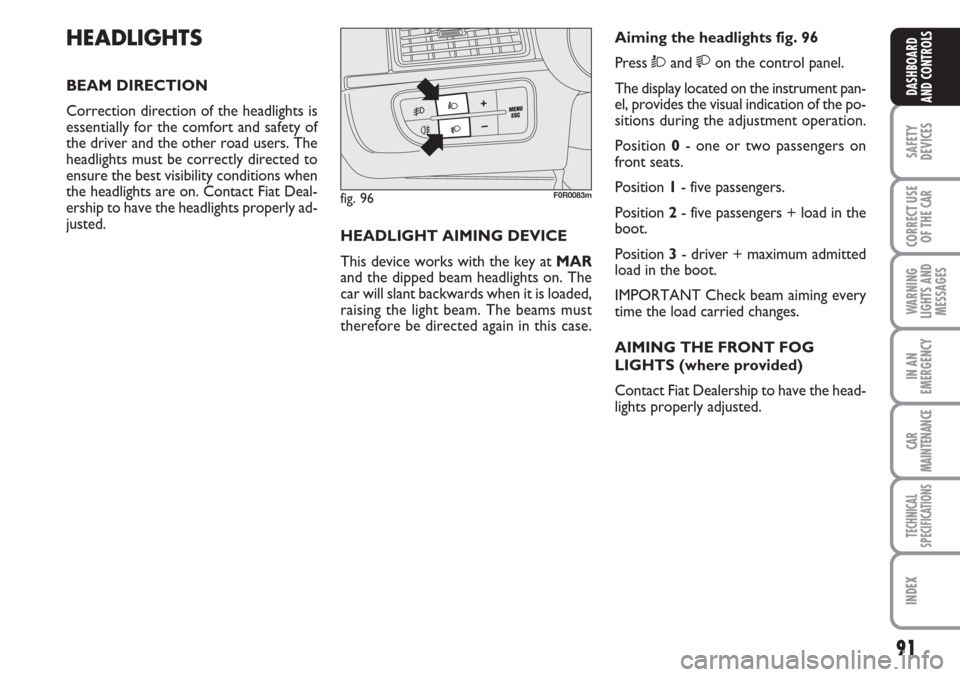
therefore be directed again in this case.Aiming the headlights fig. 96
Press Òand on the control panel.
The display located on the instrument pan-
el, provides the visual indication of the po-
sitions during the adjustment operation.
Position 0- one or two passengers on
front seats.
Position 1- five passengers.
Position 2- five passengers + load in the
boot.
Position 3- driver + maximum admitted
load in the boot.
IMPORTANT Check beam aiming every
time the load carried changes.
AIMING THE FRONT FOG
LIGHTS (where provided)
Contact Fiat Dealership to have the head-
lights properly adjusted.
fig. 96F0R0083m
Page 93 of 230
92
SAFETY
DEVICES
CORRECT USE
OF THE
CAR
WARNING
LIGHTS AND
MESSAGES
IN AN
EMERGENCY
CAR
MAINTENANCE
TECHNICAL
SPECIFICATIONS
INDEX
DASHBOARD
AND CONTROLS
ABS SYSTEM
If you have never driven a car with ABS be-
fore, it is advisable to perform a few tests
on slippery ground, naturally in conditions
of safety and respecting the Highway Code
of the country where you are driving. Read
the following information carefully.
The car is fitted with an ABS braking sys-
tem, which prevents the wheels from lock-
ing when braking, makes the most of road
grip and gives the best control when emer-
gency braking under difficulty road condi-
tions.
System is completed by EBD (Electronic
Braking force Distribution), which dis-
tributes the braking action between front
and rear wheels.
IMPORTANT Maximum efficiency of the
braking system is obtained after approxi-
mately 500 km (when the car is new or af-
ter replacing the brake pads/discs): during
this time, avoid sudden, repeated and pro-
longed braking.The ABS exploits the tyre-
road grip at the best, but it
cannot improve it; you should there-
fore take every care when driving on
slippery surfaces without taking un-
necessary risks.
WARNING
ABS SYSTEM INTERVENTION
Intervention of the ABS is detected by a
slight pulsing of the brake pedal accompa-
nied by noise: such an event indicates that
you need to adjust your speed to the type
of road on which you are travelling.
When the ABS intervenes it
means that you are ap-
proaching the grip limit between tyres
and road: slow down to exploit all the
available grip.
WARNING
FAILURE INDICATIONS
ABS failure
ABS failure is indicated by the turning on
of warning light
>on the instrument pan-
el together with the dedicated message on
the multifunctional display (where pro-
vided), (see section “Warning lights and
messages”).
In the case, the braking system will work
as normal without the extra potentials of-
fered by the ABS system. Drive carefully
to the nearest Fiat Dealership to have the
system checked.
Page 94 of 230
93
SAFETY
DEVICES
CORRECT USE
OF THE
CAR
WARNING
LIGHTS AND
MESSAGES
IN AN
EMERGENCY
CAR
MAINTENANCE
TECHNICAL
SPECIFICATIONS
INDEX
DASHBOARD
AND CONTROLS
BRAKE ASSIST
(integrated ESP emergency
braking assistance)
(where provided)
This system (which cannot be deactivat-
ed) recognises emergency braking condi-
tions according to the speed of operation
of the brake pedal and provides an addi-
tional hydraulic braking pressure to sup-
port that provided by the driver. This al-
lows faster and more power operation of
the braking system.
Brake Assist is deactivated on the versions
equipped with ESP, in the event of ESP sys-
tem failure (indicated by warning light
áswitching on together with the message
on the multifunctional display, where pro-
vided).
ESP SYSTEM
(Electronic Stability
Program)
(where provided)
The ESP system is an electronic system
controlling the car stability in the event of
tyre grip loss.
The ESP system is therefore particularly
useful when grip conditions of the road sur-
faces changes.
In addition to the ESP system, ASR system
and Hill Holder, (where provided) also the
MSR system (adjusting the engine braking
torque) and the HBA system (improving
the braking force during emergency brak-
ing) are provided.
ABS SYSTEM INTERVENTION
It is signalled by the blinking of the warn-
ing light
áon the instrument panel, to
inform the driver that the car is in criti-
cal stability and grip conditions.When the ABS cuts in, and
you feel the brake pedal pul-
sating, do not remove your foot, but
keep it pressed; in doing so you will
stop in the shortest amount of space
possible under the current road con-
ditions.
WARNING
EBD failure
ABS failure is indicated by the turning on
warning lights
>and xon the instru-
ment panel together with the dedicated
message on the multifunctional display
(where provided), (see section “Warning
lights and messages”).
In this case, the rear wheels may sudden-
ly lock and the car may swerve. Drive
carefully to the nearest Fiat Dealership to
have the system checked.
If warning light xonly lights
up on the instrument panel
(with a message on the multifunc-
tional display, where provided), stop
the car immediate and go to the
nearest Fiat Dealership. Leakage of
hydraulic fluid from the braking sys-
tem will compromise functionality of
the braking system, either of the con-
ventional type or with ABS.
WARNING