diagram FIAT MAREA 2000 1.G User Guide
[x] Cancel search | Manufacturer: FIAT, Model Year: 2000, Model line: MAREA, Model: FIAT MAREA 2000 1.GPages: 330
Page 69 of 330
Marea- Marea Weekend • ^ Engine
2000 range (Q) Fuel feed system
10.
ENGINE MANAGEMENT SYSTEM
The Marea-Marea Weekend 1596 16v has a 4 cylinder in line engine, with 16 valves, 1596 cc, twin over
head camshaft and a Marelli IAW 4EF integrated electronic injection/ignition system.
The fuel system differs from the one described for the 1581 16v "99 range" version through the addition
of several variants to make it compatible with the EEC Stage 3 EOBD regulations.
The main modifications to the system can be summarized as follows:
- Engine management control unit with IAW 4EF
- Catalytic converter near the exhaust manifold to take maximum advantage of the heat of the gases.
- Two Lambda senors, one upstream (front) and one downstream (rear) which check the quality of the
exhaust gases and the operation of the catalyzer.
- Adoption of a timing sensor on the inlet side timing pulley.
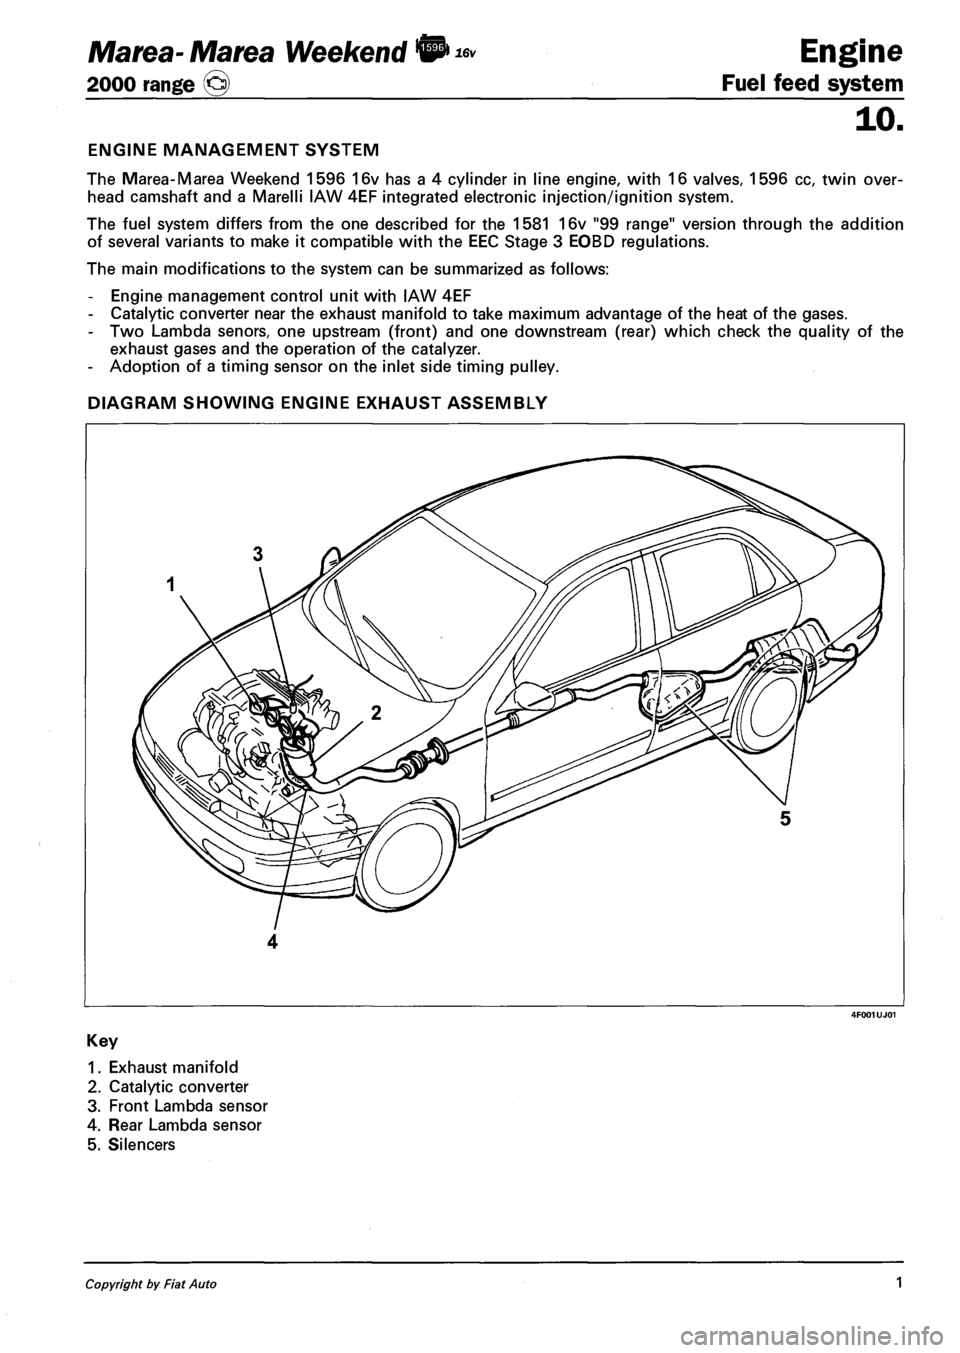
DIAGRAM SHOWING ENGINE EXHAUST ASSEMBLY
1. Exhaust manifold
2. Catalytic converter
3. Front Lambda sensor
4. Rear Lambda sensor
5. Silencers
Copyright by Fiat Auto 1
Page 78 of 330
Marea- Marea Weekend & Engine
2000 range (§) Fuel feed system
ENGINE MANAGEMENT SYSTEM
Foreword
The Marea-Marea Weekend 1998 20v is equipped with a 5 cylinder in line engine with 20 valves, 1998
cc, twin overhead camshaft and a Bosch ME3.1 integrated electronic injection/ignition system.
The fuel system differs from the one described for the 1998 20v "99 range" version through the addition
of several variants to make it compatible with the EEC Stage 3 EOBD regulations.
The main modifications to the system can be summarized as follows:
- Catalytic converter near the exhaust manifold to take maximum advantage of the heat of the gases.
- Two Lambda sensors, one upstream (front) and one downstream (rear) which check the quality of the
exhaust gases and the operation of the catalyzer.
- Adoption of an accelerometre sensor on the right shock absorber turret, used to distinguish between
engine torque variations doe to the uneveness of the road surface and those due to failed ignition in
the combustion chamber (misfire).
- Adoption of a timing sensor on the inlet side timing pulley.
- Multi-purpose valve on the tank to prevent leaks.
- Adoption of raipd attachment connectors for the anti-evaporation system pipes.
- Cap on the fuel filler with an attachment cable.
For further information on the fuel system, refer to publication 507137.
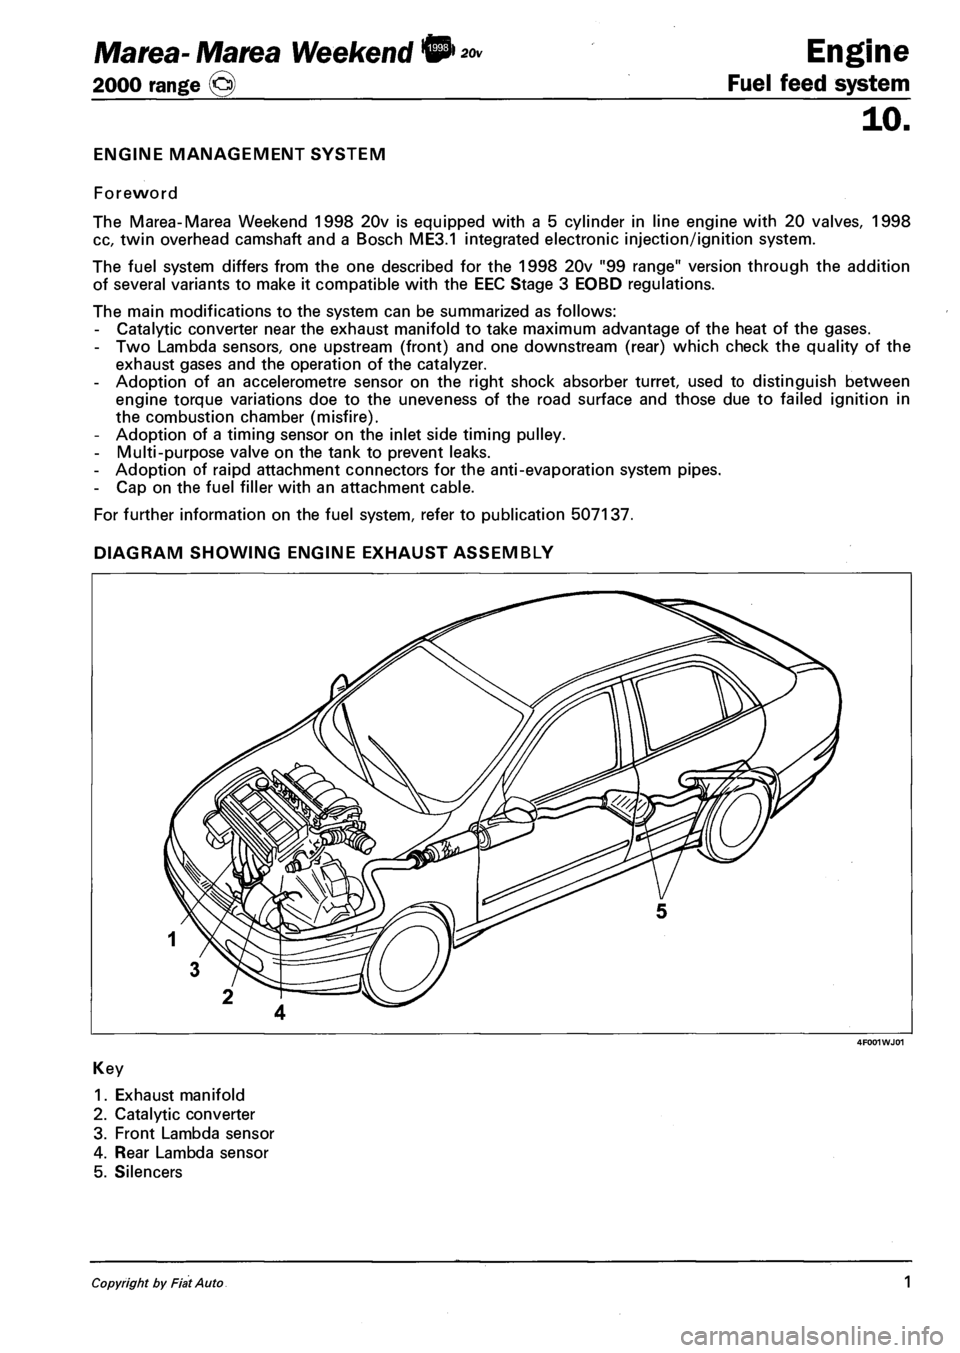
DIAGRAM SHOWING ENGINE EXHAUST ASSEMBLY
4F001WJ01
Key
1. Exhaust manifold
2. Catalytic converter
3. Front Lambda sensor
4. Rear Lambda sensor
5. Silencers
Copyright by Fiat Auto 1
Page 81 of 330
Engine
Fuel feed system
Marea- Marea Weekend 9
2000 range ©
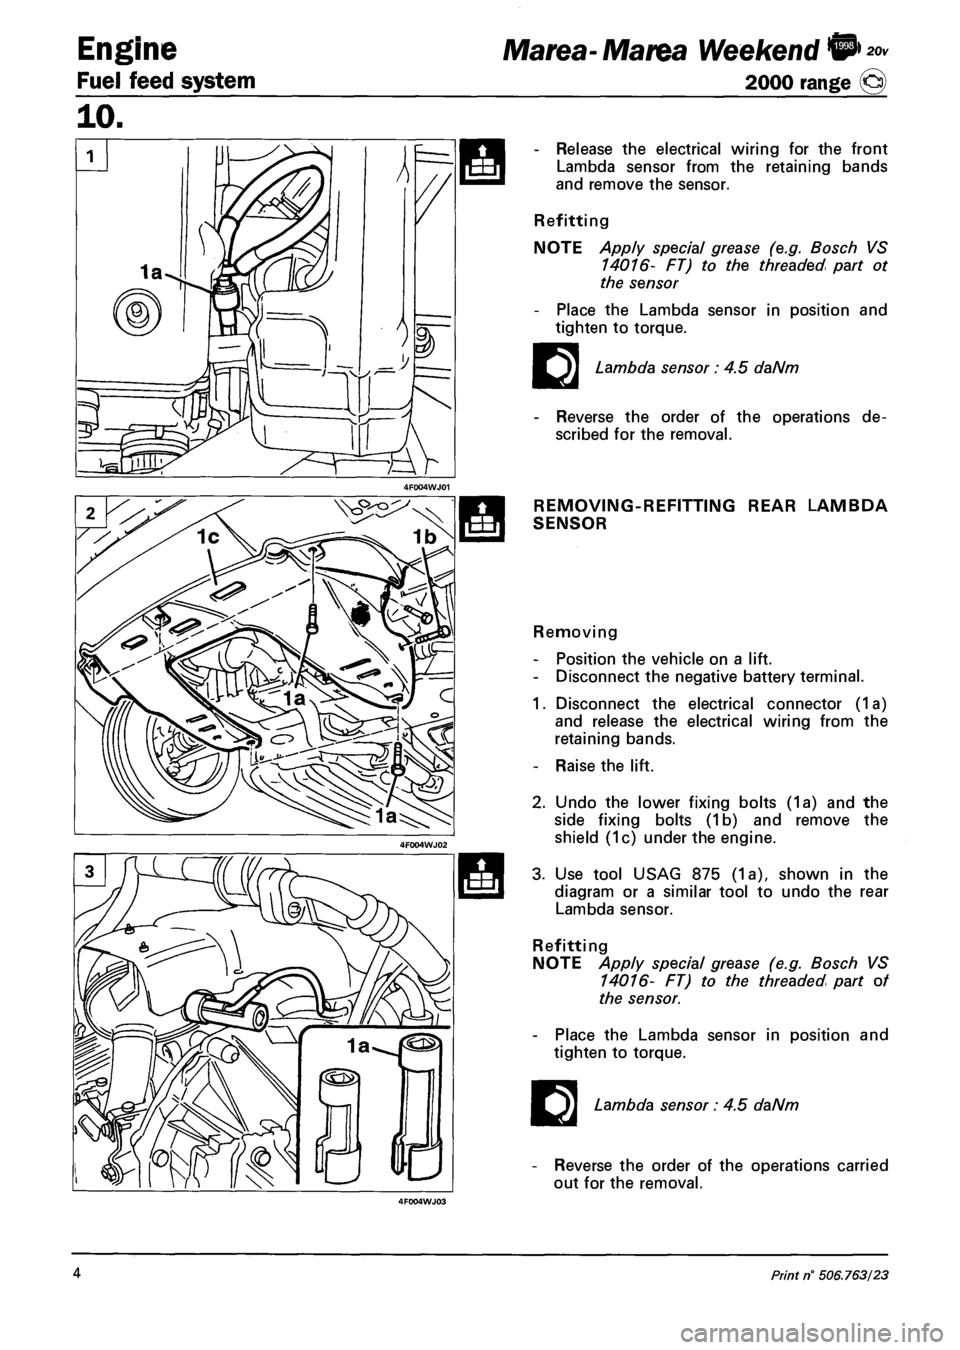
- Release the electrical wiring for the front
Lambda sensor from the retaining bands
and remove the sensor.
Refitting
NOTE Apply special grease (e.g. Bosch VS
14016- FT) to the threaded part ot
the sensor
- Place the Lambda sensor in position and
tighten to torque.
E Lambda sensor : 4.5 daNm
Reverse the order of the operations de
scribed for the removal.
REMOVING-REFITTING REAR LAMBDA
SENSOR
Removing
- Position the vehicle on a lift.
- Disconnect the negative battery terminal.
1. Disconnect the electrical connector (1a)
and release the electrical wiring from the
retaining bands.
- Raise the lift.
2. Undo the lower fixing bolts (1a) and the
side fixing bolts (1b) and remove the
shield (1c) under the engine.
3. Use tool USAG 875 (1a), shown in the
diagram or a similar tool to undo the rear
Lambda sensor.
Refitting
NOTE Apply special grease (e.g. Bosch VS
14016- FT) to the threaded part of
the sensor.
- Place the Lambda sensor in position and
tighten to torque.
E Lambda sensor: 4.5 daNm
Reverse the order of the operations carried
out for the removal.
4 Print n° 506.763/23
Page 86 of 330
Marea- Marea Weekend 9 \) JTD
2000 range O
Engine
Index
FUEL SYSTEM
- Introduction
- System management strategies
- Fuel system functional diagram
- Diagram showing information ente
ring/leaving the control unit and
sensors/actuators
INJECTION SYSTEM WIRING DIA
GRAM
- Injection electronic control unit
- Rpm sensor
- Timing sensor
- Air flow meter
- Injectors
- Engine coolant temperature sensor
- Fuel temperature sensor
- Fuel pressure sensor
- Heater plugs control unit
- Accelerator pedal potentiometer
- Brake pedal switch
- Clutch pedal switch
- Excess pressure sensor
- Atmospheric pressure sensor
page
1
1
1
2
8
10
12
13
13
14
15
15
15
16
16
17
17
17
17
THROTTLE CASING
- Removing-refitting
E.G.R. VALVE
- Removing-refitting
E.G.R. VALVE SELF-ADJUSTMENT
MOTOR
- Removing-refitting
E.G.R. VALVE HEAT EXCHANGER
- Removing-refitting
SOLENOID VALVE ON VACUUM
RESERVOIR FOR THROTTLE CA
SING PNEUMATIC VALVE
- Removing-refitting
VACUUM RESERVOIR
- Removing-refitting
10.
page
30
31
32
32
34
34
FUEL SUPPLY CIRCUIT 18
- Immersed (auxiliary) pump and fuel
gauge assembly 19
- Fuel filter 19
- Pressure pump 20
- Fuel pressure regulator 20
- Multifunction valve 21
- Supply manifold (rail) 21
- Inertia safety switch 22
AIR SUPPLY CIRCUIT 23
- Throttle case 24
- Turbocharger 25
SUPERCHARGING PRESSURE
CONTROL SOLENOID VALVE
- Removing-refitting 35
FUEL FILTER
- Removing-refitting 35
PRESSURE REGULATOR
- Removing-refitting 36
EMISSION CONTROL DEVICES 27
- Oxidizing catalytic converter 27
- Exhaust gas recirculation circuit
(EGR) 27
- Recirculation circuit for crankcase
vapours (blow-by) 29
Copyright by Fiat Auto VI 01 Cancels anil replaces
Page 88 of 330
Engine
Fuel feed system
Marea- Marea Weekend © ™
2000 range ©
10.
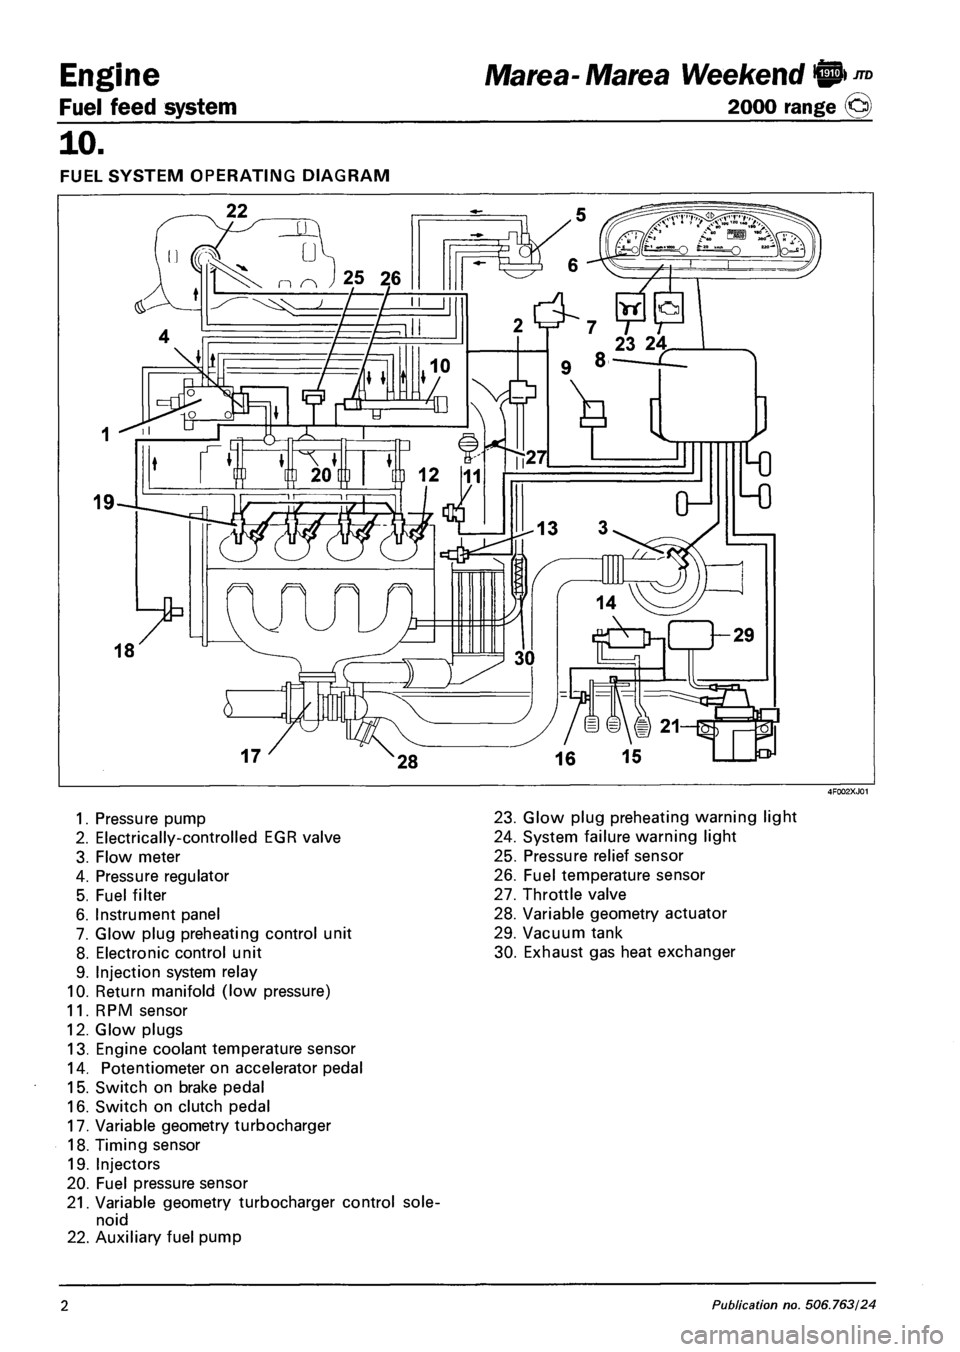
FUEL SYSTEM OPERATING DIAGRAM
1. Pressure pump
2. Electrically-controlled EGR valve
3. Flow meter
4. Pressure regulator
5. Fuel filter
6. Instrument panel
7. Glow plug preheating control unit
8. Electronic control unit
9. Injection system relay
10. Return manifold (low pressure)
11. RPM sensor
12. Glow plugs
13. Engine coolant temperature sensor
14. Potentiometer on accelerator pedal
15. Switch on brake pedal
16. Switch on clutch pedal
17. Variable geometry turbocharger
18. Timing sensor
19. Injectors
20. Fuel pressure sensor
21. Variable geometry turbocharger control sole
noid
22. Auxiliary fuel pump
23. Glow plug preheating warning light
24. System failure warning light
25. Pressure relief sensor
26. Fuel temperature sensor
27. Throttle valve
28. Variable geometry actuator
29. Vacuum tank
30. Exhaust gas heat exchanger
2 Publication no. 506.763/24
Page 93 of 330
Marea- Marea Weekend 9 ™
2000 range ©
Engine
Fuel feed system
10.
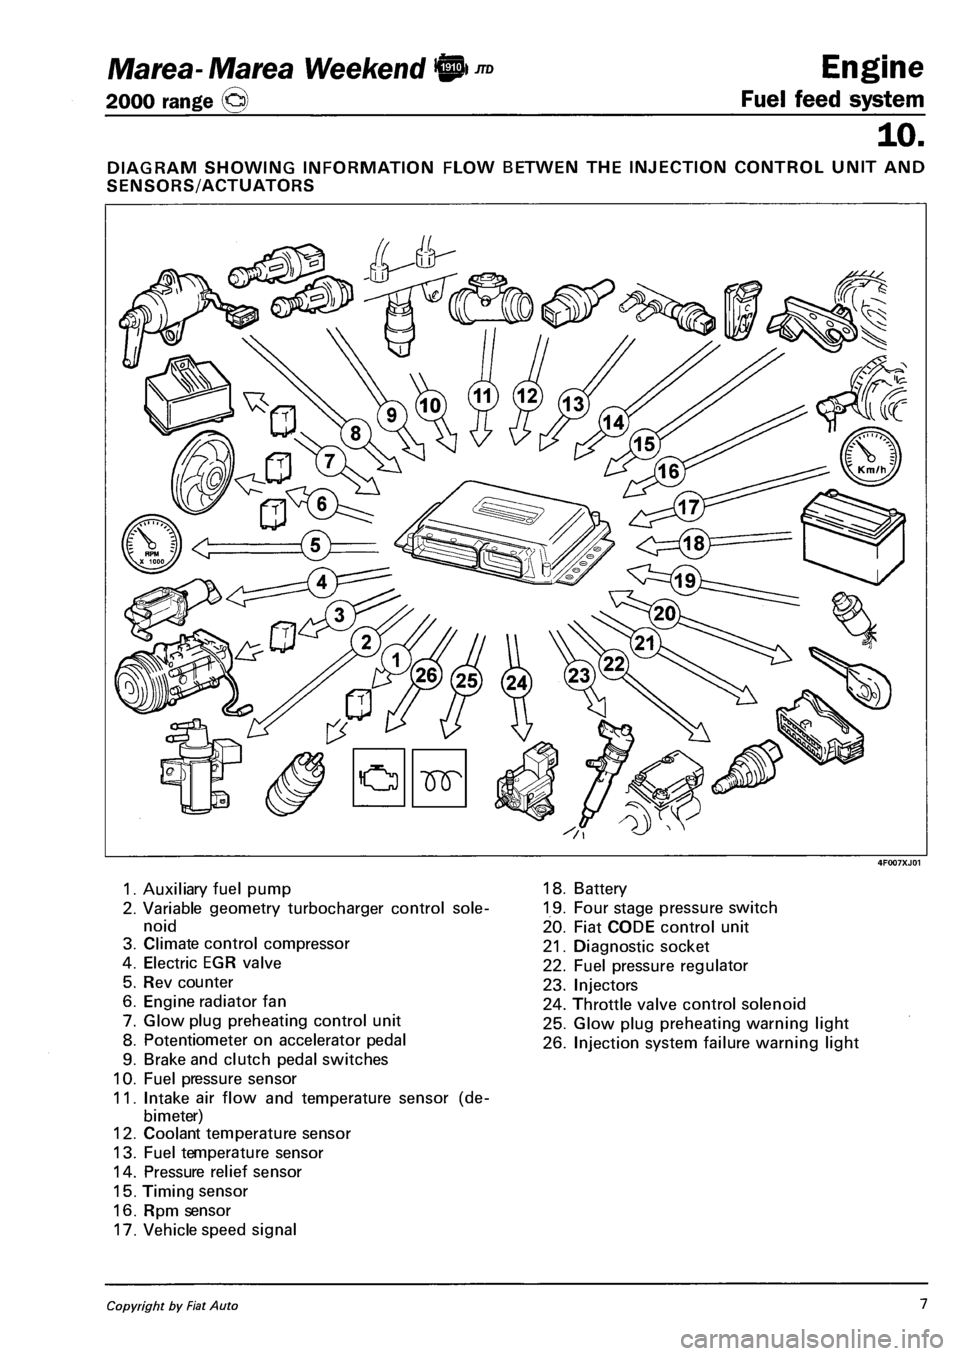
DIAGRAM SHOWING INFORMATION FLOW BETWEN THE INJECTION CONTROL UNIT AND
SENSORS/ACTUATORS
1. Auxiliary fuel pump
2. Variable geometry turbocharger control sole
noid
3. Climate control compressor
4. Electric EGR valve
5. Rev counter
6. Engine radiator fan
7. Glow plug preheating control unit
8. Potentiometer on accelerator pedal
9. Brake and clutch pedal switches
10. Fuel pressure sensor
11. Intake air flow and temperature sensor (de-
bimeter)
12. Coolant temperature sensor
13. Fuel temperature sensor
14. Pressure relief sensor
15. Timing sensor
16. Rpm sensor
17. Vehicle speed signal
18. Battery
19. Four stage pressure switch
20. Fiat CODE control unit
21. Diagnostic socket
22. Fuel pressure regulator
23. Injectors
24. Throttle valve control solenoid
25. Glow plug preheating warning light
26. Injection system failure warning light
Copyright by Fiat Auto 1
Page 94 of 330
Engine
Fuel feed system
Marea- Marea Weekend 9 ™
2000 range O
10.
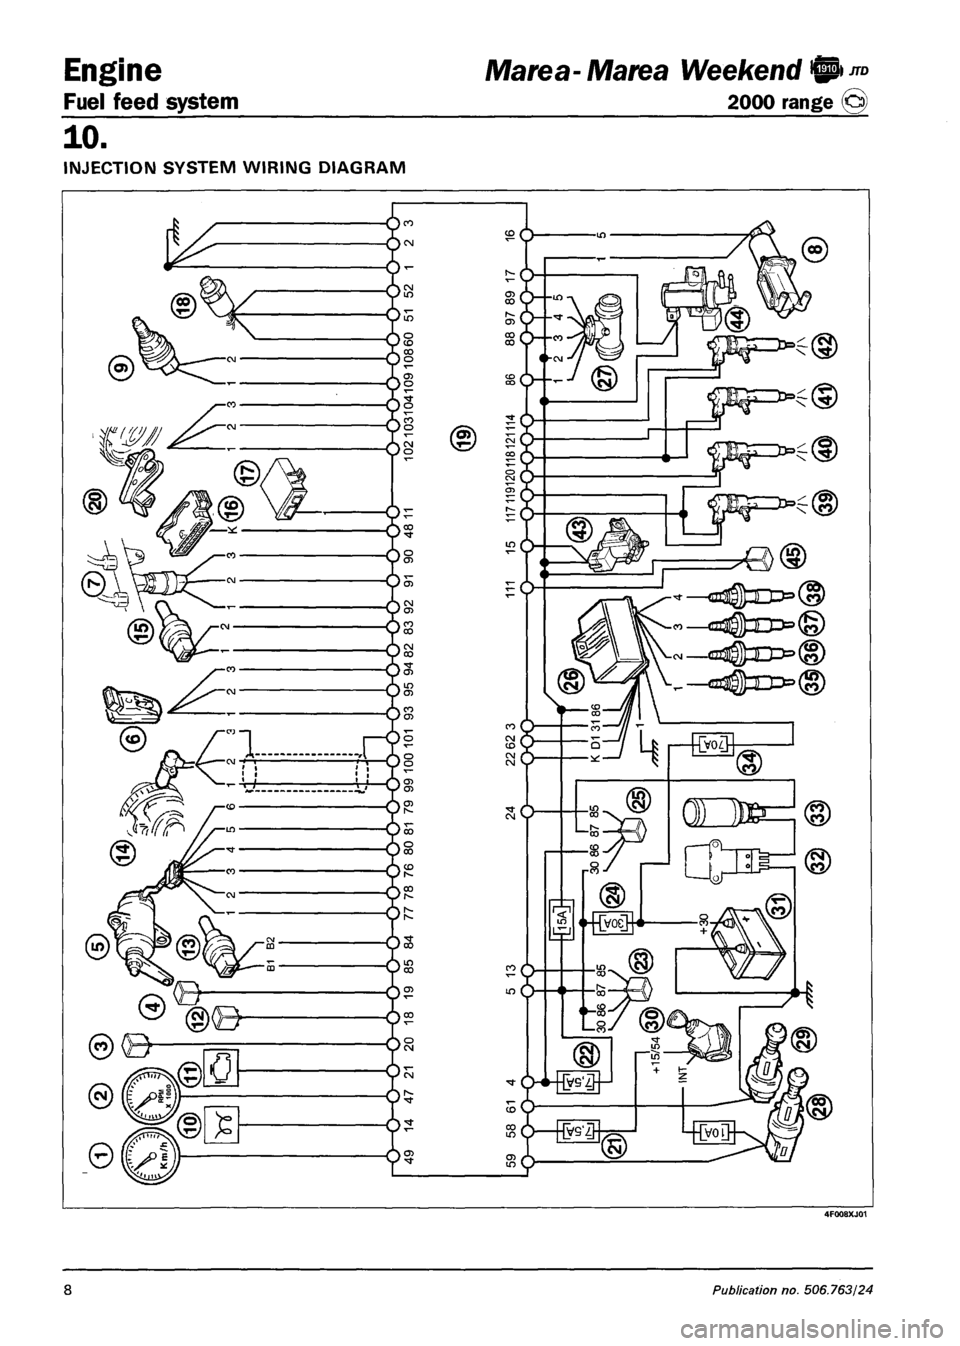
INJECTION SYSTEM WIRING DIAGRAM
4F008XJ01
8 Publication no. 506.763/24
Page 95 of 330
Marea- Marea Weekend 9 ™
2000 range ©) Fuel feed system
Engine
10.
Compents of injection system wiring diagram
1. Vehicle speepd
2. Rev counter
3. Engine radiator fan low speed relay
4. Radiator fan high speed activation relay
5. Potentiometer on accelerator pedal
6. Timing sensor
7. Fuel pressure sensor
8. EGR system modulator solenoid
9. Fuel pressure regulator
10. Glow plug preheating warning light on control panel
11. Injection system failure warning light
12. Air conditioning system relay
13. Coolant temperature sensor
14. Rpm sensor
15. Fuel temperature sensor
16. Diagnostic socket
17. Fiat CODE control unit
18. Four stage pressure switch
19. Injection electronic control unit
20. Pressure relief sensor
21. 7.5A fuse protecting electronic injection system ( + 15 power supply from ignition switch)
22. 7.5A fuse protecting electronic injection system ( + 30 power supply from ignition switch)
23. Main injection system relay
24. 30A fuse protecting injection system
25. Auxiliary fuel pump relay
26. Glow plug preheating control unit
27. Intake air flow and temperature sensor (debimeter)
28. Brake pedal switch
29. Clutch pedal switch
30. Ignition switch
31. Battery
32. Inertia switch
33. Auxiliary fuel pump (submerged in tank)
34. 60A fuse protecting glow plug control unit
35. Cylinder no. 1 glow plug
36. Cylinder no. 2 glow plug
37. Cylinder no. 3 glow plug
38. Cylinder no. 4 glow plug
39. Cylinder no. 1 injector
40. Cylinder no. 2 injector
41. Cylinder no. 3 injector
42. Cylinder no. 4 injector
43. Throttle valve control solenoid
44. Variable geometry turbocharger control solenoid
45. Diesel filter heater relay
Copyright by Fiat Auto 9
Page 109 of 330
Marea-Marea Weekend 9 Engine
2000 range ©) Fuel feed system
10.
AIR INTAKE CIRCUIT
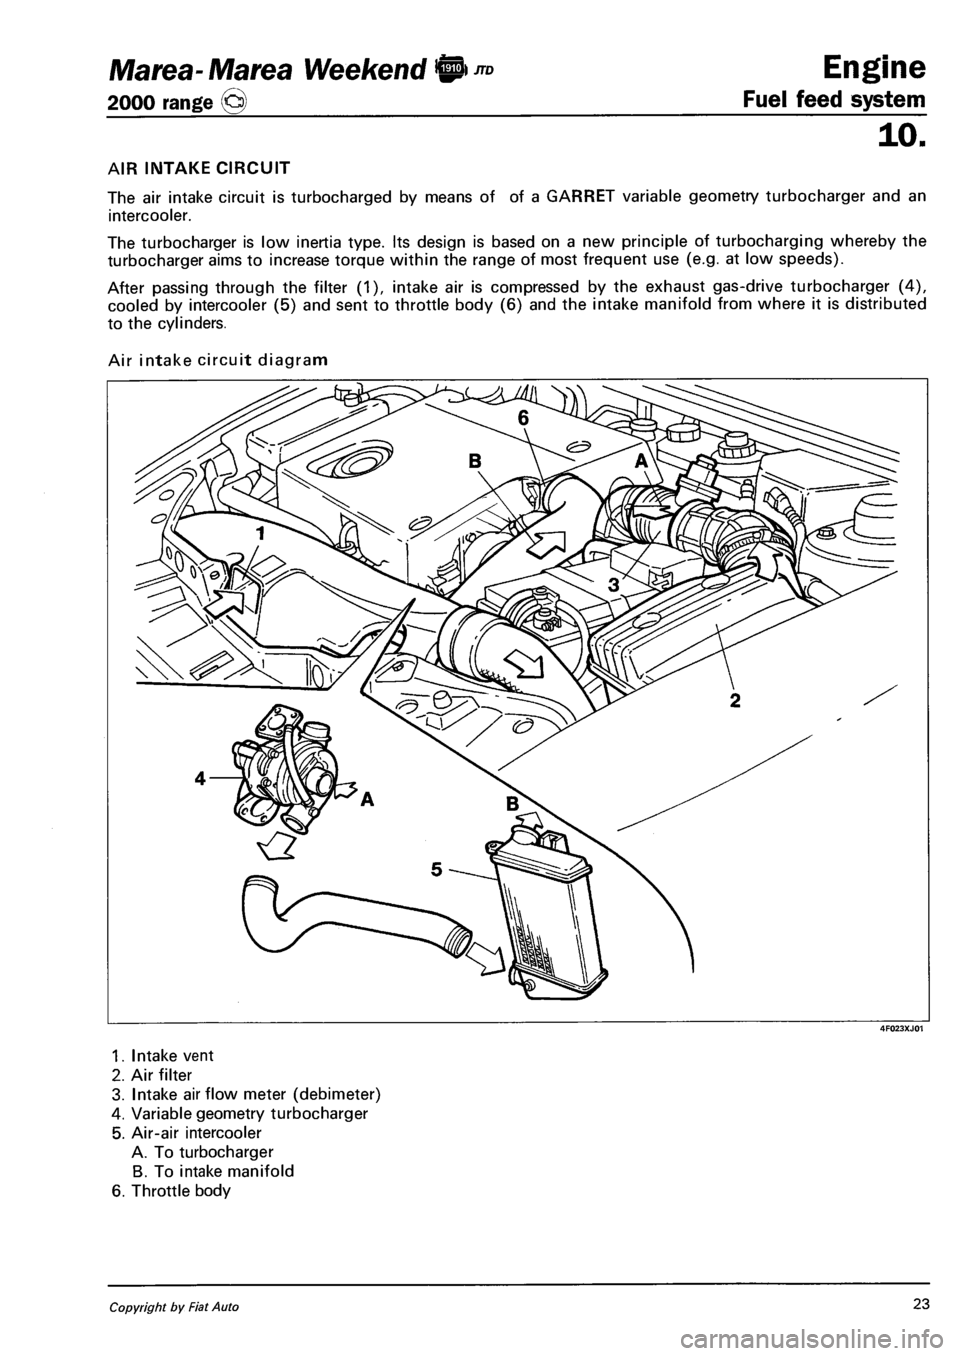
The air intake circuit is turbocharged by means of of a GARRET variable geometry turbocharger and an
intercooler.
The turbocharger is low inertia type. Its design is based on a new principle of turbocharging whereby the
turbocharger aims to increase torque within the range of most frequent use (e.g. at low speeds).
After passing through the filter (1), intake air is compressed by the exhaust gas-drive turbocharger (4),
cooled by intercooler (5) and sent to throttle body (6) and the intake manifold from where it is distributed
to the cylinders.
Air intake circuit diagram
4F023XJ01
1. Intake vent
2. Air filter
3. Intake airflow meter (debimeter)
4. Variable geometry turbocharger
5. Air-air intercooler
A. To turbocharger
B. To intake manifold
6. Throttle body
Copyright by Fiat Auto 23
Page 119 of 330
Marea- Marea Weekend 9
2000 range ©
Engine
Fuel feed system
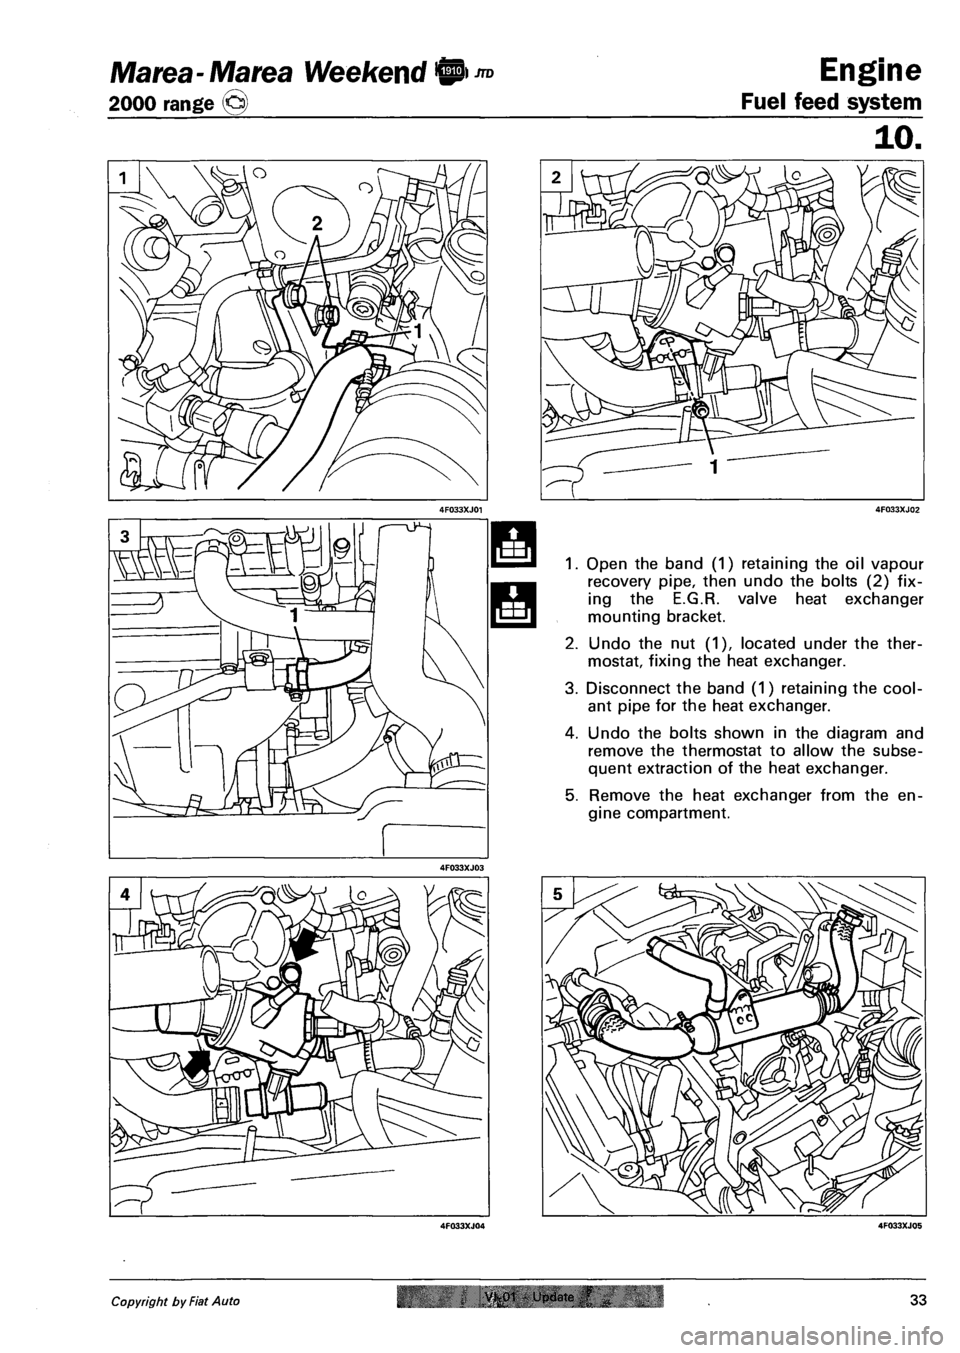
Open the band (1) retaining the oil vapour
recovery pipe, then undo the bolts (2) fix
ing the E.G.R. valve heat exchanger
mounting bracket.
Undo the nut (1), located under the ther
mostat, fixing the heat exchanger.
Disconnect the band (1) retaining the cool
ant pipe for the heat exchanger.
Undo the bolts shown in the diagram and
remove the thermostat to allow the subse
quent extraction of the heat exchanger.
Remove the heat exchanger from the en
gine compartment.
Copyright by Fiat Auto VK01 - Update ,f 33