key FIAT MAREA 2000 1.G Workshop Manual
[x] Cancel search | Manufacturer: FIAT, Model Year: 2000, Model line: MAREA, Model: FIAT MAREA 2000 1.GPages: 330
Page 70 of 330
Engine
Fuel feed system
Marea- Marea Weekend
2000 range @
10.
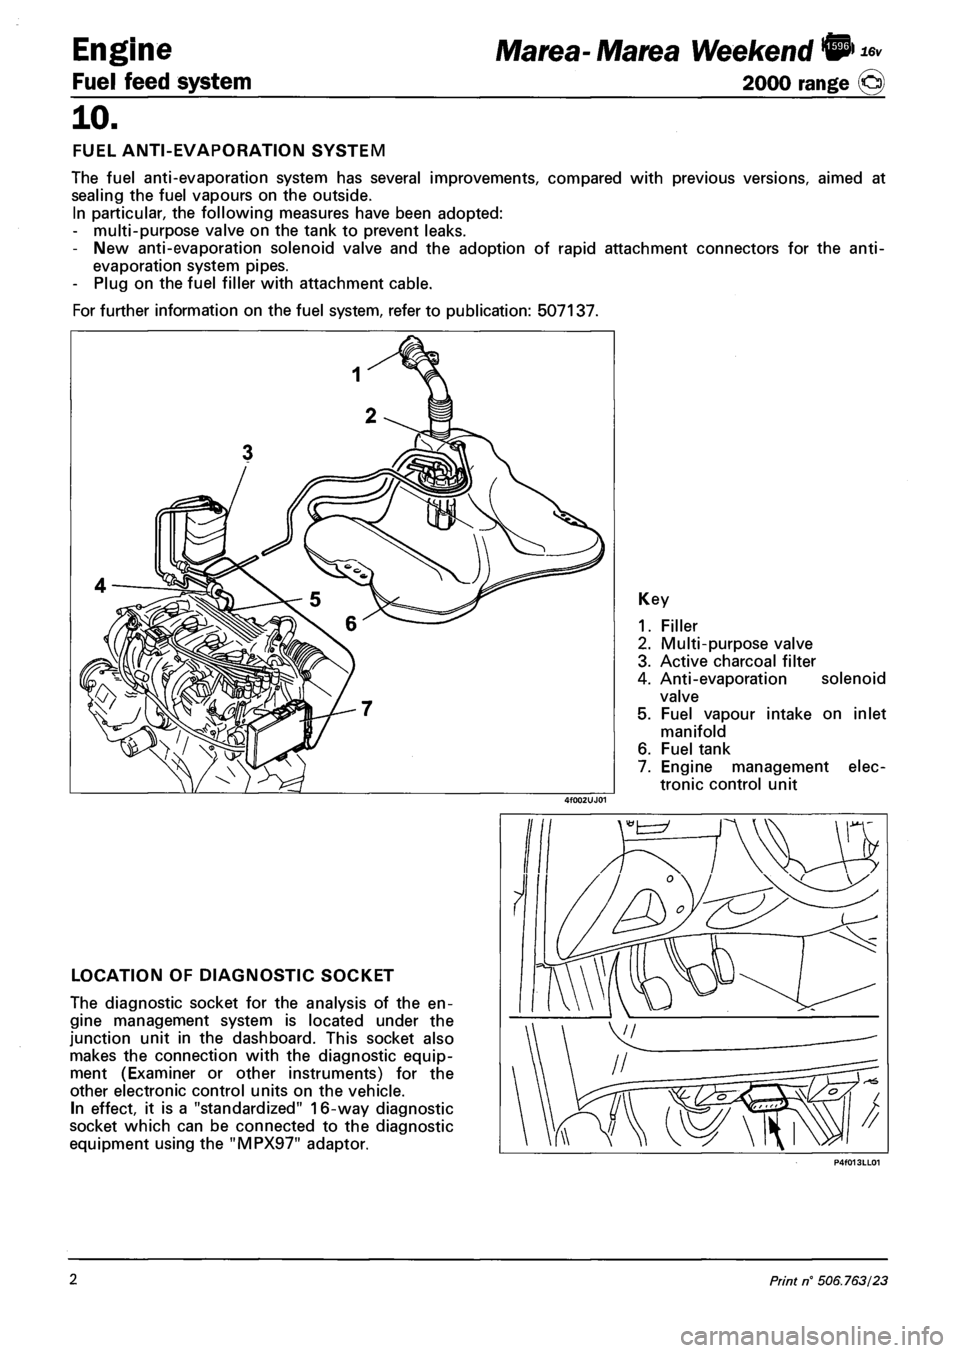
FUEL ANTI-EVAPORATION SYSTEM
The fuel anti-evaporation system has several improvements, compared with previous versions, aimed at
sealing the fuel vapours on the outside.
In particular, the following measures have been adopted:
- multi-purpose valve on the tank to prevent leaks.
- New anti-evaporation solenoid valve and the adoption of rapid attachment connectors for the anti-
evaporation system pipes.
- Plug on the fuel filler with attachment cable.
For further information on the fuel system, refer to publication: 507137.
Key
1. Filler
2. Multi-purpose valve
3. Active charcoal filter
4. Anti-evaporation solenoid
valve
5. Fuel vapour intake on inlet
manifold
6. Fuel tank
7. Engine management elec
tronic control unit
LOCATION OF DIAGNOSTIC SOCKET
The diagnostic socket for the analysis of the en
gine management system is located under the
junction unit in the dashboard. This socket also
makes the connection with the diagnostic equip
ment (Examiner or other instruments) for the
other electronic control units on the vehicle.
In effect, it is a "standardized" 16-way diagnostic
socket which can be connected to the diagnostic
equipment using the "MPX97" adaptor.
2 Print n° 506.763/23
Page 71 of 330
Marea- Marea Weekend 9* Engine
2000 range (Q) Fuel feed system
10.
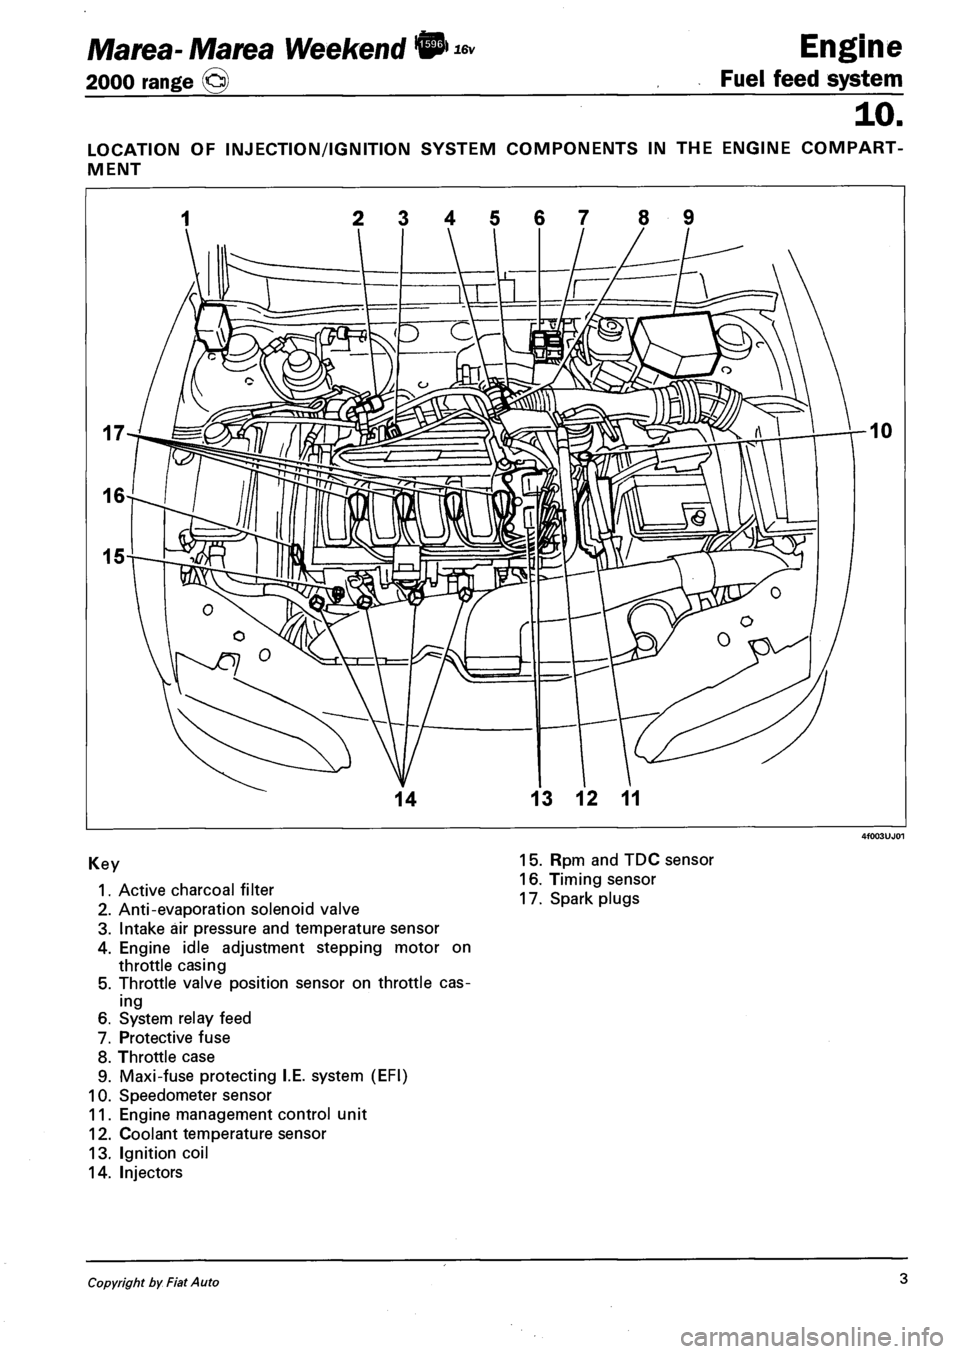
LOCATION OF INJECTION/IGNITION SYSTEM COMPONENTS IN THE ENGINE COMPART
MENT
1 2345678 9
Key
1. Active charcoal filter
2. Anti-evaporation solenoid valve
3. Intake air pressure and temperature sensor
4. Engine idle adjustment stepping motor on
throttle casing
5. Throttle valve position sensor on throttle cas
ing
6. System relay feed
7. Protective fuse
8. Throttle case
9. Maxi-fuse protecting I.E. system (EFI)
10. Speedometer sensor
11. Engine management control unit
12. Coolant temperature sensor
13. Ignition coil
14. Injectors
15. Rpm and TDC sensor
16. Timing sensor
17. Spark plugs
Copyright by Fiat Auto 3
Page 78 of 330
Marea- Marea Weekend & Engine
2000 range (§) Fuel feed system
ENGINE MANAGEMENT SYSTEM
Foreword
The Marea-Marea Weekend 1998 20v is equipped with a 5 cylinder in line engine with 20 valves, 1998
cc, twin overhead camshaft and a Bosch ME3.1 integrated electronic injection/ignition system.
The fuel system differs from the one described for the 1998 20v "99 range" version through the addition
of several variants to make it compatible with the EEC Stage 3 EOBD regulations.
The main modifications to the system can be summarized as follows:
- Catalytic converter near the exhaust manifold to take maximum advantage of the heat of the gases.
- Two Lambda sensors, one upstream (front) and one downstream (rear) which check the quality of the
exhaust gases and the operation of the catalyzer.
- Adoption of an accelerometre sensor on the right shock absorber turret, used to distinguish between
engine torque variations doe to the uneveness of the road surface and those due to failed ignition in
the combustion chamber (misfire).
- Adoption of a timing sensor on the inlet side timing pulley.
- Multi-purpose valve on the tank to prevent leaks.
- Adoption of raipd attachment connectors for the anti-evaporation system pipes.
- Cap on the fuel filler with an attachment cable.
For further information on the fuel system, refer to publication 507137.
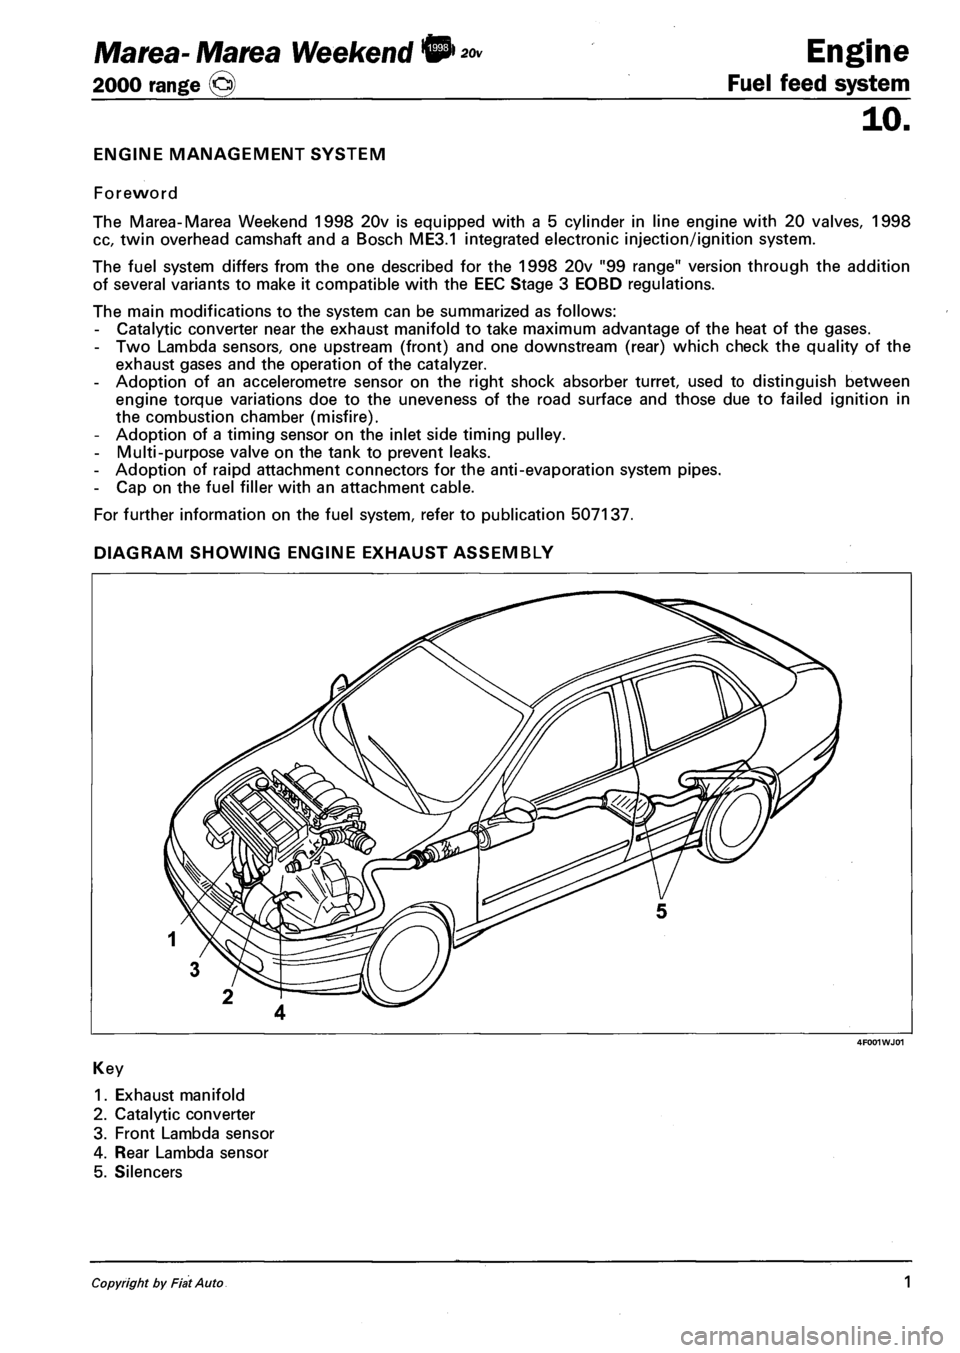
DIAGRAM SHOWING ENGINE EXHAUST ASSEMBLY
4F001WJ01
Key
1. Exhaust manifold
2. Catalytic converter
3. Front Lambda sensor
4. Rear Lambda sensor
5. Silencers
Copyright by Fiat Auto 1
Page 79 of 330
Engine
Fuel feed system
Marea-Marea Weekend ®> *»
2000 range @)
10.
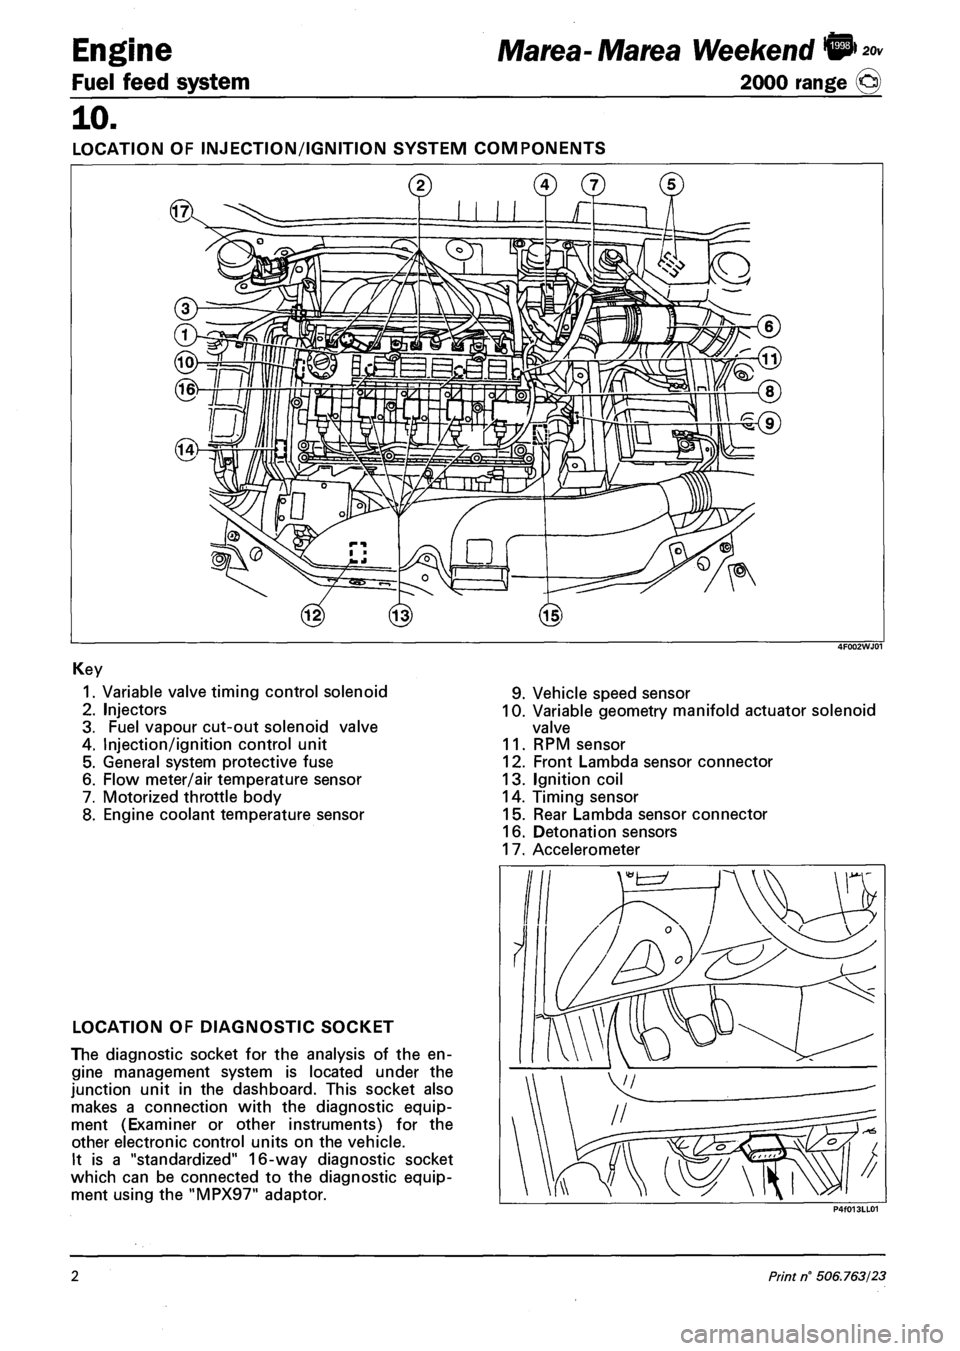
LOCATION OF INJECTION/IGNITION SYSTEM COMPONENTS
Key
1. Variable valve timing control solenoid
2. Injectors
3. Fuel vapour cut-out solenoid valve
4. Injection/ignition control unit
5. General system protective fuse
6. Flow meter/air temperature sensor
7. Motorized throttle body
8. Engine coolant temperature sensor
9. Vehicle speed sensor
10. Variable geometry manifold actuator solenoid
valve
11. RPM sensor
12. Front Lambda sensor connector
13. Ignition coil
14. Timing sensor
15. Rear Lambda sensor connector
16. Detonation sensors
17. Accelerometer
LOCATION OF DIAGNOSTIC SOCKET
The diagnostic socket for the analysis of the en
gine management system is located under the
junction unit in the dashboard. This socket also
makes a connection with the diagnostic equip
ment (Examiner or other instruments) for the
other electronic control units on the vehicle.
It is a "standardized" 16-way diagnostic socket
which can be connected to the diagnostic equip
ment using the "MPX97" adaptor.
2 Print n° 506.763/23
Page 89 of 330
Ma tea- Marea Weekend 9 ™
2000 range (Q) Fuel feed system
Engine
10.
Control of injected fuel quantity
The control unit controls the fuel pressure regulator and injectors on the basis of output signals from the
accelerator pedal potentiometer, flow meter and rpm sensor.
The timing and thus the injection sequence are determined when the engine is started up using signals
from the rpm and timing sensor (synchronisation stage); injection timing is then implemented using the
rpm sensor signal alone and considering a injection sequence of 1 -3-4-2.
The control unit inhibits injection in the following cases:
- fuel pressure level greater than 1500 bars;
- fuel pressure level lower than 120 bars;
- engine speed higher than 6000 rpm.
When the engine has warmed up, maximum injection duration (injector opening time) is 1500 ns, but it
can reach 3000 ns during the start-up stage.
Control of injection advance
The electronic control unit determines injection advance mainly on the basis of the quantity of fuel to be
injected.
The injection advance is then corrected on the basis of coolant temperature and speed in order to com
pensate for ignition delays due to low temperatures in the combustion chamber during warm-up.
The optimum injection point is also processed to ensure driving comfort and emission limits laid down by
Euro 3 legislation.
Control of injection pressure
This control is of particular importance because injection pressure influences the following parameters:
- amount of fuel taken into the cylinders for the same injection time duration;
- injected fuel nebulation;
- spray penetration;
- lag between electrical control to injection and actual injection start and end times.
The above parameters engine behaviour significantly, particularly in terms of power output, exhaust emis
sions, noise levels and handling.
The injection control unit controls the pressure governor on the basis of engine load to obtain an optimal
line pressure at all times.
When the engine is cold, injection pressure is corrected on the basis of engine speed and engine coolant
temperature to meet engine needs at different operating temperatures.
Control of auxiliary fuel pump
The auxiliary fuel pump submerged in the tank is supplied by the injection control unit by means of a relay
when the ignition key is turned on.
Fuel supply to the pump is inhibited when one of the following condition occurs:
- when the ignition has been turned on for a certain length of time without the engine running;
- if the inertia switch cuts in.
Control of injection during over-run (cut-off)
The fuel cut-off strategy is implemented when the injection control unit receives information that the ac
celerator pedal has been released from the potentiometer.
Under these conditions, the control unit cuts off the fuel supply to the injectors and restores it before idle
speed is reached.
Copyright by Fiat Auto 3
Page 91 of 330
![FIAT MAREA 2000 1.G Workshop Manual Marea-Marea Weekend 9]
2000 range (j§)
I) JTD
Fuel feed system
Engine
10.
Exhaust fumes control
Through this function the injection control unit limits any exhaust fumes that could be produce FIAT MAREA 2000 1.G Workshop Manual Marea-Marea Weekend 9]
2000 range (j§)
I) JTD
Fuel feed system
Engine
10.
Exhaust fumes control
Through this function the injection control unit limits any exhaust fumes that could be produce](/img/10/4653/w960_4653-90.png)
Marea-Marea Weekend 9]
2000 range (j§)
I) JTD
Fuel feed system
Engine
10.
Exhaust fumes control
Through this function the injection control unit limits any exhaust fumes that could be produced during
transition speeds.
To satisy these requirements the control unit processes the signals supplied by the accelerator pedal po
tentiometer, the rpm sensor and the air flow meter and controls the fuel pressure regulator and the injec
tors to meter the correct amount of fuel to inject.
Exhaust gas recirculation control
On the basis of the signals supplied by the rpm sensor, intake air quantity sensor, engine coolant tempe
rature sensor and accelerator pedal position sensor, the control unit calculates the operating times for the
EGR valve so that the exhaust gases are partly recirculated in certain engine operating conditions in line
with Euro 3 pollution control standards.
Air conditioning system engagement control
The injection control unit manages the operation of the air conditioning system compressor electro
magnet coupling following a logic aimed at preventing operating conditions that would adversely affect
engine performance.
- When the compressor is switched on the injection control unit increases the quantity of fuel during
idling to allow the engine to adjust to the increased power requirements and momentarily interrupts the
supply to the compressor in high engine power requirement conditions (strong acceleration).
Engine immobilizer function control
The system is equipped with an engine immobilizer function. This function is achieved through the pre
sence of a specific control unit (Fiat CODE), capable of conversing with the injection control unit and an
electronic key with a special transmitter for sending a recognition code.
Each time the key is turned to the OFF position, the Fiat CODE system completely deactivates the injecti
on control unit.
When the key is turned to the ON position the following operations take place, in order:
1. the injection control unit (whose memory contains a secret code) sends the Fiat CODE control unit a
request to send the secret code to deactivate the immobilizer functions;
2. the Fiat CODE control unit responds by only sending the secret code after, in turn, having received the
recognition code transmitted by the ignition key;
3. the recognition of the secret code allows the deactivation of the injection control unit immobilizer func
tion and its normal operation.
Autodiagnosis
The complete electronic fault diagnosis of the injection system is carried out by connecting the special
equipment (EXAMINER or EXAMINER PLUS) to the standardized diagnostic socket (EOBD).
The system is also equipped with a self-diagnostic function which recognizes, memorizes and signals any
faults.
If a fault is detected in the sensors or actuators, the recovery strategy is immediately activated in order to
ensure that the engine functions at an acceptable level. The vehicle can be driven to a service centre for
the appropriate repairs to be carried out.
Copyright by Fiat Auto 5
Page 92 of 330
Fuel feed system
Engine Marea- Marea Weekend © ™
2000 range @
10.
The control unit autodiagnostic system checks the signals coming from the sensors and compares them
with the figures allowed:
- signalling faults during starting
- warning light on for 4 seconds indicates test stage
- warning light off after 4 seconds indicates no fault with components that could alter the pollution con
trol standard figures
- warning light on after 4 seconds indicates fault.
- signalling faults during operation
- warning light on indicates fault
- warning light off indicates no fault with components that could alter the pollution control standard fig
ures.
- recovery
- from time to time, the control unit defines the type of recovery according to the components which are
faulty
- the recovery parameters are managed by components which are not faulty.
Control of cylinder balancing during idling
According to the signals coming from the sensors, the injection control unit controls the idle speed torque,
altering the injector operating times.
Control of irregular operation
Depending on the signals coming from the sensors, the injection control unit corrects the amount of fuel
to be injected in order to improve driveability and reduce jerking whilst driving.
The correction is achieved through the fuel pressure regulator and by varying the injector operating times.
Control of electrical balance
According to the battery voltage, the injection control unit alters the idle speed, to guarantee a sufficient
current supply from the alternator in situations where the consumers are absorbing a great deal of power.
The variation in the idle speed is achived by regulating the fuel pressure and altering the injector operat
ing times.
VGT variable geometry turbocharger control (1910 JTD 110 CV)
The injection control unit processes the signal coming from the supercharging sensor, at the various en
gine operating speeds, and determines the quantity of fuel to be injected, acting on the fuel pressure
regulator and the injector opening times.
In addition, through the solenoid valve, the control unit regulates the geometry of the turbine in order to
ensure optimum performance in all operating conditions.
Turbocharger waste gate valve control (1910 JTD 100 CV)
At the various engine operating speeds, the injection control unit processes the signal coming from the
supercharging sensor and determines the amount of fuel to inject, acting on the fuel pressure regulator
and the injector opening times.
In addition, the control unit controls the opening of the turbocharger waste gate valve, via the solenoid
valve, in order to ensure excellent performance in all operating conditions.
Control of throttle closing when engine is switched off
When the engine is switched off (ignition key in OFF position) the injection control unit closes the throt
tle valve located on the air intake duct via the special solenoid valve.
This action makes it possible to limit the tiresome shuddering of the engine whilst it is switching off.
6 .i. V!-01-.Cancelftand replaces Print n° 506.763/25
Page 97 of 330
Ma tea- Ma tea Weekend !@ ™
2000 range ©
Engine
Fuel feed system
10.
37 Not connected
38 Not connected
39 Not connected
40 Not connected
41 Not connected
42 Not connected
43 Not connected
44 Not connected
45 Not connected
46 Not connected
47 Engine rpm signal output
48 Diagnostic line k
49 Vehicle speed signal input
50 Not connected
51 Activation signal from 4-stage pressure switch
52 Activation signal from 3-stage pressure switch
53 Not connected
54 Not connected
55 Not connected
56 Not connected
57 Not connected
58 Key ON signal
59 Brake switch
60 Air conditioner activation request
61 Clutch switch
62 Glow plug diagnosis
63 Not connected
64 Not connected
65 Not connected
66 Not connected
67 Not connected
68 Not connected
69 Not connected
70 Not connected
71 Not connected
72 Not connected
73 Not connected
74 Not connected
75 Not connected
76 Accelerator pedal 1 earth
77 Accelerator pedal 1 signal
78 Accelerator pedal 1 power supply
79 Accelerator pedal 2 earth
80 Accelerator pedal 2 signal
81 Accelerator pedal 2 power supply
82 Diesel temperature sensor (pin 1)
83 Diesel temperature sensor (pin 2)
84 Coolant temperature sensor (pin 1)
85 Coolant temperature sensor (pin 2)
86 Air flow meter (pin 1)
87 Not connected
88 Air flow meter (pin 3)
89 Air flow meter (pin 5)
90 Fuel pressure sensor (pin 3)
91 Fuel pressure sensor (pin 2)
92 Fuel pressure sensor (pin 1)
93 Turbo pressure sensor (pin 1)
94 Turbo pressure sensor (pin 3)
95 Turbo pressure sensor (pin 2)
96 Not connected
97 Air flow meter (pin 4)
98 Not connected
99 RPM sensor (pin 1)
100 RPM sensor (pin 2)
101 RPM sensor (pin 3)
102 RPM sensor (pin 1)
103 Timing sensor (pin 2)
104 Timing sensor (pin 3)
105 Not connected
106 Not connected
107 Not connected
108 Fuel pressure regulator
109 Fuel pressure regulator
110 Not connected
111 Heater relay control Fuel filter
112 Not connected
113 Not connected
114 Cylinder 4 injector control
115 Not connected
116 Not connected
117 Cylinder 1 and 2 injector power supply
118 Cylinder 3 and 4 injector power supply
119 Cylinder 1 injector control
120 Cylinder 2 injector control
121 Cylinder 3 injector control
Copyright by Fiat Auto 11
Page 110 of 330
Engine Marea- Marea Weekend 9*nD
Fuel feed system 2000 range (§)
10.
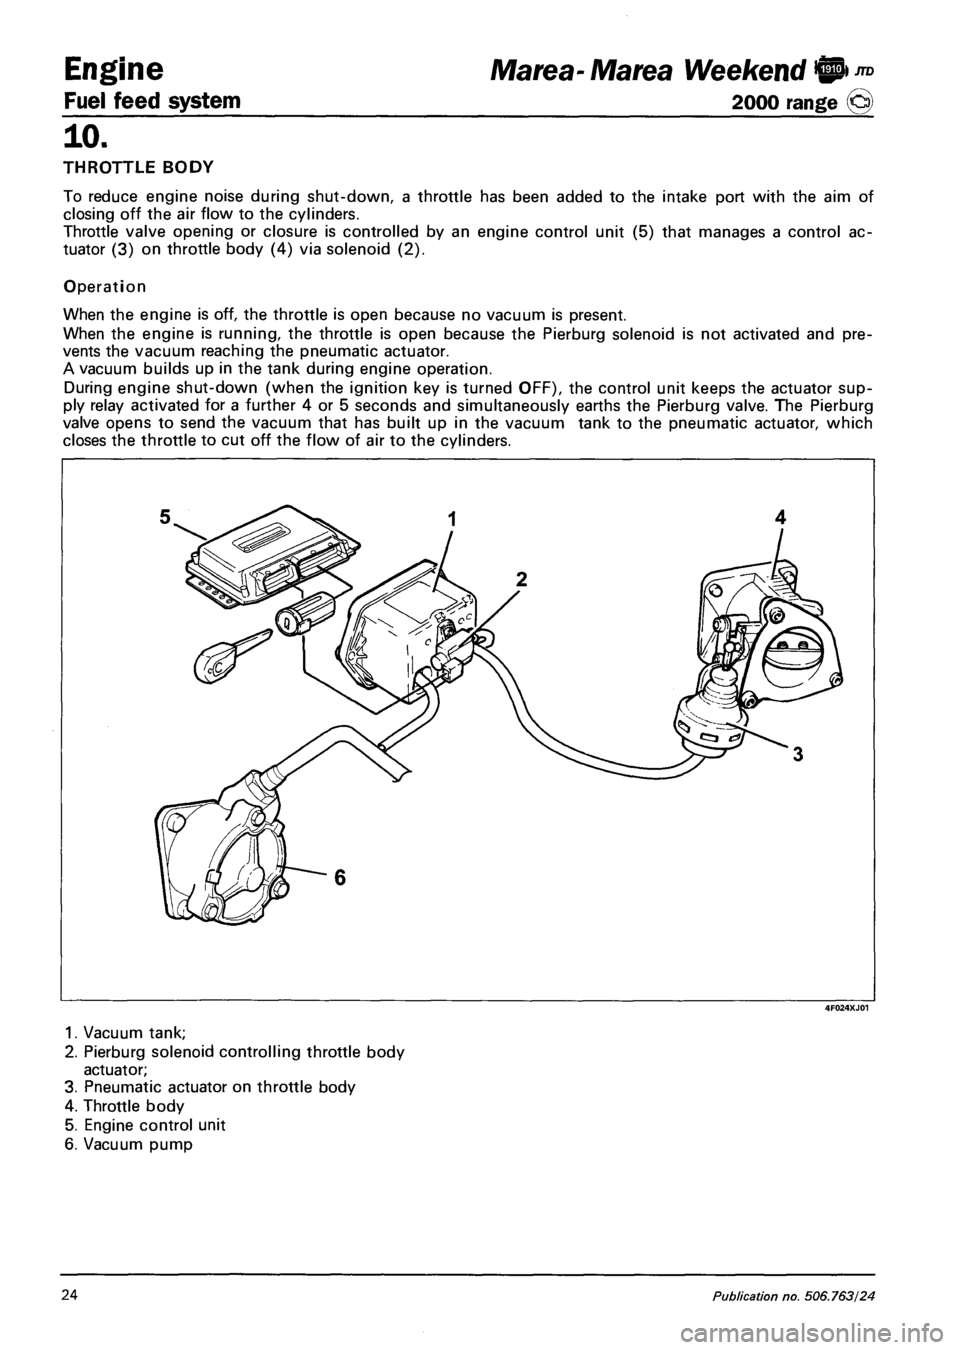
THROTTLE BODY
To reduce engine noise during shut-down, a throttle has been added to the intake port with the aim of
closing off the air flow to the cylinders.
Throttle valve opening or closure is controlled by an engine control unit (5) that manages a control ac
tuator (3) on throttle body (4) via solenoid (2).
Operation
When the engine is off, the throttle is open because no vacuum is present.
When the engine is running, the throttle is open because the Pierburg solenoid is not activated and pre
vents the vacuum reaching the pneumatic actuator.
A vacuum builds up in the tank during engine operation.
During engine shut-down (when the ignition key is turned OFF), the control unit keeps the actuator sup
ply relay activated for a further 4 or 5 seconds and simultaneously earths the Pierburg valve. The Pierburg
valve opens to send the vacuum that has built up in the vacuum tank to the pneumatic actuator, which
closes the throttle to cut off the flow of air to the cylinders.
4F024XJ01
1. Vacuum tank;
2. Pierburg solenoid controlling throttle body
actuator;
3. Pneumatic actuator on throttle body
4. Throttle body
5. Engine control unit
6. Vacuum pump
24 Publication no. 506.763/24
Page 123 of 330
Marea-Marea Weekend H nD Engine
2000 range (Q) Fuel feed system
10.
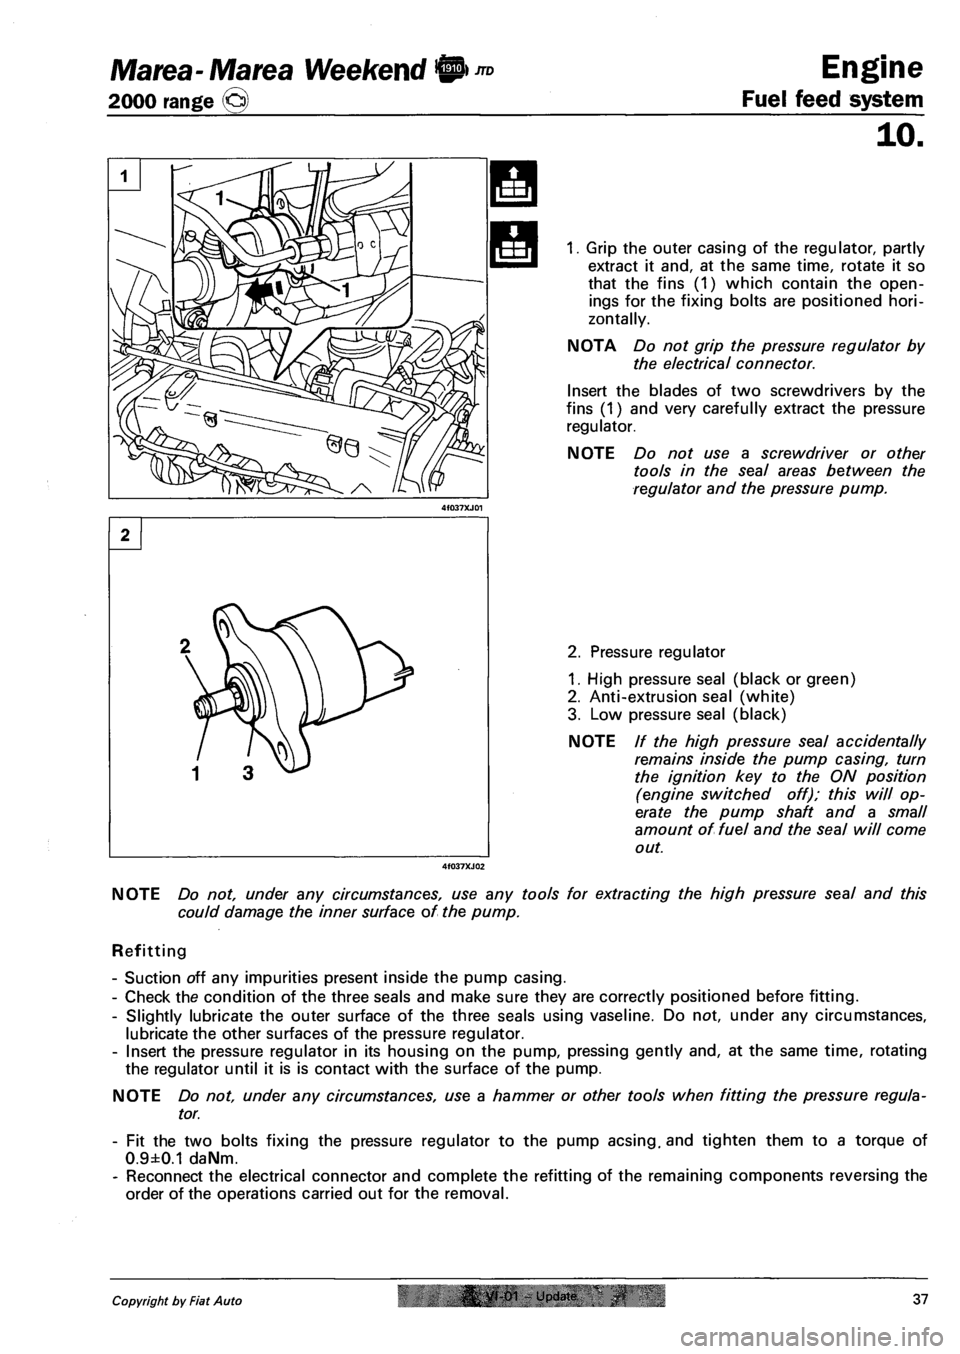
1. Grip the outer casing of the regulator, partly
extract it and, at the same time, rotate it so
that the fins (1) which contain the open
ings for the fixing bolts are positioned hori
zontally.
NOTA Do not grip the pressure regulator by
the electrical connector.
Insert the blades of two screwdrivers by the
fins (1) and very carefully extract the pressure
regulator.
NOTE Do not use a screwdriver or other
tools in the seal areas between the
regulator and the pressure pump.
2. Pressure regulator
1. High pressure seal (black or green)
2. Anti-extrusion seal (white)
3. Low pressure seal (black)
NOTE // the high pressure seal accidentally
remains inside the pump casing, turn
the ignition key to the ON position
(engine switched off); this will op
erate the pump shaft and a small
amount of fuel and the seal will come
out.
NOTE Do not, under any circumstances, use any tools for extracting the high pressure seal and this
could damage the inner surface of the pump.
Refitting
- Suction off any impurities present inside the pump casing.
- Check the condition of the three seals and make sure they are correctly positioned before fitting.
- Slightly lubricate the outer surface of the three seals using vaseline. Do not, under any circumstances,
lubricate the other surfaces of the pressure regulator.
- Insert the pressure regulator in its housing on the pump, pressing gently and, at the same time, rotating
the regulator until it is is contact with the surface of the pump.
NOTE Do not, under any circumstances, use a hammer or other tools when fitting the pressure regula
tor.
- Fit the two bolts fixing the pressure regulator to the pump acsing. and tighten them to a torque of
0.9±0.1 daNm.
- Reconnect the electrical connector and complete the refitting of the remaining components reversing the
order of the operations carried out for the removal.
Copyright by Fiat Auto |& yt-01 - Update 37