set FIAT MULTIPLA 2004 1.G Connect NavPlus Manual
[x] Cancel search | Manufacturer: FIAT, Model Year: 2004, Model line: MULTIPLA, Model: FIAT MULTIPLA 2004 1.GPages: 202, PDF Size: 2.22 MB
Page 21 of 202
20
CONNECT NAV
NAVIGATOR
RDS-REG FUNCTION
At certain times of the day, some sta-
tions broadcast different regional pro-
grammes. When the function is off and
you are tuned to a regional station in
a certain area, you will receive a new
regional programme when entering a
new area.
Switching on and off
Tune to FM and proceed as follows
to switch the RDS-REG function on:
1) in Radio mode, press the MEN
button (10). The Radio menu fig. 19
will appear on the display
2) press the button (13) next to REG.
The message ON or OFF will appear.
The default setting is OFF (i.e. the func-
tion is not active). When the function
is on, the system will change the fre-
quency only when the current fre-
quency can no longer be received. Switching on and off
Proceed as follows to use the RDS:
1) in Radio mode, press the MEN
button (10). The Radio menu fig. 18
will appear on the display
2) repeatedly press the button (14)
next to the RDS message to select the
required operations (VAR, FIX or
OFF) (the default setting is VAR) de-
scribed below:
FIX Switches the Radio RDS func-
tion on. Since some stations
use RDS to broadcast adver-
tisements in addition to the
station name, you can decide
to display only the station
name. VAR Basic setting with which the
Radio RDS function is fully ac-
tive. Advertising will also be
shown on the display.
OFFSwitches the RDS function off.
Stations are tuned to by indi-
cating the frequency on the
display (example: 87.5). Under
this condition also the TA
function is off.
Page 22 of 202
21
CONNECT NAV
NAVIGATOR
PTY FUNCTION
(PROGRAM TYPE)
PTY is an RDS function. The stations
use PTY to broadcast the contents of
their programmes (POP, ROCK, etc.)
to help you make your choice.
The programme contents will appear
for a few seconds when the PTY func-
tion is on and a new station is tuned
to. The contents will not be displayed
if the station does not use the PTY
function.Switching on and off
Proceed as follows to switch the PTY
function on and off:
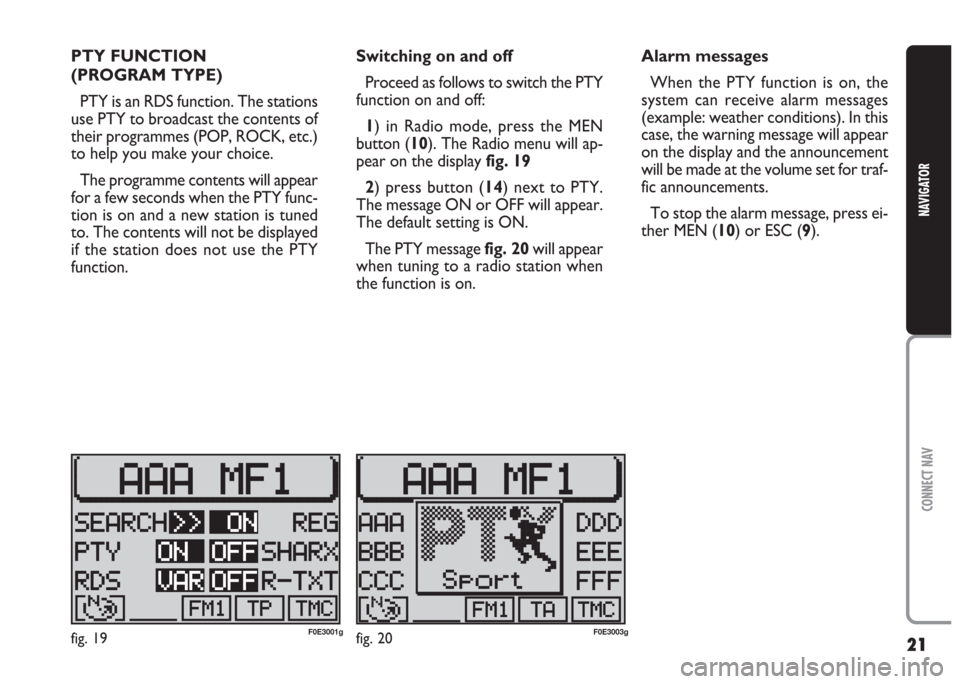
1) in Radio mode, press the MEN
button (10). The Radio menu will ap-
pear on the display fig. 19
2) press button (14) next to PTY.
The message ON or OFF will appear.
The default setting is ON.
The PTY message fig. 20will appear
when tuning to a radio station when
the function is on.Alarm messages
When the PTY function is on, the
system can receive alarm messages
(example: weather conditions). In this
case, the warning message will appear
on the display and the announcement
will be made at the volume set for traf-
fic announcements.
To stop the alarm message, press ei-
ther MEN (10) or ESC (9).
fig. 19F0E3001gfig. 20F0E3003g
Page 23 of 202
22
CONNECT NAV
NAVIGATOR
TA FUNCTION
(TRAFFIC
ANNOUNCEMENT)
This function can be switched on on-
ly in Radio mode in the FM waveband.
When listening to the CD source,
the CD changer (where fitted) or
when the navigation system is on and
the TA button (4) is pressed, the ra-
dio will switch to the FM waveband in
background and activate the TA func-
tion. This will not change the sound
source and the message “TA” will ap-
pear on the display.
When the TA function is on, you can
listen to traffic announcements even
when the CD player or CD changer
(where fitted) is on or in navigation
mode. The system will automatically
switch to the station broadcasting the
traffic announcement. At the end of
the announcement, the sound naviga-
tion system will automatically return
to the previous source.
Press the TA button (4) to switch
the TA function off.IMPORTANT In Radio mode, with
the TA function on, a beep will be
heard if you leave the area where the
station broadcasting traffic announce-
ments can be received. In this case, an
automatic TP (Traffic Program) search
will be started.
Interrupting traffic
announcements
When the TA function is on, press
either TA (4) or MEN (10) or change
station to interrupt the traffic an-
nouncement.TMC FUNCTION
(TRAFFIC MESSAGE
CHANNEL)
The TMC function is used to receive
traffic information which is then
analysed by the sound/navigation sys-
tem in order to “guide” the driver to
the required preset destination.
Since only some stations are enabled
to provide the TMC function, it is pos-
sible that traffic information in certain
areas cannot be received.
When the “Dynamic travel guide”
function is on (see “Dynamic travel
guide” in chapter “Navigation”), the
sound/navigation system will tune au-
tomatically to a TMC station.
Page 25 of 202
24
CONNECT NAV
NAVIGATOR
SHARX FUNCTION
(FM interference reduction)
Occasional interference in the signals
can occur when tuned to FM radio sta-
tions caused by stations broadcasting
on very close frequencies. The
SHARX function reduces such inter-
ference.Switching on and off
Proceed as follows to switch the
SHARX function on and off:
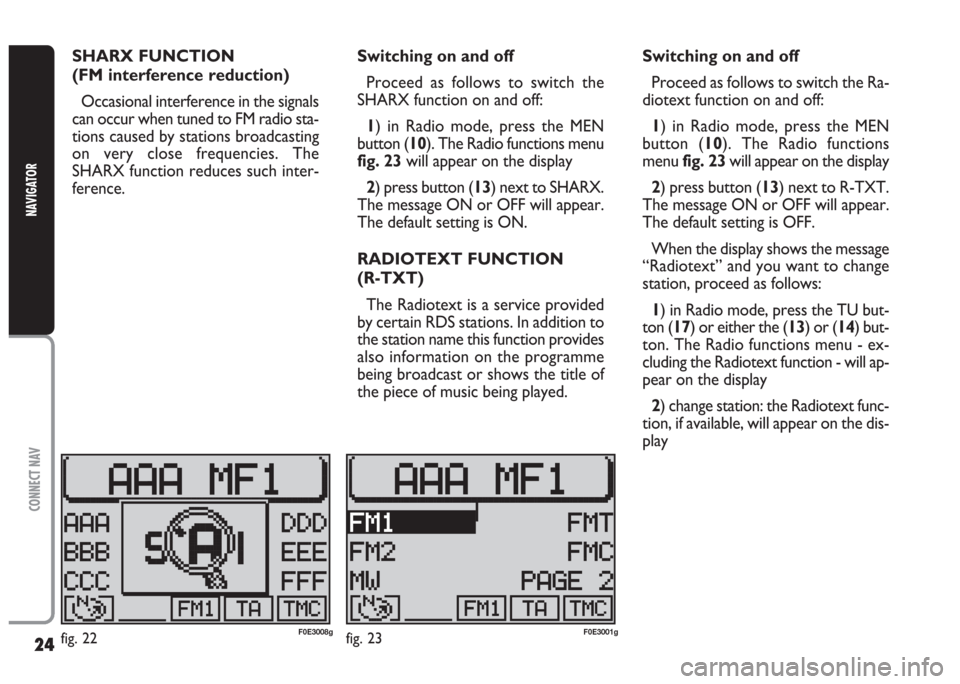
1) in Radio mode, press the MEN
button (10). The Radio functions menu
fig. 23will appear on the display
2) press button (13) next to SHARX.
The message ON or OFF will appear.
The default setting is ON.
RADIOTEXT FUNCTION
(R-TXT)
The Radiotext is a service provided
by certain RDS stations. In addition to
the station name this function provides
also information on the programme
being broadcast or shows the title of
the piece of music being played. Switching on and off
Proceed as follows to switch the Ra-
diotext function on and off:
1) in Radio mode, press the MEN
button (10). The Radio functions
menu fig. 23will appear on the display
2) press button (13) next to R-TXT.
The message ON or OFF will appear.
The default setting is OFF.
When the display shows the message
“Radiotext” and you want to change
station, proceed as follows:
1) in Radio mode, press the TU but-
ton (17) or either the (13) or (14) but-
ton. The Radio functions menu - ex-
cluding the Radiotext function - will ap-
pear on the display
2) change station: the Radiotext func-
tion, if available, will appear on the dis-
play
fig. 22F0E3008gfig. 23F0E3001g
Page 27 of 202
26
CONNECT NAV
NAVIGATOR
When switching the device off, the
message “GOODBYE” will appear on
the display together with the traffic
message storage time previously se-
lected.
Listening to stored traffic
messages
Proceed as follows:
1) press the T button (8). The Traf-
fic menu fig. 24will appear on the dis-
play
2) press button (13) next to TIM-IN-
FO. The last stored message has the
highest number (14) and will be played
first; then all the other messages will
be played in decreasing sequence. The
display will also show the time of ar-
rival of the message being played.
Once the message playing procedure
is over, the system will automatically
switch over to the last selected sound
source (Radio, CD or CD changer).Proceed as follows to listen to the last
selected sound source (Radio, CD or
CD changer) without playing all traffic
messages:
– press T (8) or ESC (9)
Displaying TMC traffic
messages
The device can also display the traf-
fic messages broadcast with the TMC
function (See paragraph “TMC (Traf-
fic Message Channel)” in this chapter).
This type of messages is used by the
satellite sound/navigation system “to
guide” the driver to the required pre-
set destination (see “Dynamic travel
guide” in chapter “Navigation”).To display TMC traffic messages pro-
ceed as follows:
1) press the T button (8)
2) press button (13) next to TIM-IN-
FO. The displayed message number
and the number of stored messages
will appear in the upper row of the dis-
play. The last received message is iden-
tified by the lowest number (1)
3) select one of the stored messages
using the knob/button (11)
4) after reading the required mes-
sage/s, press T (8) or ESC (9) to quit.
IMPORTANT TMC messages re-
ferring to roads distant more than 100
km from the actual car position, are
not processed by the TMC function.
Page 28 of 202
27
CONNECT NAV
NAVIGATOR
C C
O O
M M
P P
A A
C C
T T
D D
I I
S S
C C
( (
C C
D D
) )
Audio CDs can be played with the in-
ternal CD player or with the CD
CHANGER(where fitted).
During CD playback, either the track
number and the playing time, or the
track number only, will appear on the
display (according to the settings, see
CD
FUNCTIONSin this chapter).
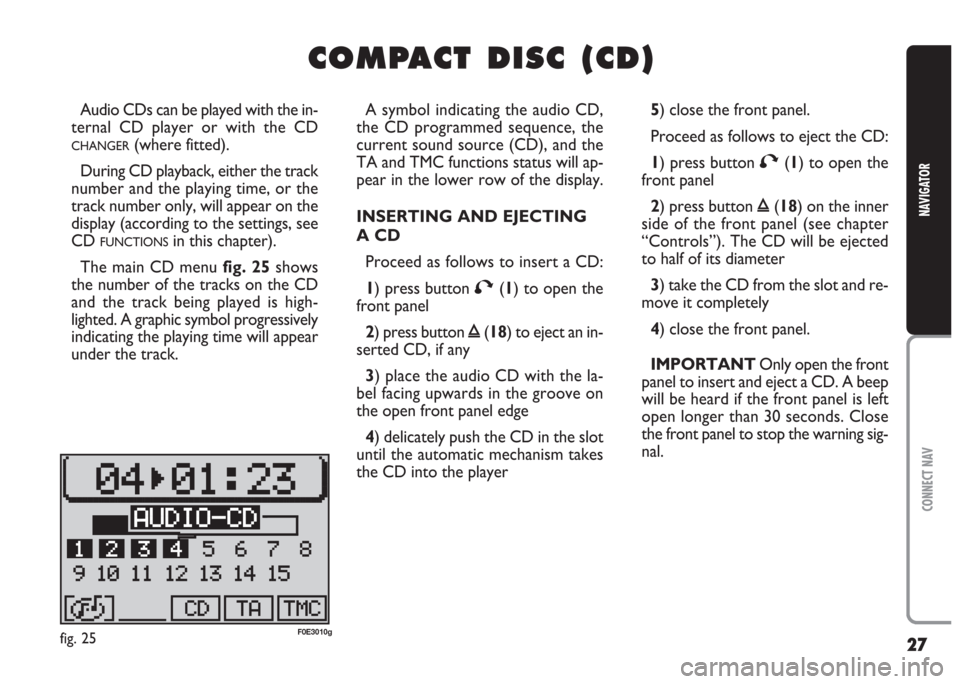
The main CD menu fig. 25shows
the number of the tracks on the CD
and the track being played is high-
lighted. A graphic symbol progressively
indicating the playing time will appear
under the track.A symbol indicating the audio CD,
the CD programmed sequence, the
current sound source (CD), and the
TA and TMC functions status will ap-
pear in the lower row of the display.
INSERTING AND EJECTING
A CD
Proceed as follows to insert a CD:
1) press button
T(1) to open the
front panel
2) press button
ı(18) to eject an in-
serted CD, if any
3) place the audio CD with the la-
bel facing upwards in the groove on
the open front panel edge
4) delicately push the CD in the slot
until the automatic mechanism takes
the CD into the player5) close the front panel.
Proceed as follows to eject the CD:
1) press button
T(1) to open the
front panel
2) press button
ı(18) on the inner
side of the front panel (see chapter
“Controls”). The CD will be ejected
to half of its diameter
3) take the CD from the slot and re-
move it completely
4) close the front panel.
IMPORTANT Only open the front
panel to insert and eject a CD. A beep
will be heard if the front panel is left
open longer than 30 seconds. Close
the front panel to stop the warning sig-
nal.
fig. 25F0E3010g
Page 29 of 202
28
CONNECT NAV
NAVIGATOR
PLAYING A CD
(INTERNAL PLAYER)
Playback will start automatically as
soon as a CD is inserted.
If you are using another source and
a CD is inserted in the internal player,
press the CD-C button (15). The main
CD menu fig. 25will appear on the
display and the CD playback will start.CD FUNCTIONS
Proceed as follows if the last source
was the CD
CHANGER(where fitted)
and there are one or more audio CDs
inside:
1) go to the CDC functions menu by
pressing the CD-C button (15). The
CD functions menu will appear on the
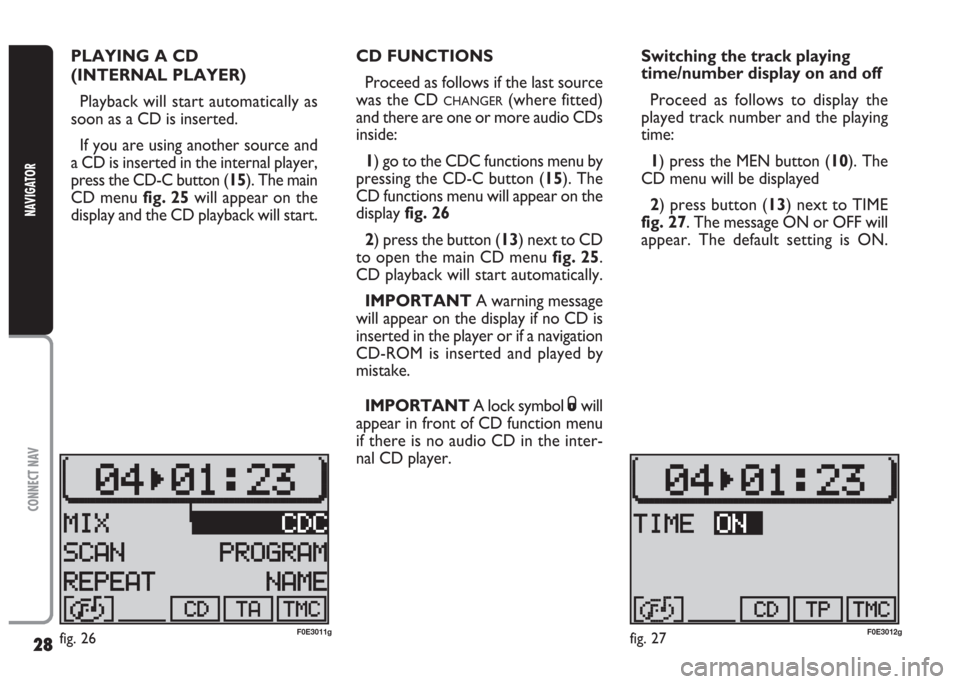
display fig. 26
2) press the button (13) next to CD
to open the main CD menu fig. 25.
CD playback will start automatically.
IMPORTANT A warning message
will appear on the display if no CD is
inserted in the player or if a navigation
CD-ROM is inserted and played by
mistake.
IMPORTANT A lock symbol
Swill
appear in front of CD function menu
if there is no audio CD in the inter-
nal CD player.Switching the track playing
time/number display on and off
Proceed as follows to display the
played track number and the playing
time:
1) press the MEN button (10). The
CD menu will be displayed
2) press button (13) next to TIME
fig. 27. The message ON or OFF will
appear. The default setting is ON.
fig. 26F0E3011gfig. 27F0E3012g
Page 32 of 202
31
CONNECT NAV
NAVIGATOR
PROGRAMMING
THE TRACK SEQUENCE
You can programme your favourite
track sequence and skip the tracks you
do not like.
Setting the required sequence
Proceed as follows to set the re-
quired sequence:
1) in CD mode, go to the CD func-
tions menu by pressing the CD-C but-
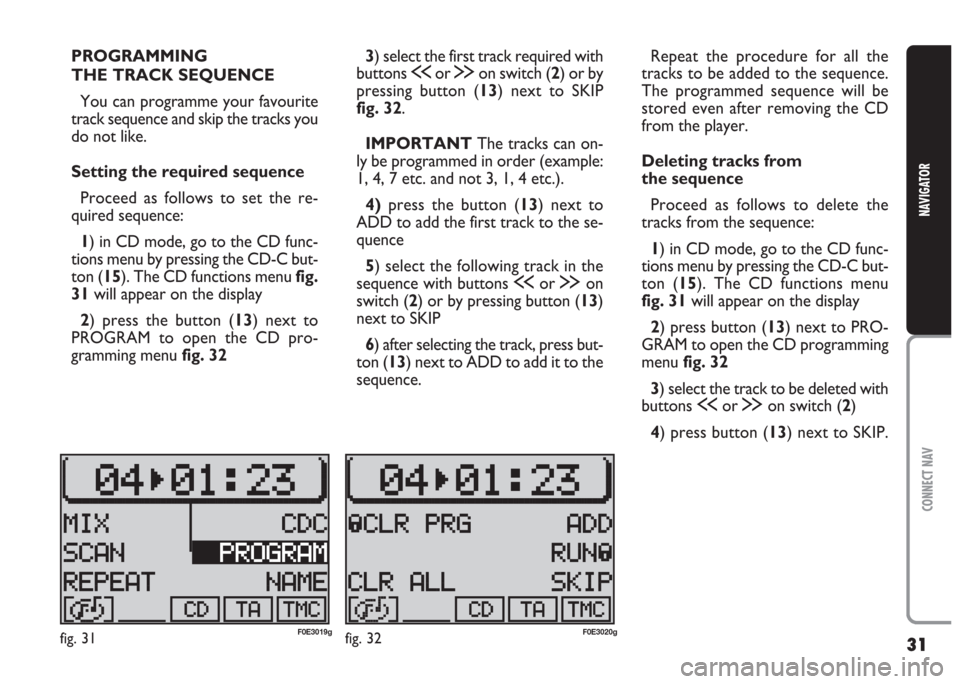
ton (15). The CD functions menu fig.
31will appear on the display
2) press the button (13) next to
PROGRAM to open the CD pro-
gramming menu fig. 323) select the first track required with
buttons
ùor §on switch (2) or by
pressing button (13) next to SKIP
fig. 32.
IMPORTANT The tracks can on-
ly be programmed in order (example:
1, 4, 7 etc. and not 3, 1, 4 etc.).
4)press the button (13) next to
ADD to add the first track to the se-
quence
5) select the following track in the
sequence with buttons
ùor §on
switch (2) or by pressing button (13)
next to SKIP
6) after selecting the track, press but-
ton (13) next to ADD to add it to the
sequence.Repeat the procedure for all the
tracks to be added to the sequence.
The programmed sequence will be
stored even after removing the CD
from the player.
Deleting tracks from
the sequence
Proceed as follows to delete the
tracks from the sequence:
1) in CD mode, go to the CD func-
tions menu by pressing the CD-C but-
ton (15). The CD functions menu
fig. 31will appear on the display
2) press button (13) next to PRO-
GRAM to open the CD programming
menu fig. 32
3) select the track to be deleted with
buttons
ùor §on switch (2)
4) press button (13) next to SKIP.
fig. 31F0E3019gfig. 32F0E3020g
Page 45 of 202
44
CONNECT NAV
NAVIGATOR
2) confirm the selection by pressing
the knob/button (11). The destination
entry menu will be opened
3) select DEST. SPECIALI (P.O.I.)
with the knob/button (11) fig. 47. The
special destinations menu will be
opened
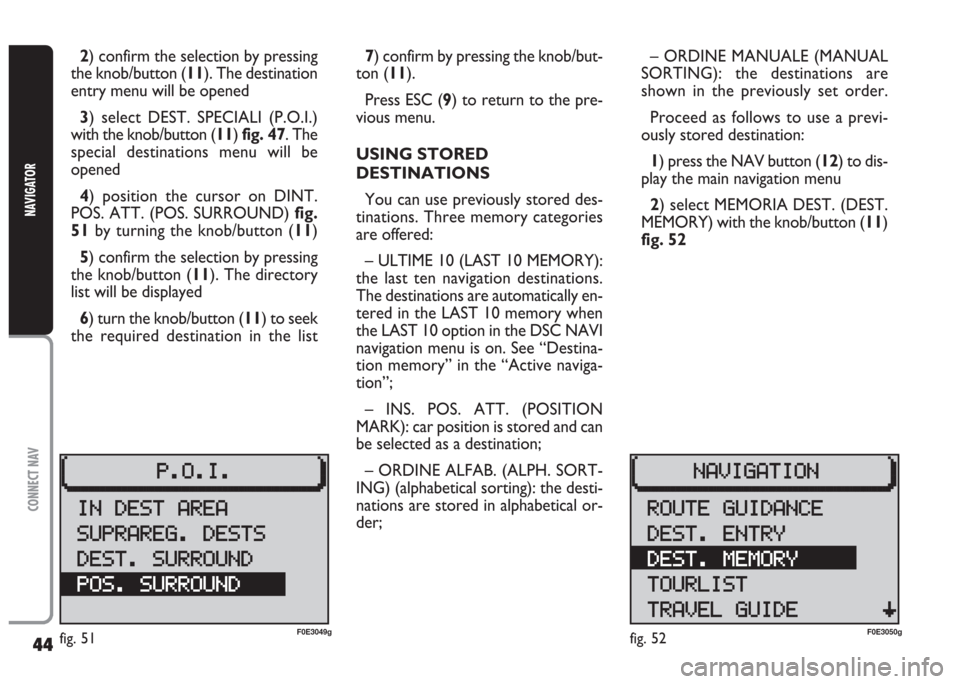
4) position the cursor on DINT.
POS. ATT. (POS. SURROUND) fig.
51by turning the knob/button (11)
5) confirm the selection by pressing
the knob/button (11). The directory
list will be displayed
6) turn the knob/button (11) to seek
the required destination in the list7) confirm by pressing the knob/but-
ton (11).
Press ESC (9) to return to the pre-
vious menu.
USING STORED
DESTINATIONS
You can use previously stored des-
tinations. Three memory categories
are offered:
– ULTIME 10 (LAST 10 MEMORY):
the last ten navigation destinations.
The destinations are automatically en-
tered in the LAST 10 memory when
the LAST 10 option in the DSC NAVI
navigation menu is on. See “Destina-
tion memory” in the “Active naviga-
tion”;
– INS. POS. ATT. (POSITION
MARK): car position is stored and can
be selected as a destination;
– ORDINE ALFAB. (ALPH. SORT-
ING) (alphabetical sorting): the desti-
nations are stored in alphabetical or-
der;– ORDINE MANUALE (MANUAL
SORTING): the destinations are
shown in the previously set order.
Proceed as follows to use a previ-
ously stored destination:
1) press the NAV button (12) to dis-
play the main navigation menu
2) select MEMORIA DEST. (DEST.
MEMORY) with the knob/button (11)
fig. 52
fig. 51F0E3049gfig. 52F0E3050g
Page 47 of 202
46
CONNECT NAV
NAVIGATOR
A A
C C
T T
I I
V V
E E
N N
A A
V V
I I
G G
A A
T T
I I
O O
N N
ROUTE GUIDANCE
Active navigation requires an entered
destination (see
DESTINATION ENTRYin
the
SATELLITE NAVIGATIONchapter) and
route operations settings.
Proceed as follows:
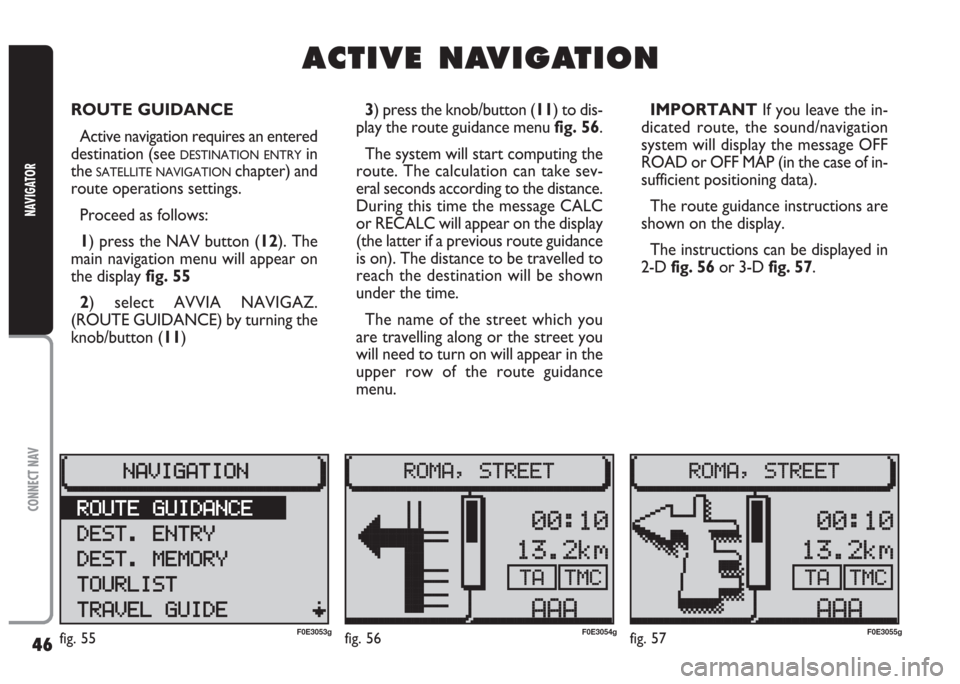
1) press the NAV button (12). The
main navigation menu will appear on
the display fig. 55
2) select AVVIA NAVIGAZ.
(ROUTE GUIDANCE) by turning the
knob/button (11) 3) press the knob/button (11) to dis-
play the route guidance menu fig. 56.
The system will start computing the
route. The calculation can take sev-
eral seconds according to the distance.
During this time the message CALC
or RECALC will appear on the display
(the latter if a previous route guidance
is on). The distance to be travelled to
reach the destination will be shown
under the time.
The name of the street which you
are travelling along or the street you
will need to turn on will appear in the
upper row of the route guidance
menu.IMPORTANT If you leave the in-
dicated route, the sound/navigation
system will display the message OFF
ROAD or OFF MAP (in the case of in-
sufficient positioning data).
The route guidance instructions are
shown on the display.
The instructions can be displayed in
2-D fig. 56or 3-D fig. 57.
fig. 55F0E3053gfig. 56F0E3054gfig. 57F0E3055g