navigation FIAT MULTIPLA 2004 1.G Connect NavPlus Manual
[x] Cancel search | Manufacturer: FIAT, Model Year: 2004, Model line: MULTIPLA, Model: FIAT MULTIPLA 2004 1.GPages: 202, PDF Size: 2.22 MB
Page 139 of 202
138
CONNECT NAV
NAVIGATOR
ENTERING AND EDITING
DESTINATION SHORT
NAMES
Proceed as follows to edit or enter
a short name in the destination mem-
ory:
1) Press the NAV button (12). The
main navigation menu will appear on
the display
2)select DEST. MEMORY by turn-
ing the knob/button (11)
3) confirm the selection by pressing
the knob/button (11). The DEST.
MEMORY menu will appear on the
display
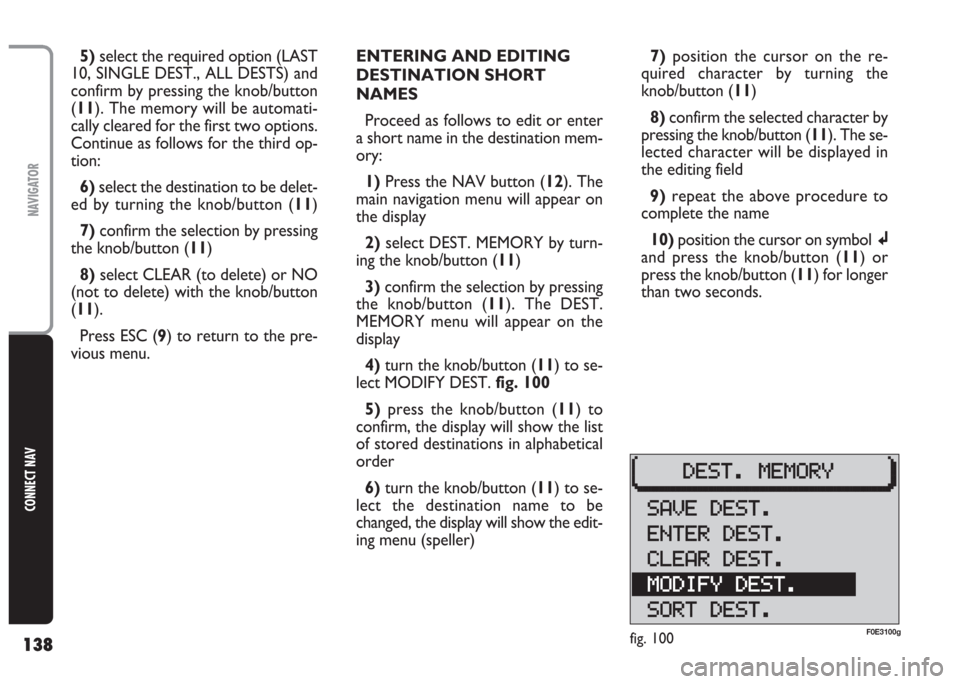
4) turn the knob/button (11) to se-
lect MODIFY DEST. fig. 100
5) press the knob/button (11) to
confirm, the display will show the list
of stored destinations in alphabetical
order
6) turn the knob/button (11) to se-
lect the destination name to be
changed, the display will show the edit-
ing menu (speller) 5)select the required option (LAST
10, SINGLE DEST., ALL DESTS) and
confirm by pressing the knob/button
(11). The memory will be automati-
cally cleared for the first two options.
Continue as follows for the third op-
tion:
6)select the destination to be delet-
ed by turning the knob/button (11)
7) confirm the selection by pressing
the knob/button (11)
8)select CLEAR (to delete) or NO
(not to delete) with the knob/button
(11).
Press ESC (9) to return to the pre-
vious menu.7)position the cursor on the re-
quired character by turning the
knob/button (11)
8) confirm the selected character by
pressing the knob/button (11). The se-
lected character will be displayed in
the editing field
9)repeat the above procedure to
complete the name
10) position the cursor on symbolj
and press the knob/button (11) or
press the knob/button (11) for longer
than two seconds.
fig. 100F0E3100g
Page 140 of 202
139
CONNECT NAV
NAVIGATOR
GPS STATUS AND POSITION
INFORMATION
Proceed as follows to display the
number of GPS satellites which can be
received and the car position:
1) Press the NAV button (12). The
main navigation menu will appear on
the display
2) select GPS STATUS by turning the
knob/button (11)
3) confirm the selection by pressing
the knob/button (11).
Press ESC (9) to return to the pre-
vious menu.AVOIDING TAILBACKS
DURING NAVIGATION
When active navigation is on, the sys-
tem can detour tailbacks or road in-
terruptions.
IMPORTANT Only the options
for which data is available on the nav-
igation CD are offered. A lock symbol
Swill appear next to the unavailable
options.
Proceed as follows:
1)press T (8): the display will show
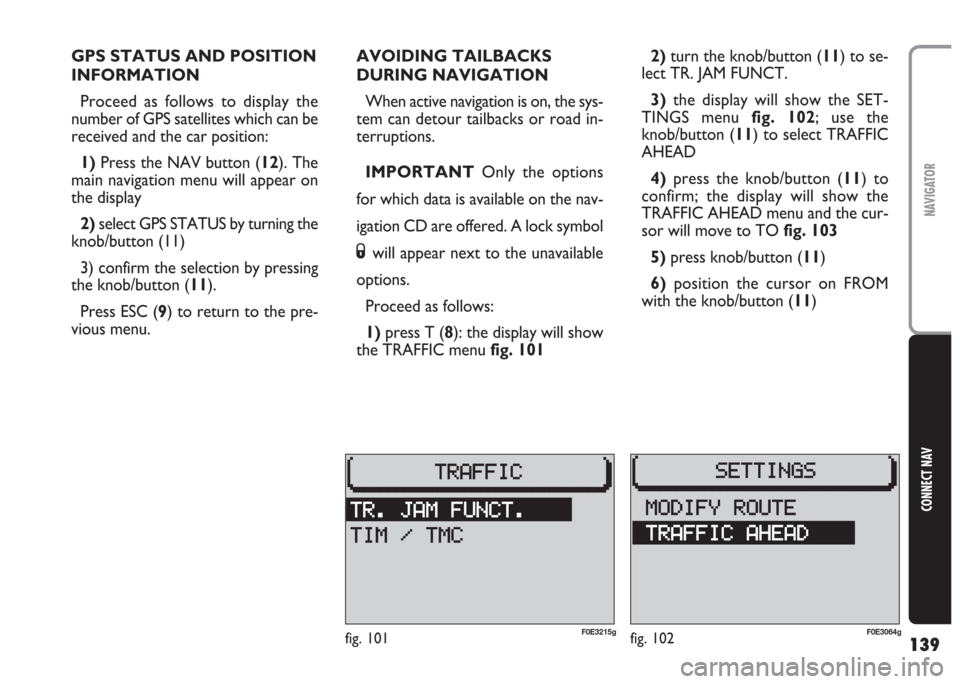
the TRAFFIC menu fig. 1012)turn the knob/button (11) to se-
lect TR. JAM FUNCT.
3)the display will show the SET-
TINGS menu fig. 102; use the
knob/button (11) to select TRAFFIC
AHEAD
4) press the knob/button (11) to
confirm; the display will show the
TRAFFIC AHEAD menu and the cur-
sor will move to TO fig. 103
5)press knob/button (11)
6) position the cursor on FROM
with the knob/button (11)
fig. 101F0E3215gfig. 102F0E3064g
Page 142 of 202
141
CONNECT NAV
NAVIGATOR
3)the display will show the SET-
TINGS menu fig. 102
4) turn the knob/button (11) to se-
lect MODIFY ROUTE fig. 104; the
display will show the route list where
to lock the required route section
IMPORTANT Long routes in
which single short sections cannot be
locked are marked with symbol “
+”.
To display short route sections, select
items marked with symbol “
+” and
hold the knob/button pressed for
longer than two seconds.
Short route sections which are not
divided are marked with symbol“
-”.
Route sections that cannot be locked
(since an alternative route cannot be
selected), are marked with symbol
S.5) use the knob/button (11) to se-
lect the first route section you want
to delete from the list (it is better to
select a long route)
6) press the knob/button (11): a ring
will be displayed in front of the se-
lected route
7) turn the knob/button (11) until
selecting the last route to delete from
the list (it is better to select a long
route)
8)press the knob/button (11). The
main navigation menu will appear on
the display and a new route is calcu-
lated. The message NEW CALC will
appear on the display.Deleting/changing route lock
Proceed as follows:
1) press T (8): the display will show
the TRAFFIC menu fig. 101
2)turn the knob/button (11) to se-
lect TR. JAM FUNCT.
3)the display will show the SET-
TINGS menu
4) turn the knob/button (11) to se-
lect MODIFY ROUTE fig. 104; the
display will show the clear or change
options.
– to cleara route section, select
CLEAR. The display will show the
main navigation menu and new route
will be calculated: the display shows
NEW CALC.
– to changea route section, select
CHANGEand repeat the operations
listed in points 3), 4), 5)and 6)con-
cerning route lock
Page 143 of 202
142
CONNECT NAV
NAVIGATOR
CUSTOMISING THE ROUTE
Routes can be customised at any mo-
ment, even during navigation by en-
tering the following parameters:
– ROUTE: you can choose between
the fastest or shortest route or select
the “Dynamic travel guide” (DYN.)
with TMC (see paragraph “Dynamic
travel guide” in this section). When
this function is on, all the other op-
tions (MOTORWAY, FERRY and
TOOL) are not displayed. The system
tunes automatically to a TMC station
and calculates the fastest/shortest
route on the basis of the traffic mes-
sages;
– MOTORWAY: during navigation,
you can choose whether to use mo-
torways;
– FERRY: you can choose whether
to use ferries;
– TOOL: you can exclude toll roads
from the route.IMPORTANT For instance, setting
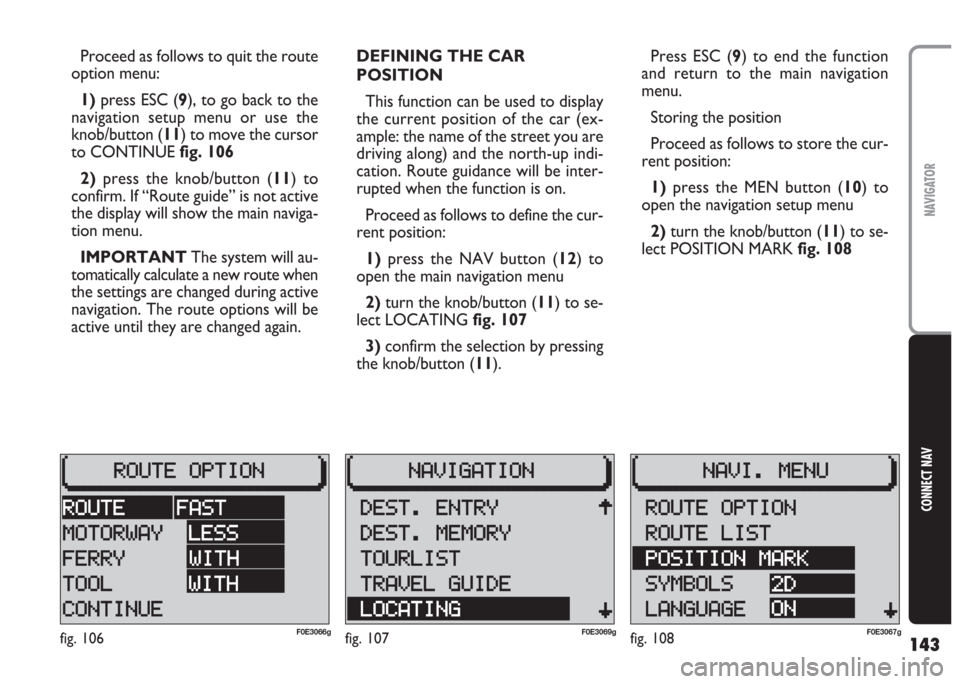
MOTOR WAY LESS fig. 106, you
avoid motorways but you have to cov-
er long route sections, the system will
therefore programme motorways in
the calculated route. The same stands
valid for FERRY and for TOOL roads.
Proceed as follows to select the
route options:
1)press the MEN button (10) to
open the navigation setup menu
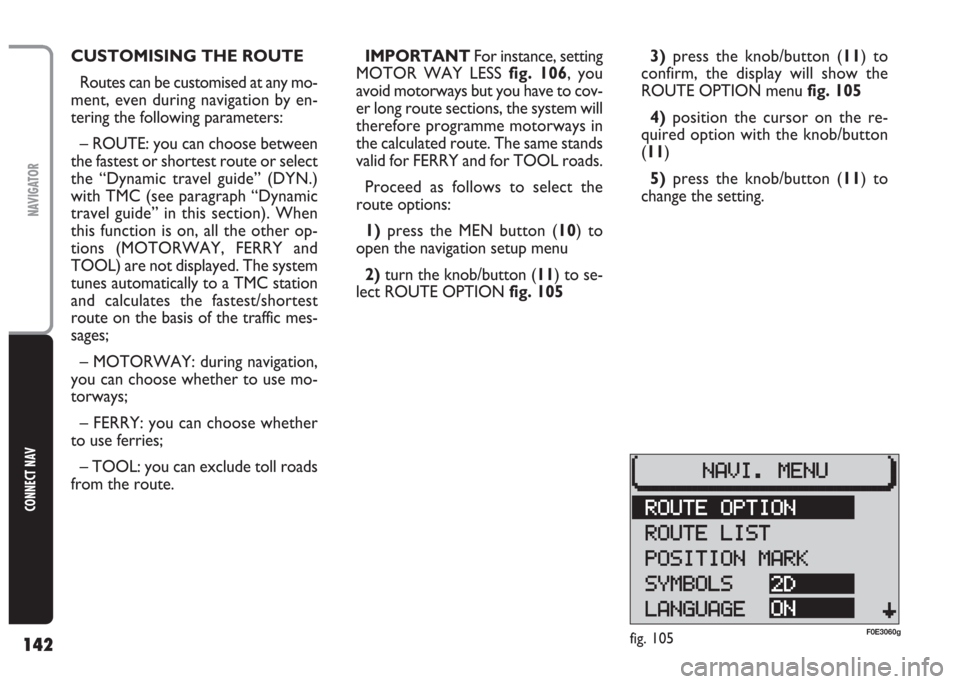
2)turn the knob/button (11) to se-
lect ROUTE OPTION fig. 1053) press the knob/button (11) to
confirm, the display will show the
ROUTE OPTION menu fig. 105
4)position the cursor on the re-
quired option with the knob/button
(11)
5) press the knob/button (11) to
change the setting.
fig. 105F0E3060g
Page 144 of 202
143
CONNECT NAV
NAVIGATOR
Proceed as follows to quit the route
option menu:
1) press ESC (9), to go back to the
navigation setup menu or use the
knob/button (11) to move the cursor
to CONTINUE fig. 106
2)press the knob/button (11) to
confirm. If “Route guide” is not active
the display will show the main naviga-
tion menu.
IMPORTANT The system will au-
tomatically calculate a new route when
the settings are changed during active
navigation. The route options will be
active until they are changed again.DEFINING THE CAR
POSITION
This function can be used to display
the current position of the car (ex-
ample: the name of the street you are
driving along) and the north-up indi-
cation. Route guidance will be inter-
rupted when the function is on.
Proceed as follows to define the cur-
rent position:
1) press the NAV button (12) to
open the main navigation menu
2)turn the knob/button (11) to se-
lect LOCATING fig. 107
3) confirm the selection by pressing
the knob/button (11).Press ESC (9) to end the function
and return to the main navigation
menu.
Storing the position
Proceed as follows to store the cur-
rent position:
1)press the MEN button (10) to
open the navigation setup menu
2)turn the knob/button (11) to se-
lect POSITION MARK fig. 108
fig. 108F0E3067gfig. 107F0E3069gfig. 106F0E3066g
Page 145 of 202
144
CONNECT NAV
NAVIGATOR
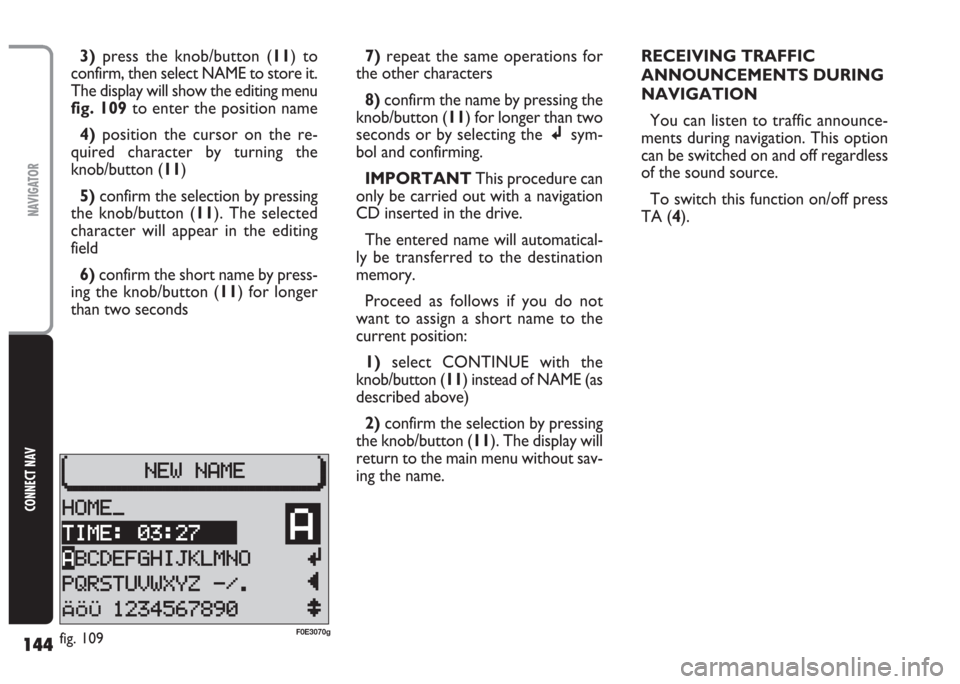
3)press the knob/button (11) to
confirm, then select NAME to store it.
The display will show the editing menu
fig. 109to enter the position name
4)position the cursor on the re-
quired character by turning the
knob/button (11)
5)confirm the selection by pressing
the knob/button (11). The selected
character will appear in the editing
field
6) confirm the short name by press-
ing the knob/button (11) for longer
than two seconds7)repeat the same operations for
the other characters
8)confirm the name by pressing the
knob/button (11) for longer than two
seconds or by selecting thejsym-
bol and confirming.
IMPORTANT This procedure can
only be carried out with a navigation
CD inserted in the drive.
The entered name will automatical-
ly be transferred to the destination
memory.
Proceed as follows if you do not
want to assign a short name to the
current position:
1)select CONTINUE with the
knob/button (11) instead of NAME (as
described above)
2)confirm the selection by pressing
the knob/button (11). The display will
return to the main menu without sav-
ing the name.RECEIVING TRAFFIC
ANNOUNCEMENTS DURING
NAVIGATION
You can listen to traffic announce-
ments during navigation. This option
can be switched on and off regardless
of the sound source.
To switch this function on/off press
TA (4).
fig. 109F0E3070g
Page 146 of 202
145
CONNECT NAV
NAVIGATOR
SWITCHING VOICE
MESSAGES ON AND OFF
Route guidance consists of voice
messages. The voice messages provide
information on the distances to be
travelled before turning.
The voice messages can be switched
on and off:
1)press the MEN button (10) to
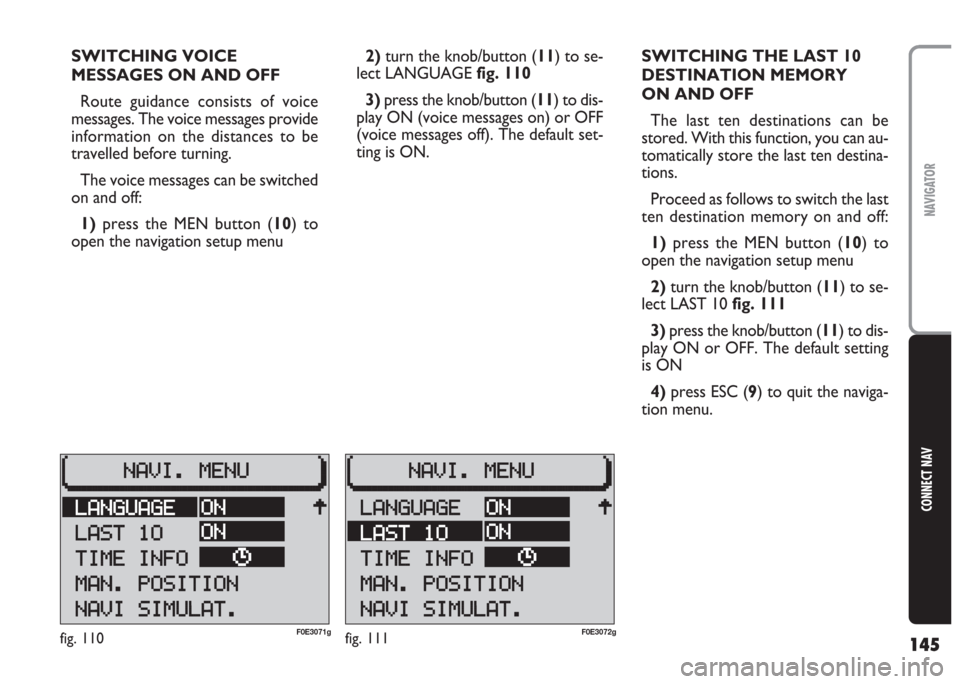
open the navigation setup menu2)turn the knob/button (11) to se-
lect LANGUAGE fig. 110
3) press the knob/button (11) to dis-
play ON (voice messages on) or OFF
(voice messages off). The default set-
ting is ON.SWITCHING THE LAST 10
DESTINATION MEMORY
ON AND OFF
The last ten destinations can be
stored. With this function, you can au-
tomatically store the last ten destina-
tions.
Proceed as follows to switch the last
ten destination memory on and off:
1)press the MEN button (10) to
open the navigation setup menu
2)turn the knob/button (11) to se-
lect LAST 10 fig. 111
3)press the knob/button (11) to dis-
play ON or OFF. The default setting
is ON
4)press ESC (9) to quit the naviga-
tion menu.
fig. 111F0E3072gfig. 110F0E3071g
Page 147 of 202
146
CONNECT NAV
NAVIGATOR
SWITCHING ROUTE TIME
INFORMATION ON AND OFF
This function enables to select the
time required to reach the destination
and the estimated and exact time of
arrival.
Proceed as follows to switch the
route time information on and off:
1)press MEN (10) the display will
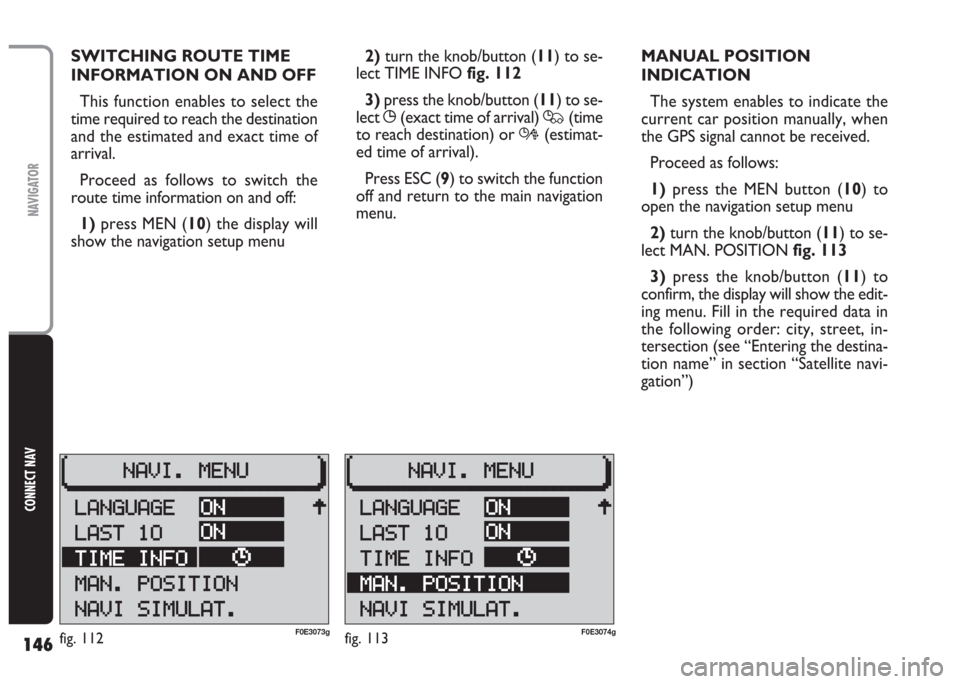
show the navigation setup menu2) turn the knob/button (11) to se-
lect TIME INFO fig. 112
3)press the knob/button (11) to se-
lect
X(exact time of arrival) Q(time
to reach destination) or R(estimat-
ed time of arrival).
Press ESC (9) to switch the function
off and return to the main navigation
menu.MANUAL POSITION
INDICATION
The system enables to indicate the
current car position manually, when
the GPS signal cannot be received.
Proceed as follows:
1)press the MEN button (10) to
open the navigation setup menu
2) turn the knob/button (11) to se-
lect MAN. POSITION fig. 113
3)press the knob/button (11) to
confirm, the display will show the edit-
ing menu. Fill in the required data in
the following order: city, street, in-
tersection (see “Entering the destina-
tion name” in section “Satellite navi-
gation”)
fig. 112F0E3073gfig. 113F0E3074g
Page 148 of 202
147
CONNECT NAV
NAVIGATOR
4)after completing the above oper-
ation, press the knob/button (11) for
over 2 seconds to confirm or select
symbol (
j) and confirm: the display will
show the main navigation menu.
IMPORTANT Certain road inter-
sections (e.g. straight road intersection
with loop road) are not suitable for in-
dicating the car position. NAVIGATION SIMULATION
The system can simulate a trip. The
system simulates navigation by pro-
viding realistic visual instructions, voice
messages and acoustic signals.
Proceed as follows to start a simu-
lation:
1)press the MEN button (10) to
open the navigation setup menu
2) turn the knob/button (11) to se-
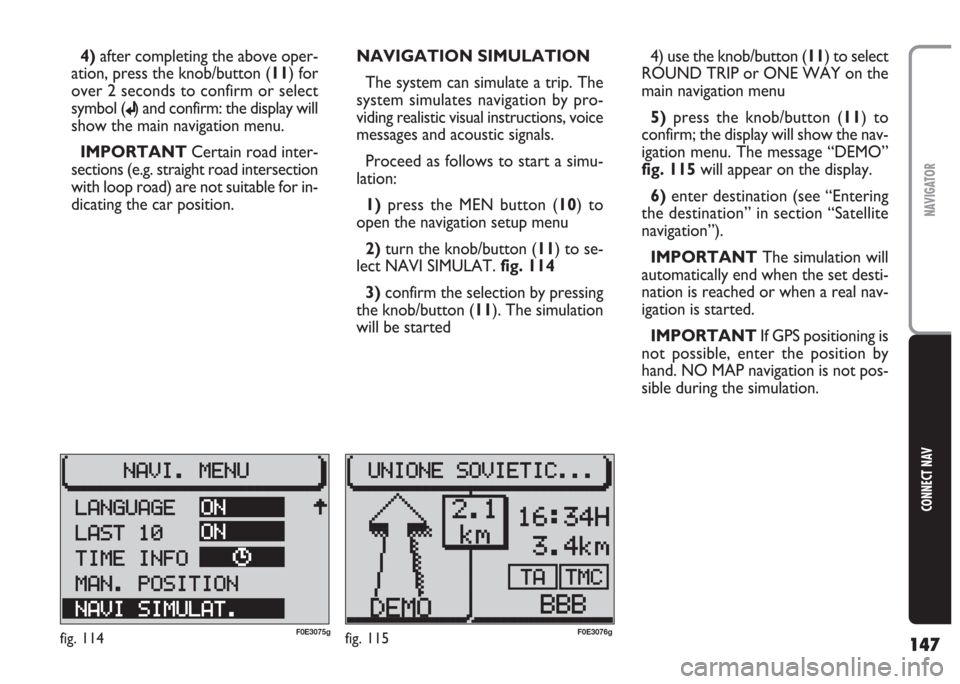
lect NAVI SIMULAT. fig. 114
3)confirm the selection by pressing
the knob/button (11). The simulation
will be started4) use the knob/button (11) to select
ROUND TRIP or ONE WAY on the
main navigation menu
5) press the knob/button (11) to
confirm; the display will show the nav-
igation menu. The message “DEMO”
fig. 115 will appear on the display.
6)enter destination (see “Entering
the destination” in section “Satellite
navigation”).
IMPORTANT The simulation will
automatically end when the set desti-
nation is reached or when a real nav-
igation is started.
IMPORTANT If GPS positioning is
not possible, enter the position by
hand. NO MAP navigation is not pos-
sible during the simulation.
fig. 114F0E3075gfig. 115F0E3076g
Page 149 of 202
148
CONNECT NAV
NAVIGATOR
GENERAL INFORMATION
The Connect Nav system provides a
set of functions enabling to receive,
from the Targa Infomobilitycon-
tact centre, useful information (e.g. ho-
tel, closest workshop) or to send a re-
quest for assistance.
With all these functions your geo-
graphical position is automatically giv-
en to the assistance centre. The nec-
essary condition to establish your ex-
act position is reception of at least 3
GPS satellites. The number of received
satellites is shown on the display.
Furthermore, with the “Follow
me”, function you can be updated on
the traffic situation along your way.
Updating intervals can be changed as
described in paragraph “Setting the in-
terval for updating the distance cov-
ered” in this section).
Targa Infomobilityservices (IN-
FOMOBILITY, MEDICAL ADVICE,
ROAD ASSIST.) shall be requested by
voice connection. IMPORTANT Access to Targa
Infomobilityè Telematic services is
linked to the terminal activation and
to the telephone operator profile ac-
tivation of the SIM card inserted in the
system. If a SIM card and a telephone
operator with no profile activated are
used, it is necessary to request Tar-
ga infomobilityfor a new activation.
The system can manage 5 different
profiles.
IMPORTANT Before requesting
this function, get familiar with the oth-
er functions, i.e.: Radio, CD-Changer
(where fitted), Navigation and Tele-
phone.
When no SIM card has been insert-
ed and you press
•(7) it will possi-
ble to call the emergency service num-
ber 112.
Instead, if a valid SIM card is insert-
ed, but there is no Targa Infomo-
bilitysubscription, pressing
•(7) will
activate the PERS. NUMBER function.
T T
A A
R R
G G
A A
I I
N N
F F
O O
M M
O O
B B
I I
L L
I I
T T
Y Y
S S
E E
R R
V V
I I
C C
E E
S S
After voice request, an message will
be sent to the Targa Infomobility
contact centre that will recall the user
immediately after. Required info will
therefore be received (also through
SMS).
If not deleted the information re-
ceived (max. 20) will be stored.
The necessary conditions to use the
telematic services are the following:
– valid SIM card for Targa Info-
mobilityContact Centre connection
– activation of pay services run by
Targa Infomobility (INFOMOBIL-
ITY, MEDICAL ADVICE, ROAD AS-
SIST.).
IMPORTANT If the user has not
yet subscribed to the pay services run
by Targa Infomobility, the associ-
ated menu functions are inactive. Dur-
ing subscription you will be given the
activation and deactivation procedures
of the Telematic Services offered by
Targa infomobility.