remove seats FIAT MULTIPLA 2006 1.G Owners Manual
[x] Cancel search | Manufacturer: FIAT, Model Year: 2006, Model line: MULTIPLA, Model: FIAT MULTIPLA 2006 1.GPages: 266, PDF Size: 4.61 MB
Page 45 of 266
44
SAFETY
DEVICES
CORRECT USE
OF THE CAR
WARNING
LIGHTS AND
MESSAGES
IN AN
EMERGENCY
CAR
MAINTENANCE
TECHNICAL
SPECIFICATIONS
INDEX
DASHBOARD
AND CONTROLS
HEAD RESTRAINTS
FRONT SEATS
To improve passenger safety, the height of the head restraints can be
adjusted. They will automatically lock in the position required.
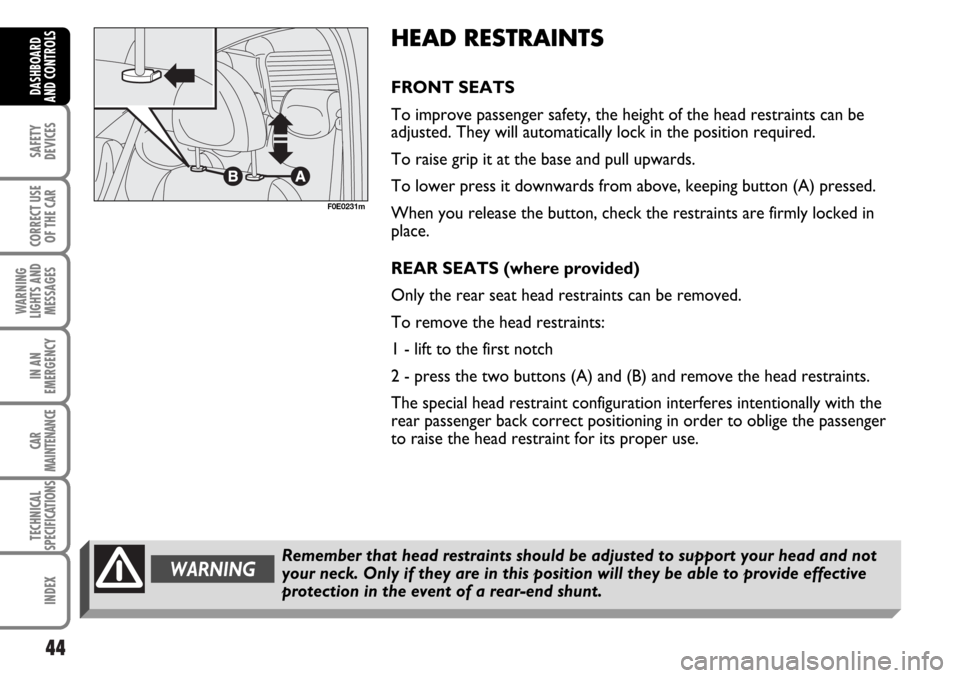
To raise grip it at the base and pull upwards.
To lower press it downwards from above, keeping button (A) pressed.
When you release the button, check the restraints are firmly locked in
place.
REAR SEATS (where provided)
Only the rear seat head restraints can be removed.
To remove the head restraints:
1 - lift to the first notch
2 - press the two buttons (A) and (B) and remove the head restraints.
The special head restraint configuration interferes intentionally with the
rear passenger back correct positioning in order to oblige the passenger
to raise the head restraint for its proper use.
Remember that head restraints should be adjusted to support your head and not
your neck. Only if they are in this position will they be able to provide effective
protection in the event of a rear-end shunt.WARNING
F0E0231m
Page 77 of 266
76
SAFETY
DEVICES
CORRECT USE
OF THE CAR
WARNING
LIGHTS AND
MESSAGES
IN AN
EMERGENCY
CAR
MAINTENANCE
TECHNICAL
SPECIFICATIONS
INDEX
DASHBOARD
AND CONTROLS
WARNINGImproper use of power windows can be dangerous. Before and during its operation
ensure that any passengers are not at risk from the moving window either by
personal objects getting caught on the mechanism or by being injured by it directly.
When leaving the car, the ignition key should be removed to prevent the power
window from being operated inadvertently and harming anyone remaining in the
car.
F0E0081m
ELECTRIC WINDOWS
FRONT SEATS
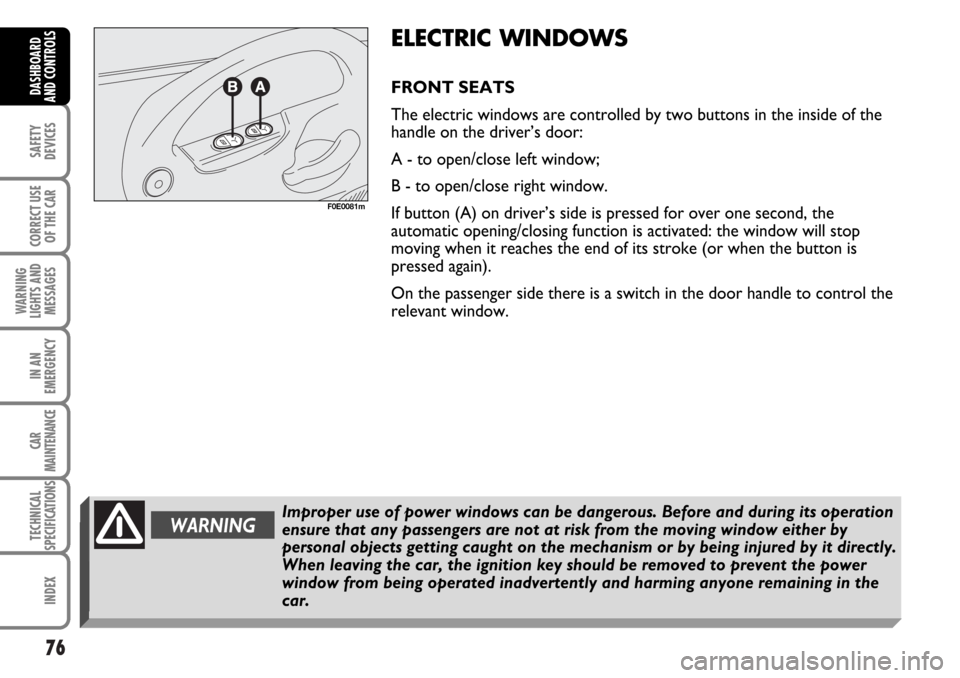
The electric windows are controlled by two buttons in the inside of the
handle on the driver’s door:
A - to open/close left window;
B - to open/close right window.
If button (A) on driver’s side is pressed for over one second, the
automatic opening/closing function is activated: the window will stop
moving when it reaches the end of its stroke (or when the button is
pressed again).
On the passenger side there is a switch in the door handle to control the
relevant window.
Page 82 of 266
81
SAFETY
DEVICES
CORRECT USE
OF THE CAR
WARNING
LIGHTS AND
MESSAGES
IN AN
EMERGENCY
CAR
MAINTENANCE
TECHNICAL
SPECIFICATIONS
INDEX
DASHBOARD
AND CONTROLS
EXTENDING THE BOOT
The boot can be extended when needed in the following ways:
1) moving the rear seats forward (by 15 cm);
2) removing the rear window shelf;
3) tipping the rear seats forward;
4) removing the seats.
Moving the rear seats
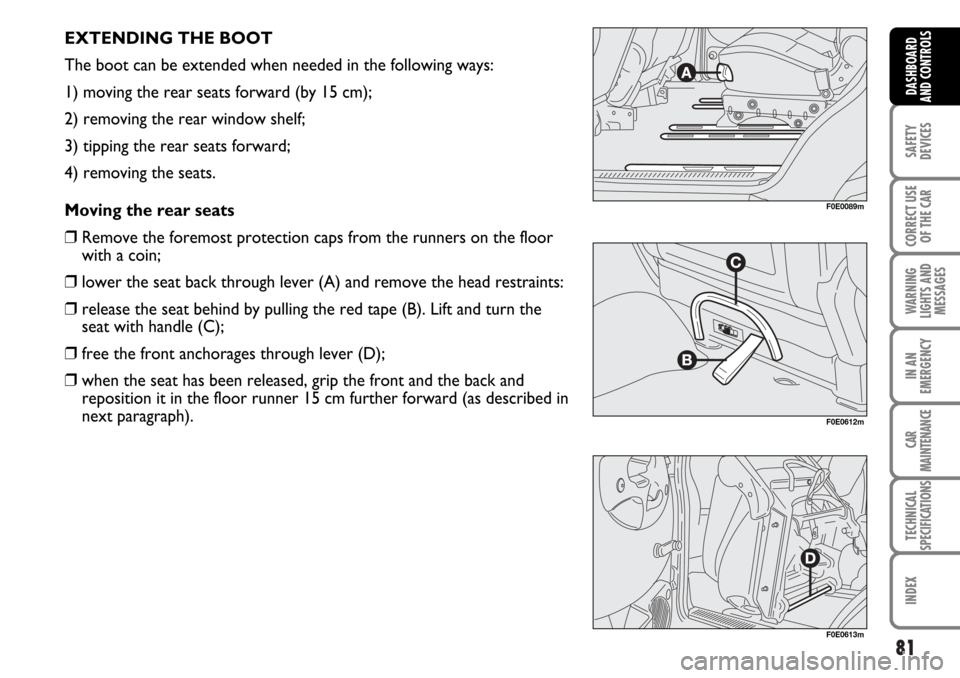
❒Remove the foremost protection caps from the runners on the floor
with a coin;
❒lower the seat back through lever (A) and remove the head restraints:
❒release the seat behind by pulling the red tape (B). Lift and turn the
seat with handle (C);
❒free the front anchorages through lever (D);
❒when the seat has been released, grip the front and the back and
reposition it in the floor runner 15 cm further forward (as described in
next paragraph).
F0E0089m
F0E0612m
F0E0613m
Page 84 of 266
83
SAFETY
DEVICES
CORRECT USE
OF THE CAR
WARNING
LIGHTS AND
MESSAGES
IN AN
EMERGENCY
CAR
MAINTENANCE
TECHNICAL
SPECIFICATIONS
INDEX
DASHBOARD
AND CONTROLS
Removing the rear window shelf
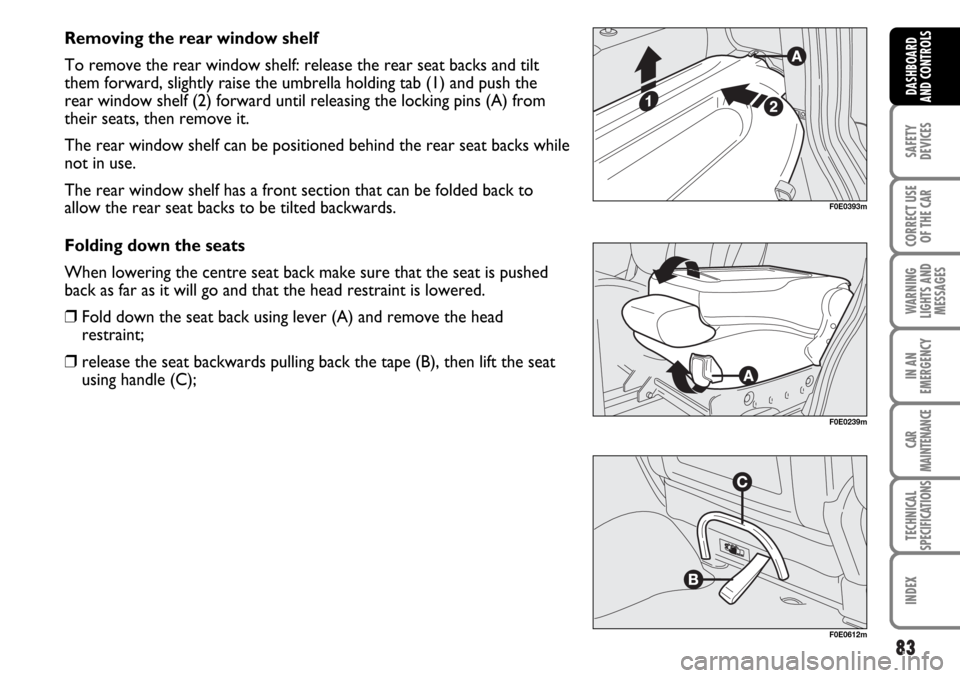
To remove the rear window shelf: release the rear seat backs and tilt
them forward, slightly raise the umbrella holding tab (1) and push the
rear window shelf (2) forward until releasing the locking pins (A) from
their seats, then remove it.
The rear window shelf can be positioned behind the rear seat backs while
not in use.
The rear window shelf has a front section that can be folded back to
allow the rear seat backs to be tilted backwards.
Folding down the seats
When lowering the centre seat back make sure that the seat is pushed
back as far as it will go and that the head restraint is lowered.
❒Fold down the seat back using lever (A) and remove the head
restraint;
❒release the seat backwards pulling back the tape (B), then lift the seat
using handle (C);
F0E0239m
F0E0393m
F0E0612m
Page 122 of 266
121
CORRECT USE
OF THE CAR
WARNING
LIGHTS AND
MESSAGES
IN AN
EMERGENCY
CAR
MAINTENANCE
TECHNICAL
SPECIFICATIONS
INDEX
DASHBOARD
AND CONTROLS
SAFETY
DEVICES
All restraint devices must bear the certification data,
together with the control brand, on a solidly fixed
label which must absolutely never be removed.Over 1.50 m in height, from the point of view of
restraint systems, children are considered as adults
and wear the seat belts normally.
Lineaccessori Fiat offers seats for each weight group,
which are the recommended choice, as they have been
designed and experimented specifically for Fiat cars.
WARNINGWith passenger’s air bag active, never place child’s seats with the cradle facing
backwards since the air bag activation could cause to the child serious injuries,
even mortal, regardless of the seriousness of the crash that triggered it. You are
advised to carry children always with proper restraint systems on the rear seats, as
this is the most protected position in the case of a crash.
WARNINGSERIOUS DANGER Should it be absolutely necessary to carry a baby on the front
passenger seat with a child's seat with the cradle facing backwards, deactivate the
passenger's air bags (front and side on the seat, where provided) using the key
switch and then check warning light
Fon the cluster to make sure that
deactivation has actually took place (see paragraph “ Manual deactivation of
passenger's front air bag”).
The front passenger's seat shall be adjusted in the most backward position to
prevent any contact between child's seat and dashboard.
Page 176 of 266
175
SAFETY
DEVICES
CORRECT USE
OF THE CAR
WARNING
LIGHTS AND
MESSAGES
CAR
MAINTENANCE
TECHNICAL
SPECIFICATIONS
INDEX
DASHBOARD
AND CONTROLS
IN AN
EMERGENCY
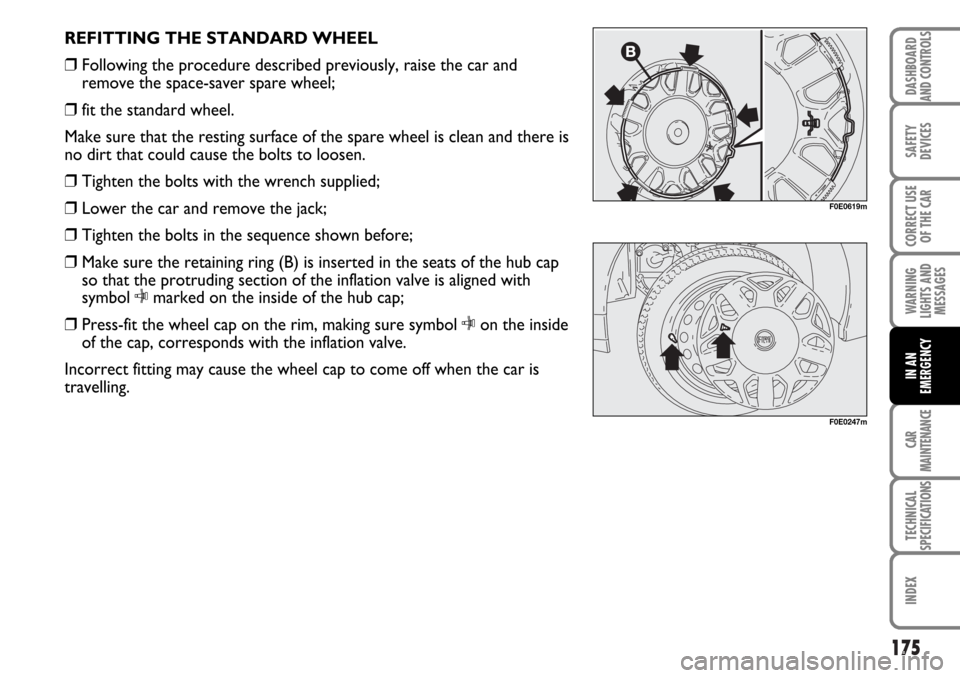
REFITTING THE STANDARD WHEEL
❒Following the procedure described previously, raise the car and
remove the space-saver spare wheel;
❒fit the standard wheel.
Make sure that the resting surface of the spare wheel is clean and there is
no dirt that could cause the bolts to loosen.
❒Tighten the bolts with the wrench supplied;
❒Lower the car and remove the jack;
❒Tighten the bolts in the sequence shown before;
❒Make sure the retaining ring (B) is inserted in the seats of the hub cap
so that the protruding section of the inflation valve is aligned with
symbol
Cmarked on the inside of the hub cap;
❒Press-fit the wheel cap on the rim, making sure symbol
Con the inside
of the cap, corresponds with the inflation valve.
Incorrect fitting may cause the wheel cap to come off when the car is
travelling.
F0E0619m
F0E0247m
Page 192 of 266
191
SAFETY
DEVICES
CORRECT USE
OF THE CAR
WARNING
LIGHTS AND
MESSAGES
CAR
MAINTENANCE
TECHNICAL
SPECIFICATIONS
INDEX
DASHBOARD
AND CONTROLS
IN AN
EMERGENCY
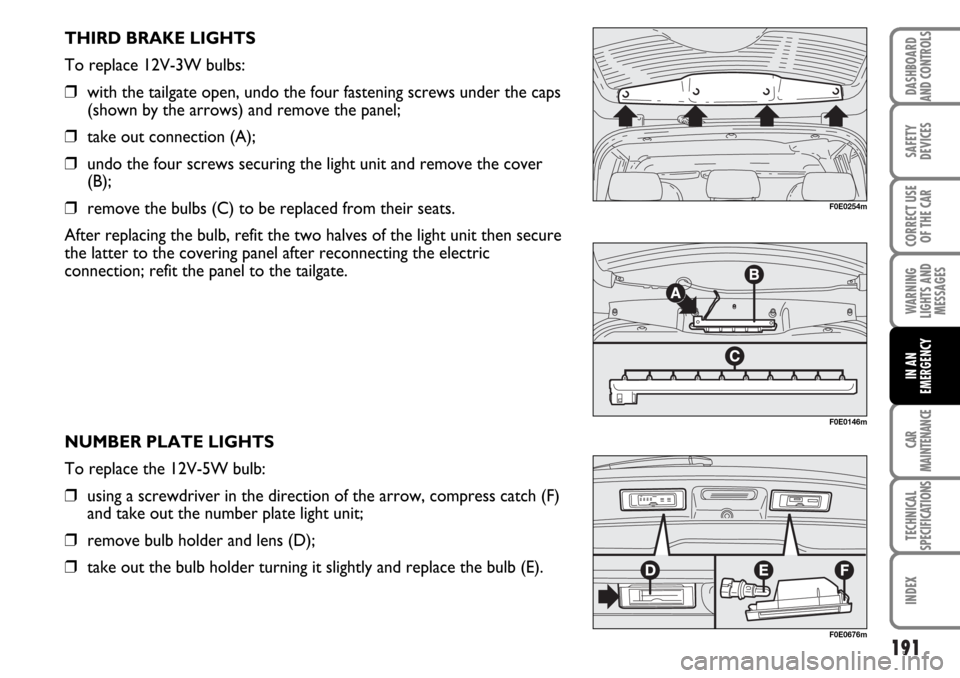
THIRD BRAKE LIGHTS
To replace 12V-3W bulbs:
❒with the tailgate open, undo the four fastening screws under the caps
(shown by the arrows) and remove the panel;
❒take out connection (A);
❒undo the four screws securing the light unit and remove the cover
(B);
❒remove the bulbs (C) to be replaced from their seats.
After replacing the bulb, refit the two halves of the light unit then secure
the latter to the covering panel after reconnecting the electric
connection; refit the panel to the tailgate.
NUMBER PLATE LIGHTS
To replace the 12V-5W bulb:
❒using a screwdriver in the direction of the arrow, compress catch (F)
and take out the number plate light unit;
❒remove bulb holder and lens (D);
❒take out the bulb holder turning it slightly and replace the bulb (E).
F0E0254m
F0E0146m
F0E0676m
Page 232 of 266
231
SAFETY
DEVICES
CORRECT USE
OF THE CAR
WARNING
LIGHTS AND
MESSAGES
TECHNICAL
SPECIFICATIONS
INDEX
DASHBOARD
AND CONTROLS
IN AN
EMERGENCY
CAR
MAINTENANCE
Windows
Use specific window cleaner products to clean cloths
to avoid scratching the glass or damaging the
transparency.
IMPORTANT The inside of the rear window should
be wiped gently with a cloth in the direction of the
filaments to avoid damaging the heating device.
Engine compartment
At the end of the winter the engine compartment
should be carefully washed, without directing the jet
against electronic control units. Contact a specialised
workshop to have this done.
IMPORTANT Wash with the engine cold and the
ignition key at STOP. After washing make sure that the
various protections (e.g. rubber caps and various
covers) have not been damaged or removed.
Front headlights
IMPORTANT Never use aromatic substances (e.g.:
petrol) or ketones (e.g.: acetone) for cleaning front
headlight plastic lens.
IMPORTANT Wash with the engine cold and the
ignition key at STOP. After washing make sure that the
various protections (e.g. rubber caps and various
covers) have not been damaged or removed.INTERIORS
Periodically check that water is not trapped under the
mats (due to water dripping off shoes, umbrellas, etc.)
which could cause oxidisation of the sheet metal.
CLEANING SEATS AND FABRIC/JERSEY
UPHOLSTERY
❒Use a soft brush or vacuum cleaner to remove dust.
❒Rub the seats with a sponge moistened with a
solution of water and neutral detergent.
PLASTIC PARTS INSIDE THE CAR
Clean the plastic parts inside the car with a cloth
moistened with a solution of water and non-abrasive
neutral detergent. To remove grease or hard stains,
use special solvent-free products designed not to alter
the appearance and colour of components.
IMPORTANT Do not use alcohol or petrol to clean
the instrument panel.
Detergents cause water pollution.
Therefore the engine compartment should
be washed in areas equipped for
collecting and purifying the liquid used in
the washing process.
Page 245 of 266
244
SAFETY
DEVICES
CORRECT USE
OF THE CAR
WARNING
LIGHTS AND
MESSAGES
CAR
MAINTENANCE
INDEX
DASHBOARD
AND CONTROLS
IN AN
EMERGENCY
TECHNICAL
SPECIFICATIONS
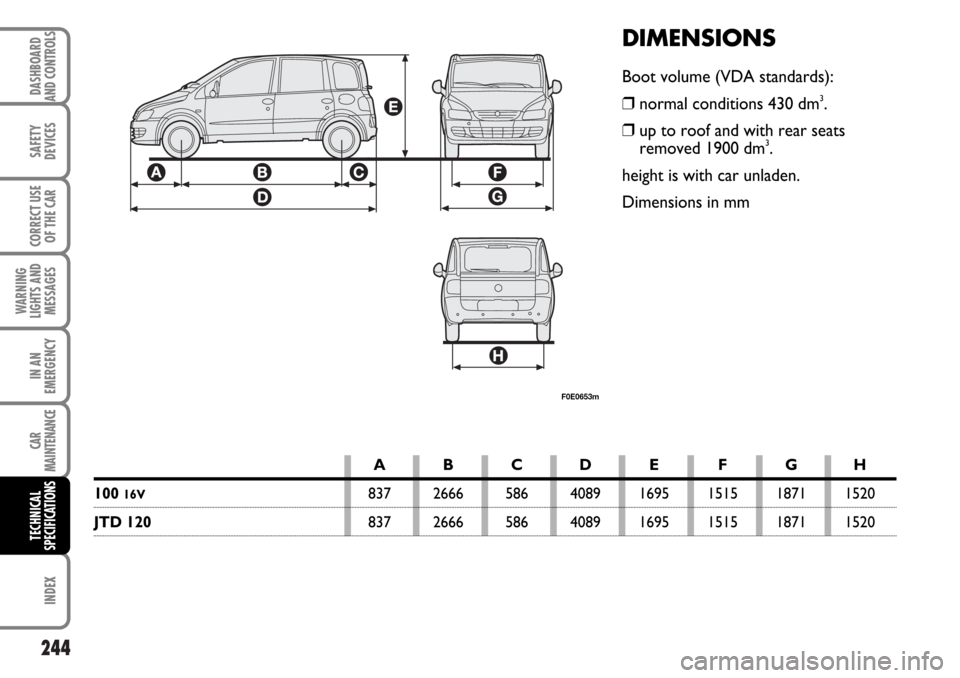
DIMENSIONS
Boot volume (VDA standards):
❒normal conditions 430 dm
3.
❒up to roof and with rear seats
removed 1900 dm
3.
height is with car unladen.
Dimensions in mm
F0E0653m
ABCDE FGH
100 16V837 2666 586 4089 1695 1515 1871 1520
JTD 120837 2666 586 4089 1695 1515 1871 1520