seats FIAT MULTIPLA 2006 1.G Owners Manual
[x] Cancel search | Manufacturer: FIAT, Model Year: 2006, Model line: MULTIPLA, Model: FIAT MULTIPLA 2006 1.GPages: 266, PDF Size: 4.61 MB
Page 5 of 266
4
SAFETY
DEVICES
CORRECT USE
OF THE CAR
WARNING
LIGHTS AND
MESSAGES
IN AN
EMERGENCY
CAR
MAINTENANCE
TECHNICAL
SPECIFICATIONS
INDEX
DASHBOARD
AND CONTROLSDASHBOARD ...................................................................... 5
SYMBOLS ............................................................................... 6
THE FIAT CODE SYSTEM ................................................ 6
THE KEYS .............................................................................. 8
ELECTRONIC ALARM ....................................................... 11
IGNITION SWITCH ........................................................... 15
INSTRUMENT PANEL ....................................................... 17
INSTRUMENTS .................................................................... 18
RICONFIGURABLE MULTIFUNCTION DISPLAY ..... 22
SEATS ..................................................................................... 41
HEAD RESTRAINTS ........................................................... 44
STEERING WHEEL ............................................................. 45
REARVIEW MIRRORS ........................................................ 46
HEATING/AND CLIMATE CONTROL SYSTEM ....... 48
HEATING AND VENTILATION ..................................... 50
MANUAL CLIMATE CONTROL SYSTEM ................... 52
AUTOMATIC CLIMATE CONTROL SYSTEM ............. 54
EXTERNAL LIGHTS ........................................................... 59
WINDOW CLEANING ..................................................... 61
CEILING LIGHT ................................................................... 63
CONTROLS .......................................................................... 65INTERIOR EQUIPMENT ................................................... 67
ELECTRICALLY CONTROLLED
DOUBLE SUNROOF ........................................................... 72
DOORS .................................................................................. 74
ELECTRIC WINDOWS ..................................................... 76
BOOT ..................................................................................... 78
BONNET ............................................................................... 85
ROOF RACK/SKI RACK ................................................... 87
HEADLIGHTS ....................................................................... 88
ABS SYSTEM .......................................................................... 90
ESP SYSTEM .......................................................................... 92
EOBD SYSTEM ..................................................................... 96
PARKING SENSORS ........................................................... 97
MULTIPLA VAN ................................................................... 99
SOUND SYSTEM ................................................................. 102
AT THE FILLING STATION ............................................. 107
PROTECTING THE ENVIRONMENT ........................... 109
D D
A A
S S
H H
B B
O O
A A
R R
D D
A A
N N
D D
C C
O O
N N
T T
R R
O O
L L
S S
Page 42 of 266
41
SAFETY
DEVICES
CORRECT USE
OF THE CAR
WARNING
LIGHTS AND
MESSAGES
IN AN
EMERGENCY
CAR
MAINTENANCE
TECHNICAL
SPECIFICATIONS
INDEX
DASHBOARD
AND CONTROLS
SEATS
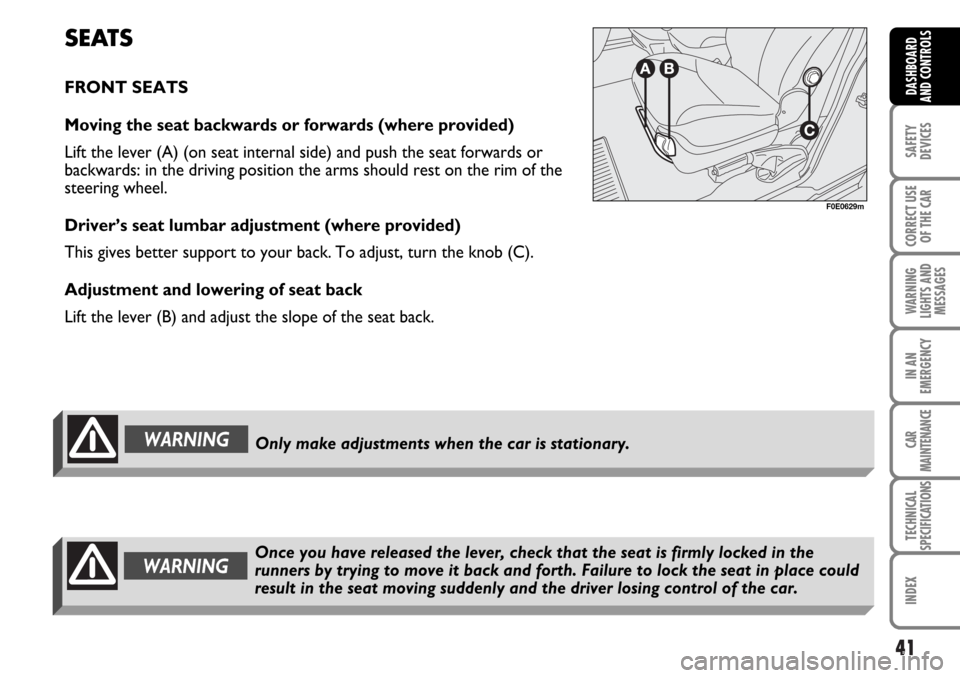
FRONT SEATS
Moving the seat backwards or forwards (where provided)
Lift the lever (A) (on seat internal side) and push the seat forwards or
backwards: in the driving position the arms should rest on the rim of the
steering wheel.
Driver’s seat lumbar adjustment (where provided)
This gives better support to your back. To adjust, turn the knob (C).
Adjustment and lowering of seat back
Lift the lever (B) and adjust the slope of the seat back.
F0E0629m
Only make adjustments when the car is stationary.WARNING
Once you have released the lever, check that the seat is firmly locked in the
runners by trying to move it back and forth. Failure to lock the seat in place could
result in the seat moving suddenly and the driver losing control of the car.WARNING
Page 43 of 266
42
SAFETY
DEVICES
CORRECT USE
OF THE CAR
WARNING
LIGHTS AND
MESSAGES
IN AN
EMERGENCY
CAR
MAINTENANCE
TECHNICAL
SPECIFICATIONS
INDEX
DASHBOARD
AND CONTROLS
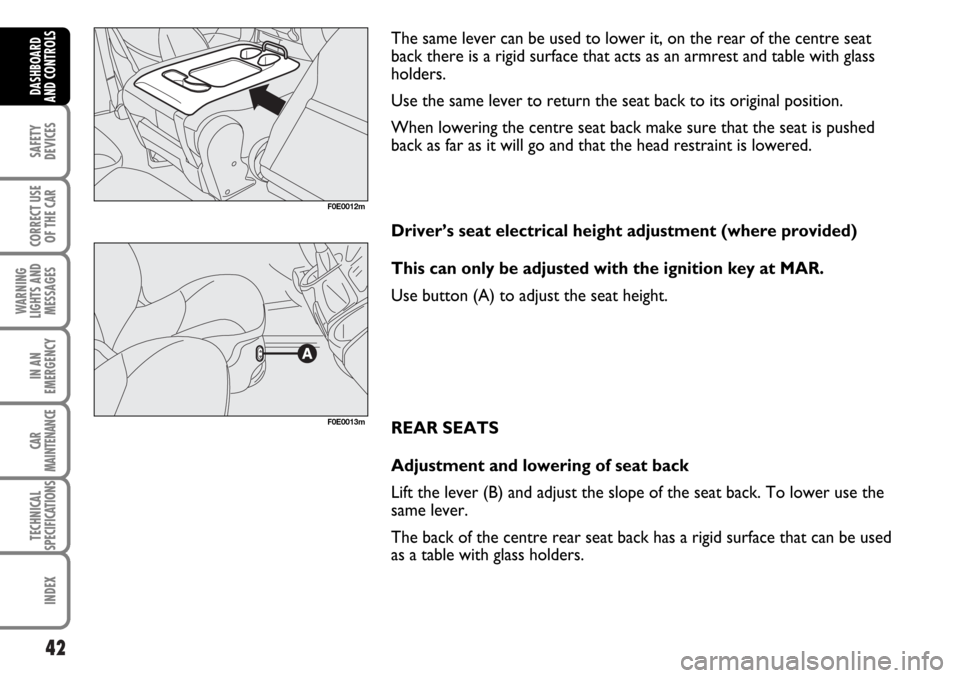
The same lever can be used to lower it, on the rear of the centre seat
back there is a rigid surface that acts as an armrest and table with glass
holders.
Use the same lever to return the seat back to its original position.
When lowering the centre seat back make sure that the seat is pushed
back as far as it will go and that the head restraint is lowered.
Driver’s seat electrical height adjustment (where provided)
This can only be adjusted with the ignition key at MAR.
Use button (A) to adjust the seat height.
REAR SEATS
Adjustment and lowering of seat back
Lift the lever (B) and adjust the slope of the seat back. To lower use the
same lever.
The back of the centre rear seat back has a rigid surface that can be used
as a table with glass holders.
F0E0012m
F0E0013m
Page 44 of 266
43
SAFETY
DEVICES
CORRECT USE
OF THE CAR
WARNING
LIGHTS AND
MESSAGES
IN AN
EMERGENCY
CAR
MAINTENANCE
TECHNICAL
SPECIFICATIONS
INDEX
DASHBOARD
AND CONTROLS
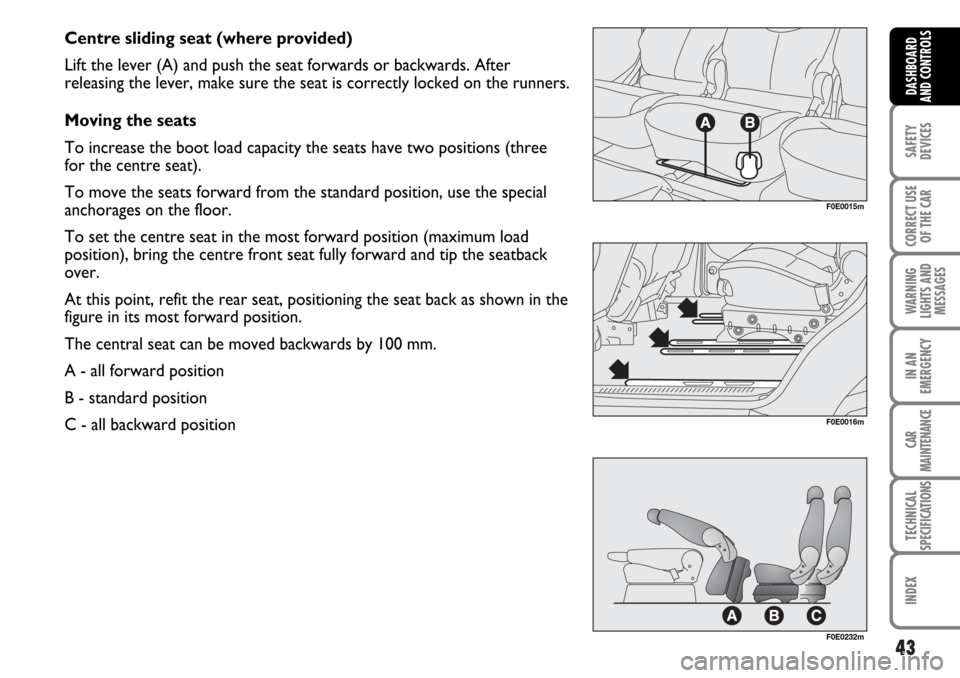
Centre sliding seat (where provided)
Lift the lever (A) and push the seat forwards or backwards. After
releasing the lever, make sure the seat is correctly locked on the runners.
Moving the seats
To increase the boot load capacity the seats have two positions (three
for the centre seat).
To move the seats forward from the standard position, use the special
anchorages on the floor.
To set the centre seat in the most forward position (maximum load
position), bring the centre front seat fully forward and tip the seatback
over.
At this point, refit the rear seat, positioning the seat back as shown in the
figure in its most forward position.
The central seat can be moved backwards by 100 mm.
A - all forward position
B - standard position
C - all backward position
F0E0016m
F0E0232m
F0E0015m
Page 45 of 266
44
SAFETY
DEVICES
CORRECT USE
OF THE CAR
WARNING
LIGHTS AND
MESSAGES
IN AN
EMERGENCY
CAR
MAINTENANCE
TECHNICAL
SPECIFICATIONS
INDEX
DASHBOARD
AND CONTROLS
HEAD RESTRAINTS
FRONT SEATS
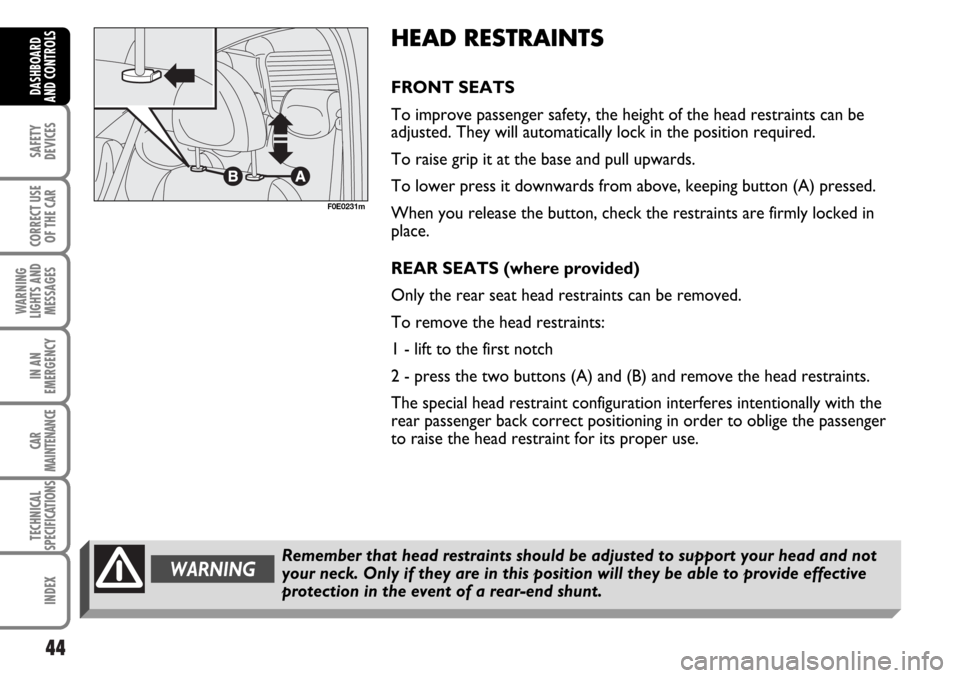
To improve passenger safety, the height of the head restraints can be
adjusted. They will automatically lock in the position required.
To raise grip it at the base and pull upwards.
To lower press it downwards from above, keeping button (A) pressed.
When you release the button, check the restraints are firmly locked in
place.
REAR SEATS (where provided)
Only the rear seat head restraints can be removed.
To remove the head restraints:
1 - lift to the first notch
2 - press the two buttons (A) and (B) and remove the head restraints.
The special head restraint configuration interferes intentionally with the
rear passenger back correct positioning in order to oblige the passenger
to raise the head restraint for its proper use.
Remember that head restraints should be adjusted to support your head and not
your neck. Only if they are in this position will they be able to provide effective
protection in the event of a rear-end shunt.WARNING
F0E0231m
Page 77 of 266
76
SAFETY
DEVICES
CORRECT USE
OF THE CAR
WARNING
LIGHTS AND
MESSAGES
IN AN
EMERGENCY
CAR
MAINTENANCE
TECHNICAL
SPECIFICATIONS
INDEX
DASHBOARD
AND CONTROLS
WARNINGImproper use of power windows can be dangerous. Before and during its operation
ensure that any passengers are not at risk from the moving window either by
personal objects getting caught on the mechanism or by being injured by it directly.
When leaving the car, the ignition key should be removed to prevent the power
window from being operated inadvertently and harming anyone remaining in the
car.
F0E0081m
ELECTRIC WINDOWS
FRONT SEATS
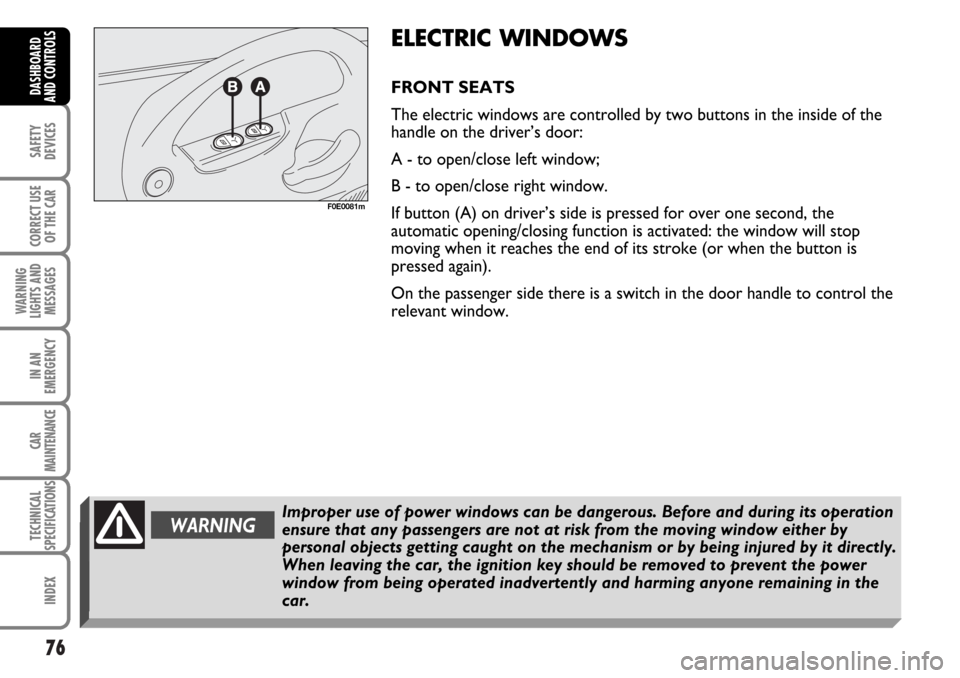
The electric windows are controlled by two buttons in the inside of the
handle on the driver’s door:
A - to open/close left window;
B - to open/close right window.
If button (A) on driver’s side is pressed for over one second, the
automatic opening/closing function is activated: the window will stop
moving when it reaches the end of its stroke (or when the button is
pressed again).
On the passenger side there is a switch in the door handle to control the
relevant window.
Page 78 of 266
77
SAFETY
DEVICES
CORRECT USE
OF THE CAR
WARNING
LIGHTS AND
MESSAGES
IN AN
EMERGENCY
CAR
MAINTENANCE
TECHNICAL
SPECIFICATIONS
INDEX
DASHBOARD
AND CONTROLS
REAR SEATS
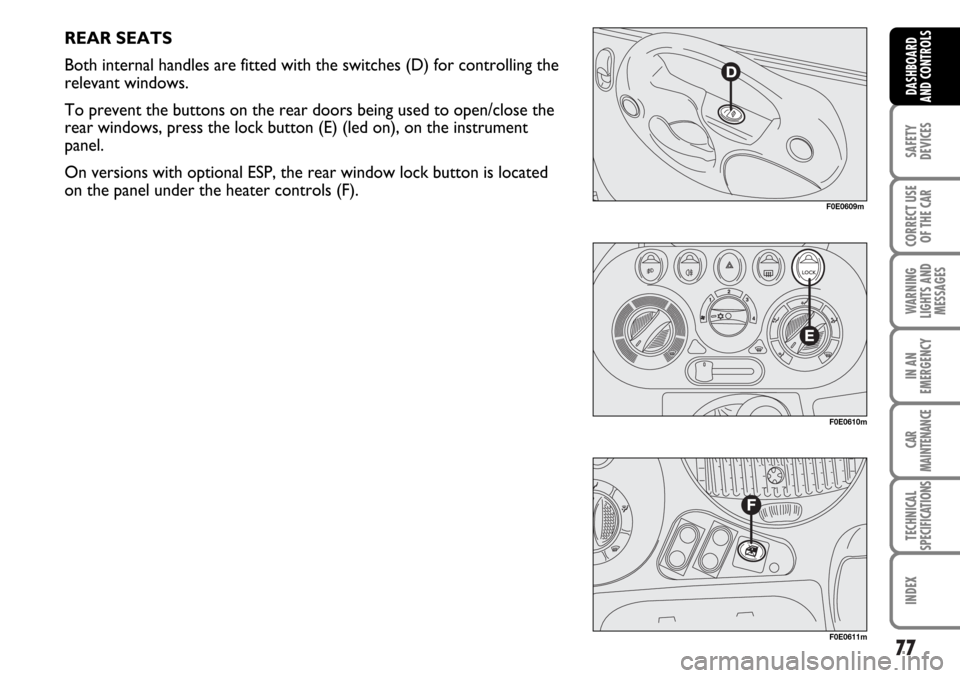
Both internal handles are fitted with the switches (D) for controlling the
relevant windows.
To prevent the buttons on the rear doors being used to open/close the
rear windows, press the lock button (E) (led on), on the instrument
panel.
On versions with optional ESP, the rear window lock button is located
on the panel under the heater controls (F).
F0E0610m
F0E0611m
F0E0609m
Page 82 of 266
81
SAFETY
DEVICES
CORRECT USE
OF THE CAR
WARNING
LIGHTS AND
MESSAGES
IN AN
EMERGENCY
CAR
MAINTENANCE
TECHNICAL
SPECIFICATIONS
INDEX
DASHBOARD
AND CONTROLS
EXTENDING THE BOOT
The boot can be extended when needed in the following ways:
1) moving the rear seats forward (by 15 cm);
2) removing the rear window shelf;
3) tipping the rear seats forward;
4) removing the seats.
Moving the rear seats
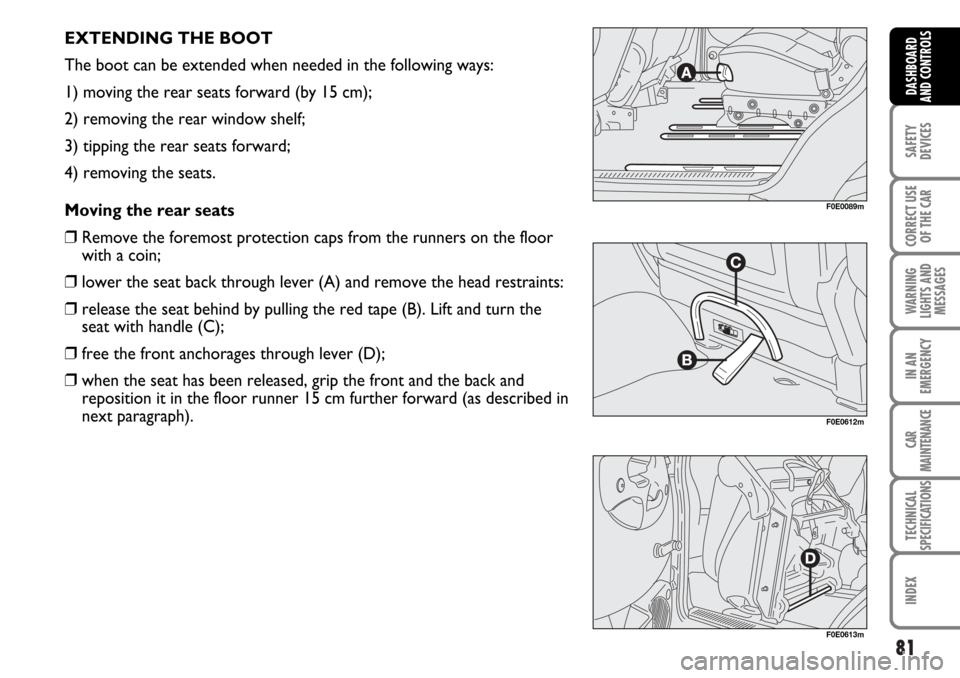
❒Remove the foremost protection caps from the runners on the floor
with a coin;
❒lower the seat back through lever (A) and remove the head restraints:
❒release the seat behind by pulling the red tape (B). Lift and turn the
seat with handle (C);
❒free the front anchorages through lever (D);
❒when the seat has been released, grip the front and the back and
reposition it in the floor runner 15 cm further forward (as described in
next paragraph).
F0E0089m
F0E0612m
F0E0613m
Page 83 of 266
82
SAFETY
DEVICES
CORRECT USE
OF THE CAR
WARNING
LIGHTS AND
MESSAGES
IN AN
EMERGENCY
CAR
MAINTENANCE
TECHNICAL
SPECIFICATIONS
INDEX
DASHBOARD
AND CONTROLS
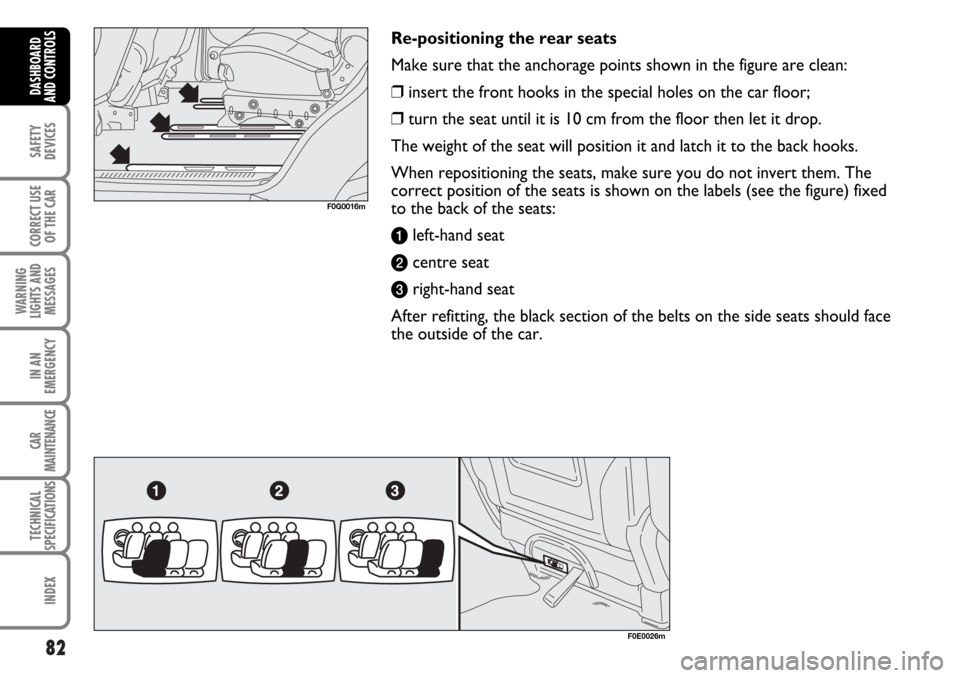
Re-positioning the rear seats
Make sure that the anchorage points shown in the figure are clean:
❒insert the front hooks in the special holes on the car floor;
❒turn the seat until it is 10 cm from the floor then let it drop.
The weight of the seat will position it and latch it to the back hooks.
When repositioning the seats, make sure you do not invert them. The
correct position of the seats is shown on the labels (see the figure) fixed
to the back of the seats:
aleft-hand seat
bcentre seat
cright-hand seat
After refitting, the black section of the belts on the side seats should face
the outside of the car.
F0E0026m
F0G0016m
Page 84 of 266
83
SAFETY
DEVICES
CORRECT USE
OF THE CAR
WARNING
LIGHTS AND
MESSAGES
IN AN
EMERGENCY
CAR
MAINTENANCE
TECHNICAL
SPECIFICATIONS
INDEX
DASHBOARD
AND CONTROLS
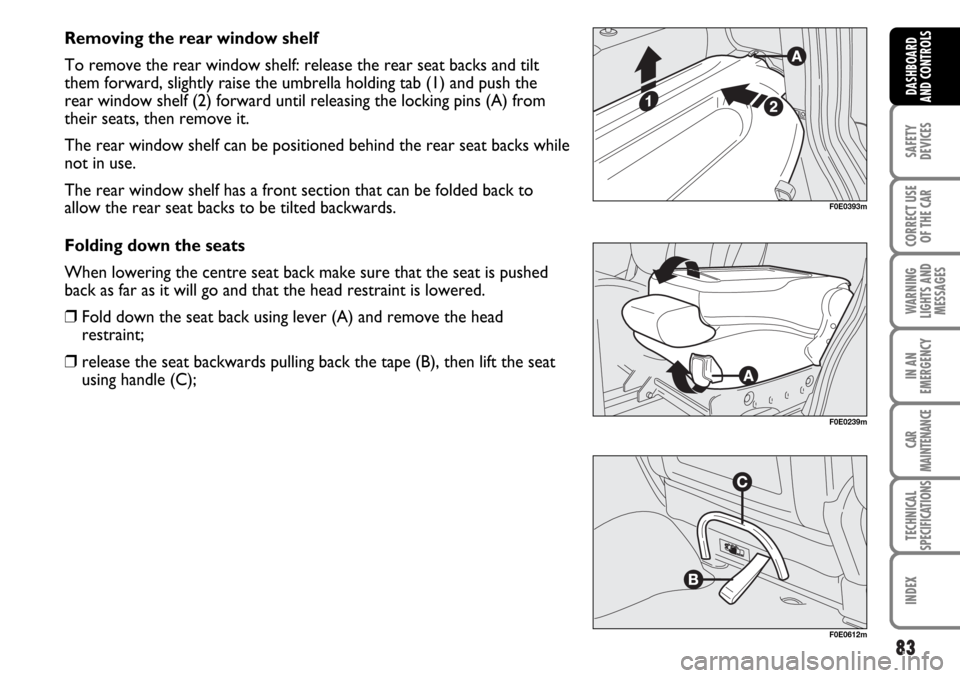
Removing the rear window shelf
To remove the rear window shelf: release the rear seat backs and tilt
them forward, slightly raise the umbrella holding tab (1) and push the
rear window shelf (2) forward until releasing the locking pins (A) from
their seats, then remove it.
The rear window shelf can be positioned behind the rear seat backs while
not in use.
The rear window shelf has a front section that can be folded back to
allow the rear seat backs to be tilted backwards.
Folding down the seats
When lowering the centre seat back make sure that the seat is pushed
back as far as it will go and that the head restraint is lowered.
❒Fold down the seat back using lever (A) and remove the head
restraint;
❒release the seat backwards pulling back the tape (B), then lift the seat
using handle (C);
F0E0239m
F0E0393m
F0E0612m