weight FIAT PALIO 2003 178 / 1.G India Version Owners Manual
[x] Cancel search | Manufacturer: FIAT, Model Year: 2003, Model line: PALIO, Model: FIAT PALIO 2003 178 / 1.GPages: 156, PDF Size: 6.27 MB
Page 30 of 156
29
TRANSPORTING
CHILDREN
IN SAFETY
For optimal protection in the event
of a crash, all passengers must be seat-
ed and wearing adequate restraint sys-
tems.
This is especially relevant for chil-
dren.
A child’s head is larger and heavier
than an adult’s head with respect to
their body weight. Moreover, a child’s
muscular and bone structure is not ful-
ly developed. For these reasons, chil-
dren require specific restraint systems,
different from those required by adult
passengers.
Child’s restraint systems are classi-
fied into the following four weight
groups,
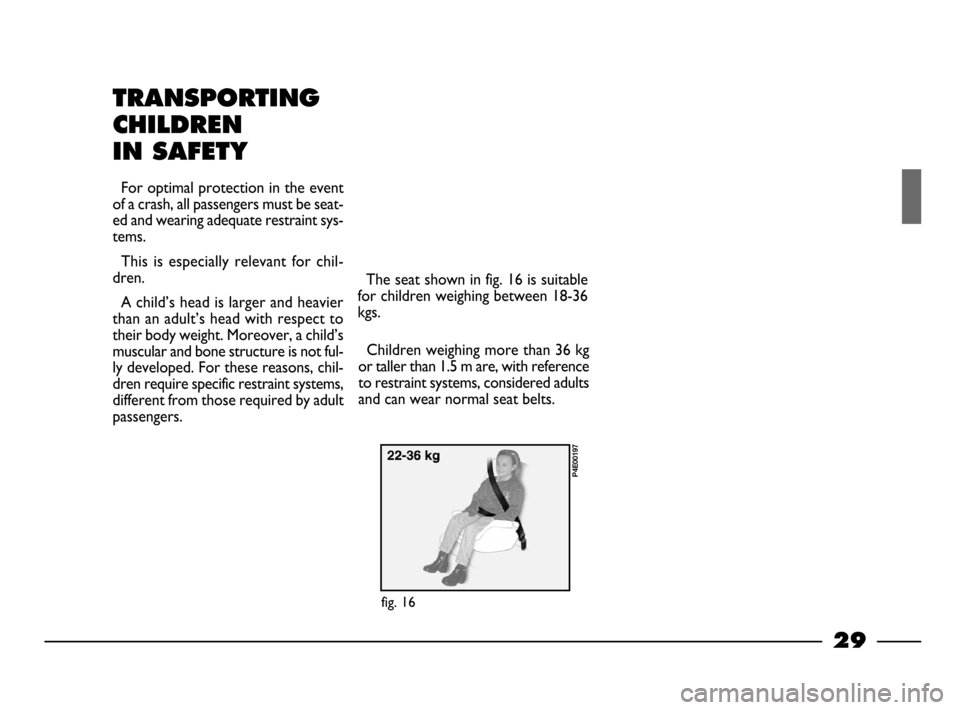
fig. 16:
Group 0 weight 0-10 kg
Group 0 weight 9-18 kg
Group 0 weight 15-25 kg
Group 3 22-36 weight kg.
The groups partially overlap. This is
because there are systems which cov-
er more than one weight group.
Children weighing more than 36 kg
or taller than 1.5 m are, with reference
to restraint systems, considered adults
and can wear normal seat belts.
fig. 16
P4E00197
The seat shown in fig. 16 is suitable
for children weighing between 18-36
kgs.
20-63 03/03/2003 06:02 PM Page 29
Page 31 of 156
30
There are child re-
straints for groups 0 and
1 which are fastened with
the car seat belts by means of an
attachment on the seat back. The
child is then secured to the seat
with specific straps. Due to their
weight, child seats can be dan-
gerous if they are fitted incor-
rectly with a cushion placed be-
tween the seat and the car seat
belts. Always attain carefully to
the specific installation instruc-
tions attached. We recommend seating
children on the rear seat.
This is the most protect-
ed position in the event of a
crash.
GROUP 0
Babies up to 10 Kg are to be seated
in a cot type seat supporting the child’s
head, facing backwards. This ensures
there is no stress on the child’s neck
in sudden decelerations.
The cot is secured with the seat
belts, as shown in
fig. 17. The child
must be strapped to the carrier with
its incorporated straps.
GROUP 1
Children from 9 kg are to be seated
facing forward in child seats with front
cushions. The seat belt secures both
seat and child
fig. 18.
fig. 17
P4E00198
fig. 18
P4E00199
The figure is only an ex-
ample. Follow the in-
structions for fastening
the specific child restraint
system you are using.
The figure is only an ex-
ample. Follow the in-
structions for fastening
the specific child restraint system
you are using.
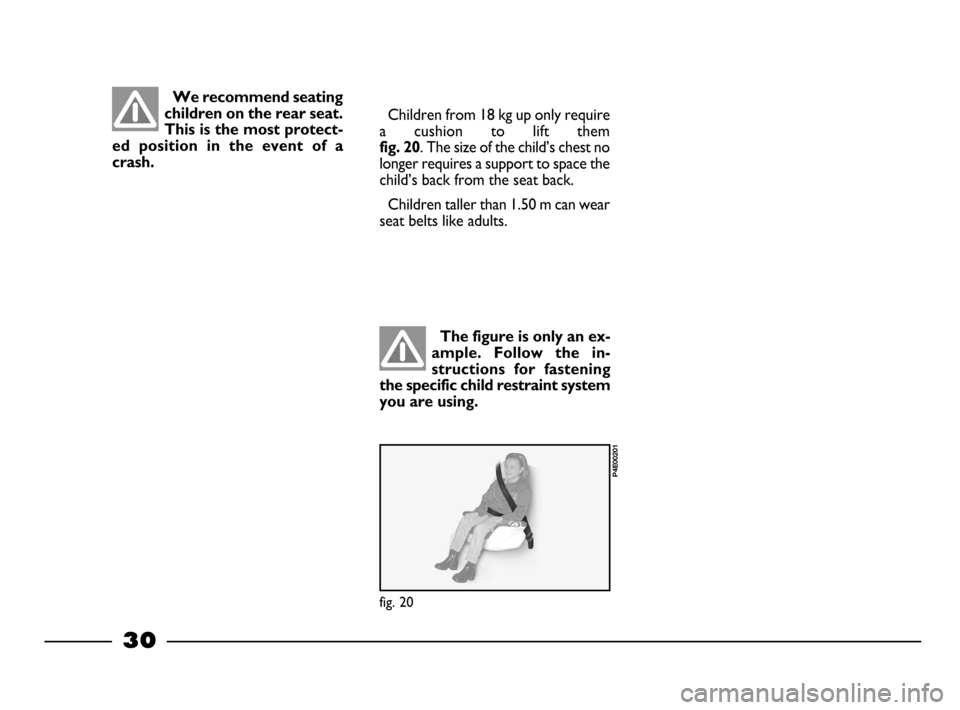
Children from 18 kg up only require
a cushion to lift them
fig. 20. The size of the child’s chest no
longer requires a support to space the
child’s back from the seat back.
Children taller than 1.50 m can wear
seat belts like adults.
fig. 20
P4E00201
The figure is only an ex-
ample. Follow the in-
structions for fastening
the specific child restraint system
you are using.
20-63 03/03/2003 06:02 PM Page 30
Page 52 of 156
51
When using the boot,
make sure the load you
are carrying does not ex-
ceed the permitted weight (see
the chapter “Technical Specifi-
cations”). Also make sure the
items in the boot are arranged
properly to prevent them being
thrown forwards and injuring pas-
sengers should you brake sharply.BOOT
OPENING/CLOSING
THE BOOT
TAILGATE
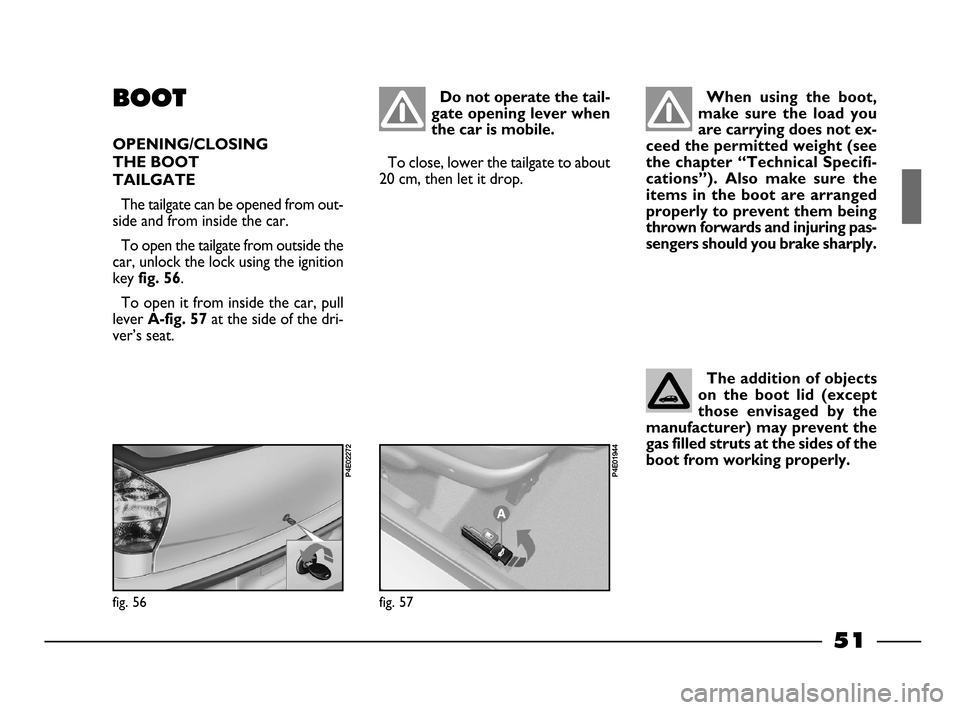
The tailgate can be opened from out-
side and from inside the car.
To open the tailgate from outside the
car, unlock the lock using the ignition
key
fig. 56.
To open it from inside the car, pull
lever
A-fig. 57at the side of the dri-
ver’s seat.
Do not operate the tail-
gate opening lever when
the car is mobile.
To close, lower the tailgate to about
20 cm, then let it drop.
fig. 56
P4E02272
fig. 57
P4E01944
The addition of objects
on the boot lid (except
those envisaged by the
manufacturer) may prevent the
gas filled struts at the sides of the
boot from working properly.
20-63 03/03/2003 06:03 PM Page 51
Page 56 of 156
55
To close the bonnet:
1) Hold the bonnet up with one hand
and with the other remove the rod
A-
fig. 65
from the recess Band replace
it in its clip.
2)Lower the bonnet until it is about
20 cm above the engine compartment.
3) Let it fall: the bonnet closes au-
tomatically.
ROOF RACK
Move the door weather strips aside
in the points shown in
fig. 66to reach
the fasteners.
When the engine is hot,
be very careful not to burn
yourself when operating
inside the engine compartment.
Keep your hands away from the
electric fan as it may switch on at
any time, even with the key re-
moved from the ignition switch.
Wait until the engine cools down.
Always make sure the
bonnet is closed properly
so it will not open whilst
the car is moving.
After travelling a few
kilometers, check that
the securing screws are
tight.
Never exceed the per-
mitted weight (see
“Technical specifications”
chapter).
Be careful not to dam-
age the objects on the
roof rack opening the tail-
gate.
20-63 03/03/2003 06:03 PM Page 55
Page 76 of 156
75
CONTAINING RUNNING COSTS
AND POLLUTION
Tyres
Tyre pressure should be checked at
least once every four weeks: if the
pressure is too low fuel consumption
increases as the resistance to the
rolling movement of the tyre is
greater. In this state, tyre wear is in-
creased and handling suffers which will
effect safety.
Unnecessary loads
Do not travel with too much load in
the boot. The weight of the car (above
all in the urban traffic)and its trim
greatly effects consumption and sta-
bility.
Roof rack/ski rack
Remove roof racks and ski racks
from the roof of the car as soon as
they are no longer needed. These ac-
cessories reduce the aerodynamic
penetration of the car and will increase
consumption.
Electrical devices
Use electric devices for the neces-
sary time only. The heated rear win-
dow, additional lights, windscreen
wipers, heater, fan of the heating sys-
tem require large amounts of elec-
tricity and increasing the request for
power will also increase fuel con-
sumption (up to +25% when driving in
towns). Some suggestions which may help
you to keep the running costs of the
car down and lower the amount of
toxic emissions released into the at-
mosphere are given below.
GENERAL
CONSIDERATIONS
Car maintenance
The overall state of the car is an im-
portant factor which has a marked in-
fluence over fuel consumption and dri-
ving comfort and on the life span of
your car. For this reason care should
be taken to maintain your car by car-
rying out the necessary checks and
regulations in accordance with the
specifications given in the service
schedule (see sections: spark plugs,
idling, air cleaners, timing).
64-79 03/03/2003 06:45 PM Page 75
Page 129 of 156
TECHNICAL SPECIFICATIONS
Motor and engineering enthusiasts as well as
those “in the trade” will probably start reading from
this point in the handbook. This, in fact, is where a
section jam-packed with facts, figures, formulae,
measurements and tables begins.
In a sense, it is Fiat Palio’s identity card. A docu-
ment that introduces the car and explains in techni-
cal jargon all the features that go together to make it
a model designed to give you superlative driving sat-
isfaction.CAR IDENTIFICATION DATA ........................... PAGE 129
ENGINE CODES -
BODYWORK PAINT IDENTIFICATION
PLATE .......................................................................... PAGE 130
ENGINE ....................................................................... PAGE 131
TRANSMISSION ....................................................... PAGE 133
BRAKES ....................................................................... PAGE 134
SUSPENSIONS ......................................................... PAGE. 134
STEERING ................................................................... PAGE 135
WHEELS AND TYRES ............................................ PAGE 136
ELECTRICAL SYSTEM ............................................ PAGE 137
WEIGHTS ................................................................... PAGE 138
PERFORMANCES ..................................................... PAGE 138
DIMENSIONS ............................................................ PAGE 139
CAPACITIES .............................................................. PAGE 140
FLUIDS AND LUBRICANTS ................................. PAGE 141
TYRE PRESSURE ....................................................... PAGE 143
128
128-143 03/03/2003 07:39 PM Page 128
Page 130 of 156
129
CAR IDENTIFICATION DATA
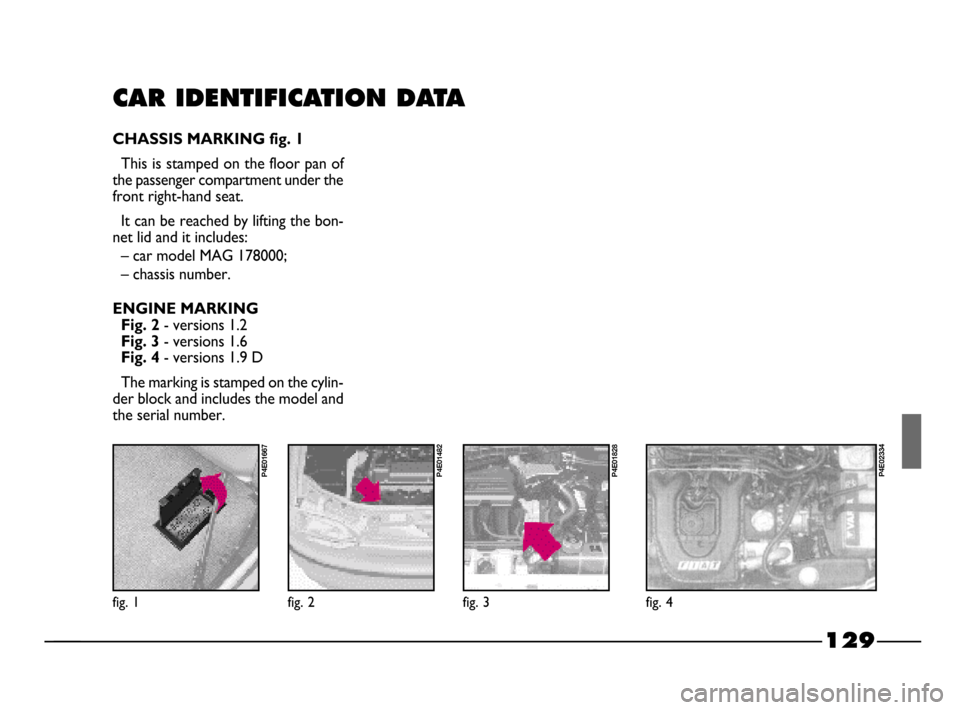
CHASSIS MARKING fig. 1
This is stamped on the floor pan of
the passenger compartment under the
front right-hand seat.
It can be reached by lifting the bon-
net lid and it includes:
– car model MAG 178000;
– chassis number.
ENGINE MARKING
Fig. 2
- versions 1.2
Fig. 3- versions 1.6
Fig. 4- versions 1.9 D
The marking is stamped on the cylin-
der block and includes the model and
the serial number.
fig. 1
P4E01667
fig. 2
P4E01482
fig. 3
P4E01828
MODEL PLATE fig. 4
This label is secured to the bonnet
and bears the following identification
data:
A - Manufacturer’s name
B - Homologation number
C - Vehicle type code
D - Chassis number
E - Maximum vehicle weight fully
loaded
F- Maximum vehicle weight fully
loaded plus trailer
G - Maximum vehicle weight on
front axle
H - Maximum vehicle weight on rear
axle
I - Engine type
L - Body version code
M- Number for spares
fig. 4
P4E02334
128-143 03/03/2003 07:39 PM Page 129
Page 139 of 156
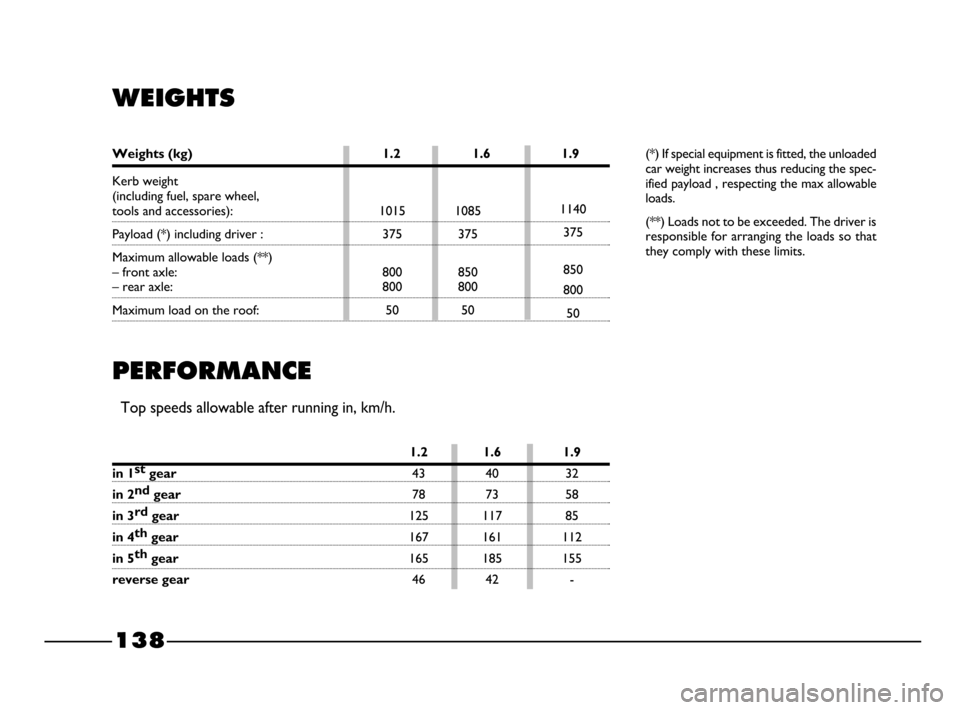
1015 1085
375 375
800 850
800 800
50 50
138
WEIGHTS
(*) If special equipment is fitted, the unloaded
car weight increases thus reducing the spec-
ified payload , respecting the max allowable
loads.
(**) Loads not to be exceeded. The driver is
responsible for arranging the loads so that
they comply with these limits.
PERFORMANCE
Top speeds allowable after running in, km/h.
1140
375
850
800
50 Kerb weight
(including fuel, spare wheel, tools and accessories):
Payload (*) including driver :
Maximum allowable loads (**)
– front axle:
– rear axle:
Maximum load on the roof:
Weights (kg) 1.2 1.6 1.9
1.2 1.6 1.9
in 1st
gear43 40 32
in 2nd
gear78 73 58
in 3rd
gear125 117 85
in 4th
gear167 161 112
in 5th
gear165 185 155
reverse gear46 42 -
128-143 03/03/2003 07:39 PM Page 138
Page 148 of 156
147
Spark plugs ................................... 121
Speedometer................................. 33
Starter (specifications) ............... 137
Starting the engine ...................... 65
- Jump starting ......................... 81
- bump starting ........................ 66-82
- ignition switch ....................... 21
- turning off the engine .......... 66
- starting procedure ................ 65
- engine warm up (just
started) ................................... 66
Steering column lock .................. 11-22
Steering column stalks ............... 13-41
Steering........................................... 135
Storing the car ............................. 78
Sun visors ...................................... 47
Suspensions .................................. 134
Symbols .......................................... 4
Technical specifications ........... 128
Third brake light ......................... 91Towing the car ........................... 101
Transmission ................................. 133
Transporting children in
safety .......................................... 29
Tubing ............................................ 123
Tyre pressure ......................... 121-143
Tyres
- specifications........................... 136
- Correct reading .................... 136
- maintenance .......................... 121
- inflation pressure ............ 121-143
- changing the wheel................ 82
Useful accessories ................... 79
Ventilation.................................. 40
Warning lights
- injection system failure ....... 35
- air bag failure ......................... 36- engaged handbrake .............. 35
- direction indicators ............. 36
- low brake-clutch fluid level 35
- low engine oil pressure........ 35
- low battery recharge ......... 35
- main beam headlights .......... 36
- Exterior lights ......................... 36
- unserviceable ABS ................. 36
Weights .......................................... 138
Wheel rims.................................... 136
- correct reading of the rim .. 136
Wheels
- wheel geometry ..................... 136
- specifications........................... 136
- maintenance .......................... 121
- replacement ........................... 82
Windows
- electric window winder .... 15-49
- manual window winder ...... 16-50
- cleaning operation ................. 126
Windscreen washer
- control .................................... 13-42
144-152 03/03/2003 07:30 PM Page 147