tyre pressure FIAT PANDA 2018 Owner handbook (in English)
[x] Cancel search | Manufacturer: FIAT, Model Year: 2018, Model line: PANDA, Model: FIAT PANDA 2018Pages: 228, PDF Size: 17.05 MB
Page 56 of 228

Warning light What it means
amberiTPMS
(for versions/markets, where provided)
Tyre pressure low
The warning light switches on constantly to indicate that the tyre pressure is lower than the recommended
value, in order to guarantee long tyre life and low fuel consumption, or to indicate a slow loss of pressure.
In this way the iTPMS warns the driver that one or more tyres may be flat and probably punctured. In this
case it is advisable to restore the correct pressure value. Once the normal operating conditions of the
vehicle are restored, carry out the Tyre reset procedure.
IMPORTANT Do not continue driving with one or more flat tyres as handling may be compromised. Stop
the vehicle, avoiding sharp braking and steering.
iTPMS failure/iTPMS temporarily deactivated
The warning light flashes for about 75 seconds and then stays on constantly (along with a dedicated
message on the display) to indicate that the system is temporarily deactivated or faulty. The system goes
back to normal operation when the operating conditions allow it. If this is not the case, carry out the Tyre
reset procedure after restoring the normal operating conditions.
If the malfunction warning persists, contact a Fiat Dealership as soon as possible.
amberLPG FUEL RESERVE
(for versions/markets, where provided)
The warning light switches on when the residual quantity of LPG drops below 1/5 of the tank capacity. On
certain versions a dedicated message is displayed.
amberMETHANE RESERVE (Natural Power versions)
The warning light switches on when the residual quantity of Methane drops below 1/5 of the tank capacity.
On certain versions a dedicated message is displayed.
54
KNOWING THE INSTRUMENT PANEL
Page 62 of 228
ACTIVE SAFETY
SYSTEMS
ABS (Anti-lock Braking
System)
This system, which is an integral part of
the braking system, prevents one or
more wheels from locking and slipping
in all road surface conditions,
irrespective of the intensity of the
braking action, ensuring that the car
can be controlled even during
emergency braking.
IMPORTANT To obtain the maximum
efficiency of the braking system, a
bedding-in period of about 500 km is
needed: during this period it is better to
avoid sharp, repeated and prolonged
braking.
The ABS also integrates the following
systems: EBD (Electronic Braking Force
Distribution), MSR (Motor
Schleppmoment Regelung) and MBA
(Mechanical Brake Assist) (for
versions/markets, where provided).System intervention
The driver can feel that the ABS system
has come into action because the
brake pedal pulsates slightly and the
system gets noisier: this is entirely
normal with the system operating.
44) 45) 46) 47) 48) 49) 50) 51) 52)
ESC (Electronic Stability
Control) SYSTEM
(for versions/markets, where provided)
This is an electronic system that
controls car stability in the event of loss
of tyre grip, helping maintain directional
control. The system is capable of
recognising potentially dangerous
situations in terms of the stability and
intervenes automatically on the brakes
in a differentiated manner for the four
wheels in order to provide a stabilising
torque.
The ESC system switches on
automatically when the engine is
started and cannot be switched off.
System intervention
The intervention of the system is
indicated by the flashing of theESC
warning light on the instrument panel,
to inform the driver that the vehicle is in
critical stability and grip conditions.
53) 54) 55) 56) 57) 58)
HH (Hill Holder) SYSTEM
This system is an integral part of the
ESC system and facilitates starting on
slopes.
It is automatically activated in the
following conditions:
uphill: vehicle stationary on a road
with a gradient higher than 5%, engine
running, brake pressed and
transmission in neutral or gear other
than reverse engaged;
downhill: car stationary on a road
with a gradient of more than 5%,
engine running, brake pressed and
reverse gear engaged.
When setting off, the ESC system
control unit maintains the braking
pressure on the wheels until the torque
necessary for starting is reached, or
in any case for a maximum of 2
seconds, allowing your right foot to be
moved easily from the brake pedal to
the accelerator.
When the 2 seconds have elapsed,
without starting, the system is
automatically deactivated, gradually
releasing the braking pressure. During
this release stage, the typical
mechanical brake release noise can be
heard, indicating that the car is about
to move.
NOTE: The Hill Holder system is not
active with the handbrake engaged.
60
SAFETY
Page 69 of 228

Driving in special conditions
In certain driving conditions, such as,
for example:
driving close to a bend (see fig. 54);
vehicles with small dimensions
and/or not aligned in the driving lane
(see fig. 55);
lane change by other vehicles (see
fig. 56);
system intervention can be unexpected
or delayed. The driver must therefore
be very careful, keeping control of
the vehicle to drive in complete safety.
IMPORTANT If you are driving on roads
close to trees with protruding branches
it is advisable to deactivate the system
to prevent the branches at the height
of the bonnet or the windscreen from
interfering with the system.iTPMS System (indirect
Tyre Pressure
Monitoring System)
(for versions/markets, where provided)
72) 73) 74) 75) 76) 77)
The car can be equipped with the
iTPMS (indirect Tire Pressure
Monitoring System) which monitors the
tyre inflation status thanks to wheel
speed sensors.The system warns the driver if one or
more tyres are flat by the
warning
light continuously lit on the instrument
panel and a dedicated warning
message on the display.
If one tyre only is flat, the system can
indicate its position: it is in any case
recommended to check the pressure
on all four tyres.
This indication is displayed also when
turning the engine off and on again until
the RESET procedure is carried out.
Reset procedure
The iTPMS needs an initial "self-
learning" phase (with length depending
on the driving style and road conditions:
optimal conditions being driving on a
straight road at 80 km/h for at least 20
minutes) which starts when the Reset
procedure is carried out.
The Reset procedure must be carried
out:
each time tyre pressure is modified;
when even only one tyre is changed;
when tyres are rotated/inverted;
when the space-saver wheel is
fitted.
54F1D0042
55F1D0043
56F1D0044
67
Page 70 of 228

Before carrying out the Reset
procedure, inflate the tyres to the rated
pressure values specified in the inflation
pressure table (see "Wheels" paragraph
in the "Technical specifications"
chapter).
If the Reset procedure is not carried
out, in all above cases, the
warning
light may give false indications on
one or more tyres.
To carry out the RESET procedure, with
the car stopped and the ignition device
at MAR, use the Main Menu as follows:
briefly press thebutton: the
display will show Reset;
press thebutton or the
button to select ("Yes" or "No");
briefly press thebutton: the
display will show "Confirm";
pressbutton orto select
("Yes" to Reset or "No" to exit the video
page);
press thebutton again to return
to the standard screen or to the main
menu according to where you are in the
menu.
At the end of the Reset procedure, the
display will show the message "Reset
saved", indicating that self-learning has
started.Operating conditions
The system is active for speeds above
15 km/h.
In a few situations such as sporty
driving, particular conditions of the road
surface (e.g. icy, snowy, unsurfaced
roads...) the signalling may be delayed
or partial in detecting the contemporary
deflation of more than one tyre.
Under special conditions (e.g. vehicle
loaded asymmetrically on one side,
towing a trailer, damaged or worn tyre,
fitting the space-saver wheel, use of the
"Fix&Go" kit, fitting snow chains, fitting
different tyres on the axles) the system
may give false indications or be
temporarily deactivated.
If the system is temporarily deactivated,
the warning light
flashes for about
75 seconds and then is continuously
on; at the same time, the display shows
a dedicated message.
This warning is also displayed after the
engine has been switched off and
then on again if the correct operating
conditions are not restored.
WARNING
67)The system is an aid for the driver, who
must always pay full attention while
driving. The responsibility always rests with
the driver, who must take into account
the traffic conditions in order to drive
in complete safety. The driver must always
maintain a safe distance from the vehicle
in front.
68)If the driver depresses the brake pedal
fully or carries out a fast steering during
system operation, the automatic braking
function may stop (e.g. to allow a possible
manoeuvre to avoid the obstacle).
69)The laser beam is not visible at the
naked eye. Do not look directly, or with
optical instruments (e.g. lenses), at the
laser beam from a distance lower than 10
cm: this may cause damage to the sight.
The laser beam is also present when
the key is at MAR but its operation is off,
not available or manually deactivated
with the display Setup Menu.
70)The system intervenes on vehicles
travelling in the same lane. Small sized
vehicles (e.g. bicycles or motorbikes)
or people, animals and things (e.g.
pushchairs) and more in general all those
obstacles with a low reflection of the light
emitted by the laser (e.g. vehicles soiled
with mud) are not taken into consideration.
68
SAFETY
Page 71 of 228
71)If the car must be placed on a roller
bench (at a speed within 5 and 30 km/h)
for maintenance interventions or if it is
washed in an automatic roller washing
tunnel with an obstacle in the front part
(e.g. another car, a wall or another
obstacle), the system may detect its
presence and activate. In this case the
system must be deactivated through the
display Setup Menu.
72)If the system signals a pressure
decrease on a specific tyre, it is
recommended to check the pressure on all
four tyres.
73)The iTPMS does not relieve the driver
from the obligation to check the tyre
pressure every month; it is not to
be considered a system to replace
maintenance or a safety system.
74)Tyre pressure must be checked with
tyres cold. Should it become necessary for
whatever reason to check pressure with
warm tyres, do not reduce pressure even
though it is higher than the prescribed
value, but repeat the check when tyres are
cold.
75)The iTPMS cannot indicate sudden
tyre pressure drops (for example when
a tyre bursts). In this case, stop the vehicle,
braking with caution and avoiding abrupt
steering.
76)The system only warns that the tyre
pressure is low: it is not able to inflate
them.
77)Insufficient tyre inflation increases fuel
consumption, reduces the tread duration
and may affect the capacity to drive safely.
WARNING
30)The laser sensor may have limited or
absent operation due to weather
conditions such as: heavy rain, hail, thick
fog, heavy snow, formation of ice layers on
the windscreen.
31)Sensor operation may also be
compromised by the presence of dust,
condensation, dirt or ice on the
windscreen, by traffic conditions (e.g.
vehicles that are driving not aligned with
you car, vehicle driving in a transverse
or opposite way on the same lane, bend
with a small radius of curvature), by road
surface conditions and by driving
conditions (e.g. off-road driving). Make sure
the windscreen is always clean. Use
specific detergents and clean cloths to
avoid scratching the windscreen. The
sensor operation may also be limited or
absent in some driving, traffic and road
surface conditions.
32)Projecting loads on the roof of the car
may interfere with the correct operation
of the sensor. Before starting make sure
the load is correctly positioned, in order not
to cover the sensor operating range.
33)If the windscreen must be replaced
due to scratches, chipping or breakage,
contact exclusively a Fiat Dealership.
Do not replace the windscreen on your
own, risk of malfunction! It is advisable to
replace the windscreen if it is damaged
in the laser sensor area.34)Do not tamper nor operate on the laser
sensor. Do not close the openings in the
aesthetic cover located under the interior
rear view mirror. In the event of a sensor
failure, contact a Fiat Dealership.
35)Do not cover the operating range of the
sensor with stickers or other objects. Also
pay attention to other objects on the
bonnet (e.g. a layer of snow) and make
sure they do not interfere with the light
emitted by the laser.
36)If a trailer or a vehicle is towed the
system must be deactivated with the
display Setup Menu.
69
Page 122 of 228
146)The vehicle's driving characteristics
will be modified with the space-saver wheel
fitted. Avoid violent acceleration and
braking, abrupt steering and fast cornering.
The overall duration of the space-saver
wheel is of about 3000 km, after which the
relevant tyre must be replaced with another
one of the same type. Never install a
traditional tyre on a rim designed to be
used as a space-saver wheel. Have the
wheel repaired and refitted as soon as
possible. Using two or more space-saver
wheels at the same time is forbidden.
Do not apply grease to the bolt threads
before fitting: they could come unscrewed.
147)The jack is a tool developed and
designed only for changing a wheel, if a
tyre gets punctured or damaged, on the
vehicle with which it is supplied or on other
vehicles of the same model. Any other
use, e.g. to jack up other vehicle models or
different things, is strictly prohibited. Never
use for maintenance or repair activities
under the car or to exchange the
summer/winter wheels and vice versa.
Never go under the raised vehicle. If any
work under the vehicle is necessary,
contact the Fiat Service Network. Incorrect
positioning of the jack may cause the
raised vehicle to fall: use only in the
positions indicated. Do not use the jack for
loads higher than the one shown on its
label. Never start the engine with vehicle
raised. If the vehicle is raised more than
necessary, everything can become more
unstable, with the risk of the vehicle
dropping violently. Thus, lift the vehicle only
as needed in order to access the spare
wheel.148)If the hub cap is not fitted correctly, it
may come off when the car is travelling.
Never tamper with the inflation valve. Never
introduce tools of any kind between rim
and tyre. Check tyre and space-saver
wheel pressures regularly, complying with
the values given in the "Technical
specifications" chapter.
WARNING
53)When turning the jack handle make
sure that it can turn freely without scraping
your hand against the ground. The moving
components of the jack ("worm screw"
and joints) can also cause injuries: avoid
touching them. If you come into contact
with lubricating grease, clean yourself
thoroughly.
54)Contact a Fiat Dealership as soon as
possible to have the correct tightening
of the wheel bolts checked.
Fix&Go KIT
149) 150)
55)
DESCRIPTION
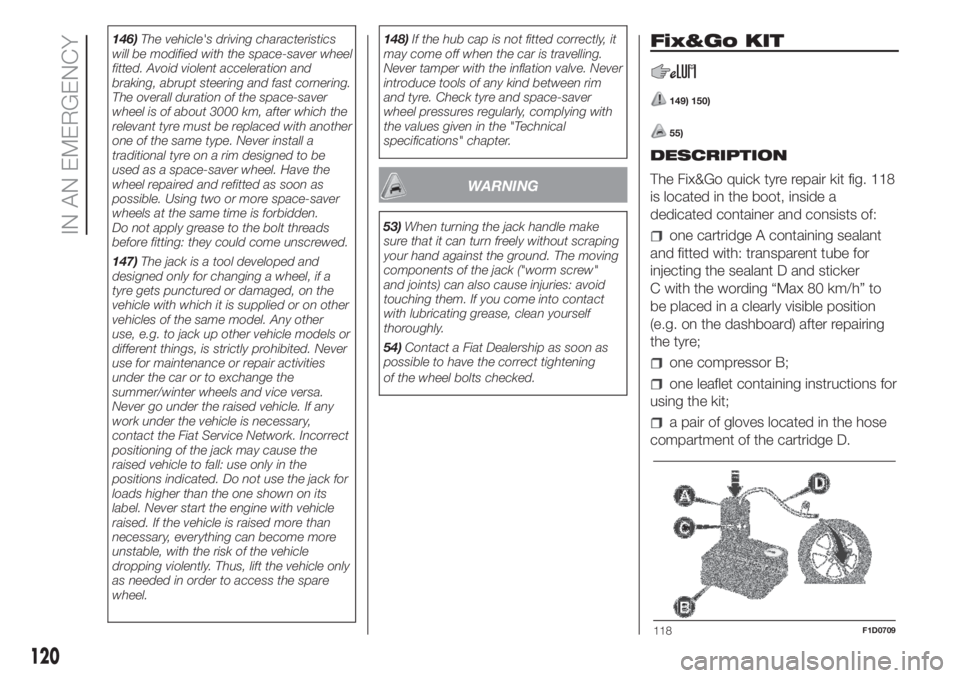
The Fix&Go quick tyre repair kit fig. 118
is located in the boot, inside a
dedicated container and consists of:
one cartridge A containing sealant
and fitted with: transparent tube for
injecting the sealant D and sticker
C with the wording “Max 80 km/h” to
be placed in a clearly visible position
(e.g. on the dashboard) after repairing
the tyre;
one compressor B;
one leaflet containing instructions for
using the kit;
a pair of gloves located in the hose
compartment of the cartridge D.
118F1D0709
120
IN AN EMERGENCY
Page 123 of 228
REPAIR PROCEDURE
Proceed as follows:
stop the car in a position that is not
dangerous for oncoming traffic where
you can carry out the procedure safely.
The ground must be flat and sufficiently
compact;
stop the engine, engage the hazard
warning lights and the parking brake;
wear the reflective safety jacket
before getting out of the car (anyway
comply with the laws in force in the
country you are driving in);
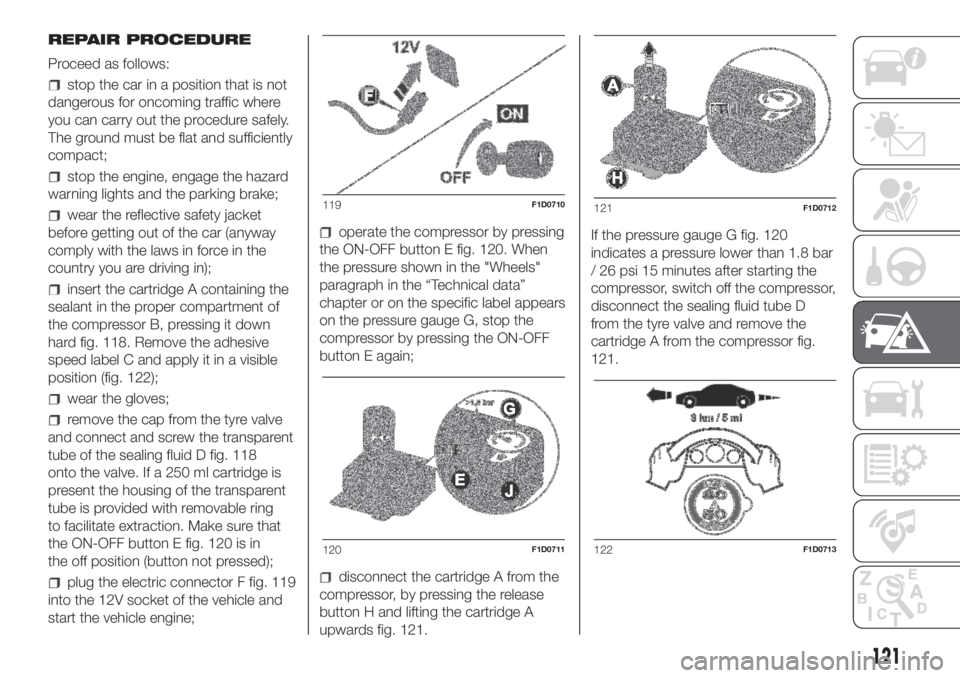
insert the cartridge A containing the
sealant in the proper compartment of
the compressor B, pressing it down
hard fig. 118. Remove the adhesive
speed label C and apply it in a visible
position (fig. 122);
wear the gloves;
remove the cap from the tyre valve
and connect and screw the transparent
tube of the sealing fluid D fig. 118
onto the valve. If a 250 ml cartridge is
present the housing of the transparent
tube is provided with removable ring
to facilitate extraction. Make sure that
the ON-OFF button E fig. 120 is in
the off position (button not pressed);
plug the electric connector F fig. 119
into the 12V socket of the vehicle and
start the vehicle engine;
operate the compressor by pressing
the ON-OFF button E fig. 120. When
the pressure shown in the "Wheels"
paragraph in the “Technical data”
chapter or on the specific label appears
on the pressure gauge G, stop the
compressor by pressing the ON-OFF
button E again;
disconnect the cartridge A from the
compressor, by pressing the release
button H and lifting the cartridge A
upwards fig. 121.If the pressure gauge G fig. 120
indicates a pressure lower than 1.8 bar
/ 26 psi 15 minutes after starting the
compressor, switch off the compressor,
disconnect the sealing fluid tube D
from the tyre valve and remove the
cartridge A from the compressor fig.
121.
119F1D0710
120F1D0711
121F1D0712
122F1D0713
121
Page 124 of 228

Move the vehicle by approximately 10
m to promote the distribution of
sealant; stop the vehicle safely, operate
the handbrake and restore pressure
using the black inflation pipe I fig. 123
to reach the required pressure. If also in
this case, the pressure is lower than
1.8 bar / 26 psi 15 minutes after turning
on, do not resume driving but contact
a Fiat Dealership.
After driving for about 8 km / 5 miles,
position the car in a safe and suitable
area and engage the handbrake. Take
the compressor and restore pressure
using the black inflation tube I fig. 123.
If the pressure shown is higher than
1.8 bar / 26 psi, restore the pressure
and drive safely to a Fiat Dealership as
soon as possible. If, however, the
pressure is lower than 1.8 bar / 26 psi,
do not resume driving but contact a
Fiat Dealership.INFLATION PROCEDURE
Proceed as follows:
stop the vehicle safely, as shown
above, and operate the handbrake;
extract the black inflation tube I fig.
123 and screw it firmly onto the tyre
valve. Follow the instructions shown in
fig. 119 and fig. 123.
Press the air release button J fig. 120 to
adjust any tyre overpressure.
CARTRIDGE
REPLACEMENT
Proceed as follows:
only use original Fix&Go cartridges,
which can be purchased from the
Fiat Dealership.
to remove the cartridge A fig. 118
press the release button H fig. 121 and
lift it.
WARNING
149)The information required by the
applicable regulation is indicated on the
Fix&Go kit package label. Carefully read
the label on the cartridge before use, avoid
improper use. The kit should be used by
adults and cannot be used by children.150)IMPORTANT: Do not exceed 80 km/h.
Avoid sudden acceleration or braking.
The kit provides a temporary repair,
therefore the tyre must be examined and
repaired by a specialist as soon as
possible. Before using the kit, ensure that
the tyre is not excessively damaged and
that the rim is in good condition, otherwise
do not use it and call roadside assistance.
Do not remove foreign bodies from the
tyre. Do not let the compressor turned on
for more than 20 consecutive minutes -
overheating hazard.
WARNING
55)The sealant is effective with external
temperatures of between -40°C and
+55°C. The sealant has an expiry date. It is
possible to repair tyres which have been
damaged on tread up to a diameter of
6 mm. Show the cartridge and the label to
the personnel charged with handling the
tyre treated with the tyre repair kit.
123F1D0714
122
IN AN EMERGENCY
Page 130 of 228
SCHEDULED
SERVICING
Correct servicing is crucial for
guaranteeing a long life for the car
under the best conditions.
For this reason, Fiat has planned a
series of checks and services at fixed
distance and/or time intervals, as
described in the Service Schedule.
To keep the car’s efficiency in tip-top
condition, in the previous Scheduled
Service plan pages a few additional
checks are listed that should be carried
out more frequently with respect to
the normal coupon redemption
schedule.
Scheduled Servicing is offered by all
Fiat Dealerships according to a set time
schedule. If, during each operation, in
addition to the ones scheduled, the
need arises for further replacements or
repairs, these may be carried out with
the owner's explicit agreement only.
If your car is used frequently for towing,
the interval between one scheduled
servicing operation and the next should
be reduced.IMPORTANT Scheduled Servicing
interventions are set out by the
Manufacturer. Failure to have them
carried out may invalidate the warranty.
It is advisable to inform a Fiat
Dealership of any small operating
irregularities without waiting for the next
service.
PERIODIC CHECKS
Every1,000km or before long
journeys, check and if necessary, top
up: engine coolant level; brake fluid
level; screen washer fluid level; tyre
inflation pressure and condition; lighting
system operation (headlights, direction
indicators, hazard warning lights, etc.);
screen washer/wiper system operation
and positioning/wear of windscreen/
rear window wiper blades.
Every3,000km, check and top up if
required: engine oil level.
For cars with 0.9 TwinAir engines:
every3,000km check the engine oil
level and top it up to the maximum level
if necessary.DEMANDING USE OF THE
CAR
If the car is used under one of the
following conditions: towing a trailer or
motorhome; dusty roads; short (less
than 7-8 km) and repeated journeys
with sub-zero outside temperatures;
engine often idling or driving long
distances at low speed or long periods
of inactivity, the following checks must
be carried out more often than
indicated in the Scheduled Servicing
Plan:
check front disc brake pad condition
and wear;
check the cleanliness of the side,
bonnet and luggage compartment
locks, and the cleanliness and
lubrication of the linkages;
visually inspect conditions of:
engine, gearbox, transmission, pipes
and hoses (exhaust/fuel system/brakes)
and rubber elements (gaiters/sleeves/
bushes, etc.);
check battery charge and battery
fluid level (electrolyte);
visually inspect conditions of the
accessory drive belts;
check and, if necessary, change
engine oil and replace oil filter / pollen
filter / air cleaner.
128
SERVICING AND CARE
Page 131 of 228

SCHEDULED SERVICING PLAN.
PETROL VERSIONS
WARNING: Once you have carried out the last intervention in the table, continue with the scheduled servicing, maintaining the
frequency indicated in the plan by marking each operation with a dot or dedicated note.
Warning: simply restarting the maintenance from the start of the plan may cause the allowed interval to be exceeded for some
operations!
Thousands of miles 9 18 27 36 45 54 63 72 81 90
Thousands of kilometres 15 30 45 60 75 90 105 120 135 150
Years12345678910
Check tyre condition/wear and adjust pressure, if
necessary; check the expiry date of the “Fix&Go” repair kit
(for versions/markets, where provided)
Check operation of lighting system (headlights, direction
indicators, hazard warning lights, boot, passenger
compartment, glove compartment, instrument panel
warning lights, etc.)
Check and, if necessary, top up fluid levels (1)
Check exhaust emissions/smokiness
Use the diagnosis socket to check supply/engine
management systems operation, emissions and, for
versions/markets, where provided, engine oil degradation
(1) Always only use the liquids shown in the handbook for topping up after having checked that the system is not damaged.
129