specified torque FIAT PUNTO 1998 176 / 1.G Workshop Manual
[x] Cancel search | Manufacturer: FIAT, Model Year: 1998, Model line: PUNTO, Model: FIAT PUNTO 1998 176 / 1.GPages: 225, PDF Size: 18.54 MB
Page 9 of 225
o«8
Roadside repairs
Wheel changing
Some of the details shown horo will vary according to model. For Instance, the location of the spare wheel and jack is not the same on all cars. However, the basic principles apply to aii vehicles-
Preparation
• When a puncture occurs, stop as soon as it Is safe to do so. • Park on firm level ground. If possible, and v/etl out of the way of other traffic. • Use hazard warning lights if necessary.
Changing the wheel
A
Warning: Do not change a wheel (n a situation where you risk being hit by another vehicle. On busy roads, try to stop in a fay-by or a gateway. Be wary of passing traffic white changing the wheel - it Is easy to becomo distracted by the job in hand.
If you have one, use a warning triangle to alert other drivers of your presence. Apply the handbrake and engage first or reverse gear (or P on models with automatic transmission).
• Chock the wheel diagonally opposite the one being removed - a couple of largo stones will do for this. G If the ground is soft, use a flat piece of wood to spread the load under the iack.
I
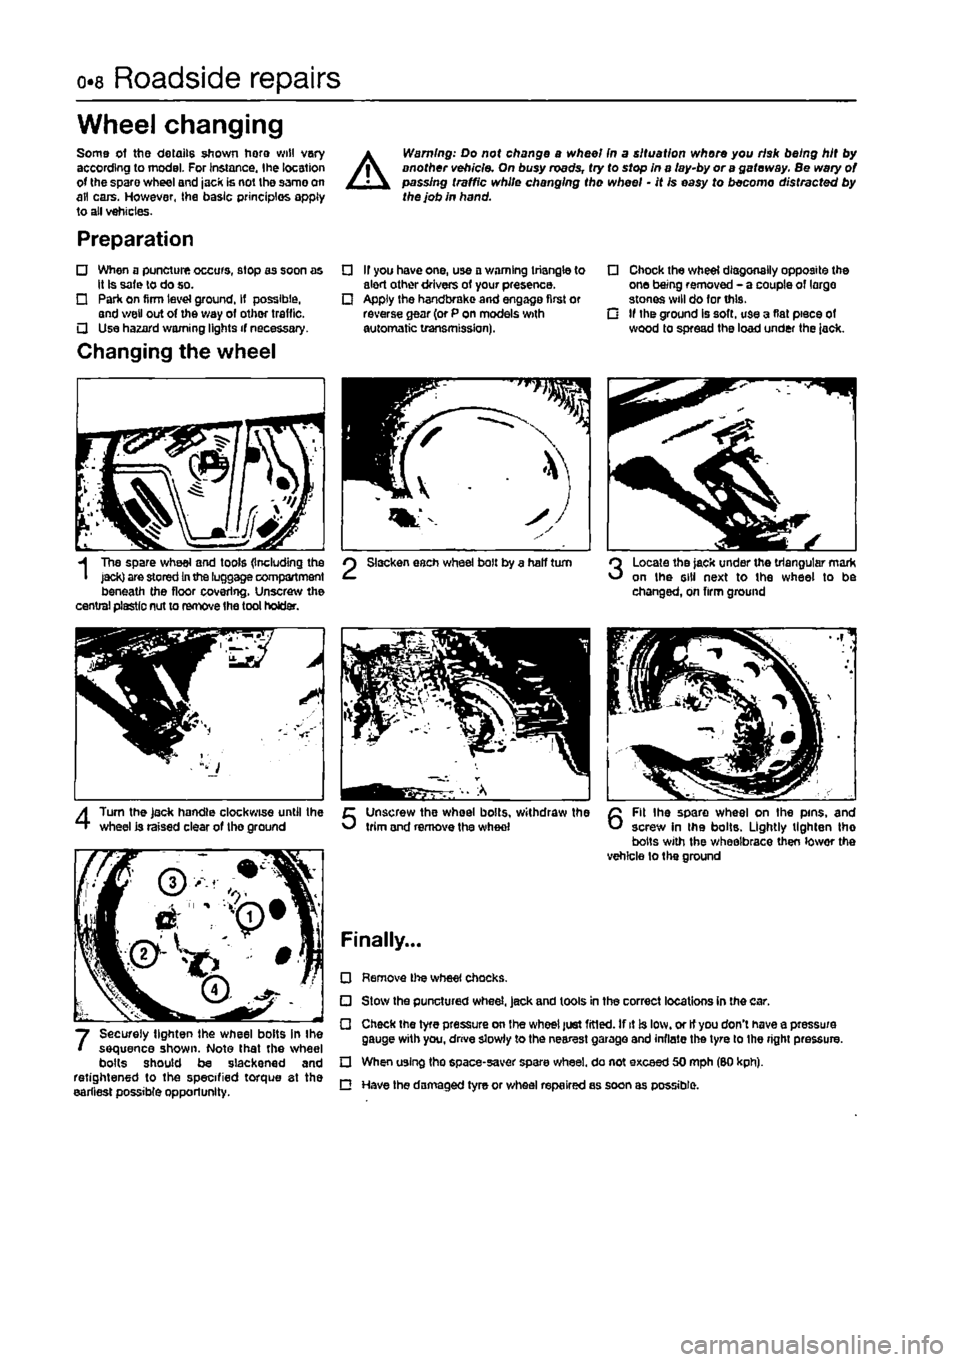
Tbe spare wheel and tools (Including the jack) are stored
In
the luggage compartment beneath the floor covering. Unscrew the central plastic nut to remove the tool holder.
Slacken each wheel bolt by a half turn Locale the jack under the triangular mark on the 6)11 next to the wheel to be changed, on firm ground
4
Turn the Jack handle clockwise until the wheel Is raised clear of the ground Unscrew the wheel bolts, withdraw the trim and remove the whed
6
Fit Ihe spare wheel on the pins, and screw In the bolts. Lightly lighten tho bolts with the wheelbrace then lowor the vehicle to the ground
Finally...
Securely lighten the wheel bolts in Ihe sequence shown. Note that the wheel bolts should be slackened and retightened to the specified torque at the earliest possible opportunity.
• Remove l)>e wheel chocks.
• Stow the punctured wheel, jack and tools in the correct locations in the car. • Check the tyre pressure on the wheel just fitted. If it is low. or It you don't have a pressure gauge with you, drive slowly to the nearest garage and inflate the tyre to Ihe right pressure.
D When using tho space-saver spare wheel, do not exceed 50 mph (SO kph). C Have the damaged tyre or wheal repaired as soon as possible.
Page 31 of 225
1A.12
Every 20 000 miles - petrol models
18.7 Lift up the cover and remove the filter element (18-va!ve engines) 9 Fit a new air (liter element In position, ensuring that the edges are securely seated 10 Refit the air cloaner cover, engage the rear retainers and secure with the three bolts.
19 Spark plug renewal
1 The correct functioning of the spark plugs is vital for the correct running and efficiency of the engine. It is essential that the plugs fitted are appropnate for the engine (a suitable type is specified at the beginning of this Chapter. If this type is used and the engine Is In good condition, the spark plugs should not need attention between scheduled replacement intervals Spark plug cleaning Is rarely necessary, and should not be attempted
19.2a Disconnecting tho HT leads from Iho spark plugs on 8-valve engines ...
19.4 Removing the spark plugs
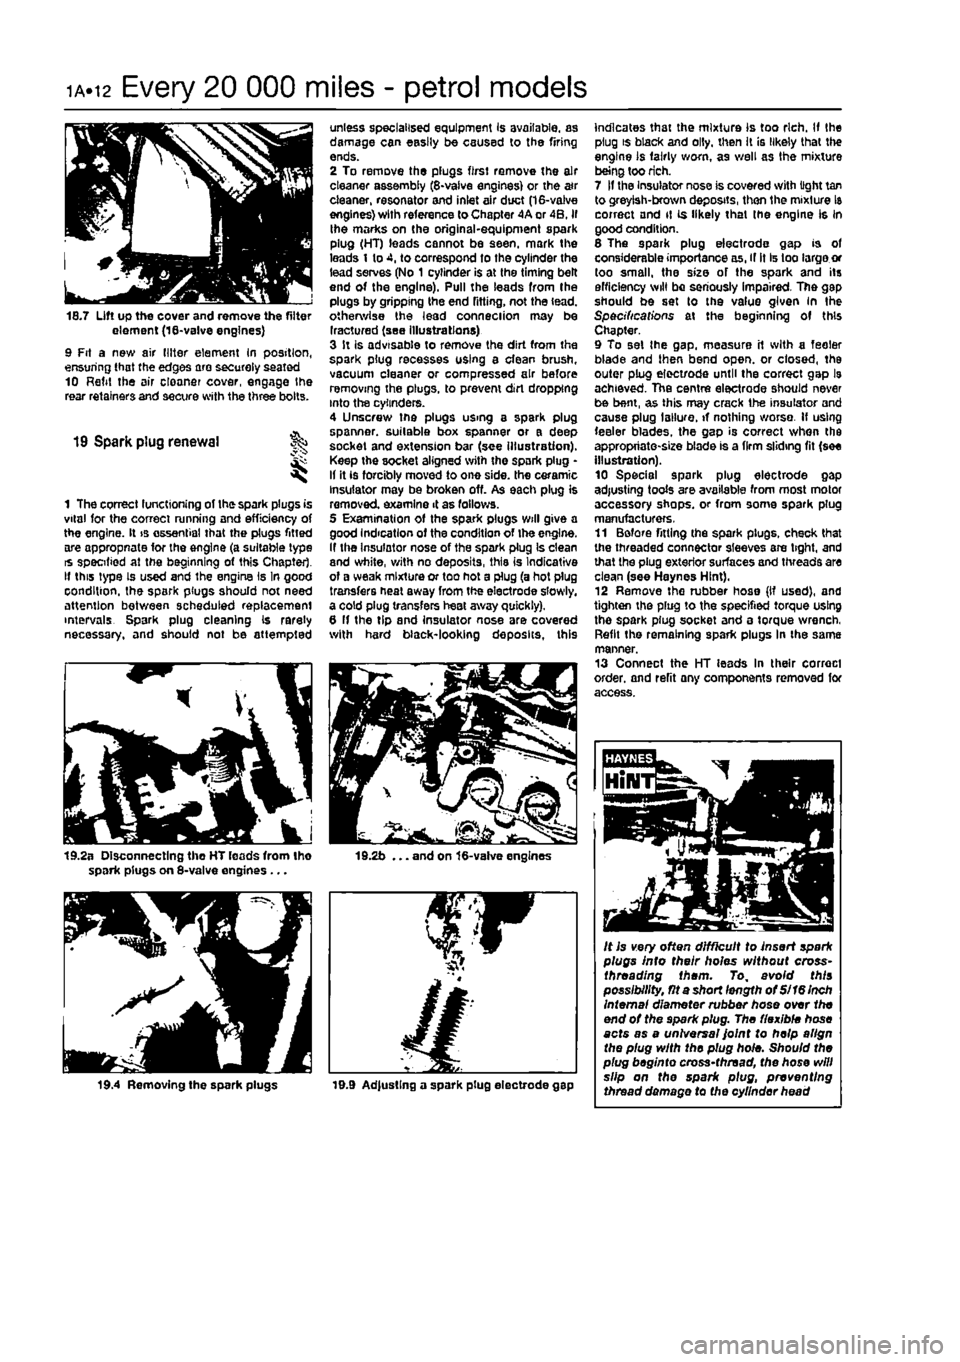
unless specialised equipment Is available, as damage can easily be caused to the firing ends. 2 To remove the plugs first remove the air cleaner assembly (8-vaive engines) or the a»r cleaner, resonator and inlet air duct (16-valve engines) with reference to Chapter 4A or 4B. if the marks on the original-equipment spark plug (HT) leads cannot be seen, mark the leads 1 to 4, to correspond to the cylinder the lead serves (No 1 cylinder is at the timing belt end of the engine). Pull the leads from the plugs by gripping the end fitting, not the lead, otherwise the lead conneciion may be Iractured (see illustrations) 3 It is advisable to remove the dirt from the spark plug recesses using a clean brush, vacuum cleaner or compressed air before removing the plugs, to prevent dirt dropping into the cylinders. 4 Unscrew the plugs using a spark plug spanner, suitable box spanner or a deep socket and extension bar (see illustration). Keep the socket aligned with the spark plug • If it is forcibly moved to one side, the ceramic insulator may be broken off. As each plug is removed examine 4 as fallows. 5 Examination of the spark plugs will give a good Indication of the condition of the engine. If the Insulator nose of the spark plug Is clean and white, with no deposits, this is Indicative of a weak mixture or too hot a plug (a hot plug transfers heal away from the electrode slowly, a cold plug transfers heat away quickly). 6 If the tip and insulator nose are covered with hard black-looking deposits, this
19.2b ... and on 16-valve engines
19.9 Ad|ustlng a spark plug electrode gap
indicates that the mixture Is too rich. If the plug is black and oily, then It is likely that the engine is fairly worn, as well as the mixture being too rich. 7 If the Insulator nose is covered with light tan to greyish-brown deposits, then the mixture Is correct and it is likely that (he engine Is in good condition. 6 The spark plug electrode gap is of considerable importance as, if it Is too large or too small, the size of the spark and its efficiency will be seriously impaired. The gap should be set to the value given in the Specifications at the beginning of this Chapter. 9 To set the gap. measure it with a feeler blade and then bend open, or closed, the outer plug elect/ode until the correct gap l9 achieved. The centre electrode should never be bent, as this may crack the insulator and cause plug I allure, if nothing worse. If using feeler blades, the gap is correct when the appropriate-size blade is a firm sliding fit (see illustration). 10 Special spark plug electrode gap adjusting tools are available from most motor accessory shops, or from some spark plug manufacturers, 11 Before fitting the spark plugs, check that the threaded connector sleeves are tight, and that the plug exterior surfaces and threads are clean (see Haynes Hint). 12 Remove the rubber hose (If used), and tighten the plug to the specified torque using the spark plug socket and a torque wrench, Refit the remaining spark plugs In the same manner. 13 Connect the HT leads In their correct order, and refit any components removed for access.
It is very often difficult to insert spark plugs into their holes without cross-threading them. To, avoid this possibility, fit a short length of Si 16 Inch Internal diameter rubber hose over the end of the spark plug. The flexible hose acts as a universal Joint to help align the plug with the plug hole. Should the plug beginto cross-thread, the hose will slip on the spark plug, preventing thread damage to the cylinder head
Page 55 of 225
2A*10 SOHC (8-valve) petrol engine in-car repair procedures
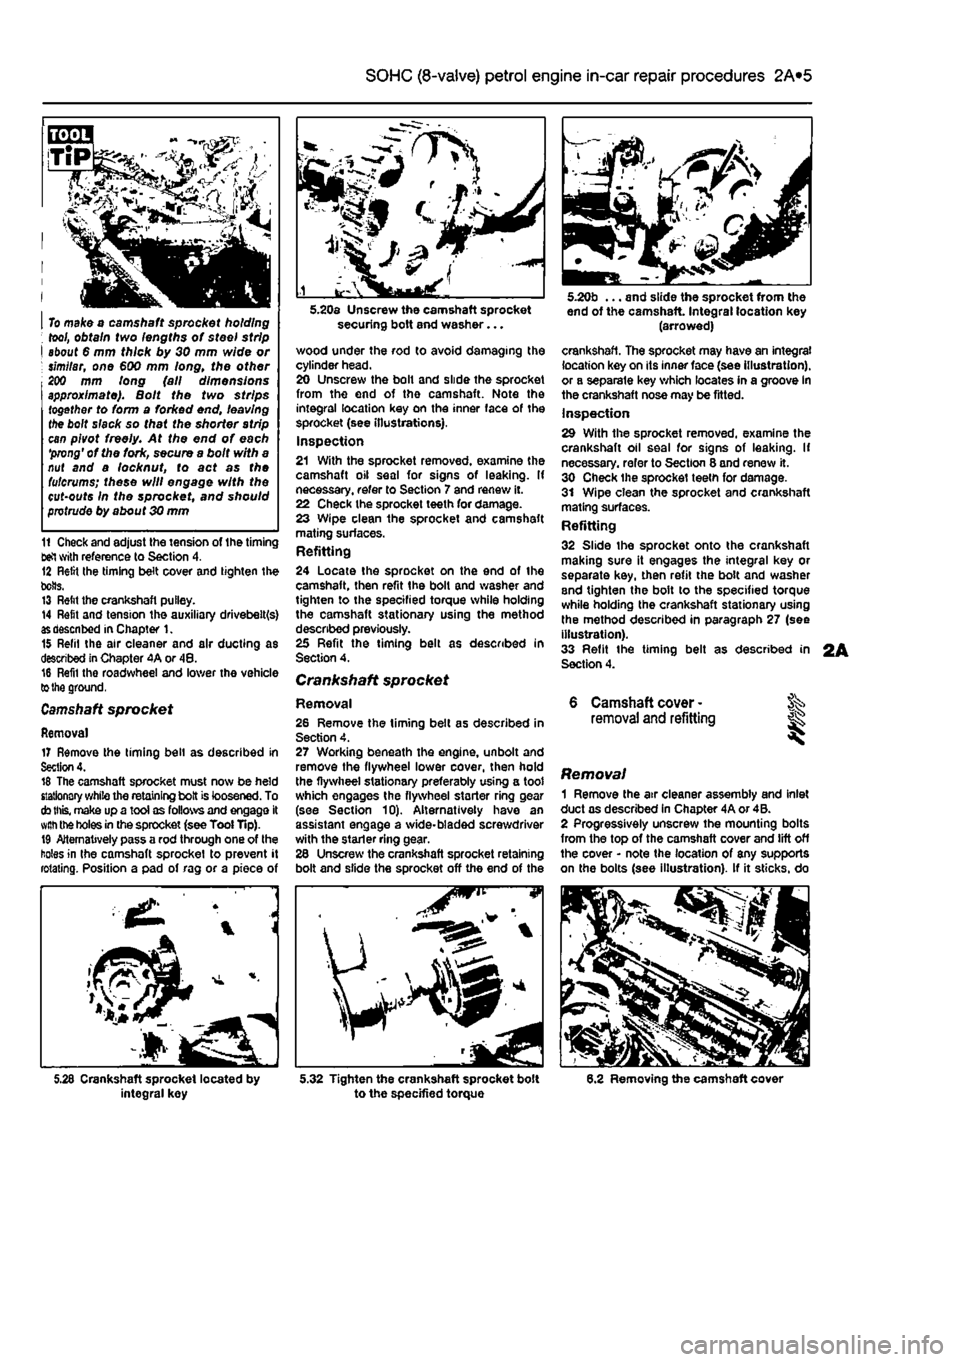
I To make o camshaft sprocket holding ; tool, obtain two lengths of steel strip I about 6 mm thick by 30 mm wide or ; similar, one €00 mm long, the other 200 mm long (all dimensions approximate). Bolt the two strips together to form a forked end, leaving the bolt slack so that the shorter strip can pivot freely. At the end of each 'prong' of the fork, secure a bolt with a nut and a locknut, to act as the fulcrums; these will engage with the cut-outs In the sprocket, and should protrude by about 30 mm
11 Check and adjust the tension of the timing tel with reference to Section 4. 12 Relit Ihe timing belt cover and tighten the bolts. 13 Relit the crankshaft pulley. 14 Refit and tension the auxiliary drivebelt(s)
as
described in Chapter 1. 15 Refil the air cleaner and air ducting as described in Chapter 4A or 48. 16 Refil the roadwheel and lower the vehicle
to the
ground.
Camshaft
sprocket
Removal 17 Remove the timing bell as described in Section 4. 16 The camshaft sprocket must now be held stationary while the retaining bolt is loosened. To
cto this,
make up a tool as follows and engage it
with the
holes
in
the sprocket (see Tool Tip). 19 Alternatively pass a rod through one of the holes in the camshaft sprocket to prevent it rotating. Position a pad of rag or a piece of
integral key
securing bolt and washer...
wood under the rod to avoid damaging the cylinder head. 20 Unscrew the bolt and slide the sprocket from the end of tho camshaft. Note the integral location key on the inner face of the sprocket (see illustrations). Inspection 21 With the sprocket removed, examine the camshaft oil seal for signs of leaking. If necessary, refer to Section 7 and renew it. 22 Check the sprocket teeth for damage. 23 Wipe clean the sprocket and camshaft mating surfaces. Refitting 24 Locate the sprocket on the end of the camshaft, then refit the bolt and washer and tighten to the specified torque while holding the camshaft stationary using the method described previously. 25 Refit the timing belt as described in Section 4.
Crankshaft sprocket
Removal 26 Remove the timing belt as described in Section 4. 27 Working beneath the engine, unbolt and remove the flywheel lower cover, then hold the flywheel stationary preferably using a toot which engages the flywheel starter ring gear (see Section 10). Alternatively have an assistant engage a wide-bladed screwdriver with the stader ring gear. 26 Unscrew the crankshaft sprocket retaining bolt and slide the sprocket off the end of the
^P
5.32 Tighten the crankshaft sprocket bolt to the specified torque
end of the camshaft Integral location key (arrowed)
crankshaft. The sprocket may have an integral location key on its inner face (see illustration), or a separate key which locates in a groove in the crankshaft nose may be fitted. Inspection 29 With the sprocket removed, examine the crankshaft oil seal for signs of leaking. If necessary, refer to Section 8 and renew it. 30 Check the sprocket teeth for damage. 31 Wipe clean the sprocket and crankshaft mating surfaces. Refitting 32 Slide the sprocket onto the crankshaft making sure it engages the integral key or separate key, then refit the bolt and washer and tighten the bolt to the specified torque while holding the crankshaft stationary using the method described in paragraph 27 (see illustration). 33 Refit the timing belt as described in Section 4.
6 Camshaft cover -removal and refitting
Removal 1 Remove the air cleaner assembly and inlet duct as described in Chapter 4A or 4B. 2 Progressively unscrew the mounting bolts from the top of the camshaft cover and lift off the cover • note the location of any supports on the bolts (see illustration). If it sticks, do
6.2 Removing the camshaft cover
Page 56 of 225
2A*10 SOHC (8-valve) petrol engine in-car repair procedures
6.3 Camshaft cover gasket
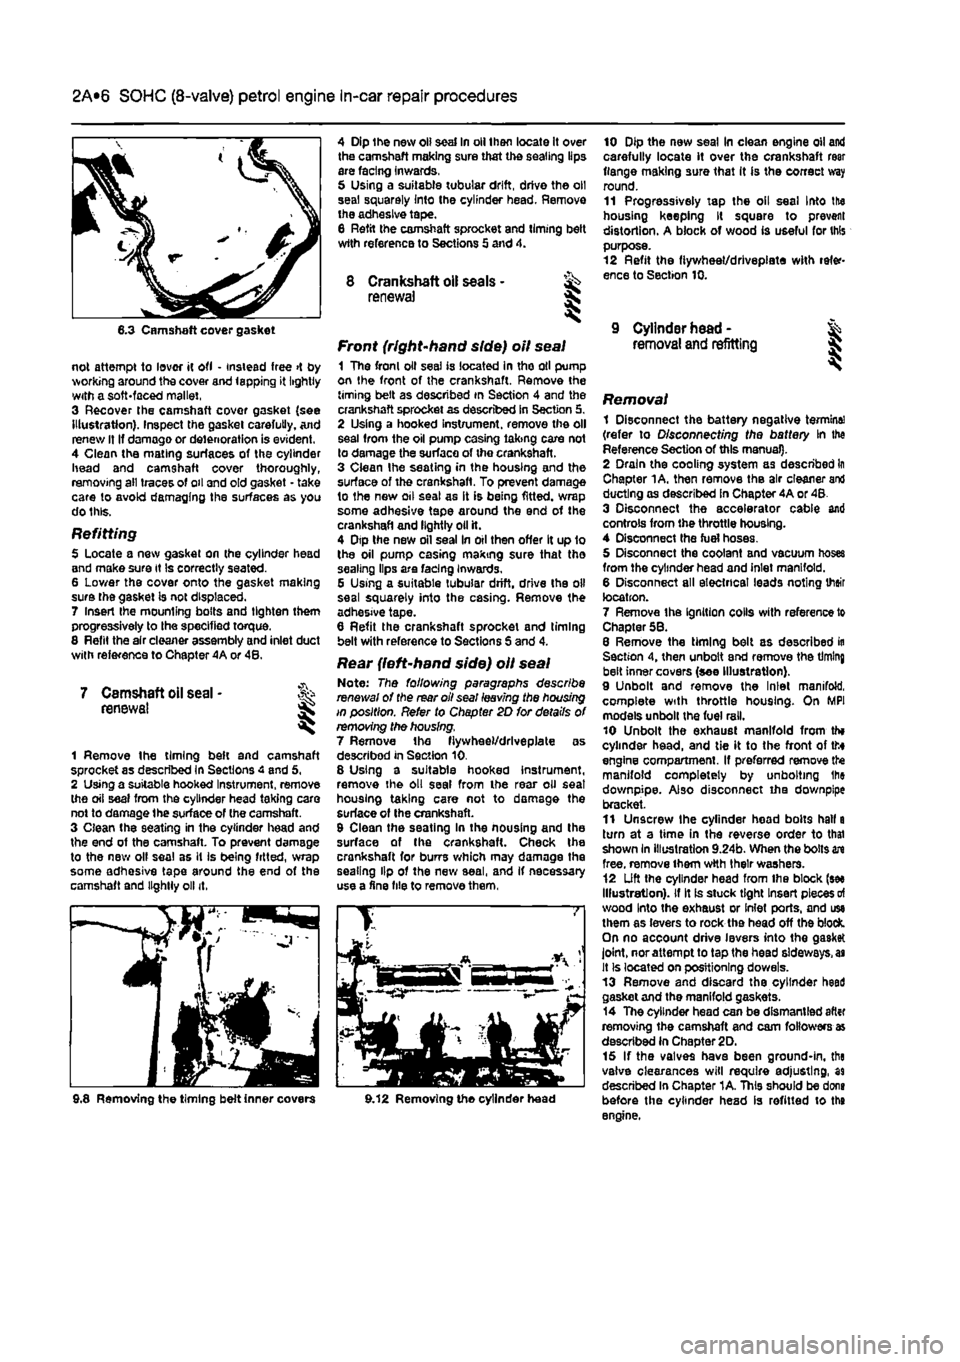
not attempt to lover it ofl • instead free >t by working around the cover and lapping it lightly with a soft-faced mallet, 3 Recover the camshaft covor gasket {see Illustration). Inspect the gasket carefully. And renew It If damage or deterioration is evident. 4 Clean the mating surfaces of the cylinder head and camshaft cover thoroughly, removing all traces of oil and old gasket - take care to avoid damaging the surfaces as you do this.
Refitting 5 Locate a new gasket on the cylinder head and make sure it Is correctly seated. 6 Lower the cover onto the gasket making sure the gasket is not displaced. 7 Insert Ihe mounting bolts and tighten them progressively to the specified torque. 8 Refit the air cleaner assembly and inlet duct with reference to Chapter 4A or 48.
7 Camshaft oil seal • renewal I
1 Remove the timing beft and camshaft sprocket as described in Sections 4 and 5, 2 Using a suitable hooked Instrument, remove the oil seal from the cylinder head taking care not to damage the surface of (he camshaft. 3 Clean the seating in the cylinder head and the end of the camshaft. To prevent damage to the new olf seal as it is being fitted, wrap some adhesive tape around the end of the camshaft and lightly oil it.
4 Dip the new oil seal In oil then locate it over the camshaft making sure that the sealing lips are facing inwards, 5 Using a suitable tubular drift, drive the oil seal squarely Into the cylinder head. Remove the adhesive tape. 8 Refit the camshaft sprocket and liming belt wtth reference to Sections 5 and 4.
8 Crankshaft oil seals - ^ renewal S
Front (right-hand side) oil seal 1 The fronl oil seal is located in tho oil pump on the front of the crankshaft. Remove the timing belt as described in Section 4 and the crankshaft sprocket as described in Section 5. 2 Using a hooked instrument, remove the oil seal from the oil pump casing taking care not to damage the surface of the crankshaft. 3 Clean Ihe seating in the housing and the surface of the crankshaft. To prevent damage to the new oil seal as it is being fitted, wrap some adhesive tape around the end of the crankshaft and lightly oil it. 4 Dtp the new oil seal In oil then offer It up 1o the oil pump casing making sure that tho sealing lips are facing Inwards. G Using a suitable tubular drift, drive the oil seal squarely into the casing. Remove the adhesive tape. 6 Refit the crankshaft sprocket and timing belt with reference to Sections S and 4.
Rear {left-hand side) oil seal Note: The following paragraphs describe renewal of the rear oil seal leaving the housing in position. Refer to Chapter 2D for details of removing the housing. 7 Remove the fiywheel/drlveplate as described in Section 10. 8 Using a suitable hooked instrument, remove the oil seal from the rear oil seat housing taking care not to damage the surface of Ihe crankshaft. 9 Clean the seating In the nousing and the surface of the crankshaft. Check the crankshaft for burrs which may damage the sealing lip of the new seal, and If necessary use a fine file to remove them,
10 Dip the new seal In clean engine oil and carefully locate it over the crankshaft rear flange making sure that It is the correct way round. 11 Progressively tap the oil seal Into the housing keeping It square to prevent distortion. A block of wood is useful for this purpose. 12 Refit the fiywheet/drlvepiate with refer-ence to Section 10.
9 Cylinder head -removal and refitting I
i Removing the timing belt inner covers 9.12 Removing the cylinder head
Removal 1 Disconnect the battery negative termine! (refer to Disconnecting the battery In the Reference Section of this manual). 2 Drain the cooling system as described In Chapter 1A. then remove the air cleaner and ducting as described in Chapter 4A or 48. 3 Disconnect the accelerator cable and controls from the throttle housing. 4 Disconnect the fuel hoses. 5 Disconnect the coolant and vacuum hoses from the cylinder head and inlet manifold. 6 Disconnect all electrical leads noting their location. 7 Remove the Ignition colls with reference to Chapter 58. 8 Remove the timing belt as described in Section 4, then unbolt end remove the timing belt inner covers (see Illustration). 9 Unbolt and remove the Inlet manifold, complete with throttle housing. On MPI models unbolt the fuel rail. 10 Unbolt the exhaust manifold from th» cylinder head, and tie it to the front of tto engine compartment. If preferred remove the manifold completely by unbolting Ihe downpipe. Also disconnect iha downpipe bracket. 11 Unscrew the cylinder head bolts hall a turn at a time in the reverse order to thai shown In illustration 9.24b. When the bolts in free, remove them wtth their washers. 12 Lift the cylinder head from Ihe block (see Illustration), if It is stuck tight Insert pieces
of
wood Into the exhaust or Inlet ports, and use them as levers to rock the head off the block. On no account drive levers into the gasket joint, nor attempt to tap the head sideways,
as
It Is located on positioning dowels. 13 Remove and discard the cylinder heed gasket and the manifold gaskets. 14 The cylinder head can be dismantled after removing the camshaft and cam followers as described in Chapter 2D. 15 If the valves have been ground-in, the valve clearances will require adjusting, as described In Chapter 1A. This should be dons before the cylinder head is refitted to the engine.
Page 57 of 225
2A*10 SOHC (8-valve) petrol engine in-car repair procedures
Preparation for refitting 16 The mating faces of the cylinder head and cylinder block must be perfectly clean before
refitting
the head. Use a hard plastic or wooden scraper to remove all traces of gasket and carbon; also clean the piston crowns. Take padicular care when cleaning the piston crowns as the soft aluminium alloy is easily damaged. Make sure that the carbon is not afowed to enter the oil and water passages -Ihs is particularly important for the lubrication
system, as
carbon could block the oil supply to
Ihe
engine's components. Using adhesive tape
and
paper, seal the water, oil and bolt holes in tf« cylinder block. To prevent carbon entering twgap between the pistons and bores, smear
a
iittte grease in the gap. After cleaning each piston, use a small brush to remove all traces of grease and carbon from the gap, then wipe away the remainder with a clean rag. Clean all
ttie pistons
in the same way. 17 Check the mating surfaces of the cylinder block and the cylinder head for nicks, deep scratches and other damage. If slight, they may be removed carefully with a file, but if (xcassive, machining may be the only alternative to renewal. If warpage of the Cytodar head gasket surface is suspected, use a straight-edge to check it for distortion.
Refer
to Part 0 of this Chapter if necessary. 18 Check the condition of the cylinder head
MRS.
and particularly their threads, whenever
they are
removed. Wash the bolts In a suitable solvent, and wipe them dry. Check each bolt for any sign of visible wear or damage, renewing them if necessary.
Refitting 18 Before refitting Ihe assembled cylinder head, make sure that the head and block mating surfaces are perfectly clean, and that
the
bolt holes in the cylinder block have been
mopped
out to clear any oil. 20 Check that the camshaft and crankshaft sprocket timing marks are still aligned with tteir respective cylinder head and oil pump covtr marks as described in Section 2. 21 The new gasket should not be removed from its nylon cover until required for use. Fit
the
gasket dry, and make sure that the mating surfaces on the head and block are perfectly dean.
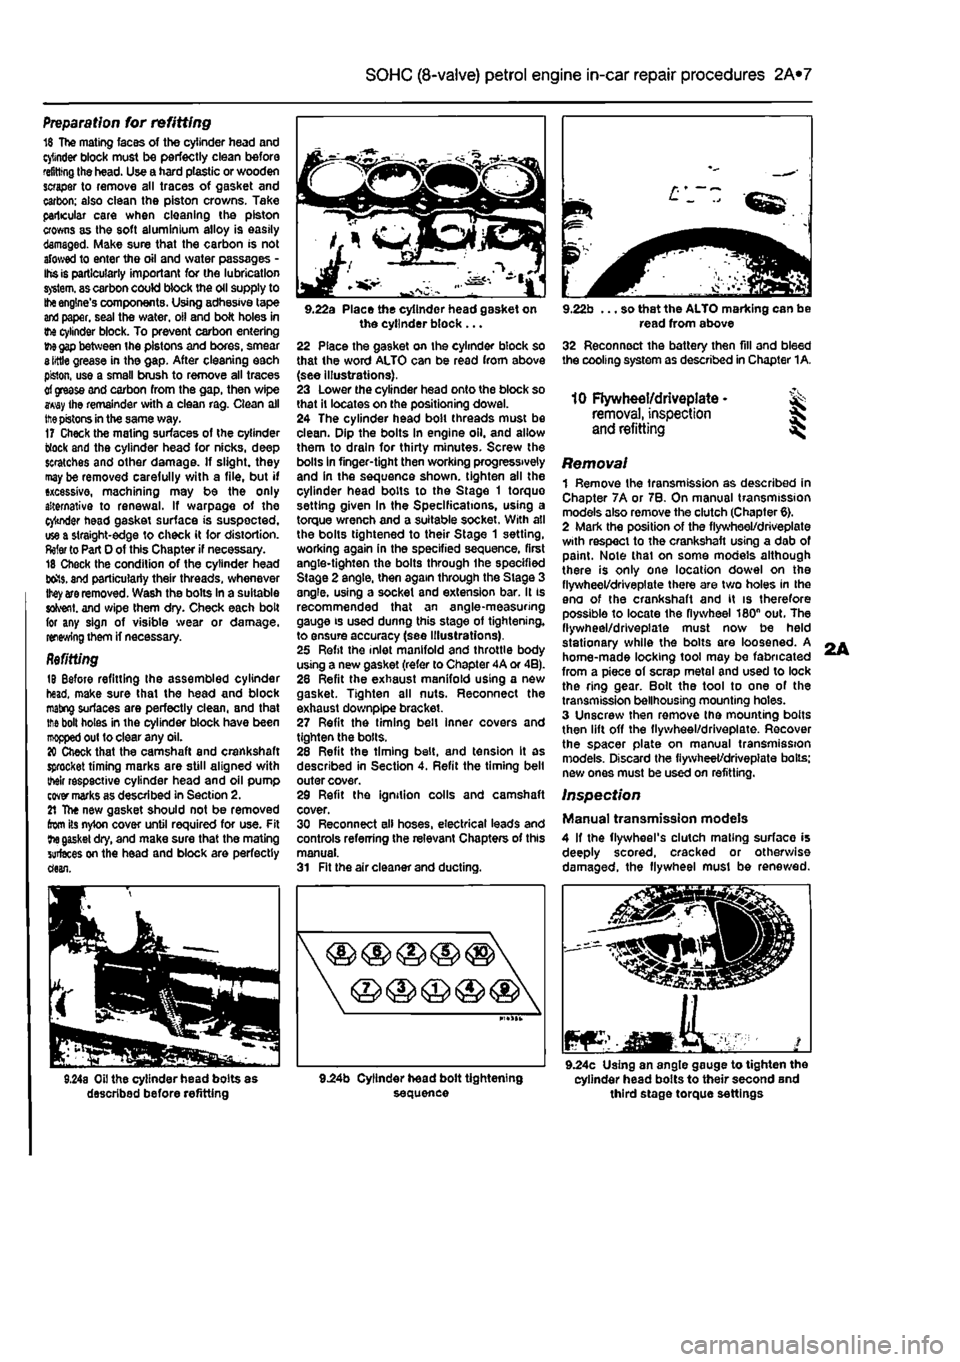
9.22a Place the cylinder head gasket on the cylinder block ... 22 Place the gasket on the cylinder block so that the word ALTO can be read from above (see illustrations). 23 Lower the cylinder head onto the block so that It locates on the positioning dowel. 24 The cylinder head bolt threads must be clean. Dip the bolts In engine oil. and allow them to drain for thirty minutes. Screw the bolls in finger-tight then working progressively and in the sequence shown, tighten all the cylinder head bolts to the Stage 1 torque setting given In the Specifications, using a torque wrench and a suitable socket. With all the bolts tightened to their Stage 1 setting, working again in the specified sequence, first angle-tighten the bolts through ihe specified Stage 2 angle, then again through the Stage 3 angle, using a socket and extension bar. It is recommended that an angle-measuring gauge is used dunng this stage of tightening, to ensure accuracy (see Illustrations). 25 Refit the inlet manifold and throttle body using a new gasket (refer to Chapter 4A or 4B). 28 Refit the exhaust manifold using a new gasket. Tighten all nuts. Reconnect the exhaust downplpe bracket. 27 Refit the timing belt inner covers and tighten the bolls. 28 Refit the timing belt, and tension It as described in Section 4. Refit the timing belt outer cover. 29 Refit the ignition colls and camshaft cover. 30 Reconnect all hoses, electrical leads and controls referring the relevant Chapters of this manual. 31 Fit the air cleaner and ducting.
9.22b ... so that the ALTO marking can be read from above 32 Reconnect the battery then fill and bleed the cooling system as described in Chapter 1A.
10 Flywheel/driveplate • ^ removal, inspection
and
refitting ^
Removal 1 Remove the transmission as described in Chapter 7A or 7B. On manual transmission models also remove the clutch (Chapter 6). 2 Mark the position of the flywheel/driveplate with respect to the crankshaft using a dab of paint. Note thai on some models although there is only one location dowel on the flywheel/driveplate there are two holes in the eno of the crankshaft and it is therefore possible to locate Ihe flywheel 180n out. The flywheel/driveplate must now be held stationary while the bolts are loosened. A home-made locking tool may be fabricated from a piece of scrap metal and used to lock the ring gear. Bolt the tool to one of the transmission bellhousing mounting holes. 3 Unscrew then remove the mounting bolts then lift off the flywheel/driveplate. Recover the spacer plate on manual transmission models. Discard the fiywheet/drivepiate boils; new ones must be used on refitting.
Inspection
Manual transmission models 4 If the flywheel's clutch mating surface is deeply scored, cracked or otherwise damaged, the flywheel must be renewed.
JEaMKA. mar 9.24c Using an angle gauge to tighten the cylinder head bolts to their second and third stage torque settings
L
Page 58 of 225
2A*10 SOHC (8-valve) petrol engine in-car repair procedures
10.10 Tighten the flywheel bolt to the specified torque However, it may be possible lo have it surface*ground; seek (he advice of a Rat dealer or engine reconditioning specialist, 5 If Ihe ring gear is badly worn or has missing teeth, the flywheel must be renewed. Automatic transmission models 6 Check the driveplate for signs of damage and renew it if necessary. If the ring gear is badly worn or has missing teeth, the driveplate must be renewed.
Refitting 7 Clean the mating surfaces of the flywheel/ drivoplate and crankshoft. Remove any remaining locking compound from the threads of the crankshaft holes, using the correct-size tap. if available.
ft a suitable tap fs not . # | available, cut two slots down jHlNTI
toe
threads of ono of the old bolts with a hacksaw, and use the bolt to remove the locking compound from the throads.
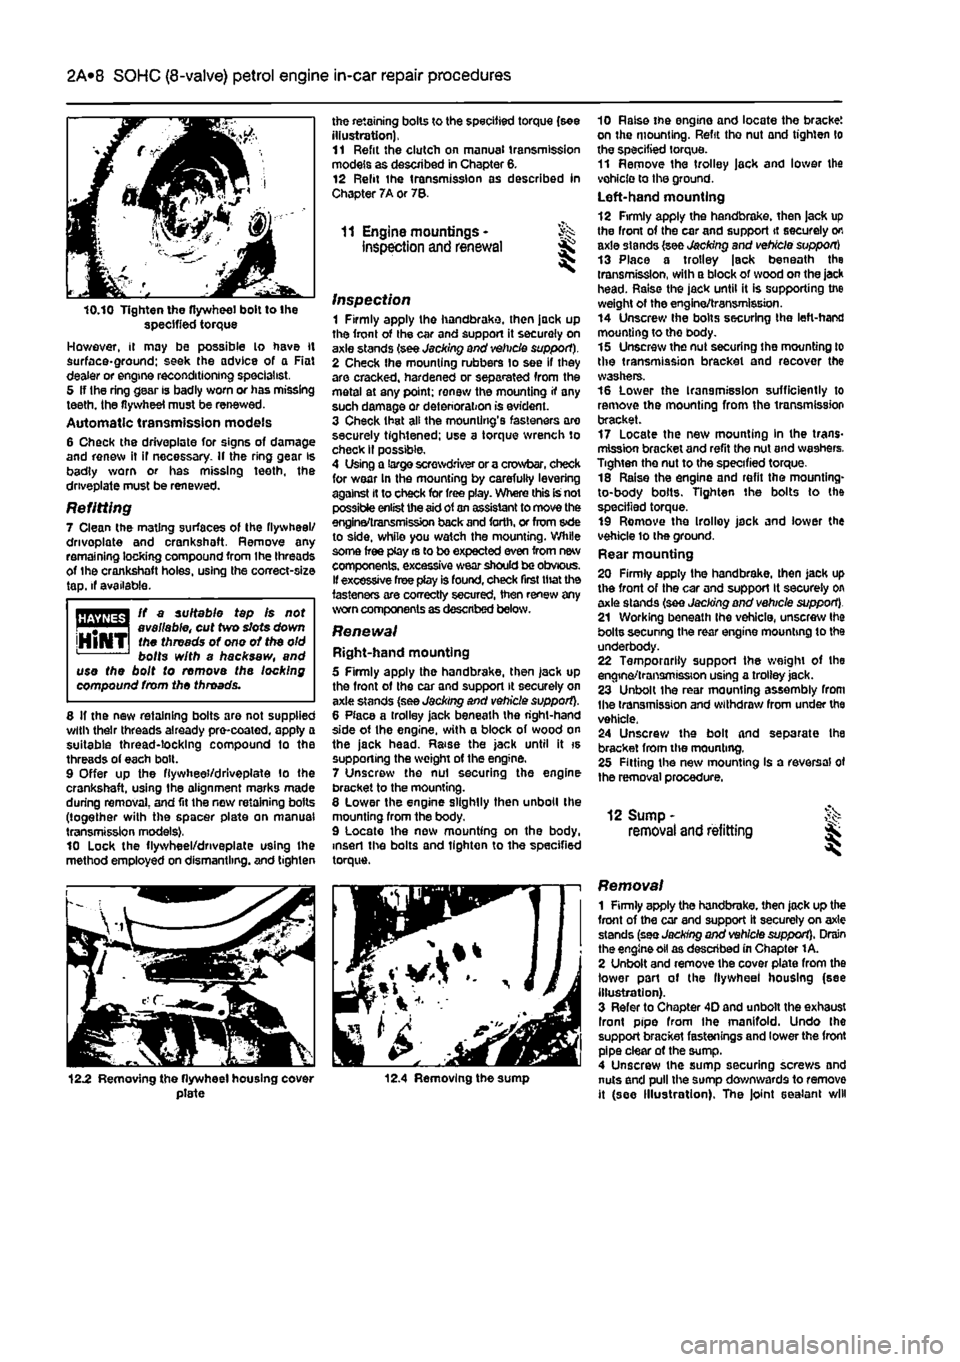
8 If the new retaining bolts are not supplied with their threads already pre-coated, apply a suitable thread-locking compound to the threads of each bolt. 9 Offer up the fiywhee'/drlveplate lo the crankshaft, using the alignment marks made during removal, and fit the new retaining bolts (together with the spacer plate on manual transmission models), 10 Lock the flywheel/dnveplate using Ihe method employed on dismantling, and tighten
the retaining bolts to the specified torque (see illustration), 11 Refit the clutch on manual transmission models as described in Chapter 6. 12 Relit the transmission as described In Chapter 7A or 78.
11 Engine mountings • inspection and renewal
inspection 1 Firmly apply the handbrake, then jack up the front of the car and support it securely on axle stands (see Jacking and vehicle support). 2 Check Ihe mounting rubbers to see if they are cracked, hardened or separated from the metal at any point; renew the mounting if any such damage or deterioration is evident. 3 Check that all the mounting's fasteners are securely tightened; use a torque wrench to check II possible. 4 Using a large screwdriver or a crowbar, check for wear In the mounting by carefuliy levering against It to check for free play. Where this is not possible enlist the
aid
of
an
assistant to move the engina/transmission back
and
forth, or from s»de to side, while you watch the mounting. While some free play rs to bo expected even from new components, excessive wear
should
be obvious. If excessive free play is found, check first that the fasteners are correctly secured, then renew any worn components as described below.
Renewal Right-hand mounting 5 Firmly apply the handbrake, then jack up the front of the car and support it securely on axle stands (see Jacking and vehicle support). 8 Place a trolley jack beneath the right-hand side of Ihe engine, with a block of wood on the jack head. Raise the jack until it is supporting the weight of the engine. 7 Unscrew the nut securing the engine bracket to the mounting. 8 Lower the engine slightly then unboll the mounting from the body. 9 Locate the new mounting on the body, insert the bolts and tighten to the specified torque.
10 Raise tne engine and locate the bracket on the mounting. Refit tho nut and tighten lo the specified torque. 11 Remove the trolley jack and lower the vehicle to the ground. Left-hand mounting 12 Firmly apply the handbrake, then jack up the front of the car and support it securely on axle stands (see Jacking and vehicle support) 13 Place a trolley |sck beneath the transmission, with a block of wood on the jack head. Raise the jack until it is supporting tne weight of the engine/transmission. 14 Unscrew Ihe bolts securing the left-hand mounting to tho body. 15 Unscrew the nut securing ihe mounting to the transmission bracket and recover the washers. 16 Lower the transmission sufficiently to remove the mounting from the transmission bracket. 17 Locate the new mounting In the trans-mission bracket and refit the nut and washers. Tighten the nut to the specified torque. 18 Raise the engine and refit the mounting-to-body bolts. Tighten the bolts to the specified torque. 19 Remove the Irolloy jack and lower the vehicle lo the ground. Rear mounting 20 Firmly apply the handbrake, then Jack up the front of the car and support It securely on axle stands (see Jacking and vehicle support). 21 Working beneath Ihe vehicle, unscrew Ihe bolts secunng the rear engine mounting to the underbody. 22 Temporarily support the weight of the engine/transmission using a trolley jack. 23 Unbolt the rear mounting assembly from Ihe transmission and withdraw from under the vehicle. 24 Unscrew the bolt and separate Ihe bracket from tlve mounting. 28 Fitting the new mounting Is a reversal of the removal procedure.
12 Sump -removal and refitting
12.2 Removing the flywheel housing cover plate 12.4 Removing the sump
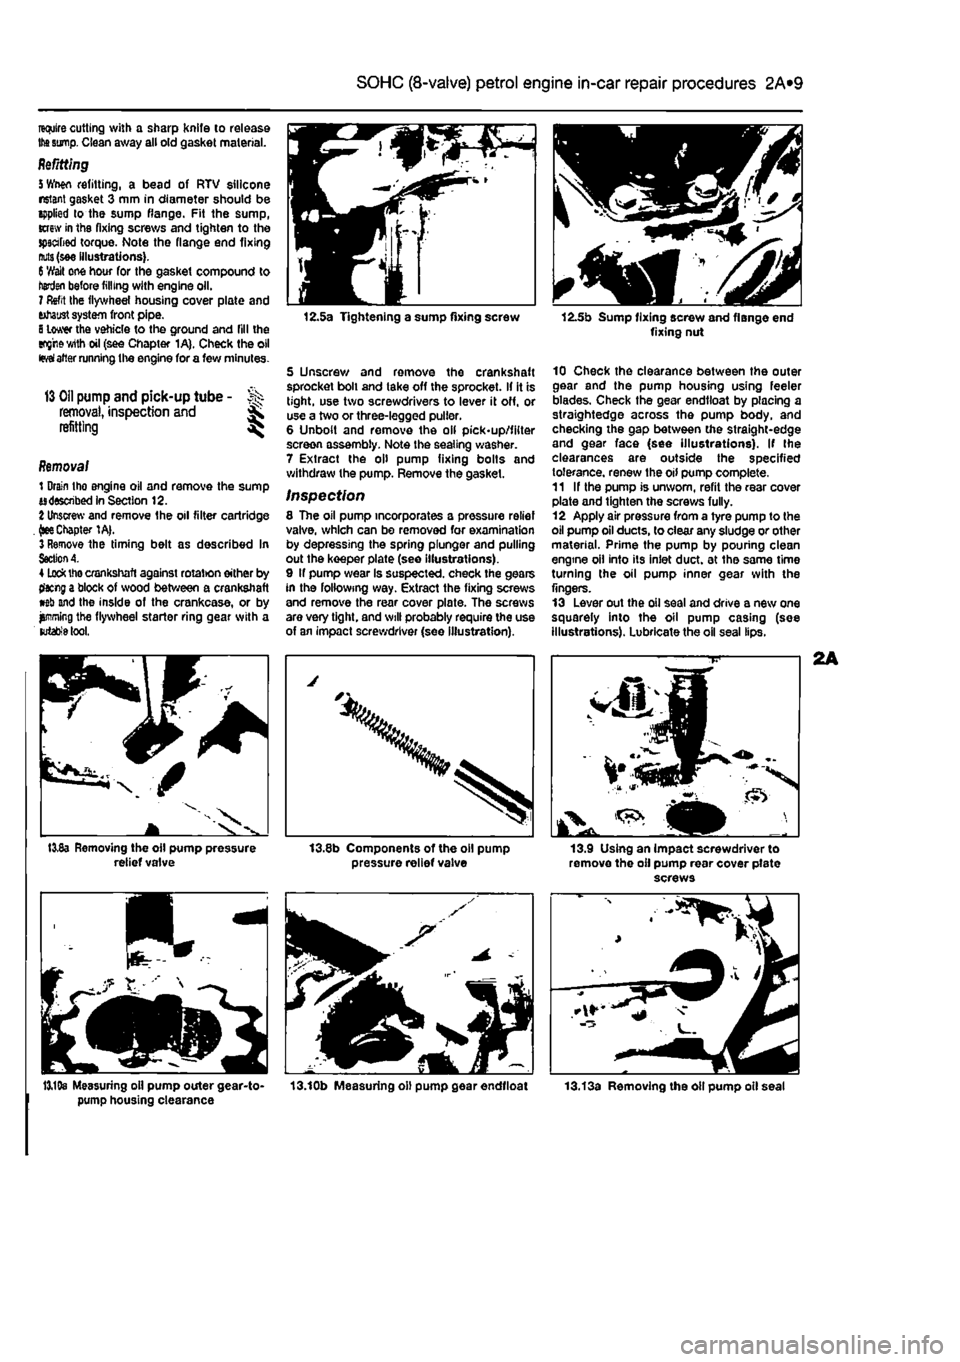
Removal 1 Firmly apply the handbrake, then jack up the front of the car and support it securely on axle stands (see Jacking and vehicle support). Drain the engine oil as described in Chapter 1 A. 2 Unbolt and remove the cover plate from the lower pari of the llywheel housing (see illustration). 3 Refer to Chapter 4D and unbolt the exhaust Iront pipe from Ihe manifold. Undo Ihe support bracket fastenings and lower the front pipe clear of the sump. 4 Unscrew the sump securing screws and nuts and pull the sump downwards to remove it (see Illustration). The joint sealant will
Page 59 of 225
2A*10 SOHC (8-valve) petrol engine in-car repair procedures
require cutting with a sharp Knife to release
the sump.
Clean away all old gasket material. Refitting
5
Wwn refitting, a bead of RTV silicone nsiant gasket 3 mm in diameter should be applied lo the sump flange. Fit the sump, screw in tha fixing screws and tighten to the spscabed torque. Note the flange end fixing
nuts
(see illustrations).
6
'//ait one hour for the gasket compound to henjai before filling with engine oil. 7 Refit the flywheel housing cover plate and tohaust system front pipe.
8
lower the vehicle to the ground and fill the eng'rewith oil (see Chapter 1A). Check the oil
fevai
alter running the engine for a few minutes.
13 Oil
pump and pick-up tube - >>>
removal,
inspection and ^ refitting ^
Removal 1 Drain tho engine oil and remove the sump adsswibed in Section 12.
%
Unscrew and remove the oil filter cartridge .
(see
Chapter 1A|. 3 Remove the timing belt as described In
Section A.
4
Lock
the crankshaft against rotat>on either by tfacng a block of wood between a crankshaft wb and the inside of the crankcase, or by jjmning the flywheel starter ring gear with a
lutabfe
tool.
I3v8a Removing the oil pump pressure relief valve
12.5a Tightening a sump fixing screw
5 Unscrew and remove the crankshaft sprocket boll and take off the sprocket. If it is tight, use two screwdrivers to lever it off, or use a two or three-legged puller. 6 Unbolt and remove the oil pick-up/filter screen assembly. Note the sealing washer. 7 Extract the oil pump fixing bolts and withdraw the pump. Remove the gasket.
Inspection 8 The oil pump incorporates a pressure relief valve, which can be removed for examination by depressing the spring plunger and pulling out the keeper plate (see illustrations). 9 If pump wear Is suspected, check the gears in the following way. Extract the fixing screws and remove the rear cover plate. The screws are very tight, and will probably require the use of an impact screwdriver (see illustration).
pressure relief valve
12.5b Sump fixing screw and flange end fixing nut
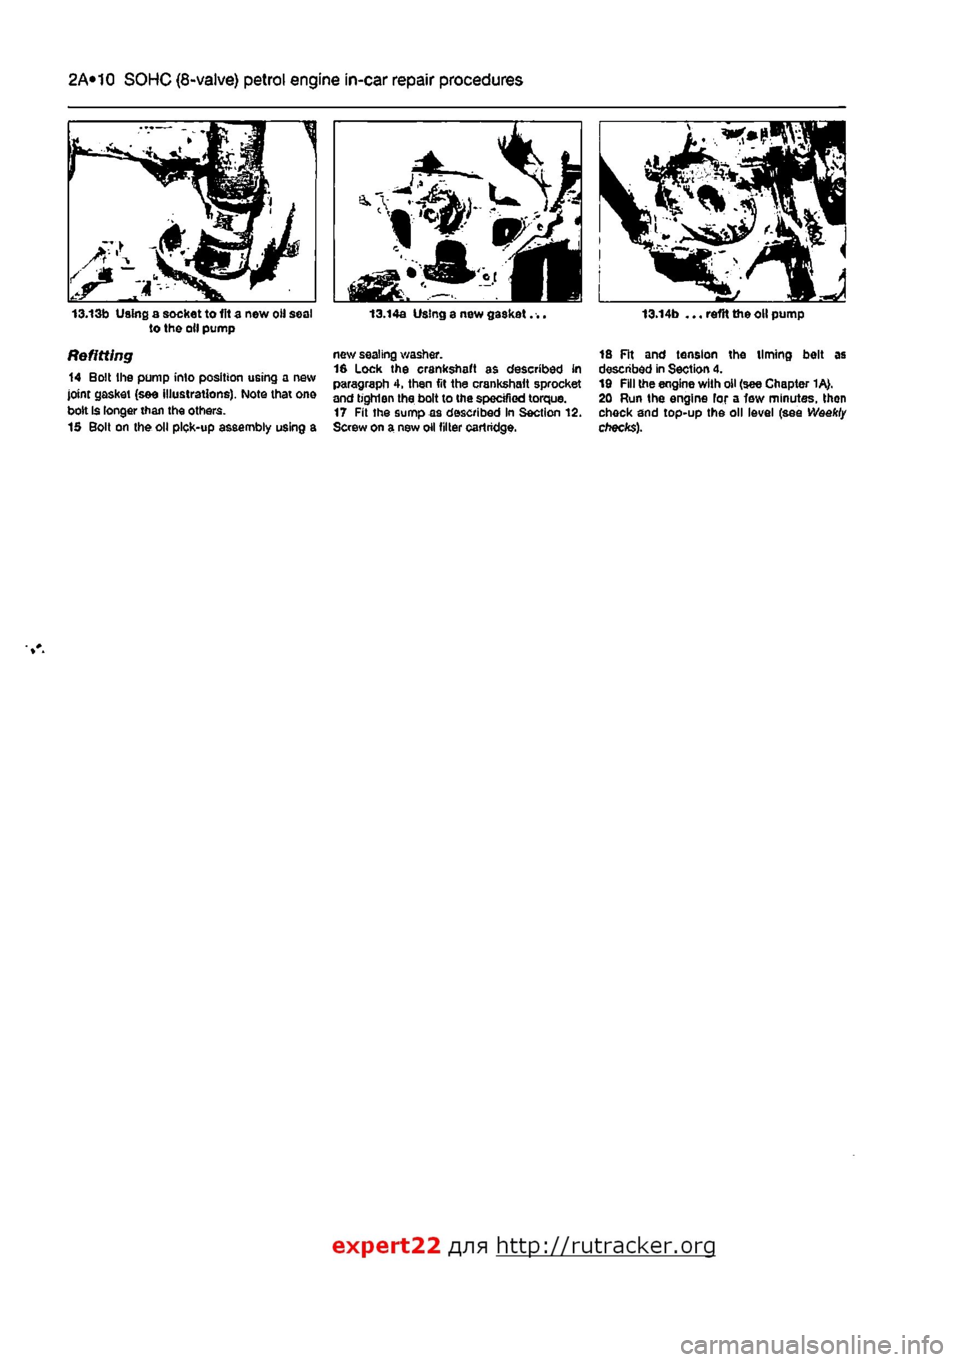
10 Check the clearance between the outer gear and the pump housing using feeler blades. Check the gear endtloat by placing a straightedge across the pump body, and checking the gap between the straight-edge and gear face (see illustrations). If the clearances are outside the specified tolerance, renew the oil pump complete. 11 If the pump is unworn, refit the rear cover plate and tighten the screws fully. 12 Apply air pressure from a tyre pump to the oil pump oil ducts, to clear any sludge or other material. Prime the pump by pouhng clean engine oil into its inlet duct, at the same time turning the oil pump inner gear with the fingers. 13 Lever out the oil seal and drive a new one squarely into the oil pump casing (see illustrations). Lubricate the oil seal lips.
13.9 Using an impact screwdriver to remove the oil pump rear cover pfate screws
13,19s Measuring oil pump outer gear-to- 13.10b Measuring oil pump gear endtloat pump housing clearance
Page 60 of 225
2A*10 SOHC (8-valve) petrol engine in-car repair procedures
13.13b Using a socket to lit a new oil sea! to the oil pump
Refitting 14 Bolt the pump into position using a new joint gasket (see illustrations). Note that on© bolt Is longer than the others. 15 Bolt on the oil pick-up assembly using a
13.14a Using a new gasket. ..
new sealing washer. 16 Lock the crankshaft as described in paragraph 4, then fit the crankshaft sprocket and bghlen the bolt to the specified torque. 17 Fit the sumpaa described in Section 12. Screw on a new oil filter cartridge.
13.14b ... reftt the oil pump
18 Fit and tension the timing belt as described in Section 4. 19 Fill the engine with oil (see Chapter 1A>. 20 Run the engine for a few minutes, then check and top-up the oil level (see Weekly checks).
expert22 f
a http://rutracker.org
Page 66 of 225
2B*6 DOHC (16-valve) petrol engine in-car repair procedures
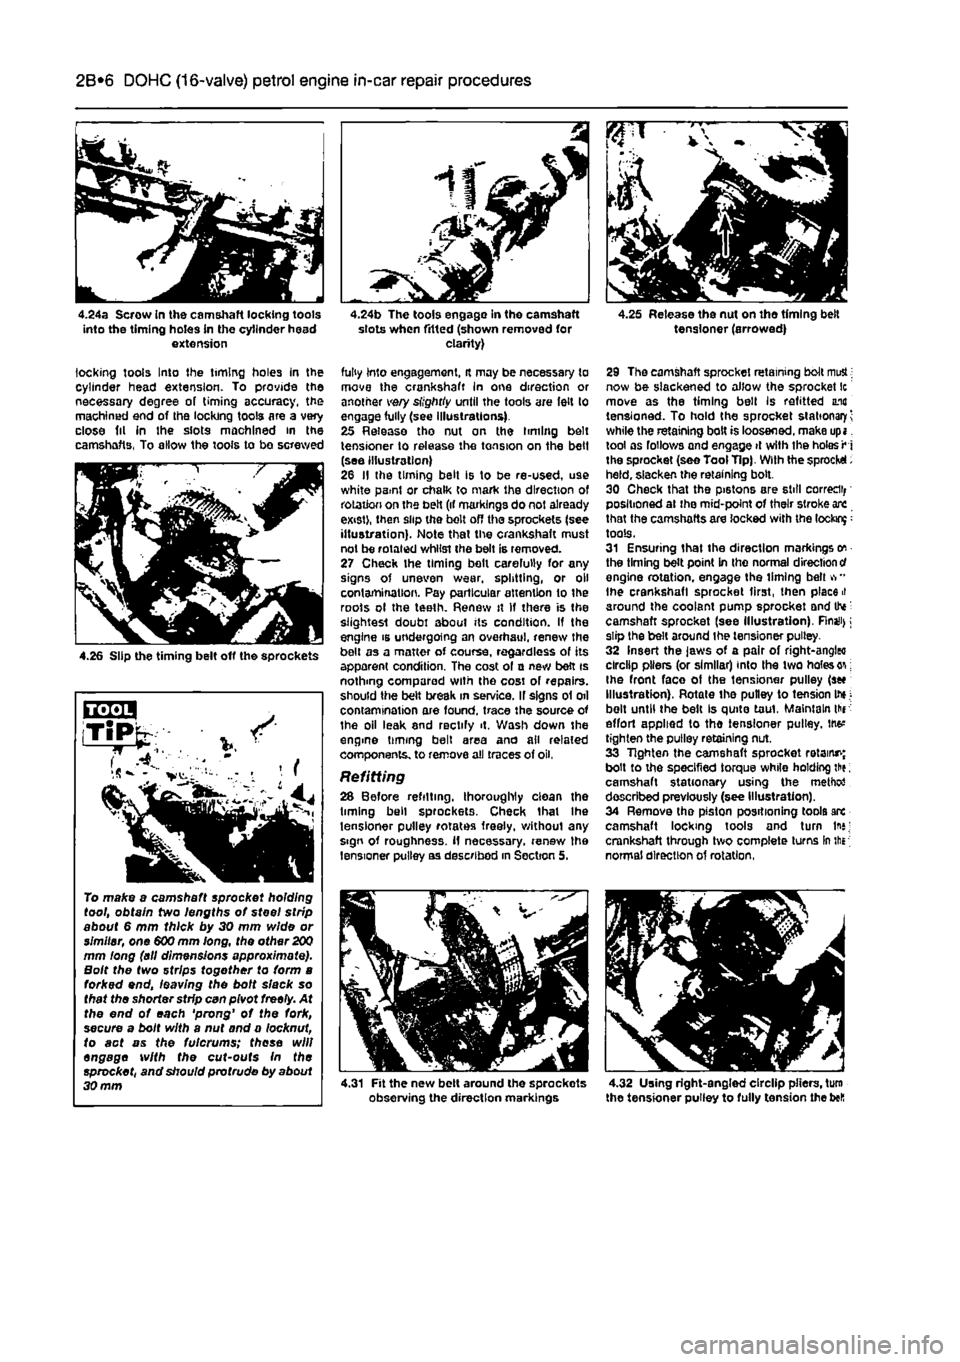
4.24a Scrow in the camshaft locking tools into the timing holes in the cylinder head extension
locking tools Into the timing holes in the cylinder head extension. To provide the necessary degree of timing accuracy, the machined end of the locking tools are a very close fit in the slots machined in the camshafts. To allow the tools to be screwed
4.26 Slip the timing belt off the sprockets
To make a camshaft sprocket holding tool, obtain two lengths of steel strip about 6 mm thick by 30 mm wide or simitar, one 600 mm long, the other
200
mm long (all dimensions approximate). Bolt the two strips together to form a forked end, leaving the bolt slack so that the shorter sfrfp can pivot freely. At the end of each 'prong' of the fork, secure a bolt with a nut and a locknut, to act as the fulcrums; these will engage with the cut-outs In the sprocket, and should profrude by about 30 mm
4.24b The tools engage in tho camshaft slots when fitted (shown removed for clarity)
fully into engagement, it may be necessary to move the crankshaft In one direction or another very slightiy until the tools are felt to engage fully (see illustrations). 25 Release tho nut on the timing belt tensioner to release the tension on the belt (see illustration) 26 II the timing belt is to be re-used, use white paml or chalk to mark the direction of rotation on the belt (if markings do not already exist), then slip the belt off the sprockets (see illustration). Note that the crankshaft must not be rotated whilst the belt is removed. 27 Check the timing belt carefully for any signs of uneven wear, splitting, or oil contamination. Pay particular attention to the roots ol the teeth. Renew it If there is the slightest doubt about its condition. If the engine is undergoing an overhaul, renew the belt as a matter of course, regardless of its apparent condition. The cost ol a new bett is nothing compared with the cosi of repairs, should the belt break in service. If signs of oil contamination are found, trace the source of the oil leak 8nd rectify it. Wash down the engme timing belt area and all related components, to remove all traces of oil,
Refitting 28 Before refilling, thoroughly clean the liming bell sprockets. Check that Ihe tensioner pulley rotates freely, without any sign of roughness. If necessary, renew Ihe tensioner pulley as described in Section 5,
4.31 Fit the new belt around the sprockots observing the direction markings
4.25 Release the nut on the timing belt tensioner (arrowed)
29 The camshaft sprocket retaining bolt mutt; now be slackened to allow the sprocket Ic move as the timing bell Is refitted una tensioned. To hold the sprocket stationary^ while the retaining bolt is loosened, make upi. tool os follows and engage
>t
with the holes ^ i the sprocket (see Tool Tip). With the sprocket. held, slacken the retaining bolt. 30 Check that the pi6tons are still correct positioned at ihe mid-point of their stroke are that the camshafts are locked with the lockup: tools. 31 Ensuring that the direction markings on the timing belt point in the normal direction
cf
engine rotation, engage the Umlng belt vr* Ihe crankshaft sprocket first, then placed around the coolant pump sprocket and tte: camshaft sprocket (see Illustration). Rnaii>; slip the belt around the tensioner pulley. 32 Insert the jaws of a pair of right-angleo clrclip pliers (or similar) into Ihe two holes on; Ihe front face of the tensioner pulley (sec Illustration). Rotate the pulley to tension Ihj; belt until the belt Is quite taut. Maintain thr effort applied to the tensioner pulley. JM* tighten the pulley retaining nut. 33 Tighten the camshaft sprocket retains; bolt to the specified torque while holding th?; camshaft stationary using the method described previously (see Illustration). 34 Remove the piston positioning tools arc camshaft locking tools and turn In*; crankshaft through two complete turns In the normal direction of rotation,
4.32 Using right-angled clrclip pliers, turn the tensioner pulley to fully tension the bell
Page 67 of 225
2B*7 DOHC (16-valve) petrol engine in-car repair procedures
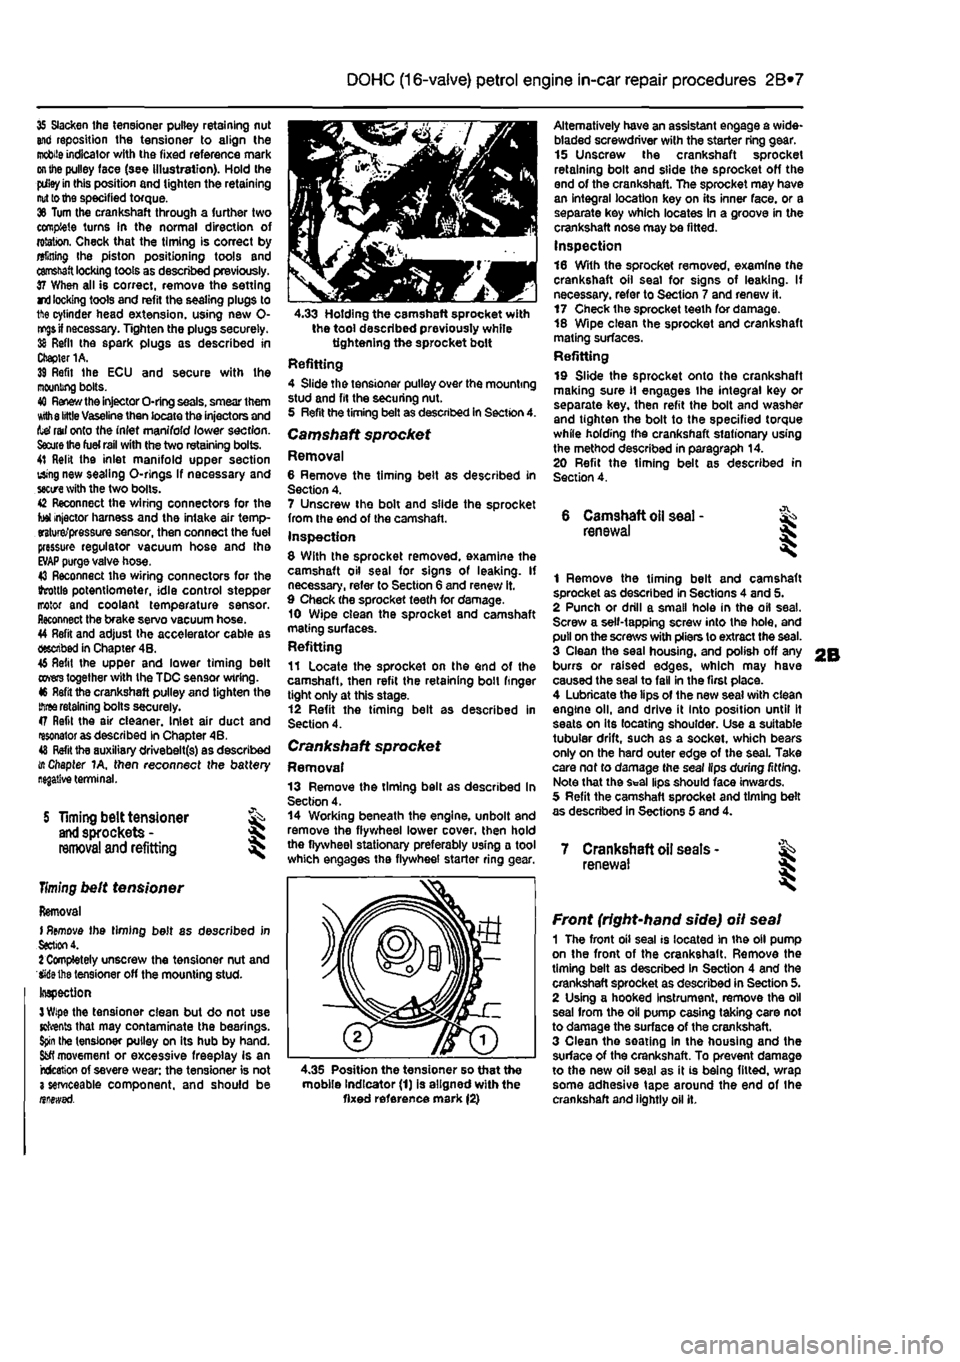
35 Slacken the tensioner pulley retaining nut and reposition the tensioner to align the
mobile
indicator with the fixed reference mark
on the
pulley face (see illustration). Hold the
pdley in
this position and tighten the retaining
nut to the
specified torque. 36 Turn the crankshaft through a further two complete turns In the normal direction of rotation. Check that the timing is correct by alining Ihe piston positioning tools and
camshaft
locking tools as described previously. 37 When all is correct, remove the setting rri
locking
tools and refit the sealing plugs to 1ft© cylinder head extension, using new 0-
nr^s if
necessary. Tighten the plugs securely. 38 Refit the spark plugs as described in Chapter 1A. 39 Refit Ihe ECU and secure with Ihe mooning bolts. 40
Renew the
injector O-ring seals, smear them Kith
8 little
Vaseline then locate the injectors and tef rail onto the inlet manifold lower section.
Saute Ihe fuel rail
with the two retaining bolts. 41 Relit the inlet manifold upper section using new sealing O-rlngs If necessary and
sectre
with the two bolts. 42 Reconnect the wiring connectors for the tot injector harness and the intake air temp-erature/pressure sensor, then connect the fuel pressure regulator vacuum hose and tha
EVAP
purge valve hose. 43 Reconnect the wiring connectors for the ihrottls potentiometer, idle control stepper motor and coolant temperature sensor. Reconnect the brake servo vacuum hose. 44 Refit and adjust the accelerator cable as described in Chapter 4B. 46 Refit the upper and lower timing belt
covers
together with the TDC sensor wiring. 46 Refit the crankshaft pulley and tighten the
three
retaining bolts securely. 47 Refit the air cleaner. Inlet air duct and resonator as described in Chapter 4B. 48
Refit
tha auxiliary drivebelt(s) as described i/t Chapter 1A, then reconnect the battery
S Timing belt tensioner
and
sprockets -
removal
and refitting
Timing
belt tensioner
Removal I
Remove
the timing belt as described in
Section
4. 1 Completely unscrew the tensioner nut and Wiethe tensioner off the mounting stud-Inspection
3 Wipe
the tensioner clean but do not use Kfrents that may contaminate the bearings.
Spin
the tensioner pulley on its hub by hand.
Sfcfl
movement or excessive freeplay is an rcfceticn of severe wear: the tensioner is not 3 serviceable component, and should be nnewsd.
4.33 Holding the camshaft sprocket with the tool described previously while tightening the sprocket bolt Refitting 4 Slide the tensioner pulley over the mounting stud and fit the securing nut. 5 Refit the timing belt as described in Section 4. Camshaft sprocket Removal 6 Remove the timing belt as described in Section 4. 7 Unscrew the bolt and slide the sprocket from the end of the camshaft. Inspection 8 With the sprocket removed, examine the camshaft oil seal for signs of leaking. If necessary, refer to Section 6 and renew it. 9 Check the sprocket teeth for damage. 10 Wipe clean the sprocket and camshaft mating surfaces. Refitting 11 Locate the sprocket on the end of the camshaft, then refit the retaining boll finger tight only at this stage. 12 Refit the timing belt as described in Section 4.
Crankshaft sprocket Removal 13 Remove the timing bell as described In Section 4. 14 Working beneath the engine, unbolt and remove the flywheel lower cover, then hold the flywheel stationary preferably using a tool which engages the flywheel starter ring
<
Alternatively have an assistant engage a wide-bladed screwdriver with the starter ring gear. 15 Unscrew the crankshaft sprocket retaining bolt and slide the sprocket off the end of the crankshaft. The sprocket may have an integral location key on its inner face, or a separate key which locates In a groove in the crankshaft nose may be fitted. Inspection 16 With the sprocket removed, examine the crankshaft oil seal for signs of leaking. If necessary, refer to Section 7 and renew it. 17 Check the sprocket teeth for damage. 18 Wipe clean the sprocket and crankshaft mating surfaces. Refitting 19 Slide the sprocket onto the crankshaft making sure
11
engages the integral key or separate key, then refit the bolt and washer and tighten the bolt to the specified torque while holding the crankshaft stationary using the method described in paragraph 14. 20 Refit the timing belt as described in Section 4.
6 Camshaft
oil
seal -renewal
1 Remove the timing belt and camshaft sprocket as described in Sections 4 and 5. 2 Punch or drill a small hole in the oil seal. Screw a self-tapping screw into the hole, and pull on the screws with pliers to extract the seal. 3 Clean the seal housing, and polish off any burrs or raised edges, which may have caused the seal to fall in the first place. 4 Lubricate the lips of the new seal with clean engine oil, and drive it into position until It seats on its locating shoulder. Use a suitable tubular drift, such as a socket, which bears only on the hard outer edge of the seal. Take care nof to damage the seal lips during fitting. Note that the Seal lips should face inwards. 5 Refit the camshaft sprocket and timing belt as described in Sections 5 and 4.
7 Crankshaft oil seats -renewal I
4.35 Position the tensioner so that the mobile Indicator (1) is aligned with the fixed reference mark (2)
Front (right-hand side) oil seal 1 The front oil seal is located in the oil pump on the front of the crankshaft. Remove the timing belt as described in Section 4 and the crankshaft sprocket as described in Section 5. 2 Using a hooked Instrument, remove the oil seal from the oil pump casing taking care not to damage the surface of the crankshaft. 3 Clean the seating in the housing and the surface of the crankshaft. To prevent damage to the new oil seal as it is being fitted, wrap some adhesive tape around the end of the crankshaft and lightly oil it.