Multi function display FIAT PUNTO EVO 2010 1.G Owners Manual
[x] Cancel search | Manufacturer: FIAT, Model Year: 2010, Model line: PUNTO EVO, Model: FIAT PUNTO EVO 2010 1.GPages: 270, PDF Size: 8.34 MB
Page 4 of 270
KNOWING YOUR VEHICLE
DASHBOARD
The presence and position of the controls, the instruments and the indicators may vary according to the versions.
F0U0001mfig. 1
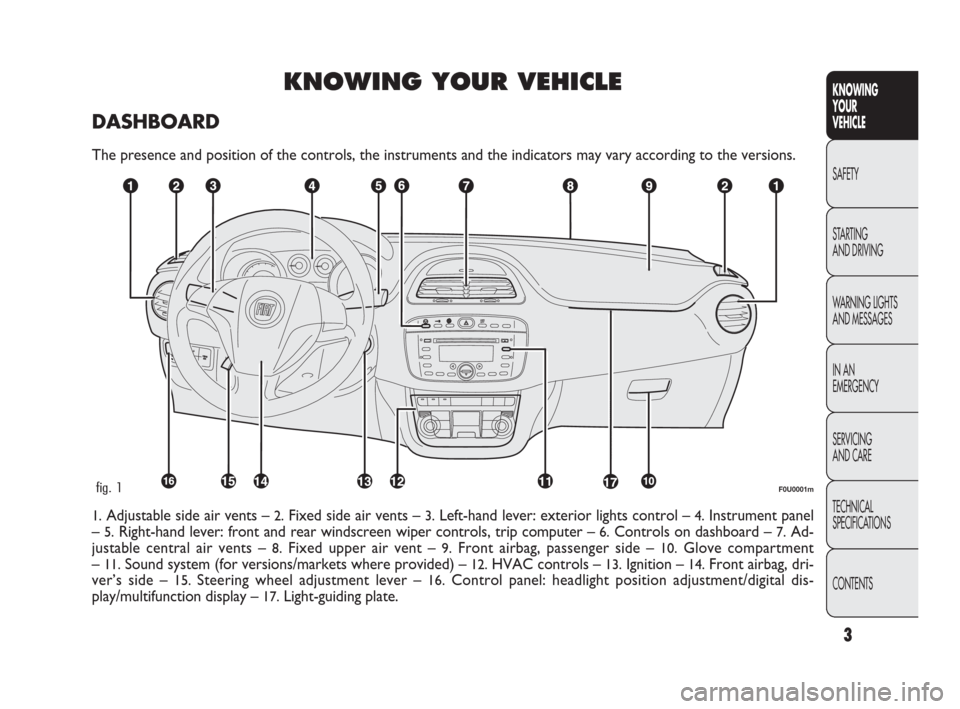
1.Adjustable side air vents – 2.Fixed side air vents – 3.Left-hand lever: exterior lights control – 4.Instrument panel
–
5.Right-hand lever: front and rear windscreen wiper controls, trip computer – 6.Controls on dashboard – 7.Ad-
justable central air vents –
8.Fixed upper air vent – 9.Front airbag, passenger side – 10.Glove compartment
–
11.Sound system (for versions/markets where provided) – 12.HVAC controls – 13.Ignition – 14.Front airbag, dri-
ver’s side –
15. Steering wheel adjustment lever – 16.Control panel: headlight position adjustment/digital dis-
play/multifunction display –
17.Light-guiding plate.CONTENTS TECHNICAL
SPECIFICATIONS SERVICING
AND CARE IN AN
EMERGENCY WARNING LIGHTS
AND MESSAGES STARTING
AND DRIVING SAFETY
KNOWING
YOUR
VEHICLE
3
001-036 PUNTO FL EN 4ed 18-01-2010 12:21 Pagina 3
Page 14 of 270
INSTRUMENT PANEL
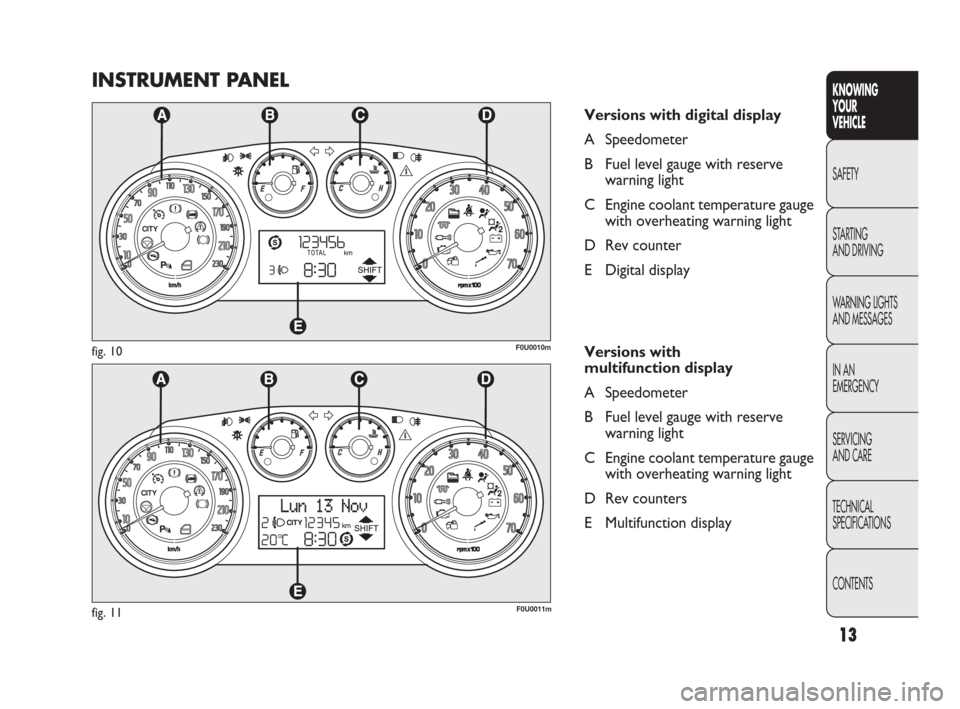
Versions with digital display
A Speedometer
B Fuel level gauge with reserve
warning light
C Engine coolant temperature gauge
with overheating warning light
D Rev counter
E Digital display
Versions with
multifunction display
A Speedometer
B Fuel level gauge with reserve
warning light
C Engine coolant temperature gauge
with overheating warning light
D Rev counters
E Multifunction display
F0U0010mfig. 10
F0U0011mfig. 11
CONTENTS TECHNICAL
SPECIFICATIONS SERVICING
AND CARE IN AN
EMERGENCY WARNING LIGHTS
AND MESSAGES STARTING
AND DRIVING SAFETY
KNOWING
YOUR
VEHICLE
13
001-036 PUNTO FL EN 4ed 18-01-2010 12:21 Pagina 13
Page 15 of 270
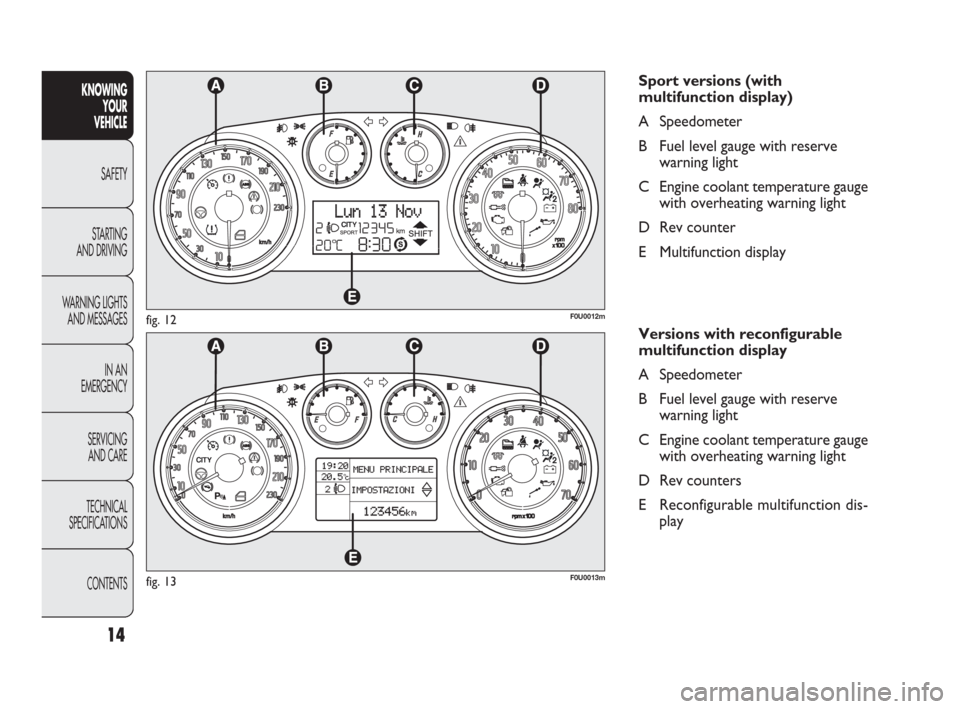
Sport versions (with
multifunction display)
A Speedometer
B Fuel level gauge with reserve
warning light
C Engine coolant temperature gauge
with overheating warning light
D Rev counter
E Multifunction display
Versions with reconfigurable
multifunction display
A Speedometer
B Fuel level gauge with reserve
warning light
C Engine coolant temperature gauge
with overheating warning light
D Rev counters
E Reconfigurable multifunction dis-
play
F0U0012mfig. 12
F0U0013mfig. 13CONTENTS TECHNICAL
SPECIFICATIONSSERVICING
AND CAREIN AN
EMERGENCY WARNING LIGHTS
AND MESSAGESSTARTING
AND DRIVINGSAFETY
KNOWING
YOUR
VEHICLE
14
001-036 PUNTO FL EN 4ed 18-01-2010 12:21 Pagina 14
Page 24 of 270
MULTIFUNCTION DISPLAY
(for versions/markets where provided)
The car can be equipped with the multifunction display
that, depending on previous settings, shows useful infor-
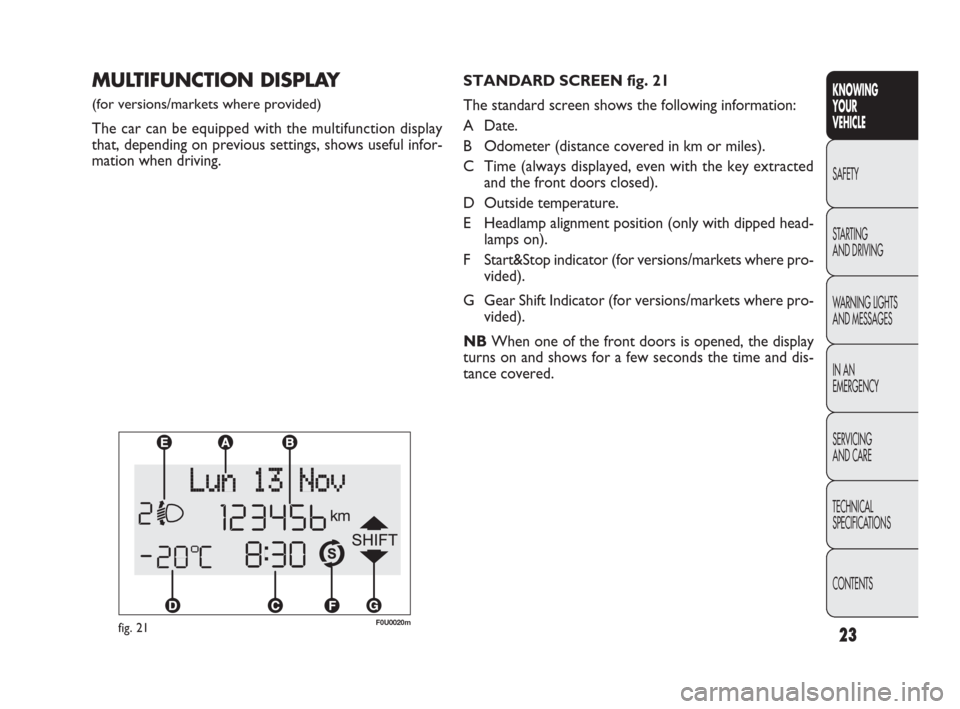
mation when driving.STANDARD SCREEN fig. 21
The standard screen shows the following information:
A Date.
B Odometer (distance covered in km or miles).
C Time (always displayed, even with the key extracted
and the front doors closed).
D Outside temperature.
E Headlamp alignment position (only with dipped head-
lamps on).
F Start&Stop indicator (for versions/markets where pro-
vided).
G Gear Shift Indicator (for versions/markets where pro-
vided).
NBWhen one of the front doors is opened, the display
turns on and shows for a few seconds the time and dis-
tance covered.
fig. 21F0U0020m
CONTENTS TECHNICAL
SPECIFICATIONS SERVICING
AND CARE IN AN
EMERGENCY WARNING LIGHTS
AND MESSAGES STARTING
AND DRIVING SAFETY
KNOWING
YOUR
VEHICLE
23
001-036 PUNTO FL EN 4ed 18-01-2010 12:21 Pagina 23
Page 25 of 270
24
KNOWING
YOUR
VEHICLE
SAFETY
STARTING
AND DRIVING
WARNING LIGHTS
AND MESSAGES
IN AN
EMERGENCY
SERVICING
AND CARE
TECHNICAL
SPECIFICATIONS
CONTENTS
fig. 24F0U2050g
RECONFIGURABLE
MULTIFUNCTION DISPLAY
(for versions/markets where provided)
The car may be equipped with a reconfigurable multi-
function display that, according to previous settings, will
show useful driving information.
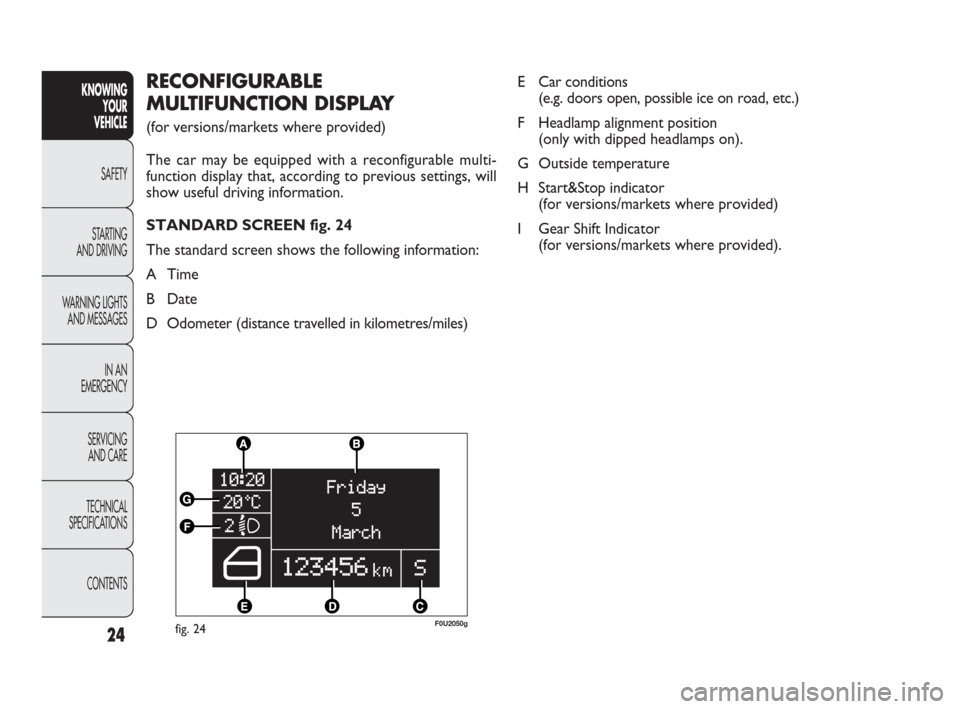
STANDARD SCREEN fig. 24
The standard screen shows the following information:
A Time
B Date
D Odometer (distance travelled in kilometres/miles)E Car conditions
(e.g. doors open, possible ice on road, etc.)
F Headlamp alignment position
(only with dipped headlamps on).
G Outside temperature
H Start&Stop indicator
(for versions/markets where provided)
I Gear Shift Indicator
(for versions/markets where provided).
001-036 PUNTO FL EN 4ed 18-01-2010 12:21 Pagina 24
Page 26 of 270
25
KNOWING
YOUR
VEHICLE
SAFETY
STARTING
AND DRIVING
WARNING LIGHTS
AND MESSAGES
IN AN
EMERGENCY
SERVICING
AND CARE
TECHNICAL
SPECIFICATIONS
CONTENTS
CONTROL BUTTONS MULTIFUNCTION
DISPLAY/RECONFIGURABLE
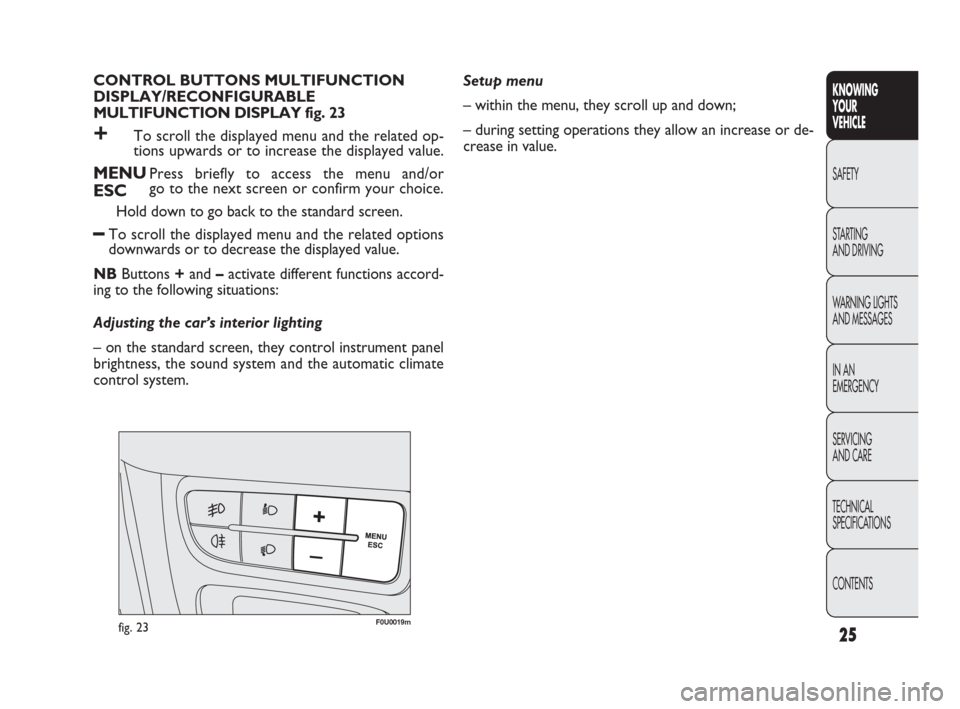
MULTIFUNCTION DISPLAY fig. 23
+To scroll the displayed menu and the related op-
tions upwards or to increase the displayed value.
MENUPress briefly to access the menu and/or
ESCgo to the next screen or confirm your choice.
Hold down to go back to the standard screen.
–To scroll the displayed menu and the related options
downwards or to decrease the displayed value.
NBButtons +and –activate different functions accord-
ing to the following situations:
Adjusting the car’s interior lighting
– on the standard screen, they control instrument panel
brightness, the sound system and the automatic climate
control system.Setup menu
– within the menu, they scroll up and down;
– during setting operations they allow an increase or de-
crease in value.
F0U0019mfig. 23
001-036 PUNTO FL EN 4ed 18-01-2010 12:21 Pagina 25
Page 27 of 270
CONTENTS TECHNICAL
SPECIFICATIONSSERVICING
AND CAREIN AN
EMERGENCY WARNING LIGHTS
AND MESSAGESSTARTING
AND DRIVINGSAFETY
KNOWING
YOUR
VEHICLE
26
SETUP MENU
(multifunction display/
reconfigurable multifunction display)
The menu comprises a series of functions arranged in a
circle which can be selected through the +and –buttons
to access the different operations and settings described
in the following paragraphs. A submenu is provided for
some items (clock and unit setting).
The setup menu can be activated by pressing the MENU
ESC button briefly.
Press buttons +and – to scroll the setup menu options.
Management modes differ from each other according to
the option selected.
Selecting an option from the main menu without a submenu
– Briefly press MENU ESC to select the main menu option
you wish to set;
– Press +or –(with single presses) to select the new set-
ting;
– briefly press the MENU ESC button to store the new
setting and to go back to the main menu option selected
previously.Selecting an option from the main menu with a submenu:
– Briefly press the MENU ESC button to display the first
submenu option;
– Press +or –(with single presses) to scroll all the sub-
menu options;
– Briefly press the MENU ESC button to select the dis-
played submenu option and to open the relevant setup
menu;
– Press +or –(with single presses) to select the new set-
ting for this submenu option;
– Briefly press the MENU ESC button to store the new
setting and go back to the previous menu option.
Selecting “Date” and “Set time”:
– Briefly press MENU ESC to select the first value to
change (e.g. hours/minutes or year/month/day);
– Press +or –(with single presses) to select the new set-
ting;
– Briefly press MENU ESC to store the new setting and
go to the next setup menu option; if this is the last one
you will go back to the previous menu option.
001-036 PUNTO FL EN 4ed 18-01-2010 12:21 Pagina 26
Page 29 of 270
CONTENTS TECHNICAL
SPECIFICATIONSSERVICING
AND CAREIN AN
EMERGENCY WARNING LIGHTS
AND MESSAGESSTARTING
AND DRIVINGSAFETY
KNOWING
YOUR
VEHICLE
28
DISPLAY FUNCTIONS
(see multifunction display
or reconfigurable multifunction
display)
SPEED BEEP
(Setting the speed limit)
This function is used to set the car speed limit (km/h or
mph); the driver is immediately alerted when this limit is
exceeded (see section “Warning lights and messages”).
To set the desired speed limit, proceed as follows:
– briefly press the MENU ESC button: the display will show
the words (Speed Beep);
– press +or –to select speed limit activation (On) or
deactivation (Off);
– when the function has been activated (On) by pressing
buttons +or –, select the speed limit and press MENU
ESC to confirm selection.NB You can select a speed between 30 and 200 km/h, or
20 and 125 mph depending on the selected unit, see “Set-
ting measurement unit (Unit)”. The setting will in-
crease/decrease by five units each time +/ –is pressed.
Hold down +/–to increase/decrease the setting rapidly.
Complete the setting with single presses of the button
when you approach the required setting.
– briefly press the MENU ESC button to go back to the
menu screen or hold the button down to go back to the
standard screen without saving.
To cancel the setting, proceed as follows:
– press the MENU ESC button briefly to make the dis-
play flash (On);
– press –: (Off) will flash on the display;
– briefly press the MENU ESC button to go back to the
menu screen or hold the button down to go back to the
standard screen without saving.
001-036 PUNTO FL EN 4ed 18-01-2010 12:21 Pagina 28
Page 38 of 270
37
Values displayed
Outside temperature
Indicates the temperature outside the vehicle passenger
compartment.
Range
This indicates the approximate distance that may be trav-
elled with the fuel remaining in the tank, assuming that dri-
ving conditions do not change. The display will show the
reading “----” when the following events take place:
– value lower than 50 km (or 30 mi)
– car left parked with engine running for a long time.
Distance travelled
This value shows the distance covered from the start of
the new journey.
Average consumption
This value shows the approximate average fuel consump-
tion from the start of the new journey.
Current consumption
Indicates the fuel consumption. The value is constantly up-
dated. The message “----” will appear on the display if the
car is parked with the engine running.
Average speed
This value shows the car’s average speed based on the
overall time elapsed since the start of the new journey.TRIP COMPUTER
Introduction
The Trip computer is used to display information on car
operation when the key is turned to MAR. This function
allows you to define two separate trips, called “Trip A”
and “Trip B”, for monitoring the car’s “complete mission”
(journey) in a reciprocally independent manner.
Both functions can be reset (reset – start of a new jour-
ney).
“Trip A” is used to display the figures relating to:
– Outside temperature
– Range
– Distance travelled
– Average consumption
– Current consumption
– Average speed
– Journey time (driving time).
“Trip B”, available on multifunction display only, is used to
display the figures relating to:
– Distance travelled B
– Average consumption B
– Average speed B
– Travel time B (driving time).
NB“Trip B” functions may be excluded (see “Trip B on”).
“Range” and “Instant consumption” parameters cannot be
reset.
KNOWING
YOUR
VEHICLE
SAFETY
STARTING
AND DRIVING
WARNING LIGHTS
AND MESSAGES
IN AN
EMERGENCY
SERVICING
AND CARE
TECHNICAL
SPECIFICATIONS
CONTENTS
037-081 PUNTO FL EN 4ed 18-01-2010 12:23 Pagina 37
Page 62 of 270
F0U0042mfig. 49
The daytime running lights are an alterna-
tive to the dipped beam headlights for dri-
ving during the daytime in countries where it is com-
pulsory to have lights on during the day, and they
are also permitted in those countries where this not
obligatory. Daytime running lights cannot replace
dipped headlights when driving at night or through
tunnels. The use of daytime running lights is gov-
erned by the highway code of the country in which
you are driving. Keep to the rules.
WARNING
EXTERIOR LIGHTS
The left-hand stalk operates most of the external lights.
The ignition key has to be in the MAR position for the
exterior lights to come on. The instrument panel and the
various controls on the dashboard will be lit up when the
exterior lights are switched on.
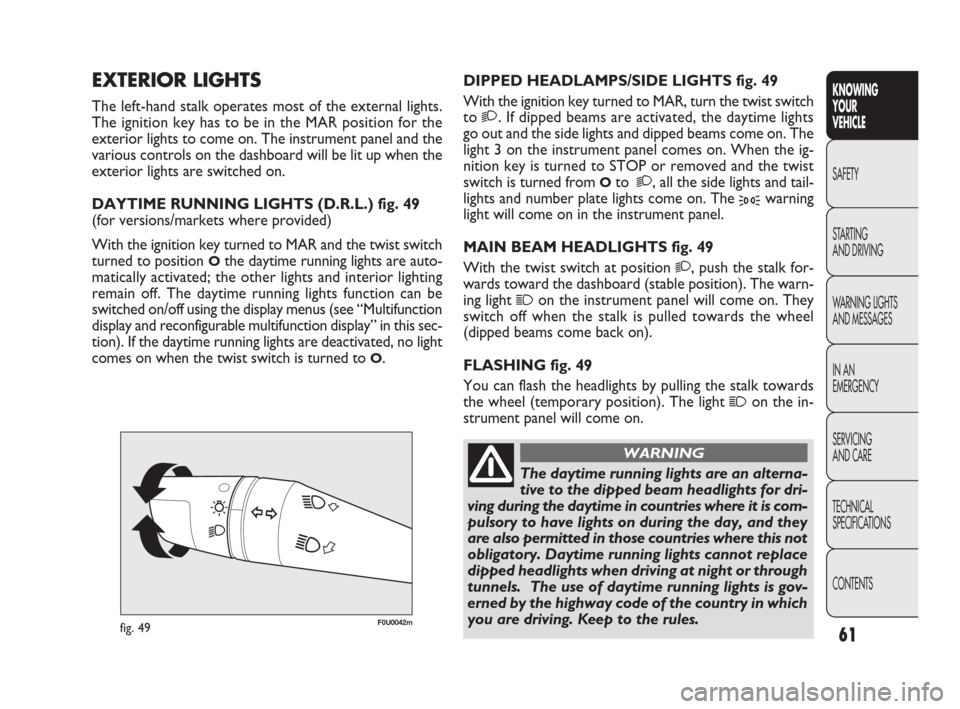
DAYTIME RUNNING LIGHTS (D.R.L.) fig. 49
(for versions/markets where provided)
With the ignition key turned to MAR and the twist switch
turned to position
Othe daytime running lights are auto-
matically activated; the other lights and interior lighting
remain off. The daytime running lights function can be
switched on/off using the display menus (see “Multifunction
display and reconfigurable multifunction display” in this sec-
tion). If the daytime running lights are deactivated, no light
comes on when the twist switch is turned to
O.DIPPED HEADLAMPS/SIDE LIGHTS fig. 49
With the ignition key turned to MAR, turn the twist switch
to
2. If dipped beams are activated, the daytime lights
go out and the side lights and dipped beams come on. The
light 3 on the instrument panel comes on. When the ig-
nition key is turned to STOP or removed and the twist
switch is turned from
Oto 2, all the side lights and tail-
lights and number plate lights come on. The
3warning
light will come on in the instrument panel.
MAIN BEAM HEADLIGHTS fig. 49
With the twist switch at position
2, push the stalk for-
wards toward the dashboard (stable position). The warn-
ing light
1on the instrument panel will come on. They
switch off when the stalk is pulled towards the wheel
(dipped beams come back on).
FLASHING fig. 49
You can flash the headlights by pulling the stalk towards
the wheel (temporary position). The light
1on the in-
strument panel will come on.
61
KNOWING
YOUR
VEHICLE
SAFETY
STARTING
AND DRIVING
WARNING LIGHTS
AND MESSAGES
IN AN
EMERGENCY
SERVICING
AND CARE
TECHNICAL
SPECIFICATIONS
CONTENTS
037-081 PUNTO FL EN 4ed 18-01-2010 12:23 Pagina 61