brake light FIAT QUBO 2010 1.G User Guide
[x] Cancel search | Manufacturer: FIAT, Model Year: 2010, Model line: QUBO, Model: FIAT QUBO 2010 1.GPages: 230, PDF Size: 4.38 MB
Page 130 of 230

BRAKE PAD WEAR (amber)
The warning light goes on if the front brake pads are
worn. In this case replace them as soon as possible.
A specific message is displayed on certain versions.
PARKING SENSOR FAULT (yellow)
(for versions/markets, where provided)
The warning light turns on when a parking sensor
fault is detected.
On certain versions warning light
comes on
instead.
In this case, contact a Fiat Dealership.
A specific message is displayed on certain versions.
SIDE/TAIL LIGHTS (green) -
FOLLOW ME HOME (green)
Side lights/tail lights
The warning light comes on when the side/taillights
are turned on.Follow Me Home
The warning light will turn on when this device is
active (see “Follow me home” in the “Know your
vehicle” section).
The display will show a dedicated message.
FRONT FOG LIGHTS (green)
The warning light turns on when the front fog lights
are turned on.
REAR FOG LIGHTS (amber)
The warning light comes on when the rear fog lights
are turned on.
129
KNOW YOUR
VEHICLE
SAFETY
STARTING AND
DRIVING
WARNING LIGHTS
AND
MESSAGES
IN AN EMERGENCY
SERVICING
AND
MAINTENANCE
TECHNICAL
SPECIFICATIONS
INDEX
Page 133 of 230
WARNING
This procedure must be performed by
e
xperts because incorrect actions may
cause considerable electrical discharge.
Furthermore, battery fluid is poisonous and
corrosive: avoid contact with skin and eyes.
Keep naked flames and lit cigarettes away from
the battery. Do not create sparks.
BUMP STARTING
Never bump start the engine by pushing, towing or
driving downhill. This could cause fuel to flow into
the catalytic converter and damage it beyond repair.
IMPORTANT Remember that the brake booster
and the power steering system are not active until
the engine is started, so you will need to apply much
more force to the brake pedal or steering wheel.
CHANGING A TYRE
The vehicle is originally equipped with the Fix&Go
automatic quick tyre repair kit (see instructions
in the next chapter). As an alternative, the vehicle
may have a normal-sized spare wheel.
Changing the wheel and correct use of the jack and
spare wheel require some precautions, which are
listed below.
WARNING
The spare wheel (for versions/markets,
w
here provided) is specific for your
vehicle.Therefore, it must not be used on other
models. Do not use spare wheels of other
models on your vehicle.The spare wheel must
be used only in an emergency. Use of the spare
wheel must kept to the minimum necessary.
132
KNOW YOUR
VEHICLE
SAFETY
STARTING AND
DRIVING
WARNING LIGHTS
AND MESSAGES
IN AN
EMERGENCY
SERVICING AND
MAINTENANCE
TECHNICAL
SPECIFICA
TIONS
INDEX
Page 134 of 230
WARNING
Use your hazard lights, warning triangle,
et
c . to show that your vehicle is
stationary according to the regulations in force.
Passengers should get out of the vehicle,
particularly if it is heavily loaded, and wait for
the wheel to be changed away from the traffic .
If you are on a slope or uneven surface, place
wedges or other suitable objects under the
wheels to secure the vehicle. Have the standard
wheel repaired and refitted as soon as possible.
Do not apply grease to the bolt threads before
fitting: they could unscrew themselves.
WARNING
Use the jack only to replace wheels on
t
he vehicle with which it is supplied
or on other vehicles of the same model. Never
use the jack for other purposes, such as lifting
other models. Never use the jack to carry out
repairs under the vehicle. Incorrect positioning
of the jack may cause the raised vehicle to
fall. Do not use the jack for loads higher than
the one shown on its label.
WARNING
Incorrect hub cap assembly may cause it
to
come off when the car is moving.
Never tamper with the inflation valve. Never
introduce tools of any kind between rim and
tyre. Check tyre and spare wheel pressures
regularly, complying with the values given in the
"Technical specifications" chapter.
Important notes:
❒the jack weighs 1.76 kg;
❒the jack requires no adjustment;
❒the jack cannot be repaired; if it breaks, it must be
replaced with a new one of the same type;
❒no tool other than the cranking handle may be
fitted on the jack.
To change a wheel proceed as follows:
❒stop the vehicle in a position where it is not a
danger for other traffic and where you can replace
the wheel safely. The ground should be flat and
solid;
❒stop the engine off and pull up the handbrake;
❒engage first gear or reverse;
❒wear the reflective safety jacket (compulsory by
law) before getting out of the vehicle;
133
KNOW YOUR
VEHICLE
SAFETY
STARTING AND
DRIVING
WARNING LIGHTS
AND MESSAGES
IN AN
EMERGENCY
SERVICING AND
MAINTENANCE
TECHNICAL
SPECIFICA
TIONS
INDEX
Page 141 of 230

INFLATION PROCEDURE
WARNING
Put on the safety gloves provided
to
gether with the quick tyre repair kit .
❒Apply the handbrake. Unscrew the tyre valve cap,
take out the flexible filler pipe A fig. 128 and
tighten the ring nut B on the tyre valve;
❒make sure that switch E fig. 130 of the compressor
is at 0 (off ), start the engine, insert plug D fig. 129
in the cigar lighter socket and turn the compressor
on by setting switch E fig. 130 to I (on). Inflate
the tyre to the pressure specified in the "Cold tyre
pressures" paragraph in the "Technical
specifications" section. For a more accurate
reading, check pressure gauge F fig. 130 with the
compressor off;❒if after 5 minutes it is still impossible to reach at
least 1.5 bar, disengage compressor from valve
and unplug it from the socket, then move the car
forth for approx. ten metres in order to distribute
the sealing fluid inside the tyre evenly, then repeat
the inflation operation;
fig. 128F0T0190
fig. 129F0T0133
fig. 130F0T0131
140
KNOW YOUR
VEHICLE
SAFETY
STARTING AND
DRIVING
WARNING LIGHTS
AND MESSAGES
IN AN
EMERGENCY
SERVICING AND
MAINTENANCE
TECHNICAL
SPECIFICA
TIONS
INDEX
Page 142 of 230

❒if after this operation it is still impossible after 5
minutes to reach at least 1.8 bar, do not start
driving since the tyre is excessively damaged and
the quick tyre repair kit cannot guarantee suitable
sealing, contact Fiat Dealership;
❒if you do reach the tyre pressure specified in the
“Cold tyre pressures” paragraph of the “Technical
specifications” section, continue your journey
immediately;
WARNING
Apply the adhesive label where it can be
easily
seen by the driver as a reminder
that the tyre has been treated with the quick
repair kit . Drive carefully, particularly on bends.
Do not exceed 80 km/h. Do not accelerate or
brake suddenly.
❒after having driven for about 10 minutes, stop and
recheck the tyre pressure; remember to apply the
handbrake;
WARNING
If the pressure has fallen below 1.8 bar,
do
not drive any further: the Fix&Go
automatic quick tyre repair kit cannot
guarantee proper hold because the tyre is too
damaged. Contact a Fiat Dealership.❒if, on the other hand, the pressure is at least 1.8
bar, restore the correct pressure (with the engine
running and the handbrake applied) and resume
driving;
❒drive with the utmost care to the nearest Fiat
Dealership.
WARNING
Remember to inform the workshop that
t
he tyre has been treated with a quick
repair kit . Give the instruction booklet to the
personnel charged with handling the treated
tyre.
141
KNOW YOUR
VEHICLE
SAFETY
STARTING AND
DRIVING
WARNING LIGHTS
AND MESSAGES
IN AN
EMERGENCY
SERVICING AND
MAINTENANCE
TECHNICAL
SPECIFICA
TIONS
INDEX
Page 146 of 230

Bulbs
Bulbs Type Power Ref. fig. 133
Main beam headlights H1 60W E
Dipped beams headlights H1 55W D
Front side lights W5W 5W A
Front direction indicators PY21W 2IW B
Side direction indicators WY5W 5W A
Rear direction indicators PY2IW 21W B
Taillights/rear fog lights P4/21W 4W/21W B
Brake light P21W 21W B
3rd brake light W5W 5W A
Reverse light P21W 21W B
Front fog lights (for versions/markets where
provided)H1 55W E
Front ceiling light with movable lens C 10W C
Front ceiling light with spot lights (for
versions/markets, where provided)C 10W C
Rear ceiling light (for versions/markets,
where provided)C 10W C
Boot light (for versions/markets, where pro-
vided)W5W 5W A
145
KNOW YOUR
VEHICLE
SAFETY
STARTING AND
DRIVING
WARNING LIGHTS
AND MESSAGES
IN AN
EMERGENCY
SERVICING AND
MAINTENANCE
TECHNICAL
SPECIFICA
TIONS
INDEX
Page 149 of 230
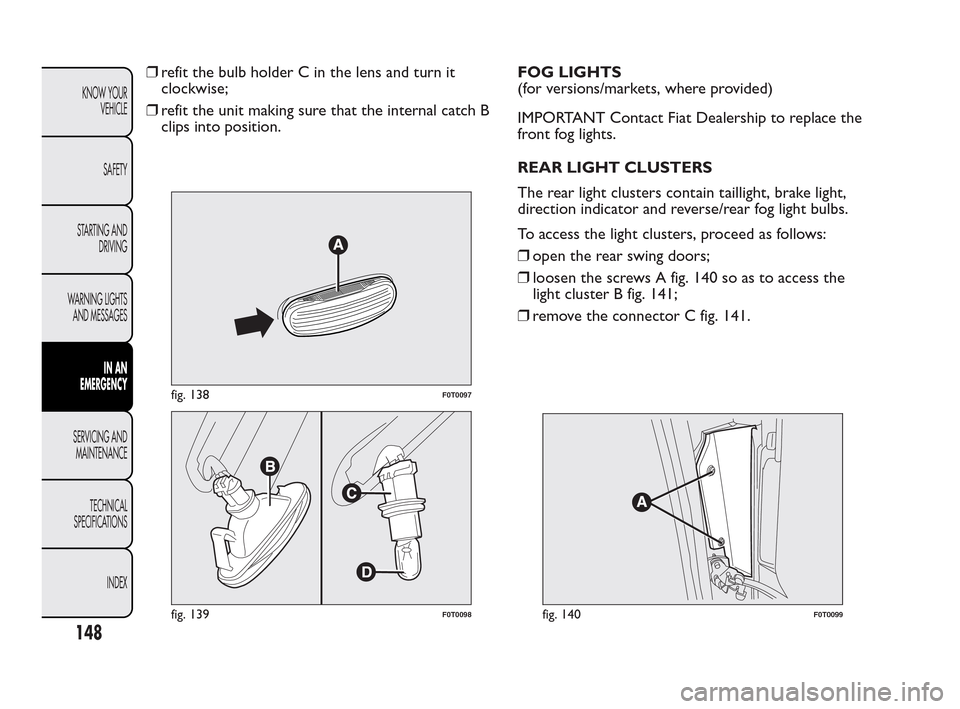
❒refit the bulb holder C in the lens and turn it
clockwise;
❒refit the unit making sure that the internal catch B
clips into position.FOG LIGHTS
(for versions/markets, where provided)
IMPORTANT Contact Fiat Dealership to replace the
front fog lights.
REAR LIGHT CLUSTERS
The rear light clusters contain taillight, brake light,
direction indicator and reverse/rear fog light bulbs.
To access the light clusters, proceed as follows:
❒open the rear swing doors;
❒loosen the screws A fig. 140 so as to access the
light cluster B fig. 141;
❒remove the connector C fig. 141.
fig. 138F0T0097
fig. 139F0T0098fig. 140F0T0099
148
KNOW YOUR
VEHICLE
SAFETY
STARTING AND
DRIVING
WARNING LIGHTS
AND MESSAGES
IN AN
EMERGENCY
SERVICING AND
MAINTENANCE
TECHNICAL
SPECIFICA
TIONS
INDEX
Page 150 of 230
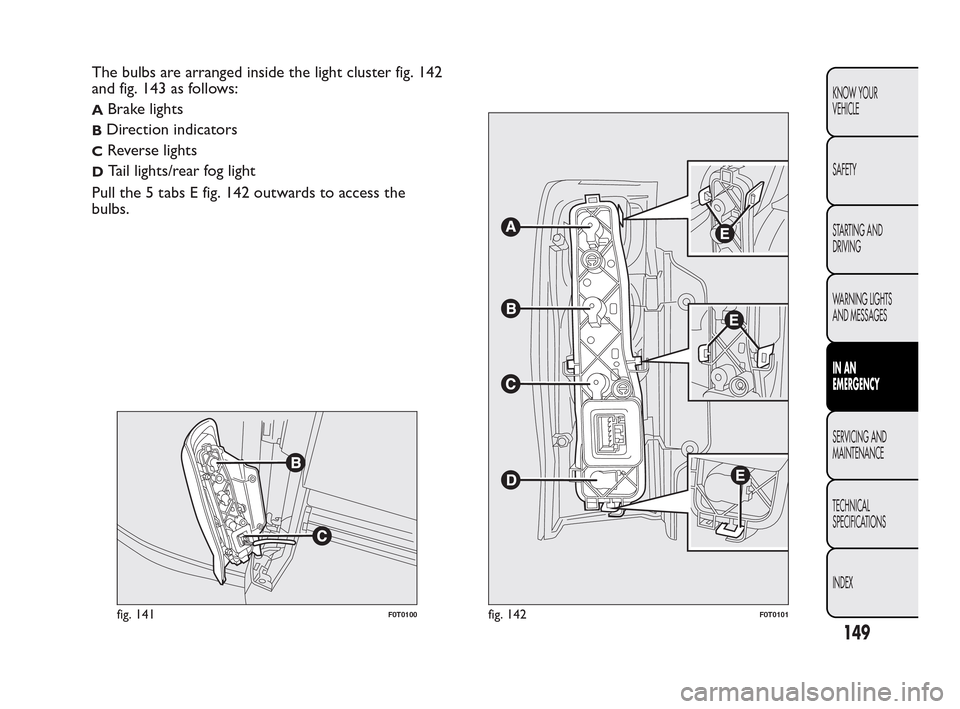
The bulbs are arranged inside the light cluster fig. 142
and fig. 143 as follows:
ABrake lights
BDirection indicators
CReverse lights
DTail lights/rear fog light
Pull the 5 tabs E fig. 142 outwards to access the
bulbs.
fig. 141F0T0100fig. 142F0T0101
149
KNOW YOUR
VEHICLE
SAFETY
STARTING AND
DRIVING
WARNING LIGHTS
AND MESSAGES
IN AN
EMERGENCY
SERVICING AND
MAINTENANCE
TECHNICAL
SPECIFICA
TIONS
INDEX
Page 151 of 230
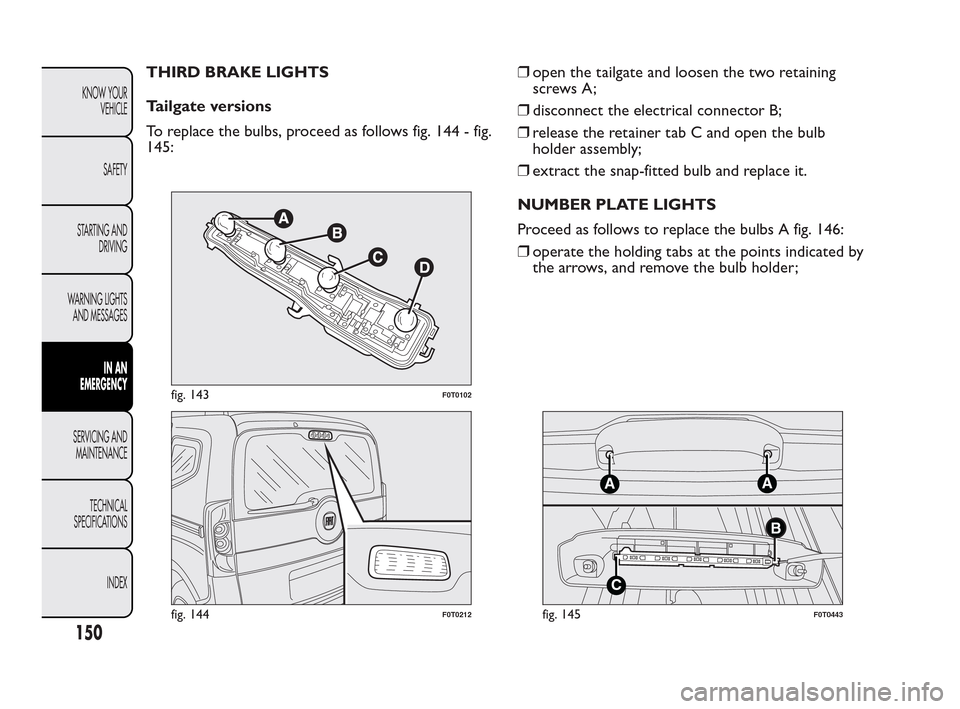
THIRD BRAKE LIGHTS
Tailgate versions
To replace the bulbs, proceed as follows fig. 144 - fig.
145:❒open the tailgate and loosen the two retaining
screws A;
❒disconnect the electrical connector B;
❒release the retainer tab C and open the bulb
holder assembly;
❒extract the snap-fitted bulb and replace it.
NUMBER PLATE LIGHTS
Proceed as follows to replace the bulbs A fig. 146:
❒operate the holding tabs at the points indicated by
the arrows, and remove the bulb holder;
fig. 143F0T0102
fig. 144F0T0212
A
C
A
B
fig. 145F0T0443
150
KNOW YOUR
VEHICLE
SAFETY
STARTING AND
DRIVING
WARNING LIGHTS
AND MESSAGES
IN AN
EMERGENCY
SERVICING AND
MAINTENANCE
TECHNICAL
SPECIFICA
TIONS
INDEX
Page 156 of 230
WARNING
If a fuse blows again, contact a Fiat
Dealer
ship.
Never replace a blown fuse with metallic
wires or other material.
WARNING
Never replace a fuse with another
h
aving higher amperage; FIRE HAZARD.
WARNING
If a general protection fuse (MEGA-
FUSE
, MIDI-FUSE) is activated, contact
a Fiat Dealership.
WARNING
Remove the key from the ignition and
s
witch off or disable all devices before
replacing a fuse.
WARNING
Contact Fiat Dealership if a safety
sys
tem (air bags, brakes), engine system
(engine, gearbox) or steering system general
protection fuse blows.
To identify the protective fuse, see the tables on the
following pages.
155
KNOW YOUR
VEHICLE
SAFETY
STARTING AND
DRIVING
WARNING LIGHTS
AND MESSAGES
IN AN
EMERGENCY
SERVICING AND
MAINTENANCE
TECHNICAL
SPECIFICA
TIONS
INDEX