display FIAT QUBO 2017 1.G User Guide
[x] Cancel search | Manufacturer: FIAT, Model Year: 2017, Model line: QUBO, Model: FIAT QUBO 2017 1.GPages: 260, PDF Size: 4.74 MB
Page 23 of 260
the changes already stored by the user (and
confirmed by pressing theSET
button briefly)
will be saved.
From the standard screen, press theSET
button
briefly to start browsing.
Press the
orbuttons to navigate within the
menu.
NoteOnly the reduced menu can be accessed while
the vehicle is moving for safety reasons ("Speed
Beep" setting). Stop the vehicle to access the full
menu.
Adjusting the vehicle interior lighting
This function is available with the dipped beam
headlights on to adjust brightness of the instrument
panel, buttons and radio display.
To adjust the light intensity, proceed as follows:
press the SETbutton briefly to make
the display flash the previously set level;
press theorbutton to set the required
brightness level;
press the SETbutton briefly to go back to the
menu screen or hold the button down to go back
to the standard screen without saving.
Speed limit (Speed Beep)
This function makes it possible to set the vehicle
speed limit (km/h or mph). When this limit isexceeded the driver is immediately alerted (see
“Warning lights and messages” section).
To set the desired speed limit, proceed as follows:
- press theSET
button briefly, the display will
show the wording (Speed Beep);
- press the
orbutton to select speed limit
activation (On) or deactivation (Off );
- if the function is on, press
orbutton to
select the desired speed limit and then pressSET
to confirm.
NoteSetting is possible between 30 and 200 km/h,
or 20 and 125 mph, according to the previously
set unit. See the "Setting the unit of measurement
(Measurement unit)" paragraph described below. The
setting will increase/decrease by 5 units each time
button
/is pressed. Hold down the/
button to automatically increase/decrease the
setting rapidly. Complete the adjustment with single
presses of the button when you approach the desired
value.
- press theSET
button briefly to go back to the
menu screen or hold the button down to go back
to the standard screen without saving.
To cancel the setting, proceed as follows:
- press theSET
button briefly to make the
display flash (On);
- press button
, (Off ) will flash on the display;
- press theSET
button briefly to go back to the
menu screen or hold the button down to go back
to the standard screen without saving.
19
KNOWING YOUR
VEHICLE
SAFETY
STARTING AND
DRIVING
WARNING LIGHTS
AND MESSAGES
IN AN EMERGENCY
SERVICING AND
CARE
TECHNICAL DATA
INDEX
Page 24 of 260
Trip B On/Off (Trip B data)
This function can be used to activate (On) or
deactivate (Off ) the Trip B display (partial trip).
For more information see the "Trip computer"
paragraph.
Proceed as follows to switch the function on/off:
- briefly press theSET
button to make the
display flash (On) or (Off ) according to what was
previously set;
- press button
orto select;
- press theSET
button briefly to go back to the
menu screen or hold the button down to go back
to the standard screen without saving.
Setting the clock (Set time)
This function allows the adjustment of the clock
through two submenus: Time and Format.
To carry out the adjustment, proceed as follows:
- press theSET
button briefly and the two
submenus "Time" and "Format" will be displayed;
- press the
orbutton to switch between the
two submenus;
- once you have selected a submenu, pressSET
briefly;
- when you select "Time", pressing theSET
button briefly makes the "hours" flash on the
display;
- press the
orbutton to adjust;- press theSET
button briefly: "minutes" starts
flashing on the display;
- press the
orbutton to adjust;
When you select "Format": briefly pressing theSET
button makes the display mode flash on the
display;
- press button
orto select "24h" or "12h"
mode.
When you have made the required settings, press the
SET
button briefly to go back to the submenu
screen or hold the button down to go back to
the main menu screen without saving.
- press theSET
button again to return to the
standard screen or to the main menu according
to where you are in the menu.
Setting the date (Set Date)
This function allows updating of the date (day -
month - year).
Proceed as follows to update:
- press theSET
button briefly: "day" (dd) starts
flashing on the display;
- press the
orbutton to adjust;
- press theSET
button briefly: "month" starts
flashing on the display (mm);
- press the
orbutton to adjust;
- press theSET
button briefly: "year" starts
flashing on the display (yyyy);
- press the
orbutton to adjust.
20
KNOWING YOUR
VEHICLE
SAFETY
STARTING AND
DRIVING
WARNING LIGHTS
AND MESSAGES
IN AN EMERGENCY
SERVICING AND
CARE
TECHNICAL DATA
INDEX
Page 25 of 260
NoteThe setting will increase or decrease by one
unit each time the
orbutton is pressed.
Keeping the button pressed causes an automatic
rapid value increase/decrease. Complete the
adjustment with single presses of the button when
you approach the desired value.
- press theSET
button briefly to go back to the
menu screen or hold the button down to go back
to the standard screen without saving.
Audio information (See radio)
This function is used to display radio information.
- Radio: selected radio station frequency or RDS
message, automatic tuning activation or AutoSTore;
- Audio CD, MP3 CDs: track number;
- CD Changer: CD number and track number;
To show the sound system information on
the display (On) or clear it (Off ), proceed as follows:
- briefly press theSET
button to make the
display flash (On) or (Off ) according to what was
previously set;
- press button
orto select;
- press theSET
button briefly to go back to the
menu screen or hold the button down to go back
to the standard screen without saving.Automatic central locking with vehicle
moving (Autoclose)
After activation (On), this function allows the
automatic locking of the doors when the speed
exceeds 20 km/h.
Proceed as follows to activate (On) or deactivate
(Off ) this function:
- press theSET
button briefly to display a
submenu;
- briefly press theSET
button to make the
display flash (On) or (Off ) according to what was
previously set;
- press button
orto select;
briefly press theSET
button to return to the
submenu screen or hold the button down to return
to the main menu screen without saving;
- press theSET
button again to return to the
standard screen or to the main menu according
to where you are in the menu.
Setting the unit of measurement
This function allows the setting of a unit of
measurement via three submenus: Distance,
Consumption and Temperature.
To set the desired unit of measurement, proceed as
follows:
- briefly press theSET
button to display the
three submenus;
21
KNOWING YOUR
VEHICLE
SAFETY
STARTING AND
DRIVING
WARNING LIGHTS
AND MESSAGES
IN AN EMERGENCY
SERVICING AND
CARE
TECHNICAL DATA
INDEX
Page 26 of 260
- press buttonorto navigate through the
three submenus;
- once you have selected the submenu to be changed,
press theSET
button briefly;
- if you enter the "Distances" submenu, pressing the
SET
button briefly makes the display show
"km" or "mi" (depending on the previous setting);
- press button
orto select;
- if you enter the "Consumption" submenu, pressing
theSET
button briefly makes the display show
"km/l", "l/100km" or "mpg" (depending on the
previous setting);
If the set distance unit is "km", the display enables
setting of the fuel consumption unit (km/l or
l/100km).
If the set distance unit is "mi", the display shows the
amount of fuel consumed in "mpg".
- press button
orto select;
- when you enter the “Temperature” submenu,
pressing theSET
button briefly makes “°C” or
“°F” appear on the display depending on the previous
setting;
- press button
orto select;
When you have made the required settings, press the
SET
button briefly to go back to the submenu
screen or hold the button down to go back to
the main menu screen without saving.
- press theSET
button again to return to the
standard screen or to the main menu according
to where you are in the menu.Selecting the language (Language)
Messages on the display can be shown in the
following languages: Italian, German, English, Spanish,
French, Portuguese, Turkish and Dutch.
To set the desired language, proceed as follows:
briefly press theSET
button, the previously set
"language" starts flashing on the display;
- press button
orto select;
- press theSET
button briefly to go back to the
menu screen or hold the button down to go back
to the standard screen without saving.
Adjust the failure/warning buzzer volume
(Buzzer Volume)
With this function the volume of the buzzer which
accompanies the display of any failure/warning can be
adjusted according to 8 levels.
To set the desired volume, proceed as follows:
- briefly press theSET
button, the previously set
volume “level” will flash on the display;
- press the
orbutton to adjust;
- press theSET
button briefly to go back to the
menu screen or hold the button down to go back
to the standard screen without saving.
Adjusting the button volume (Button Vol.)
This function is used to set the volume of the
acoustic signal accompanying the activation of the
SET
,andbuttons through 8 levels.
22
KNOWING YOUR
VEHICLE
SAFETY
STARTING AND
DRIVING
WARNING LIGHTS
AND MESSAGES
IN AN EMERGENCY
SERVICING AND
CARE
TECHNICAL DATA
INDEX
Page 27 of 260
To set the desired volume, proceed as follows:
- briefly press theSET
button, the previously set
volume “level” will flash on the display;
- press the
orbutton to adjust;
- press theSET
button briefly to go back to the
menu screen or hold the button down to go back
to the standard screen without saving.
Reactivation of buzzer for S.B.R. signal (Belt
buzzer)
This function can be displayed only after a Fiat
Dealership has deactivated the SBR system (see "SBR
system" in the "Safety" section).
Scheduled Servicing (Service)
Using this function you can display information about
the mileage intervals for vehicle servicing.
To consult the information, proceed as follows:
- press theSET
button briefly: the display will
show when servicing is due in km or mi according to
the previous setting (see paragraph "Units of
measurement");
- briefly press theSET
button to go back to the
menu screen or hold the button down to go back
to the standard screen.NoteThe "Scheduled Servicing Plan" includes vehicle
maintenance at fixed intervals, refer to the
"Maintenance and care" chapter. The indication of
the "Service" function will appear automatically, with
the key in MAR position, starting from 2,000 km
(or 1,240 mi) and will be displayed every 200 km (or
124 mi).
Below 200 km servicing indications are more
frequent. The display will be in km or miles according
to the unit of measurement set. When the next
service is close, when the ignition is turned ON the
word "Service" appears in the display followed by
the remaining number of kilometres/miles. Go to a
Fiat Dealership, where the "Scheduled Service Plan"
operations will be performed and the message
will be reset.
Passenger airbag and side bag activation/
deactivation (Passenger bag)
(for versions/markets, where provided)
This function allows the passenger side airbag to be
activated/deactivated.
Proceed as follows:- press the SETbutton and, after the display
shows the message (Passenger bag: Off ) (to
deactivate) or the message (Passenger Bag: On)
(to activate) by pressing the
andbuttons,
press the SET
button again;
the confirmation request message will appear on
the display;
23
KNOWING YOUR
VEHICLE
SAFETY
STARTING AND
DRIVING
WARNING LIGHTS
AND MESSAGES
IN AN EMERGENCY
SERVICING AND
CARE
TECHNICAL DATA
INDEX
Page 28 of 260
press buttonsorto select (Yes)
(confirming activation/deactivation) or (No) (to
abort);
press the SETbutton button briefly: a message
confirming the selection will be displayed and you
will return to the menu screen or, pressing the
button for longer, you will return to the standard
screen without saving.
Exit Menu
This is the last function that closes the cycle of
settings listed in the menu screen.
Pressing theSET
button briefly will return the
display to the standard screen without storing.
Press button
to return to the first menu item on
the display (Speed Beep).
TRIP COMPUTER
General features
The Trip computer is used to display information on
vehicle operation when the ignition key is turned
to MAR. This function allows you to define two
separate trips, called "Trip A" and "Trip B", for
monitoring the "complete mission" (journey) of the
vehicle in a reciprocally independent manner. Both
functions can be reset (start of a new journey).
“Trip A” is used to display the values relating to:
Outside temperature (for Natural Power vehicles
equipped with temperature sensor)
Range
Distance travelled
Average consumption
Current consumption
Average speed
Travel time (driving time).
"Trip B", available on multifunction display only, is
used to display the values relating to:
Distance travelled B
Average consumption B
Average speed B
Travel time B (driving time).
24
KNOWING YOUR
VEHICLE
SAFETY
STARTING AND
DRIVING
WARNING LIGHTS
AND MESSAGES
IN AN EMERGENCY
SERVICING AND
CARE
TECHNICAL DATA
INDEX
Page 29 of 260
“Trip B” may be disabled (see “Activating
Trip B”). “Range” and “Instant
consumption" parameters cannot be
reset .
Values displayed
Range (for versions/markets where provided)
This value shows the distance that the car can still
cover before needing fuel, assuming that driving style
is unvaried. “----”will appear on the display in
the following cases:
range is lower than 50 km (or 30 mi)
vehicle is left parked with the engine running for a
long time.
IMPORTANT The range can be affected by several
factors: driving style (see “Driving style” in the
“Starting and driving” section), type of route
(motorway, towns and cities, mountain roads, etc.),
conditions of use (load, tyre pressures, etc.). Trip
planning must therefore take the above into account.
Distance travelled
This value shows the distance covered from the start
of the new journey.
Average consumption
This value shows the approximate average fuel
consumption from the start of the new journey.Current consumption
This value shows the fuel consumption. The value is
constantly updated. The message “----” will appear
on the display if the vehicle is parked with the engine
running.
Average speed
Shows the average speed of the vehicle by using the
overall time elapsed since the start of a new journey.
Journey time
Time elapsed since the start of the new journey.
IMPORTANT If there is no information, the Trip
computer displays "----" in place of the value. When
normal operating conditions are restored, the
counting of the various values is resumed, without
either zeroing the values displayed prior to the
problem, or starting a new journey.
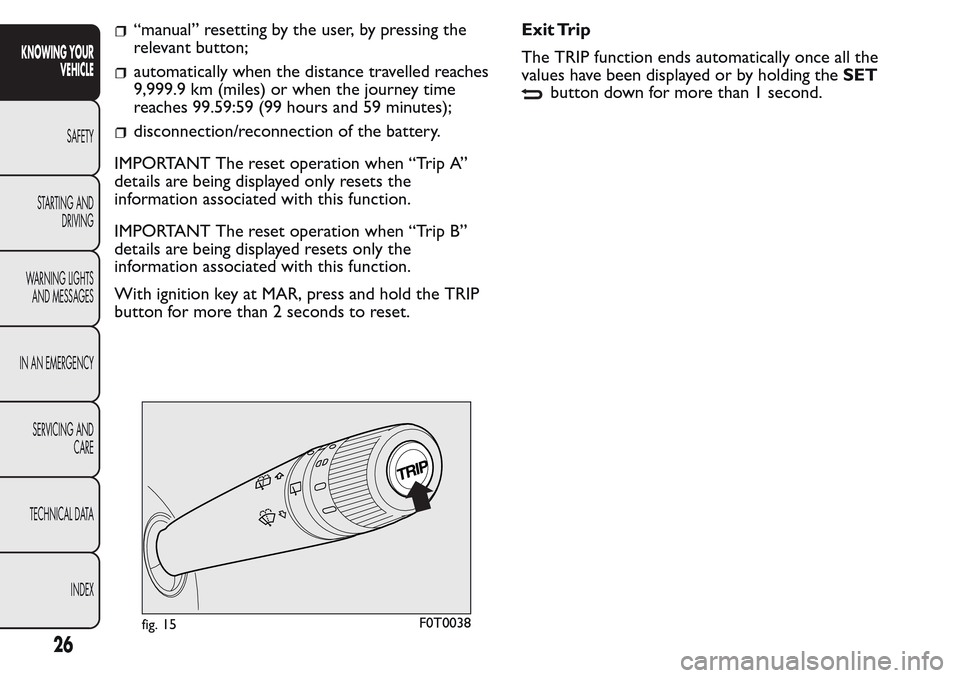
Control TRIP button
The TRIP button is located at the end of the right
stalk fig. 15. With the ignition key turned to
MAR-ON, this button allows you to view the
previously described values and also zero them to
begin a new journey:
press briefly to display the different values;
long push to reset and then start a new journey.
This begins after a reset:
25
KNOWING YOUR
VEHICLE
SAFETY
STARTING AND
DRIVING
WARNING LIGHTS
AND MESSAGES
IN AN EMERGENCY
SERVICING AND
CARE
TECHNICAL DATA
INDEX
Page 30 of 260
“manual” resetting by the user, by pressing the
relevant button;
automatically when the distance travelled reaches
9,999.9 km (miles) or when the journey time
reaches 99.59:59 (99 hours and 59 minutes);
disconnection/reconnection of the battery.
IMPORTANT The reset operation when “Trip A”
details are being displayed only resets the
information associated with this function.
IMPORTANT The reset operation when “Trip B”
details are being displayed resets only the
information associated with this function.
With ignition key at MAR, press and hold the TRIP
button for more than 2 seconds to reset.Exit Trip
The TRIP function ends automatically once all the
values have been displayed or by holding theSET
button down for more than 1 second.
fig. 15F0T0038
26
KNOWING YOUR
VEHICLE
SAFETY
STARTING AND
DRIVING
WARNING LIGHTS
AND MESSAGES
IN AN EMERGENCY
SERVICING AND
CARE
TECHNICAL DATA
INDEX
Page 47 of 260
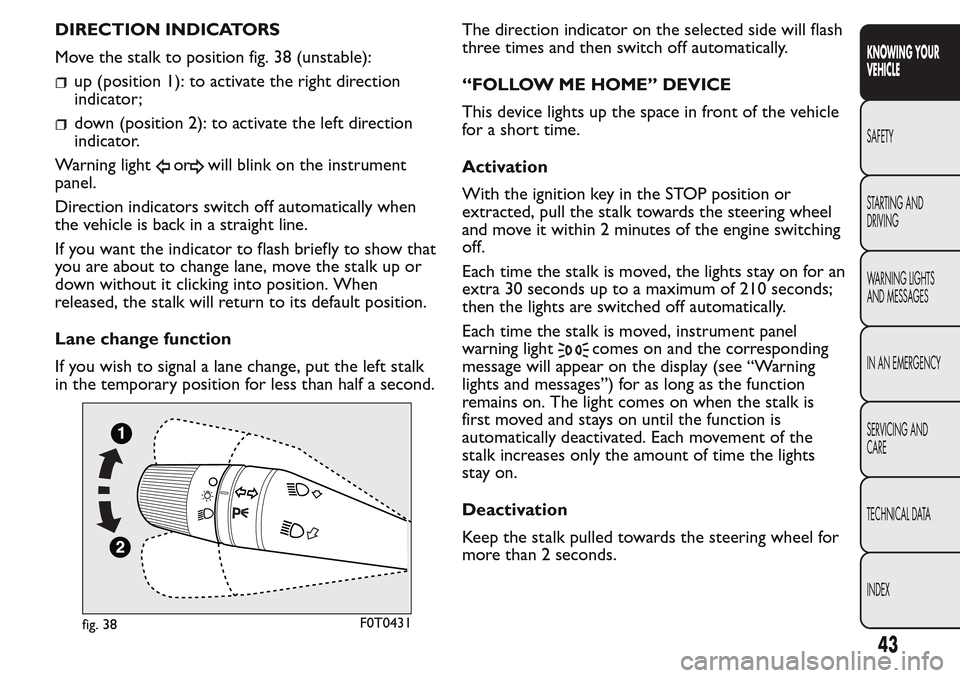
DIRECTION INDICATORS
Move the stalk to position fig. 38 (unstable):
up (position 1): to activate the right direction
indicator;
down (position 2): to activate the left direction
indicator.
Warning light
orwill blink on the instrument
panel.
Direction indicators switch off automatically when
the vehicle is back in a straight line.
If you want the indicator to flash briefly to show that
you are about to change lane, move the stalk up or
down without it clicking into position. When
released, the stalk will return to its default position.
Lane change function
If you wish to signal a lane change, put the left stalk
in the temporary position for less than half a second.The direction indicator on the selected side will flash
three times and then switch off automatically.
“FOLLOW ME HOME” DEVICE
This device lights up the space in front of the vehicle
for a short time.
Activation
With the ignition key in the STOP position or
extracted, pull the stalk towards the steering wheel
and move it within 2 minutes of the engine switching
off.
Each time the stalk is moved, the lights stay on for an
extra 30 seconds up to a maximum of 210 seconds;
then the lights are switched off automatically.
Each time the stalk is moved, instrument panel
warning light
comes on and the corresponding
message will appear on the display (see “Warning
lights and messages”) for as long as the function
remains on. The light comes on when the stalk is
first moved and stays on until the function is
automatically deactivated. Each movement of the
stalk increases only the amount of time the lights
stay on.
Deactivation
Keep the stalk pulled towards the steering wheel for
more than 2 seconds.
fig. 38F0T0431
43
KNOWING YOUR
VEHICLE
SAFETY
STARTING AND
DRIVING
WARNING LIGHTS
AND MESSAGES
IN AN EMERGENCY
SERVICING AND
CARE
TECHNICAL DATA
INDEX
Page 75 of 260
Adjusting headlight alignment
Press the
orbuttons on the control
panelfig. 90.
The instrument panel display shows the position in
relation to the adjustment set.
Position 0 - one or two people in the front seats.
Position1-fivepeople.
Position2-fivepeople + load in the boot.
Position 3 - driver + maximum permitted load
stowed in the boot.
IMPORTANT Check the alignment of the light beams
each time the weight of the load transported
changes.
FOG LIGHT DIRECTION
(for versions/markets, where provided)
Contact a Fiat Dealership to have the direction
checked and, if necessary, adjusted.
ADJUSTING THE HEADLIGHTS WHEN
ABROAD
The dipped headlights are directed for operation in
the country where the vehicle was originally
purchased. In countries where you drive on the
other side of the road, you need to alter the beam
direction by affixing a specially designed self-adhesive
film in order not to dazzle the vehicles travelling in
the opposite direction.
ABS SYSTEM
This is an integral part of the braking system, which
prevents one or more wheels from locking or
slipping regardless of the road surface conditions and
braking intensity, giving the best control during
emergency braking.
The EBD system (Electronic Braking Force
Distribution) completes the system, allowing the
brake force to be distributed between the front and
rear wheels.
IMPORTANT For maximum efficiency of the braking
system, a bedding-in period of about 500 km is
needed: during this period it is better to avoid sharp,
repeated and prolonged braking.
SYSTEM INTERVENTION
The driver can tell the ABS system has come into
action because the brake pedal pulsates slightly and
the system gets noisier: it means that the vehicle
speed should be altered to suit the type of road
surface.
MECHANICAL BRAKE ASSIST (emergency
braking assistance)
(for versions/markets, where provided)
This system, which cannot be deactivated, recognises
emergency braking conditions (according to the
brake pedal operation speed) and provides an
additional hydraulic braking pressure to support that
71
KNOWING YOUR
VEHICLE
SAFETY
STARTING AND
DRIVING
WARNING LIGHTS
AND MESSAGES
IN AN EMERGENCY
SERVICING AND
CARE
TECHNICAL DATA
INDEX