steering FIAT SCUDO 2008 2.G Owners Manual
[x] Cancel search | Manufacturer: FIAT, Model Year: 2008, Model line: SCUDO, Model: FIAT SCUDO 2008 2.GPages: 210, PDF Size: 3.32 MB
Page 5 of 210
4
SAFETY
DEVICES
CORRECT USE
OF THE
VEHICLE
WARNING
LIGHTS AND
MESSAGES
IN AN
EMERGENCY
VEHICLE
MAINTENANCE
TECHNICAL
SPECIFICATIONS
INDEX
DASHBOARD
AND CONTROLSDASHBOARD ...................................................................... 5
SYMBOLS ............................................................................... 6
THE FIAT CODE SYSTEM ................................................. 6
THE KEYS .............................................................................. 7
ALARM ................................................................................... 10
IGNITION DEVICE ............................................................. 12
INSTRUMENT PANEL ........................................................ 13
INSTRUMENTS .................................................................... 14
DISPLAY.................................................................................. 15
MAINTENANCE INDICATOR ........................................ 16
TRIP COMPUTER................................................................. 17
FRONT SEATS ..................................................................... 17
REAR SEATS .......................................................................... 20
SEAT ARRANGEMENTS .................................................... 22
HEAD RESTRAINTS ........................................................... 23
STEERING WHEEL .............................................................. 24
REARVIEW MIRRORS ........................................................ 25
HEATING AND VENTILATION ..................................... 27
MANUAL CLIMATE CONTROL SYSTEM .................... 31
AUTOMATIC TWO-ZONE CLIMATE
CONTROL SYSTEM ........................................................... 37
AUTOMATIC THREE-ZONE CLIMATE
CONTROL SYSTEM ........................................................... 45
EXTERNAL LIGHTS ............................................................ 47WINDOW WASHING ...................................................... 50
CRUISE CONTROL SPEED REGULATOR.................... 54
“LIMIT” SPEED RESTRICTOR .......................................... 57
CEILING LIGHTS ................................................................. 60
CONTROLS .......................................................................... 61
FUEL CUT-OFF SWITCH .................................................. 64
INTERIOR EQUIPMENT..................................................... 65
DOORS .................................................................................. 69
SLIDING LUGGAGE COVER............................................ 73
POWER WINDOWS/WINDOW WINDERS .............. 74
BONNET ............................................................................... 76
ROOF RACK/SKI RACK .................................................... 77
PNEUMATIC SUSPENSIONS............................................. 78
LOAD RECOMMENDATIONS......................................... 79
HEADLIGHTS ....................................................................... 81
ABS SYSTEM ......................................................................... 82
ESP SYSTEM .......................................................................... 84
EOBD SYSTEM ..................................................................... 87
PARKING SENSORS ........................................................... 88
SOUND SYSTEM ................................................................. 89
ACCESSORIES PURCHASED BY THE OWNER ......... 90
AT THE FILLING STATION ............................................. 91
PROTECTING THE ENVIRONMENT ........................... 92
D D
A A
S S
H H
B B
O O
A A
R R
D D
A A
N N
D D
C C
O O
N N
T T
R R
O O
L L
S S
Page 6 of 210
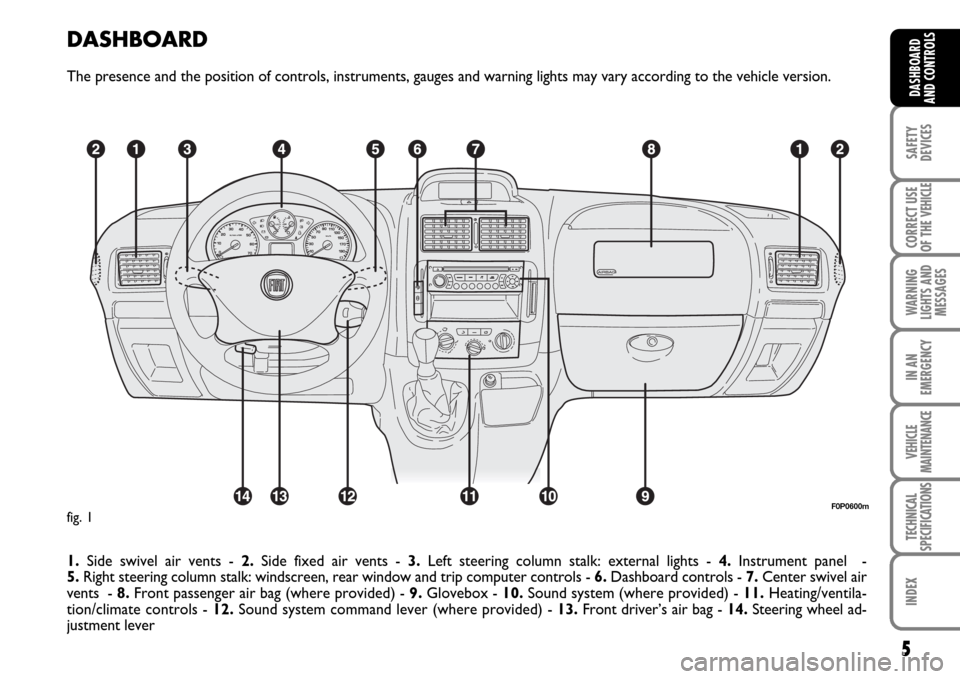
DASHBOARD
The presence and the position of controls, instruments, gauges and warning lights may vary according to the vehicle version.
1.Side swivel air vents - 2.Side fixed air vents - 3.Left steering column stalk: external lights - 4.Instrument panel -
5.Right steering column stalk: windscreen, rear window and trip computer controls - 6.Dashboard controls - 7.Center swivel air
vents - 8.Front passenger air bag (where provided) - 9.Glovebox - 10.Sound system (where provided) - 11.Heating/ventila-
tion/climate controls - 12.Sound system command lever (where provided) - 13.Front driver’s air bag - 14. Steering wheel ad-
justment lever
5
SAFETY
DEVICES
CORRECT USE
OF THE
VEHICLE
WARNING
LIGHTS AND
MESSAGES
IN AN
EMERGENCY
VEHICLE
MAINTENANCE
TECHNICAL
SPECIFICATIONS
INDEX
DASHBOARD
AND CONTROLS
F0P0600mfig. 1
Page 13 of 210
12
SAFETY
DEVICES
CORRECT USE
OF THE
VEHICLE
WARNING
LIGHTS AND
MESSAGES
IN AN
EMERGENCY
VEHICLE
MAINTENANCE
TECHNICAL
SPECIFICATIONS
INDEX
DASHBOARD
AND CONTROLS
IGNITION
DEVICE
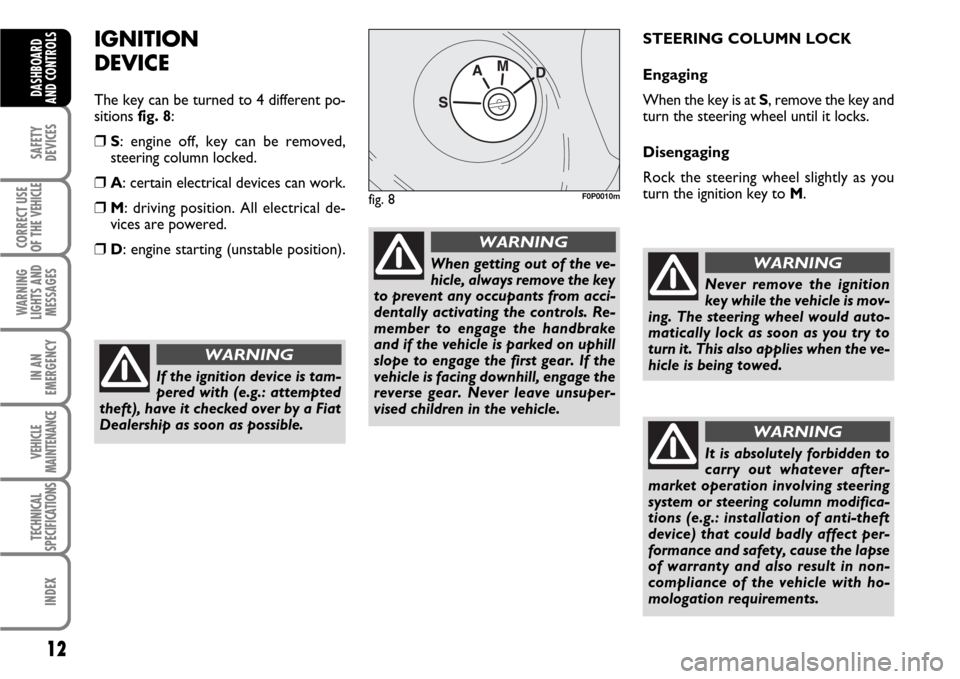
The key can be turned to 4 different po-
sitions fig. 8:
❒S: engine off, key can be removed,
steering column locked.
❒A: certain electrical devices can work.
❒M: driving position. All electrical de-
vices are powered.
❒D: engine starting (unstable position).STEERING COLUMN LOCK
Engaging
When the key is at S, remove the key and
turn the steering wheel until it locks.
Disengaging
Rock the steering wheel slightly as you
turn the ignition key to M.
If the ignition device is tam-
pered with (e.g.: attempted
theft), have it checked over by a Fiat
Dealership as soon as possible.
WARNING
When getting out of the ve-
hicle, always remove the key
to prevent any occupants from acci-
dentally activating the controls. Re-
member to engage the handbrake
and if the vehicle is parked on uphill
slope to engage the first gear. If the
vehicle is facing downhill, engage the
reverse gear. Never leave unsuper-
vised children in the vehicle.
WARNING
fig. 8F0P0010m
Never remove the ignition
key while the vehicle is mov-
ing. The steering wheel would auto-
matically lock as soon as you try to
turn it. This also applies when the ve-
hicle is being towed.
WARNING
It is absolutely forbidden to
carry out whatever after-
market operation involving steering
system or steering column modifica-
tions (e.g.: installation of anti-theft
device) that could badly affect per-
formance and safety, cause the lapse
of warranty and also result in non-
compliance of the vehicle with ho-
mologation requirements.
WARNING
Page 18 of 210
17
SAFETY
DEVICES
CORRECT USE
OF THE
VEHICLE
WARNING
LIGHTS AND
MESSAGES
IN AN
EMERGENCY
VEHICLE
MAINTENANCE
TECHNICAL
SPECIFICATIONS
INDEX
DASHBOARD
AND CONTROLS
Distance to cover
This value shows the distance to be cov-
ered yet, under active navigation condi-
tion.
Trip distance
This value shows the distance covered
from the start of the journey, after reset-
ting (Reset).
Average consumption
This value shows the average consump-
tion from the start of the journey, after
resetting (Reset).
Average speed
This value shows the vehicle average
speed calculated from the start of the
journey, after resetting (Reset).
TRIP COMPUTER
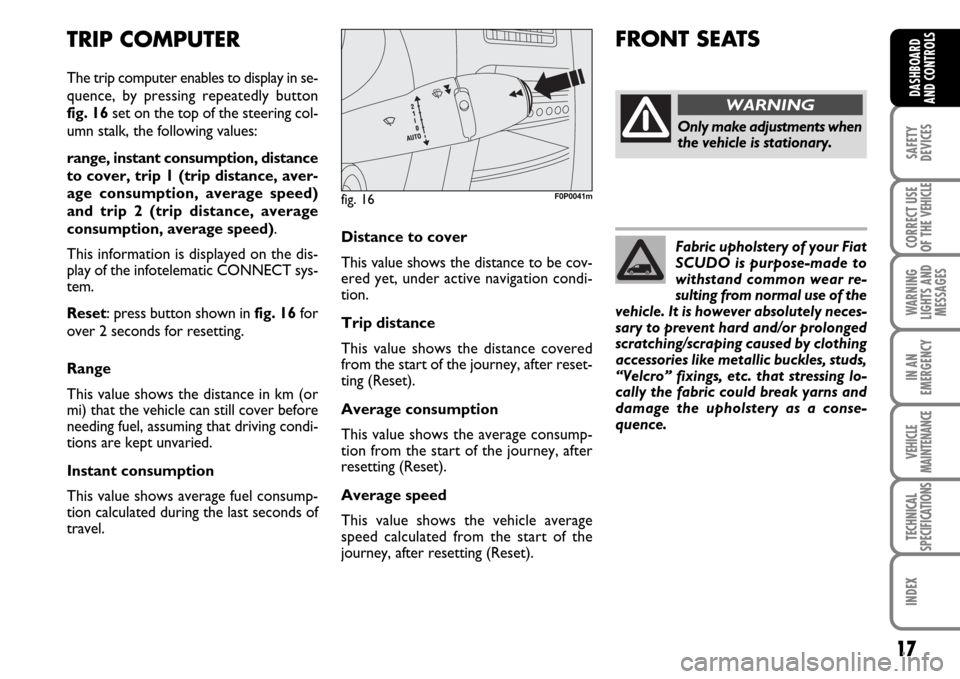
The trip computer enables to display in se-
quence, by pressing repeatedly button
fig. 16set on the top of the steering col-
umn stalk, the following values:
range, instant consumption, distance
to cover, trip 1 (trip distance, aver-
age consumption, average speed)
and trip 2 (trip distance, average
consumption, average speed).
This information is displayed on the dis-
play of the infotelematic CONNECT sys-
tem.
Reset: press button shown in fig. 16for
over 2 seconds for resetting.
Range
This value shows the distance in km (or
mi) that the vehicle can still cover before
needing fuel, assuming that driving condi-
tions are kept unvaried.
Instant consumption
This value shows average fuel consump-
tion calculated during the last seconds of
travel.
fig. 16F0P0041m
FRONT SEATS
Only make adjustments when
the vehicle is stationary.
WARNING
Fabric upholstery of your Fiat
SCUDO is purpose-made to
withstand common wear re-
sulting from normal use of the
vehicle. It is however absolutely neces-
sary to prevent hard and/or prolonged
scratching/scraping caused by clothing
accessories like metallic buckles, studs,
“Velcro” fixings, etc. that stressing lo-
cally the fabric could break yarns and
damage the upholstery as a conse-
quence.
Page 25 of 210
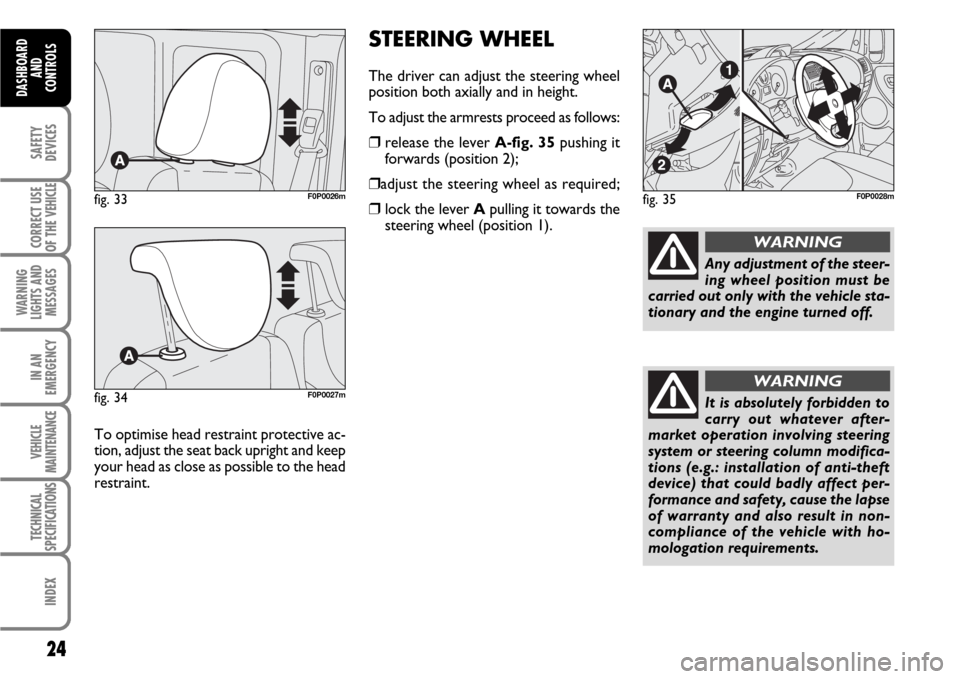
STEERING WHEEL
The driver can adjust the steering wheel
position both axially and in height.
To adjust the armrests proceed as follows:
❒release the lever A-fig. 35pushing it
forwards (position 2);
❒adjust the steering wheel as required;
❒lock the lever Apulling it towards the
steering wheel (position 1).fig. 35F0P0028m
Any adjustment of the steer-
ing wheel position must be
carried out only with the vehicle sta-
tionary and the engine turned off.
WARNING
It is absolutely forbidden to
carry out whatever after-
market operation involving steering
system or steering column modifica-
tions (e.g.: installation of anti-theft
device) that could badly affect per-
formance and safety, cause the lapse
of warranty and also result in non-
compliance of the vehicle with ho-
mologation requirements.
WARNING
24
SAFETY
DEVICES
CORRECT USE
OF THE
VEHICLE
WARNING
LIGHTS AND
MESSAGES
IN AN
EMERGENCY
VEHICLE
MAINTENANCE
TECHNICAL
SPECIFICATIONS
INDEX
DASHBOARD
AND
CONTROLS
fig. 33F0P0026m
fig. 34F0P0027m
To optimise head restraint protective ac-
tion, adjust the seat back upright and keep
your head as close as possible to the head
restraint.
Page 48 of 210
47
SAFETY
DEVICES
CORRECT USE
OF THE
VEHICLE
WARNING
LIGHTS AND
MESSAGES
IN AN
EMERGENCY
VEHICLE
MAINTENANCE
TECHNICAL
SPECIFICATIONS
INDEX
DASHBOARD
AND CONTROLS
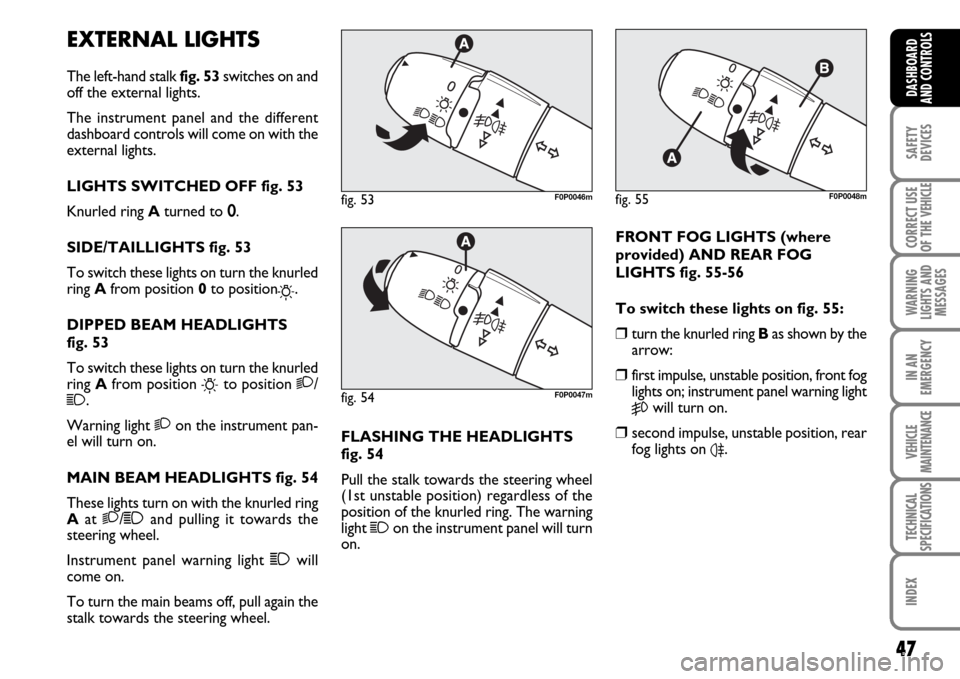
EXTERNAL LIGHTS
The left-hand stalk fig. 53switches on and
off the external lights.
The instrument panel and the different
dashboard controls will come on with the
external lights.
LIGHTS SWITCHED OFF fig. 53
Knurled ring Aturned to 0.
SIDE/TAILLIGHTS fig. 53
To switch these lights on turn the knurled
ring Afrom position 0 to position
6.
DIPPED BEAM HEADLIGHTS
fig. 53
To switch these lights on turn the knurled
ring Afrom position
6to position 2/1.
Warning light 2on the instrument pan-
el will turn on.
MAIN BEAM HEADLIGHTS fig. 54
These lights turn on with the knurled ring
Aat 2/1and pulling it towards the
steering wheel.
Instrument panel warning light 1will
come on.
To turn the main beams off, pull again the
stalk towards the steering wheel.FLASHING THE HEADLIGHTS
fig. 54
Pull the stalk towards the steering wheel
(1st unstable position) regardless of the
position of the knurled ring. The warning
light
1on the instrument panel will turn
on.
fig. 53F0P0046m
fig. 54F0P0047m
fig. 55F0P0048m
FRONT FOG LIGHTS (where
provided) AND REAR FOG
LIGHTS fig. 55-56
To switch these lights on fig. 55:
❒turn the knurled ring Bas shown by the
arrow:
❒first impulse, unstable position, front fog
lights on; instrument panel warning light
5will turn on.
❒second impulse, unstable position, rear
fog lights on
4.
Page 49 of 210
48
SAFETY
DEVICES
CORRECT USE
OF THE
VEHICLE
WARNING
LIGHTS AND
MESSAGES
IN AN
EMERGENCY
VEHICLE
MAINTENANCE
TECHNICAL
SPECIFICATIONS
INDEX
DASHBOARD
AND
CONTROLS
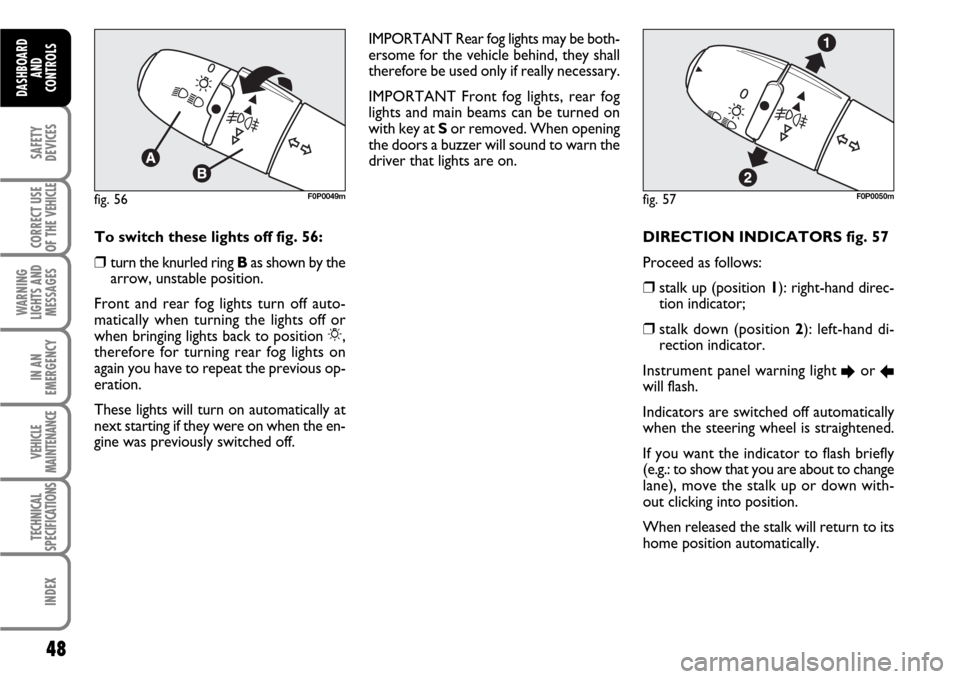
DIRECTION INDICATORS fig. 57
Proceed as follows:
❒stalk up (position 1): right-hand direc-
tion indicator;
❒stalk down (position 2): left-hand di-
rection indicator.
Instrument panel warning light
Eor Rwill flash.
Indicators are switched off automatically
when the steering wheel is straightened.
If you want the indicator to flash briefly
(e.g.: to show that you are about to change
lane), move the stalk up or down with-
out clicking into position.
When released the stalk will return to its
home position automatically.
fig. 57F0P0050mfig. 56F0P0049m
To switch these lights off fig. 56:
❒turn the knurled ring Bas shown by the
arrow, unstable position.
Front and rear fog lights turn off auto-
matically when turning the lights off or
when bringing lights back to position 6,
therefore for turning rear fog lights on
again you have to repeat the previous op-
eration.
These lights will turn on automatically at
next starting if they were on when the en-
gine was previously switched off.IMPORTANT Rear fog lights may be both-
ersome for the vehicle behind, they shall
therefore be used only if really necessary.
IMPORTANT Front fog lights, rear fog
lights and main beams can be turned on
with key at Sor removed. When opening
the doors a buzzer will sound to warn the
driver that lights are on.
Page 53 of 210
52
SAFETY
DEVICES
CORRECT USE
OF THE
VEHICLE
WARNING
LIGHTS AND
MESSAGES
IN AN
EMERGENCY
VEHICLE
MAINTENANCE
TECHNICAL
SPECIFICATIONS
INDEX
DASHBOARD
AND
CONTROLS
Operating the windscreen washer with
the rain sensor activated the normal wash-
ing cycle is performed at the end of which
the rain sensor resumes its normal auto-
matic function.
So as to deactivate the rain sensor, put the
windscreen wiper command in the I, 1or
2positions. The deactivation is accompa-
nied by a message on the display.
To activate the rain sensor you have to
move the stalk to another position and
then back to AUTO.The rain sensor is able to recognize and
automatically adjust itself in the presence
of the following particular conditions:
❒impurities on the controlled surface
(salt, dirt, etc...);
❒streaks of water produced by worn
wiper blades;
❒difference between day and night (hu-
man eye is more bothered by wet glass
at night).Pulling the stalk towards the steering
wheel (unstable position), regardless of
the position of the knurled ring, operates
the windscreen washer and if the dipped
or high beams are on, also the headlight
washer (where provided).
Windscreen wiper will then perform three
wiping strokes.
Do not activate the rain sen-
sor when washing the vehi-
cle at automatic car-wash stations.
WARNING
When cleaning or washing
the windscreen make sure the
rain sensor is off.
WARNING
Do not activate the rain sen-
sor if the windscreen is icy.
WARNING
Page 108 of 210
107
CORRECT USE
OF THE
VEHICLE
WARNING
LIGHTS AND
MESSAGES
IN AN
EMERGENCY
VEHICLE
MAINTENANCE
TECHNICAL
SPECIFICATIONS
INDEX
DASHBOARD
AND CONTROLS
SAFETY
DEVICES
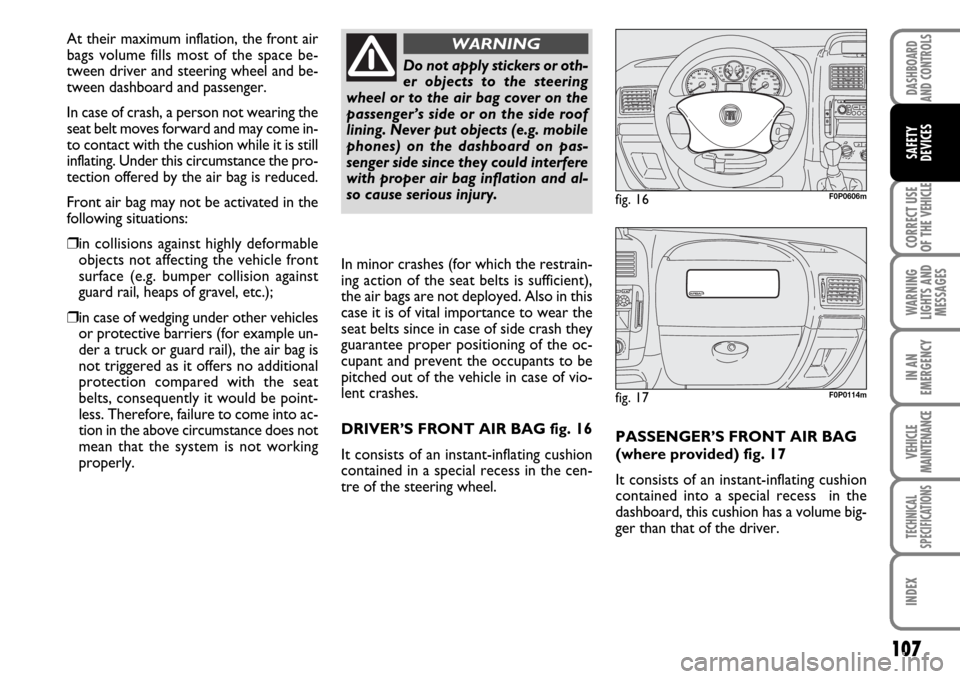
PASSENGER’S FRONT AIR BAG
(where provided) fig. 17
It consists of an instant-inflating cushion
contained into a special recess in the
dashboard, this cushion has a volume big-
ger than that of the driver.
fig. 16F0P0606m
fig. 17F0P0114m
In minor crashes (for which the restrain-
ing action of the seat belts is sufficient),
the air bags are not deployed. Also in this
case it is of vital importance to wear the
seat belts since in case of side crash they
guarantee proper positioning of the oc-
cupant and prevent the occupants to be
pitched out of the vehicle in case of vio-
lent crashes.
DRIVER’S FRONT AIR BAG fig. 16
It consists of an instant-inflating cushion
contained in a special recess in the cen-
tre of the steering wheel.
Do not apply stickers or oth-
er objects to the steering
wheel or to the air bag cover on the
passenger’s side or on the side roof
lining. Never put objects (e.g. mobile
phones) on the dashboard on pas-
senger side since they could interfere
with proper air bag inflation and al-
so cause serious injury.
WARNINGAt their maximum inflation, the front air
bags volume fills most of the space be-
tween driver and steering wheel and be-
tween dashboard and passenger.
In case of crash, a person not wearing the
seat belt moves forward and may come in-
to contact with the cushion while it is still
inflating. Under this circumstance the pro-
tection offered by the air bag is reduced.
Front air bag may not be activated in the
following situations:
❒in collisions against highly deformable
objects not affecting the vehicle front
surface (e.g. bumper collision against
guard rail, heaps of gravel, etc.);
❒in case of wedging under other vehicles
or protective barriers (for example un-
der a truck or guard rail), the air bag is
not triggered as it offers no additional
protection compared with the seat
belts, consequently it would be point-
less. Therefore, failure to come into ac-
tion in the above circumstance does not
mean that the system is not working
properly.
Page 112 of 210
111
CORRECT USE
OF THE
VEHICLE
WARNING
LIGHTS AND
MESSAGES
IN AN
EMERGENCY
VEHICLE
MAINTENANCE
TECHNICAL
SPECIFICATIONS
INDEX
DASHBOARD
AND CONTROLS
SAFETY
DEVICES
Never rest head, arms and
elbows on the door, on the
windows and in the window bag area
to prevent possible injuries during in-
flation phase.
WARNING
Never lean head, arms and
elbows out of window.
WARNING
GENERAL WARNINGS
If when turning the key to M
the warning light ¬does not
turn on or if it stays on when travel-
ling there could be a failure in safety
systems; in this event air bags or pre-
tensioners could not trigger in case of
impact or, in a minor number of cas-
es, they could trigger accidentally.
Contact Fiat Dealership immediately
to have the system checked.
WARNING
Do not cover the backrest of
front and rear seats with
trims or covers that are not suitable
to be used with side bags.
WARNING
Never travel with objects on
your lap, in front of your
chest or with a pipe, pencil, etc. be-
tween your lips; injury may result in
the event of the air bag being trig-
gered.
WARNINGIMPORTANT The triggering of preten-
sioners, front air bags and side bags is de-
cided in a differentiated manner by the
electronic control unit, depending on the
type of crash. The failure to deploy one or
more of them does not mean that the sys-
tem is not working properly.
Always keep your hands on
the steering wheel rim when
driving, so that if the air bag is trig-
gered, it can inflate without meeting
any obstacles which could cause seri-
ous harm to you. Do not drive with
the body bent forwards, keep the seat
back rest in the erect position and
lean your back well against it.
WARNING