change wheel FIAT SCUDO 2016 Owner handbook (in English)
[x] Cancel search | Manufacturer: FIAT, Model Year: 2016, Model line: SCUDO, Model: FIAT SCUDO 2016Pages: 227, PDF Size: 4.46 MB
Page 2 of 227
We really know your vehicle because we invented,
designed and built it: we really know every single detail. At Fiat Professional Service authorised workshops
you can find technicians directly trained by us, offering quality and professionalism for all service operations.
Fiat Professional workshops are always close to you for the regular servicing operations, season checks and practical
recommendations by our experts.
With Fiat Professional Genuine Parts you keep the reliability, comfort and performance features of your
new vehicle unchanged in time: that's why you bought it for.
Always ask for Genuine Parts for the components used on our vehicles; we recommend them because they come from
our steady commitment in research and development of highly innovative technologies.
For all these reasons: rely on Genuine Parts,
because they are the only ones designed by Fiat Professional for your vehicle.
SAFETY: BRAKING
SYSTEMENVIRONMENT: PARTICULATE FILTERS,
CLIMATE CONTROL SYSTEM MAINTENANCECOMFORT:
SUSPENSION AND WINDSCREEN WIPERSPERFORMANCE:
SPARK PLUGS, INJECTORS AND
BATTERIESLINEACCESSORI:
ROOF RACK BARS, WHEEL RIMS
WHY CHOOSING
GENUINE PARTS
SCUDO UM GB:SCUDO UM GB 30-05-2011 13:44 Pagina 2
Page 54 of 227
50SAFETY
DEVICESCORRECT USE
OF THE VEHICLE
WARNING
LIGHTS AND
MESSAGESIN AN
EMERGENCYVEHICLE
MAINTENANCETECHNICAL
SPECIFICATIONSINDEX
DASHBOARD
AND
CONTROLS
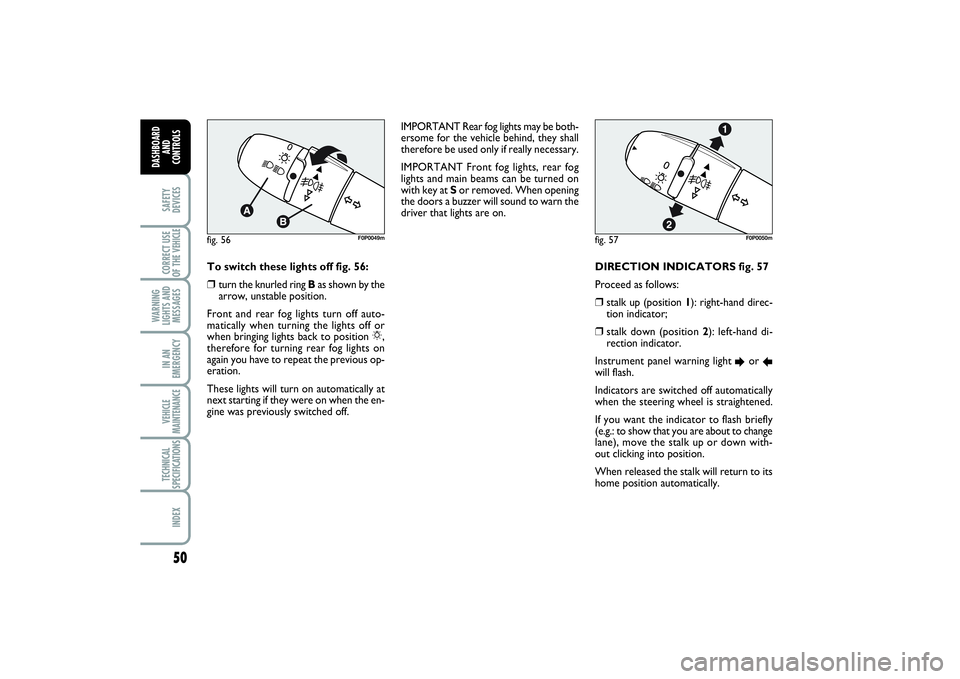
DIRECTION INDICATORS fig. 57
Proceed as follows: ❒
stalk up (position 1): right-hand direc-
tion indicator;
❒
stalk down (position 2): left-hand di-
rection indicator.
Instrument panel warning light
E
or
R
will flash.
Indicators are switched off automatically
when the steering wheel is straightened.
If you want the indicator to flash briefly
(e.g.: to show that you are about to change
lane), move the stalk up or down with-
out clicking into position.
When released the stalk will return to its
home position automatically.fig. 57
F0P0050m
fig. 56
F0P0049m
To switch these lights off fig. 56:❒
turn the knurled ring Bas shown by the
arrow, unstable position.
Front and rear fog lights turn off auto-
matically when turning the lights off or
when bringing lights back to position 6,
therefore for turning rear fog lights on
again you have to repeat the previous op-
eration.
These lights will turn on automatically at
next starting if they were on when the en-
gine was previously switched off.IMPORTANT Rear fog lights may be both-
ersome for the vehicle behind, they shall
therefore be used only if really necessary.
IMPORTANT Front fog lights, rear fog
lights and main beams can be turned on
with key at Sor removed. When opening
the doors a buzzer will sound to warn the
driver that lights are on.
020-082 SCUDO LUM GB 19/11/13 09.54 Pagina 50
Page 91 of 227
87
SAFETY
DEVICESCORRECT USE
OF THE VEHICLE WARNING
LIGHTS AND
MESSAGESIN AN
EMERGENCYVEHICLE
MAINTENANCETECHNICAL
SPECIFICATIONSINDEX DASHBOARD
AND CONTROLS
fig. 113/a
F0F0701m
ASR SYSTEM (Antislip Regulator)
The ASR system controls the vehicle
drive and cuts in automatically every
time one or both driving wheels slip.
In slipping conditions, two different con-
trol systems are activated:❒
if slipping involves both driving wheels,
the ASR function intervenes reducing
the power transmitted by the engine;
❒
if the slipping involves only one driving
wheel, the ASR system cuts in auto-
matically braking the wheel that is slip-
ping. The action of the ASR system is particu-
larly helpful in the following circumstances:
❒
slipping of the inner wheel due to the
effect of dynamic load changes or ex-
cessive acceleration;
❒
too much power transmitted to the
wheels also in relation to the conditions
of the road surface;
❒
acceleration on slippery, snowy or
frozen surfaces;
❒
in the case of loss of grip on a wet sur-
face (aquaplaning).
Do not take unnecessary
risks, even if your vehicle is
fitted with the ESC and ASR sys-
tems.Your driving style must always
be suited to the road conditions, vis-
ibility and traffic.The driver is always
responsible for road safety.
WARNING
Switching the system on/off
The ASR system switches on automatically
each time the engine is started.
Switching the ESC system off will auto-
matically switch off the ASR system too.
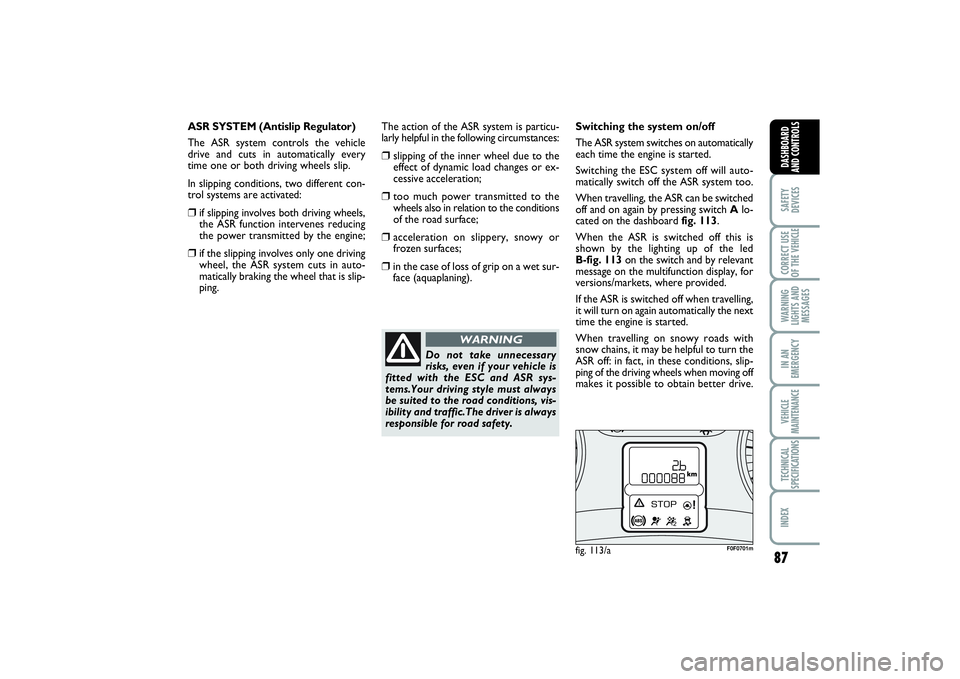
When travelling, the ASR can be switched
off and on again by pressing switch Alo-
cated on the dashboard fig. 113.
When the ASR is switched off this is
shown by the lighting up of the led
B-fig. 113on the switch and by relevant
message on the multifunction display, for
versions/markets, where provided.
If the ASR is switched off when travelling,
it will turn on again automatically the next
time the engine is started.
When travelling on snowy roads with
snow chains, it may be helpful to turn the
ASR off: in fact, in these conditions, slip-
ping of the driving wheels when moving off
makes it possible to obtain better drive.
083-096 SCUDO LUM GB 27/03/14 10:22 Pagina 87
Page 126 of 227
122WARNING
LIGHTS AND
MESSAGESIN AN
EMERGENCYVEHICLE
MAINTENANCETECHNICAL
SPECIFICATIONSINDEXDASHBOARD
AND CONTROLSSAFETY
DEVICESCORRECT USE
OF THE VEHICLE
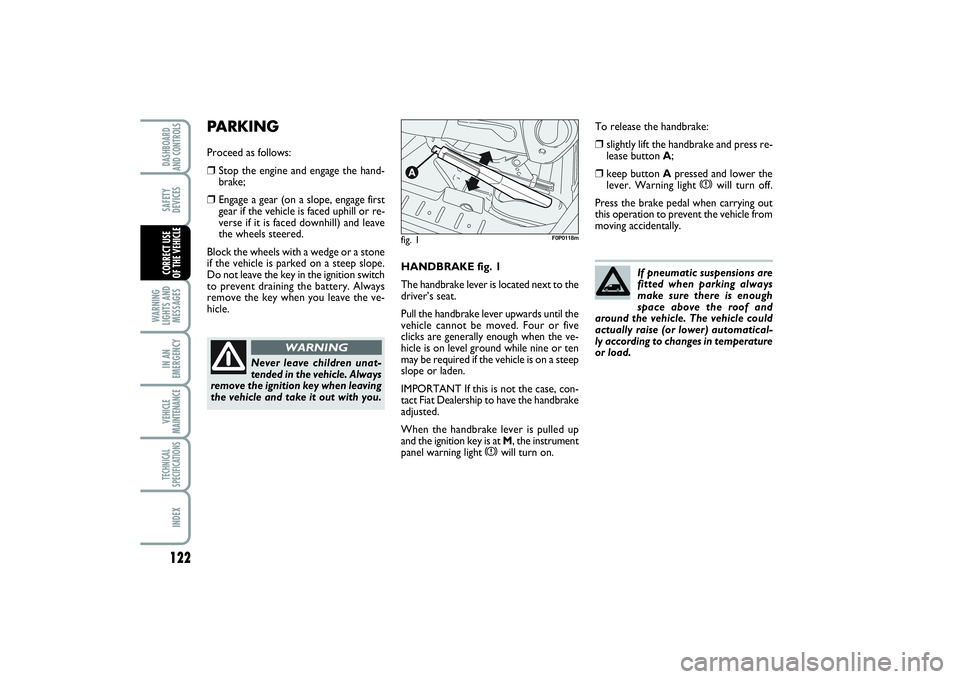
HANDBRAKE fig. 1
The handbrake lever is located next to the
driver’s seat.
Pull the handbrake lever upwards until the
vehicle cannot be moved. Four or five
clicks are generally enough when the ve-
hicle is on level ground while nine or ten
may be required if the vehicle is on a steep
slope or laden.
IMPORTANT If this is not the case, con-
tact Fiat Dealership to have the handbrake
adjusted.
When the handbrake lever is pulled up
and the ignition key is at M, the instrument
panel warning light
x
will turn on.
PARKINGProceed as follows:❒
Stop the engine and engage the hand-
brake;
❒
Engage a gear (on a slope, engage first
gear if the vehicle is faced uphill or re-
verse if it is faced downhill) and leave
the wheels steered.
Block the wheels with a wedge or a stone
if the vehicle is parked on a steep slope.
Do not leave the key in the ignition switch
to prevent draining the battery. Always
remove the key when you leave the ve-
hicle.
Never leave children unat-
tended in the vehicle. Always
remove the ignition key when leaving
the vehicle and take it out with you.
WARNING
fig. 1
F0P0118m
To release the handbrake:❒
slightly lift the handbrake and press re-
lease button A;
❒
keep button Apressed and lower the
lever. Warning light
x
will turn off.
Press the brake pedal when carrying out
this operation to prevent the vehicle from
moving accidentally.
If pneumatic suspensions are
fitted when parking always
make sure there is enough
space above the roof and
around the vehicle. The vehicle could
actually raise (or lower) automatical-
ly according to changes in temperature
or load.
119-128 SCUDO LUM GB 18/11/13 14.26 Pagina 122
Page 131 of 227
127
WARNING
LIGHTS AND
MESSAGESIN AN
EMERGENCYVEHICLE
MAINTENANCETECHNICAL
SPECIFICATIONSINDEXDASHBOARD
AND CONTROLSSAFETY
DEVICESCORRECT USE
OF THE VEHICLE
IMPORTANT When snow tyres are used
with a max speed index below the one
that can be reached by the vehicle (in-
creased by 5%), place a notice in the pas-
senger’s compartment, plainly in the dri-
ver’s view which states the max permis-
sible speed of the snow tyres (as per EC
Directive).
All four tyres should be the same (brand
and track) to ensure greater safety when
driving and braking and better driveability.
Remember that it is inappropriate to
change the direction of rotation of tyres.
SNOW CHAINSThe use of snow chains is regulated by the
legislation in force in the country the ve-
hicle is driven in.
Snow chains should only be applied to the
driving wheels (front wheels). We rec-
ommend using Lineaccessori Fiat snow
chains.
Check the tension of the chains after the
first few metres have been driven.
IMPORTANT With snow chains, use the
accelerator with extreme care to prevent
or to limit as much as possible slipping of
the driving wheels that could cause chain
breaking resulting in damages to the ve-
hicle body or mechanical components.
SNOW TYRESUse snow tyres of the same size as the
normal tyres provided with the vehicle.
Fiat Dealership will be happy to provide
advice concerning the most suitable type
of tyre for the customer’s requirements.
The winter features of these tyres are re-
duced considerably when the tread depth
is below 4 mm. In this case, they should
be replaced.
Due to the snow tyre features, under nor-
mal conditions of use or on long motor-
way journeys, the performance of these
tyres is lower than that of normal tyres. It
is therefore necessary to limit their use to
the purposes for which they are certified.
The max speed for snow
tyres with “Q” marking is
160 km/h; 190 km/h for tyres with “T”
marking and 210 km/h for tyres with
H marking. The Road Traffic Code
speed limits must however be always
strictly observed.
WARNING
119-128 SCUDO LUM GB 18/11/13 14.26 Pagina 127
Page 137 of 227
133
IN AN
EMERGENCYVEHICLE
MAINTENANCETECHNICAL
SPECIFICATIONSINDEXDASHBOARD
AND CONTROLSSAFETY
DEVICESCORRECT USE
OF THE VEHICLEWARNING
LIGHTS AND
MESSAGES
ELECTRIC POWER
STEERING FAILURE
(amber)
Turning the ignition key to Mthe warn-
ing light turns on, but it should go off
after few seconds.
If the warning light stays on, you will not
have the steering assistance and the
effort on the steering wheel will be
increased, steering is however possible.
Contact Fiat Dealership.
If warning light
v
flashes,
contact Fiat Dealership im-
mediately to have oil changed and in-
strument panel warning light turned
off.
WARNING
»
INCOMPLETE DOOR
LOCKING (red)
The warning light lights up, on
some versions, when one or more
doors are not perfectly closed.
If the warning light lights up; check that
the passenger compartment, the side,
rear and the engine casing doors are
closed.
A buzzer will sound when doors are
open and the vehicle is moving.
9
129-138 SCUDO LUM GB 27/03/14 11:47 Pagina 133
Page 145 of 227
141
WARNING
LIGHTS AND
MESSAGESVEHICLE
MAINTENANCETECHNICAL
SPECIFICATIONSINDEXDASHBOARD
AND CONTROLSSAFETY
DEVICESCORRECT USE
OF THE VEHICLEIN AN
EMERGENCY
IF A TYRE
IS PUNCTURED GENERAL INSTRUCTIONS
Wheel changing and correct use of the
jack and spare wheel call for some pre-
cautions as listed below.
Alert other drivers that the
vehicle is stationary in com-
pliance with the regulations in force:
hazard warning lights, warning trian-
gle etc. Any passengers on board
should leave the vehicle, especially if
it is heavily laden. Passengers should
stay away from oncoming traffic
while the wheel is being changed on.
Pull the handbrake.
WARNING
Before starting to change
the wheel, deactivate the
pneumatic suspension system (for
versions/markets, where provided).
See paragraph “Pneumatic suspen-
sions” in this section.
WARNING
The spare wheel is specific to
your vehicle, do not use it on
other models, or use the spare wheel
of other models on your vehicle.
Wheel bolts are specific to your vehi-
cle: do not use them on other models
and do not use bolts of other models.
WARNING
Have the punctured wheel
repaired and refitted as soon
as possible. Do not grease the threads
of bolts before installing them: they
might slip out.
WARNING
The jack shall only be used
for changing wheels on the
vehicle with which it is provided or on
vehicles of the same model. It must
not be used for other purposes such
as for instance raising vehicles of oth-
er models. In no case should it be used
for repairs under the vehicle. Incor-
rect positioning of the jack may cause
the jacked vehicle to fall. Do not use
the jack for higher capacities than
stated on its label.
WARNING
Fasten the wheel cap cor-
rectly to prevent the wheel
from coming free in motion.
Never tamper with the inflation
valve. Never place tools between the
rim and tyre. Check and restore, if re-
quired, the pressure of tyres and
spare wheel to the values given in sec-
tion “Technical Specifications”.
WARNING
Please note:❒
the jack weight is 1.76 kg;
❒
the jack requires no adjustment;
❒
the jack cannot be repaired. If it breaks
it must be replaced with a new jack;
❒
no tool other than its cranking device
may be fitted on the jack.
139-158 SCUDO LUM GB 07/03/14 08.47 Pagina 141
Page 146 of 227
142WARNING
LIGHTS AND
MESSAGESVEHICLE
MAINTENANCETECHNICAL
SPECIFICATIONSINDEXDASHBOARD
AND CONTROLSSAFETY
DEVICESCORRECT USE
OF THE VEHICLEIN AN
EMERGENCY
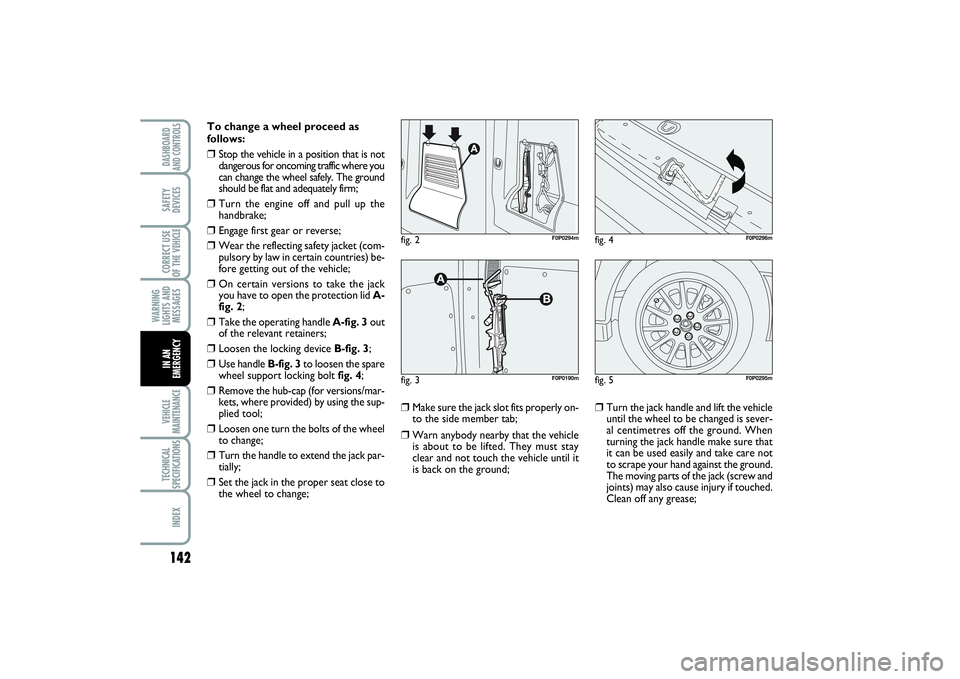
To change a wheel proceed as
follows:❒
Stop the vehicle in a position that is not
dangerous for oncoming traffic where you
can change the wheel safely. The ground
should be flat and adequately firm;
❒
Turn the engine off and pull up the
handbrake;
❒
Engage first gear or reverse;
❒
Wear the reflecting safety jacket (com-
pulsory by law in certain countries) be-
fore getting out of the vehicle;
❒
On certain versions to take the jack
you have to open the protection lid A-
fig. 2;
❒
Take the operating handle A-fig. 3 out
of the relevant retainers;
❒
Loosen the locking device B-fig. 3;
❒
Use handle B-fig. 3to loosen the spare
wheel support locking bolt fig. 4;
❒
Remove the hub-cap (for versions/mar-
kets, where provided) by using the sup-
plied tool;
❒
Loosen one turn the bolts of the wheel
to change;
❒
Turn the handle to extend the jack par-
tially;
❒
Set the jack in the proper seat close to
the wheel to change;
❒
Make sure the jack slot fits properly on-
to the side member tab;
❒
Warn anybody nearby that the vehicle
is about to be lifted. They must stay
clear and not touch the vehicle until it
is back on the ground;
❒
Turn the jack handle and lift the vehicle
until the wheel to be changed is sever-
al centimetres off the ground. When
turning the jack handle make sure that
it can be used easily and take care not
to scrape your hand against the ground.
The moving parts of the jack (screw and
joints) may also cause injury if touched.
Clean off any grease;
fig. 4
F0P0296m
fig. 5
F0P0295m
fig. 2
F0P0294m
fig. 3
F0P0190m
139-158 SCUDO LUM GB 07/03/14 08.47 Pagina 142
Page 147 of 227
143
WARNING
LIGHTS AND
MESSAGESVEHICLE
MAINTENANCETECHNICAL
SPECIFICATIONSINDEXDASHBOARD
AND CONTROLSSAFETY
DEVICESCORRECT USE
OF THE VEHICLEIN AN
EMERGENCY
❒
Remove the hub-cap by using the tool
supplied with the vehicle. Unscrew the
anti-theft bolt (versions with alloy
wheel rims) (one per wheel) by using
the tool supplied with the vehicle and
then the remaining bolts so as to re-
move the wheel;
❒
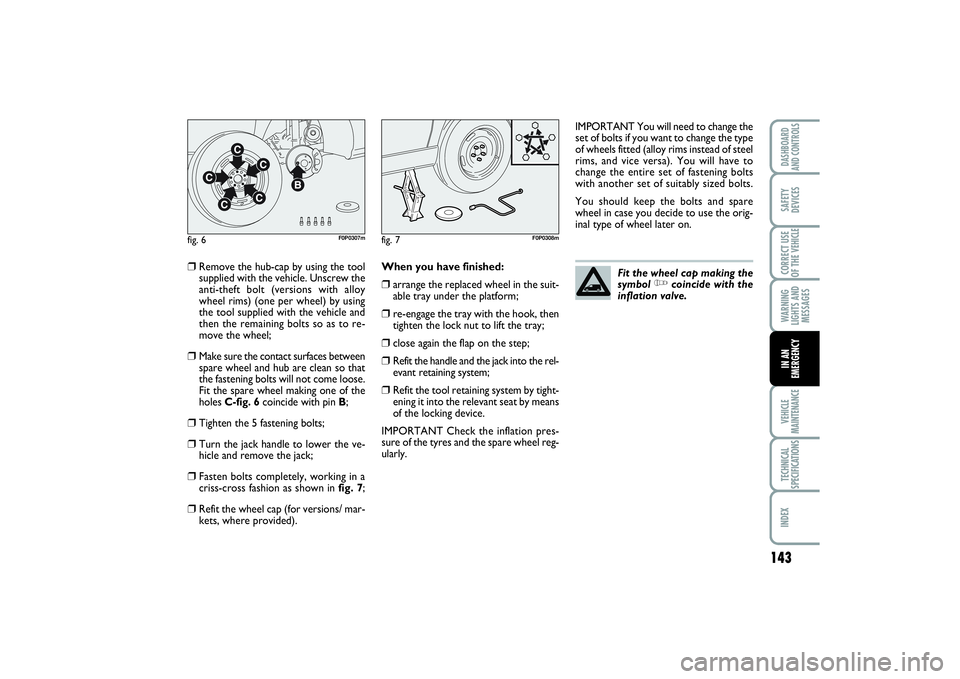
Make sure the contact surfaces between
spare wheel and hub are clean so that
the fastening bolts will not come loose.
Fit the spare wheel making one of the
holes C-fig. 6coincide with pin B;
❒
Tighten the 5 fastening bolts;
❒
Turn the jack handle to lower the ve-
hicle and remove the jack;
❒
Fasten bolts completely, working in a
criss-cross fashion as shown in fig. 7;
❒
Refit the wheel cap (for versions/ mar-
kets, where provided).When you have finished:
❒
arrange the replaced wheel in the suit-
able tray under the platform;
❒
re-engage the tray with the hook, then
tighten the lock nut to lift the tray;
❒
close again the flap on the step;
❒
Refit the handle and the jack into the rel-
evant retaining system;
❒
Refit the tool retaining system by tight-
ening it into the relevant seat by means
of the locking device.
IMPORTANT Check the inflation pres-
sure of the tyres and the spare wheel reg-
ularly.IMPORTANT You will need to change the
set of bolts if you want to change the type
of wheels fitted (alloy rims instead of steel
rims, and vice versa). You will have to
change the entire set of fastening bolts
with another set of suitably sized bolts.
You should keep the bolts and spare
wheel in case you decide to use the orig-
inal type of wheel later on.
fig. 6
F0P0307m
fig. 7
F0P0308m
Fit the wheel cap making the
symbol
Y
coincide with the
inflation valve.
139-158 SCUDO LUM GB 07/03/14 08.47 Pagina 143
Page 177 of 227
173
WARNING
LIGHTS AND
MESSAGESTECHNICAL
SPECIFICATIONSINDEX DASHBOARD
AND CONTROLSSAFETY
DEVICESCORRECT USE
OF THE VEHICLEIN AN
EMERGENCYVEHICLE
MAINTENANCE
WHEELS AND TYRESCheck the pressure of each tyre, includ-
ing the spare, every two weeks and before
long journeys. The pressure should be
checked with the tyre rested and cold.
It is normal for pressure to rise when you
are driving. For the correct tyre inflation
pressure, see “Wheels” in section “Tech-
nical specifications”.
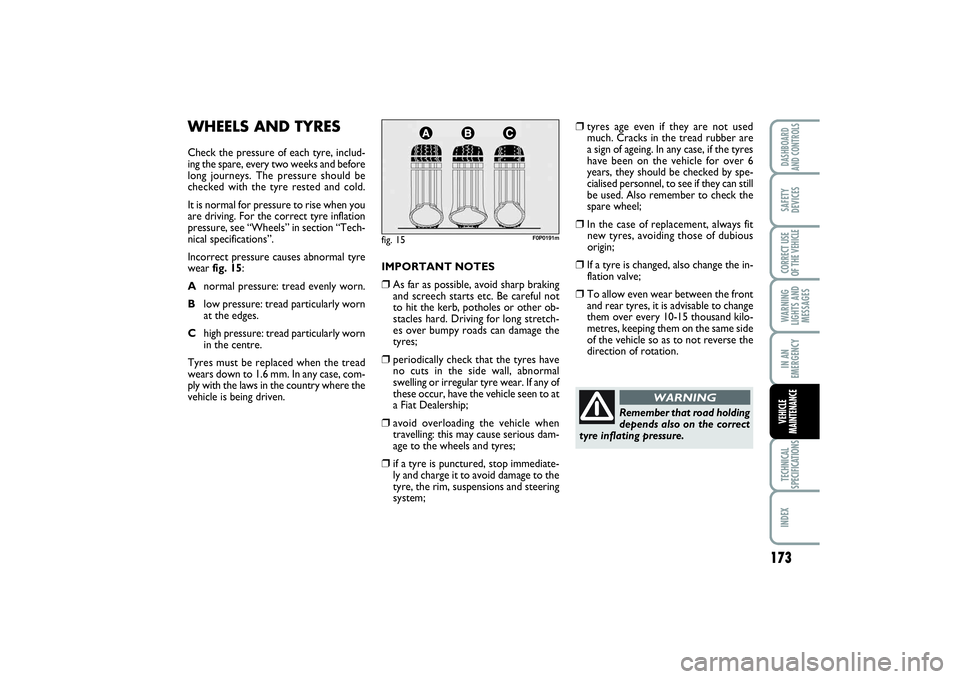
Incorrect pressure causes abnormal tyre
wearfig. 15:
Anormal pressure: tread evenly worn.
Blow pressure: tread particularly worn
at the edges.
Chigh pressure: tread particularly worn
in the centre.
Tyres must be replaced when the tread
wears down to 1.6 mm. In any case, com-
ply with the laws in the country where the
vehicle is being driven.
fig. 15
F0P0191m
IMPORTANT NOTES❒
As far as possible, avoid sharp braking
and screech starts etc. Be careful not
to hit the kerb, potholes or other ob-
stacles hard. Driving for long stretch-
es over bumpy roads can damage the
tyres;
❒
periodically check that the tyres have
no cuts in the side wall, abnormal
swelling or irregular tyre wear. If any of
these occur, have the vehicle seen to at
a Fiat Dealership;
❒
avoid overloading the vehicle when
travelling: this may cause serious dam-
age to the wheels and tyres;
❒
if a tyre is punctured, stop immediate-
ly and charge it to avoid damage to the
tyre, the rim, suspensions and steering
system;
❒
tyres age even if they are not used
much. Cracks in the tread rubber are
a sign of ageing. In any case, if the tyres
have been on the vehicle for over 6
years, they should be checked by spe-
cialised personnel, to see if they can still
be used. Also remember to check the
spare wheel;
❒
In the case of replacement, always fit
new tyres, avoiding those of dubious
origin;
❒
If a tyre is changed, also change the in-
flation valve;
❒
To allow even wear between the front
and rear tyres, it is advisable to change
them over every 10-15 thousand kilo-
metres, keeping them on the same side
of the vehicle so as to not reverse the
direction of rotation.
Remember that road holding
depends also on the correct
tyre inflating pressure.
WARNING
159-178 SCUDO LUM GB 12/12/13 10.02 Pagina 173