remove seats FIAT SCUDO 2016 Owner handbook (in English)
[x] Cancel search | Manufacturer: FIAT, Model Year: 2016, Model line: SCUDO, Model: FIAT SCUDO 2016Pages: 227, PDF Size: 4.46 MB
Page 24 of 227
20SAFETY
DEVICESCORRECT USE
OF THE VEHICLE
WARNING
LIGHTS AND
MESSAGESIN AN
EMERGENCYVEHICLE
MAINTENANCETECHNICAL
SPECIFICATIONSINDEX
DASHBOARD
AND
CONTROLS
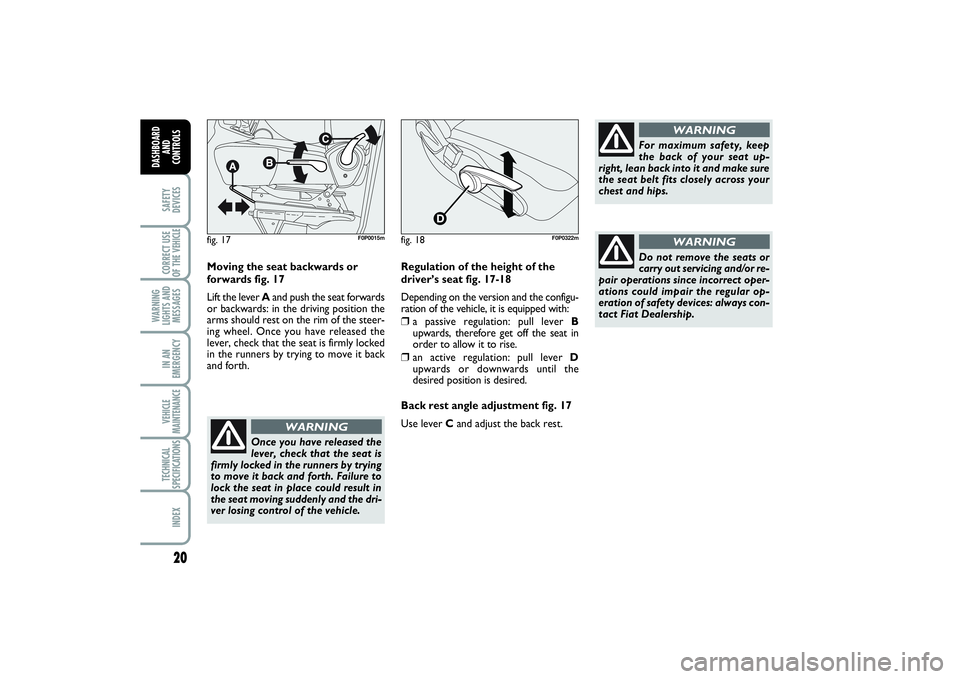
Moving the seat backwards or
forwards fig. 17
Lift the lever Aand push the seat forwards
or backwards: in the driving position the
arms should rest on the rim of the steer-
ing wheel. Once you have released the
lever, check that the seat is firmly locked
in the runners by trying to move it back
and forth.
Once you have released the
lever, check that the seat is
firmly locked in the runners by trying
to move it back and forth. Failure to
lock the seat in place could result in
the seat moving suddenly and the dri-
ver losing control of the vehicle.
WARNING
For maximum safety, keep
the back of your seat up-
right, lean back into it and make sure
the seat belt fits closely across your
chest and hips.
WARNING
Regulation of the height of the
driver’s seat fig. 17-18
Depending on the version and the configu-
ration of the vehicle, it is equipped with: ❒
a passive regulation: pull lever B
upwards, therefore get off the seat in
order to allow it to rise.
❒
an active regulation: pull lever D
upwards or downwards until the
desired position is desired.
Back rest angle adjustment fig. 17
Use lever C and adjust the back rest.
Do not remove the seats or
carry out servicing and/or re-
pair operations since incorrect oper-
ations could impair the regular op-
eration of safety devices: always con-
tact Fiat Dealership.
WARNING
fig. 17
F0P0015m
fig. 18
F0P0322m
020-082 SCUDO LUM GB 19/11/13 09.53 Pagina 20
Page 26 of 227
22SAFETY
DEVICESCORRECT USE
OF THE VEHICLE
WARNING
LIGHTS AND
MESSAGESIN AN
EMERGENCYVEHICLE
MAINTENANCETECHNICAL
SPECIFICATIONSINDEX
DASHBOARD
AND
CONTROLS
FOLDING, REMOVING AND
REFITTING THE REAR BENCH
SEAT
To remove and then to re-
fit the bench seat, keep
the back rest firmly lowered and
flattened against the cushion to
prevent any contact between the
seat articulation mechanisms.
WARNING
REAR SEATSSingle seat
This seat can be folded to facilitate access
to the rear area and it can be removed.
Certain versions can be fitted with a shelf
obtained in the back of the seat.
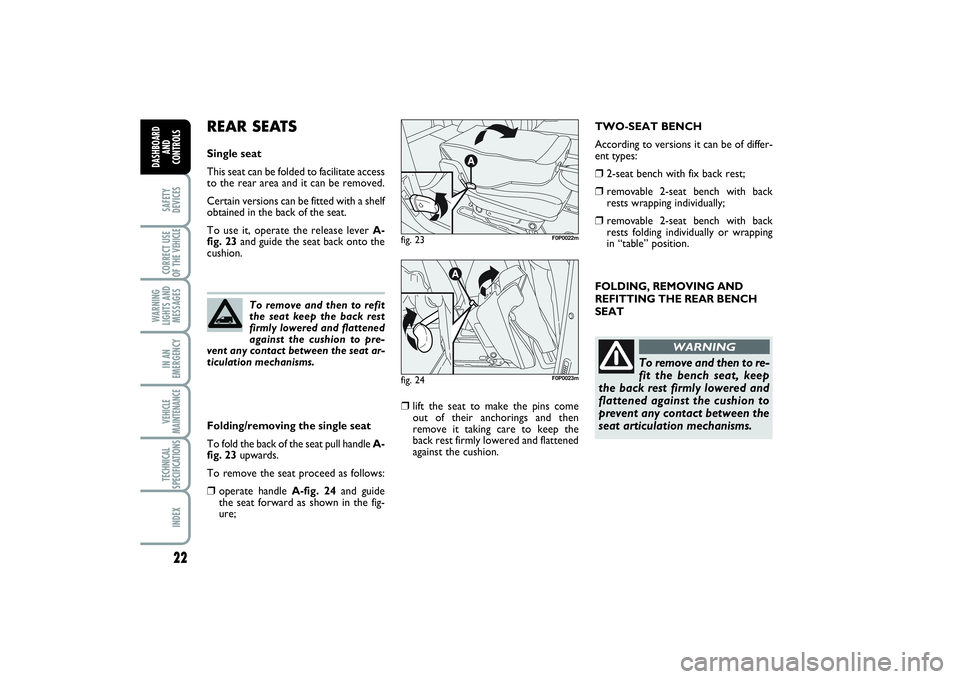
To use it, operate the release lever A-
fig. 23and guide the seat back onto the
cushion.
Folding/removing the single seat
To fold the back of the seat pull handle A-
fig. 23upwards.
To remove the seat proceed as follows:❒
operate handle A-fig. 24and guide
the seat forward as shown in the fig-
ure;
❒
lift the seat to make the pins come
out of their anchorings and then
remove it taking care to keep the
back rest firmly lowered and flattened
against the cushion.
fig. 23
F0P0022m
fig. 24
F0P0023m
To remove and then to refit
the seat keep the back rest
firmly lowered and flattened
against the cushion to pre-
vent any contact between the seat ar-
ticulation mechanisms.
TWO-SEAT BENCH
According to versions it can be of differ-
ent types:❒
2-seat bench with fix back rest;
❒
removable 2-seat bench with back
rests wrapping individually;
❒
removable 2-seat bench with back
rests folding individually or wrapping
in “table” position.
020-082 SCUDO LUM GB 19/11/13 09.53 Pagina 22
Page 27 of 227
23
SAFETY
DEVICESCORRECT USE
OF THE VEHICLE WARNING
LIGHTS AND
MESSAGESIN AN
EMERGENCYVEHICLE
MAINTENANCETECHNICAL
SPECIFICATIONSINDEX DASHBOARD
AND CONTROLS
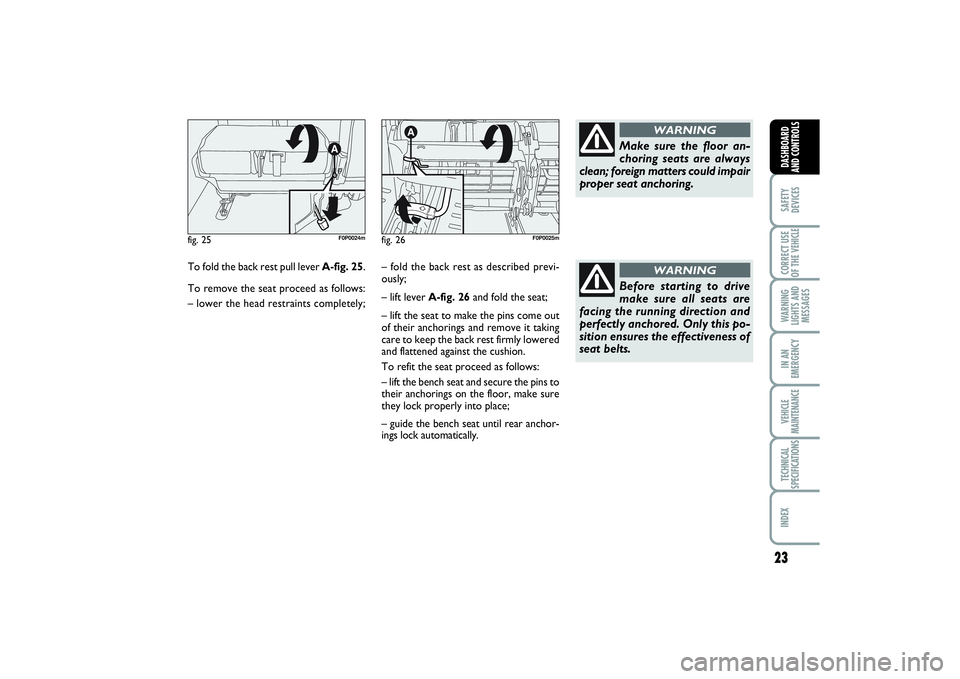
To fold the back rest pull lever A-fig. 25.
To remove the seat proceed as follows:
– lower the head restraints completely;fig. 25
F0P0024m
fig. 26
F0P0025m
– fold the back rest as described previ-
ously;
– lift leverA-fig. 26and fold the seat;
– lift the seat to make the pins come out
of their anchorings and remove it taking
care to keep the back rest firmly lowered
and flattened against the cushion.
To refit the seat proceed as follows:
– lift the bench seat and secure the pins to
their anchorings on the floor, make sure
they lock properly into place;
– guide the bench seat until rear anchor-
ings lock automatically.
Make sure the floor an-
choring seats are always
clean; foreign matters could impair
proper seat anchoring.
WARNING
Before starting to drive
make sure all seats are
facing the running direction and
perfectly anchored. Only this po-
sition ensures the effectiveness of
seat belts.
WARNING
020-082 SCUDO LUM GB 19/11/13 09.53 Pagina 23
Page 79 of 227
75
SAFETY
DEVICESCORRECT USE
OF THE VEHICLE WARNING
LIGHTS AND
MESSAGESIN AN
EMERGENCYVEHICLE
MAINTENANCETECHNICAL
SPECIFICATIONSINDEX DASHBOARD
AND CONTROLS
Always use this device when
transporting children.
WARNING
After engaging the child lock
on both rear doors, check for
proper engagement by trying to open
a rear door with the internal handle.
WARNING
SLIDING LUGGAGE
COVER (for versions/markets, where provided)
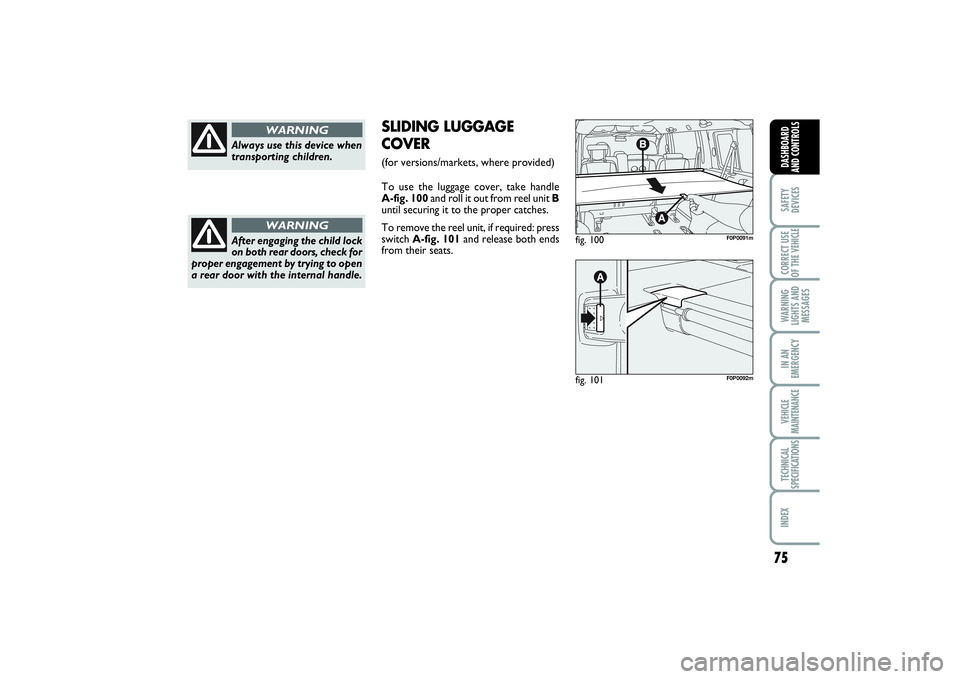
To use the luggage cover, take handle
A-fig. 100and roll it out from reel unit B
until securing it to the proper catches.
To remove the reel unit, if required: press
switch A-fig. 101and release both ends
from their seats.
fig. 100
F0P0091m
fig. 101
F0P0092m
020-082 SCUDO LUM GB 19/11/13 09.54 Pagina 75
Page 159 of 227
155
WARNING
LIGHTS AND
MESSAGESVEHICLE
MAINTENANCETECHNICAL
SPECIFICATIONSINDEXDASHBOARD
AND CONTROLSSAFETY
DEVICESCORRECT USE
OF THE VEHICLEIN AN
EMERGENCY
fig. 24
F1
F2
F3
F1 F4 F3 F4 F5
F0P0241m
F1
F2
F3
F4
F36
F37
F38
F39
F4030
–
40/50
–
15
10
20
–
5
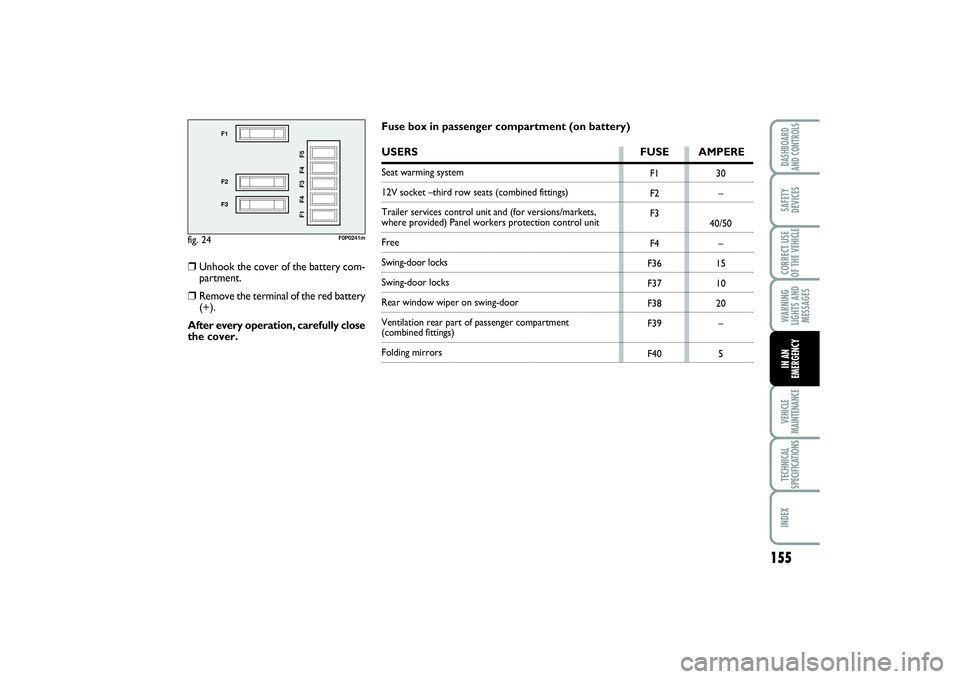
Fuse box in passenger compartment (on battery)USERS FUSE AMPERESeat warming system12V socket –third row seats (combined fittings)
Trailer services control unit and (for versions/markets, where provided) Panel workers protection control unitFreeSwing-door locksSwing-door locksRear window wiper on swing-door
Ventilation rear part of passenger compartment (combined fittings)Folding mirrors
❒
Unhook the cover of the battery com-
partment.
❒
Remove the terminal of the red battery
(+).
After every operation, carefully close
the cover.
139-158 SCUDO LUM GB 07/03/14 08.47 Pagina 155
Page 182 of 227
178WARNING
LIGHTS AND
MESSAGESTECHNICAL
SPECIFICATIONSINDEXDASHBOARD
AND CONTROLSSAFETY
DEVICESCORRECT USE
OF THE VEHICLEIN AN
EMERGENCYVEHICLE
MAINTENANCE
Fabric upholstery of your ve-
hicle is purpose-made to
withstand common wear re-
sulting from normal use of the
vehicle. It is however absolutely neces-
sary to prevent hard and/or prolonged
scratching/scraping caused by clothing
accessories like metallic buckles, studs,
“Velcro” fixings, etc. that stressing lo-
cally the fabric could break yarns and
damage the upholstery as a conse-
quence. CLEANING SEATS
AND FABRICS
Remove dust with a soft brush and vacu-
um cleaner. For velvet seats use a damp
brush.
Rub the seats with a sponge moistened
with a solution of water and neutral de-
tergent.
Never use flammable prod-
ucts like oil ether or rectified
petrol for cleaning vehicle interiors.
Electrostatic discharges generated by
rubbing during cleaning operations
could cause fire.
WARNING
Do not keep aerosol cans in
the vehicle: they might ex-
plode. Aerosol cans must never be ex-
posed to a temperature above 50° C.
The temperature inside the vehicle
exposed to the sun may go well be-
yond that figure.
WARNING
INTERIORSPeriodically check that water is not trapped
under the mats (due to water dripping off
shoes, umbrellas, etc.) which could cause
oxidisation of the sheet metal.STEERING WHEEL/GEAR LEVER
KNOB WITH GENUINE
LEATHER COVERING
These components shall only be cleaned
with water and neutral soap.
Never use spirit or alcohol-based prod-
ucts.
Before using special products for clean-
ing interiors, read carefully label instruc-
tions and indications to make sure they
are free from spirit and/or alcohol-based
substances.
If when cleaning the windscreen with spe-
cial glass products, some drops fall on the
leather covering of the steering wheel/gear
lever knob remove them immediately and
then clean with water and neutral soap.
IMPORTANT Take the utmost care when
engaging the steering lock to prevent
scratching the leather covering.
INTERIOR PLASTIC PARTS
For routine cleaning of interior plastic parts
use a soft cloth moistened with water and
neutral soap. Remove grease or persisting
stains using appropriate solvent-free prod-
ucts designed to preserve appearance and
colour of plastic components.
IMPORTANT Never use alcohol, petrols
and derivatives to clean the instrument
panel lens.
159-178 SCUDO LUM GB 12/12/13 10.02 Pagina 178