Battery type FIAT SEDICI 2007 2.G Owners Manual
[x] Cancel search | Manufacturer: FIAT, Model Year: 2007, Model line: SEDICI, Model: FIAT SEDICI 2007 2.GPages: 266, PDF Size: 3.24 MB
Page 16 of 266
15
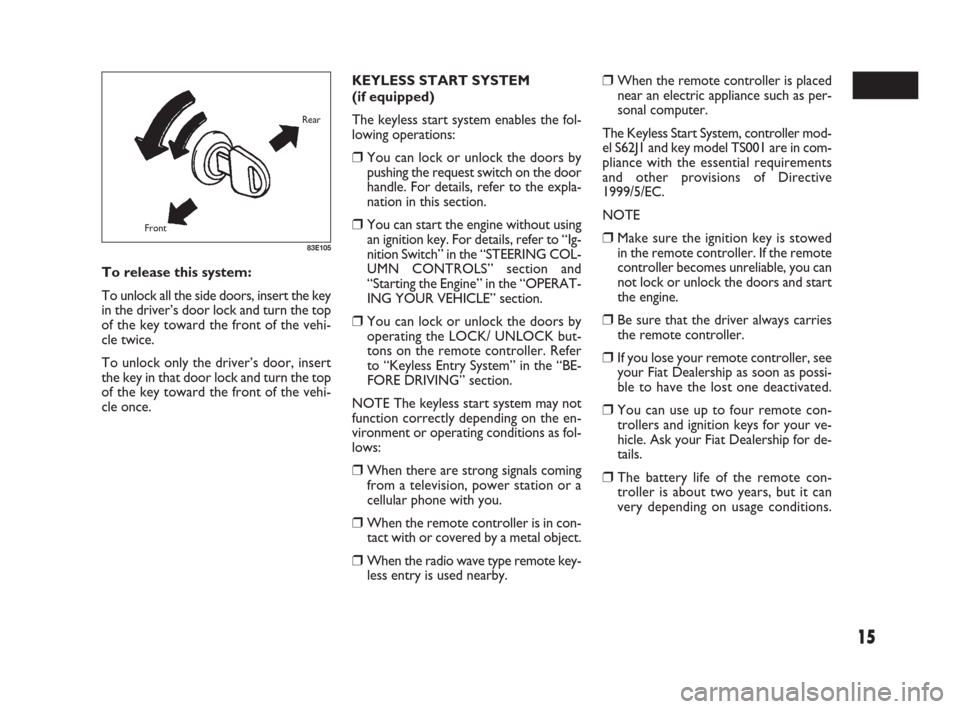
To release this system:
To unlock all the side doors, insert the key
in the driver’s door lock and turn the top
of the key toward the front of the vehi-
cle twice.
To unlock only the driver’s door, insert
the key in that door lock and turn the top
of the key toward the front of the vehi-
cle once.
83E105
Rear
Front
❒When the remote controller is placed
near an electric appliance such as per-
sonal computer.
The Keyless Start System, controller mod-
el S62J1 and key model TS001 are in com-
pliance with the essential requirements
and other provisions of Directive
1999/5/EC.
NOTE
❒Make sure the ignition key is stowed
in the remote controller. If the remote
controller becomes unreliable, you can
not lock or unlock the doors and start
the engine.
❒Be sure that the driver always carries
the remote controller.
❒If you lose your remote controller, see
your Fiat Dealership as soon as possi-
ble to have the lost one deactivated.
❒You can use up to four remote con-
trollers and ignition keys for your ve-
hicle. Ask your Fiat Dealership for de-
tails.
❒The battery life of the remote con-
troller is about two years, but it can
very depending on usage conditions. KEYLESS START SYSTEM
(if equipped)
The keyless start system enables the fol-
lowing operations:
❒You can lock or unlock the doors by
pushing the request switch on the door
handle. For details, refer to the expla-
nation in this section.
❒You can start the engine without using
an ignition key. For details, refer to “Ig-
nition Switch” in the “STEERING COL-
UMN CONTROLS” section and
“Starting the Engine” in the “OPERAT-
ING YOUR VEHICLE” section.
❒You can lock or unlock the doors by
operating the LOCK/ UNLOCK but-
tons on the remote controller. Refer
to “Keyless Entry System” in the “BE-
FORE DRIVING” section.
NOTE The keyless start system may not
function correctly depending on the en-
vironment or operating conditions as fol-
lows:
❒When there are strong signals coming
from a television, power station or a
cellular phone with you.
❒When the remote controller is in con-
tact with or covered by a metal object.
❒When the radio wave type remote key-
less entry is used nearby.
009-056 Fiat16 New GB 27-11-2007 11:25 Pagina 15
Page 21 of 266
20
Replacement of the battery
If the transmitter/ remote controller be-
comes unreliable, replace the battery.
To replace the battery for the
transmitter of the keyless entry
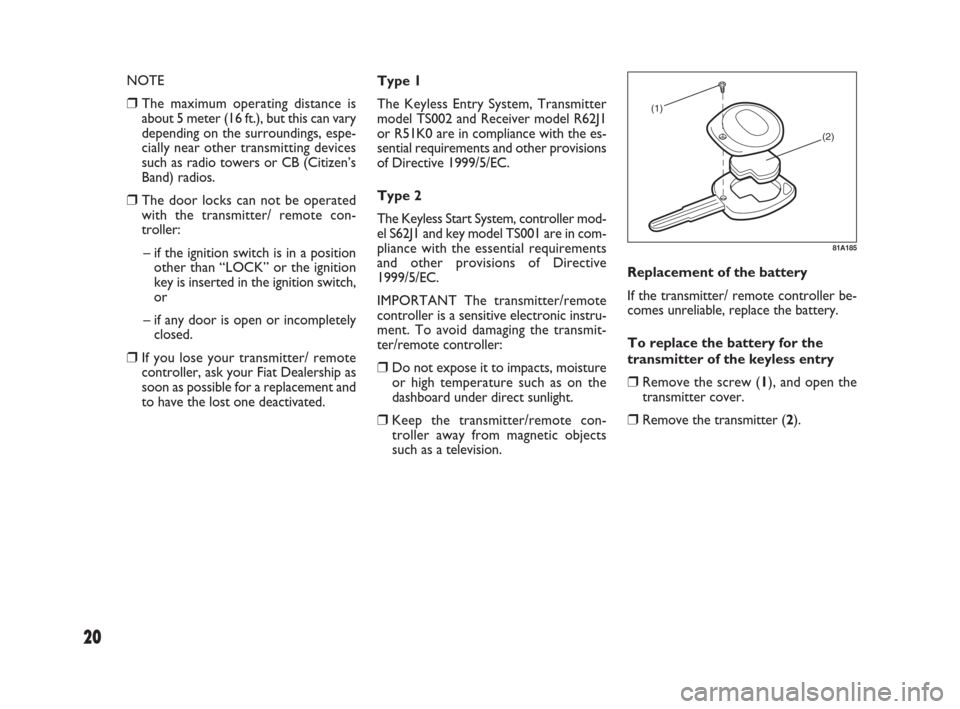
❒Remove the screw (1), and open the
transmitter cover.
❒Remove the transmitter (2). Type 1
The Keyless Entry System, Transmitter
model TS002 and Receiver model R62J1
or R51K0 are in compliance with the es-
sential requirements and other provisions
of Directive 1999/5/EC.
Type 2
The Keyless Start System, controller mod-
el S62J1 and key model TS001 are in com-
pliance with the essential requirements
and other provisions of Directive
1999/5/EC.
IMPORTANT The transmitter/remote
controller is a sensitive electronic instru-
ment. To avoid damaging the transmit-
ter/remote controller:
❒Do not expose it to impacts, moisture
or high temperature such as on the
dashboard under direct sunlight.
❒Keep the transmitter/remote con-
troller away from magnetic objects
such as a television.
(1)
(2)
81A185
NOTE
❒The maximum operating distance is
about 5 meter (16 ft.), but this can vary
depending on the surroundings, espe-
cially near other transmitting devices
such as radio towers or CB (Citizen’s
Band) radios.
❒The door locks can not be operated
with the transmitter/ remote con-
troller:
– if the ignition switch is in a position
other than “LOCK” or the ignition
key is inserted in the ignition switch,
or
– if any door is open or incompletely
closed.
❒If you lose your transmitter/ remote
controller, ask your Fiat Dealership as
soon as possible for a replacement and
to have the lost one deactivated.
009-056 Fiat16 New GB 27-11-2007 11:25 Pagina 20
Page 22 of 266
21
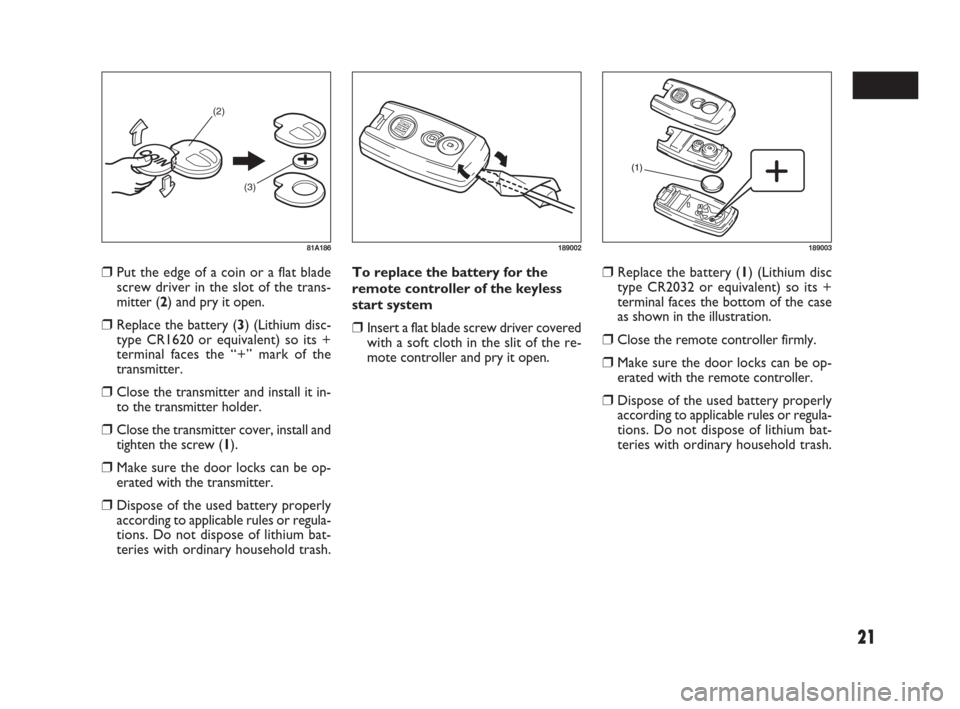
❒Put the edge of a coin or a flat blade
screw driver in the slot of the trans-
mitter (2) and pry it open.
❒Replace the battery (3) (Lithium disc-
type CR1620 or equivalent) so its +
terminal faces the “+” mark of the
transmitter.
❒Close the transmitter and install it in-
to the transmitter holder.
❒Close the transmitter cover, install and
tighten the screw (1).
❒Make sure the door locks can be op-
erated with the transmitter.
❒Dispose of the used battery properly
according to applicable rules or regula-
tions. Do not dispose of lithium bat-
teries with ordinary household trash.
(2)
(3)
81A186
❒Replace the battery (1) (Lithium disc
type CR2032 or equivalent) so its +
terminal faces the bottom of the case
as shown in the illustration.
❒Close the remote controller firmly.
❒Make sure the door locks can be op-
erated with the remote controller.
❒Dispose of the used battery properly
according to applicable rules or regula-
tions. Do not dispose of lithium bat-
teries with ordinary household trash. To replace the battery for the
remote controller of the keyless
start system
❒Insert a flat blade screw driver covered
with a soft cloth in the slit of the re-
mote controller and pry it open.
189002189003
009-056 Fiat16 New GB 27-11-2007 11:25 Pagina 21
Page 89 of 266
88
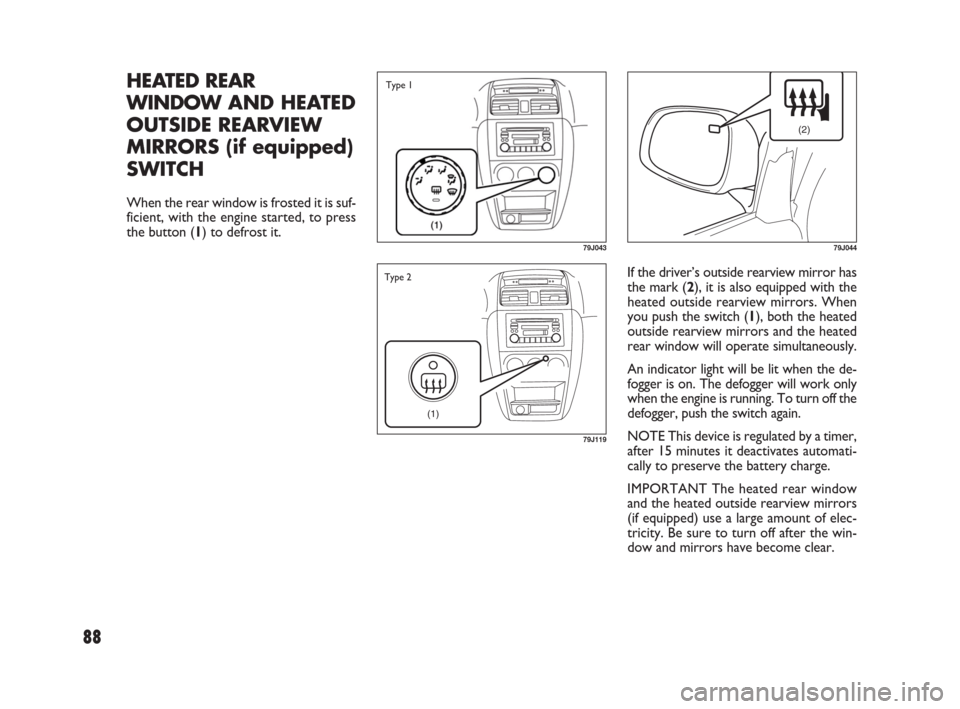
If the driver’s outside rearview mirror has
the mark (2), it is also equipped with the
heated outside rearview mirrors. When
you push the switch (1), both the heated
outside rearview mirrors and the heated
rear window will operate simultaneously.
An indicator light will be lit when the de-
fogger is on. The defogger will work only
when the engine is running. To turn off the
defogger, push the switch again.
NOTE This device is regulated by a timer,
after 15 minutes it deactivates automati-
cally to preserve the battery charge.
IMPORTANT The heated rear window
and the heated outside rearview mirrors
(if equipped) use a large amount of elec-
tricity. Be sure to turn off after the win-
dow and mirrors have become clear.
HEATED REAR
WINDOWAND HEATED
OUTSIDE REARVIEW
MIRRORS (if equipped)
SWITCH
When the rear window is frosted it is suf-
ficient, with the engine started, to press
the button (1) to defrost it.
79J043
(1)
79J119
Type 1
Type 2
(2)
79J044
069-128 Fiat16 New GB 27-11-2007 11:26 Pagina 88
Page 97 of 266
96
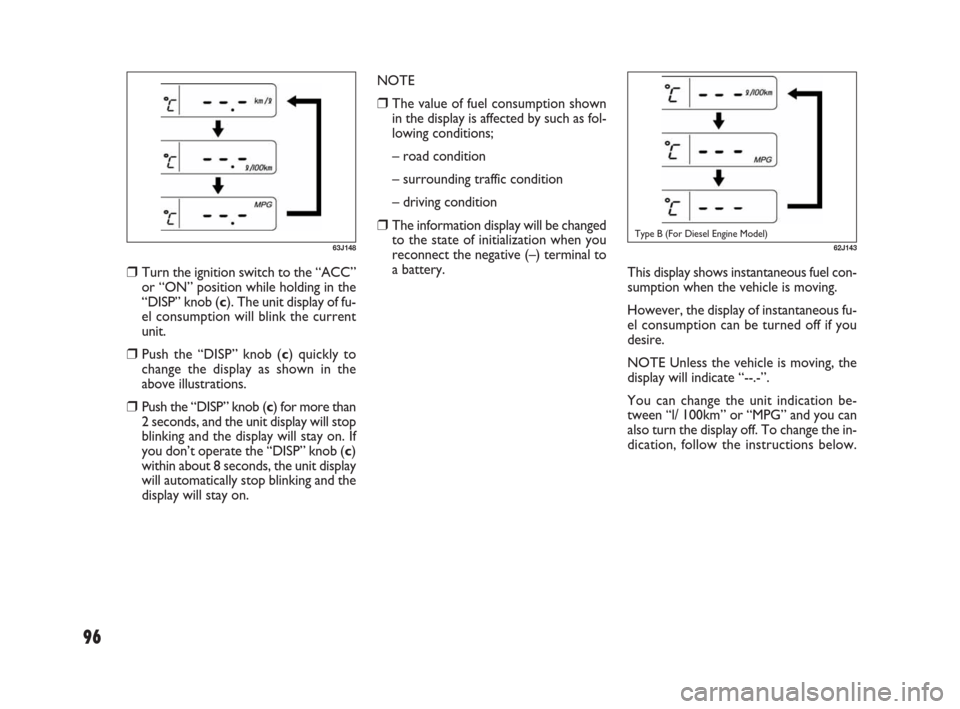
62J143Type B (For Diesel Engine Model)
This display shows instantaneous fuel con-
sumption when the vehicle is moving.
However, the display of instantaneous fu-
el consumption can be turned off if you
desire.
NOTE Unless the vehicle is moving, the
display will indicate “--.-”.
You can change the unit indication be-
tween “l/ 100km” or “MPG” and you can
also turn the display off. To change the in-
dication, follow the instructions below. NOTE
❒The value of fuel consumption shown
in the display is affected by such as fol-
lowing conditions;
– road condition
– surrounding traffic condition
– driving condition
❒The information display will be changed
to the state of initialization when you
reconnect the negative (–) terminal to
a battery.
63J148
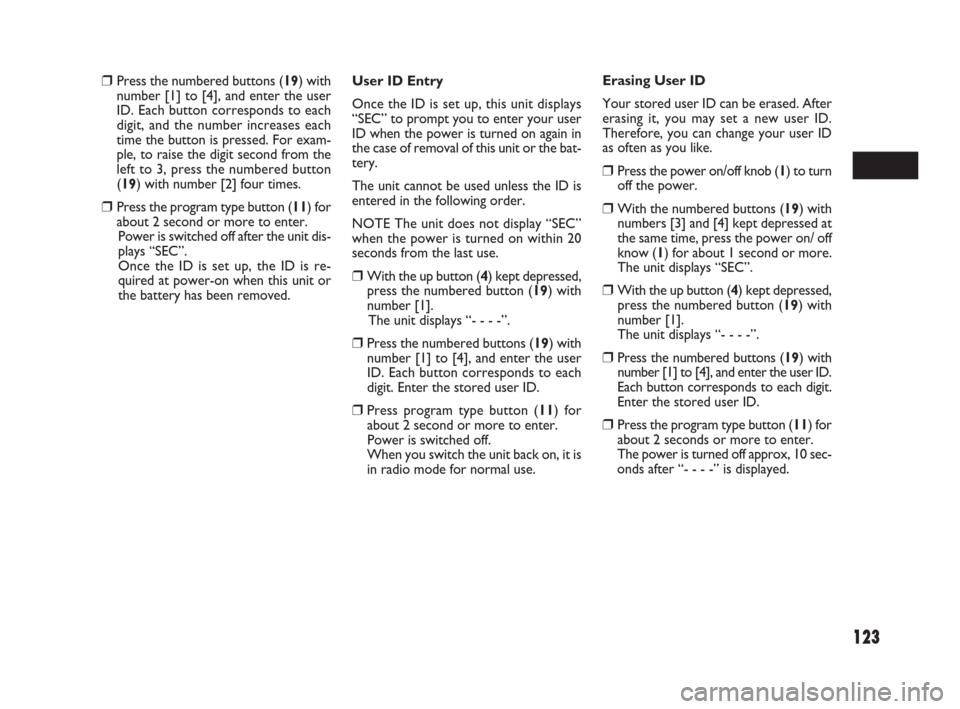
❒Turn the ignition switch to the “ACC”
or “ON” position while holding in the
“DISP” knob (c). The unit display of fu-
el consumption will blink the current
unit.
❒Push the “DISP” knob (c) quickly to
change the display as shown in the
above illustrations.
❒Push the “DISP” knob (c) for more than
2 seconds, and the unit display will stop
blinking and the display will stay on. If
you don’t operate the “DISP” knob (c)
within about 8 seconds, the unit display
will automatically stop blinking and the
display will stay on.
069-128 Fiat16 New GB 27-11-2007 11:26 Pagina 96
Page 123 of 266
![FIAT SEDICI 2007 2.G Owners Manual 122
User ID Setting
❒Press the power on/ off knob (1) to
turn off the power.
❒With numbered buttons (19) with
number [3] and [4] kept depressed at
the same time; press the power on/ off
knob (1) f FIAT SEDICI 2007 2.G Owners Manual 122
User ID Setting
❒Press the power on/ off knob (1) to
turn off the power.
❒With numbered buttons (19) with
number [3] and [4] kept depressed at
the same time; press the power on/ off
knob (1) f](/img/10/4719/w960_4719-122.png)
122
User ID Setting
❒Press the power on/ off knob (1) to
turn off the power.
❒With numbered buttons (19) with
number [3] and [4] kept depressed at
the same time; press the power on/ off
knob (1) for about 1 second or more.
The unit displays “SEC”.
❒With the up button (4) kept depressed,
press the numbered button (19) with
number [1].
The unit displays “- - - -”. ANTI-THEFT SYSTEM (SEC)
1.Power on/ off knob – volume control
knob
4.Up button
11.Program type button
19.Numbered buttons [1] to [4]
You can set up a 4-digit ID to prevent
theft. Once you set up the ID, the unit is
inoperable without the ID when this unit
or the battery is removed.
NOTE
❒If the wrong user ID is entered 10
times, the unit displays “HELP” and can-
not be operated.
❒If you should forget your user ID, con-
sult your Fiat Dealership.
79J195
Text Display
Each time the text display button (20) is
pressed in MP3/ WMA mode, the display
change as follows:
Elapsed Time / Folder Name / File Name /
(Elapsed Time)
NOTE For scrolling text, hold down the
text display button (20) for 2 seconds or
more.
REPEAT Play
For repeat play (playing the present file re-
peatedly), press the repeat button (15).
To release repeat play, press the repeat
button (15) again.
The “RPT” indicator remains lit during re-
peat play.
RANDOM Play
For random play (playing the disc files at
random), press the random play button
(16).
To release random play, press the random
play button (16) again.
The “RDM” indicator remains lit during
random play.
069-128 Fiat16 New GB 27-11-2007 11:26 Pagina 122
Page 124 of 266
123
User ID Entry
Once the ID is set up, this unit displays
“SEC” to prompt you to enter your user
ID when the power is turned on again in
the case of removal of this unit or the bat-
tery.
The unit cannot be used unless the ID is
entered in the following order.
NOTE The unit does not display “SEC”
when the power is turned on within 20
seconds from the last use.
❒With the up button (4) kept depressed,
press the numbered button (19) with
number [1].
The unit displays “- - - -”.
❒Press the numbered buttons (19) with
number [1] to [4], and enter the user
ID. Each button corresponds to each
digit. Enter the stored user ID.
❒Press program type button (11) for
about 2 second or more to enter.
Power is switched off.
When you switch the unit back on, it is
in radio mode for normal use.Erasing User ID
Your stored user ID can be erased. After
erasing it, you may set a new user ID.
Therefore, you can change your user ID
as often as you like.
❒Press the power on/off knob (1) to turn
off the power.
❒With the numbered buttons (19) with
numbers [3] and [4] kept depressed at
the same time, press the power on/ off
know (1) for about 1 second or more.
The unit displays “SEC”.
❒With the up button (4) kept depressed,
press the numbered button (19) with
number [1].
The unit displays “- - - -”.
❒Press the numbered buttons (19) with
number [1] to [4], and enter the user ID.
Each button corresponds to each digit.
Enter the stored user ID.
❒Press the program type button (11) for
about 2 seconds or more to enter.
The power is turned off approx, 10 sec-
onds after “- - - -” is displayed.
❒Press the numbered buttons (19) with
number [1] to [4], and enter the user
ID. Each button corresponds to each
digit, and the number increases each
time the button is pressed. For exam-
ple, to raise the digit second from the
left to 3, press the numbered button
(19) with number [2] four times.
❒Press the program type button (11) for
about 2 second or more to enter.
Power is switched off after the unit dis-
plays “SEC”.
Once the ID is set up, the ID is re-
quired at power-on when this unit or
the battery has been removed.
069-128 Fiat16 New GB 27-11-2007 11:26 Pagina 123
Page 212 of 266
211
Your vehicle is equipped with a battery
that requires infrequent maintenance. You
will never have to add water. You should,
however, periodically check the battery,
battery terminals and battery hold- down
bracket for corrosion. Remove corrosion
using a stiff brush and ammonia mixed with
water, or baking soda mixed with water.
After removing corrosion, rinse with clean
water.
The test indicator on the top of the bat-
tery provides information on the condi-
tion of the battery.
If your vehicle is not going to be driven for
a month or longer, disconnect the cable
from the negative terminal of the battery
to help prevent discharge.
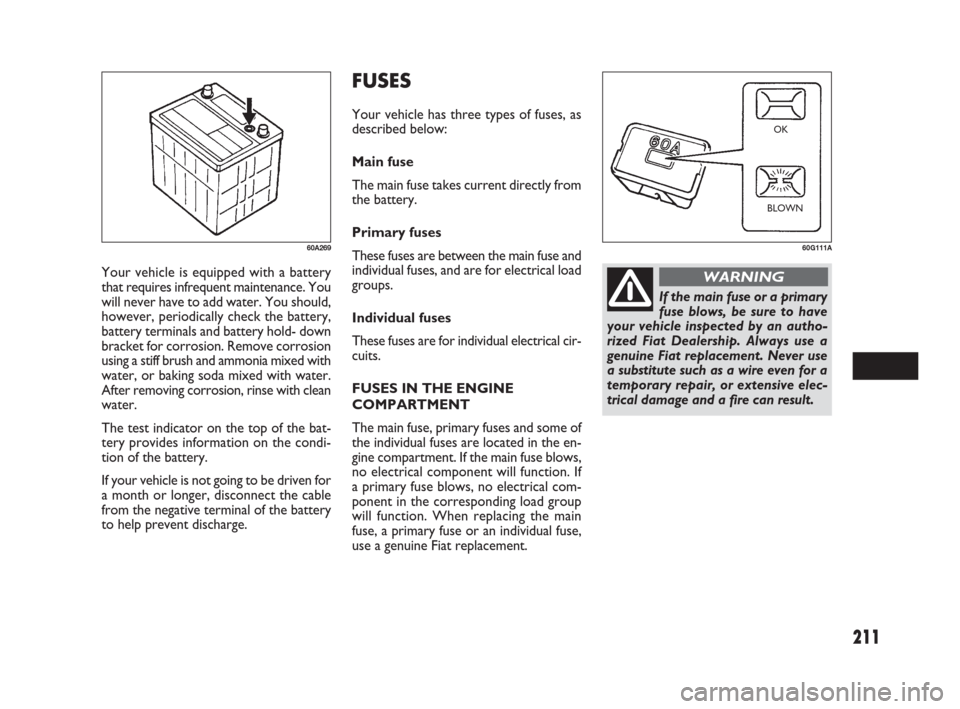
FUSES
Your vehicle has three types of fuses, as
described below:
Main fuse
The main fuse takes current directly from
the battery.
Primary fuses
These fuses are between the main fuse and
individual fuses, and are for electrical load
groups.
Individual fuses
These fuses are for individual electrical cir-
cuits.
FUSES IN THE ENGINE
COMPARTMENT
The main fuse, primary fuses and some of
the individual fuses are located in the en-
gine compartment. If the main fuse blows,
no electrical component will function. If
a primary fuse blows, no electrical com-
ponent in the corresponding load group
will function. When replacing the main
fuse, a primary fuse or an individual fuse,
use a genuine Fiat replacement.
60A26960G111A
OK
BLOWN
If the main fuse or a primary
fuse blows, be sure to have
your vehicle inspected by an autho-
rized Fiat Dealership. Always use a
genuine Fiat replacement. Never use
a substitute such as a wire even for a
temporary repair, or extensive elec-
trical damage and a fire can result.
WARNING
181-224 Fiat16 New GB 27-11-2007 11:30 Pagina 211
Page 246 of 266
245
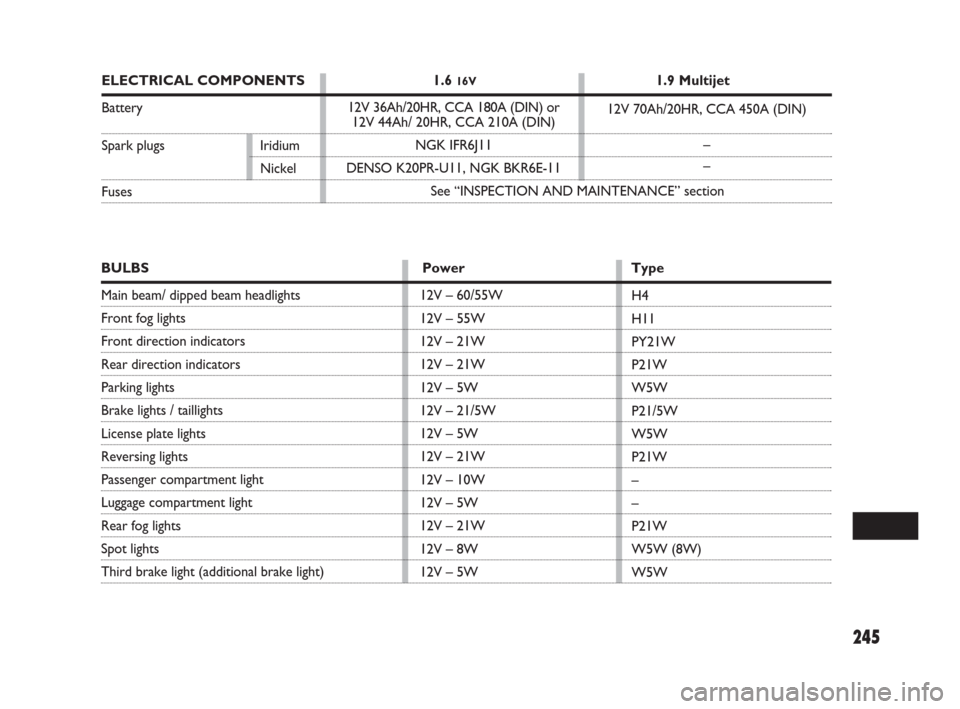
12V – 60/55W
12V – 55W
12V – 21W
12V – 21W
12V – 5W
12V – 21/5W
12V – 5W
12V – 21W
12V – 10W
12V – 5W
12V – 21W
12V – 8W
12V – 5WH4
H11
PY21W
P21W
W5W
P21/5W
W5W
P21W
–
–
P21W
W5W (8W)
W5W
BULBS Power Type
Main beam/ dipped beam headlights
Front fog lights
Front direction indicators
Rear direction indicators
Parking lights
Brake lights / taillights
License plate lights
Reversing lights
Passenger compartment light
Luggage compartment light
Rear fog lights
Spot lights
Third brake light (additional brake light)
12V 36Ah/20HR, CCA 180A (DIN) or
12V 44Ah/ 20HR, CCA 210A (DIN)
NGK IFR6J11
DENSO K20PR-U11, NGK BKR6E-1112V 70Ah/20HR, CCA 450A (DIN)
–
–
See “INSPECTION AND MAINTENANCE” section
ELECTRICAL COMPONENTS 1.6 16V1.9 Multijet
Battery
Spark plugs Iridium
Nickel
Fuses
243-248 Fiat16 New GB 27-11-2007 11:54 Pagina 245
Page 258 of 266
257
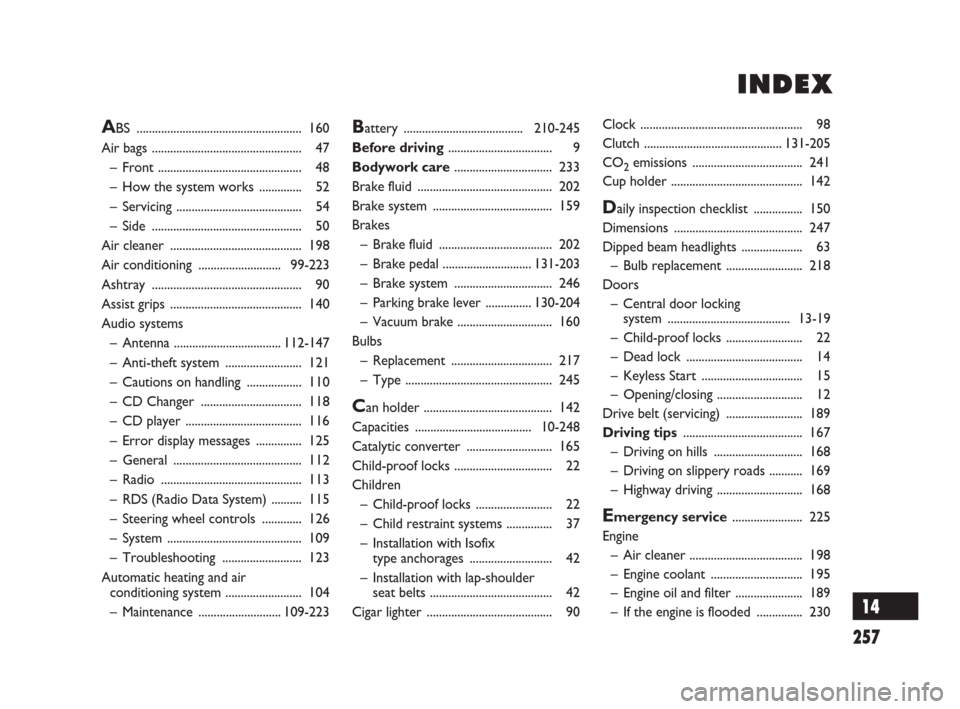
Battery .......................................210-245
Before driving.................................. 9
Bodywork care................................ 233
Brake fluid ............................................ 202
Brake system ....................................... 159
Brakes
– Brake fluid ..................................... 202
– Brake pedal .............................131-203
– Brake system ................................ 246
– Parking brake lever ...............130-204
– Vacuum brake ............................... 160
Bulbs
– Replacement ................................. 217
– Type ................................................ 245
Can holder .......................................... 142
Capacities ......................................10-248
Catalytic converter ............................ 165
Child-proof locks ................................ 22
Children
– Child-proof locks ......................... 22
– Child restraint systems ............... 37
– Installation with Isofix
type anchorages ........................... 42
– Installation with lap-shoulder
seat belts ........................................ 42
Cigar lighter ......................................... 90Clock ..................................................... 98
Clutch .............................................131-205
CO
2emissions .................................... 241
Cup holder ........................................... 142
Daily inspection checklist ................ 150
Dimensions .......................................... 247
Dipped beam headlights .................... 63
– Bulb replacement ......................... 218
Doors
– Central door locking
system ........................................13-19
– Child-proof locks ......................... 22
– Dead lock ...................................... 14
– Keyless Start ................................. 15
– Opening/closing ............................ 12
Drive belt (servicing) ......................... 189
Driving tips....................................... 167
– Driving on hills ............................. 168
– Driving on slippery roads ........... 169
– Highway driving ............................ 168
Emergency service....................... 225
Engine
– Air cleaner ..................................... 198
– Engine coolant .............................. 195
– Engine oil and filter ...................... 189
– If the engine is flooded ............... 230
ABS ...................................................... 160
Air bags ................................................. 47
– Front ............................................... 48
– How the system works .............. 52
– Servicing ......................................... 54
– Side ................................................. 50
Air cleaner ........................................... 198
Air conditioning ...........................99-223
Ashtray ................................................. 90
Assist grips ........................................... 140
Audio systems
– Antenna ...................................112-147
– Anti-theft system ......................... 121
– Cautions on handling .................. 110
– CD Changer ................................. 118
– CD player ...................................... 116
– Error display messages ............... 125
– General .......................................... 112
– Radio .............................................. 113
– RDS (Radio Data System) .......... 115
– Steering wheel controls ............. 126
– System ............................................ 109
– Troubleshooting .......................... 123
Automatic heating and air
conditioning system ......................... 104
– Maintenance ...........................109-223
I I
N N
D D
E E
X X
14
257-264 Fiat16 New GB 27-11-2007 11:55 Pagina 257