display FIAT SPIDER ABARTH 2017 User Guide
[x] Cancel search | Manufacturer: FIAT, Model Year: 2017, Model line: SPIDER ABARTH, Model: FIAT SPIDER ABARTH 2017Pages: 292, PDF Size: 9.24 MB
Page 88 of 292
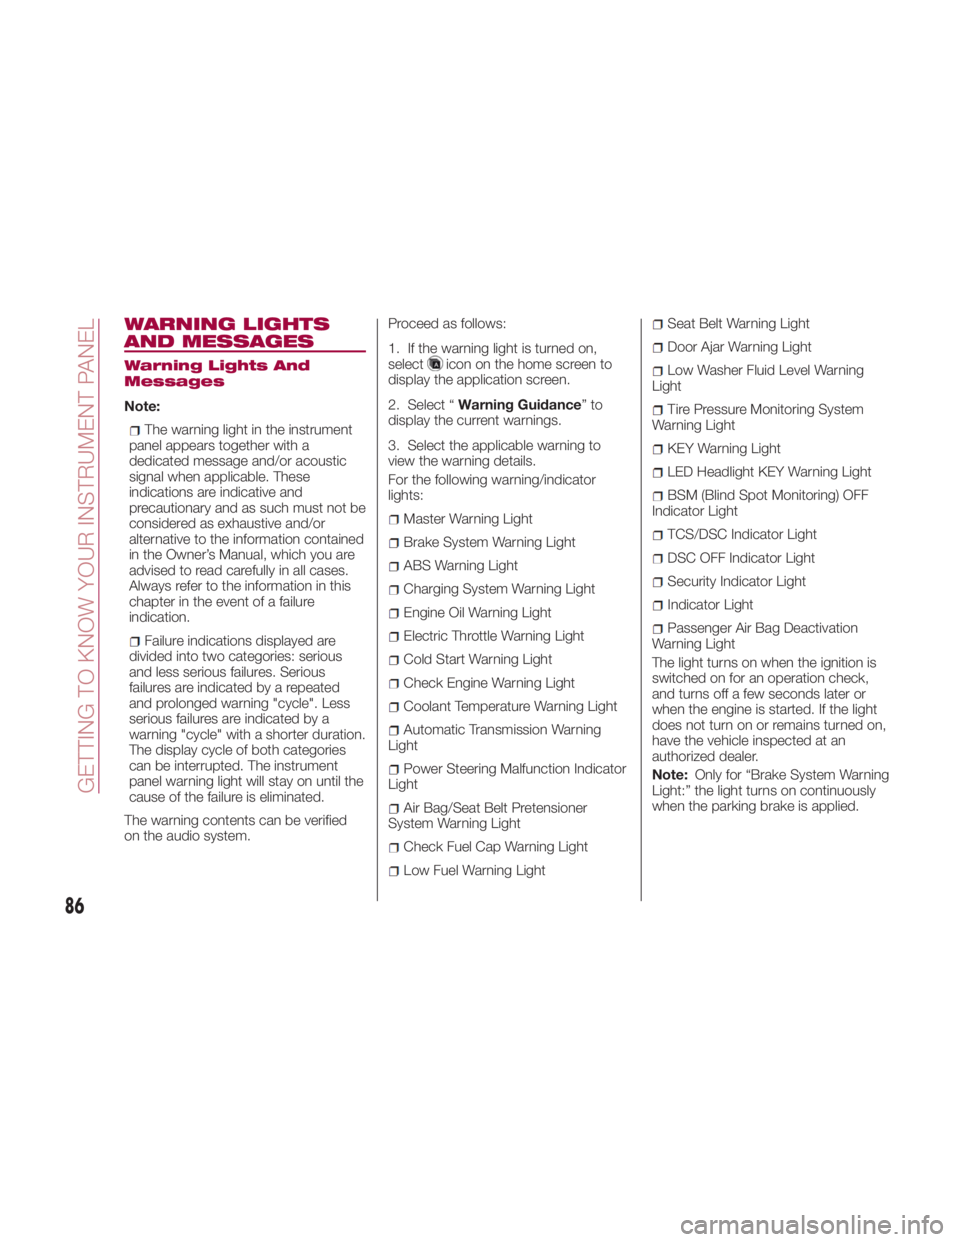
WARNING LIGHTS
AND MESSAGES Warning Lights And
Messages
Note:
The warning light in the instrument
panel appears together with a
dedicated message and/or acoustic
signal when applicable. These
indications are indicative and
precautionary and as such must not be
considered as exhaustive and/or
alternative to the information contained
in the Owner’s Manual, which you are
advised to read carefully in all cases.
Always refer to the information in this
chapter in the event of a failure
indication.
Failure indications displayed are
divided into two categories: serious
and less serious failures. Serious
failures are indicated by a repeated
and prolonged warning "cycle". Less
serious failures are indicated by a
warning "cycle" with a shorter duration.
The display cycle of both categories
can be interrupted. The instrument
panel warning light will stay on until the
cause of the failure is eliminated.
The warning contents can be verified
on the audio system. Proceed as follows:
1. If the warning light is turned on,
select
icon on the home screen to
display the application screen.
2. Select “ Warning Guidance ”to
display the current warnings.
3. Select the applicable warning to
view the warning details.
For the following warning/indicator
lights:
Master Warning Light
Brake System Warning Light
ABS Warning Light
Charging System Warning Light
Engine Oil Warning Light
Electric Throttle Warning Light
Cold Start Warning Light
Check Engine Warning Light
Coolant Temperature Warning Light
Automatic Transmission Warning
Light
Power Steering Malfunction Indicator
Light
Air Bag/Seat Belt Pretensioner
System Warning Light
Check Fuel Cap Warning Light
Low Fuel Warning Light Seat Belt Warning Light
Door Ajar Warning Light
Low Washer Fluid Level Warning
Light
Tire Pressure Monitoring System
Warning Light
KEY Warning Light
LED Headlight KEY Warning Light
BSM (Blind Spot Monitoring) OFF
Indicator Light
TCS/DSC Indicator Light
DSC OFF Indicator Light
Security Indicator Light
Indicator Light
Passenger Air Bag Deactivation
Warning Light
The light turns on when the ignition is
switched on for an operation check,
and turns off a few seconds later or
when the engine is started. If the light
does not turn on or remains turned on,
have the vehicle inspected at an
authorized dealer.
Note: Only for “Brake System Warning
Light:” the light turns on continuously
when the parking brake is applied.
86
GETTING TO KNOW YOUR INSTRUMENT PANEL
Page 90 of 292
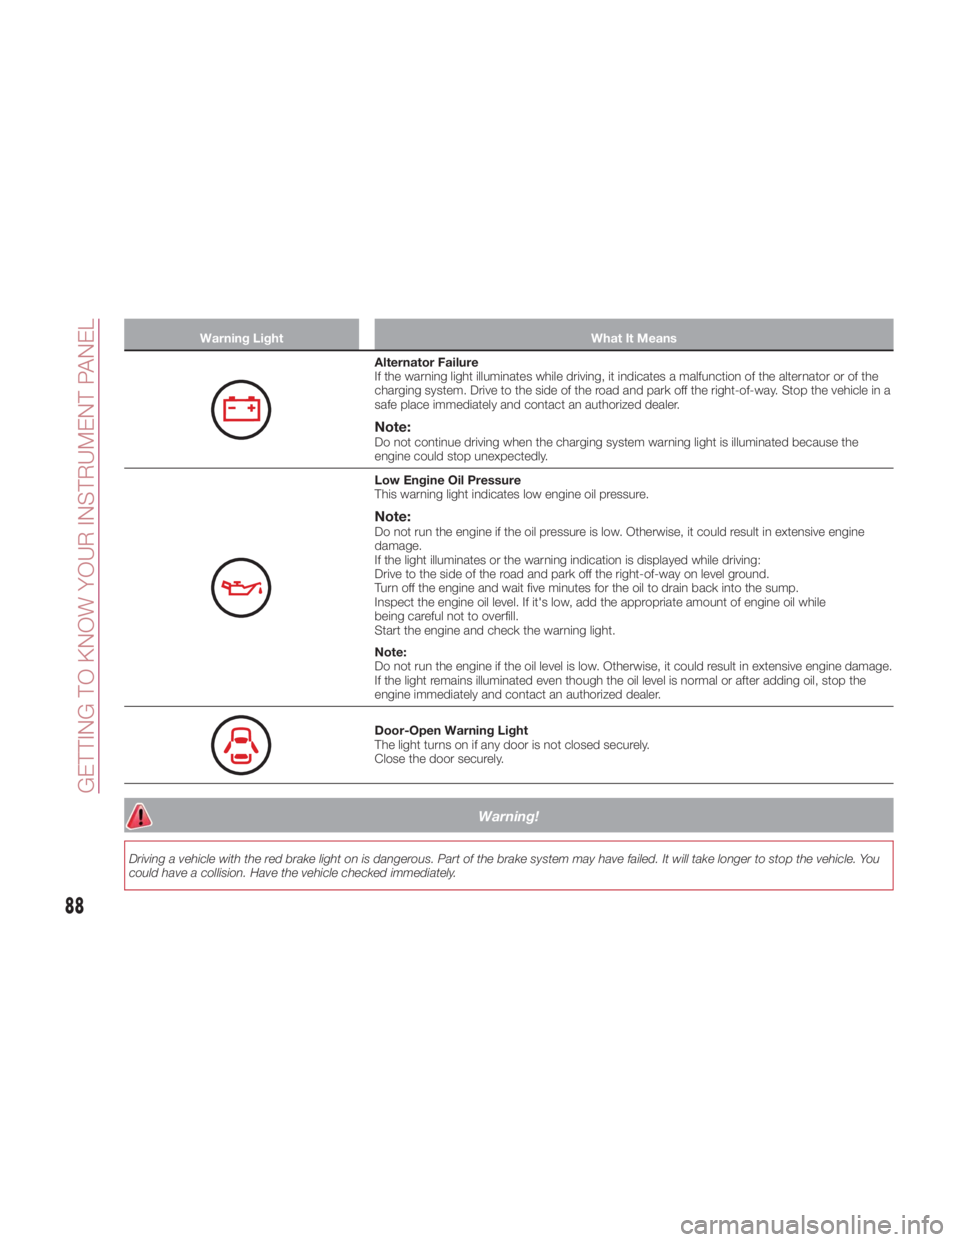
Warning Light What It Means
Alternator Failure
If the warning light illuminates while driving, it indicates a malfunction of the alternator or of the
charging system. Drive to the side of the road and park off the right-of-way. Stop the vehicle in a
safe place immediately and contact an authorized dealer.
Note: Do not continue driving when the charging system warning light is illuminated because the
engine could stop unexpectedly.
Low Engine Oil Pressure
This warning light indicates low engine oil pressure.
Note: Do not run the engine if the oil pressure is low. Otherwise, it could result in extensive engine
damage.
If the light illuminates or the warning indication is displayed while driving:
Drive to the side of the road and park off the right-of-way on level ground.
Turn off the engine and wait five minutes for the oil to drain back into the sump.
Inspect the engine oil level. If it's low, add the appropriate amount of engine oil while
being careful not to overfill.
Start the engine and check the warning light.
Note:
Do not run the engine if the oil level is low. Otherwise, it could result in extensive engine damage.
If the light remains illuminated even though the oil level is normal or after adding oil, stop the
engine immediately and contact an authorized dealer.
Door-Open Warning Light
The light turns on if any door is not closed securely.
Close the door securely.
Warning!Driving a vehicle with the red brake light on is dangerous. Part of the brake system may have failed. It will take longer to stop the vehicle. You
could have a collision. Have the vehicle checked immediately.
88
GETTING TO KNOW YOUR INSTRUMENT PANEL
Page 95 of 292
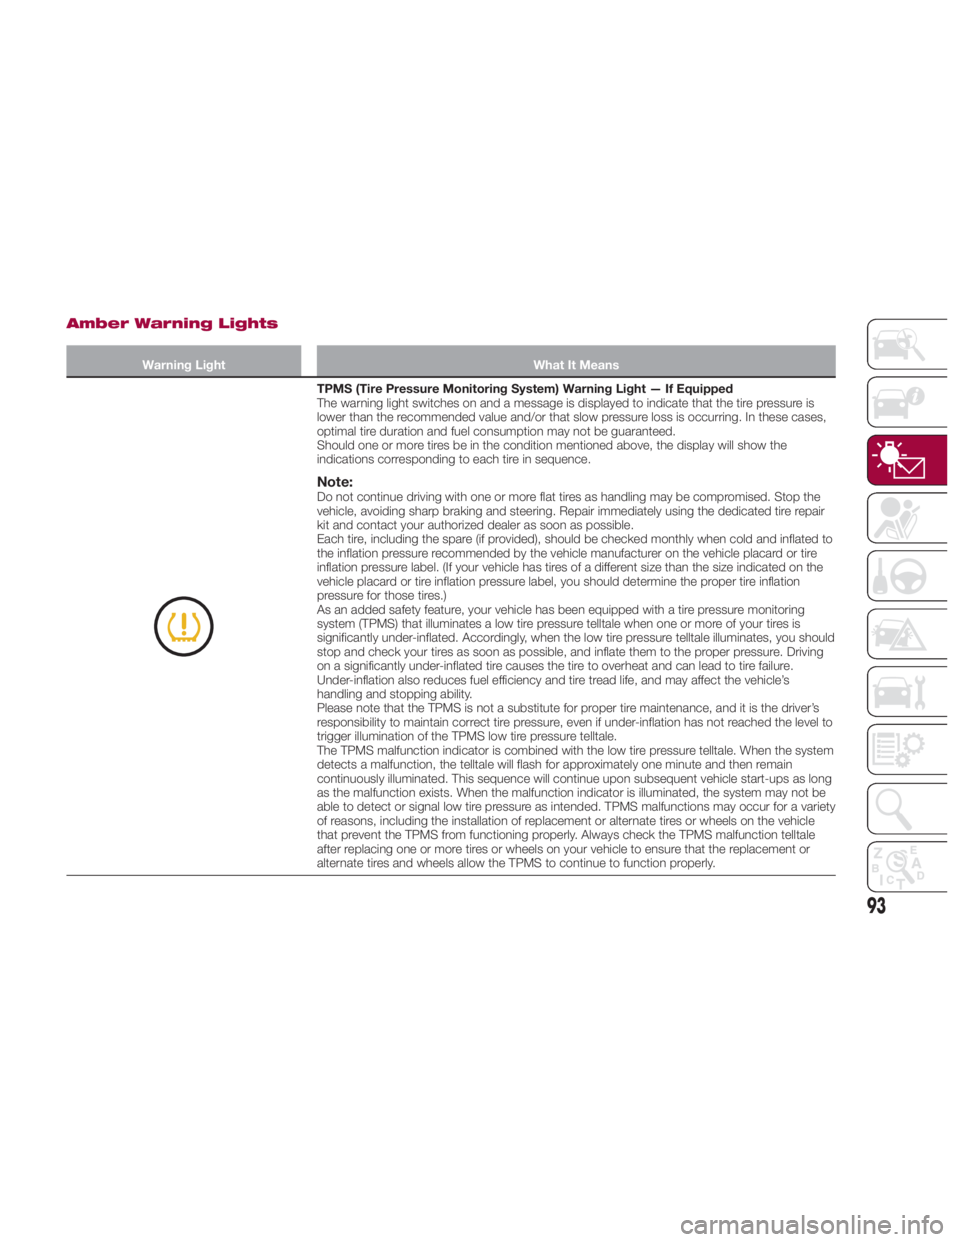
Amber Warning Lights Warning Light What It Means
TPMS (Tire Pressure Monitoring System) Warning Light — If Equipped
The warning light switches on and a message is displayed to indicate that the tire pressure is
lower than the recommended value and/or that slow pressure loss is occurring. In these cases,
optimal tire duration and fuel consumption may not be guaranteed.
Should one or more tires be in the condition mentioned above, the display will show the
indications corresponding to each tire in sequence.
Note: Do not continue driving with one or more flat tires as handling may be compromised. Stop the
vehicle, avoiding sharp braking and steering. Repair immediately using the dedicated tire repair
kit and contact your authorized dealer as soon as possible.
Each tire, including the spare (if provided), should be checked monthly when cold and inflated to
the inflation pressure recommended by the vehicle manufacturer on the vehicle placard or tire
inflation pressure label. (If your vehicle has tires of a different size than the size indicated on the
vehicle placard or tire inflation pressure label, you should determine the proper tire inflation
pressure for those tires.)
As an added safety feature, your vehicle has been equipped with a tire pressure monitoring
system (TPMS) that illuminates a low tire pressure telltale when one or more of your tires is
significantly under-inflated. Accordingly, when the low tire pressure telltale illuminates, you should
stop and check your tires as soon as possible, and inflate them to the proper pressure. Driving
on a significantly under-inflated tire causes the tire to overheat and can lead to tire failure.
Under-inflation also reduces fuel efficiency and tire tread life, and may affect the vehicle’s
handling and stopping ability.
Please note that the TPMS is not a substitute for proper tire maintenance, and it is the driver’s
responsibility to maintain correct tire pressure, even if under-inflation has not reached the level to
trigger illumination of the TPMS low tire pressure telltale.
The TPMS malfunction indicator is combined with the low tire pressure telltale. When the system
detects a malfunction, the telltale will flash for approximately one minute and then remain
continuously illuminated. This sequence will continue upon subsequent vehicle start-ups as long
as the malfunction exists. When the malfunction indicator is illuminated, the system may not be
able to detect or signal low tire pressure as intended. TPMS malfunctions may occur for a variety
of reasons, including the installation of replacement or alternate tires or wheels on the vehicle
that prevent the TPMS from functioning properly. Always check the TPMS malfunction telltale
after replacing one or more tires or wheels on your vehicle to ensure that the replacement or
alternate tires and wheels allow the TPMS to continue to function properly.
93
Page 98 of 292
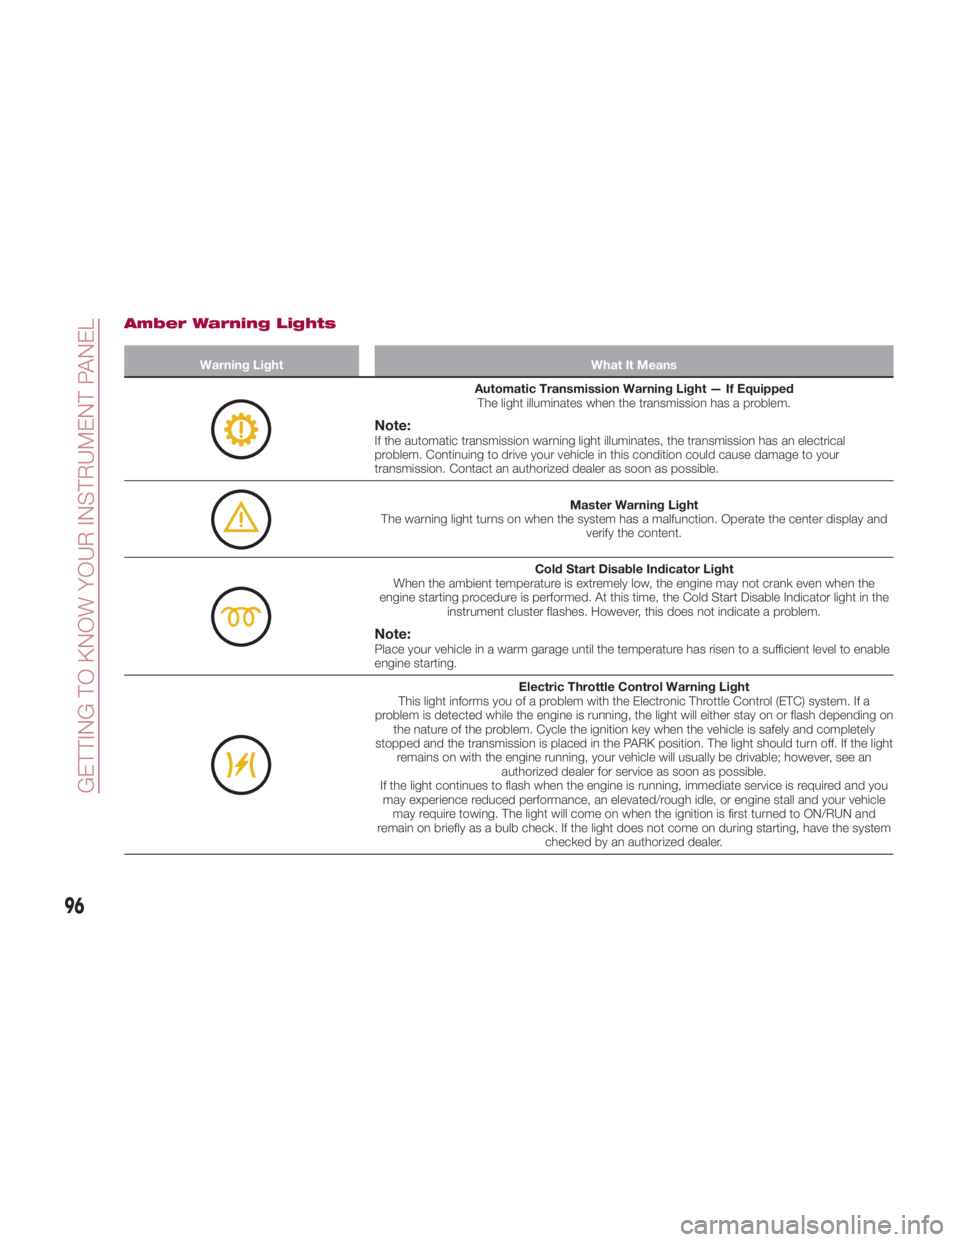
Amber Warning Lights Warning Light What It Means
Automatic Transmission Warning Light — If Equipped
The light illuminates when the transmission has a problem.
Note: If the automatic transmission warning light illuminates, the transmission has an electrical
problem. Continuing to drive your vehicle in this condition could cause damage to your
transmission. Contact an authorized dealer as soon as possible.
Master Warning Light
The warning light turns on when the system has a malfunction. Operate the center display and
verify the content.
Cold Start Disable Indicator Light
When the ambient temperature is extremely low, the engine may not crank even when the
engine starting procedure is performed. At this time, the Cold Start Disable Indicator light in the
instrument cluster flashes. However, this does not indicate a problem.
Note: Place your vehicle in a warm garage until the temperature has risen to a sufficient level to enable
engine starting.
Electric Throttle Control Warning Light
This light informs you of a problem with the Electronic Throttle Control (ETC) system. If a
problem is detected while the engine is running, the light will either stay on or flash depending on
the nature of the problem. Cycle the ignition key when the vehicle is safely and completely
stopped and the transmission is placed in the PARK position. The light should turn off. If the light
remains on with the engine running, your vehicle will usually be drivable; however, see an
authorized dealer for service as soon as possible.
If the light continues to flash when the engine is running, immediate service is required and you
may experience reduced performance, an elevated/rough idle, or engine stall and your vehicle
may require towing. The light will come on when the ignition is first turned to ON/RUN and
remain on briefly as a bulb check. If the light does not come on during starting, have the system
checked by an authorized dealer.
96
GETTING TO KNOW YOUR INSTRUMENT PANEL
Page 104 of 292
Message Indicated On
Display
If a message is displayed in the center
display, take appropriate action (in a
calm manner) according to the
displayed message.
If the following messages are displayed
in the center display, a vehicle system
may be malfunctioning:
Engine Coolant Temperature
High : displays if the engine coolant
temperature has increased excessively.
Charging System Malfunction :
displays if the charging system has a
malfunction.
Temperature Warning :the
following message is displayed when
the temperature around the center
display is high. Lowering the
temperature of the inside of the vehicle
or the temperature around the center
display by avoiding direct sunlight is
recommended.
Stop the vehicle in a safe place and
contact an authorized dealer.
Warning Sound Is
Activated
Lights-On Reminder
If lights are on and the ignition is placed
in the ACC position, or the ignition is
placed in the OFF position, a
continuous beep sound will be heard
when the driver's door is opened. Note:
When the ignition is placed in the
ACC position, the “Ignition Not Cycled
Off Warning Beep” overrides the
lights-on reminder.
A personalized function is available
to change the sound volume for the
lights-on reminder.
Air Bag/Seat Belt Pretensioner
System Warning Beep
If there is a problem with the air
bag/seat belt pretensioner systems and
the warning light illumination, a warning
beep sound will be heard for about
5 seconds every minute.
The air bag and seat belt pretensioner
system warning beep sound will
continue to be heard for approximately
35 minutes. Contact an authorized
dealer as soon as possible.
Caution!Do not drive the vehicle with the air
bag/seat belt pretensioner system warning
beep sounding. Driving the vehicle with the
air bag/seat belt pretensioner system
warning beep sounding is dangerous. In a
collision, the air bags and the seat belt
pretensioner system will not deploy and this
could result in death or serious injury.
Contact an authorized dealer as soon as
possible. Seat Belt Warning Beep
Except Mexico
If the driver's seat belt is not fastened
when the ignition is in the ON position,
a beep sound will be heard for about
six seconds.
If the driver or the passengers seat belt
is not fastened and the vehicle is driven
at a speed faster than about 12 MPH
(20 km/h), a beep sound will be heard
again for a specified period of time.
Until a seat belt is fastened or a given
period of time has elapsed, the beep
sound will not stop even if the vehicle
speed falls below 12 MPH (20 km/h).
Note:
To allow the passenger occupant
classification sensor to function
properly, do not place and sit on an
additional seat cushion on the
passengers seat. The sensor may not
function properly because the
additional seat cushion could cause
sensor interference.
If a small child is seated on the
passengers seat, the warning beep
may not operate.
Mexico
If the vehicle speed exceeds about
12 MPH (20 km/h) with the driver or
passengers seat belt unfastened, a
warning beep sounds continuously. If
the seat belt remains unfastened, the
beep sound stops once and then
102
GETTING TO KNOW YOUR INSTRUMENT PANEL
Page 107 of 292
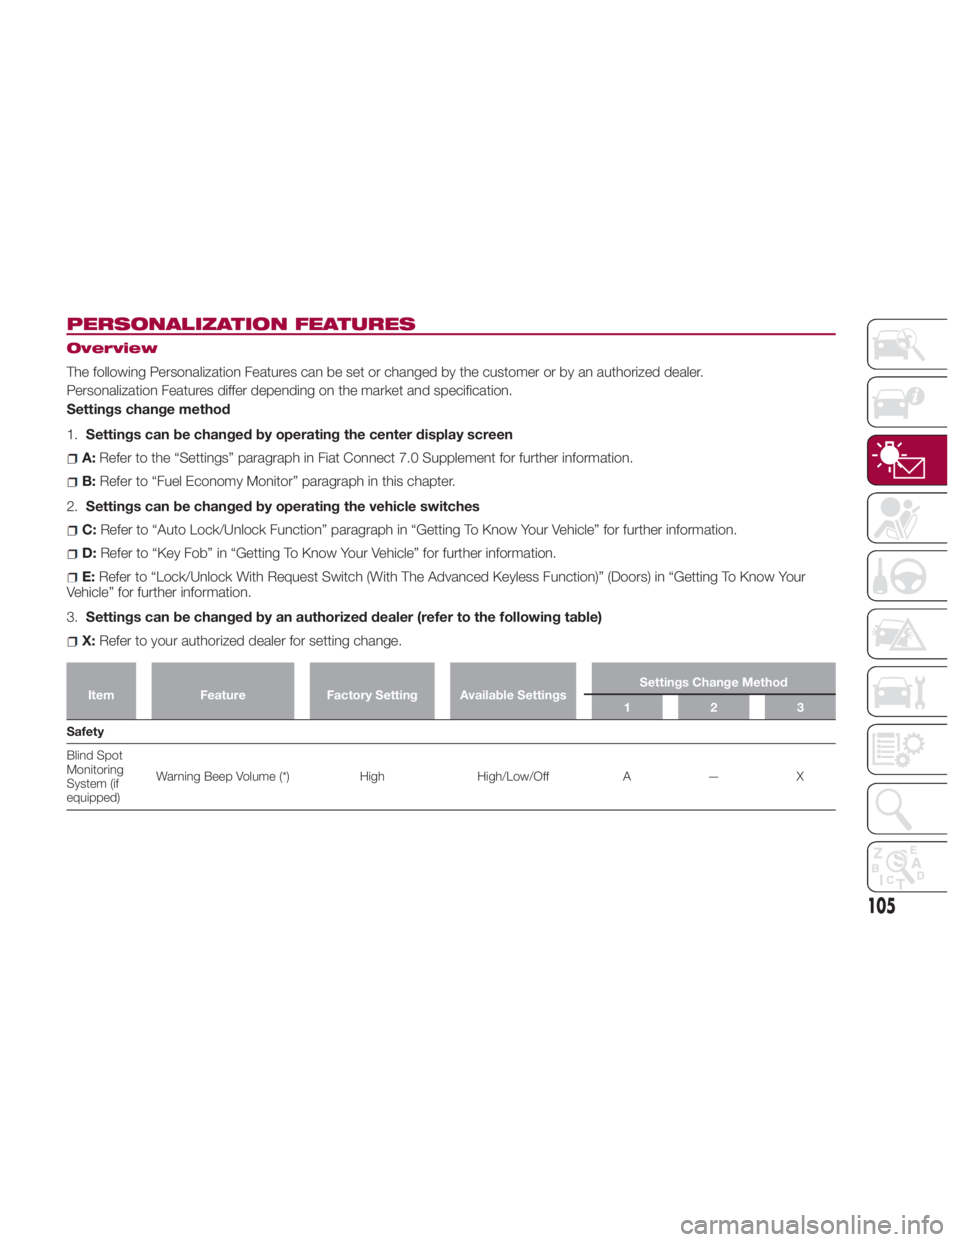
PERSONALIZATION FEATURES Overview
The following Personalization Features can be set or changed by the customer or by an authorized dealer.
Personalization Features differ depending on the market and specification.
Settings change method
1. Settings can be changed by operating the center display screen
A: Refer to the “Settings” paragraph in Fiat Connect 7.0 Supplement for further information.
B: Refer to “Fuel Economy Monitor” paragraph in this chapter.
2. Settings can be changed by operating the vehicle switches
C: Refer to “Auto Lock/Unlock Function” paragraph in “Getting To Know Your Vehicle” for further information.
D: Refer to “Key Fob” in “Getting To Know Your Vehicle” for further information.
E: Refer to “Lock/Unlock With Request Switch (With The Advanced Keyless Function)” (Doors) in “Getting To Know Your
Vehicle” for further information.
3. Settings can be changed by an authorized dealer (refer to the following table)
X: Refer to your authorized dealer for setting change.Item Feature Factory Setting Available Settings Settings Change Method
123
Safety
Blind
Spot
Monitoring
System (if
equipped) Warning Beep Volume (*) High High/Low/Off A — X
105
Page 110 of 292
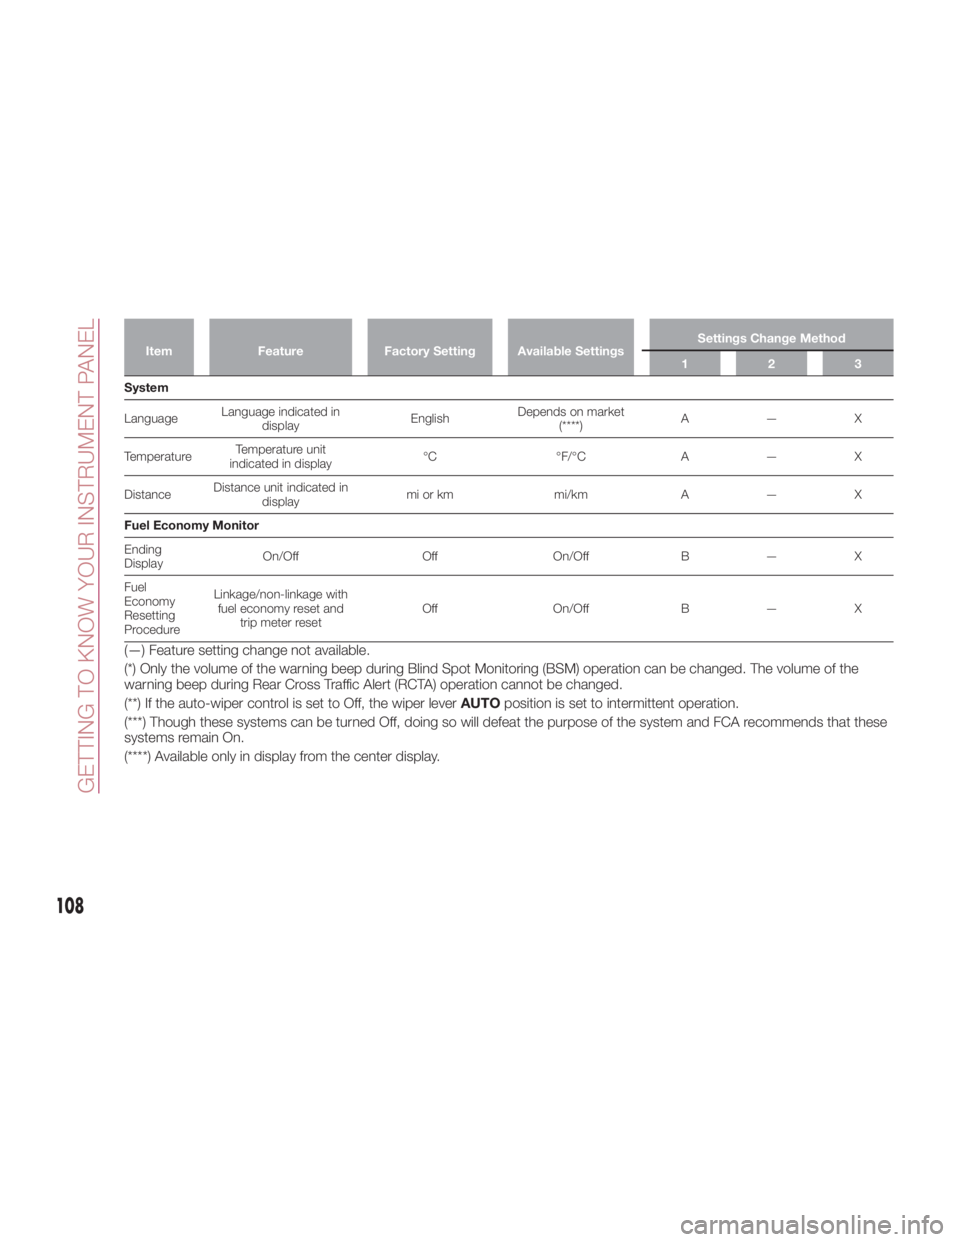
Item Feature Factory Setting Available Settings Settings Change Method
123
System
Language Language indicated in
display English Depends on market
(****) A—X
Temperature Temperature unit
indicated in display °C °F/°C A — X
Distance Distance unit indicated in
display mi or km mi/km A — X
Fuel Economy Monitor
Ending
Display On/Off Off On/Off B — X
Fuel
Economy
Resetting
Procedure Linkage/non-linkage with
fuel economy reset and
trip meter reset Off On/Off B — X
(—) Feature setting change not available.
(*) Only the volume of the warning beep during Blind Spot Monitoring (BSM) operation can be changed. The volume of the
warning beep during Rear Cross Traffic Alert (RCTA) operation cannot be changed.
(**) If the auto-wiper control is set to Off, the wiper lever AUTO position is set to intermittent operation.
(***) Though these systems can be turned Off, doing so will defeat the purpose of the system and FCA recommends that these
systems remain On.
(****) Available only in display from the center display.
108
GETTING TO KNOW YOUR INSTRUMENT PANEL
Page 156 of 292
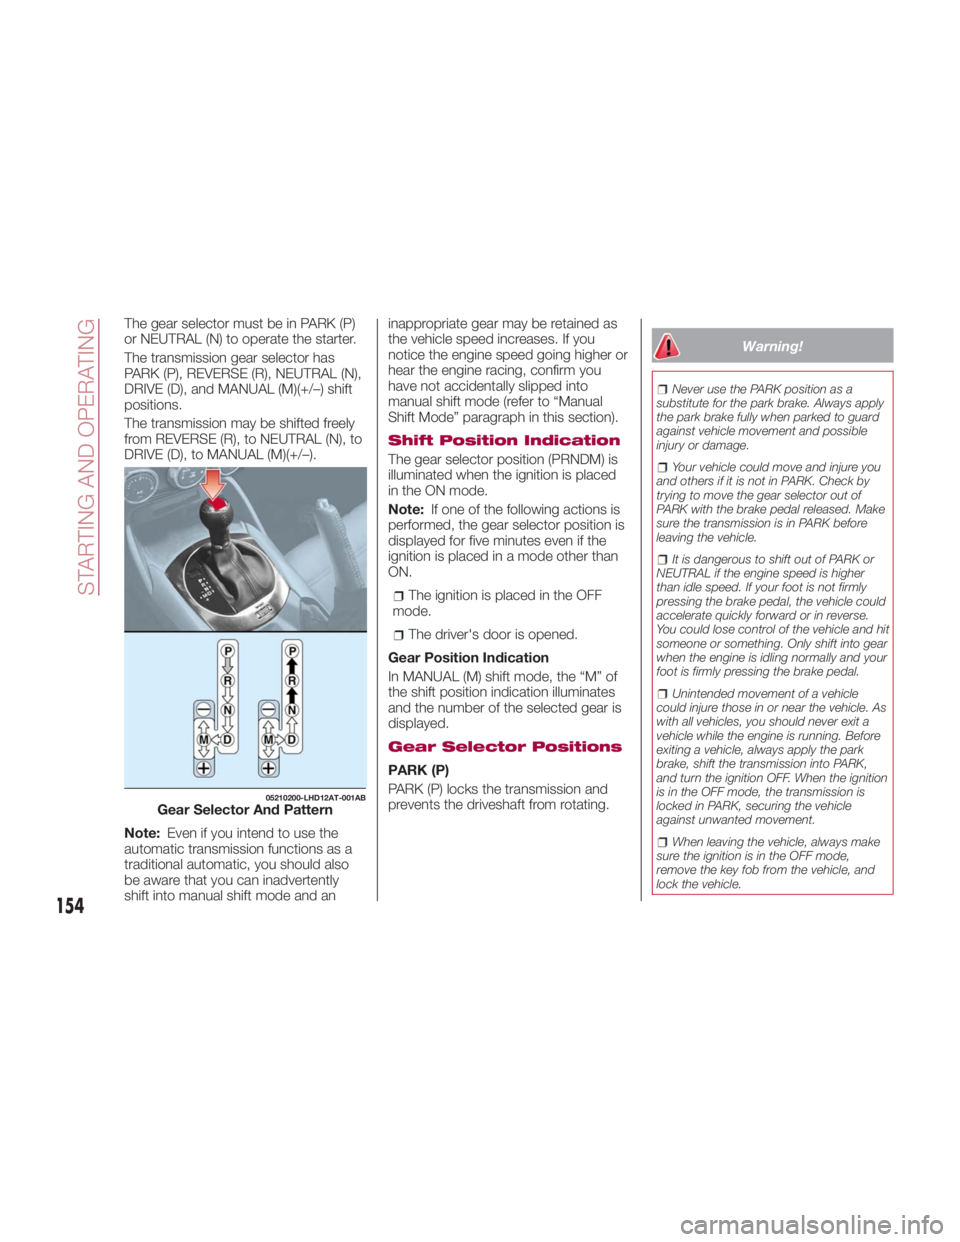
The gear selector must be in PARK (P)
or NEUTRAL (N) to operate the starter.
The transmission gear selector has
PARK (P), REVERSE (R), NEUTRAL (N),
DRIVE (D), and MANUAL (M)(+/–) shift
positions.
The transmission may be shifted freely
from REVERSE (R), to NEUTRAL (N), to
DRIVE (D), to MANUAL (M)(+/–).
Note: Even if you intend to use the
automatic transmission functions as a
traditional automatic, you should also
be aware that you can inadvertently
shift into manual shift mode and an inappropriate gear may be retained as
the vehicle speed increases. If you
notice the engine speed going higher or
hear the engine racing, confirm you
have not accidentally slipped into
manual shift mode (refer to “Manual
Shift Mode” paragraph in this section).
Shift Position Indication
The gear selector position (PRNDM) is
illuminated when the ignition is placed
in the ON mode.
Note: If one of the following actions is
performed, the gear selector position is
displayed for five minutes even if the
ignition is placed in a mode other than
ON.
The ignition is placed in the OFF
mode.
The driver's door is opened.
Gear Position Indication
In MANUAL (M) shift mode, the “M” of
the shift position indication illuminates
and the number of the selected gear is
displayed.
Gear Selector Positions
PARK (P)
PARK (P) locks the transmission and
prevents the driveshaft from rotating. Warning! Never use the PARK position as a
substitute for the park brake. Always apply
the park brake fully when parked to guard
against vehicle movement and possible
injury or damage.
Your vehicle could move and injure you
and others if it is not in PARK. Check by
trying to move the gear selector out of
PARK with the brake pedal released. Make
sure the transmission is in PARK before
leaving the vehicle.
It is dangerous to shift out of PARK or
NEUTRAL if the engine speed is higher
than idle speed. If your foot is not firmly
pressing the brake pedal, the vehicle could
accelerate quickly forward or in reverse.
You could lose control of the vehicle and hit
someone or something. Only shift into gear
when the engine is idling normally and your
foot is firmly pressing the brake pedal.
Unintended movement of a vehicle
could injure those in or near the vehicle. As
with all vehicles, you should never exit a
vehicle while the engine is running. Before
exiting a vehicle, always apply the park
brake, shift the transmission into PARK,
and turn the ignition OFF. When the ignition
is in the OFF mode, the transmission is
locked in PARK, securing the vehicle
against unwanted movement.
When leaving the vehicle, always make
sure the ignition is in the OFF mode,
remove the key fob from the vehicle, and
lock the vehicle.05210200-LHD12AT-001AB
Gear Selector And Pattern
154
STARTING AND OPERATING
Page 160 of 292
Paddle Mode — If
Equipped
Tapping one of the steering
wheel-mounted shift paddles (+/-), if
equipped, while the gear selector is in
DRIVE (D), will activate Paddle Mode (a
temporary manual mode). The current
gear will be displayed in the instrument
cluster, with the "M" also illuminated.
The transmission will revert back to
normal operation (if the gear selector
remains in DRIVE) after a period of time,
depending on accelerator pedal activity.
Note: Because Paddle mode is only
temporary, use of the MANUAL (M)
position is recommended if you need to
drive the vehicle in a particular gear for
long periods.
Driving Tips
Overtaking
For extra power when passing another
vehicle or climbing steep grades, press
the accelerator fully. The transmission
will shift to a lower gear, depending on
vehicle speed.
Note:
The accelerator pedal may initially
feel heavy as it is being pressed, then
feel lighter as it is pressed further. This
change in pedal force controls whether
or not kickdown should be performed. While the gear selector is in the
MANUAL (M) position and the Dynamic
Stability Control (DSC) is turned off,
manual shift mode does not switch to
automatic shift mode even if the
accelerator pedal is completely
pressed. Tap the gear selector forward
or rearward to select the appropriate
gear.
Climbing steep grades from a stop
To climb a steep grade from a stopped
position:
1. Press the brake pedal.
2. Shift to DRIVE (D) or M1, depending
on the load weight and grade
steepness.
3. Release the brake pedal while
gradually accelerating.
Descending steep grades
When descending a steep grade, shift
to lower gears, depending on load
weight and grade steepness.
Descend slowly, using the brakes only
occasionally to prevent them from
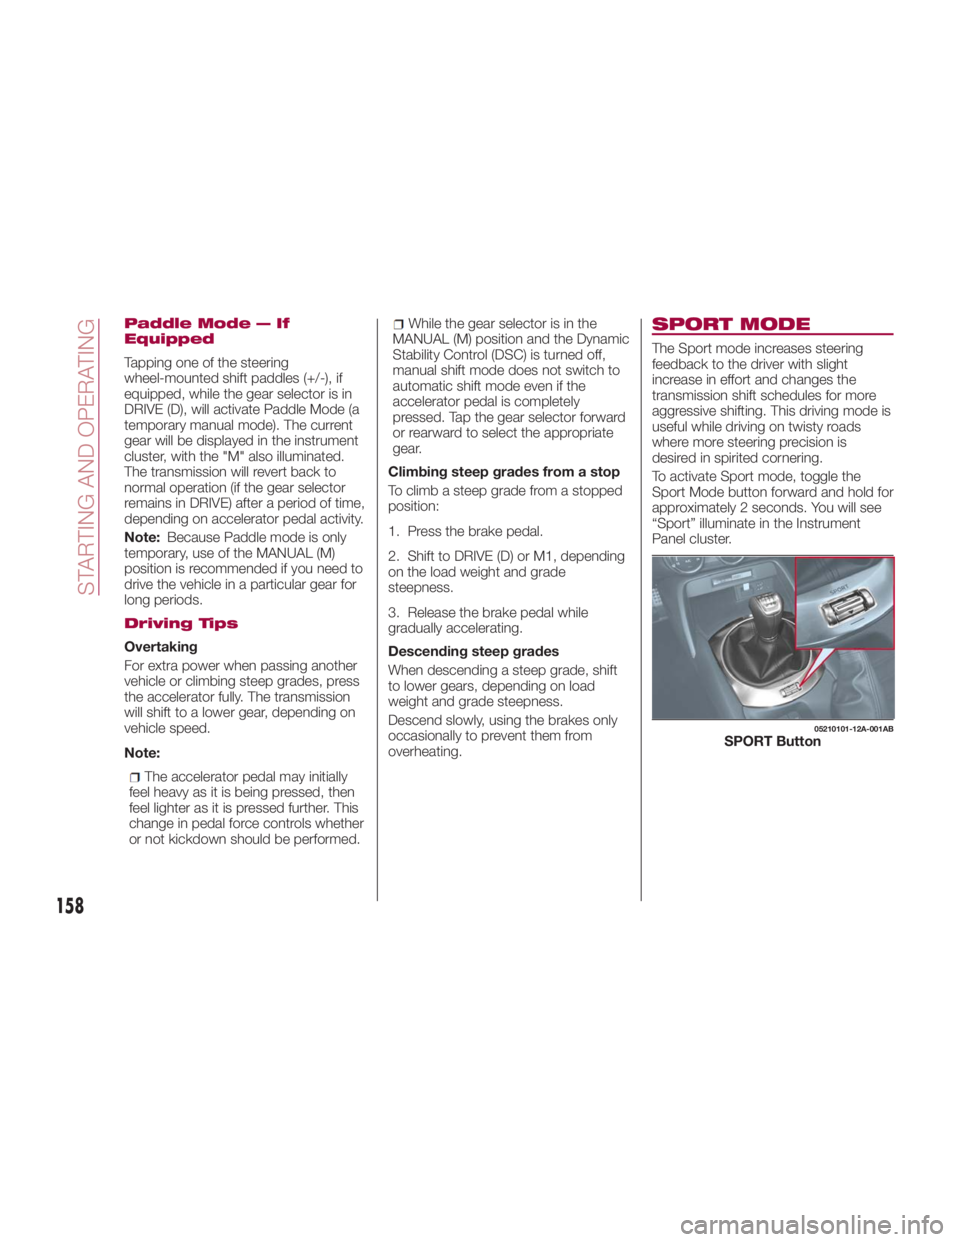
overheating. SPORT MODE The Sport mode increases steering
feedback to the driver with slight
increase in effort and changes the
transmission shift schedules for more
aggressive shifting. This driving mode is
useful while driving on twisty roads
where more steering precision is
desired in spirited cornering.
To activate Sport mode, toggle the
Sport Mode button forward and hold for
approximately 2 seconds. You will see
“Sport” illuminate in the Instrument
Panel cluster. 05210101-12A-001AB
SPORT Button
158
STARTING AND OPERATING
Page 162 of 292
Deactivating Speed Control
Push the OFF/CAN button. The
warning light (amber) in the
instrument cluster turns off.
When a speed has been set :the
warning light (green) in the
instrument cluster is illuminated, push
and hold the OFF/CAN button or push
the OFF/CAN button twice to
deactivate.
When a speed has not been set :the
warning light (amber) in the
instrument cluster is illuminated, push
the OFF/CAN button to deactivate.
Setting A Desired Speed
Proceed as follows:
1. Activate the Speed Control device
by pushing the ON button. The cruise
warning light (amber) illuminates.
2. Accelerate to the desired speed,
which must be more than 25 mph
(40 km/h).
3. Set the Speed Control by pushing
the SET (-) button at the desired speed.
The Speed Control is set at the
moment the SET (-) button is pushed.
Release the accelerator pedal
simultaneously. The
warning light
(green) illuminates.
Note: The Speed Control setting
cannot be performed under the
following conditions: Automatic transmission: the gear
selector is in the PARK or NEUTRAL
position.
Manual transmission: the gear
selector is in the NEUTRAL position or
when the clutch is disengaged (clutch
is depressed).
The parking brake is applied.
Release the SET (-) button at the
desired speed, otherwise the speed will
continue decreasing while the SET (-)
button is pushed and held (except
when the accelerator pedal is
depressed).
Note:
Release the SET (-) button at the
desired speed, otherwise the speed
will continue decreasing while the SET
(-) button is pushed and held (except
when the accelerator pedal is
depressed).
On a steep grade, the vehicle may
momentarily slow down while
ascending, or speed up while
descending.
The Speed Control will cancel if the
vehicle speed decreases below
16 mph (25 km/h) when climbing a
steep incline.
The Speed Control may cancel at
about 9 mph (15 km/h) below the
preset speed such as when climbing a
long, steep incline. The vehicle’s set speed is displayed in
the instrument cluster.
Increasing Speed
To increase speed using the Speed
Control buttons:
Push the RES (+) button and hold it ,
your vehicle will accelerate. Release the
button at the desired speed.
Push the RES (+) button and release
it immediately , to adjust the set speed.
Multiple pushes of the button will
increase the set speed according to the
number of times it is pushed.
Increasing speed with a single RES
(+) button operation:
If the instrument cluster display for
vehicle speed is indicated in mph:
speed will increase in 1 mph
increments.
If the instrument cluster display for
vehicle speed is indicated in km/h:
speed will increase in 1 km/h
increments.
To increase speed using
accelerator pedal:
Press the accelerator pedal to
accelerate to the desired speed.
Push the SET (-) button and release it
immediately. This new set speed will be
saved.
160
STARTING AND OPERATING