technical specifications FIAT STILO 2006 1.G Owners Manual
[x] Cancel search | Manufacturer: FIAT, Model Year: 2006, Model line: STILO, Model: FIAT STILO 2006 1.GPages: 274, PDF Size: 4.76 MB
Page 105 of 274
104
SAFETY
DEVICES
CORRECT USE
OF THE CAR
WARNING
LIGHTS AND
MESSAGES
IN AN
EMERGENCY
CAR
MAINTENANCE
TECHNICAL
SPECIFICATIONS
INDEX
DASHBOARD
AND CONTROLS
Detection distances
Central action radius ......................150 cm
Side action radius ............................ 60 cm
If several obstacles are detected, the con-
trol unit indicates the nearest one.
FAILURE INDICATIONS
In the event of sensor failures, when en-
gaging the reverse gear the driver is
warned by the turning on of warning light
èon the instrument panel and by the rel-
evant message on the display (see section
“Warning lights and messages”).
OPERATION WITH TRAILER
Parking sensor operation is deactivated
automatically when the trailer electric ca-
ble plug is fitted into the car tow hook
socket.
Sensors are reactivated when removing
the trailer cable plug.GENERAL WARNINGS
❒When parking, take the utmost care to
obstacles set above or under the sen-
sors.
❒Objects set close to the car front or
rear part, under certain circumstances
are not detected and could therefore
cause damages to the car.
❒Indications sent by the sensors can be
altered by dirt, snow or ice deposited
on the sensors or by ultrasound sys-
tems (e.g.: truck pneumatic brakes or
pneumatic hammers) set nearby the
car. For proper operation, the
parking sensors set on the
bumpers shall be clean from
mud, dirt, snow or ice. When
cleaning the sensors, take the utmost
care to prevent their damaging; do not
use therefore dry or rough clothes. Sen-
sors shall be washed with clean water
and car detergent, if required. In wash-
ing stations, clean sensors quickly keep-
ing the vapour jet/high pressure wash-
ing nozzles at 10 cm at least from the
sensors.
Parking manoeuvres howev-
er are always under the dri-
ver’s responsibility that shall always
check the absence of people (spe-
cially children) or animals in the ma-
noeuvre space. This system is just a
help for the driver but she/he shall
never reduce attention during dan-
gerous manoeuvres even if performed
at low speed.
WARNING
Page 106 of 274
105
SAFETY
DEVICES
CORRECT USE
OF THE CAR
WARNING
LIGHTS AND
MESSAGES
IN AN
EMERGENCY
CAR
MAINTENANCE
TECHNICAL
SPECIFICATIONS
INDEX
DASHBOARD
AND CONTROLS
AT THE FILLING
STATION
PETROL ENGINES
Use only unleaded petrol.
To prevent errors, the diameter of the fu-
el tank filler is too small to introduce a lead
petrol pump filler. Use petrol with a rat-
ed octane number (R.O.N.) not lower
than 95.
IMPORTANT An inefficient catalyst leads
to harmful exhaust emissions, thus con-
tributing to air pollution.
IMPORTANT Never use leaded petrol,
even in small amount or in an emergency,
as this would damage the catalyst beyond
repair.DIESEL ENGINES
If the outside temperature is very low, the
diesel thickens due to the formation of
paraffins and could clog the diesel fuel filter.
In order to avoid these problems, different
types of diesel are distributed according to
the season: summer type, winter type arc-
tic type (mountains/cold areas).
If refuelling with diesel fuel not suitable for
the current temperature, mix diesel fuel
with TUTELA DIESEL ART additive in the
proportions stated on the can, putting first
the antifreeze in the tank and then the
diesel fuel.
Refuel with local diesel fuel if the car is
used/parked in the mountains or in cold
areas for a long period. In this event you
are recommended to keep an amount of
fuel higher than 50% in the tank.The car must only be filled
with diesel fuel for motor ve-
hicles, in compliance with Eu-
ropean Specification EN590.
The use of other products or mixtures
may irreparably damage the engine
with invalidation of the warranty due
to the damage caused. In the event of
accidentally filling with another type
of fuel, do not start the engine and
empty the tank. If the engine has been
run even for only a very short time, in
addition to the tank, it is also necessary
to drain out the whole fuel circuit.
REFUELLING
To guarantee full tank filling, carry out two
refuelling operations after the first click of
the fuel delivery gun. Avoid further top-
ping up operations that could cause dam-
ages to the fuel system.
Page 107 of 274
106
SAFETY
DEVICES
CORRECT USE
OF THE CAR
WARNING
LIGHTS AND
MESSAGES
IN AN
EMERGENCY
CAR
MAINTENANCE
TECHNICAL
SPECIFICATIONS
INDEX
DASHBOARD
AND CONTROLS
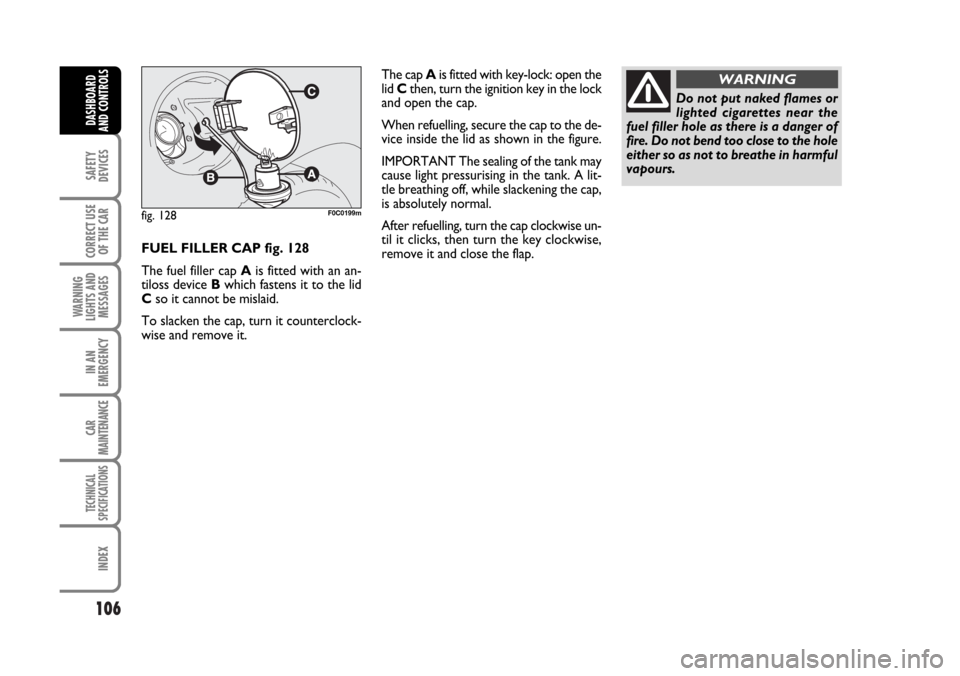
FUEL FILLER CAP fig. 128
The fuel filler cap Ais fitted with an an-
tiloss device Bwhich fastens it to the lid
Cso it cannot be mislaid.
To slacken the cap, turn it counterclock-
wise and remove it.The cap Ais fitted with key-lock: open the
lid Cthen, turn the ignition key in the lock
and open the cap.
When refuelling, secure the cap to the de-
vice inside the lid as shown in the figure.
IMPORTANT The sealing of the tank may
cause light pressurising in the tank. A lit-
tle breathing off, while slackening the cap,
is absolutely normal.
After refuelling, turn the cap clockwise un-
til it clicks, then turn the key clockwise,
remove it and close the flap.
fig. 128F0C0199m
Do not put naked flames or
lighted cigarettes near the
fuel filler hole as there is a danger of
fire. Do not bend too close to the hole
either so as not to breathe in harmful
vapours.
WARNING
Page 108 of 274
107
SAFETY
DEVICES
CORRECT USE
OF THE CAR
WARNING
LIGHTS AND
MESSAGES
IN AN
EMERGENCY
CAR
MAINTENANCE
TECHNICAL
SPECIFICATIONS
INDEX
DASHBOARD
AND CONTROLS
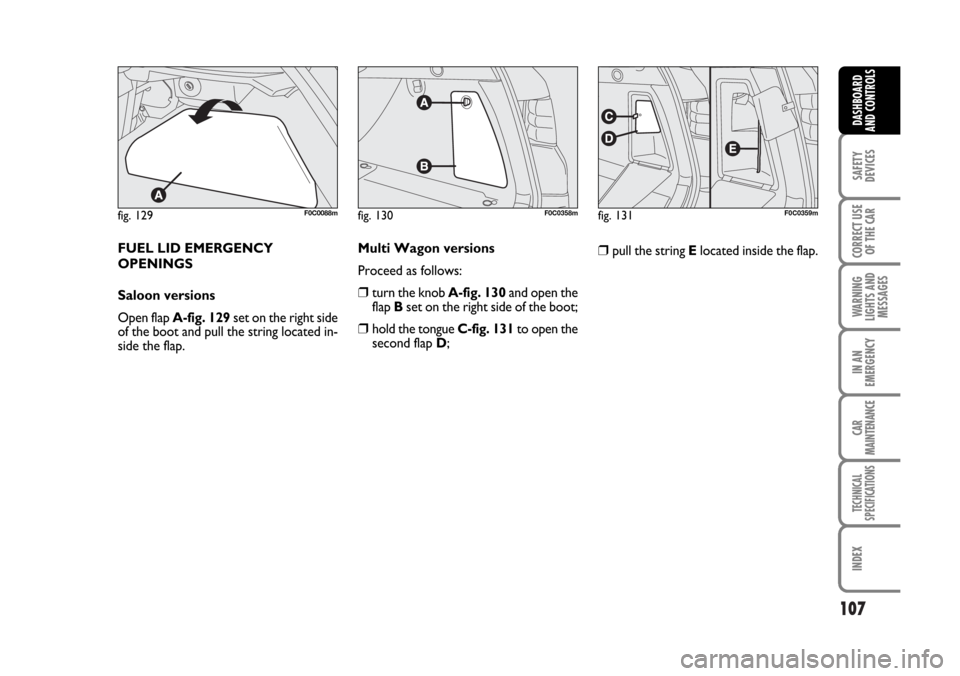
FUEL LID EMERGENCY
OPENINGS
Saloon versions
Open flap A-fig. 129set on the right side
of the boot and pull the string located in-
side the flap.
fig. 129F0C0088mfig. 130F0C0358mfig. 131F0C0359m
❒pull the string Elocated inside the flap. Multi Wagon versions
Proceed as follows:
❒turn the knob A-fig. 130and open the
flap Bset on the right side of the boot;
❒hold the tongue C-fig. 131to open the
second flap D;
Page 109 of 274
108
SAFETY
DEVICES
CORRECT USE
OF THE CAR
WARNING
LIGHTS AND
MESSAGES
IN AN
EMERGENCY
CAR
MAINTENANCE
TECHNICAL
SPECIFICATIONS
INDEX
DASHBOARD
AND CONTROLS
Diesel Particulate Filter clogged
If the dedicated message is displayed, re-
fer to section “Warning lights and mes-
sages”.
During normal service the
catalyst and the diesel par-
ticulate filter (DPF) reach high tem-
peratures. Do not therefore park the
car over inflammable materials (grass,
dry leaves, pine needles, etc.): fire
hazard.
WARNING
PROTECTING THE
ENVIRONMENT
The devices for curtailing petrol engine
emissions are the following:
❒ three-way catalytic converter;
❒Lambda sensors;
❒fuel evaporation system.
In addition, do not let the engine run, even
for a test, with one or more spark plugs
disconnected.
The devices for curtailing diesel fuel en-
gine emissions are the following:
❒oxidising catalytic converter;
❒ exhaust gas recirculation system
(E.G.R.);
❒Lambda sensors;
❒diesel particulate filter (DPF) (where
provided it is fitted instead of the Lamb-
da sensor).DIESEL PARTICULATE FILTER
(DPF) (where provided)
The Diesel Particulate Filter is a mechan-
ical filter, integral with the exhaust system,
that physically traps particulates present
in the exhaust gases of Diesel engines.
The diesel particular filter has been adopt-
ed to eliminate almost totally particulates
in compliance with current / future law
regulations.
During normal use of the car, the engine
control unit records a set of data (e.g.:
travel time, type of route, temperatures,
etc.) and it will then calculate how much
particulates has been trapped by the filter.
Since this filter physically traps particulates,
it shall be cleaned (reclaimed) at regular
intervals by burning carbon particles. Re-
claiming procedure is controlled auto-
matically by the engine control unit ac-
cording to the filter conditions and the
conditions of use of the car. During re-
claiming the following phenomena could
take place: idling slight increase, fan acti-
vation, slight smoke increase, high exhaust
temperatures. These situations shall not
be considered as faults and they do not af-
fect car performance and environment.
Page 110 of 274
109
CORRECT USE
OF THE CAR
WARNING
LIGHTS AND
MESSAGES
IN AN
EMERGENCY
CAR
MAINTENANCE
TECHNICAL
SPECIFICATIONS
INDEX
DASHBOARD
AND CONTROLS
SAFETY
DEVICES
SEAT BELTS ............................................................................ 110
PRETENSIONERS ................................................................... 113
CARRYING CHILDREN SAFELY....................................... 116
PRESETTING FOR MOUNTING THE
“ISOFIX TYPE” CHILD RESTRAINT SYSTEM ............... 121
PRESETTING FOR MOUNTING THE
“UNIVERSAL ISOFIX” CHILD RESTRAINT SYSTEM .. 124
FRONT AIR BAGS ................................................................. 126
SIDE AIR BAGS (Side bag - Window bag) ...................... 130
S S
A A
F F
E E
T T
Y Y
D D
E E
V V
I I
C C
E E
S S
Page 111 of 274
110
CORRECT USE
OF THE CAR
WARNING
LIGHTS AND
MESSAGES
IN AN
EMERGENCY
CAR
MAINTENANCE
TECHNICAL
SPECIFICATIONS
IINDEX
DASHBOARD
AND CONTROLS
SAFETY
DEVICES
When the car is parked on a steep slope
the reel mechanism may block; this is nor-
mal. The reel mechanism prevents the
webbing coming out when it is jerked or
if the car brakes sharply, in a collision or
when cornering at high speed.
The rear seat is fitted with inertial seat
belts with three anchor points and reel for
the side and centre seats.
SEAT BELTS
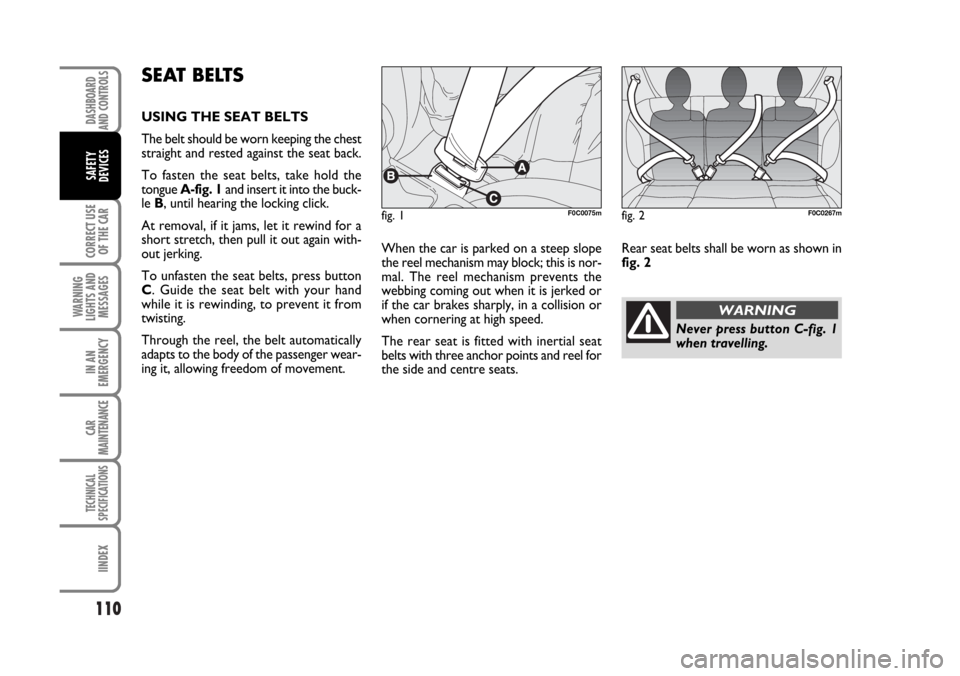
USING THE SEAT BELTS
The belt should be worn keeping the chest
straight and rested against the seat back.
To fasten the seat belts, take hold the
tongue A-fig. 1and insert it into the buck-
le B, until hearing the locking click.
At removal, if it jams, let it rewind for a
short stretch, then pull it out again with-
out jerking.
To unfasten the seat belts, press button
C. Guide the seat belt with your hand
while it is rewinding, to prevent it from
twisting.
Through the reel, the belt automatically
adapts to the body of the passenger wear-
ing it, allowing freedom of movement.
Never press button C-fig. 1
when travelling.
WARNING
Rear seat belts shall be worn as shown in
fig. 2
fig. 1F0C0075mfig. 2F0C0267m
Page 112 of 274
111
CORRECT USE
OF THE CAR
WARNING
LIGHTS AND
MESSAGES
IN AN
EMERGENCY
CAR
MAINTENANCE
TECHNICAL
SPECIFICATIONS
INDEX
DASHBOARD
AND CONTROLS
SAFETY
DEVICES
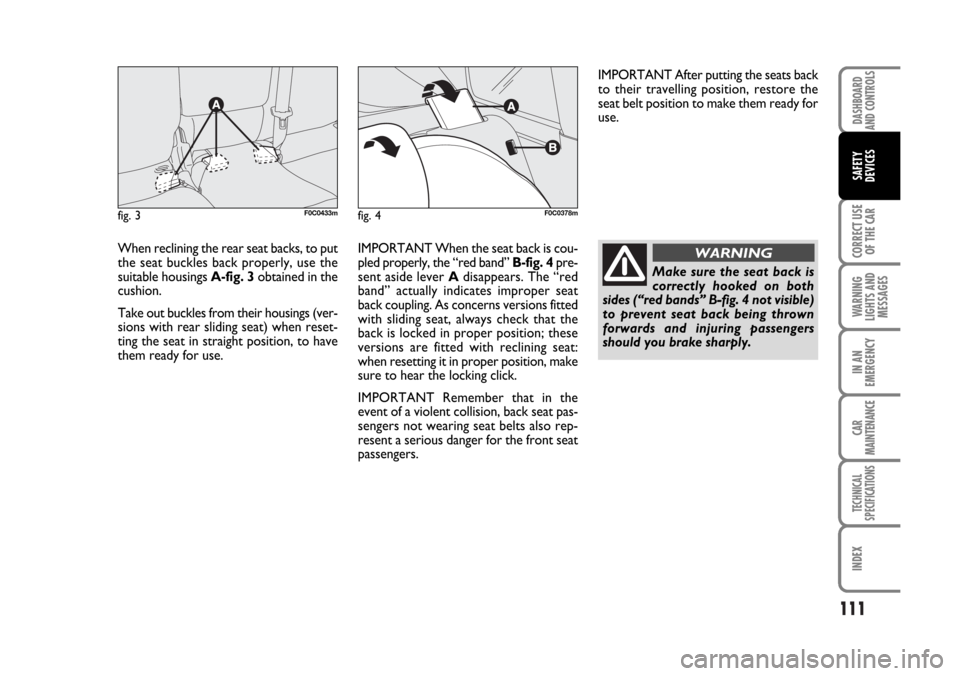
When reclining the rear seat backs, to put
the seat buckles back properly, use the
suitable housings A-fig. 3obtained in the
cushion.
Take out buckles from their housings (ver-
sions with rear sliding seat) when reset-
ting the seat in straight position, to have
them ready for use.IMPORTANT When the seat back is cou-
pled properly, the “red band” B-fig. 4pre-
sent aside lever Adisappears. The “red
band” actually indicates improper seat
back coupling. As concerns versions fitted
with sliding seat, always check that the
back is locked in proper position; these
versions are fitted with reclining seat:
when resetting it in proper position, make
sure to hear the locking click.
IMPORTANT Remember that in the
event of a violent collision, back seat pas-
sengers not wearing seat belts also rep-
resent a serious danger for the front seat
passengers.
fig. 3F0C0433mfig. 4F0C0378m
Make sure the seat back is
correctly hooked on both
sides (“red bands” B-fig. 4 not visible)
to prevent seat back being thrown
forwards and injuring passengers
should you brake sharply.
WARNING
IMPORTANT After putting the seats back
to their travelling position, restore the
seat belt position to make them ready for
use.
Page 113 of 274
112
CORRECT USE
OF THE CAR
WARNING
LIGHTS AND
MESSAGES
IN AN
EMERGENCY
CAR
MAINTENANCE
TECHNICAL
SPECIFICATIONS
IINDEX
DASHBOARD
AND CONTROLS
SAFETY
DEVICES
S.B.R. SYSTEM
The car is fitted with the S.B.R. system
(Seat Belt Reminder), consisting of a
buzzer which, together with the blinking
of warning light
The buzzer can be deactivated temporar-
ily (until next engine stop) by the follow-
ing procedure, to be carried out within
1 minute from turning the ignition key to
MAR:
❒fasten the driver’s seat belt.
❒wait for over 20 seconds and then re-
lease the driver’s seat belt.
For permanent deactivation, contact Fiat
Dealership.
The S.B.R. system can only be reset
through the set-up menu (see section
“Warning lights and messages” at para-
graph “Seat belts not fastened”).FRONT SEAT BELT HEIGHT
ADJUSTMENT
Four different adjustments in height are
provided.
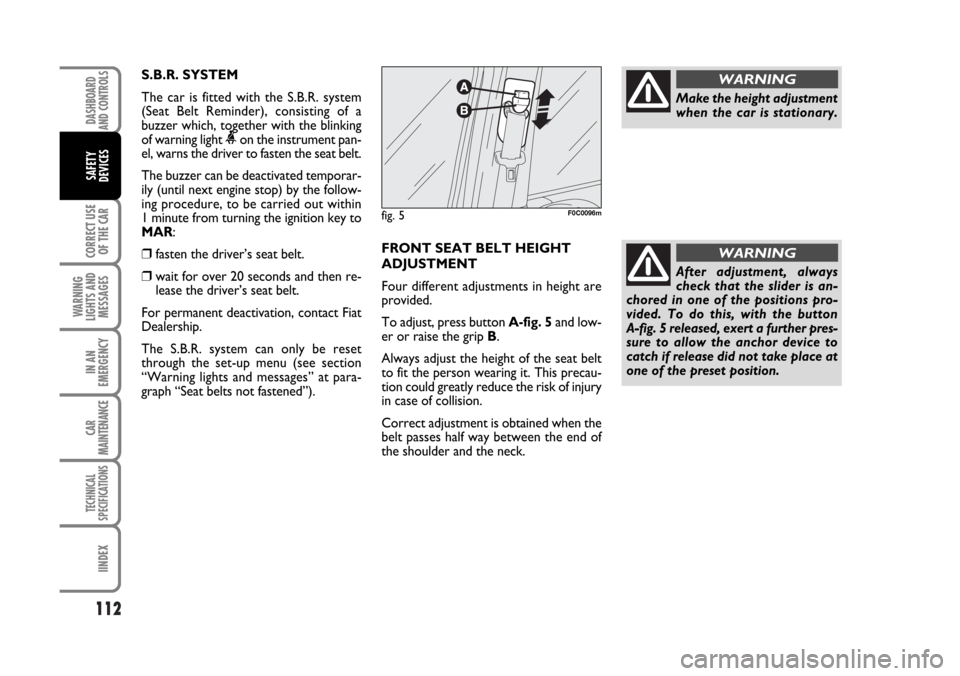
To adjust, press button A-fig. 5and low-
er or raise the grip B.
Always adjust the height of the seat belt
to fit the person wearing it. This precau-
tion could greatly reduce the risk of injury
in case of collision.
Correct adjustment is obtained when the
belt passes half way between the end of
the shoulder and the neck.
fig. 5F0C0096m
Make the height adjustment
when the car is stationary.
WARNING
After adjustment, always
check that the slider is an-
chored in one of the positions pro-
vided. To do this, with the button
A-fig. 5 released, exert a further pres-
sure to allow the anchor device to
catch if release did not take place at
one of the preset position.
WARNING
Page 114 of 274
113
CORRECT USE
OF THE CAR
WARNING
LIGHTS AND
MESSAGES
IN AN
EMERGENCY
CAR
MAINTENANCE
TECHNICAL
SPECIFICATIONS
INDEX
DASHBOARD
AND CONTROLS
SAFETY
DEVICES
PRETENSIONERS
To increase the efficiency of the front and
rear (where provided) seat belts, the car
is fitted with pretensioners. These devices,
in the event of violent front crash, rewind
the seat belts a few centimetres. In this
way they ensure that the seat belt adheres
perfectly to the wearer before the re-
straining action begins. The seat belt locks
to indicate that the device has intervened;
the seat belt cannot be drawn back up
even when guiding it manually.
IMPORTANT To obtain the highest de-
gree of protection from the action of the
pretensioning device, wear the seat belt
keeping it firmly close to the chest and
pelvis.
Front seat pretensioners activate only if
front seat belts are properly fitted into
buckles. A small amount of smoke may be
produced. This smoke is in no way toxic
and presents no fire hazard.LOAD LIMITERS
To increase passenger’s safety, the front
and rear (where provided) seat belt reels
contain a load limiter which allows con-
trolled sag in such a way as to dose the
force acting on the shoulders during the
belt restraining action in case of front
crash.
The pretensioner can only
be used once. After a colli-
sion that has triggered it, have it re-
placed at a Fiat Dealership. Preten-
sioner validity is written on the label
inside the lower oddment compart-
ment. Pretensioners should be re-
placed at Fiat Dealership as this date
approaches.
WARNING
Operations which lead to
knocks, vibrations or localised
heating (over 100°C for a
maximum of 6 hours) in the
area around the pretensioners may
cause damage or trigger them. These
devices are not affected by vibrations
caused by irregularities of the road sur-
face or low obstacles such as kerbs, etc.
Contact a Fiat Dealership for any as-
sistance.The pretensioner does not require any
maintenance or greasing. Anything that
modifies its original conditions invalidates
its efficiency. If due to unusual natural
events (floods, seas storm, etc.) the device
has been affected by water and mud, it
must necessarily be replaced.